# C 語言,關於 GCC, GDB, x86 組語和呼叫慣例
## Outline
- Source Code to Executable File
- What is ELF
- X86 Assembly and Calling Convention
- 靜態分析與動態分析
- 動態分析: 使用 GDB
- 靜態分析: 使用 IDA
## 前言
本篇章我們將回顧一個 C 語言原始碼到執行檔的整個流程,從中了解執行檔 ELF 格式,配合 cemu 回顧 x86 組合語言,通過 machine code 了解 Shellcode 概念,最後,通過分析二進位檔案來了解靜態分析工具 IDA 與動態分析工具 GDB 的使用。
## 前置工具
Linux 虛擬機 (任意發行板),或是 WSL 也可以。
安裝 make
```shell
$ sudo apt install make -y
```
安裝 32 位元函式庫
```shell
$ sudo apt-get install gcc-multilib
```
安裝 cemu
```shell
$ python3 -m pip install cemu
$ mkdir -p ~/.local/bin
$ sudo ln -s ~/.local/bin/cemu /usr/bin/cemu
```
安裝 gcc
```shell
$ sudo apt-get install gcc
```
安裝 IDA
```shell
$ wget https://out7.hex-rays.com/files/idafree82_linux.run
$ chmod +x idafree82_linux.run
$ ./idafree82_linux.run
```
安裝 NASM
```shell
$ sudo apt-get install nasm
```
## 概觀:從 `hello.c` 到 `hello.out`
這裡我們將通過 `hello.c` 來理解整個程式是如何被電腦執行的,C 語言為設計從事 系統程式 開發的語言,從 C 語言我們可以較為直覺的觀察到背後機器的行為,更準確的說,我們可以更精確的預期到 C 語言編譯後所產生的組合語言為何,以下將通過一系列的實驗來理解 `hello.out` 是如何被執行的。
首先我們先看到 GCC 的編譯過程,GCC 全名為 GNU Compiler Collection,從這個英文名稱,我們可以知道 GCC 是包含編譯時所需工具的集合,以下先看到 `hello.c` 的原始碼
```c
#include <stdio.h>
int main(void) {
printf("Hello, World!\n");
return 0;
}
```
在通常情況,我們會使用以下指令產生出可執行檔
```shell
$ gcc hello.c -o hello
```
使用 GCC 將 `hello.c` 編譯成一個可執行檔,並將可執行檔命名成 `hello.out` (`-o <name>` 表示將可執行檔命名成 `name`)。
而將 GCC 加上 `-save-temps` 和 `--verbose` 可以讓我們獲得 GCC 編譯過程中所產生的中間檔案,以及詳細的編譯資訊
```shell
$ gcc hello.c -o hello -save-temps --verbose
```
以下為指令輸出
```diff
Using built-in specs.
COLLECT_GCC=gcc
COLLECT_LTO_WRAPPER=/usr/lib/gcc/x86_64-linux-gnu/11/lto-wrapper
OFFLOAD_TARGET_NAMES=nvptx-none:amdgcn-amdhsa
OFFLOAD_TARGET_DEFAULT=1
Target: x86_64-linux-gnu
Configured with: ../src/configure -v --with-pkgversion='Ubuntu 11.3.0-1ubuntu1~22.04' --with-bugurl=file:///usr/share/doc/gcc-11/README.Bugs --enable-languages=c,ada,c++,go,brig,d,fortran,objc,obj-c++,m2 --prefix=/usr --with-gcc-major-version-only --program-suffix=-11 --program-prefix=x86_64-linux-gnu- --enable-shared --enable-linker-build-id --libexecdir=/usr/lib --without-included-gettext --enable-threads=posix --libdir=/usr/lib --enable-nls --enable-bootstrap --enable-clocale=gnu --enable-libstdcxx-debug --enable-libstdcxx-time=yes --with-default-libstdcxx-abi=new --enable-gnu-unique-object --disable-vtable-verify --enable-plugin --enable-default-pie --with-system-zlib --enable-libphobos-checking=release --with-target-system-zlib=auto --enable-objc-gc=auto --enable-multiarch --disable-werror --enable-cet --with-arch-32=i686 --with-abi=m64 --with-multilib-list=m32,m64,mx32 --enable-multilib --with-tune=generic --enable-offload-targets=nvptx-none=/build/gcc-11-xKiWfi/gcc-11-11.3.0/debian/tmp-nvptx/usr,amdgcn-amdhsa=/build/gcc-11-xKiWfi/gcc-11-11.3.0/debian/tmp-gcn/usr --without-cuda-driver --enable-checking=release --build=x86_64-linux-gnu --host=x86_64-linux-gnu --target=x86_64-linux-gnu --with-build-config=bootstrap-lto-lean --enable-link-serialization=2
Thread model: posix
Supported LTO compression algorithms: zlib zstd
gcc version 11.3.0 (Ubuntu 11.3.0-1ubuntu1~22.04)
COLLECT_GCC_OPTIONS='-o' 'hello' '-save-temps' '-v' '-mtune=generic' '-march=x86-64'
/usr/lib/gcc/x86_64-linux-gnu/11/cc1 -E -quiet -v -imultiarch x86_64-linux-gnu hello.c -mtune=generic -march=x86-64 -fpch-preprocess -fasynchronous-unwind-tables -fstack-protector-strong -Wformat -Wformat-security -fstack-clash-protection -fcf-protection -o hello.i
ignoring nonexistent directory "/usr/local/include/x86_64-linux-gnu"
ignoring nonexistent directory "/usr/lib/gcc/x86_64-linux-gnu/11/include-fixed"
ignoring nonexistent directory "/usr/lib/gcc/x86_64-linux-gnu/11/../../../../x86_64-linux-gnu/include"
+#include "..." search starts here:
+#include <...> search starts here:
+ /usr/lib/gcc/x86_64-linux-gnu/11/include
+ /usr/local/include
+ /usr/include/x86_64-linux-gnu
+ /usr/include
+End of search list.
COLLECT_GCC_OPTIONS='-o' 'hello' '-save-temps' '-v' '-mtune=generic' '-march=x86-64'
+ /usr/lib/gcc/x86_64-linux-gnu/11/cc1 -fpreprocessed hello.i -quiet -dumpbase hello.c -dumpbase-ext .c -mtune=generic -march=x86-64 -version -fasynchronous-unwind-tables -fstack-protector-strong -Wformat -Wformat-security -fstack-clash-protection -fcf-protection -o hello.s
GNU C17 (Ubuntu 11.3.0-1ubuntu1~22.04) version 11.3.0 (x86_64-linux-gnu)
compiled by GNU C version 11.3.0, GMP version 6.2.1, MPFR version 4.1.0, MPC version 1.2.1, isl version isl-0.24-GMP
GGC heuristics: --param ggc-min-expand=100 --param ggc-min-heapsize=131072
GNU C17 (Ubuntu 11.3.0-1ubuntu1~22.04) version 11.3.0 (x86_64-linux-gnu)
compiled by GNU C version 11.3.0, GMP version 6.2.1, MPFR version 4.1.0, MPC version 1.2.1, isl version isl-0.24-GMP
GGC heuristics: --param ggc-min-expand=100 --param ggc-min-heapsize=131072
Compiler executable checksum: 3f6cb05d963ad324b8f9442822c95179
COLLECT_GCC_OPTIONS='-o' 'hello' '-save-temps' '-v' '-mtune=generic' '-march=x86-64'
+ as -v --64 -o hello.o hello.s
GNU assembler version 2.38 (x86_64-linux-gnu) using BFD version (GNU Binutils for Ubuntu) 2.38
COMPILER_PATH=/usr/lib/gcc/x86_64-linux-gnu/11/:/usr/lib/gcc/x86_64-linux-gnu/11/:/usr/lib/gcc/x86_64-linux-gnu/:/usr/lib/gcc/x86_64-linux-gnu/11/:/usr/lib/gcc/x86_64-linux-gnu/
LIBRARY_PATH=/usr/lib/gcc/x86_64-linux-gnu/11/:/usr/lib/gcc/x86_64-linux-gnu/11/../../../x86_64-linux-gnu/:/usr/lib/gcc/x86_64-linux-gnu/11/../../../../lib/:/lib/x86_64-linux-gnu/:/lib/../lib/:/usr/lib/x86_64-linux-gnu/:/usr/lib/../lib/:/usr/lib/gcc/x86_64-linux-gnu/11/../../../:/lib/:/usr/lib/
COLLECT_GCC_OPTIONS='-o' 'hello' '-save-temps' '-v' '-mtune=generic' '-march=x86-64' '-dumpdir' 'hello.'
+ /usr/lib/gcc/x86_64-linux-gnu/11/collect2 -plugin /usr/lib/gcc/x86_64-linux-gnu/11/liblto_plugin.so -plugin-opt=/usr/lib/gcc/x86_64-linux-gnu/11/lto-wrapper -plugin-opt=-fresolution=hello.res -plugin-opt=-pass-through=-lgcc -plugin-opt=-pass-through=-lgcc_s -plugin-opt=-pass-through=-lc -plugin-opt=-pass-through=-lgcc -plugin-opt=-pass-through=-lgcc_s --build-id --eh-frame-hdr -m elf_x86_64 --hash-style=gnu --as-needed -dynamic-linker /lib64/ld-linux-x86-64.so.2 -pie -z now -z relro -o hello /usr/lib/gcc/x86_64-linux-gnu/11/../../../x86_64-linux-gnu/Scrt1.o /usr/lib/gcc/x86_64-linux-gnu/11/../../../x86_64-linux-gnu/crti.o /usr/lib/gcc/x86_64-linux-gnu/11/crtbeginS.o -L/usr/lib/gcc/x86_64-linux-gnu/11 -L/usr/lib/gcc/x86_64-linux-gnu/11/../../../x86_64-linux-gnu -L/usr/lib/gcc/x86_64-linux-gnu/11/../../../../lib -L/lib/x86_64-linux-gnu -L/lib/../lib -L/usr/lib/x86_64-linux-gnu -L/usr/lib/../lib -L/usr/lib/gcc/x86_64-linux-gnu/11/../../.. hello.o -lgcc --push-state --as-needed -lgcc_s --pop-state -lc -lgcc --push-state --as-needed -lgcc_s --pop-state /usr/lib/gcc/x86_64-linux-gnu/11/crtendS.o /usr/lib/gcc/x86_64-linux-gnu/11/../../../x86_64-linux-gnu/crtn.o
COLLECT_GCC_OPTIONS='-o' 'hello' '-save-temps' '-v' '-mtune=generic' '-march=x86-64' '-dumpdir' 'hello.'
```
我們特別關注綠色標記的部份,我們可以看到 GCC 在編譯一個 `.c` 檔案時,會拆分成四個部份
- 前處理 (Preprocess):
```
#include "..." search starts here:
#include <...> search starts here:
/usr/lib/gcc/x86_64-linux-gnu/11/include
/usr/local/include
/usr/include/x86_64-linux-gnu
/usr/include
End of search list.
```
從這一個部份可以看到前處理會到特定目錄底下搜尋對應到的函式庫,前處理器會將 `#include` 部份展開,加入到 `.c` 檔中,產生出 `hello.i` 檔案
- 編譯 (Compile):
```
/usr/lib/gcc/x86_64-linux-gnu/11/cc1 -fpreprocessed hello.i -quiet -dumpbase hello.c -dumpbase-ext .c -mtune=generic -march=x86-64 -version -fasynchronous-unwind-tables -fstack-protector-strong -Wformat -Wformat-security -fstack-clash-protection -fcf-protection -o hello.s
```
看到我們使用在 `/usr/lib/gcc/x86_64-linux-gnu/11` 目錄底下,名稱為 `cc1` 的工具,`cc1` 為編譯器,編譯器會將 `hello.c` 編譯成 `hello.s`,`hello.s` 的內容為組合語言
- 組譯 (Assmble):
```
as -v --64 -o hello.o hello.s
```
`as` 為組譯器,目的為將 `hello.s` 變成 `hello.o`,將組合語言變成機器指令,`hello.o` 也稱為目的檔 (Object file)
- 鏈結 (Link):
```
/usr/lib/gcc/x86_64-linux-gnu/11/collect2 -plugin /usr/lib/gcc/x86_64-linux-gnu/11/liblto_plugin.so -plugin-opt=/usr/lib/gcc/x86_64-linux-gnu/11/lto-wrapper -plugin-opt=-fresolution=hello.res -plugin-opt=-pass-through=-lgcc -plugin-opt=-pass-through=-lgcc_s -plugin-opt=-pass-through=-lc -plugin-opt=-pass-through=-lgcc -plugin-opt=-pass-through=-lgcc_s --build-id --eh-frame-hdr -m elf_x86_64 --hash-style=gnu --as-needed -dynamic-linker /lib64/ld-linux-x86-64.so.2 -pie -z now -z relro -o hello /usr/lib/gcc/x86_64-linux-gnu/11/../../../x86_64-linux-gnu/Scrt1.o /usr/lib/gcc/x86_64-linux-gnu/11/../../../x86_64-linux-gnu/crti.o /usr/lib/gcc/x86_64-linux-gnu/11/crtbeginS.o -L/usr/lib/gcc/x86_64-linux-gnu/11 -L/usr/lib/gcc/x86_64-linux-gnu/11/../../../x86_64-linux-gnu -L/usr/lib/gcc/x86_64-linux-gnu/11/../../../../lib -L/lib/x86_64-linux-gnu -L/lib/../lib -L/usr/lib/x86_64-linux-gnu -L/usr/lib/../lib -L/usr/lib/gcc/x86_64-linux-gnu/11/../../.. hello.o -lgcc --push-state --as-needed -lgcc_s --pop-state -lc -lgcc --push-state --as-needed -lgcc_s --pop-state /usr/lib/gcc/x86_64-linux-gnu/11/crtendS.o /usr/lib/gcc/x86_64-linux-gnu/11/../../../x86_64-linux-gnu/crtn.o
```
我們使用目錄 `/usr/lib/gcc/x86_64-linux-gnu/11` 底下 `collect2` 為一個指令,封裝了 `ld` 這個指令,`ld` 為鏈結器 (linker),`collect2` 作用為將 C 語言執行時需要的函式庫 (C Run Time, CRT) 中的目的檔 (`crt1.o`, `crti.o`, `crtbegin.o`, `crtend.o`, `crtn.o`),以及需要的動態鏈結函式庫 (`libgcc.so`, `libgcc_s.so`, `libc.so`),和 `hello.o` 鏈結到一起,形成一個可執行檔案,`hello.out`
我們可以觀察我們在編譯過程中,產生的所有中間檔案
```
$ ls ─╯
hello.out hello.c hello.i hello.o hello.s
```
### 前處理階段
前處理階段會處理程式碼中以 `#` 開頭的指令,例如 `#include`, `#define`,轉換之後加入到程式碼原始檔中,得到另外一個 C 語言,副檔名 `.i`。
我們可以使用以下指令產生出 `.i` 檔,也就是完成前處理之後的檔案,以下為 `hello.c`
```c
#include <stdio.h>
#define ONE 1
int main(void) {
printf("Hello, world!\n");
printf("%d\n", ONE);
return 0;
}
```
使用以下指令得到 `hello.i`
```shell
$ gcc -E hello.c -o hello.i
```
以下為 `hello.i` 的內容
```c
...
extern int fprintf (FILE *__restrict __stream,
const char *__restrict __format, ...);
extern int printf (const char *__restrict __format, ...);
extern int sprintf (char *__restrict __s,
const char *__restrict __format, ...) __attribute__ ((__nothrow__));
...
int main(void) {
printf("Hello, world!\n");
printf("%d\n", 1);
return 0;
}
```
可以看到巨集定義的 `ONE` 完成了替換
整個預處理完整的處理方式為以下
- 遞迴處理 `#include` 預處理指令,將對應的檔案內容複製到該指令的位置,如上方的 `printf`
- 刪除所有 `#define` 的指令,並將其被引用的地方遞迴進行展開
- 處理前處理指令,如 `#if`, `#ifdef`...
- 刪除所有註解
- 添加行號,檔案名稱註解
### 編譯階段
編譯階段會將 `hello.i` 進行語法分析,字詞分析,語意分析,優化等等,最終產生出組合語言程式碼。
使用 `-S` 選項,可以對 `hello.c` 或是 `hello.i` 產生出 `hello.s`,我們使用以下指令進行編譯
```shell
$ gcc -S hello.i -o hello.s -masm=intel -fno-asynchronous-unwind-tables
```
其中 `masm = intel` 表示將產生出組合語言的格式設置為 intel 格式,`hello.s` 的內容如下
```asm
.file "hello.c"
.intel_syntax noprefix
.text
.section .rodata
.LC0:
.string "Hello, world!"
.LC1:
.string "%d\n"
.text
.globl main
.type main, @function
main:
endbr64
push rbp
mov rbp, rsp
lea rax, .LC0[rip]
mov rdi, rax
call puts@PLT
mov esi, 1
lea rax, .LC1[rip]
mov rdi, rax
mov eax, 0
call printf@PLT
mov eax, 0
pop rbp
ret
.size main, .-main
.ident "GCC: (Ubuntu 11.3.0-1ubuntu1~22.04) 11.3.0"
.section .note.GNU-stack,"",@progbits
.section .note.gnu.property,"a"
.align 8
.long 1f - 0f
.long 4f - 1f
.long 5
0:
.string "GNU"
1:
.align 8
.long 0xc0000002
.long 3f - 2f
2:
.long 0x3
3:
.align 8
4:
```
這邊可以看到編譯器進行了一些優化,`printf` 被優化成了 `puts` (可以加上 `-O0` 優化選項禁止所有優化)
### 組譯階段
組譯階段會將組合語言依照對照表 (又稱為 optable) 將組合語言翻譯成機器語言,產生出 `hello.o`。
使用以下指令可以產生出目的檔
```shell
$ gcc -c hello.s -o hello.o
```
我們可以試著查看 `hello.o`
```
��UH��H�H����]�Hello, world!GCC: (Ubuntu 11.3.0-1ubuntu1~22.04) 11.3.0GNU�zRx
U E�C
�� hello.cmainputs
```
可以看到裡面有許多無法使用 ASCII 表示的字元,我們可以使用 `objdump` 這個工具查看其內容
```shell
$ objdump -sd hello.o -M intel
```
```text
hello.o: file format elf64-x86-64
Contents of section .text:
0000 f30f1efa 554889e5 488d0500 00000048 ....UH..H......H
0010 89c7e800 000000b8 00000000 5dc3 ............].
Contents of section .rodata:
0000 48656c6c 6f2c2077 6f726c64 2100 Hello, world!.
Contents of section .comment:
0000 00474343 3a202855 62756e74 75203131 .GCC: (Ubuntu 11
0010 2e332e30 2d317562 756e7475 317e3232 .3.0-1ubuntu1~22
0020 2e303429 2031312e 332e3000 .04) 11.3.0.
Contents of section .note.gnu.property:
0000 04000000 10000000 05000000 474e5500 ............GNU.
0010 020000c0 04000000 03000000 00000000 ................
Contents of section .eh_frame:
0000 14000000 00000000 017a5200 01781001 .........zR..x..
0010 1b0c0708 90010000 1c000000 1c000000 ................
0020 00000000 1e000000 00450e10 8602430d .........E....C.
0030 06550c07 08000000 .U......
Disassembly of section .text:
0000000000000000 <main>:
0: f3 0f 1e fa endbr64
4: 55 push rbp
5: 48 89 e5 mov rbp,rsp
8: 48 8d 05 00 00 00 00 lea rax,[rip+0x0] # f <main+0xf>
f: 48 89 c7 mov rdi,rax
12: e8 00 00 00 00 call 17 <main+0x17>
17: b8 00 00 00 00 mov eax,0x0
1c: 5d pop rbp
1d: c3 ret
```
從上面的結果,我們可以看到除了組合語言外,還有 `.text`, `.rodata` 等等資訊,這一些資訊我們將會在後面 ELF 檔案時說明。
### 鏈結階段
鏈結可以分成靜態鏈結和動態鏈結。GCC 預設使用動態鏈結,如果要使用靜態鏈結,加上 `-static` 的選項即可使用。
鏈結會將目的檔和其他函式庫或是相依的檔案進行鏈結,產生出一個可執行檔,在這個過程中,會分配記憶體空間,符號綁定,重新定位等等,以下解釋,首先,我們先產生出可執行檔,並指定使用靜態鏈結的方式。
```shell
$ gcc hello.o -o hello -static
```
內容如下 (僅列出部份)
```
0000000000001050 <puts@plt>:
1050: f3 0f 1e fa endbr64
1054: f2 ff 25 75 2f 00 00 bnd jmp QWORD PTR [rip+0x2f75] # 3fd0 <puts@GLIBC_2.2.5>
105b: 0f 1f 44 00 00 nop DWORD PTR [rax+rax*1+0x0]
0000000000001149 <main>:
1149: f3 0f 1e fa endbr64
114d: 55 push rbp
114e: 48 89 e5 mov rbp,rsp
1151: 48 8d 05 ac 0e 00 00 lea rax,[rip+0xeac] # 2004 <_IO_stdin_used+0x4>
1158: 48 89 c7 mov rdi,rax
115b: e8 f0 fe ff ff call 1050 <puts@plt>
1160: b8 00 00 00 00 mov eax,0x0
1165: 5d pop rbp
1166: c3 ret
```
下面我們將目的檔和執行檔進行比較
```
0000000000000000 <main>: │0000000000001149 <main>:
0: f3 0f 1e fa endbr64 │ 1149: f3 0f 1e fa endbr64
4: 55 push rbp │ 114d: 55 push rbp
5: 48 89 e5 mov rbp,rsp │ 114e: 48 89 e5 mov rbp,rsp
8: 48 8d 05 00 00 00 00 lea rax,[rip+0x0] │ 1151: 48 8d 05 ac 0e 00 00 lea rax,[rip+0xeac] # 2004 <_IO_stdin_used + 0x4>
f: 48 89 c7 mov rdi,rax │ 1158: 48 89 c7 mov rdi,rax
12: e8 00 00 00 00 call 17 <main+0x17> │ 115b: e8 f0 fe ff ff call 1050 <puts@plt>
17: b8 00 00 00 00 mov eax,0x0 │ 1160: b8 00 00 00 00 mov eax,0x0
1c: 5d pop rbp │ 1165: 5d pop rbp
1d: c3 ret │ 1166: c3 ret
```

比較兩邊的 `main`,可以發現到記憶體地址改變了,且 function 的部份 `puts` 被填入了正確的記憶體地址。
>
> 思考: 為什麼編譯器會將 `printf` 優化成 `puts()` ?
> 原因為 `printf` 需要處理許多的格式,包含 `%d, %c, %f, %s` 等等,而 `puts()` 只需要判斷 `\0` 出現在何處即可,做的判斷以及處理更少,因此執行時間也來的更好。
>
> 延伸閱讀: [你所不知道的 C 語言:編譯器和最佳化原理篇](https://hackmd.io/@sysprog/c-compiler-optimization?type=view)
`main` 改變了記憶體地址,意義上為重新定位,也就是 `main` 會被放置在記憶體中某一處。
經過了重新定位以及填入了 function 的記憶體地址,整個程式就可以正常的載入到記憶體中執行了。
接著,我們可以嘗試使用 `file` 檢視檔案資訊
我們目前知道了程式是如何從原始碼變成一個執行檔,而執行檔載入從硬碟載入到記憶體中,我們需要在記憶體中放置程式的一些資訊,諸如 ... 以下先介紹段的概念
## Lab1: Hello
觀察 `hello.c` 的所有中間檔案
## 關於 ELF 格式
ELF (Executable and Linkable Format),可執行與可鏈結格式,最初為 UNIX 實驗室為了 ABI (Application Binary Interface) 的一部分制定的,為 COFF (Commmon file format) 格式的變種,ELF 定義可以在 `/usr/include/elf.h` 中看到。
以下為 `/usr/include/elf.h` 中部份內容
```c
typedef Elf32_Half Elf32_Versym; │ 1104: 80 3d 05 2f 00 00 00 cmp BYTE PTR [rip+0x2f05],0x0 # 4010 <__TMC
typedef Elf64_Half Elf64_Versym; │_END__>
│ 110b: 75 2b jne 1138 <__do_global_dtors_aux+0x38>
│ 110d: 55 push rbp
/* The ELF file header. This appears at the start of every ELF file. */ │ 110e: 48 83 3d e2 2e 00 00 cmp QWORD PTR [rip+0x2ee2],0x0 # 3ff8 <__cx
│a_finalize@GLIBC_2.2.5>
#define EI_NIDENT (16) │ 1115: 00
│ 1116: 48 89 e5 mov rbp,rsp
typedef struct │ 1119: 74 0c je 1127 <__do_global_dtors_aux+0x27>
{ │ 111b: 48 8b 3d e6 2e 00 00 mov rdi,QWORD PTR [rip+0x2ee6] # 4008 <__ds
unsigned char e_ident[EI_NIDENT]; /* Magic number and other info */ │o_handle>
Elf32_Half e_type; /* Object file type */ │ 1122: e8 19 ff ff ff call 1040 <__cxa_finalize@plt>
Elf32_Half e_machine; /* Architecture */ │ 1127: e8 64 ff ff ff call 1090 <deregister_tm_clones>
Elf32_Word e_version; /* Object file version */ │ 112c: c6 05 dd 2e 00 00 01 mov BYTE PTR [rip+0x2edd],0x1 # 4010 <__TMC
Elf32_Addr e_entry; /* Entry point virtual address */ │_END__>
Elf32_Off e_phoff; /* Program header table file offset */ │ 1133: 5d pop rbp
Elf32_Off e_shoff; /* Section header table file offset */ │ 1134: c3 ret
Elf32_Word e_flags; /* Processor-specific flags */ │ 1135: 0f 1f 00 nop DWORD PTR [rax]
Elf32_Half e_ehsize; /* ELF header size in bytes */ │ 1138: c3 ret
Elf32_Half e_phentsize; /* Program header table entry size */ │ 1139: 0f 1f 80 00 00 00 00 nop DWORD PTR [rax+0x0]
Elf32_Half e_phnum; /* Program header table entry count */ │
Elf32_Half e_shentsize; /* Section header table entry size */ │0000000000001140 <frame_dummy>:
Elf32_Half e_shnum; /* Section header table entry count */ │ 1140: f3 0f 1e fa endbr64
Elf32_Half e_shstrndx; /* Section header string table index */ │ 1144: e9 77 ff ff ff jmp 10c0 <register_tm_clones>
} Elf32_Ehdr; │
│0000000000001149 <main>:
typedef struct │ 1149: f3 0f 1e fa endbr64
{ │ 114d: 55 push rbp
unsigned char e_ident[EI_NIDENT]; /* Magic number and other info */ │ 114e: 48 89 e5 mov rbp,rsp
Elf64_Half e_type; /* Object file type */ │ 1151: 48 8d 05 ac 0e 00 00 lea rax,[rip+0xeac] # 2004 <_IO_stdin_used+
Elf64_Half e_machine; /* Architecture */ │0x4>
Elf64_Word e_version; /* Object file version */ │ 1158: 48 89 c7 mov rdi,rax
Elf64_Addr e_entry; /* Entry point virtual address */ │ 115b: e8 f0 fe ff ff call 1050 <puts@plt>
Elf64_Off e_phoff; /* Program header table file offset */ │ 1160: b8 00 00 00 00 mov eax,0x0
Elf64_Off e_shoff; /* Section header table file offset */ │ 1165: 5d pop rbp
Elf64_Word e_flags; /* Processor-specific flags */ │ 1166: c3 ret
Elf64_Half e_ehsize; /* ELF header size in bytes */ │
Elf64_Half e_phentsize; /* Program header table entry size */ │Disassembly of section .fini:
Elf64_Half e_phnum; /* Program header table entry count */ │
Elf64_Half e_shentsize; /* Section header table entry size */ │0000000000001168 <_fini>:
Elf64_Half e_shnum; /* Section header table entry count */ │ 1168: f3 0f 1e fa endbr64
Elf64_Half e_shstrndx; /* Section header string table index */ │ 116c: 48 83 ec 08 sub rsp,0x8
} Elf64_Ehdr;
```
ELF 本質上就是一個二進位檔案的格式,在 Linux 中使用 ELF,Windows 中為 PE,Binary 檔案開頭會有一個 magic number 的欄位,可以讓作業系統確認這是什麼類型的檔案,我們可以在上方 ELF 格式中看到 magic number 欄位的存在。
也可以使用 `readelf` 這個工具去讀取 magic number,ELF 格式的檔案 magic number 為 `7f 45 4c 46` 使用 ASCII 表示為 `\177ELF`,我們此用以下指令驗證
```shell
$ readelf -h hello.o
ELF Header:
Magic: 7f 45 4c 46 02 01 01 00 00 00 00 00 00 00 00 00
Class: ELF64
Data: 2's complement, little endian
Version: 1 (current)
OS/ABI: UNIX - System V
ABI Version: 0
Type: REL (Relocatable file)
Machine: Advanced Micro Devices X86-64
Version: 0x1
Entry point address: 0x0
Start of program headers: 0 (bytes into file)
Start of section headers: 2256 (bytes into file)
Flags: 0x0
Size of this header: 64 (bytes)
Size of program headers: 0 (bytes)
Number of program headers: 0
Size of section headers: 64 (bytes)
Number of section headers: 23
Section header string table index: 22
```
在 Linux 中許多檔案都是以 ELF 格式存在,ELF 格式的檔案可以分成三種類型,分別為以下
- 可執行檔 (executable file): 經過鏈結後,可以執行的檔案,也被稱為程式 (program),包含二進位程式碼與資料,可以直接被複製到記憶體中執行
- 可重新定位檔 (relocatable file): 原始碼檔案經過編譯後尚未鍊結的目的檔,以 `.o` 作為副檔名。用來和其他目的檔鏈結產生出可執行檔或是動態鍊結函式庫,通常是一段 PIC (Position Independent Code)
- 共享目的檔 (shared object file): 動態鍊結檔案,用來在鍊結過程的時候,和其他動態鍊結或是可重新定位檔案一同組成新的目的檔。或是鍊結到一個 Process 中。
ELF 大致上我們可以分成以下幾個部分
- ELF Header: 技術基本資料
- Program Header Table: 記錄程式該如何載入到記憶體中
- Section Header Table: 記錄檔案內的段 (Section)
- Section: 數個段
ELF 格式的檔案可以用於鍊結,通常一個 ELF 檔案我們可以把他分成多個區域,也就是上面提及段,Section 的概念,包含 `.text`, `.data`, `.bss`
- .text: 放置程式碼
- .data: 放置資料
- .bss: 放置未初始化資料
分成多個區域,在安全性方面有一些好處,當程式被載入到記憶體中,資料和程式碼分別被映射到虛擬記憶體中不同的區域,而我們會為這一些不同的區域劃分不同的權限,如資料的區域我們就定義成可讀寫,程式碼區域定義成只可讀取,避免程式遭到修改,我們可以根據不同的權限,將這一些區域進行劃分
- data: rw-
- code: r-x
- stack: rw-
- heap: rw-
值得注意的地方,我們這邊分割的概念和上方解讀 ELF 結構時的概念不同,這邊讀寫與執行的概念,是當程式被載入到記憶體時,才有的概念。
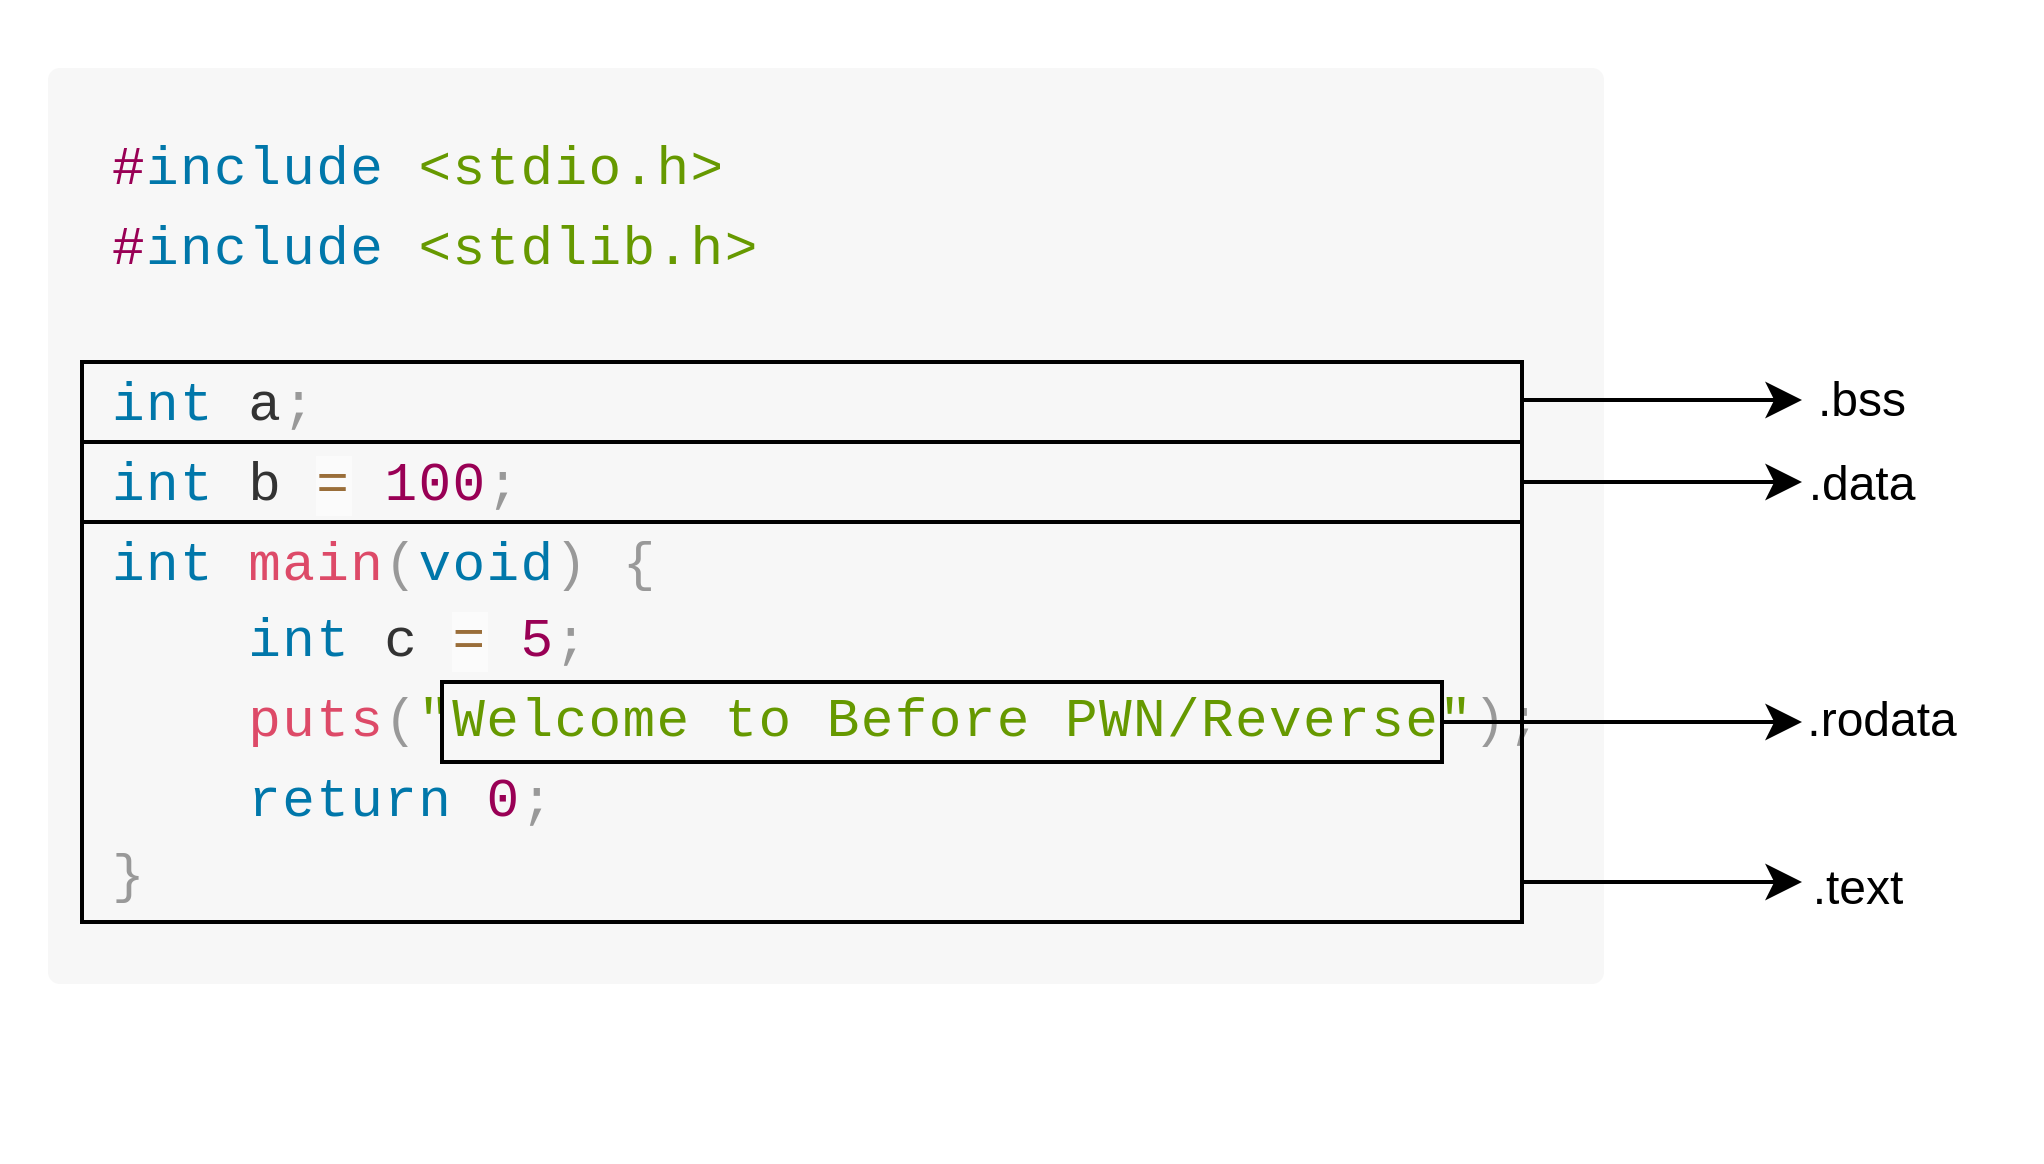
以下我們通過簡單的程式碼來更加了解 ELF Section 的概念,考慮以下 C 語言程式碼
## Lab2: ELF_Section
```c
#include <stdio.h>
#include <stdlib.h>
int a;
int b = 100;
int main(void) {
int c = 5;
puts("Welcome to Before PWN/Reverse");
return 0;
}
```
按照上面提及的 ELF Section 的概念,我們預期上面程式經過編譯後的 ELF Section 概念如下
以 b 這個全域變數,我們知道他初始化的值會放置在 `.data` 這個 Section 中,我們試著實驗,為了方便實驗,我們將關閉 PIE 保護機制,並使用 `readelf -S ./welcome` 查看所有 Section
```shell
$ gcc -g -no-pie welcome.c -o welcome_NO_NX
```
```
[Nr] Name Type Address Offset
Size EntSize Flags Link Info Align
[ 0] NULL 0000000000000000 00000000
0000000000000000 0000000000000000 0 0 0
[ 1] .interp PROGBITS 0000000000400318 00000318
000000000000001c 0000000000000000 A 0 0 1
[ 2] .note.gnu.pr[...] NOTE 0000000000400338 00000338
0000000000000030 0000000000000000 A 0 0 8
[ 3] .note.gnu.bu[...] NOTE 0000000000400368 00000368
0000000000000024 0000000000000000 A 0 0 4
.
.
.
[25] .data PROGBITS 0000000000404020 00003020
0000000000000014 0000000000000000 WA 0 0 8
```
可以看到 `.data` Section 會被映射到虛擬記憶體中 `0x404020` 的位置,而 `.data` Section 位於 ELF 檔案中的位置為檔案開頭的地方,加上 `0x3020` 的位置。
接著我們使用 gdb 執行 `welcome`,在 `main` 下一個中斷點,接著使用 `gdb-peda` 插件的 `vmmap` 查看 ELF 執行後,各各 Section 映射到虛擬記憶體空間上的情況
```
Start End Perm Name
0x00400000 0x00401000 r--p /home/ubuntu/Desktop/workspace/Reverse_1/ELF_Section/welcome_NO_NX
0x00401000 0x00402000 r-xp /home/ubuntu/Desktop/workspace/Reverse_1/ELF_Section/welcome_NO_NX
0x00402000 0x00403000 r--p /home/ubuntu/Desktop/workspace/Reverse_1/ELF_Section/welcome_NO_NX
0x00403000 0x00404000 r--p /home/ubuntu/Desktop/workspace/Reverse_1/ELF_Section/welcome_NO_NX
0x00404000 0x00405000 rw-p /home/ubuntu/Desktop/workspace/Reverse_1/ELF_Section/welcome_NO_NX
0x00007ffff7c00000 0x00007ffff7c28000 r--p /usr/lib/x86_64-linux-gnu/libc.so.6
0x00007ffff7c28000 0x00007ffff7dbd000 r-xp /usr/lib/x86_64-linux-gnu/libc.so.6
0x00007ffff7dbd000 0x00007ffff7e15000 r--p /usr/lib/x86_64-linux-gnu/libc.so.6
0x00007ffff7e15000 0x00007ffff7e19000 r--p /usr/lib/x86_64-linux-gnu/libc.so.6
0x00007ffff7e19000 0x00007ffff7e1b000 rw-p /usr/lib/x86_64-linux-gnu/libc.so.6
0x00007ffff7e1b000 0x00007ffff7e28000 rw-p mapped
0x00007ffff7f99000 0x00007ffff7f9c000 rw-p mapped
0x00007ffff7fbb000 0x00007ffff7fbd000 rw-p mappe
...
```
可以看到總共有 5 個 Section,而前面我們在 ELF 檔案中看到 `.data` Section 會被映射到 `0x404000` (`.data` 位於 ELF 檔案開頭加上 `0x3020` 的位置,這個位置的 Section 映射到了虛擬記憶體空間中 `0x404000` 的位置,大小為 `0x14`),而我們又知道,`.data` Section 的權限為只可讀取與寫入,和上面我們對 ELF 歸納的結論相同。
這邊還可以看到,在關閉 PIE 時,整個程式碼的基底記憶體地址都是從 `0x4000000` 開始的,且 ELF 在虛擬記憶體中映射的狀況,就如同 ELF 檔案中所描述一般。
如果有打開 PIE 保護,則不會如此。
我們在 gdb 中執行 `x/30x 0x404000` 將虛擬記憶體地址 `0x404000` 之後 30 個 word 的內容,並以 16 進位的方式進行輸出
```
gdb-peda$ x/30x 0x404000
0x404000: 0x0000000000403e20 0x00007ffff7ffe2e0
0x404010: 0x00007ffff7fd8d30 0x0000000000401030
0x404020: 0x0000000000000000 0x0000000000000000
0x404030 <b>: 0x0000000000000064 0x0000000000000000
0x404040: 0x0000000000000000 0x0000000000000000
0x404050: 0x0000000000000000 0x0000000000000000
0x404060: 0x0000000000000000 0x0000000000000000
0x404070: 0x0000000000000000 0x0000000000000000
0x404080: 0x0000000000000000 0x0000000000000000
0x404090: 0x0000000000000000 0x0000000000000000
0x4040a0: 0x0000000000000000 0x0000000000000000
0x4040b0: 0x0000000000000000 0x0000000000000000
0x4040c0: 0x0000000000000000 0x0000000000000000
0x4040d0: 0x0000000000000000 0x0000000000000000
0x4040e0: 0x0000000000000000 0x0000000000000000
```
這邊我們看到了,全域變數 `b` 的初始化數值 100 (`0x64`) 確實出現在 `.data` Section 中,這邊的意義為 ELF 檔案在執行後,將數值映射到虛擬記憶體空間中的情況,下面我們也可以試著尋找 100 這個數值在 ELF 檔案中具體的位置,回顧我們 `readelf` 輸出的內容,我們知道 `.data` Section 位於檔案開頭加上 `0x3020` 的位置,我們使用 16 進位檢視的方式,檢視 `welcome` 二進位檔案的內容
```shell
$ xxd welcome
```
我們檢視 `0x3020` 偏移的位置
```
00003020: 0000 0000 0000 0000 0000 0000 0000 0000 ................
00003030: [64]00 0000 4743 433a 2028 5562 756e 7475 d...GCC: (Ubuntu
```
可以看到 `0x64` 確實出現在 ELF 檔中。
### 關於 ELF 格式
下面為一個 ELF 格式表示圖
<img src="https://i.imgur.com/ShTueYw.png" width=180>
- ELF Header: 為一個 16 進位的序列,表示了產生這個 ELF 檔案的系統的 word 大小,little endian 還是 big endian 等等,剩餘的部份為幫助鍊結器進行語法分析以及解析目的檔的資訊,具體如下
- ELF Header 大小
- 目的檔類型: 可執行檔,可重新定位檔,共享目的檔
- 機器類型: 如 x86-64
- section header table 的偏移
- section header table 中 section 的數目以及大小
- `.text`: 已經過編譯的機器碼
- `.rodata`: Read only data,像是 `printf` 中的格式化字串 (`char *`)
- `.data`: 已經完成初始化的全域和靜態變數。區域變數在執行時儲存在 stack 中,也就是說不在 `.data` 中,也不在 `.bss` 中
- `.bss`: 未初始化的全域和靜態變數,以及所有被初始化為 0 的全域或是靜態變數。在目的檔中這個 section 不佔據實際空間。目的檔為了空間效率考量,未初始化變數不需要佔據實際硬碟空間,在程式執行時,記憶體分配空間給這一些變數,並初始化為 0
- `.symtab`: 符號表,存在在程式中函數的引用和全數變數的資訊,如果我們嘗試用 `gdb` 對一個執行檔進行除錯,我們會需要加上 `-g` 的選項,要不在 `gdb` 執行程式時,會產生找不到符號表的訊息。但是實際上,每一個可重新定位目的檔在 `.symtab` 都有一張符號表,和編譯器中的符號表不同之處在於,`.symtab` 不包含區域變數的 section
- `.rel.text`: 當鍊結器把目的檔和其他目的檔進行鍊結時,會需要修改目的檔中標示的記憶體地址,包含外部函數呼叫或是對全域變數的引用都需要修正,但是在本身目的檔內的函數呼叫不需要修正,在可動態重新定位的檔案中,沒有統一的定址空間,所有地址都是和特定部份相對的,可能與函式相對等等,因此,每個重新定位的檔案都需要自己的重新定位表,`.rel.text` 為用於重新定位的
- `.rel.data`: 包含全域變數以及其他引用的重新定位資訊
- `.debug`: 用於除錯的符號表 (如果沒有添加,則會在使用 gdb 對執行檔進行除錯時看見找不到符號表的訊息),包含程式中區域變數和型別的定義,全域變數的定義和引用,以及原始 C 語言程式碼,可以在 `gcc` 編譯加上 `-g` 選項得到這張表
- `.line`: C 語言程式碼中行號和 `.text` 中機器指令對應的映射關係,`gcc` 加上 `-g` 選項得到
- `.strtab`: 字串表,包含 `.symtab` 和 `.debug` 中的符號表,以及 section 名稱
## 基礎 x86 組合語言
在上面我們看到 C 語言原始碼到可執行檔的完整過程,在許多情況下,我們並沒有程式的原始碼,也就是 C 語言檔案,而是只有一個可執行檔,在分析可執行檔時,我們時常會使用到反組議的技術,也就是將二進位可執行檔中機器碼轉換成組合語言,進而去分析程式的行為。
組合語言實際上是一類語言的集合,每一種組合語言都對應到相對應的微處理器架構,諸如 x86, x64, RISC-V, ARAM 等等。在惡意程式中,大多數是以 x86 微處理器架構編譯而成的,也就是目標機器為 x86 微處理器架構的機器,以下將會簡單的介紹 x86 組合語言。
### x86 組合語言格式問題, ATT vs Intel
ATT 風格
- 暫存器前面加上 `%`
- 立即數前面加上 `$`
- 16 進位數使用 `0x` 作為前綴
- ==來源操作數在前面,目標操作數在後面==
- 針對操作的位數,加上 l, w, b 修飾,如 `movl`, `movw`
`mov %eax, %edx 等效於 edx = eax`
Intel 風格
- 暫存器前面沒有符號表示
- 立即數前面沒有符號表示
- 16 進位使用 `h` 最為後綴
- ==來源操作數在後面,目標操作數在前面==
- 針對操作的位數,加上 `+dword ptr` 修飾,如 `mov DWORD PTR[ebp-12], eax`
`mov eax, edx 等效於 eax = edx`
以下組合語言,使用 Intel 風格表示。
### `mov` 將資料從一個地方移動到另外一個地方
```
助憶符 目標操作數 來源操作數
mov ecx , 0x42
```
上面這是 `mov` 指令的使用,前面我們看到,組合語言會經過組譯器翻譯成機器語言,也就是一連串二進位數,我們可以想像得到, `mov` 這個指令會翻譯成一個二進位數,稱為 opcode,實際上 CPU 看到的是 opcode,但是組譯器是如何知道 `mov` 該翻譯成怎樣的 opcode?我們有一張表,稱為 instruction table (optable),可以用來查詢 opcode 和指令對應的轉換關係,諸如 `AAD` 這個指令對應到的 opcode 為 `0x37`,而為了方便程式設計師開發,我們不需要記住 `0x37` 對應到的是 `AAD`,只需要知道 `AAD` 是做什麼的,剩下交給組譯器完成翻譯,這也就是為什麼我們會稱 `mov`, `AAD` 為助憶符 aka 幫助記憶的符號。
操作數的一部分,常見的有以下三種類行
- 立即數 (immediate): 為一個固定的值,在上面的例子中 `0x42` 就是一個立即數
- 暫存器 (register): 指向暫存器,在上面的力中為 `ecx`
- 記憶體地址 (memory address): 指向到記憶體地址,一般來說,可以是由一個方括號包住一個值,如 `[0x0002]`,或是將暫存器中儲存的值當作記憶體地址使用,如 `[eax]`,也可以是由一條運算式組成,像是 `[eax + 0x10]`
以下為一個典型的指令表 (instruction table)

我們也可以使用工具 Cemu 幫助我們看到組合語言與機器語言之間的對應關係

從上面可以看到 `mov ecx` 對應到的機器碼為 `0xb9`,`0x43` 對應到的 machine code 為 `43 00 00 00`,特別注意到 `0x43` 在記憶體中擺放的方式,這和 big endian 以及 little endian 有關,假設現在有一個變數 `x`,型別為 `int`,存在於記憶體地址 `0x100` 中,也就是 `&x = 0x100`,而假設一個 `int` 為 4 bytes (32 bit),則變數 `x` 的 4 個位元組將被儲存在記憶體中 `0x100`, `0x101`, `0x102`, `0x103` 的位置。
若 `x` 的值為 `0x01234567`,則 big endian 以及 little endian 表示法為以下表示

回到上面的例子,我們觀察到 `0x00000043` 放置到記憶體表示為 `43 00 00 00`,由此我們得到 x86 為 little endian。
### More x86 指令(搭配 cemu 進行測試)
- `sub eax 0x1` 將 `eax` 的值減去 `0x1`,並放回 `eax` 暫存器中,`eax = eax - 1`
- `add eax 0x1` 將 `eax` 的值加上 `0x1`,並放回 `eax` 暫存器中,`eax = eax + 1`
- `call <some_address>` 呼叫某一個 function
- `inc edx` 將 `edx` 的值增加 1
### 關於 x86 暫存器
- 通用暫存器 (general purpose register): `eax`, `ebx`, `ecx`, `edx`, `ebp`, `esp`, `esi`
- 程式計數器 (program counter register): `eip`
- 旗標暫存器 (flag register): `eflags`
- 記憶體區段暫存器 (segment register): `cs`, `ss`, `ds`, `es`, `fs`, `gs`

從上面的圖中,我們可以看到前綴字有所不同,如 `rax`, `eax`, `ax` 等等,這表示在不同的環境下,如在 64 位元下,使用的為 `rax`,32 位元使用 `eax`。
而在後面的說明,我們可以看到暫存器有一些特定的用途 (但不一定遵守)
- `ax`: 用於算術運算
- `cx`: 用於處理迴圈的計數
- `bx`: 指向一個資料,或是記憶體區塊的基底記憶體地址
- `sp`: 指向 stack 的頂端,`sp` 為 stack pointer 簡寫
- `dx`: 用來算術或是 I/O 操作
### 為什麼需要暫存器?
以下為記憶體階乘圖

越往上,表示存取速度越快,但容量也越小,一般為了加速存取速度,會將變數從記憶體中載入到暫存器中進行操作。
### 條件與分支 (condition and branch)
常見的條件指令有 `test` 和 `cmp`,以下列舉
- `cmp dst, src` 意義為將 dst 和 src 相減,將結果記錄到 `EFLAGS` 中
- `test dst, src` 意義為將 dst 和 src 做 bitwise AND 運算,並將結果記錄到 `EFLAGS` 中
上面有提及到 `EFLAGS` 這個旗標暫存器,這個暫存器中會儲存以下狀態
- `CF (Carry Flag)` 如果產生進位 (carry bit),則設為 1
- `ZF (Zero Flag)` 如果結果為 0,則設為 1
- `SF (Sign Flag)` 如果結果小於 0,則設為 1
- `OF (Overflow Flag)` 如果出現 overflow, underflow,則設為 1

接著是 `jump` 系列的指令,常常會搭配 `cmp`, `test` 使用
- `jmp dst` 無條件跳到 `dst` 執行
- `jz dst` 如果 `ZF == 1`,則跳到 `dst` 執行
- `jnz dst` 如果 `ZF == 0`,則跳到 `dst` 執行
- ...
### 關於 x86 呼叫慣例
所謂呼叫慣例,指的是我們在呼叫函式時,函式的參數該如何處理,回傳值如何處理,函式如何進行呼叫。
- 函式呼叫 (function call): 定義 `call` 需要將 return address 推入 stack 中接著通過 jump 指令進行跳轉
- 函式回傳 (function return): 定義 `ret` 需要將 return address 從 stack 中彈出
- 常見在 32 位元的程式以及 64 位元的程式處理會有所不同
- 32 位元程式: 參數放置於 stack 中,回傳值放置在 `rax` 中 (cdecl)
- 64 位元程式: 參數會放置在 `rdi`, `rsi` ,`rdx` ,`rcx`, `r8`, `r9` 其他部份放在 stack,回傳值放置在 `rax` 中 (System V)
呼叫慣例會根據架構,作業系統,編譯器等等而有所不同。
## Lab3: Calling Convention
我們可以通過實驗進行驗證,給定以下 C 語言原始碼檔案
```c
#include <stdlib.h>
#include <stdio.h>
void func(int a, int b)
{
a + b;
}
int main(void)
{
int a = 2;
int b = 3;
func(a,b);
}
```
對應的 Makefile
```
all:
gcc -g -m32 func_call.c -o func_call_32
gcc -g -m64 func_call.c -o func_call_64
```
以下為 32 位元程式經過反組譯後產生的組合語言 (可以使用 gdb 執行執行檔後,使用 `disassemble main` 即可得到 `main` 函式反組譯的結果)
```
0x000011c1 <+0>: endbr32
0x000011c5 <+4>: push ebp
0x000011c6 <+5>: mov ebp,esp
0x000011c8 <+7>: sub esp,0x10
0x000011cb <+10>: call 0x11f8 <__x86.get_pc_thunk.ax>
0x000011d0 <+15>: add eax,0x2e0c
0x000011d5 <+20>: mov DWORD PTR [ebp-0x8],0x2
0x000011dc <+27>: mov DWORD PTR [ebp-0x4],0x3
0x000011e3 <+34>: push DWORD PTR [ebp-0x4]
0x000011e6 <+37>: push DWORD PTR [ebp-0x8]
0x000011e9 <+40>: call 0x11ad <func>
0x000011ee <+45>: add esp,0x8
0x000011f1 <+48>: mov eax,0x0
0x000011f6 <+53>: leave
0x000011f7 <+54>: ret
```
以下為 64 位元程式經過反組譯後產生的組合語言
```
0x000000000000113a <+0>: endbr64
0x000000000000113e <+4>: push rbp
0x000000000000113f <+5>: mov rbp,rsp
0x0000000000001142 <+8>: sub rsp,0x10
0x0000000000001146 <+12>: mov DWORD PTR [rbp-0x8],0x2
0x000000000000114d <+19>: mov DWORD PTR [rbp-0x4],0x3
0x0000000000001154 <+26>: mov edx,DWORD PTR [rbp-0x4]
0x0000000000001157 <+29>: mov eax,DWORD PTR [rbp-0x8]
0x000000000000115a <+32>: mov esi,edx
0x000000000000115c <+34>: mov edi,eax
0x000000000000115e <+36>: call 0x1129 <func>
0x0000000000001163 <+41>: mov eax,0x0
0x0000000000001168 <+46>: leave
0x0000000000001169 <+47>: ret
```
可以驗證到,32 位元程式確實是通過 stack 進行參數傳遞,而 64 位元的程式,在上面只有兩個參數進行傳遞的範例下,分別使用了 `esi` 和 `edi` 暫存器。
### 關於 stack 與函式呼叫
在上面我們看到了一個函式的呼叫與其呼叫慣例,在一些情況中我們會使用到 stack 去管理函式的記憶體空間 (非 `malloc`),區域變數,流程控制等等。stack 是一種資料結構,支援兩種操作,分別為 `push` 和 `pop`,且都是針對 stack 頂端進行操作,先進入的元素最後被彈出 stack,品課洋芋片一般。

[source](https://www.google.com/url?sa=i&url=https%3A%2F%2Ftwitter.com%2Fshaq%2Fstatus%2F966760779398762496%3Flang%3Dzh-Hant&psig=AOvVaw2jrbX12ZlPrpyjlsizyHrn&ust=1683525116851000&source=images&cd=vfe&ved=0CBEQjRxqFwoTCIicvPbB4v4CFQAAAAAdAAAAABAD)
stack 的生長方向為記憶體高位向低位生長,`sp` 暫存器指向到 stack 的頂端,使用 `push`, `pop` 指令對 stack 進行操作
如果我們要把資料放到 stack 上,我們需要使用 `push` 指令,舉例,假設我們想要把 `rax` 中的資料 `push` 到 stack 上,則圖像化為以下,搭配 cemu 進行實驗
## Lab4: Cemu: Stack
```asm
mov rax, 0x1234567
push rax
pop rbx
```

執行 `push rax` 時,首先 `rsp` 會 -8

接著把 `rax` 中的資料放入到 stack 中

將 stack 頂端的值給 `rbx`,接著 `rsp` + 8

執行結束後,暫存器為以下狀態

在 x86 組合語言中,我們可以看到許多與 stack 操作有關的指令,像是 `push`, `pop`, `call`, `ret`, `enter`, `leave` 等等,在後續的組合語言中我們會時常看到這一些指令的存在。
### Stack Frame
定義: `esp` 到函式參數的範圍稱為某一個函式的 Stack Frame,具體為 `esp` 到 `ebp` 的範圍
我們可以通過上方反組譯出來的 64 位元程式看到 Stack Frame 的運作機制
```
0x000000000000113a <+0>: endbr64
0x000000000000113e <+4>: push rbp
0x000000000000113f <+5>: mov rbp,rsp
0x0000000000001142 <+8>: sub rsp,0x10
0x0000000000001146 <+12>: mov DWORD PTR [rbp-0x8],0x2
0x000000000000114d <+19>: mov DWORD PTR [rbp-0x4],0x3
0x0000000000001154 <+26>: mov edx,DWORD PTR [rbp-0x4]
0x0000000000001157 <+29>: mov eax,DWORD PTR [rbp-0x8]
0x000000000000115a <+32>: mov esi,edx
0x000000000000115c <+34>: mov edi,eax
0x000000000000115e <+36>: call 0x1129 <func>
0x0000000000001163 <+41>: mov eax,0x0
0x0000000000001168 <+46>: leave
0x0000000000001169 <+47>: ret
```
在函式的開始,有一段程式碼我們稱為 prologue,作用為儲存函式中需要使用到的 stack 空間以及暫存器,而在結束的地方,我們需要將 stack 和暫存器回覆到函式呼叫前的狀態,而這段程式碼我們稱為 epilogue,我們可以試著找到上方組合語言中 prologue 以及 epliogue 的部份。

接著我們通過實際案例觀察 prologue 和 epliogue 是如何分配 Stack Frame
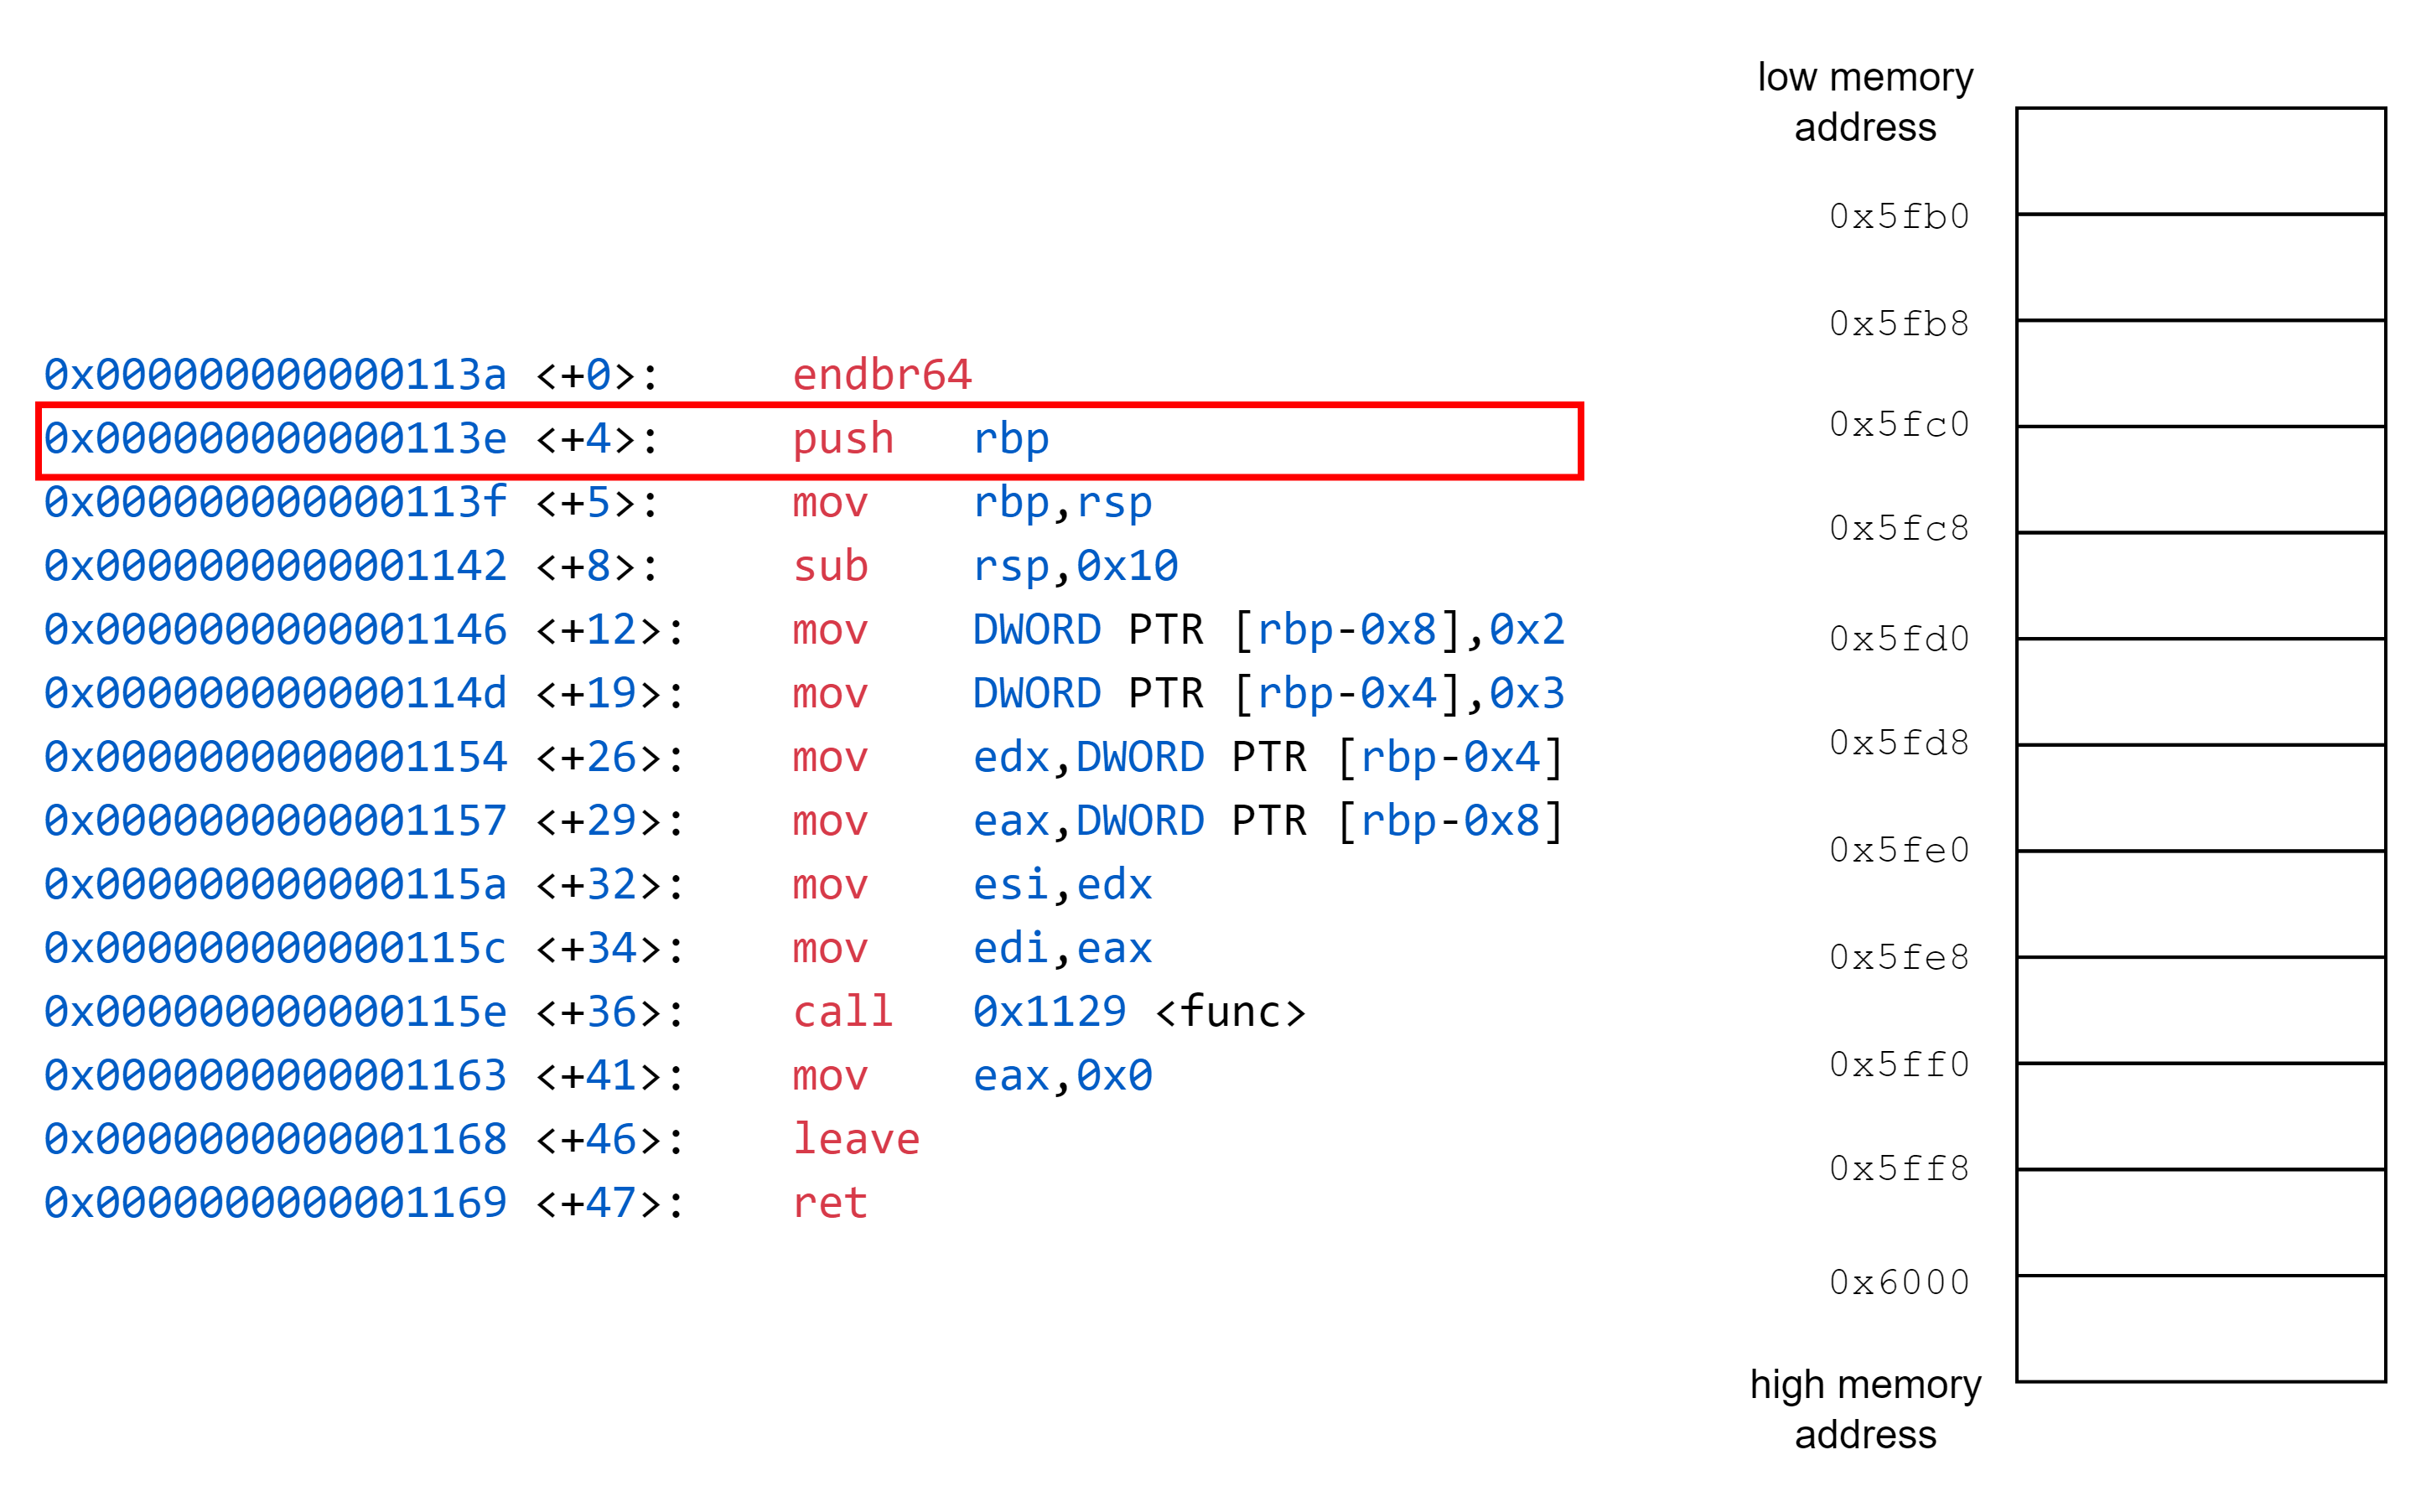
在 prologue 部份,我們將 `rbp` 的值推入到 stack 中,接著 `rsp` 的值 -8。

---
再將 `rsp` 的值設為 `rbp` 的值,因此 `rbp` 的值更新成新的 `rsp` 的值,舊的 `rbp` 的值位於 stack 中,如下圖所示
---
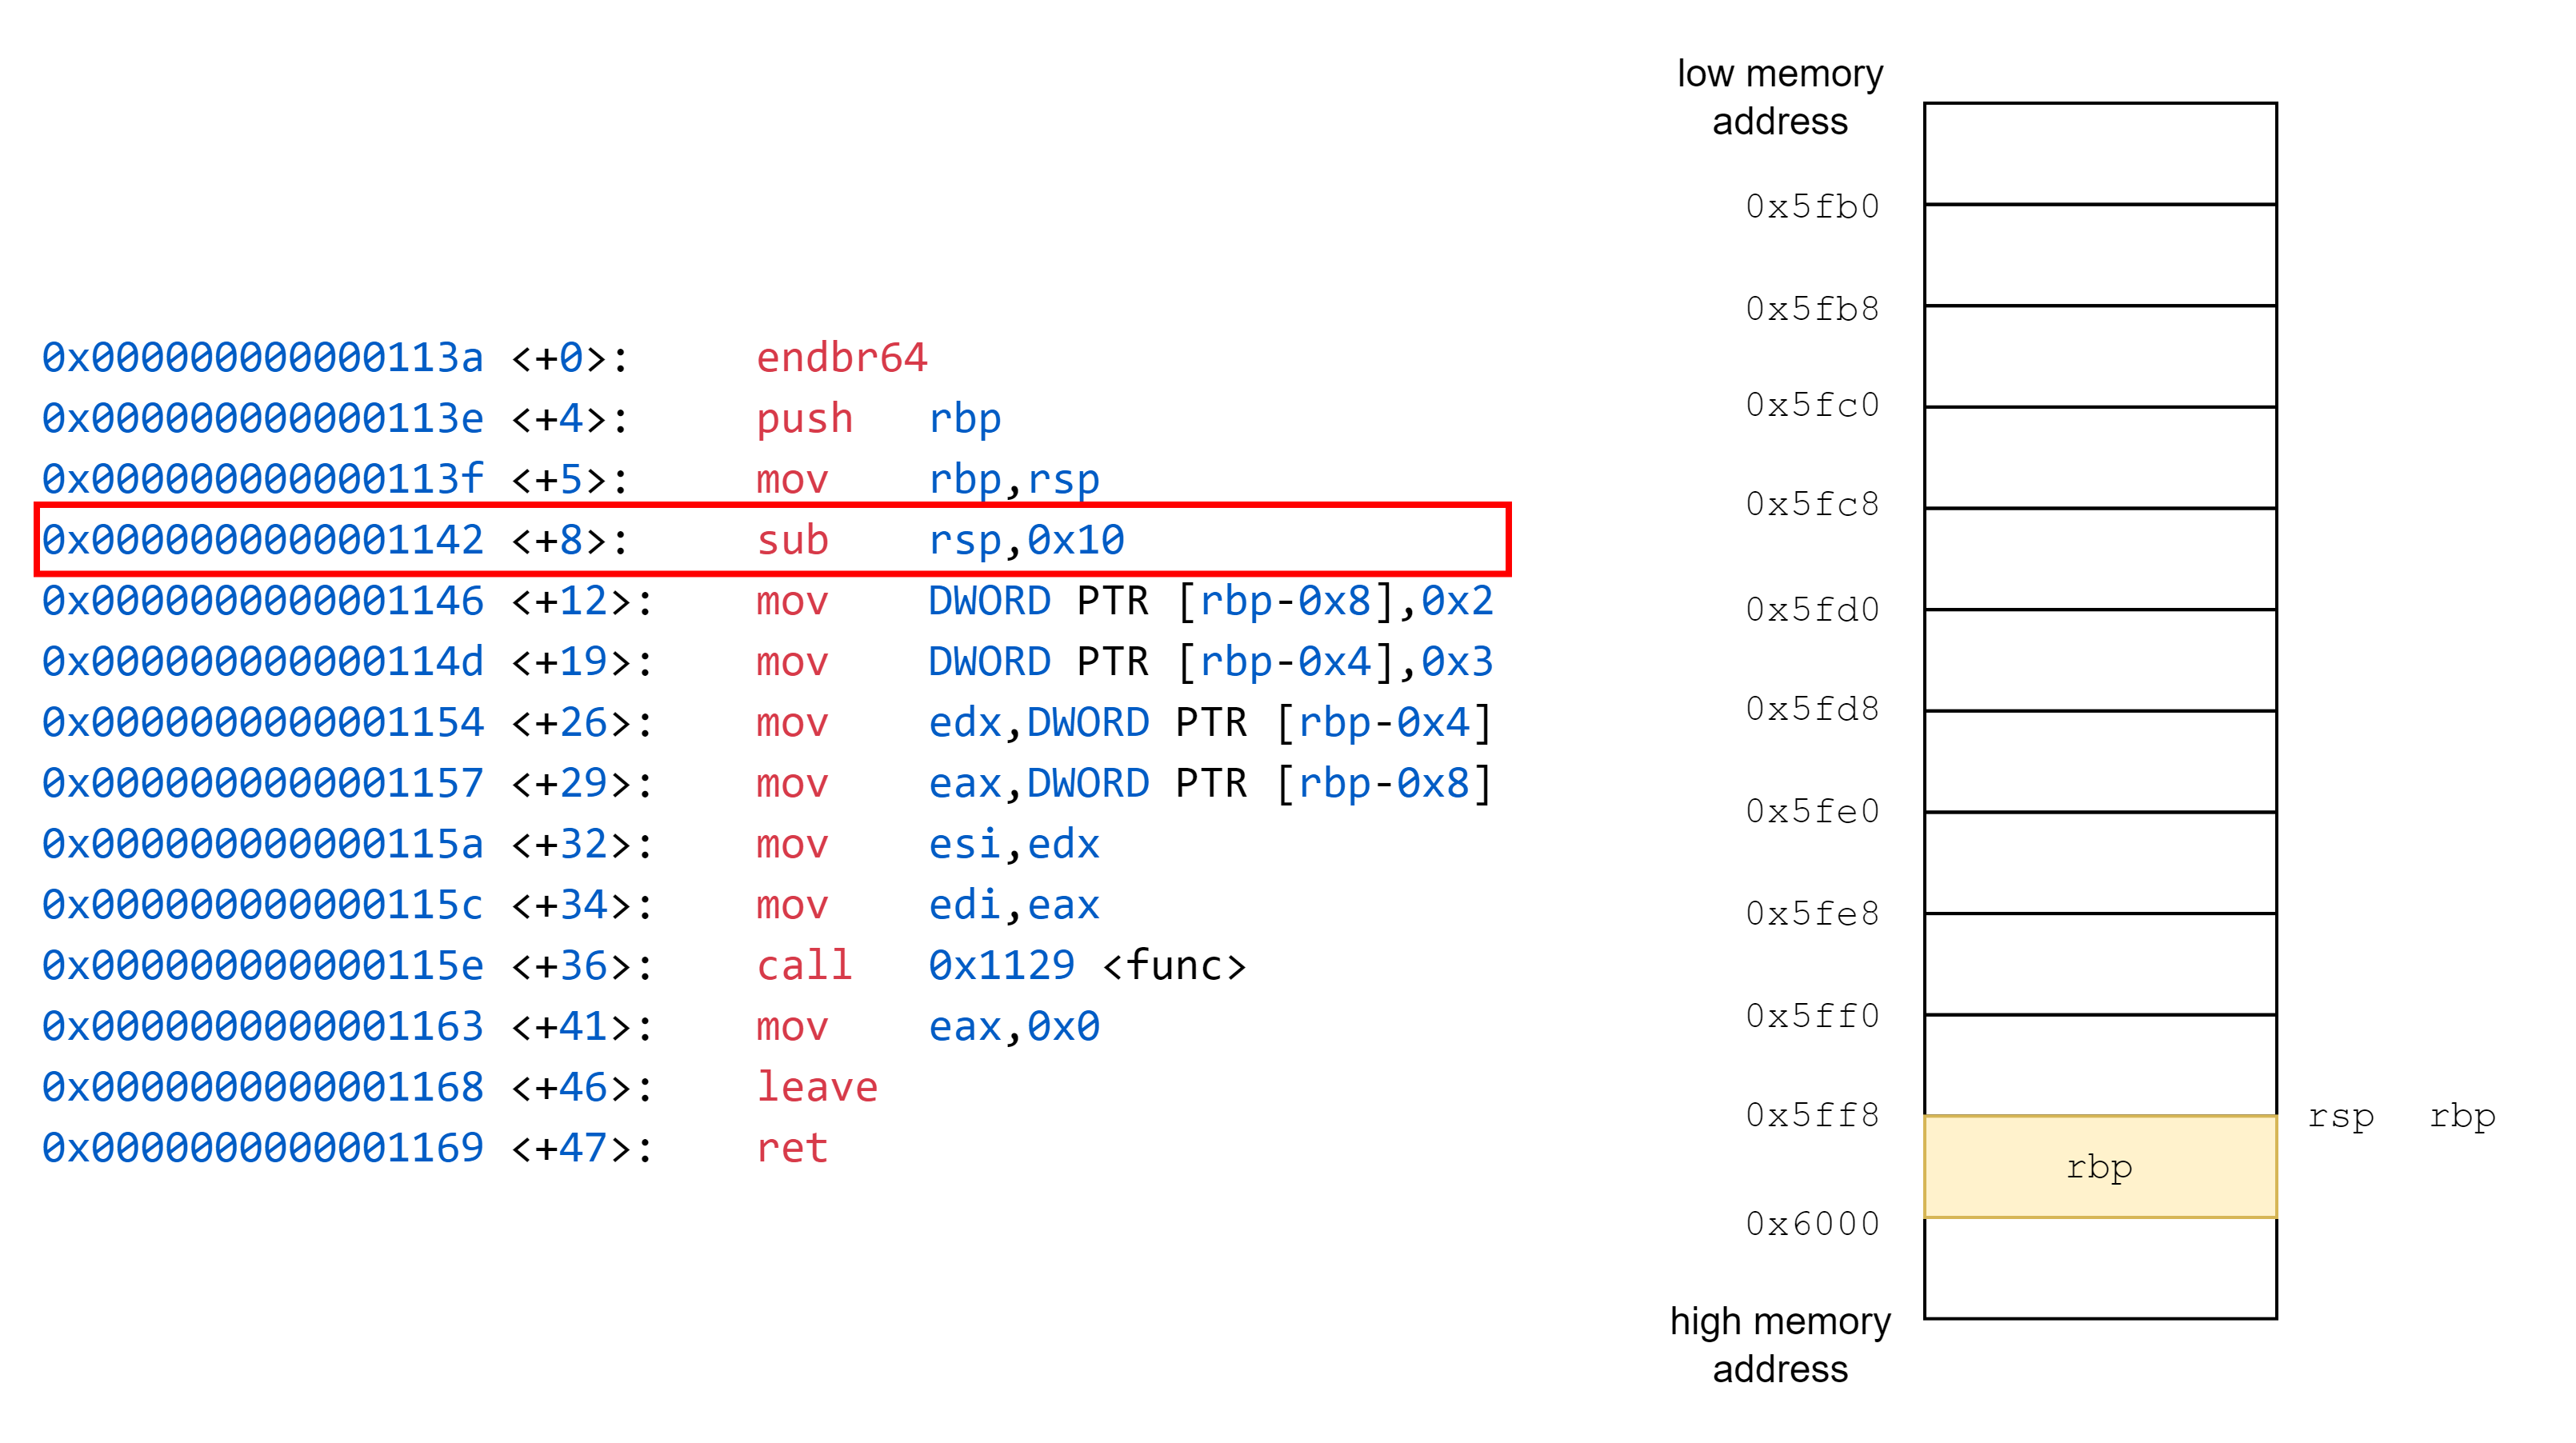
接著通過調整 `rsp`,開闢出一段給 `main` 函式使用的 stack 空間,可以在接下來函式主體中使用

-------
經過中間 mov 操作,將函式需要的資料移入 stack,參數放置到暫存器後,接著我們看到 `call 0x1129 <func>`,`call` 會執行兩件事情,分別為 `push return address`,接著 `jmp func`。
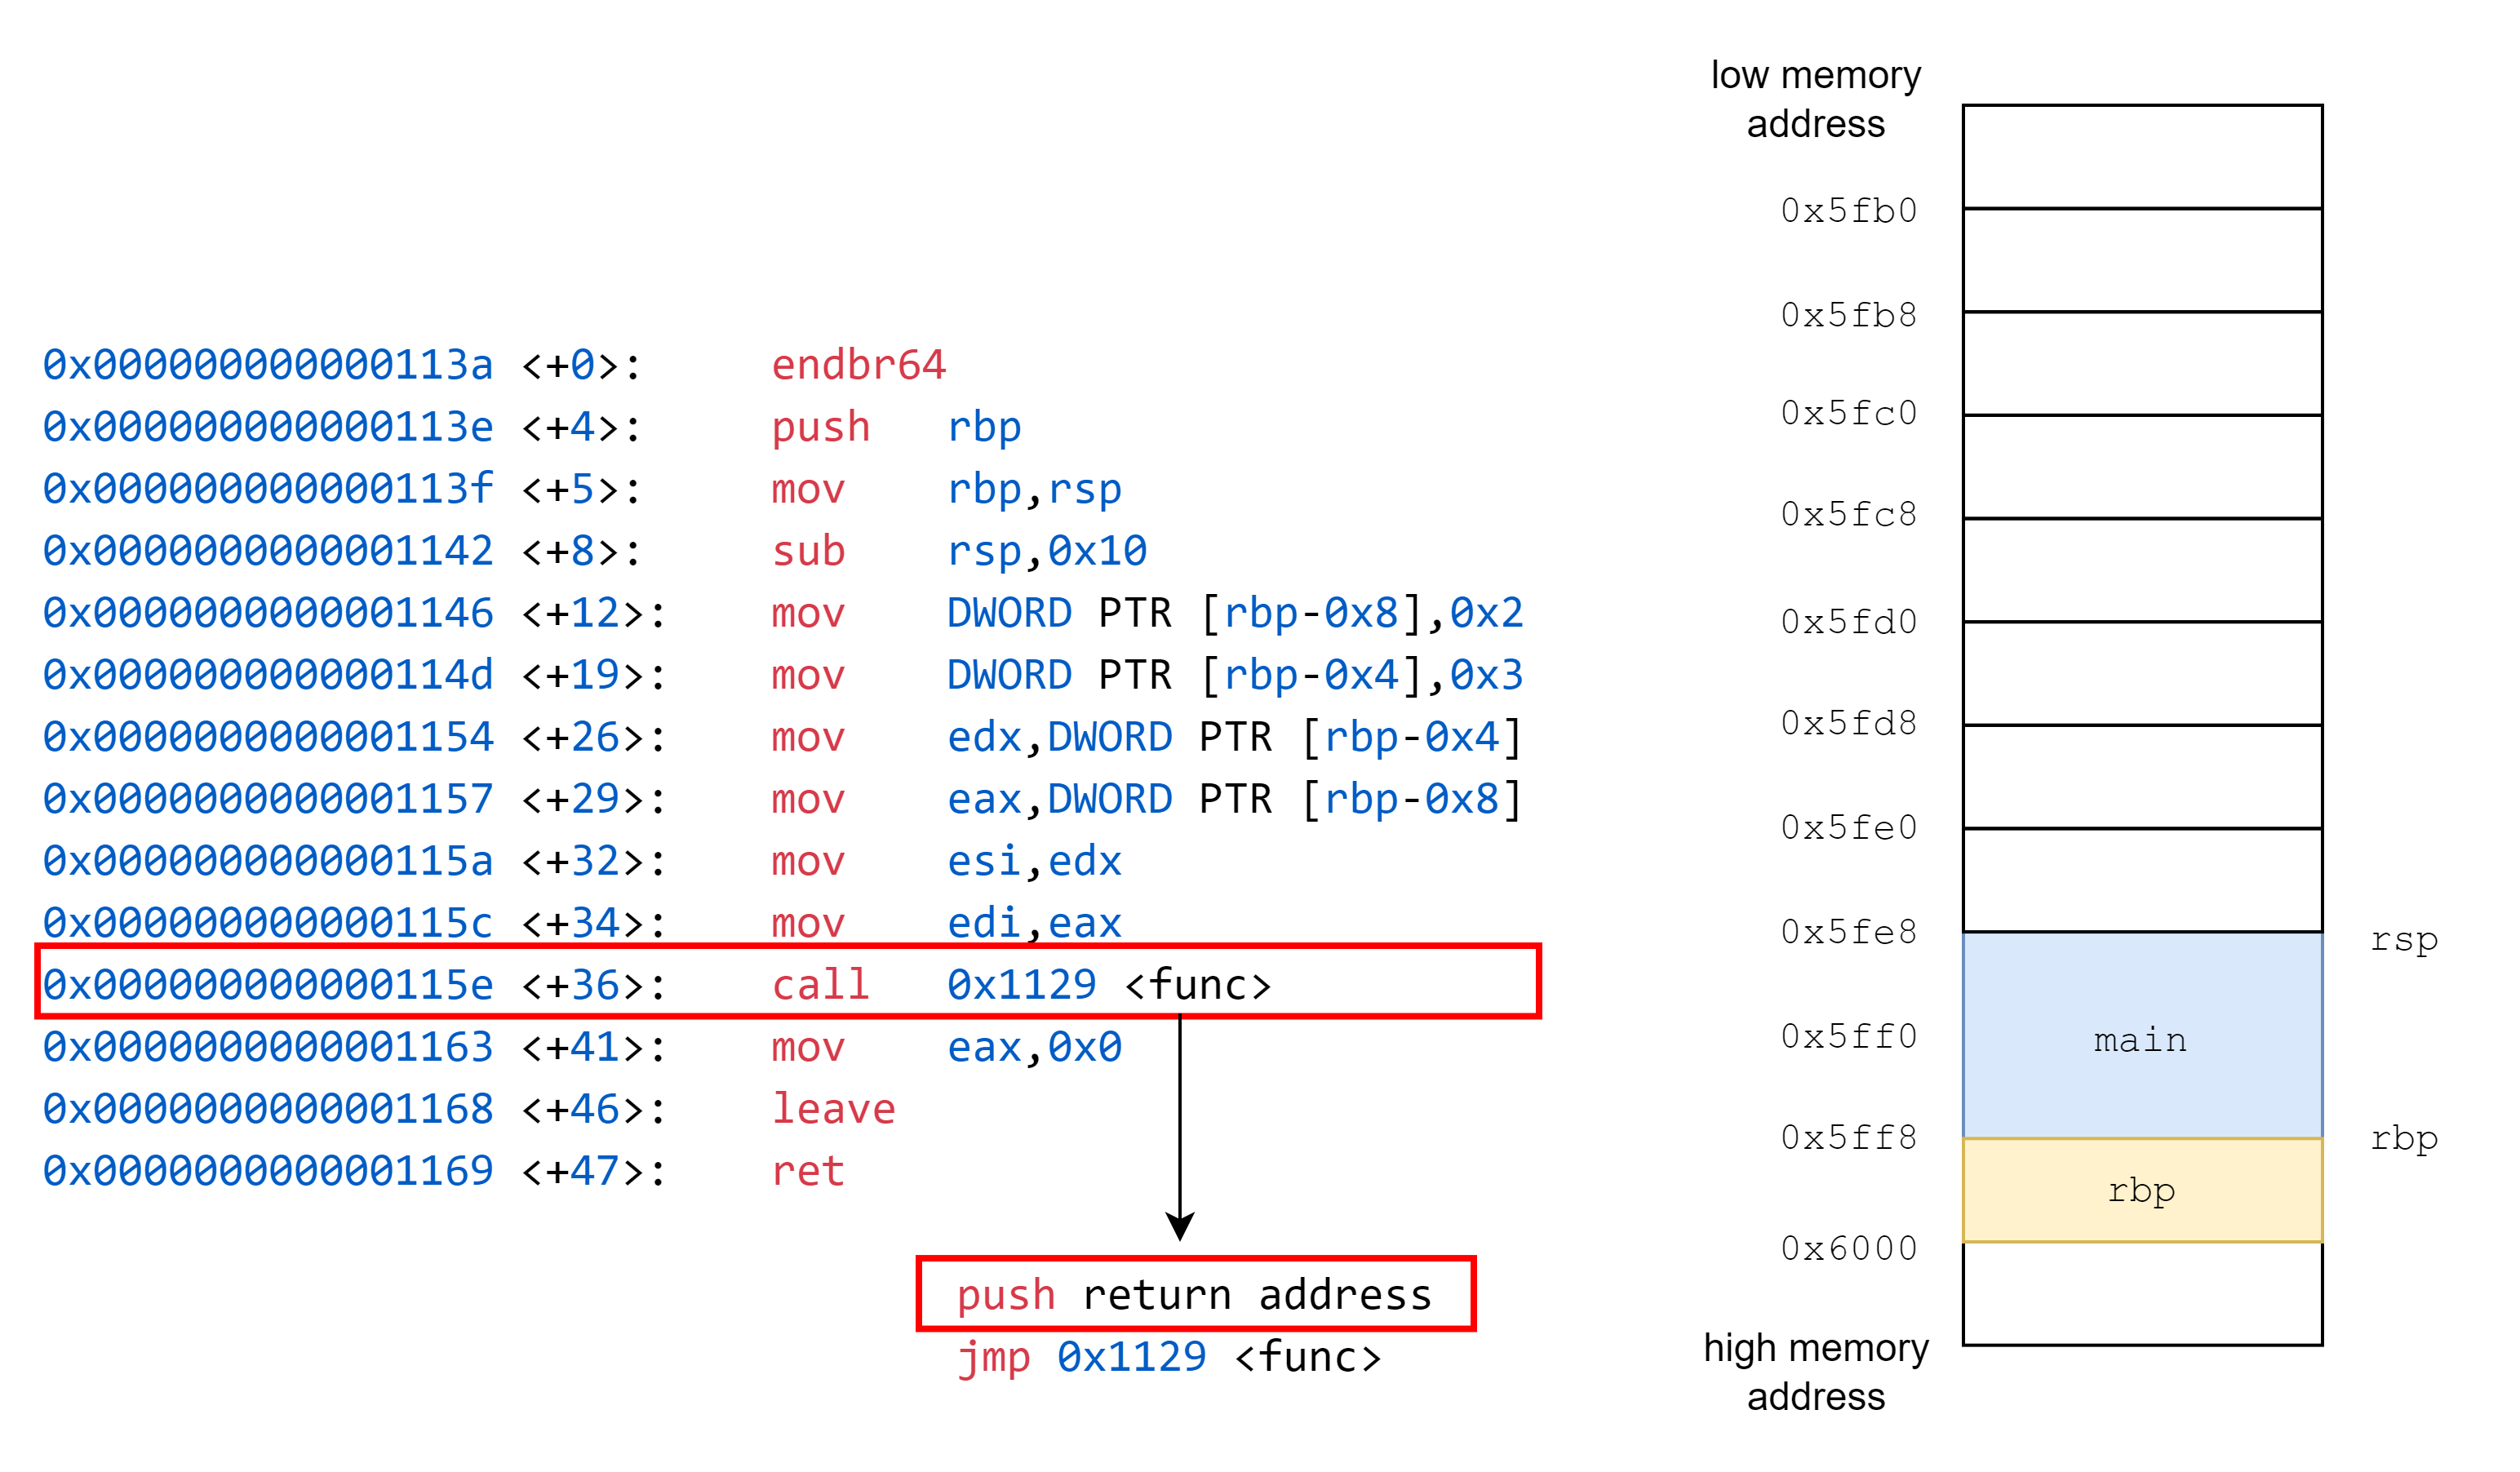
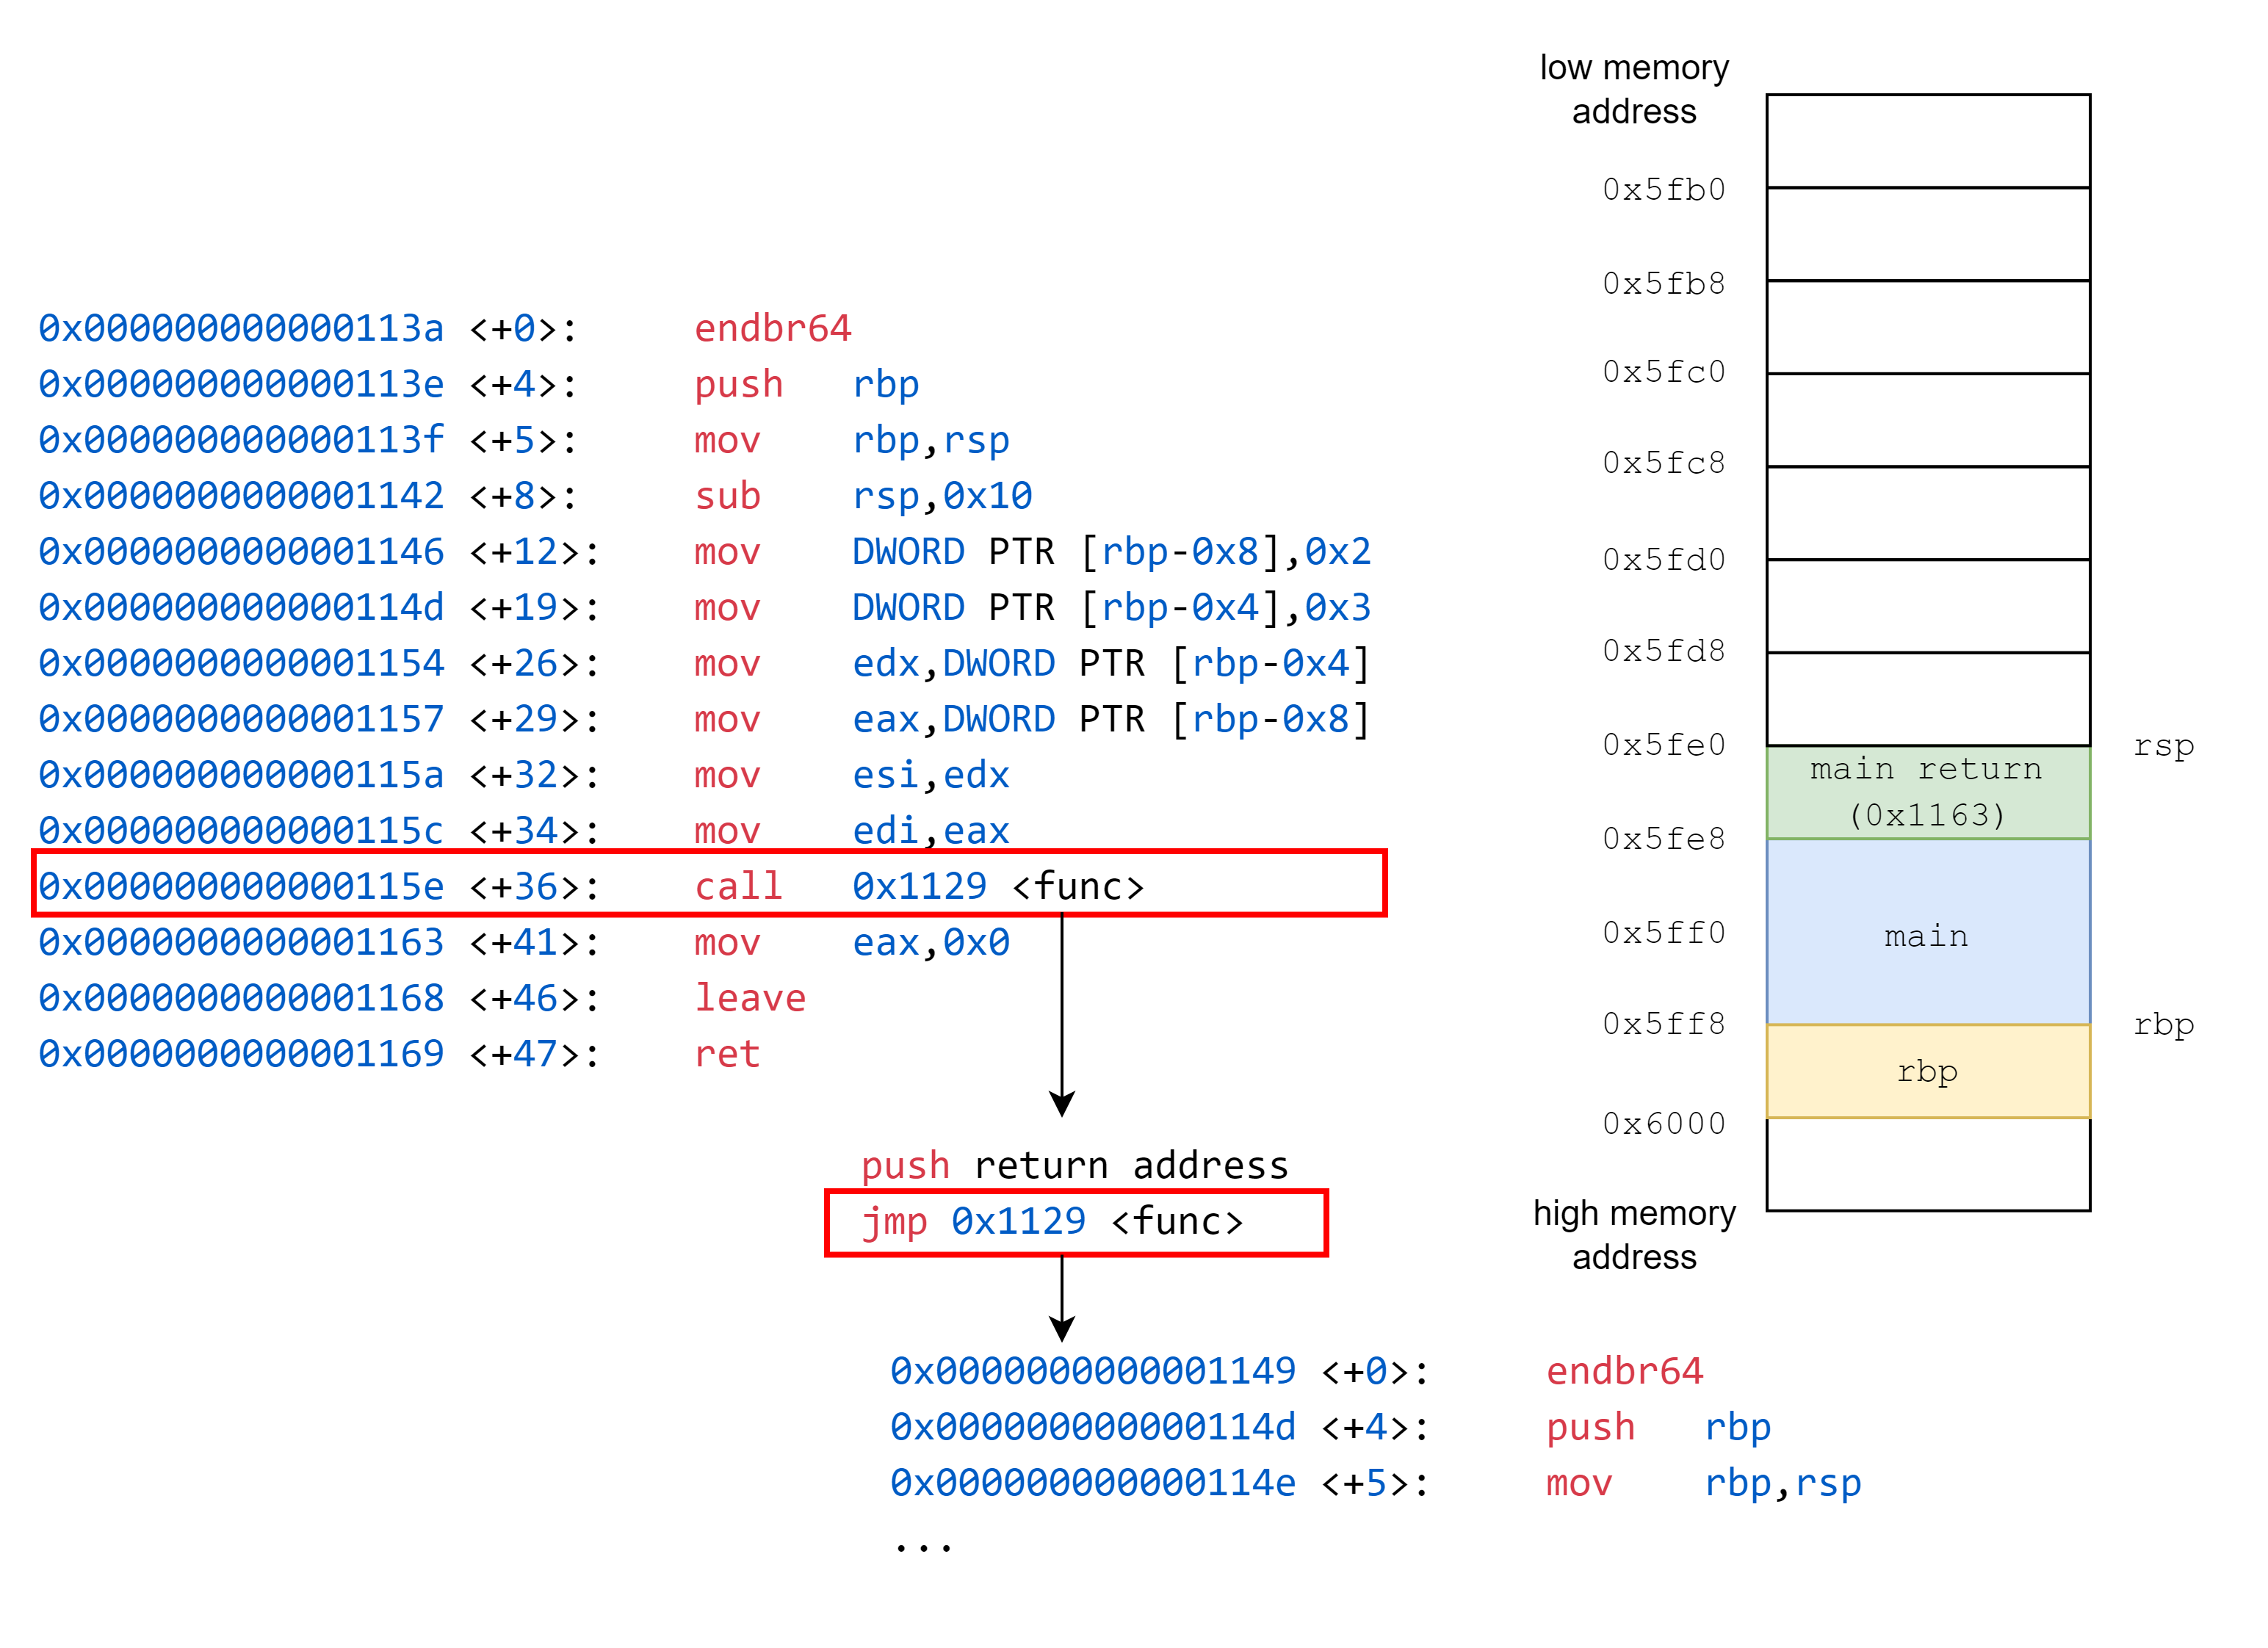
上面完成了 `push return address` 操作後,我們便 jmp 進入 `func`
---
接著我們看到 `func` 的組合語言程式碼
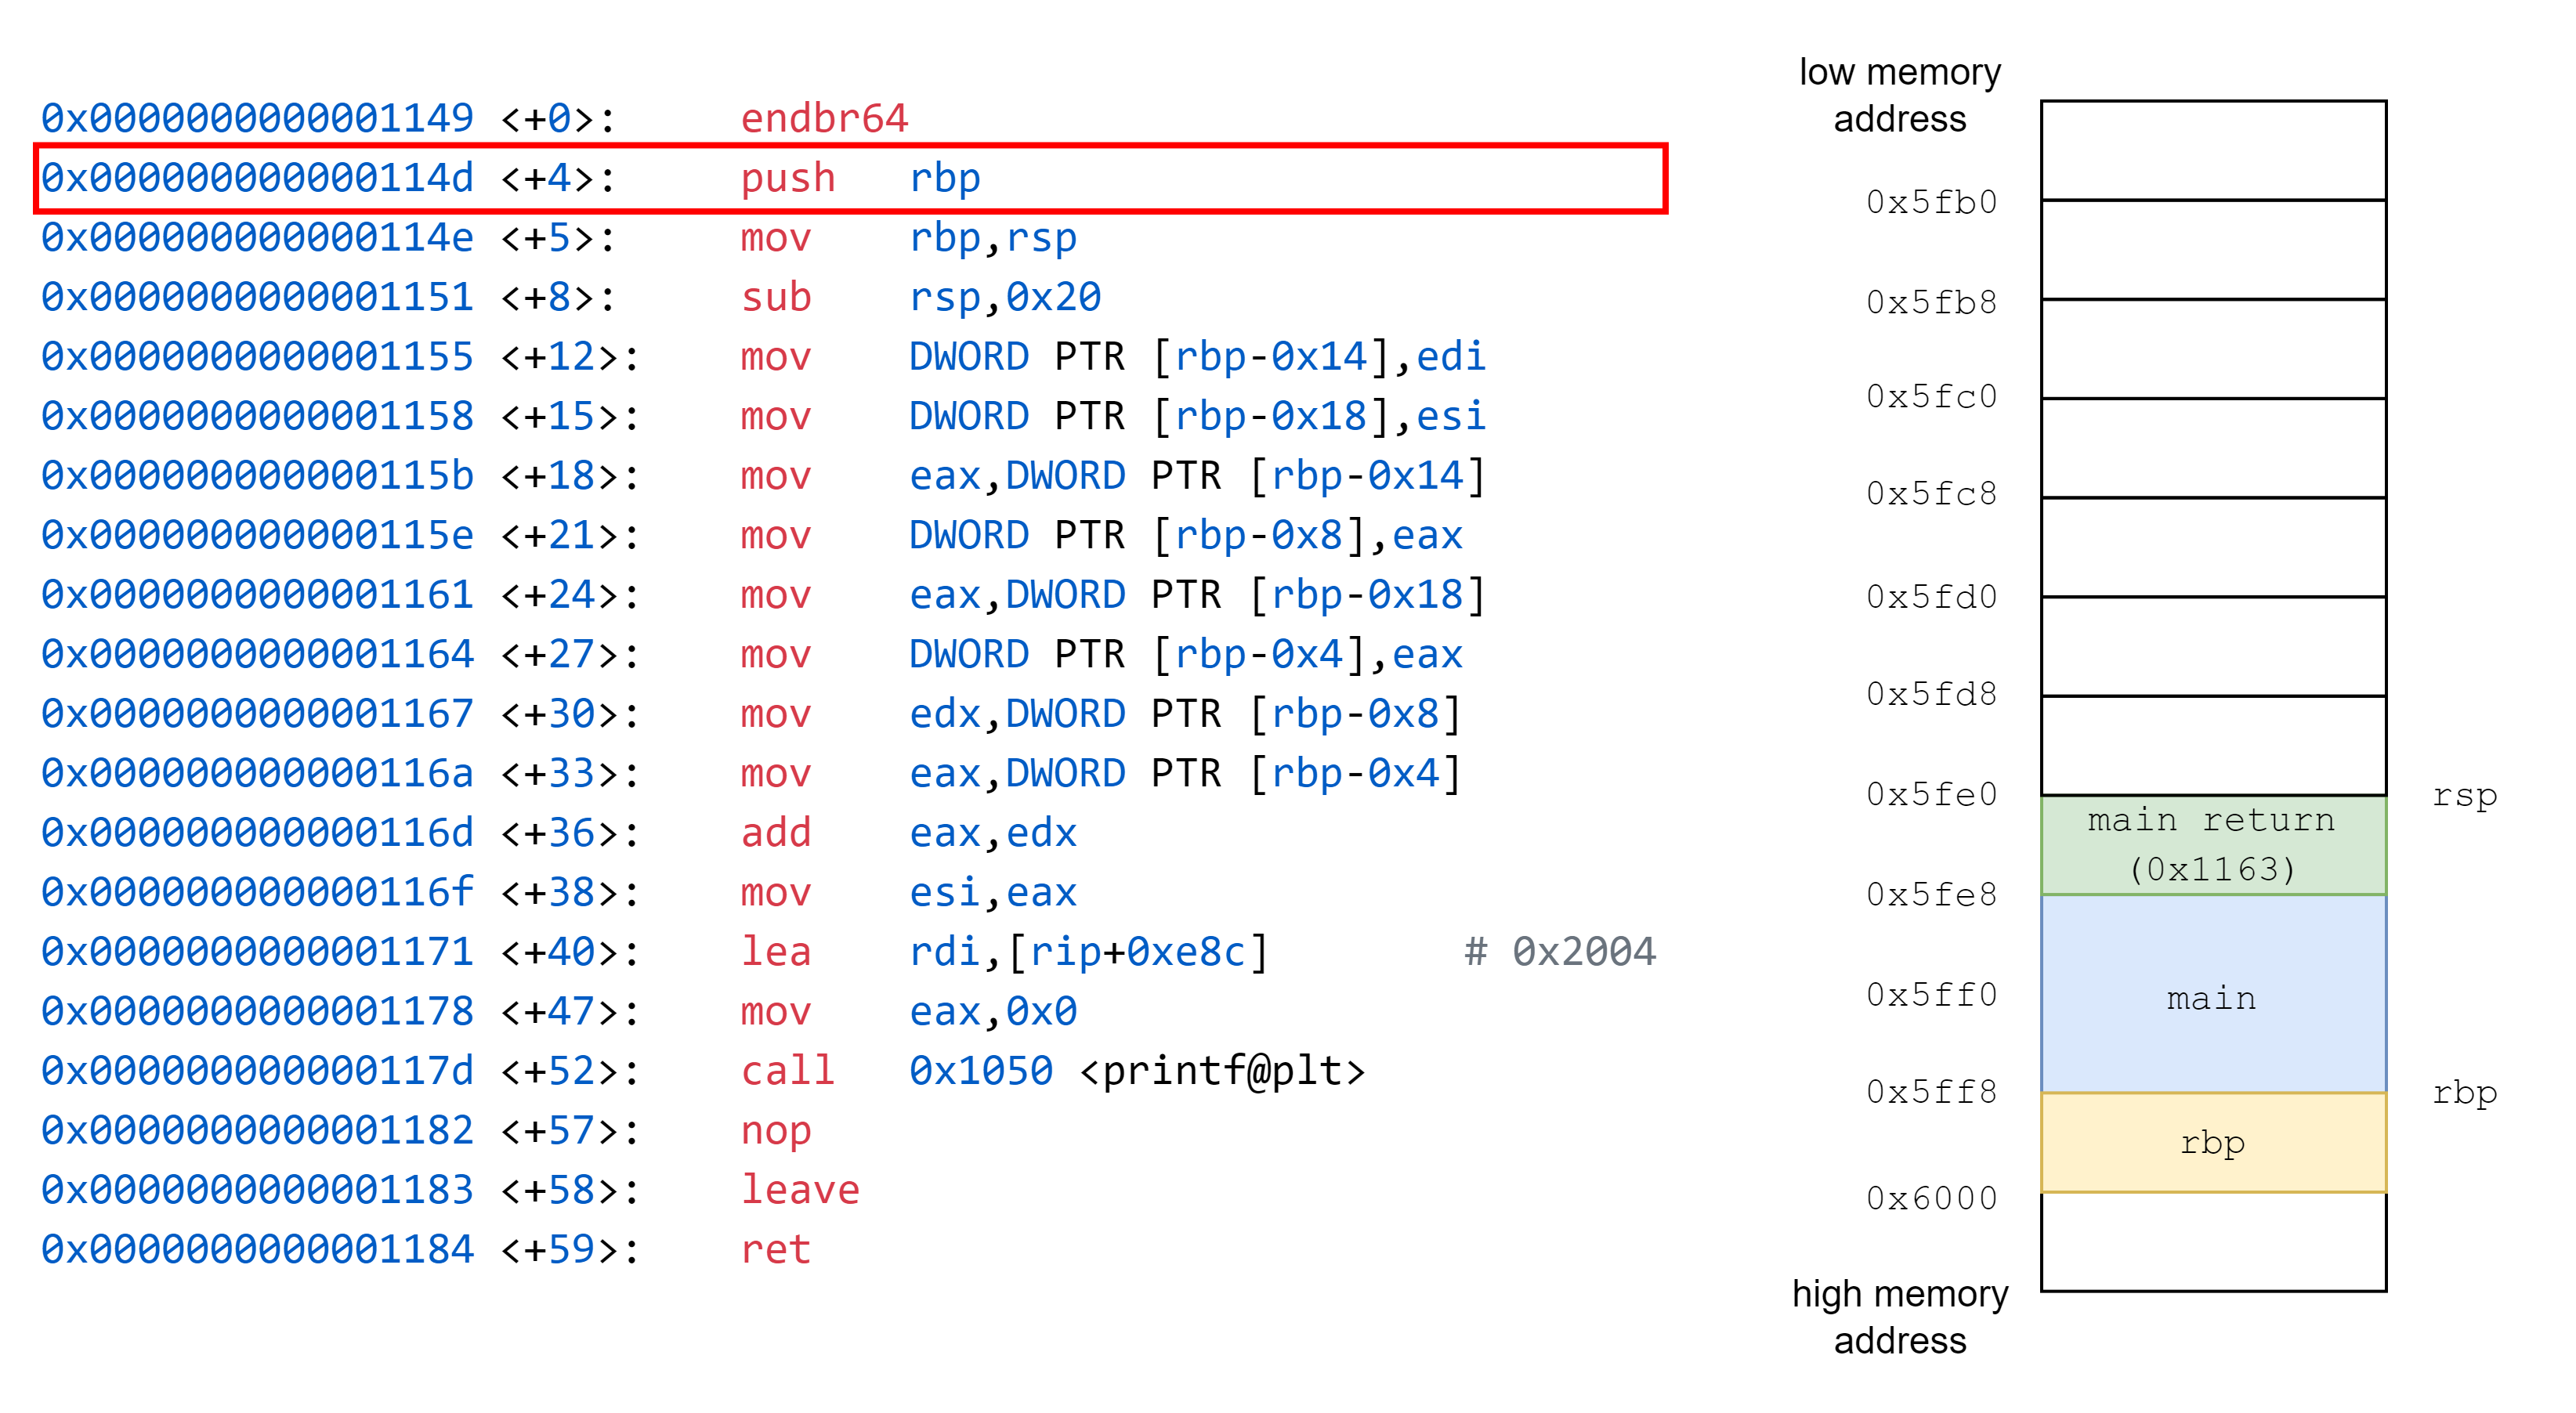
---
將 `rbp` 儲存到 stack 中,這個 `rbp` 原先指向到 `main` 的 base
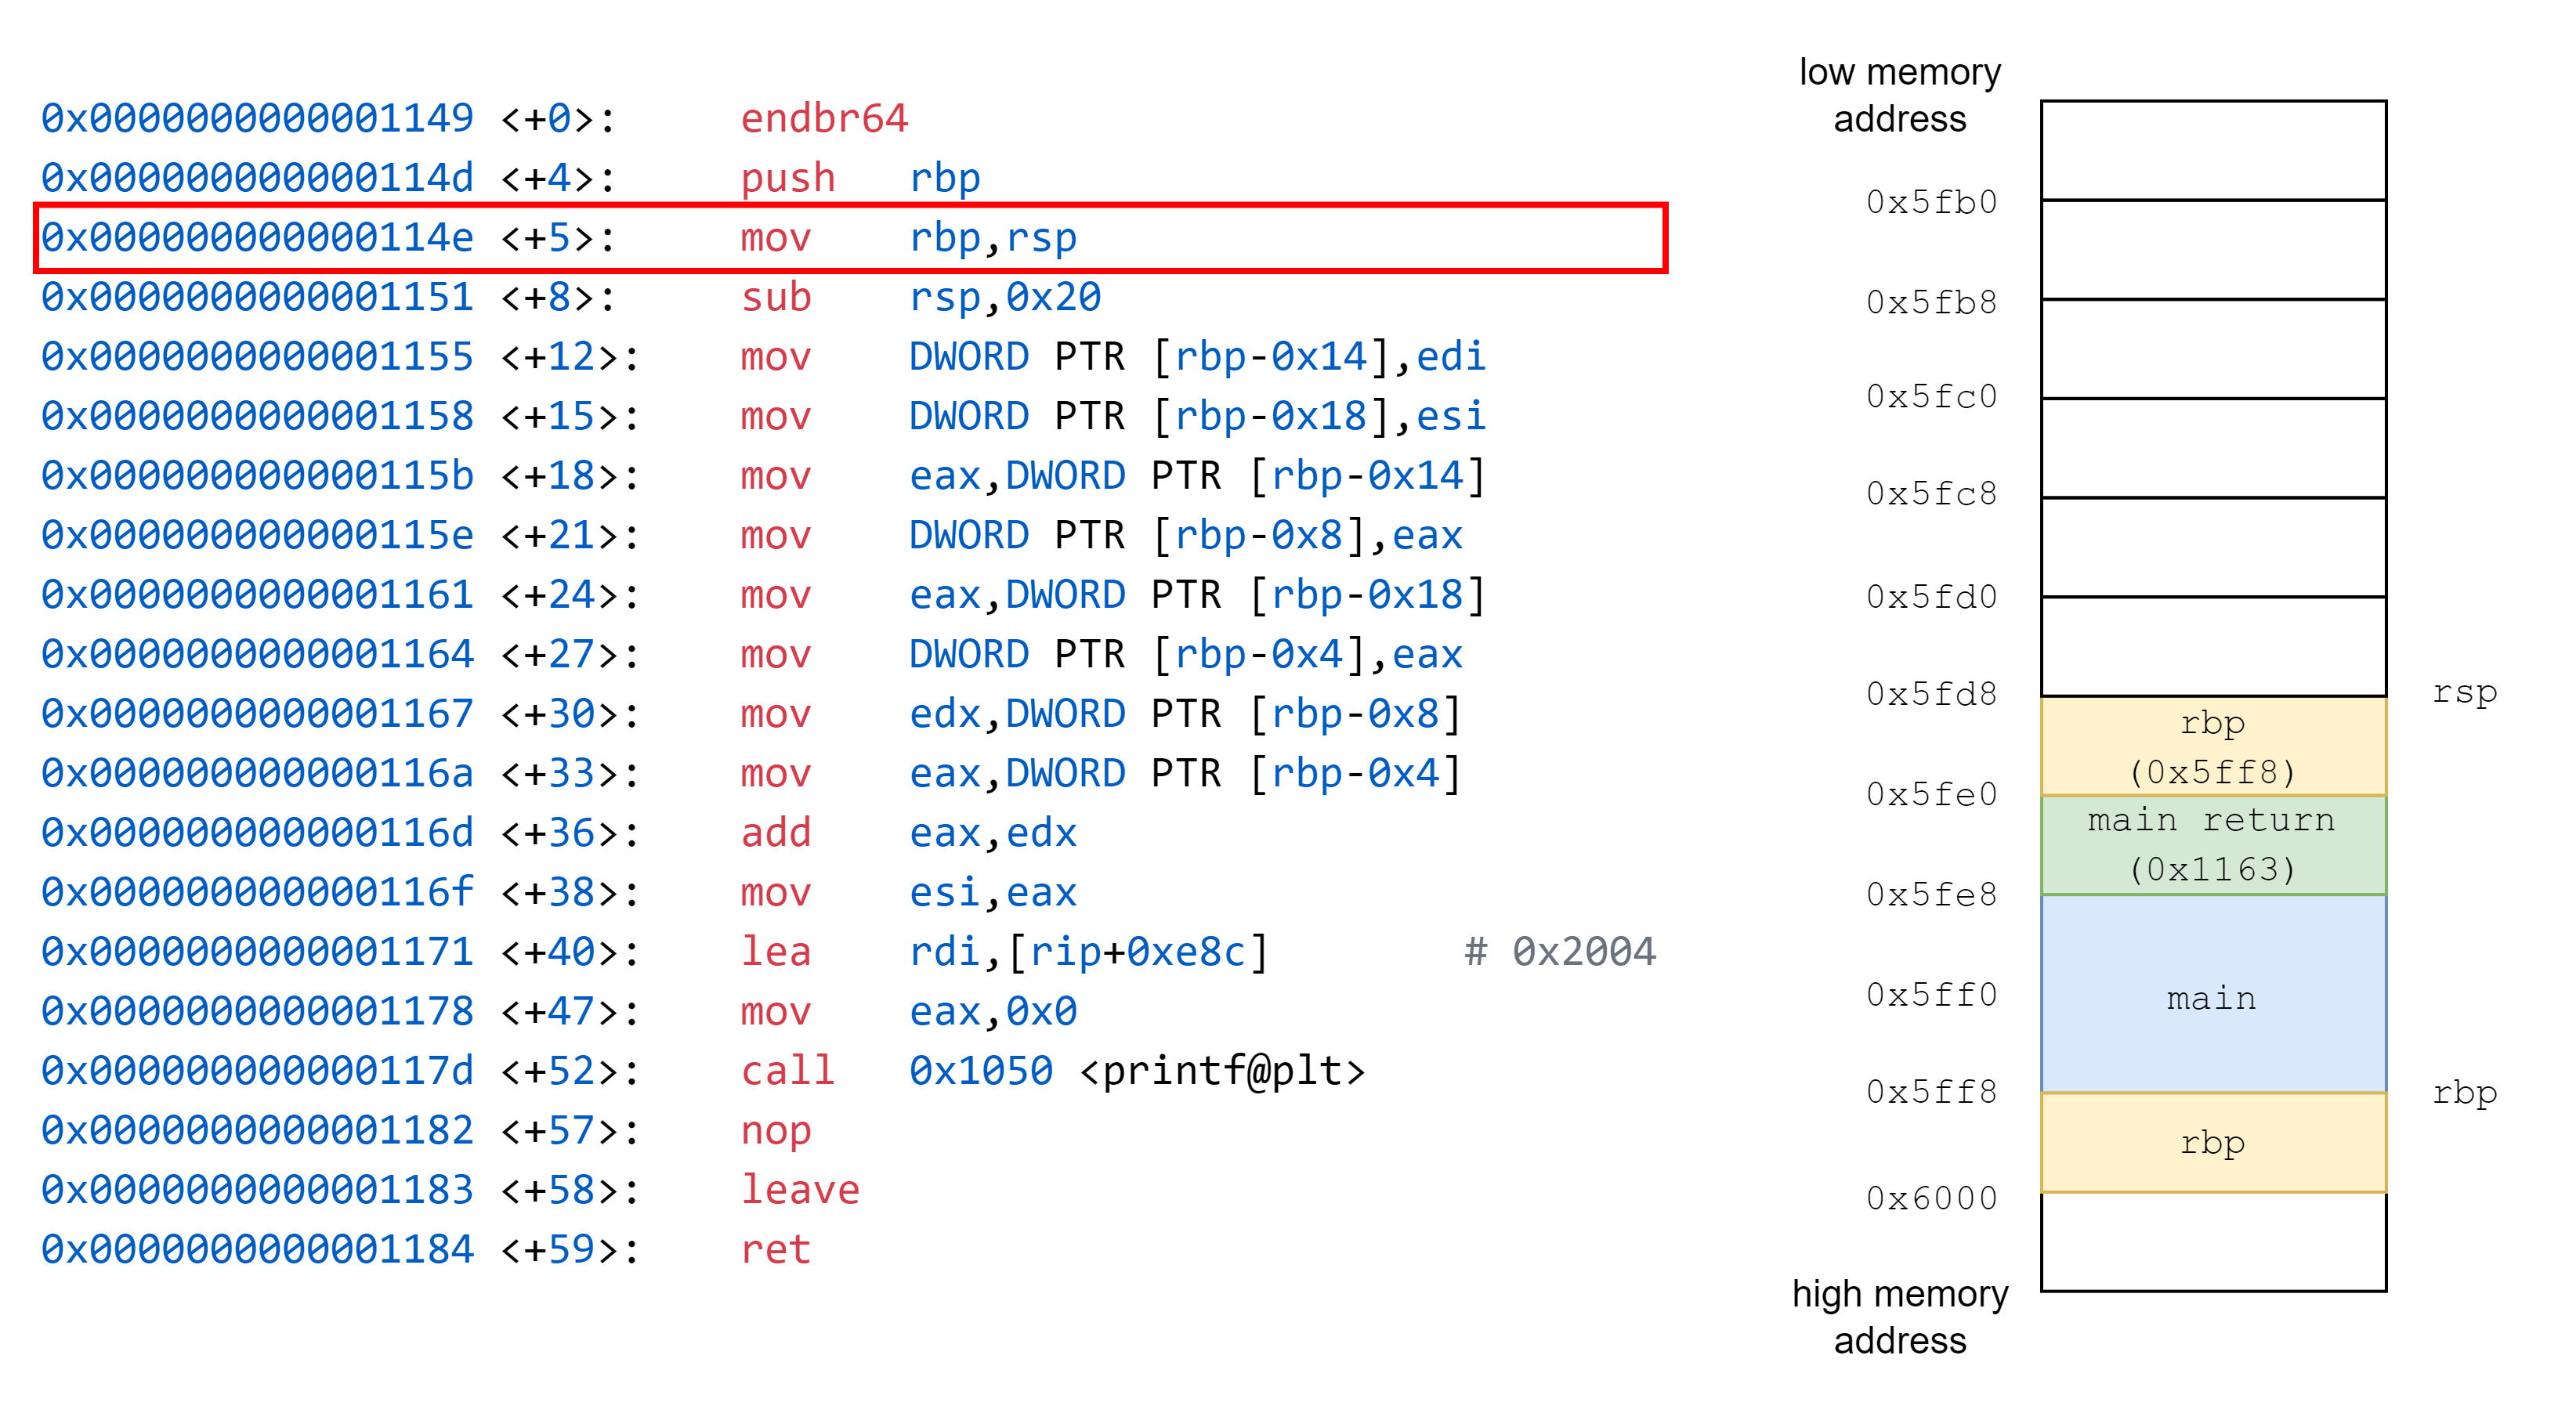
---
接著將 `rsp` 的值複製到 `rbp` 中
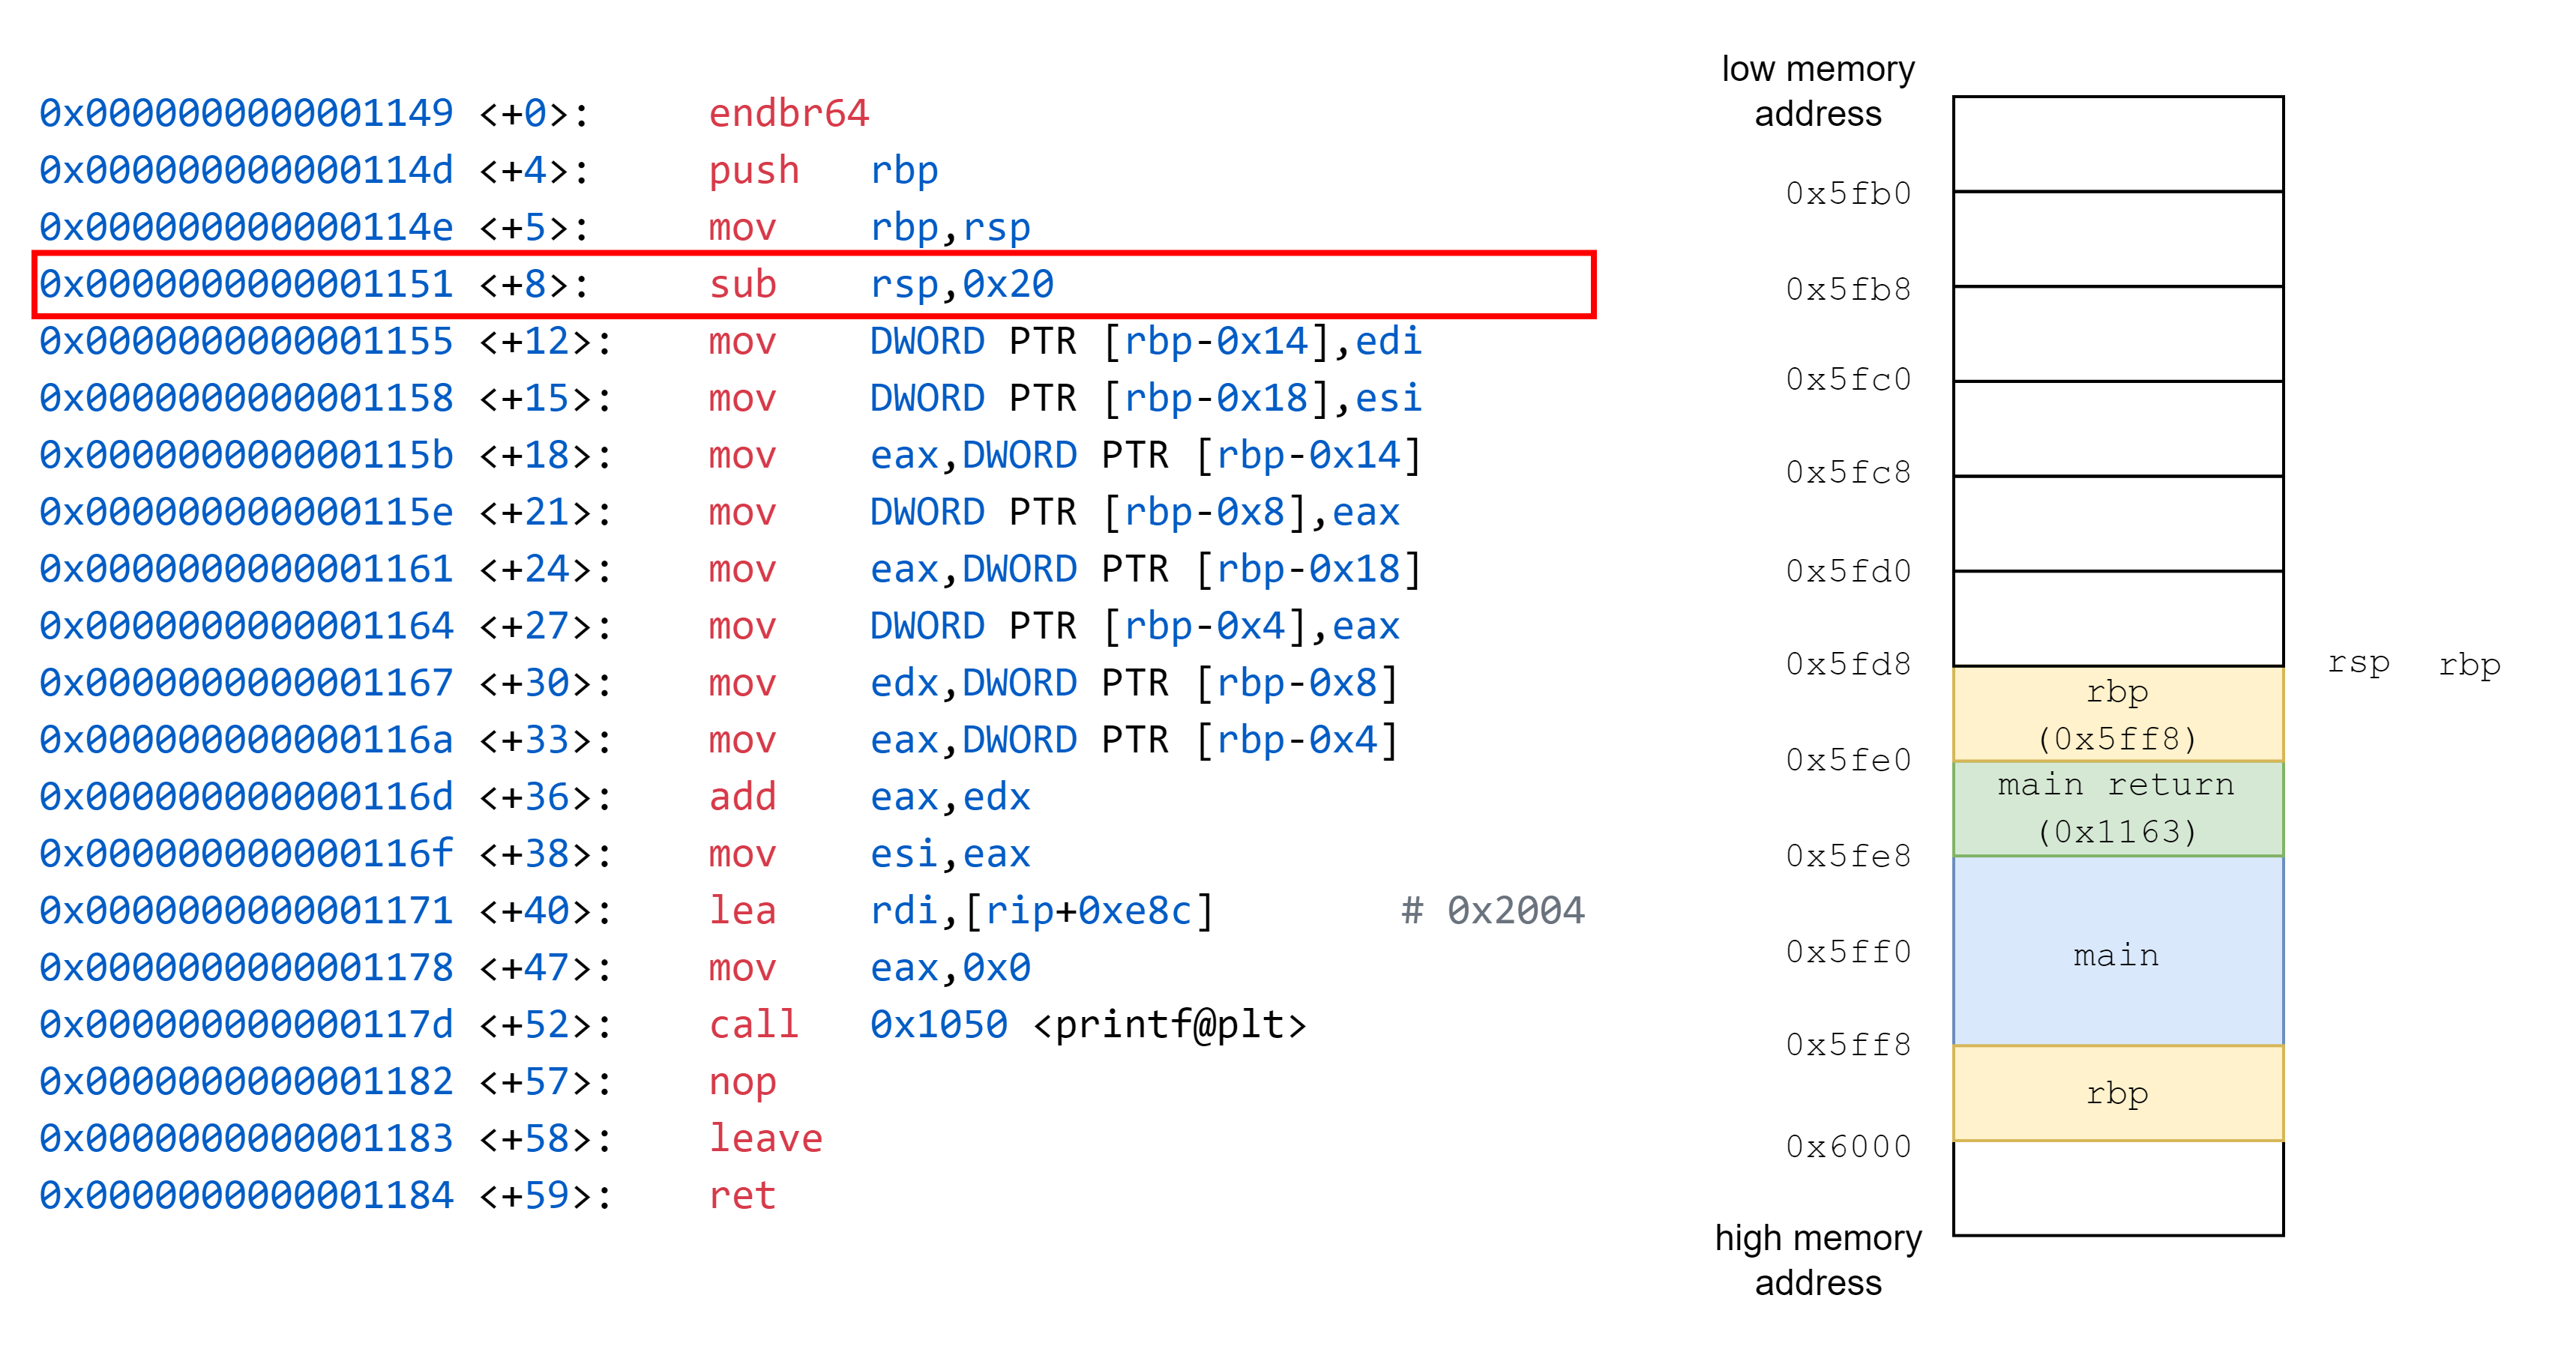
---
接著通過調整 `rsp` 的值,在 stack 中開闢一段空間給 `func` 使用
---
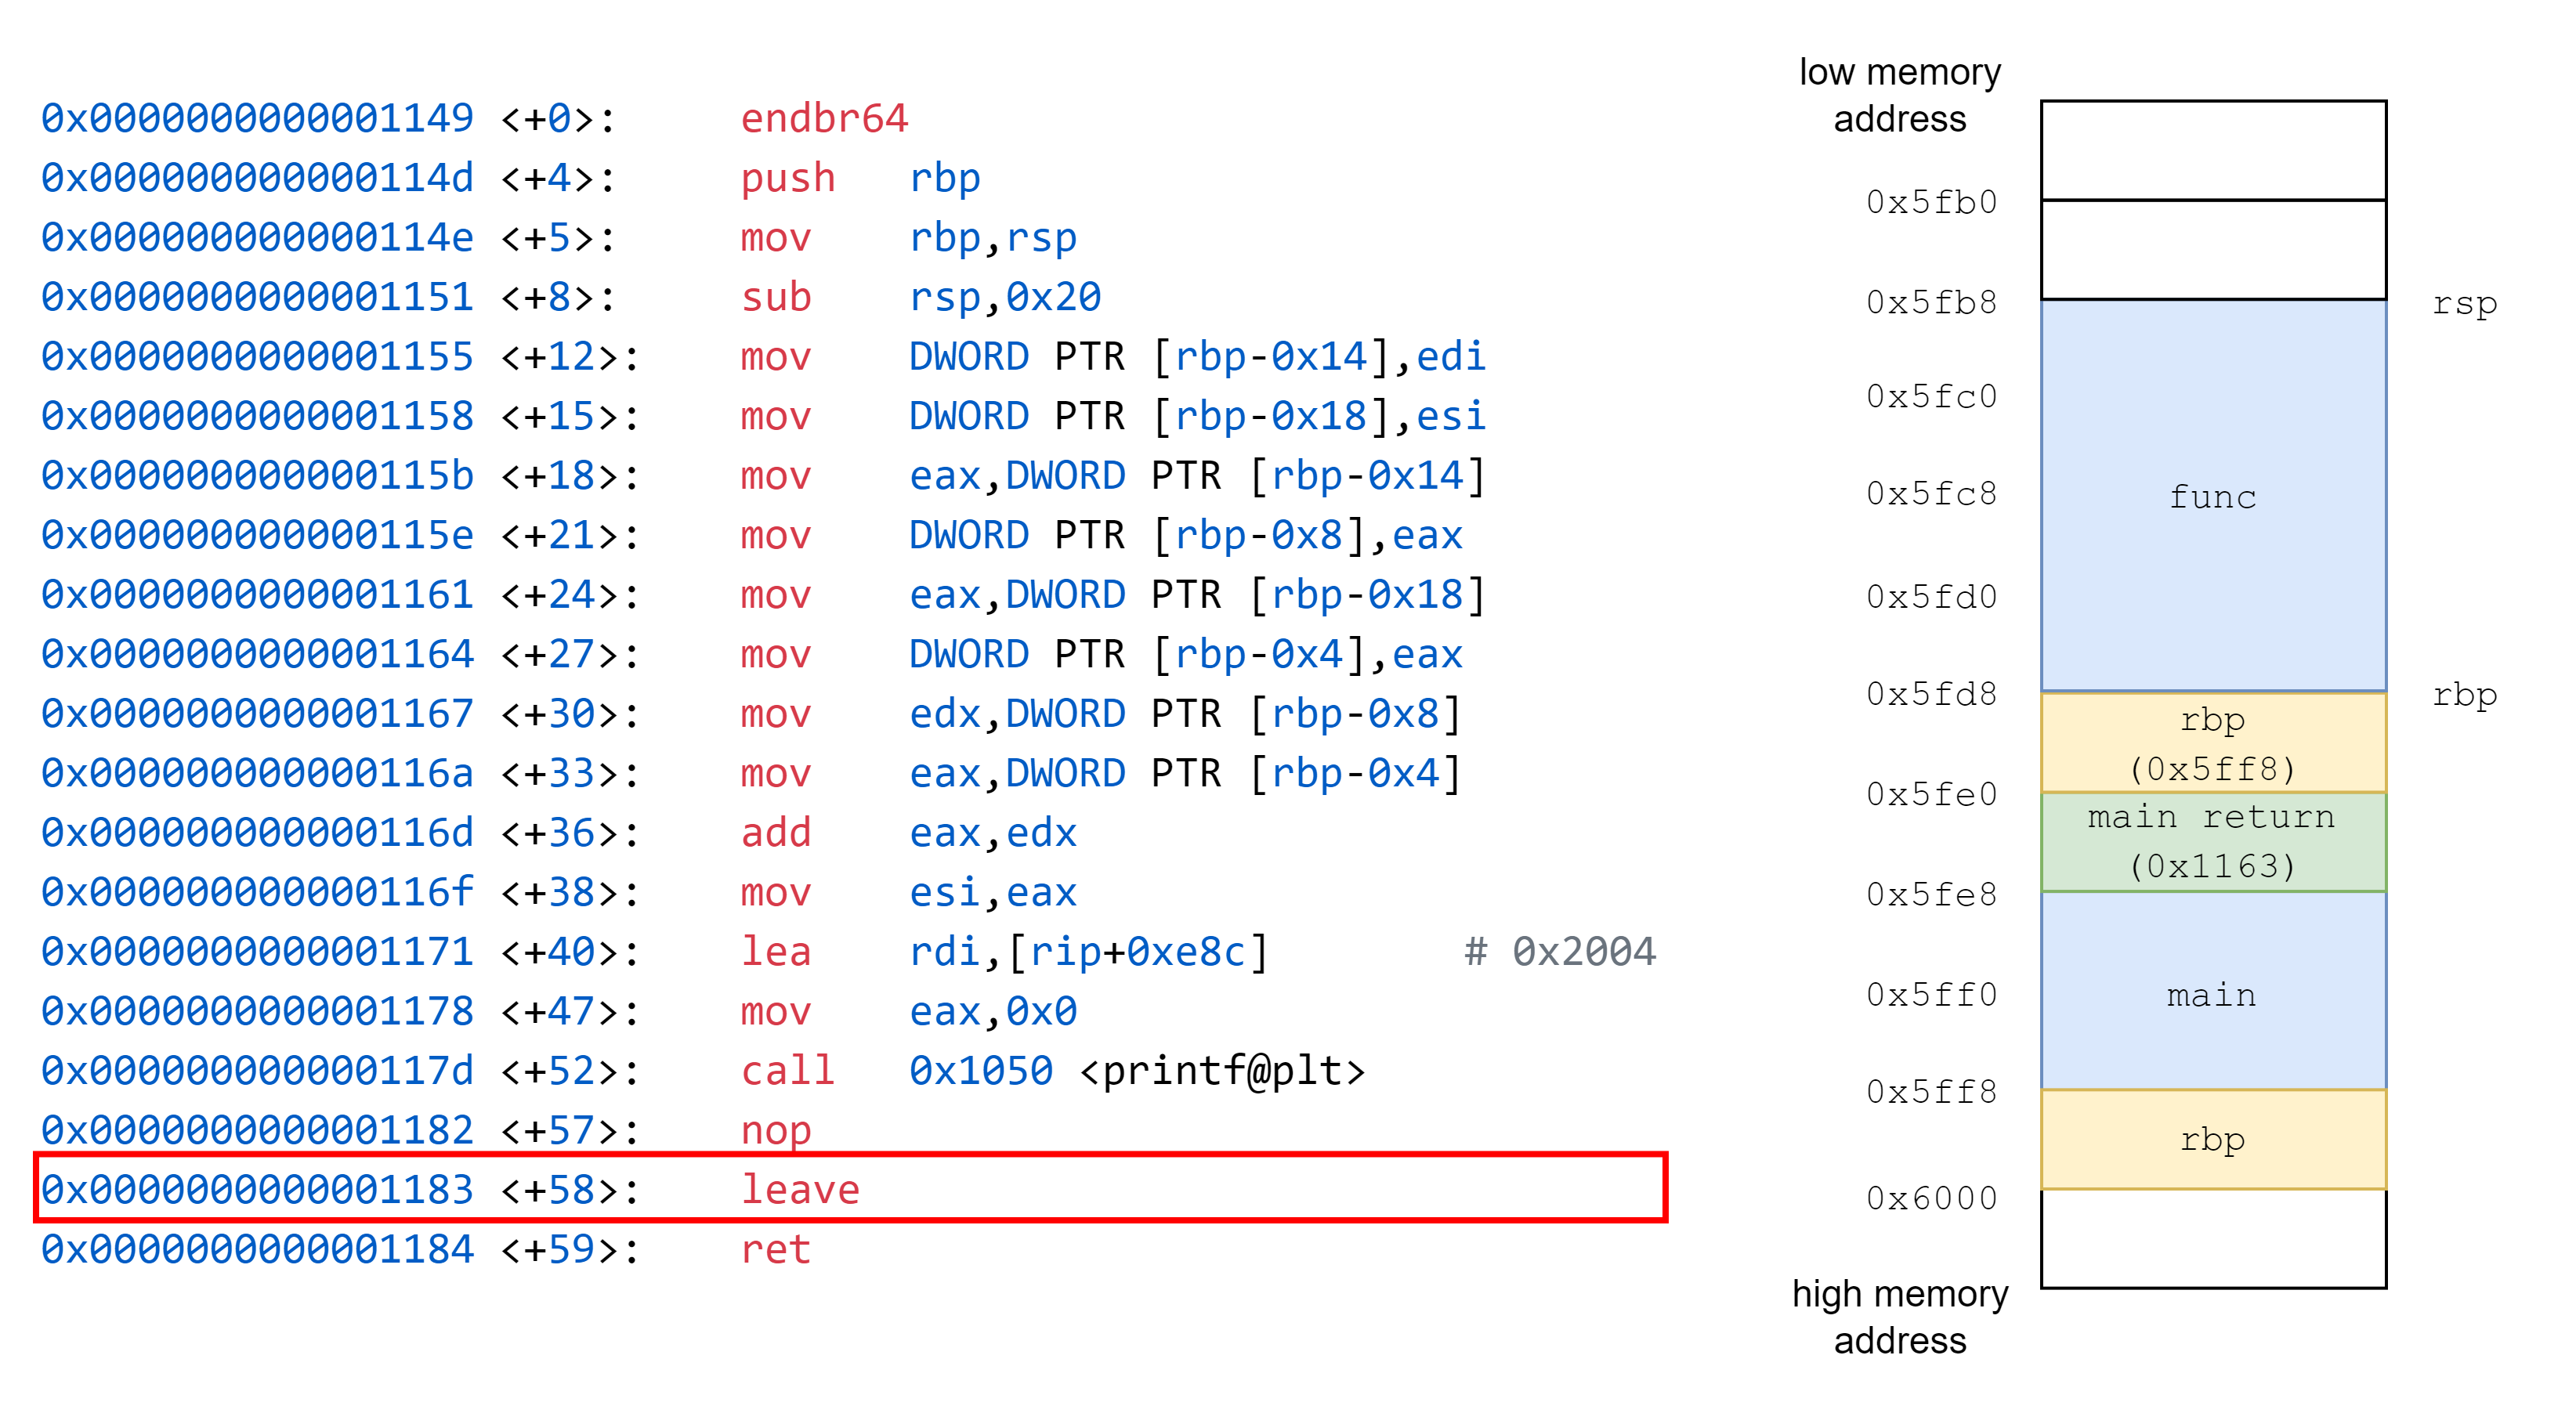
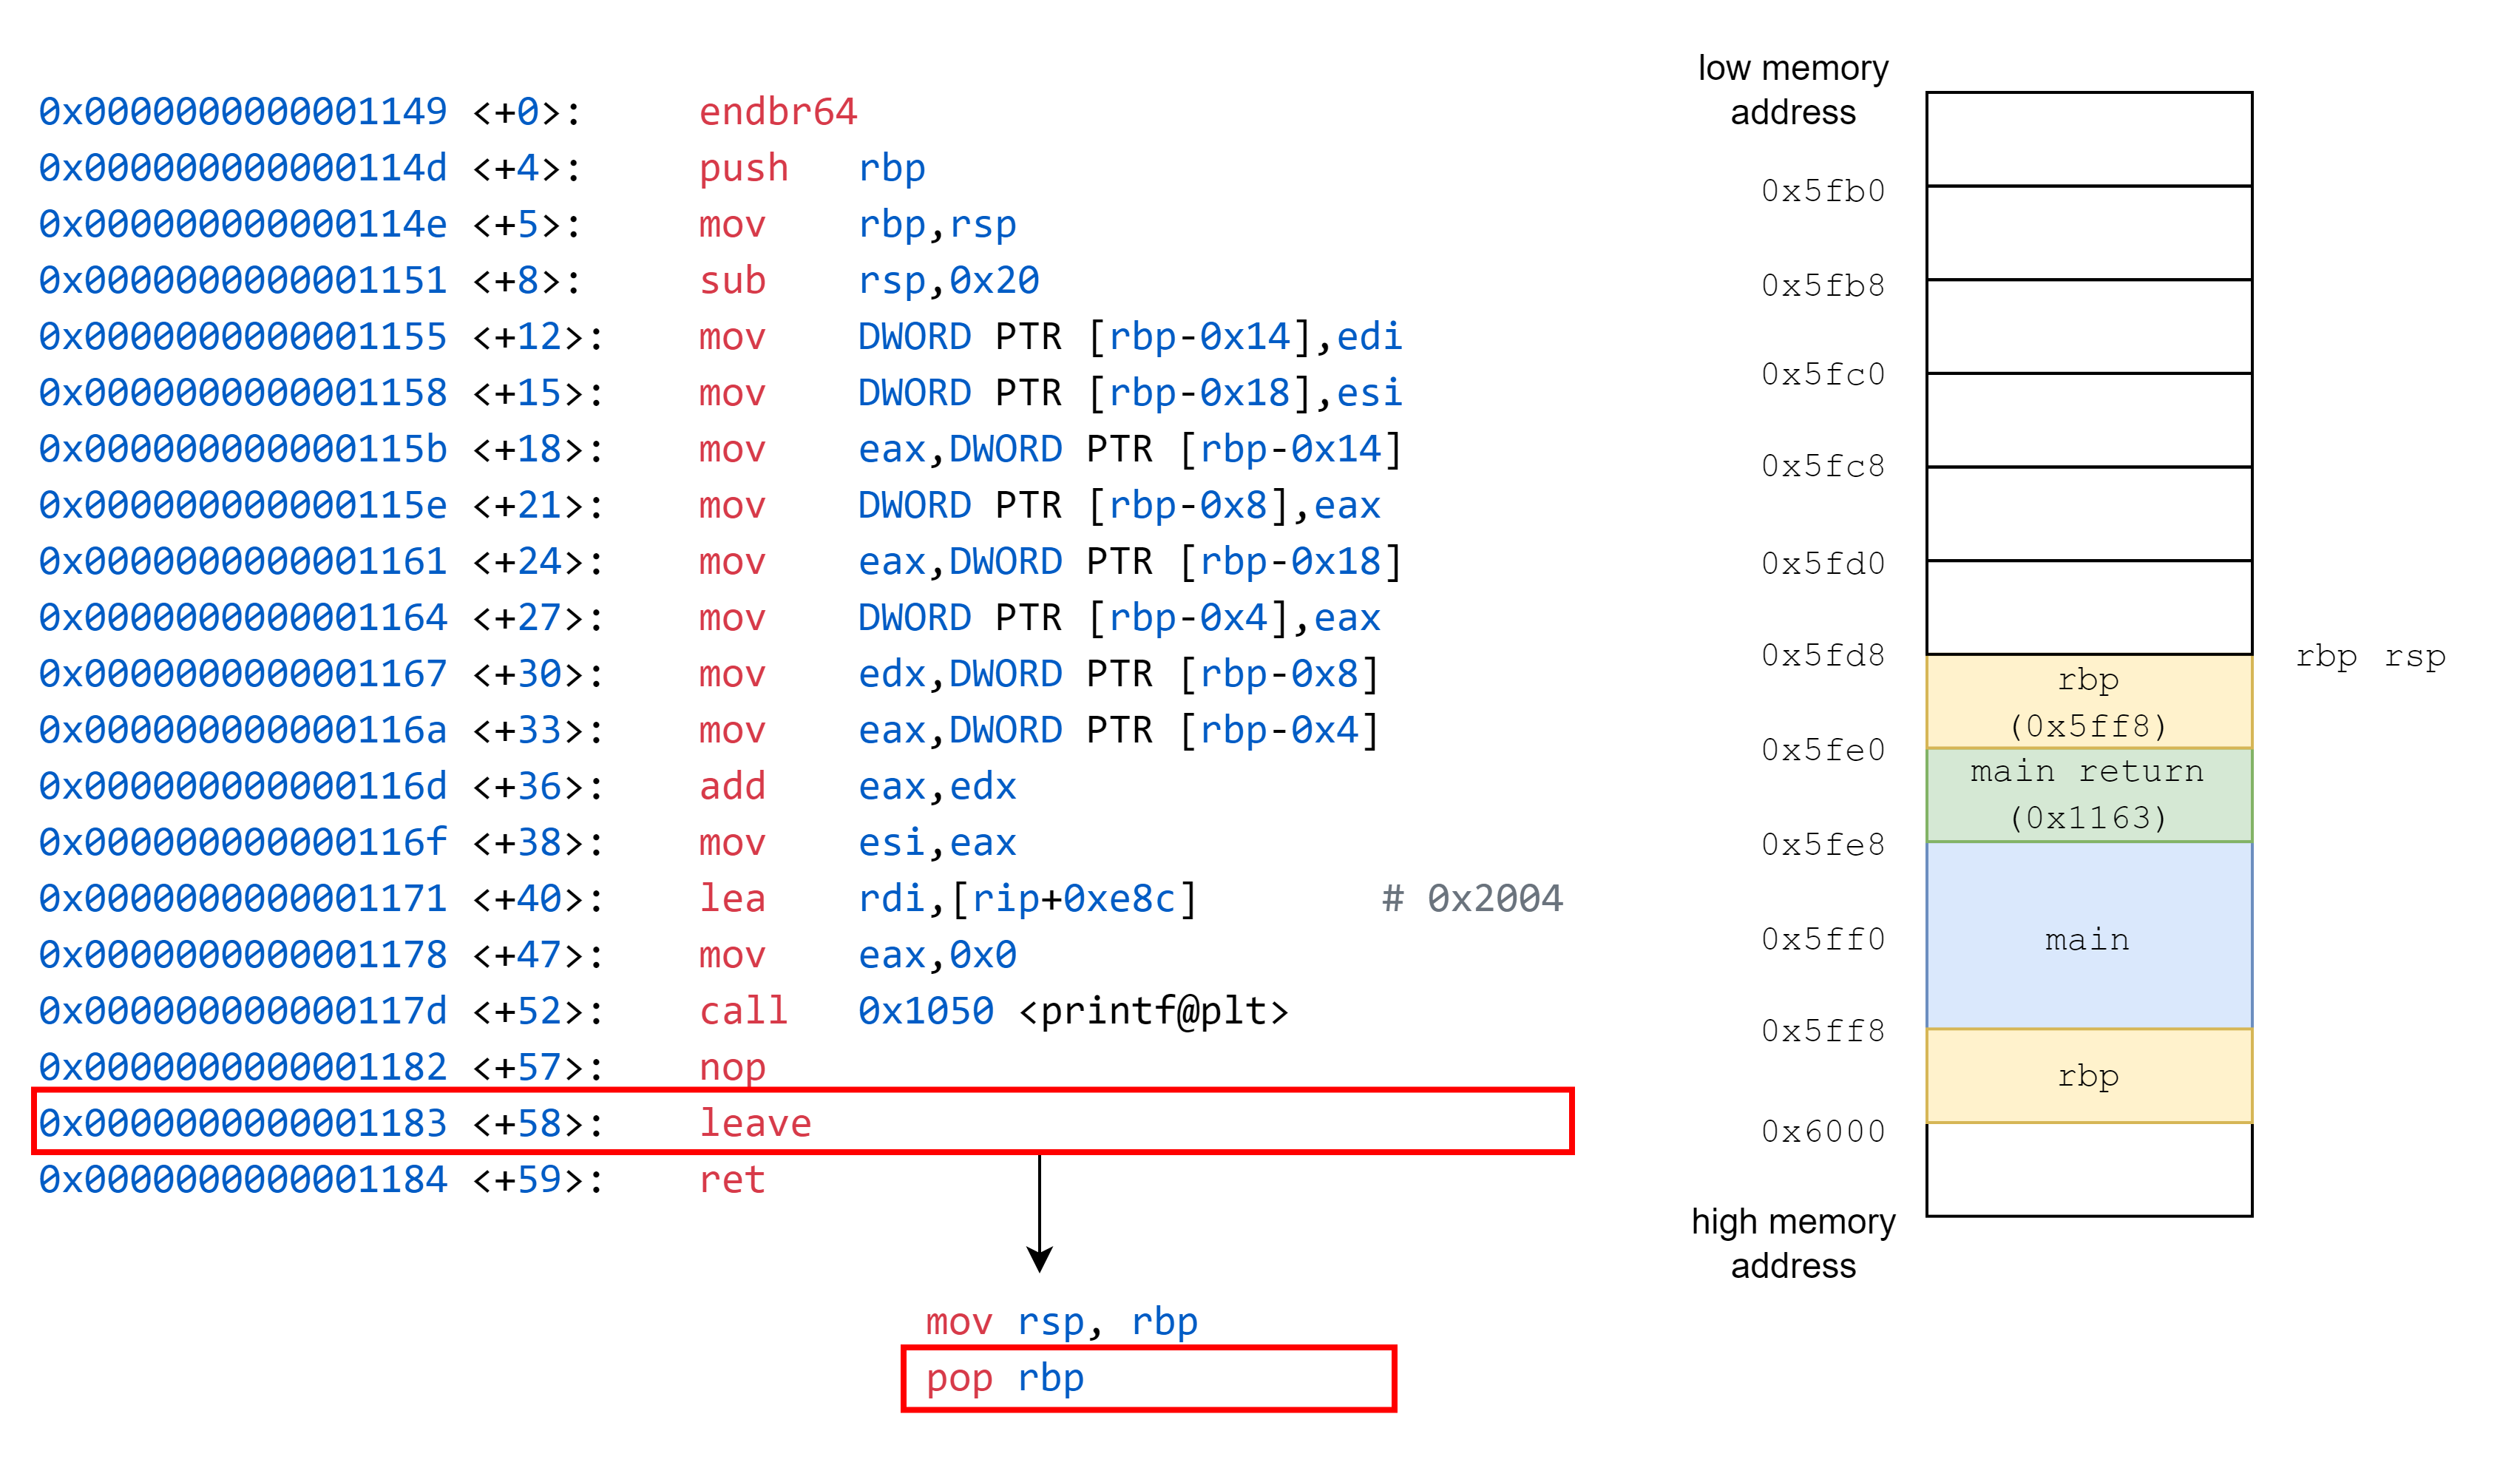
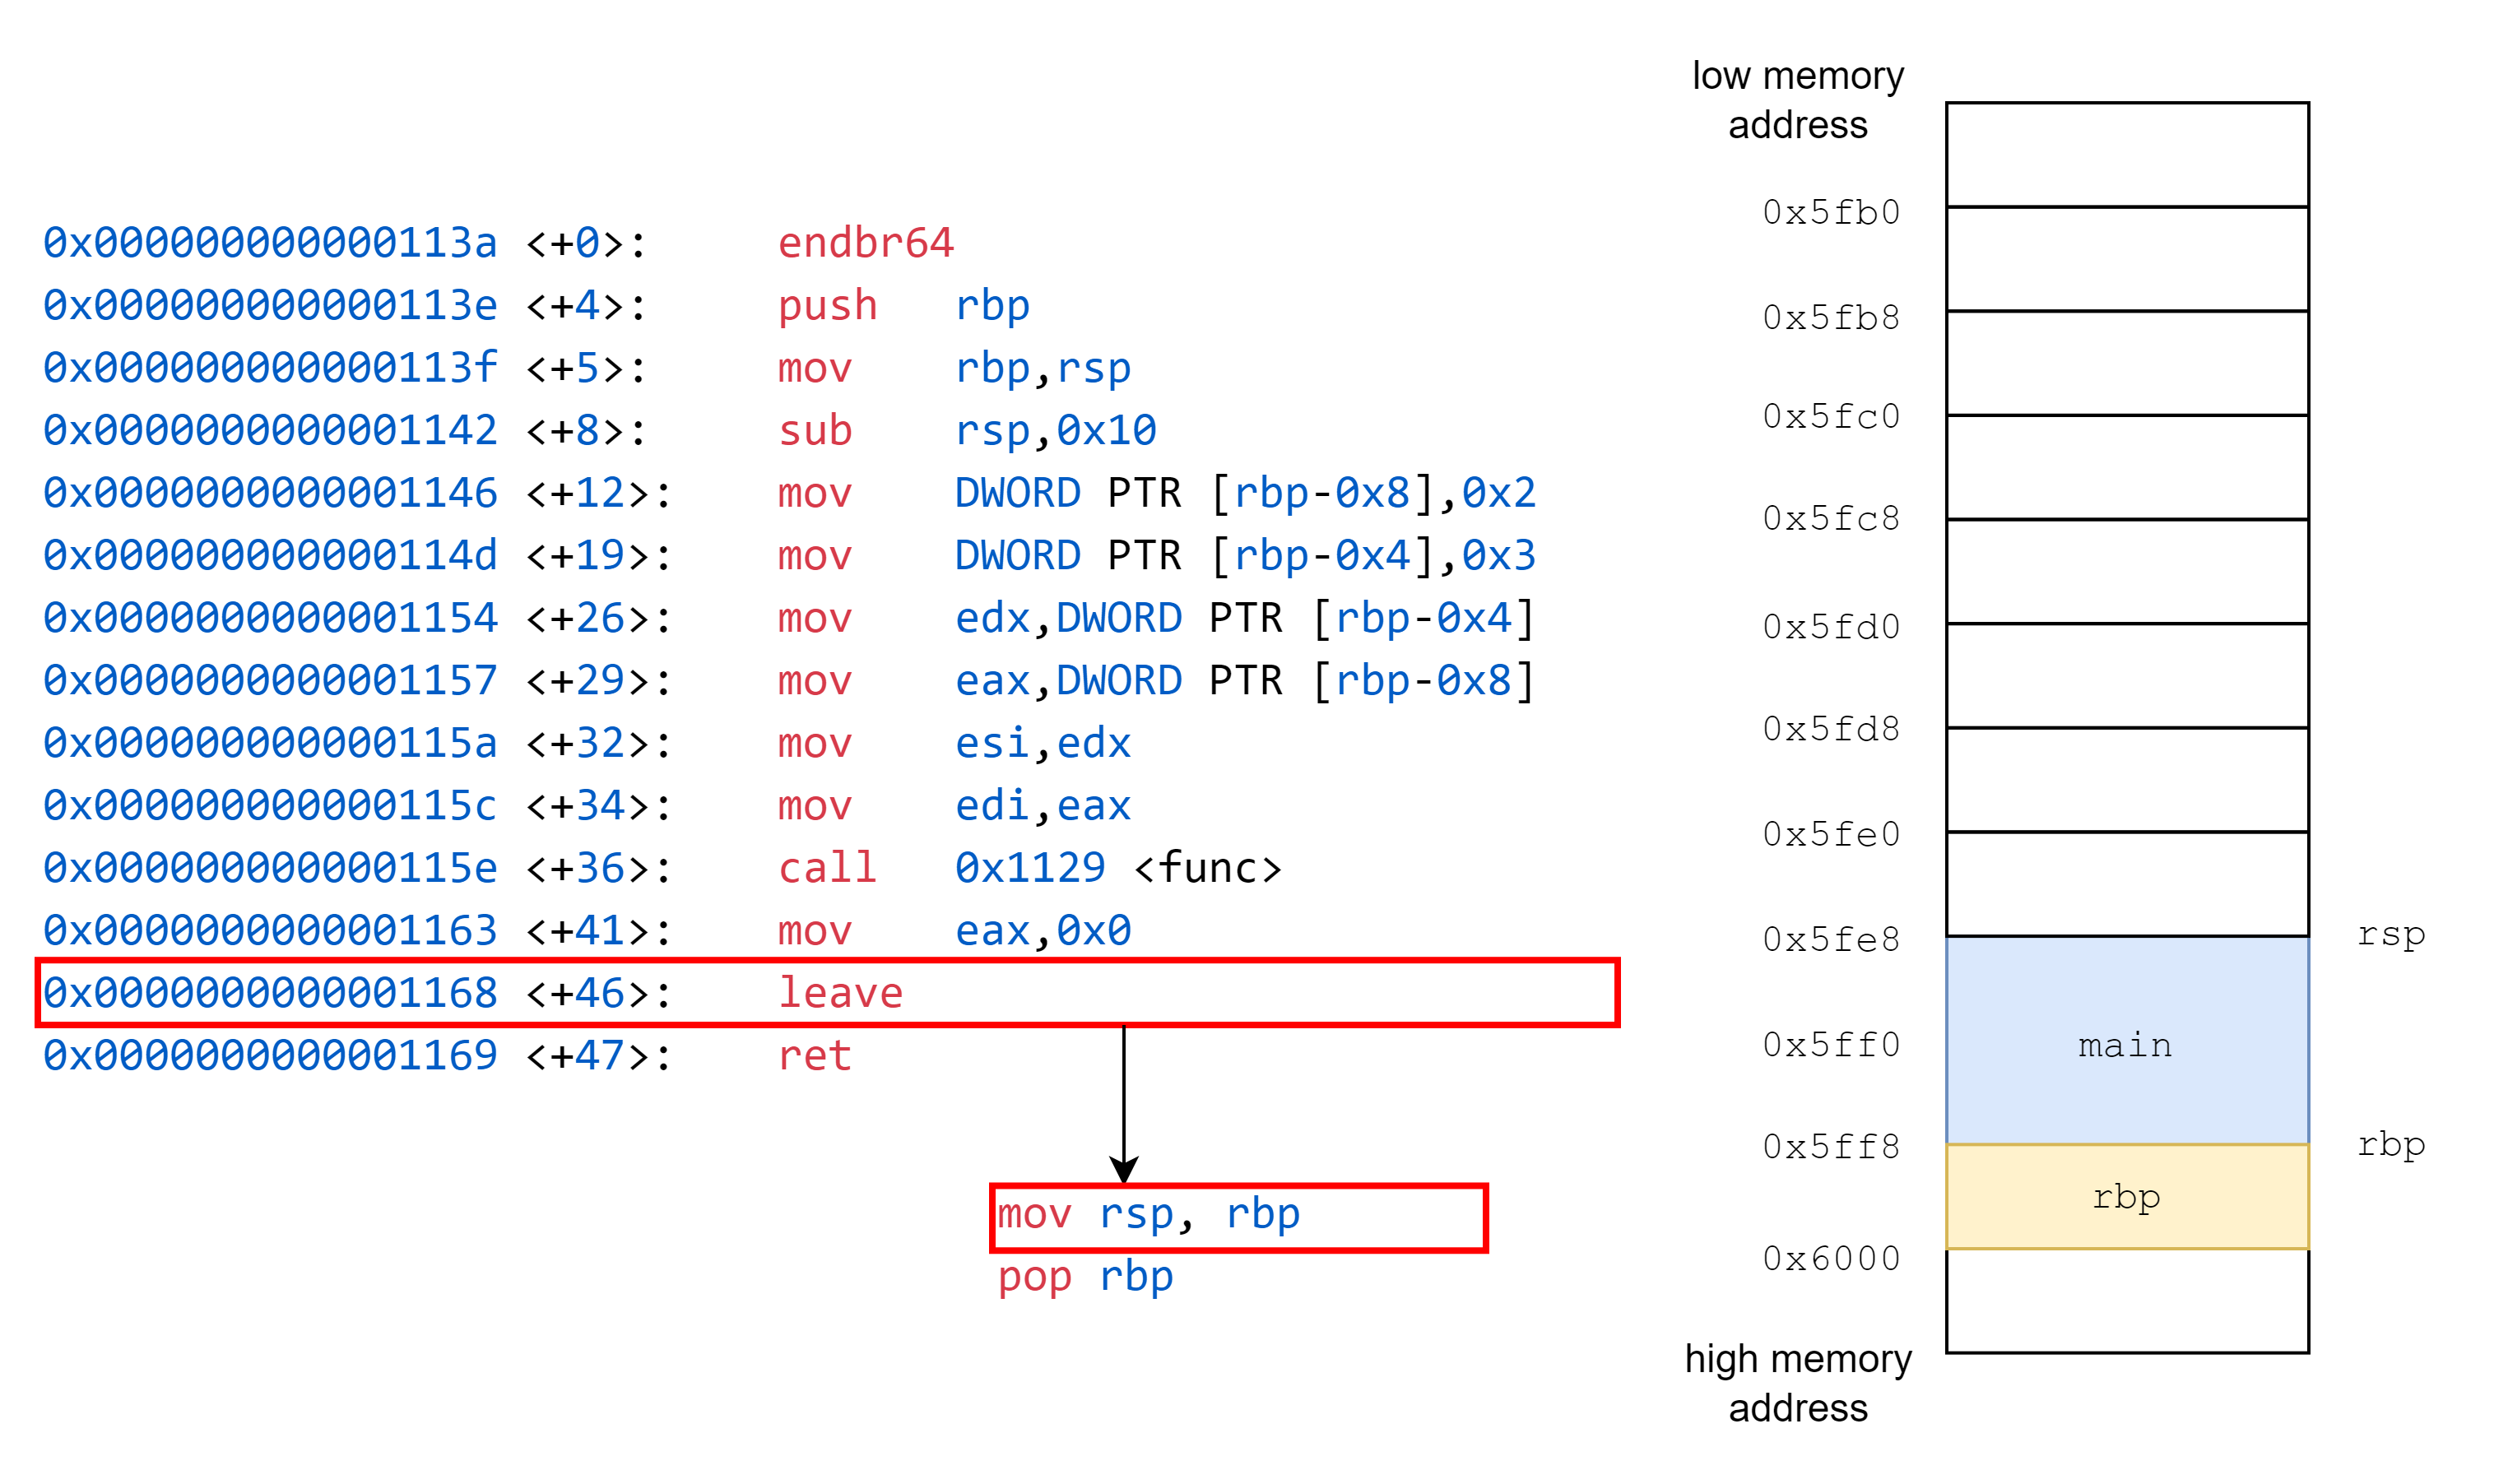
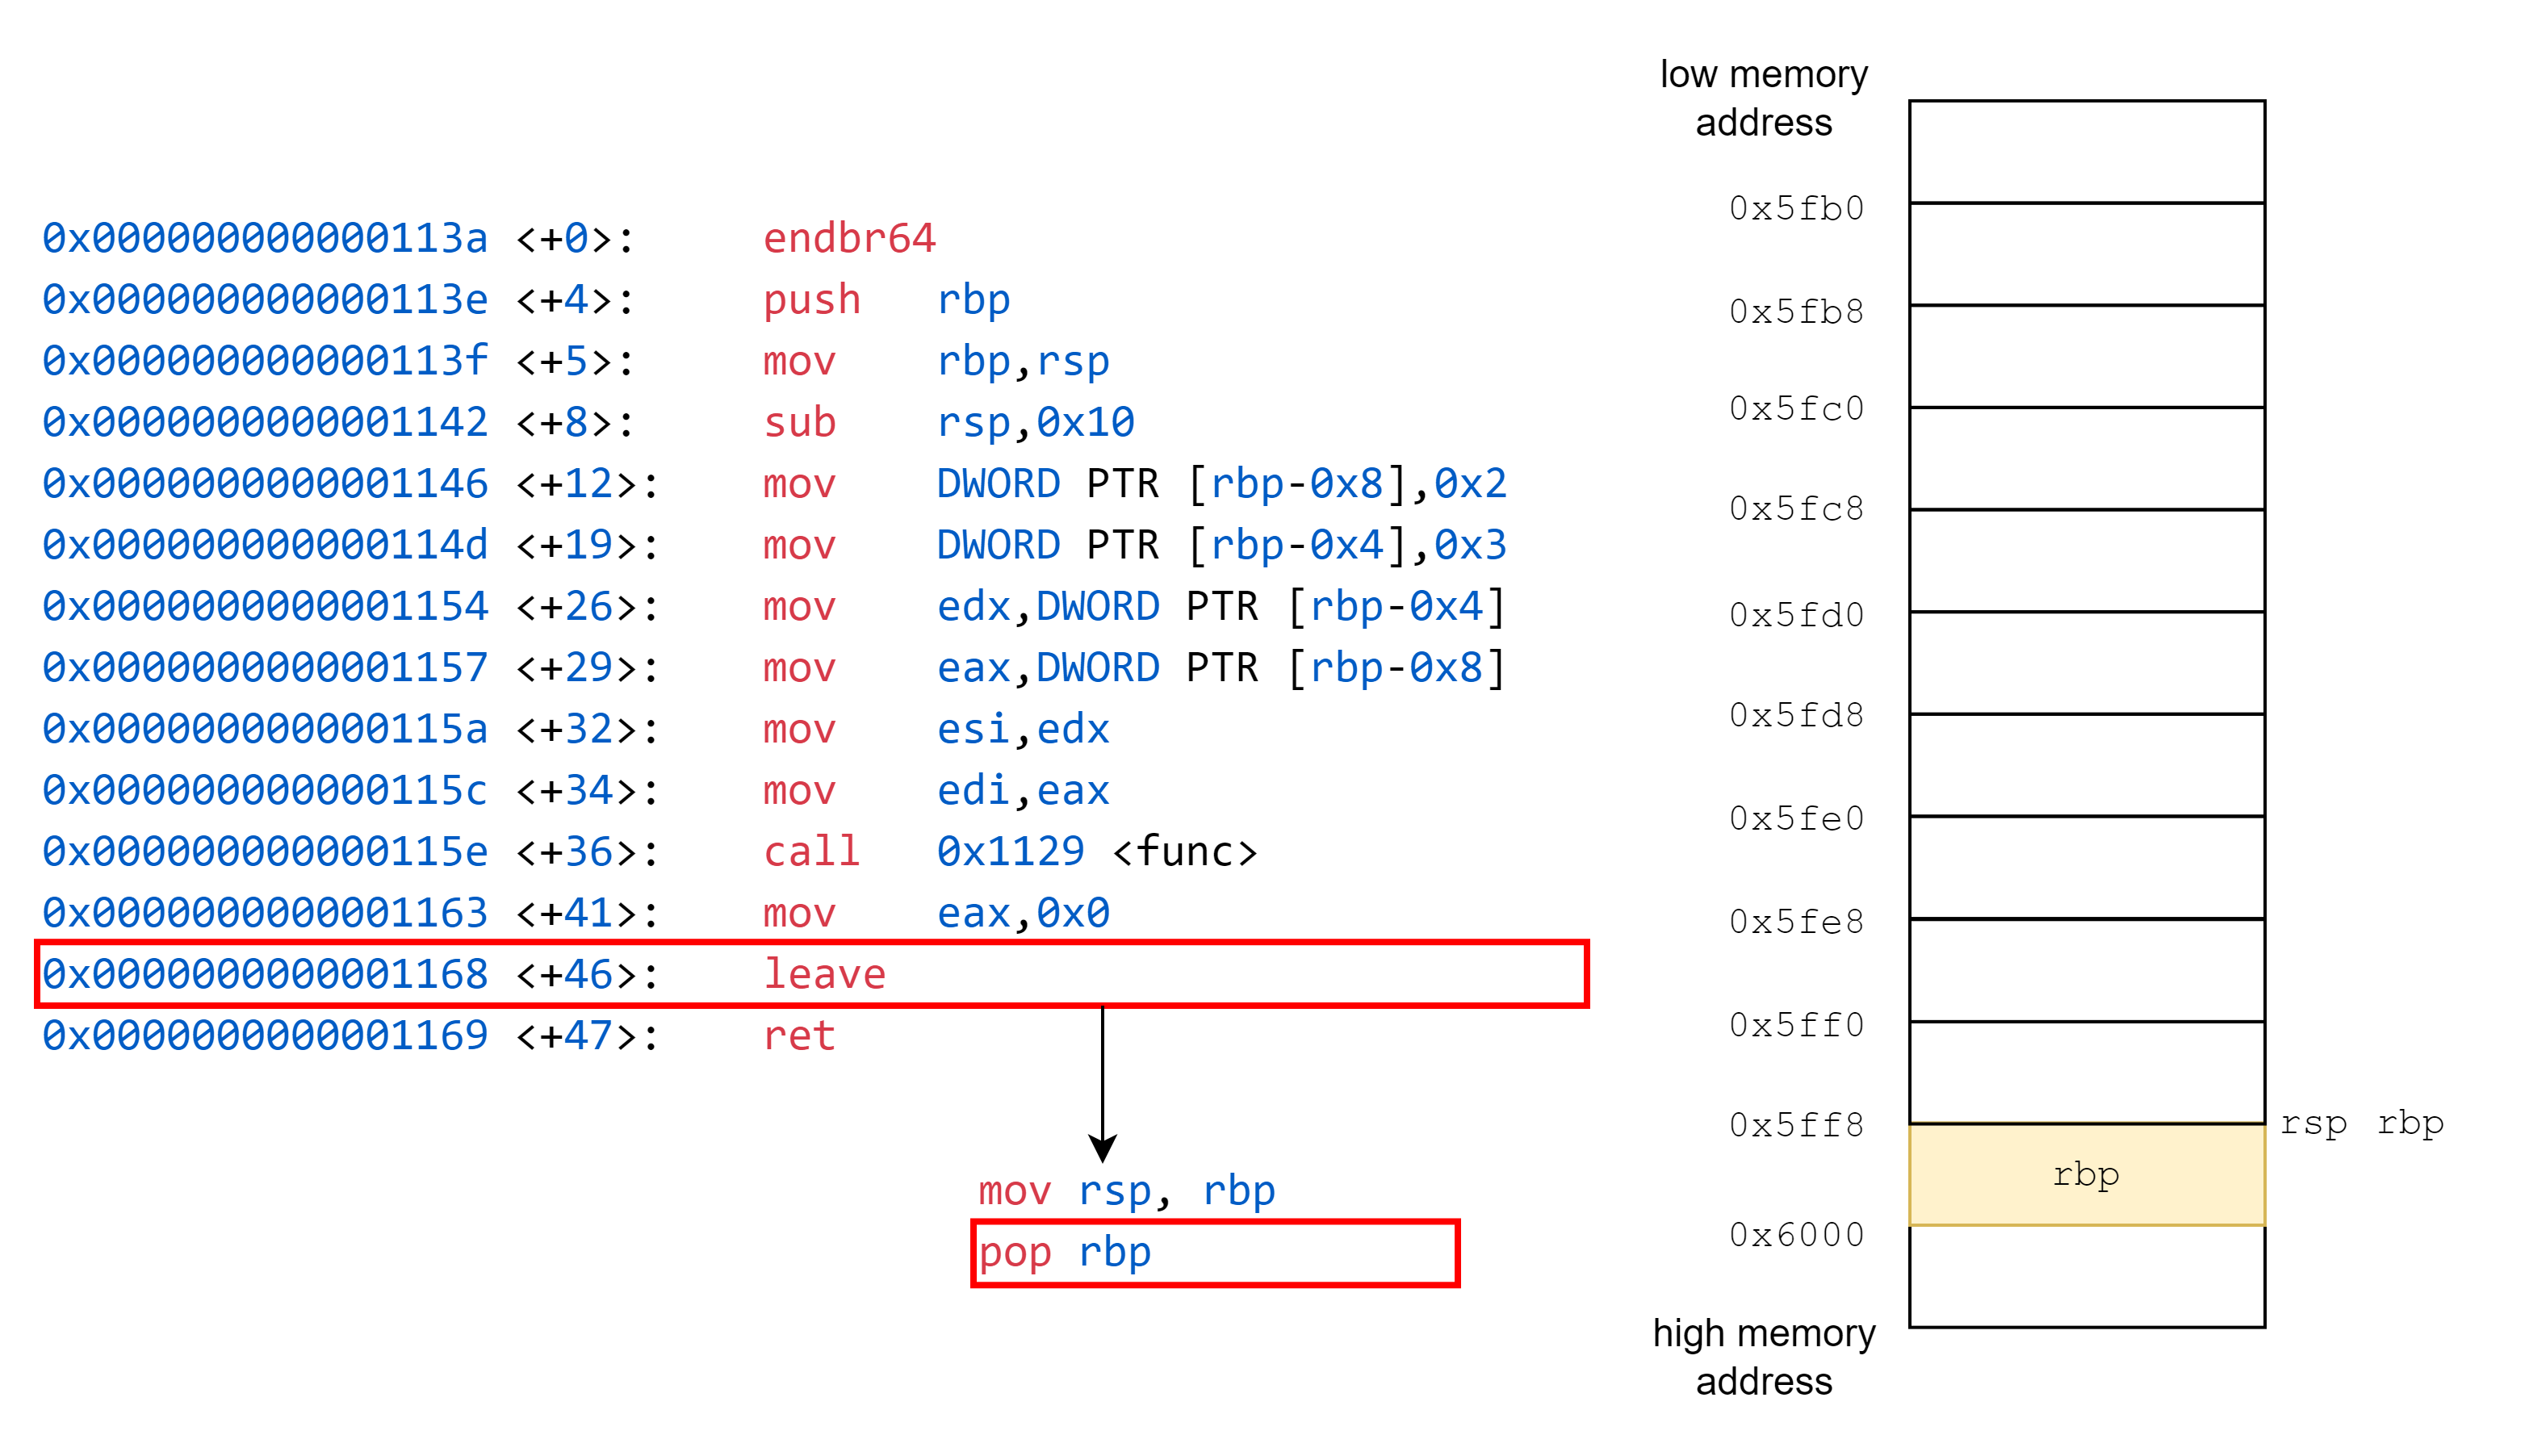
接著我們要執行 `leave`,`leave` 會 `mov rsp, rbp`,接著 `pop rbp`。

---
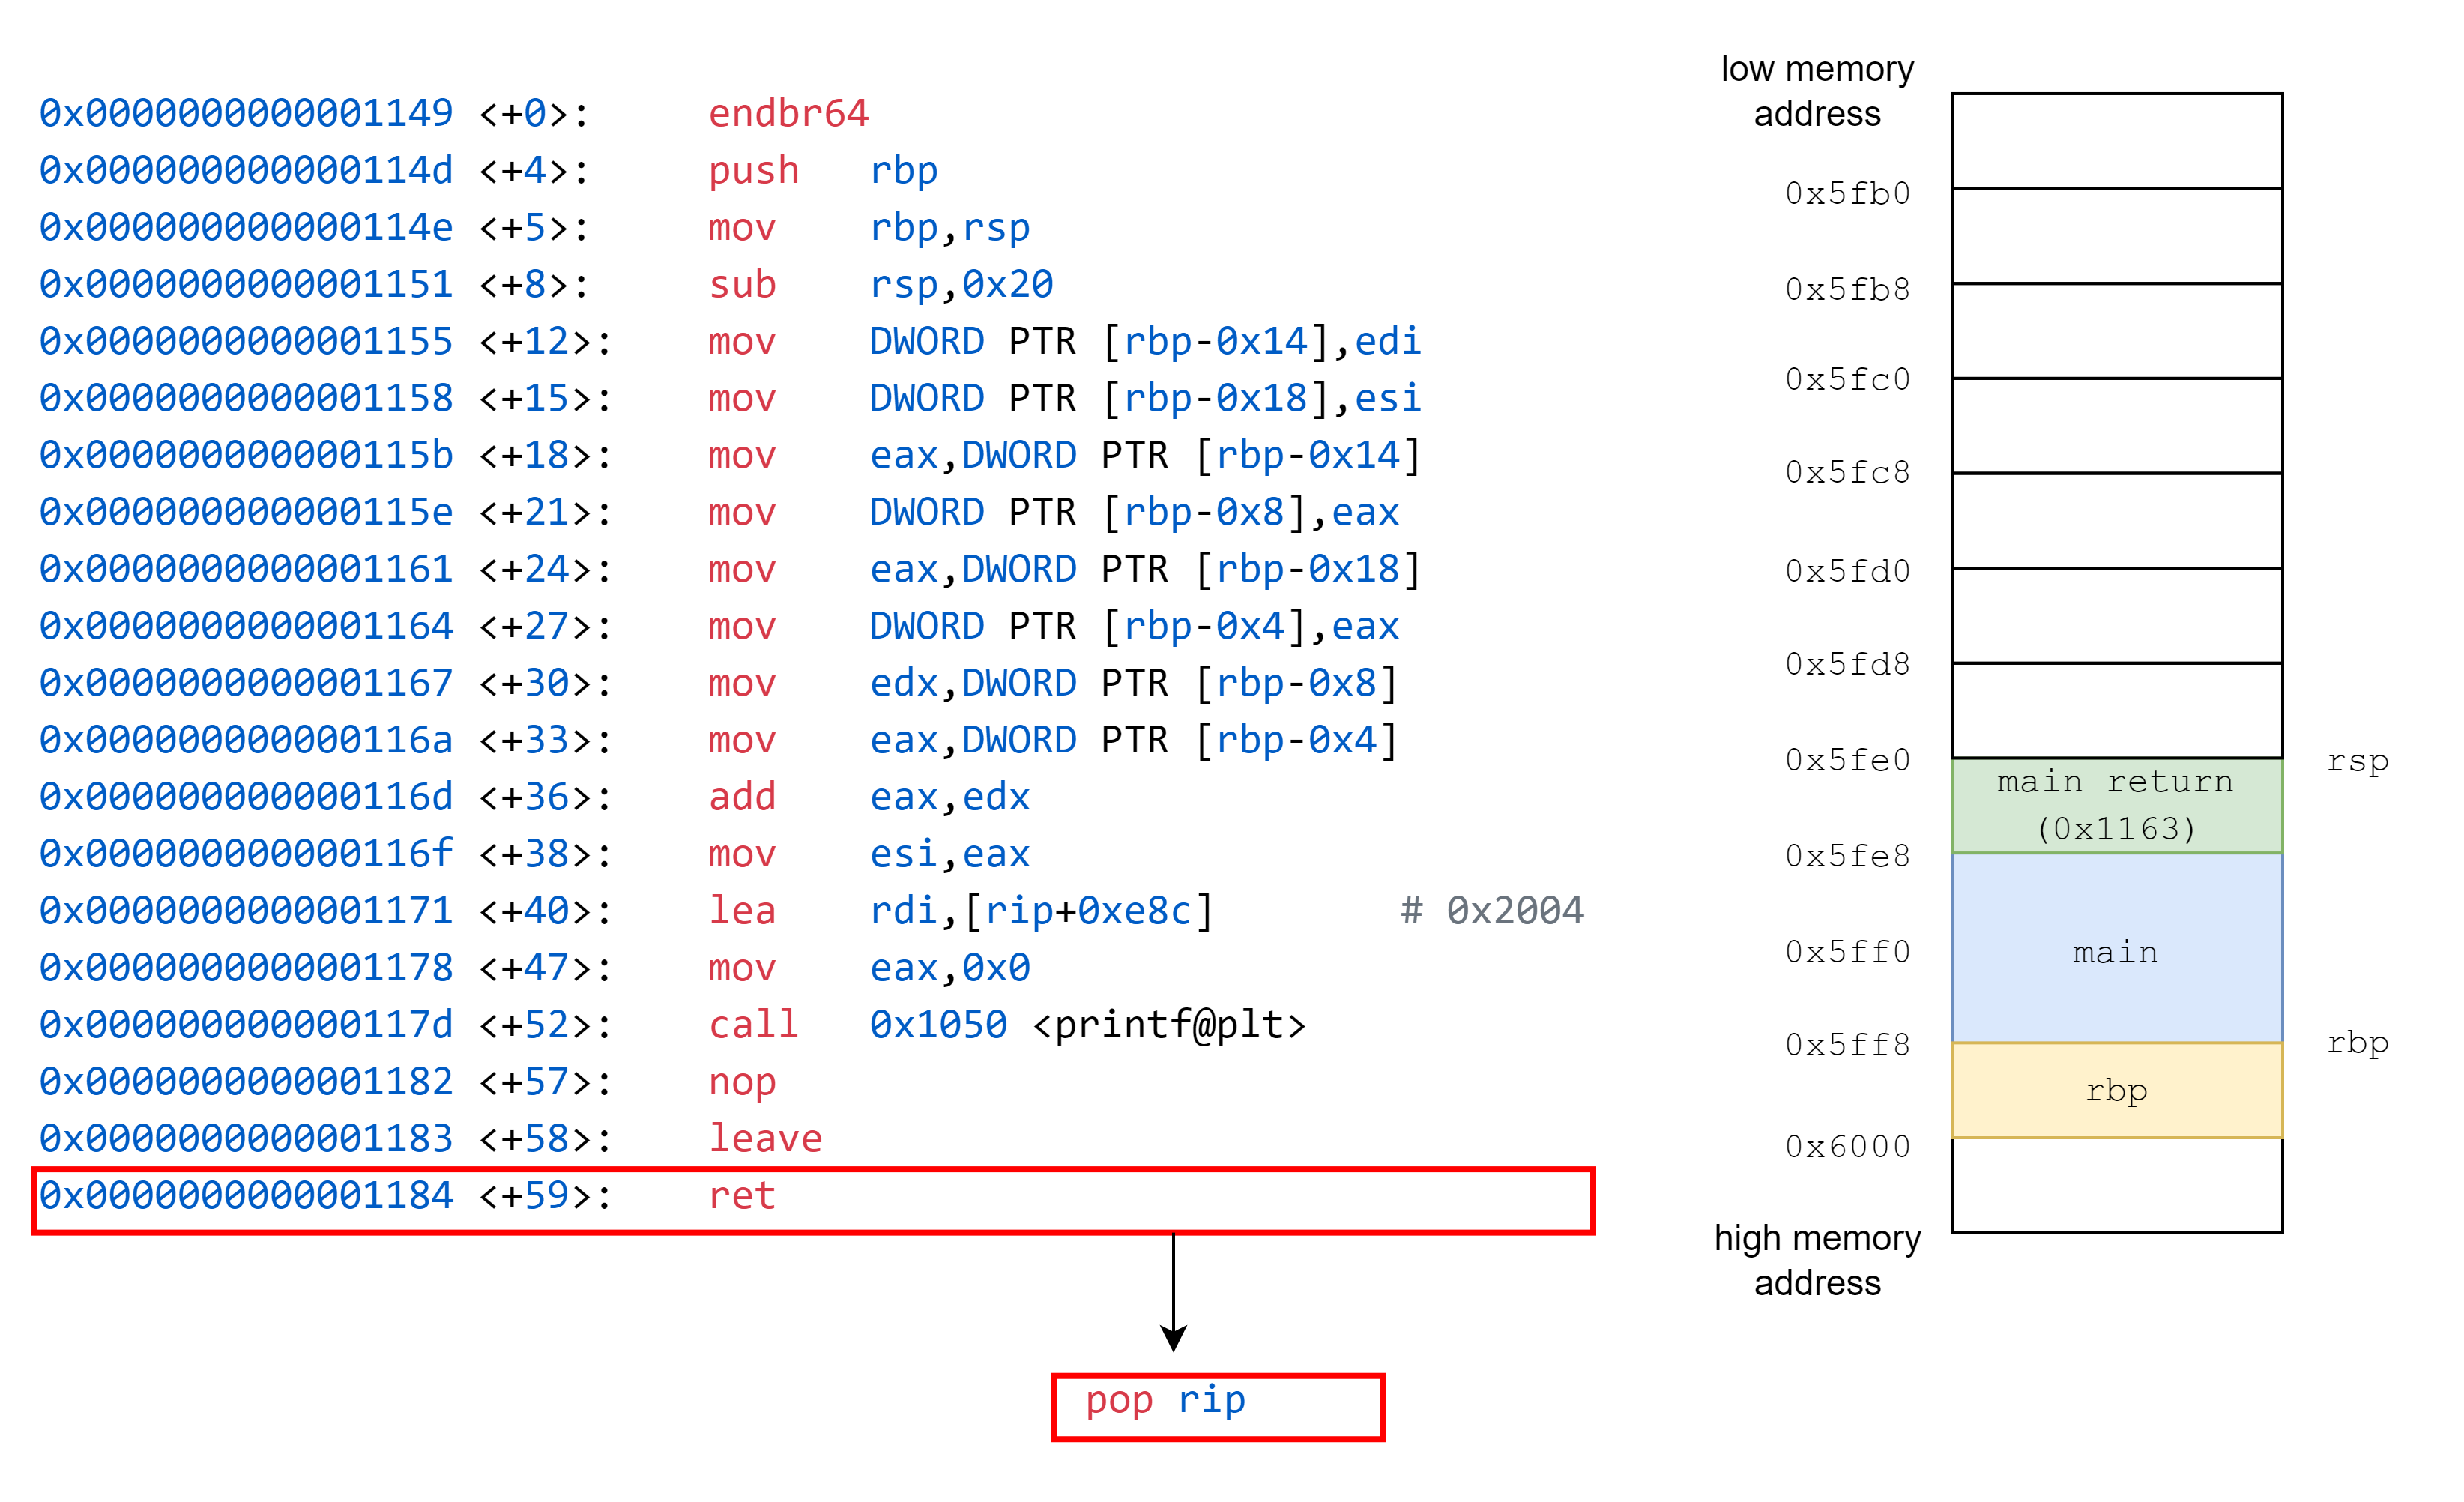
接著是 `ret`,作用為 `pop rip`,這邊對應的意義為將 `return address` 放置到儲存 instruction pointer 的暫存器,對應到圖上的意義,就是改變紅色框框的位置,執行完畢後,我們便跳回到 `main` 函式中,紅色框框的位置在 `ret` 時設定完畢。
---
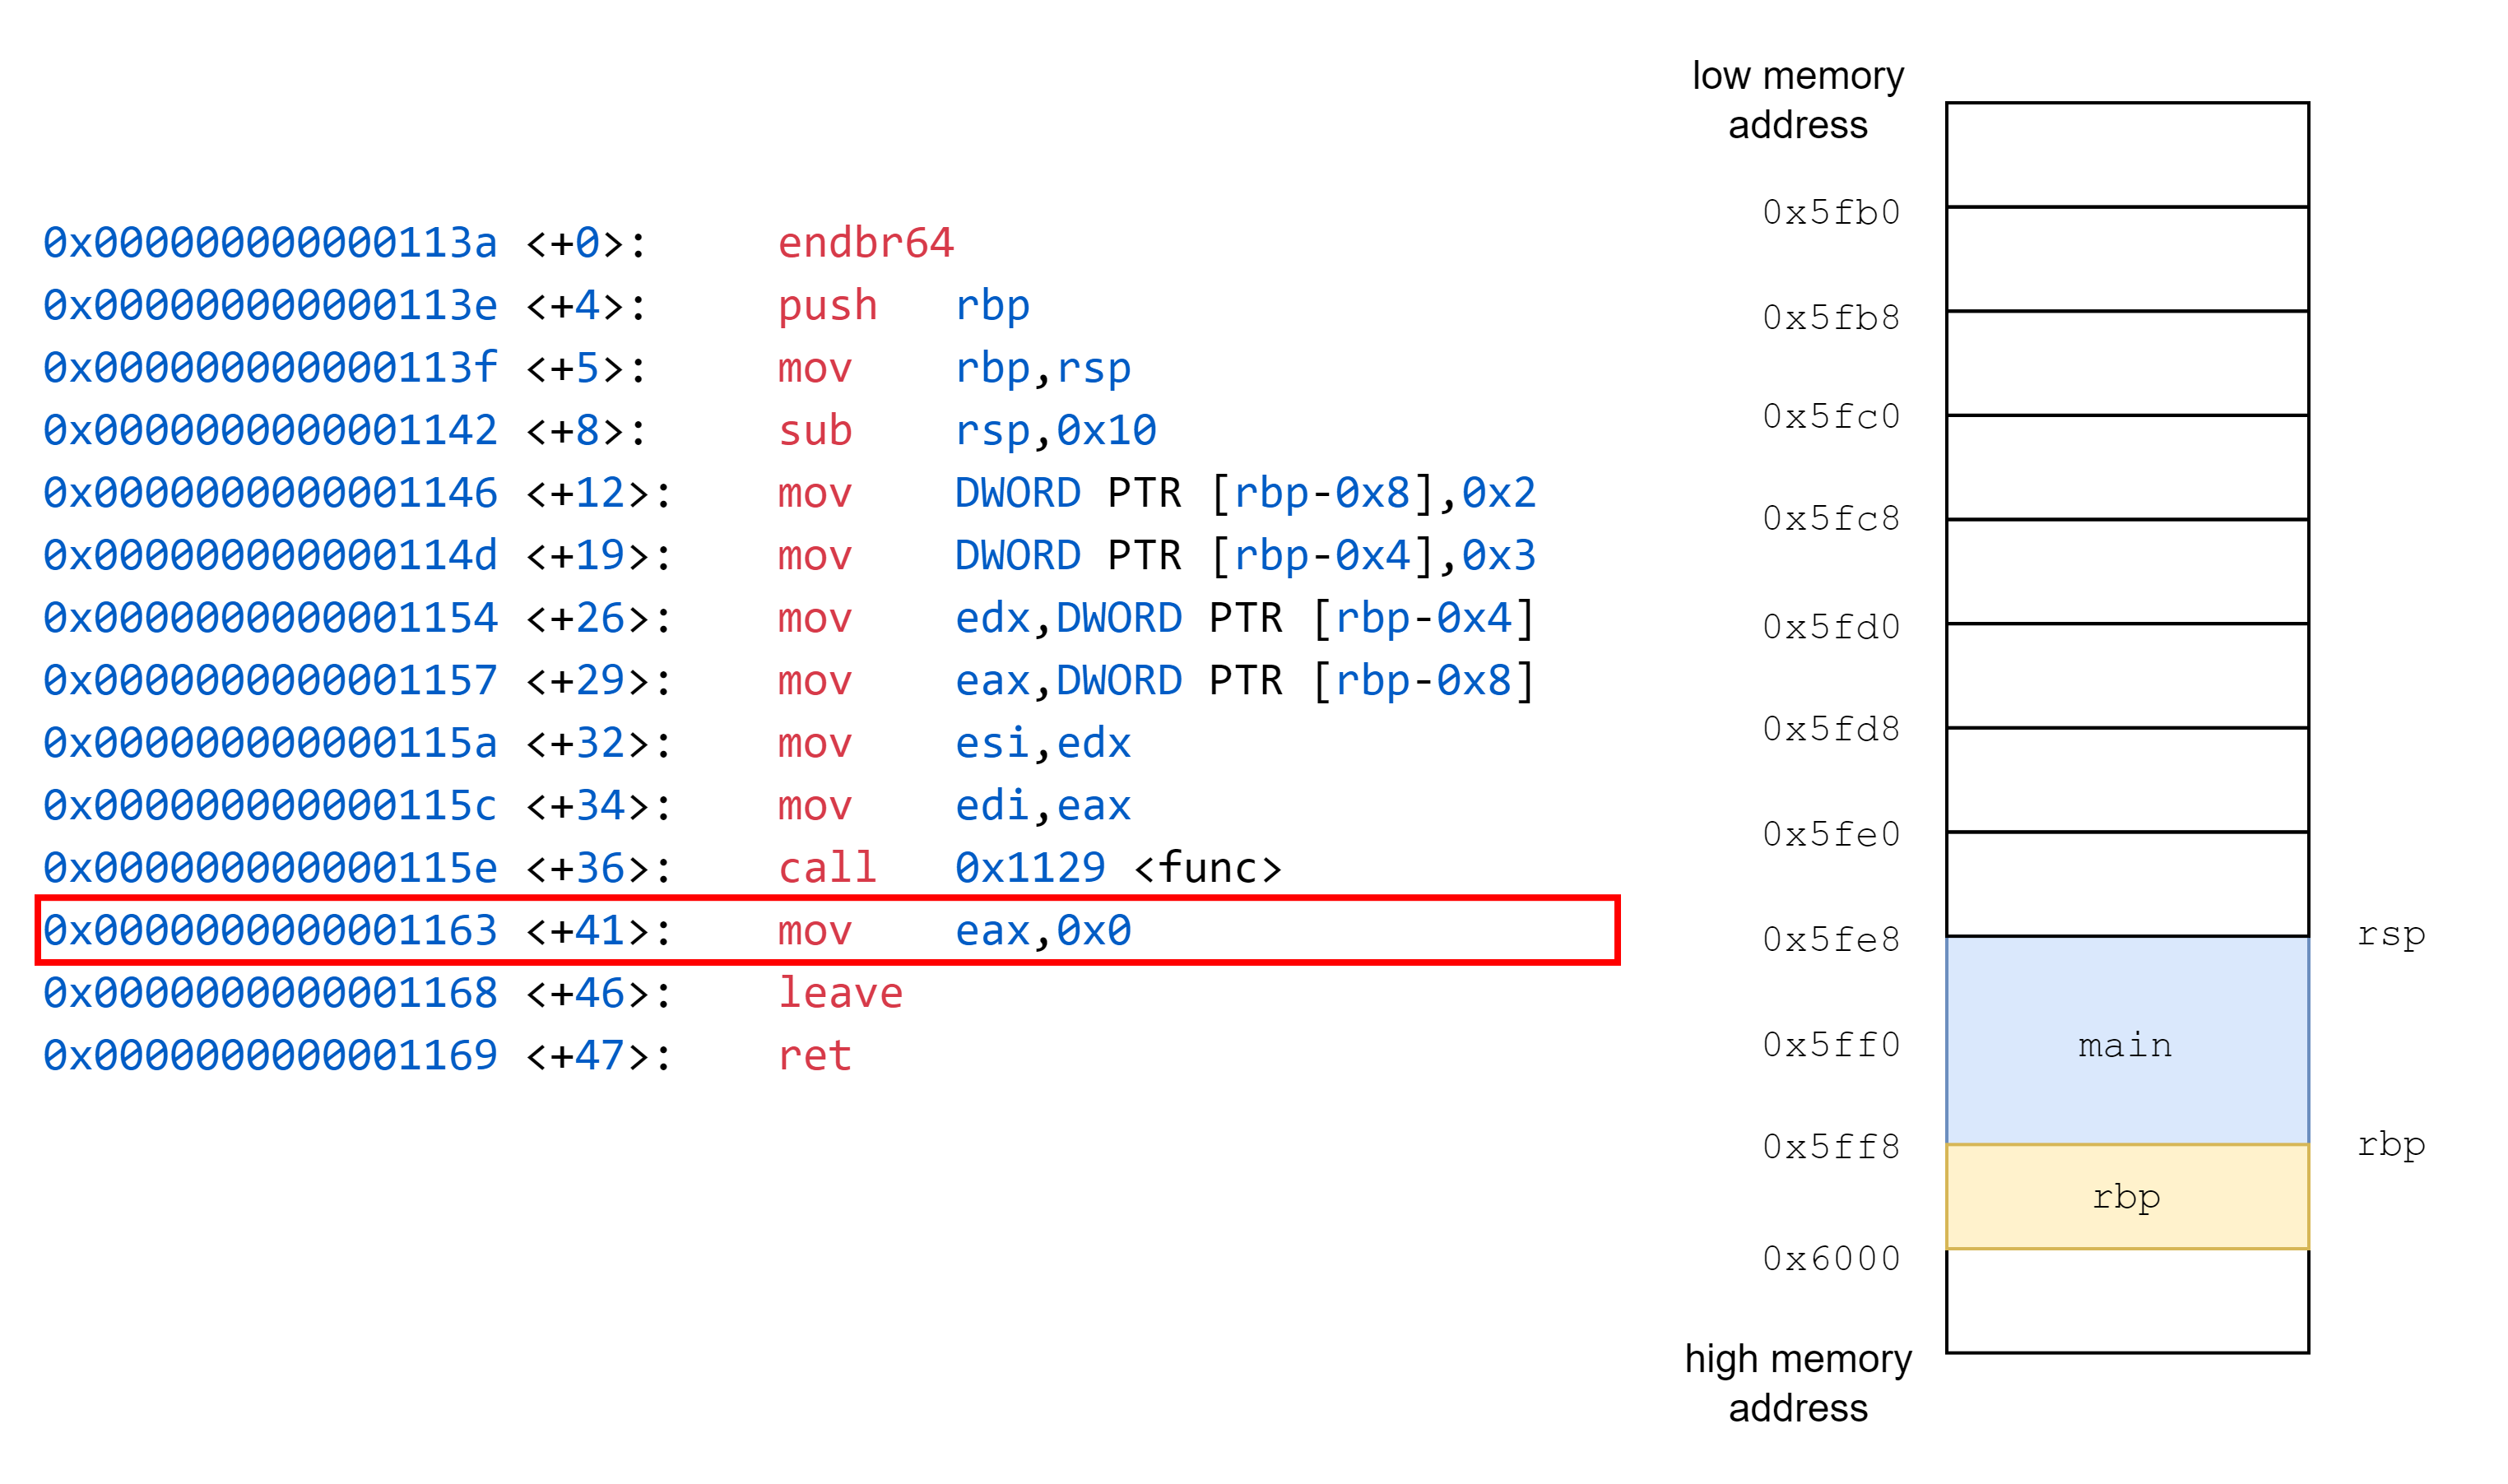
接著我們跳回了 `main` 函式,依序執行 `leave`, `ret`。
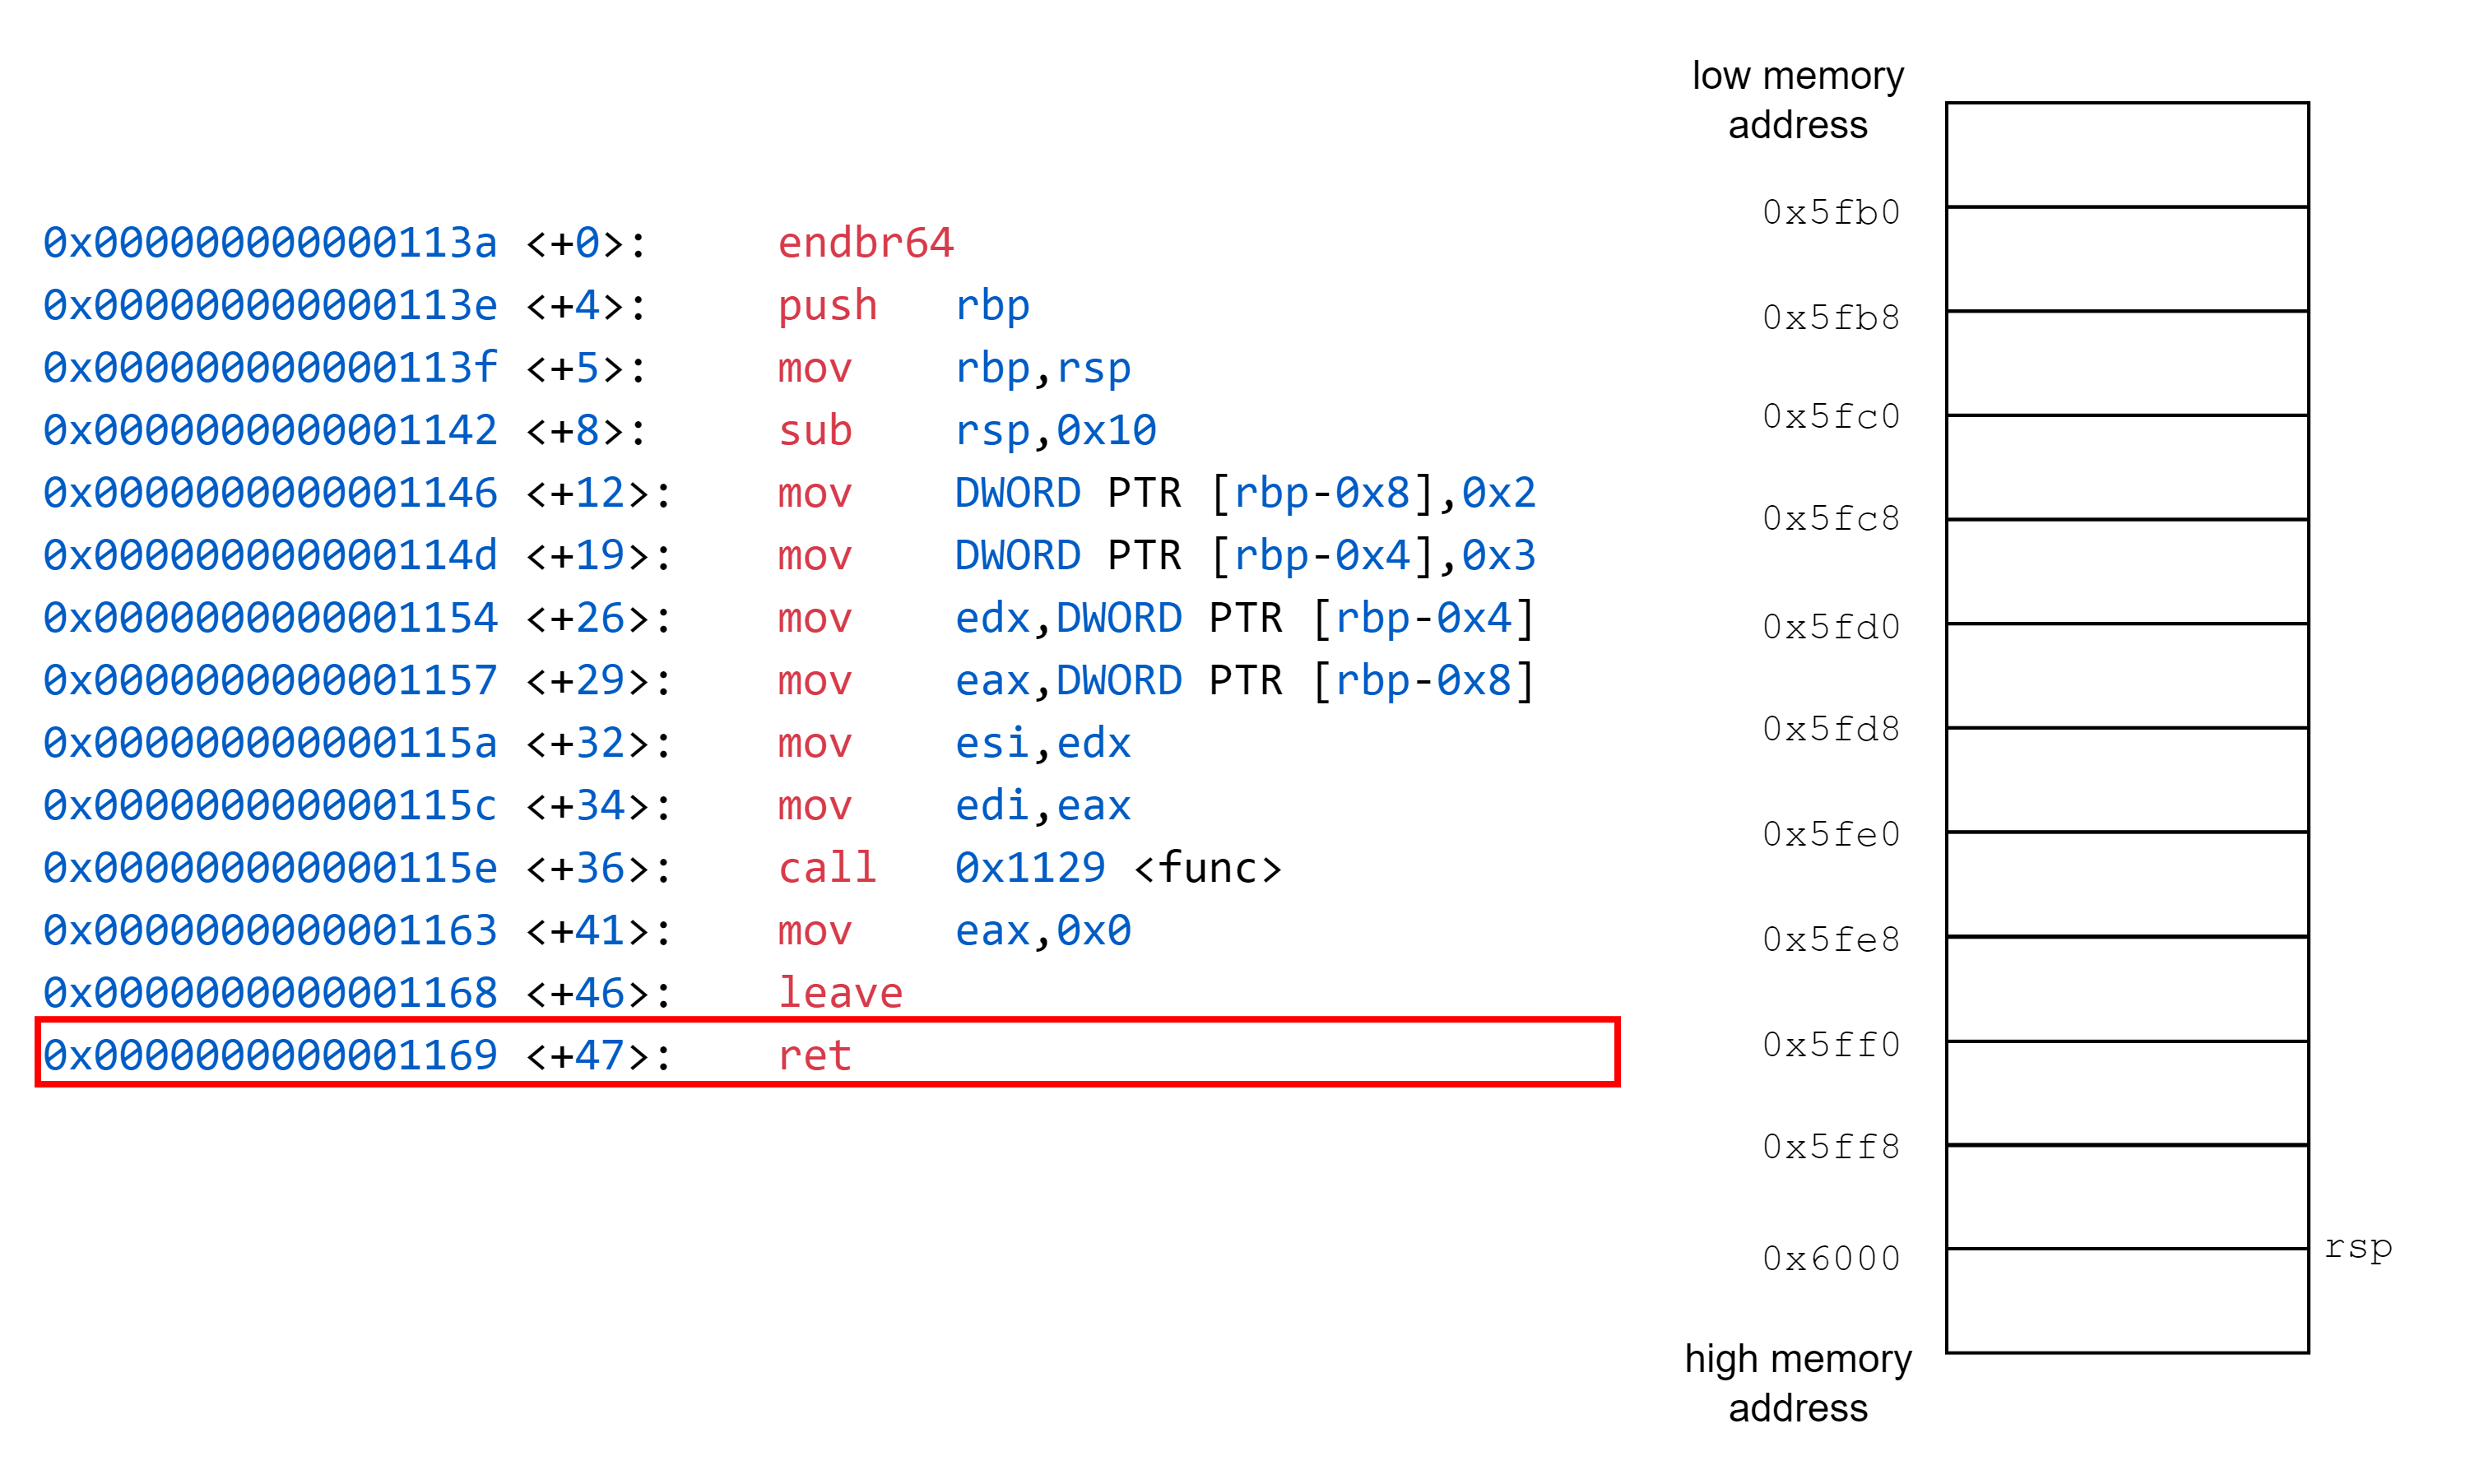
到這裡整個函式呼叫流程結束。
## 關於 Exploitation
在上面的 Stack Frame 分析中我們看到函式跳轉是通過 return address 進行控制,如果我們在逆向的過程中,發現到程式碼中的漏洞,讓我們可以改變程式的執行流程,像是修改程式的 return address,那麼我們就稱之為 Exploitation,又稱作為 PWN。
Exploitation: 利用漏洞取得程式的控制權
Binary Exploitation: 針對二進位檔案的相關漏洞利用
## 關於 Shellcode
所謂 Shellcode,就是將機器碼全部串在一起,組成一連串 16 進位的程式碼,而通常對於一個程式注入程式碼主要目的是要得到 shell,因此稱作為 Shellcode,以下為一個 x86 組合語言寫成的 `Hello.s`
## Lab5. Hello, Shellcode
```asm
section .text
global _start
_start: ;程式起始點
jmp msg ;跳轉到 msg 標籤所在位置
write:
mov eax, 4 ;把 System call 的編號存到 eax 暫存器中,編號 4 表示 write()
mov ebx, 1 ;把檔案描述子 (file descriptor) 儲存到 rbx 暫存器中,1 表示 stdout
pop ecx ;彈出 Stack 頂端的記憶體地址,該記憶體地址指向到 "Hello, World" 字串
mov edx, 14 ;把要輸出的字串長度儲存到 edx 暫存器中
int 0x80 ;呼叫 System call
mov eax, 1 ;把 System call 的編號存到 eax 暫存器中,編號 1 表示 exit()
int 0x80 ;呼叫 System call
msg:
call write ;呼叫 write,印出字串
db 'Hello, World', 0xa ;使用 db 把每一個字元轉換成 ASCII 並除存在記憶體中, 0xa 表示換行
```
參考: [System call table](https://faculty.nps.edu/cseagle/assembly/sys_call.html)

我們現在有了組合語言所撰寫出的檔案,如果我們要讓他變成可執行檔,首先我們需要先進行組譯,產生出目的檔 (object file)
```shell
$ nasm -felf32 hello.s -o hello.o
```
有了目的檔後,接著我們需要過鏈結器 (linker) 將目的檔與其他資訊進行鏈結,產生出可執行檔
```shell
$ ld hello.o -melf_i386 -o hello
```
產生可執行檔後,我們可以執行看看測試結果
```shell
$ ./hello
Hello, World
```
接著我們試著得到 `Hello` 的 shellcode,前面說到 shellcode 本質上就是機器碼組合而成,我們可以使用 `objdump` 這個工具進行檢視
```shell
$ objdump -d -M intel hello
```
```
hello: file format elf32-i386
Disassembly of section .text:
08049000 <_start>:
8049000: eb 19 jmp 804901b <msg>
08049002 <write>:
8049002: b8 04 00 00 00 mov eax,0x4
8049007: bb 01 00 00 00 mov ebx,0x1
804900c: 59 pop ecx
804900d: ba 0e 00 00 00 mov edx,0xe
8049012: cd 80 int 0x80
8049014: b8 01 00 00 00 mov eax,0x1
8049019: cd 80 int 0x80
0804901b <msg>:
804901b: e8 e2 ff ff ff call 8049002 <write>
8049020: 48 dec eax
8049021: 65 6c gs ins BYTE PTR es:[edi],dx
8049023: 6c ins BYTE PTR es:[edi],dx
8049024: 6f outs dx,DWORD PTR ds:[esi]
8049025: 2c 20 sub al,0x20
8049027: 57 push edi
8049028: 6f outs dx,DWORD PTR ds:[esi]
8049029: 72 6c jb 8049097 <msg+0x7c>
804902b: 64 fs
804902c: 0a .byte 0xa
```
接著使用 `objcopy` 這個工具,將機器碼儲存到 `shellcode.bin`
```shell
$ objcopy -O binary hello shellcode.bin
```
機器碼是由二進位所組成,我們無法通過文字檢視器直接進行檢視,這時候我們可以使用 16 進位檢視工具,如 `xxd`
```shell
$ xxd -i shellcode.bin
```
```c
unsigned char shellcode_bin[] = {
0xeb, 0x19, 0xb8, 0x04, 0x00, 0x00, 0x00, 0xbb, 0x01, 0x00, 0x00, 0x00,
0x59, 0xba, 0x0c, 0x00, 0x00, 0x00, 0xcd, 0x80, 0xb8, 0x01, 0x00, 0x00,
0x00, 0xcd, 0x80, 0xe8, 0xe2, 0xff, 0xff, 0xff, 0x48, 0x65, 0x6c, 0x6c,
0x6f, 0x2c, 0x20, 0x57, 0x6f, 0x72, 0x6c, 0x64, 0x0a
};
```
如此我們便得到了 `hello` 的 shellcode,仔細觀察可以發現到,shellcode 確實就是由 `hello` 的機器碼所組成,接著我們試著執行這一段 shellcode
```c
#include <stdio.h>
int main(void)
{
unsigned char shellcode_bin[] = {
0xeb, 0x19, 0xb8, 0x04, 0x00, 0x00, 0x00, 0xbb, 0x01, 0x00, 0x00, 0x00,
0x59, 0xba, 0x0e, 0x00, 0x00, 0x00, 0xcd, 0x80, 0xb8, 0x01, 0x00, 0x00,
0x00, 0xcd, 0x80, 0xe8, 0xe2, 0xff, 0xff, 0xff, 0x48, 0x65, 0x6c, 0x6c,
0x6f, 0x2c, 0x20, 0x57, 0x6f, 0x72, 0x6c, 0x64, 0x0a
};
void (*func)(void) = shellcode_bin;
func();
}
```
使用以下指令進行編譯
```shell
$ gcc -m32 -z execstack call_shellcode.c -o call_shellcode
```
在通常情況下,我們無法在 stack 上執行程式碼,這與 C 語言中硬體保護機制有關 (如 NX, ASLR 等等,後續將介紹),因此,我們使用 `-z execstack` 禁用 NX 保護 (NX 為 Not Execute on stack 縮寫)。
可以使用 `gdb-peda` 中 checksec 功能確認已經禁用 NX 保護
```shell
Warning: 'set logging off', an alias for the command 'set logging enabled', is deprecated.
Use 'set logging enabled off'.
Warning: 'set logging on', an alias for the command 'set logging enabled', is deprecated.
Use 'set logging enabled on'.
CANARY : ENABLED
FORTIFY : disabled
NX : disabled
PIE : ENABLED
RELRO : FULL
```
執行程式
```shell
$ ./call_shellcode
Hello, World
```