# How to use Yup validation with React Hook Form
Have you ever built a form in [React](https://strapi.io/integrations/react-cms), only to realise you have to spend time writing endless validation logic, handling errors manually, and dealing with inconsistent user input? it's quite frustrating because a simple mistake in a field can break an entire submission. That's where Yup comes in.
Yup is a powerful schema validation library that helps you to enforce rules on form fields effortlessly, combined with React hook form, it allows you to build highly efficient forms with minimal boilerplate code, giving your users instant feedback if a form field is filled out incorrectly.
This guide will explain what yup validation is, how to integrate with React hook form and some practical examples to get you started.
## What is Yup?
### Definition and Origin
[Yup](https://github.com/jquense/yup) is a schema builder for JavaScript applications, it allows you to validate data against a schema and transform data in your applications easily. It was originally inspired by [Joi](https://joi.dev/api/?v=17.13.3), a popular validation library, but Yup is optimized for client-side use, making it perfect for form validation with React.
While [Zod](https://strapi.io/blog/form-validation-in-typescipt-projects-using-zod-and-react-hook-forma) is another popular alternative, especially favored for its TypeScript support, Yup remains a widely used choice due to its flexibility and seamless integration with React applications.
### Why use Yup for validation?
By using Yup, you can **simplify form validation** while keeping your codebase clean and scalable.
- It has a declarative validations schema allowing you to define complex validation rules in a clean and readable format.
- It encourages you to centralize validation logic for multiple forms making it reusable and maintainable.
- It's lightweight and performant with minimal overhead making it perfect for client side use.
## Features of Yup
Yup provides you with a declarative way to validate form data in [JavaScript apps](https://strapi.io/blog/how-to-build-a-school-website-with-strapi-cms-using-vanilla-javascript). It has a set of features which make it a flexible and efficient choice for handling validation in [React](https://react.dev/), [React hook form](https://react-hook-form.com/), and [other frameworks](https://strapi.io/blog/comprehensive-review-of-top-javascript-frontend-frameworks).
### Type checking
[Type checking](https://strapi.io/blog/improve-your-frontend-experience-with-strapi-types-and-type-script) reduces validation errors by making sure that form inputs have the correct data type. For example, forcing a field to accept a certain data type like numbers.
``` javascript
const schema = yup.object({
age: yup.number(), // Ensures the value is a number
});
```
### Chaining validators
Yup allows you yo chain multiple validation rules for a single field, so you can create flexible and custom validation logic.
``` javascript
const schema = yup.object({
username: yup.string().min(3).max(15).required()
});
```
### Conditional validation
Yup also supports dynamic validation rules that depend on other field values, this can be useful for multi-step forms or complex business logic.
``` javascript
const schema = yup.object({
password: yup.string().required(),
confirmPassword: yup.string().oneOf([yup.ref("password")], "Passwords must match"),
});
```
### Custom error messages
Yup allows you to provide user friendly error messages instead of generic system errors, which improves form usability.
``` javascript
const schema = yup.object({
email: yup.string().email("Enter a valid email address").required("Email is required"),
});
```
### Data transformations
You can also modify input values before validation, for example you can trim whitespace, convert strings to lowercase, or format dates.
``` javascript
const schema = yup.object({
username: yup.string().trim().lowercase(),
});
```
Here are some of the most commonly used built in validation methods that yup offers at a glance:
| **Method** | **Functionality** |
|-----------------|------------------------------------------------------|
| `.required()` | Ensures a field is not empty |
| `.email()` | Validates email format |
| `.min()` | Sets a minimum value or length |
| `.max()` | Sets a maximum value or length |
| `.matches()` | Validates against custom regex patterns |
## Yup schema
A Yup schema is a structured blueprint that defines the rules and constraints for form validation. It allows you to declare what your expected data types, required fields, and validation conditions are in a clean and reusable way.
When using Yup, instead of manually writing out all of your validation logic, you define a schema that will enforce those rules automatically.
### Basic Yup schema syntax
Yup schemas are normally created using `yup.object()`, and consists of **fields** with their respective validation rules.
For instance here's a basic schema validating a user registration form:
``` javascript
import * as yup from "yup";
const userSchema = yup.object({
name: yup.string().required("Name is required"),
email: yup.string().email("Invalid email").required("Email is required"),
age: yup.number().min(18, "Must be at least 18").required("Age is required"),
});
```
In the above code, each **field** in the schema represents a form input, validation rules like `.required()` are chained with other methods to define constraints, this schema can be used to validate form data before submission.
### Common use cases of Yup schemas
Yup supports nested objects, allowing you to validate structured data (an address inside a user profile object):
``` javascript
const userSchema = yup.object({
name: yup.string().required(),
address: yup.object({
street: yup.string().required(),
city: yup.string().required(),
zip: yup.string().matches(/^\d{5}$/, "Invalid ZIP code"),
}),
});
```
This helps to validate complex form structures, it also ensures all nested fields meet validation criteria.
Yup also allows validation of arrays of objects, this makes it very useful for forms which may have repeating fields (like a list of phone numbers):
``` javascript
const userSchema = yup.object({
contacts: yup.array().of(
yup.object({
type: yup.string().oneOf(["home", "work", "mobile"]),
number: yup.string().matches(/^\d+$/, "Must be a valid number"),
})
),
});
```
This is great for multi-step forms or dynamically added fields, and it ensures each item in an array follows the expected structure.
Lastly instead of duplicating validation logic across multiple forms, you can define reusable Yup schemas:
``` javascript
const emailSchema = yup.string().email("Invalid email").required();
const passwordSchema = yup.string().min(8, "Must be at least 8 characters");
const loginSchema = yup.object({
email: emailSchema,
password: passwordSchema,
});
const registerSchema = yup.object({
email: emailSchema,
password: passwordSchema,
confirmPassword: yup
.string()
.oneOf([yup.ref("password")], "Passwords must match"),
});
```
This promotes code reuse and maintainability as well as making sure you have consistent validation rules across different forms in your application.
## Yup validation with schema
Once you have defined all of your Yup schemas, you can use them to validate data. Yup provides you with both synchronous and asynchronous validation methods, as well as support for custom validation logic.
### Synchronous validation
Synchronous validation runs instantly without returning a promise, making it useful for when validation does not involve asynchronous operations (simple field checks)
The method `.validateSync()` validates data synchronously, throwing an error if validation fails.
``` javascript
import * as yup from "yup";
const schema = yup.object({
name: yup.string().required(),
age: yup.number().min(18).required(),
});
try {
schema.validateSync({ name: "John", age: 17 }); // Throws validation error
} catch (error) {
console.log(error.message); // "age must be at least 18"
}
```
### Asynchronous validation
In real world applications, validation will at some point require asynchronous checks-such as verifying a username's availability in a database or checking external APIs for information.
The `.validate()` method returns a promise, making it suitable for async operations.
``` javascript
const schema = yup.object({
username: yup.string().required(),
});
const validateData = async () => {
try {
const data = await schema.validate({ username: "" });
console.log("Valid!", data);
} catch (error) {
console.log("Validation failed:", error.message);
}
};
```
### Custom validation logic
Yup allows you to make custom validation rules using the `.test()` method. This is useful when built-in validation methods don't meet your specific needs.
For example the following validation makes sure that a password contains at least one number:
``` javascript
const passwordSchema = yup.string()
.min(8, "Password must be at least 8 characters")
.test("contains-number", "Password must include a number", (value) => {
return /\d/.test(value); // Ensures at least one number exists
});
passwordSchema
.validate("password") // No number, so this fails
.catch((error) => console.log(error.message)); // "Password must include a number"
```
You can also use `.test()` for more complex validations, for instance maybe you want to validate a field based on another fields value (password confirmation):
``` javascript
const schema = yup.object({
password: yup.string().required(),
confirmPassword: yup.string().test(
"match-password",
"Passwords must match",
function (value) {
return value === this.parent.password;
}
),
});
schema
.validate({ password: "123456", confirmPassword: "123" })
.catch((error) => console.log(error.message)); // "Passwords must match"
```
The above Yup schema checks if the `confirmPassword` field matches the `password` field all in one `.test()` method.
## How to validate forms with Yup
Before introducing React Hook Form, the following example will show how Yup works independently in a basic form validation scenario.
First define a Yup schema, you can create a simple schema that ensures that the object has:
- A name field which is required
- An email field which must be a valid email
- An age field that must be at least 18 years old
``` javascript
import * as yup from "yup";
const schema = yup.object({
name: yup.string().required("Name is required"),
email: yup.string().email("Invalid email format").required("Email is required"),
age: yup.number().min(18, "You must be at least 18").required("Age is required"),
});
```
Now you can use the `.validate()` method to validate a sample form submission.
``` javascript
const formData = { name: "", email: "invalid-email", age: 15 };
schema.validate(formData, { abortEarly: false })
.then(() => console.log("Validation passed!"))
.catch((error) => console.log(error.errors));
```
When validation fails, Yup will return an array of error messages:
``` javascript
["Name is required", "Invalid email format", "You must be at least 18"]
```
Right now, you have to manually check for errors and display them in the UI, which is repetitive and inefficient, this is where React Hook Form excels. Let's see how React Hook Form can simplify the validation process.
## Yup validation with React hook form
Instead of manually checking for validation errors and then having to display them, you can use React Hook Form to make your form handling more efficient (minimal re-renders), easier to manage (auto triggers validation) and easier to integrate with Yup in general.
### Step 1: Create project and Install dependencies
First create a folder to host your new project in:
```
mkdir yup-example
```
Create the frontend for the project:
```
npm create vite@latest yup-frontend --template react
```
Change into the `yup-frontend` directory and run the following command to install `react-hook-form` and Yup's resolver package:
```
npm install react-hook-form @hookform/resolvers yup
```
### Step 2: Create the form component
Now, create a form component called `SignupForm` in the root directory with the following code:
``` javascript
import React from "react";
import { useForm } from "react-hook-form";
import { yupResolver } from "@hookform/resolvers/yup";
import * as yup from "yup";
// Define Yup Schema
const schema = yup.object({
name: yup.string().required("Name is required"),
email: yup.string().email("Invalid email").required("Email is required"),
age: yup.number().min(18, "You must be at least 18").required("Age is required"),
});
const SignupForm = () => {
const { register, handleSubmit, formState: { errors } } = useForm({
resolver: yupResolver(schema),
});
const onSubmit = (data) => {
console.log("Form Submitted:", data);
};
return (
<form onSubmit={handleSubmit(onSubmit)}>
<div>
<label>Name:</label>
<input {...register("name")} />
<p>{errors.name?.message}</p>
</div>
<div>
<label>Email:</label>
<input {...register("email")} />
<p>{errors.email?.message}</p>
</div>
<div>
<label>Age:</label>
<input type="number" {...register("age")} />
<p>{errors.age?.message}</p>
</div>
<button type="submit">Register</button>
</form>
);
};
export default SignupForm;
```
In the above code the `register()` function binds the inputs to React Hook Form, the `resolver: yupResolver(schema)` automatically validates data with Yup, and `errors.name?.message` displays validation errors.
Now replace the code in `App.jsx` with the following:
``` javascript
import reactLogo from "./assets/react.svg";
import viteLogo from "/vite.svg";
import "./App.css";
import SignupForm from "./SignupForm";
function App() {
return (
<>
<div>
<a href="https://vite.dev" target="_blank" rel="noopener noreferrer">
<img src={viteLogo} className="logo" alt="Vite logo" />
</a>
<a href="https://react.dev" target="_blank" rel="noopener noreferrer">
<img src={reactLogo} className="logo react" alt="React logo" />
</a>
</div>
<h1>Form Example</h1>
<SignupForm />
</>
);
}
export default App;
```
The above code is just importing and then displaying the `SignupForm` in the `App` component.
Start the app with `npm run dev` and navigate to `http://localhost:5173/` in your browser, the form should appear, try entering some numbers for the name and pressing the button to register.
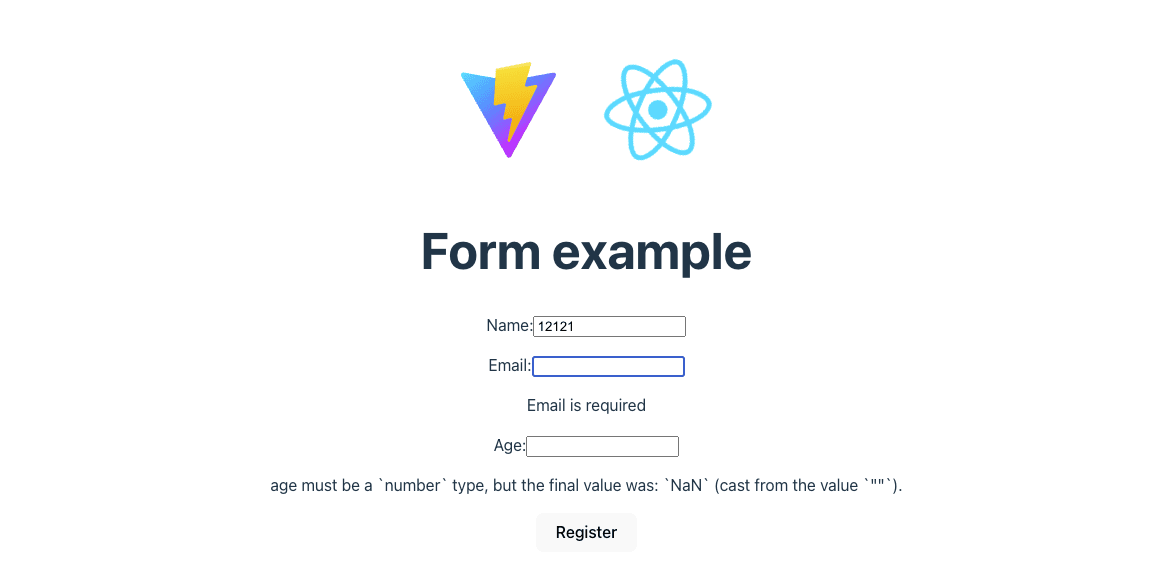
As you can see entering a number for the name field and leaving email blank shows validation errors.
## Set up a Strapi Backend
Now that you have form validation in place, let's extend the form to submit user data to a Strapi backend.
Strapi is a [headless CMS](https://strapi.io/what-is-headless-cms) that lets you easily store and manage form data, with Strapi you can:
- Spin up a backend effortlessly.
- Save form submissions in a database.
- Send form data via API without having to set up a full backend.
- Get an admin panel to view all submitted data.
### Step 1: Set up Strapi locally
In your terminal, open another tab and navigate back to `yup-example` and then run the following command:
```
npx create-strapi@latest strapi-backend --quickstart
```
This should auto start and bring you to the admin panel, create a new admin user and proceed.

### Step 2: Create a "YupUser" collection in Strapi
Now under content-type-builder create a new collection (which are entities where we can store data) called - `YupUser` by clicking on `Create new collection type` and add the `name`, `email`, and `age` fields respectively:
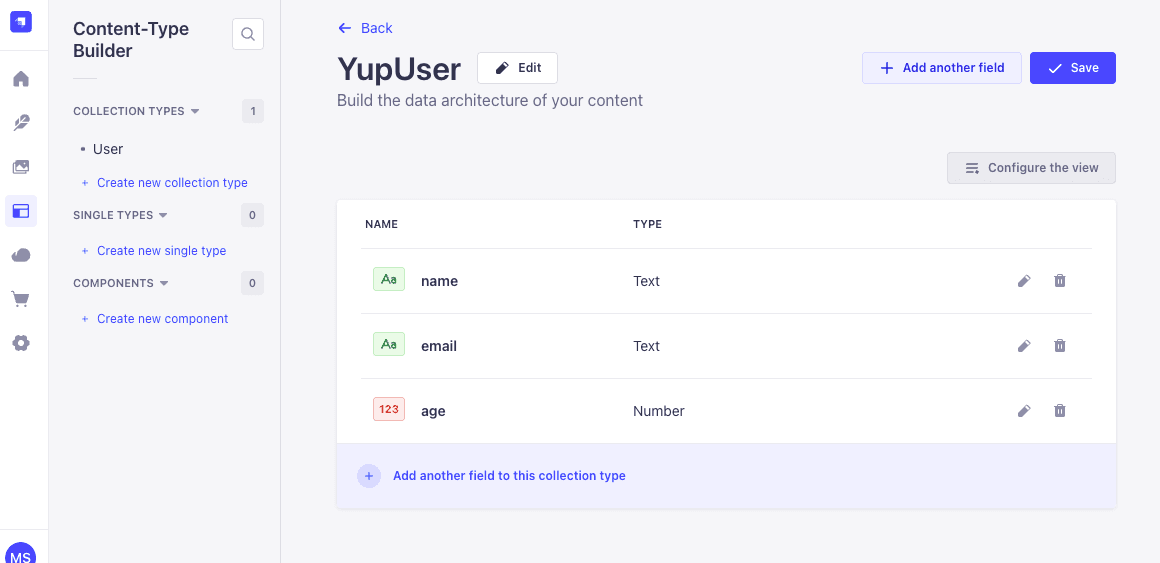
Now save it by clicking on `save` in the top right hand corner.
You will also need to enable public API access so the form can send data, you find this under the **settings -> Roles -> Public -> Permissions**:

Click to select all and then save in the top right hand corner.
### Step 3: Modify the form to submit data to Strapi
Now we want to modify the frontend code so that when the form is submitted it sends a `POST` request to the Strapi backend, if the request is successful we want to log a success message, if something goes wrong, we catch the error and display it.
So change the `onSubmit` function in the `SignupForm` component to the following:
``` javascript
const onSubmit = async (data) => {
try {
const response = await fetch("http://localhost:1337/api/users", {
method: "POST",
headers: { "Content-Type": "application/json" },
body: JSON.stringify({ data }),
});
if (!response.ok) throw new Error("Failed to submit form");
console.log("Form submitted successfully!");
} catch (error) {
console.error("Error:", error);
}
};
```
Now try navigating to the app and entering a user.
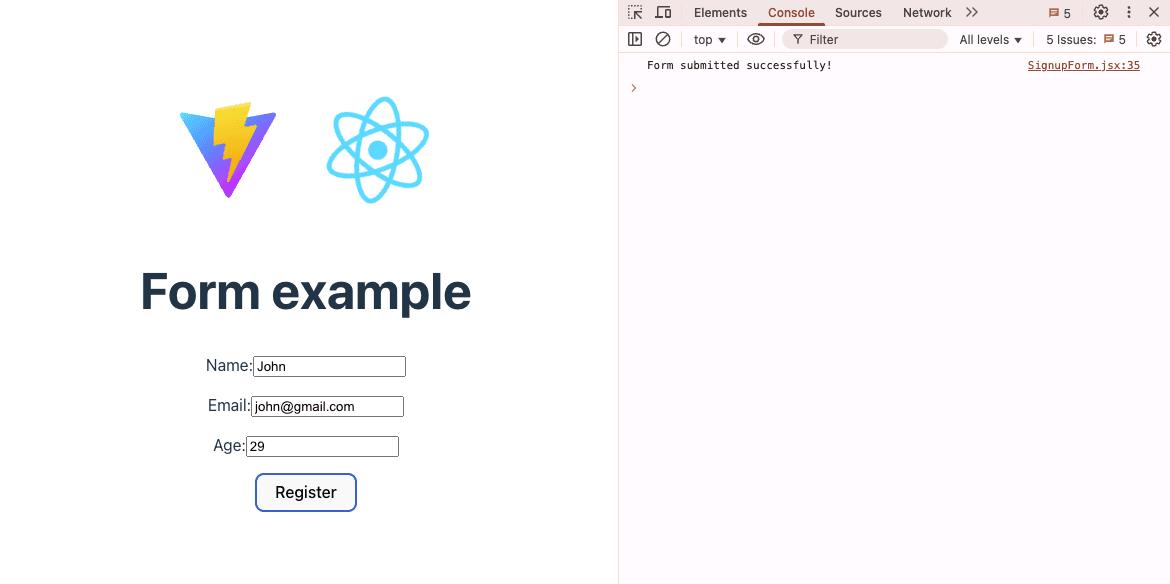
Provided you enter valid data to the form and submit you will see a new user appear in the Strapi dashboard, saved to the database, If you enter incorrect information our validation will stop it before it has a chance to be sent to the database.

## Why use Strapi as a Backend for your React apps?
Strapi is a powerful headless CMS that simplifies backend development, it allows you to quickly set up APIs and manage content without having to write complex backend logic.
### What's new in Strapi v5?
We have recently released a [new version of our platform](https://strapi.io/five) and here are just a few of its benefits:
* **Improved API performance:** Faster response times for real-time apps.
* **Better role management:** More granular access controls.
* **Plugin system enhancements:** Extend Strapi with custom plugins and community add-ons.
By using Strapi with a frontend library like [React](https://strapi.io/integrations/react-cms?), you get a flexible, efficient, and maintainable backend without the usual time constraint and complexity, allowing you to focus on building great frontends and complex business logic.
## Github Source Code
**You can find the full code example repository [here](https://github.com/gitChimp88/yup-example).**
## Conclusion
Integrating Yup with React Hook Form provides a powerful, efficient, and scalable approach to form validation in React applications. By leveraging schema-based validation, you can ensure consistent, reusable, and maintainable form logic while reducing boilerplate code.
Key Takeaways
* Yup simplifies validation logic with declarative schemas, reducing manual error handling.
* React Hook Form enhances performance with minimal re-renders and automatic validation.
* Combining both tools streamlines form development, ensuring a better user experience and cleaner codebase.
* Extending this setup with Strapi as a backend enables seamless data storage, API integration, and better form data management.
By following this guide, you now have a fully functional validation system that can handle everything from basic field checks to complex, conditional validations. Whether you're working on authentication forms, registration pages, or multi-step wizards, this combination ensures your forms are fast, reliable, and user-friendly.
 Sign in with Wallet


