---
title: "Lecture 6: Working with remotes"
tags: Lecture, Pedro, Day 4
description: "TODO"
---
Introduction to Git --- Fall 2023
# Lecture 6: Working with remotes
<!-- .slide: data-background="#ffffff" -->
<!-- Lecture material made by Pedro Ojeda-May for the version of the course that was given in fall 2020. Lecture was first given by Pedro Ojeda-May in fall 2020.-->
   
<small>Slides: https://hackmd.io/@git-fall-2023/L6-remotes#/</small>
---
<!-- .slide: data-background="#ffffff" -->
<style type="text/css">
.reveal p {
text-align: left;
}
.reveal ul {
display: block;
}
.reveal ol {
display: block;
}
</style>
## Concepts
A remote repository is a version of the project which can be hosted in your local machine, some network, or over the internet (Pro Git, 2nd. Ed., Scott Chacon and Ben Straub) where you and your collaborators can push or pull code modifications.
In addition to this, a remote is a way to backup your repository.
---
<!-- .slide: data-background="#ffffff" -->

---
<!-- .slide: data-background="#ffffff" -->
<!-- .slide: style="font-size: 30px;" -->
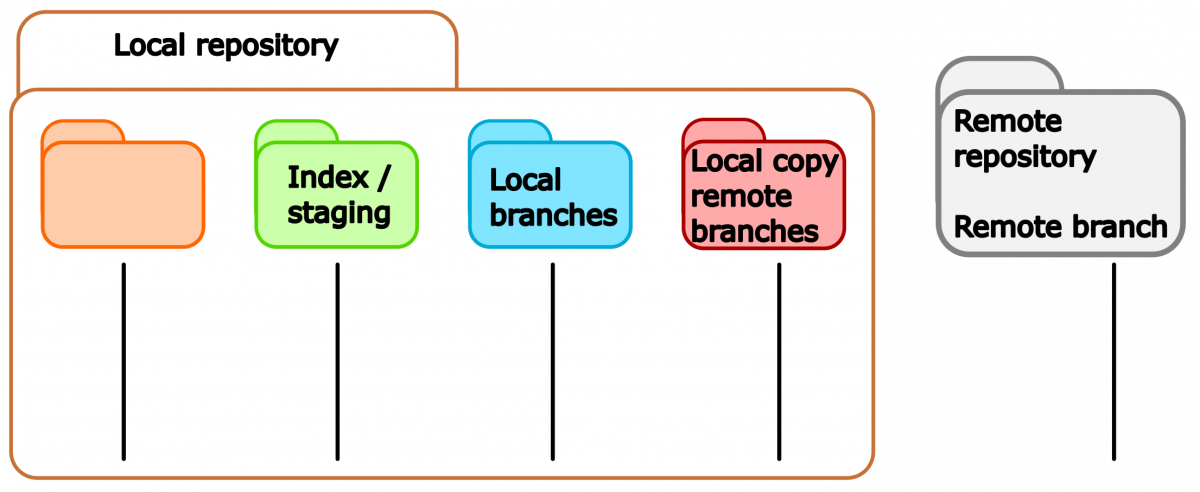
## Updated scheme for file stages

---
<!-- .slide: data-background="#ffffff" -->
## Concepts cont.
The command
```java
$ git remote -v
origin git@bitbucket.org:arm2011/gitcourse.git (fetch)
origin git@bitbucket.org:arm2011/gitcourse.git (push)
```
displays the remotes that are already set up where you can *fetch* and *pull* changes. In this case there is only a single remoted called **origin**.
---
<!-- .slide: data-background="#ffffff" -->
```java
$ git graph
* 2e56d0a (HEAD -> main, origin/main, origin/HEAD) text of exercise git diff usage
* 22a7316 Adding yet more lectures
* 0ddb791 Adding some more of the lectures
* 3ff9f8f Adding some of the lectures
```
---
<!-- .slide: data-background="#ffffff" -->
<!-- .slide: style="font-size: 30px;" -->
## Adding remotes
A remote repository can be added manually with the command
```java
$ git remote add remote_name location
$ git remote add remote_name git@github.com:aliceuser2020/my-first-project.git
$ git remote -v
remote_name git@github.com:aliceuser2020/my-first-project.git (fetch)
remote_name git@github.com:aliceuser2020/my-first-project.git (push)
```
where the location of the remote can be an URL or the path if that is in your local machine.
---
<!-- .slide: data-background="#ffffff" -->
Protocols:
- local -> git clone /opt/git/project.git
- SSH -> git clone ssh://user@server:project.git
- HTTP -> git clone http://example.com/gitproject.git
- Git
---
<!-- .slide: data-background="#ffffff" -->
Why do we need more than one remote?
```graphviz
digraph {
rankdir=TD
S [style=invis]
"Bob repo" [shape=diamond]
"Alice fork" [fixedsize=circle]
"Alice fork" -> "Alice local"
"Bob repo" -> "Alice fork"
"Alice local" -> "Bob repo" [style=dashed]
orig [label="origin" shape=plaintext fontcolor=red]
orig -> "Alice fork" [style=dashed color=red]
ups [label="upstream" shape=plaintext fontcolor=red]
ups -> "Bob repo" [style=dashed color=red]
}
```
---
<!-- .slide: data-background="#ffffff" -->
<!-- .slide: style="font-size: 28px;" -->
```java
$ git remote add upstream git@github.com:bob/my-first-project.git
$ git remote -v
origin git@github.com:aliceuser2020/my-first-project.git (fetch)
origin git@github.com:aliceuser2020/my-first-project.git (push)
upstream git@github.com:bobuser2020/my-first-project.git (fetch)
upstream git@github.com:bobuser2020/my-first-project.git (push)
```
---
<!-- .slide: data-background="#ffffff" -->
<!-- .slide: style="font-size: 30px;" -->
```java
$git graph
* 2e56d0a (HEAD -> main, upstream/main, origin/main, origin/HEAD) text of exercise git diff usage
* 22a7316 Adding yet more lectures
* 0ddb791 Adding some more of the lectures
* 3ff9f8f Adding some of the lectures
```
---
<!-- .slide: data-background="#ffffff" -->
## Working with remotes
One can push or fetch/pull to or from remotes:
```shell
$ git push remote_name branch_name
$ git fetch remote_name branch_name
$ git pull remote_name branch_name
```
---
<!-- .slide: data-background="#ffffff" -->
In case you obtained the repository by cloning an existing one you will have the **origin** remote. You can do push/fetch/pull for this remote with
```shell
$ git push origin master
$ git fetch origin master
$ git pull origin master
```
---
<!-- .slide: data-background="#ffffff" -->
or
```shell
$ git push
$ git fetch
$ git pull
```
because the remote *origin* and the *master* branch are configured for pushing and pulling by default upon cloning.
---
<!-- .slide: data-background="#ffffff" -->
The command:
```shell
$ git pull
```
brings all the changes (branches) that are in the remote and tries to merge them with the current branch of the local repo. The default behavior of *git pull* (*fetch* part) is in the *$GIT_DIR/config* file:
```shell
[remote "origin"]
fetch = +refs/heads/*:refs/remotes/origin/*
```
---
<!-- .slide: data-background="#ffffff" -->
In fact, *git pull* is a combination of two commands:
```shell
$ git fetch remote_name branch_name
$ git merge remote_name/branch_name
```
If you want to fetch all branches and merge the current one:
```shell
$ git fetch
$ git merge
```
---
<!-- .slide: data-background="#ffffff" -->
## Advanced
The command
```shell
$ git push
```
will send the changes in the current branch to the remote by default.
---
<!-- .slide: data-background="#ffffff" -->
The default behavior can be seen with:
```shell
$ git config --get push.default
```
This can be changed by applying:
```shell
git config --global push.default matching(default), current, ...
```
---
<!-- .slide: data-background="#ffffff" -->
If you have a brand-new branch called **new**, you can push it the first time with the command:
```shell
git push -u origin new
```
which is equivalent to
```shell
git push origin new
git branch --set-upstream new origin/new
```
---
<!-- .slide: data-background="#ffffff" -->
then, you will be able to push/pull the changes in the branch by simply typing **git push/pull**
---
<!-- .slide: data-background="#ffffff" -->
<!-- .slide: style="font-size: 30px;" -->
### Displaying remote information
```console
$ git remote show origin
* remote origin
Fetch URL: git@bitbucket.org:arm2011/gitcourse.git
Push URL: git@bitbucket.org:arm2011/gitcourse.git
HEAD branch: master
Remote branches:
experiment tracked
feature tracked
less-salt tracked
master tracked
nested-feature tracked
Local branches configured for 'git pull':
feature merges with remote feature
master merges with remote master
nested-feature merges with remote nested-feature
Local refs configured for 'git push':
feature pushes to feature (fast-forwardable)
master pushes to master (up to date)
nested-feature pushes to nested-feature (up to date)
```
---
<!-- .slide: data-background="#ffffff" -->
### Renaming remotes
```shell
$ git remote rename initial_name new_name
```
### Deleting remotes
```shell
$ git remote remove remote_name
```
---
<!-- .slide: data-background="#ffffff" -->
## Bare repositories
A bare repository is a repository with no working directory.
---
<!-- .slide: data-background="#ffffff" -->
### Creating a bare repository
```shell
$ mkdir bare.git && cd bare.git
$ git init --bare
```
### Cloning a bare repository cont.
```shell
$ git clone --bare location
```
---
<!-- .slide: data-background="#ffffff" -->
## Using GitHub

---
<!-- .slide: data-background="#ffffff" -->
Upon login into your GitHub account you will see the following option to create a new repository

---
<!-- .slide: data-background="#ffffff" -->
<!-- .slide: style="font-size: 28px;" -->
Here, you can choose the type of repository that is appropriate to your needs (public/private), if you want to add *README* and *.gitignore* files and also the type of license for your project,

---
<!-- .slide: data-background="#ffffff" -->
GitHub will suggest some steps that you can take for your brand-new repository:

---
<!-- .slide: data-background="#ffffff" -->

---
<!-- .slide: data-background="#ffffff" -->
## Setting ssh-keys
1. ssh-keygen -t rsa -b 4096 -C "pedro@gemail.com"
2. eval $(ssh-agent -s)
3. ssh-add ~/.ssh/id_rsa
4. clip < ~/.ssh/id_rsa.pub (it copies the ssh key that has got generated)
---
<!-- .slide: data-background="#ffffff" -->
5. Go to your remote repository on github.com and then **Settings** -> **SSH and GPG keys** ->new SSH key -> write a title and paste the copied SSH key and save it
6. check if the key was properly set on github/bitbucket
```
$ ssh -T git@bitbucket.org
$ ssh -T git@github.com
```
---
<!-- .slide: data-background="#ffffff" -->

---
<!-- .slide: data-background="#ffffff" -->
## Network visualization

---
<!-- .slide: data-background="#ffffff" -->
## Development with collaborators
In the following scenario, a developer, Bob, has its repo on GitHub. Another developer, Alice, finds it useful and forks it.
```graphviz
digraph {
rankdir=LR
S [style=invis]
"Bob repo" [shape=diamond]
"Alice fork" [fixedsize=circle]
"Alice fork" -> "Alice local"
"Bob repo" -> "Alice fork"
"Alice local" -> "Bob repo" [style=dashed]
orig [label="origin" shape=plaintext fontcolor=red]
orig -> "Alice fork" [style=dashed color=red]
ups [label="upstream" shape=plaintext fontcolor=red]
ups -> "Bob repo" [style=dashed color=red]
}
```
---
<!-- .slide: data-background="#ffffff" -->
## Forking a repository
To fork a repository, Alice go to the URL of the target repository and use the option *Fork* in Bob's repository:

---
<!-- .slide: data-background="#ffffff" -->
## Forking a repository
Then, Alice will see the forked repository on her user space:

---
<!-- .slide: data-background="#ffffff" -->
After doing some changes, Alice push them to her forked repository but she wants Bob become aware of them (1 commit in this case, click on this commit)

---
<!-- .slide: data-background="#ffffff" -->
A **pull request** will be suggested:

---
<!-- .slide: data-background="#ffffff" -->
You can then create a the PR:

---
---
<!-- .slide: data-background="#ffffff" -->
Another way to create PR is with "Pull request" option:

---
<!-- .slide: data-background="#ffffff" -->
<!-- .slide: style="font-size: 30px;" -->
Then, Bob receives an email with the pull request information about Alice modifications. On the GitHub site he sees the request:

---
<!-- .slide: data-background="#ffffff" -->
Because Bob find the changes from Alice useful and there are no conflicts he can merge them straight away,

---
<!-- .slide: data-background="#ffffff" -->
## Issues
If you find some issues in the files/code you can open an "Issue" on GitHub

---
<!-- .slide: data-background="#ffffff" -->

---
<!-- .slide: data-background="#ffffff" -->
You may also assign people to the issues that are more related to that topic.
In future commits you may refer to this issue by using the issue number, <span style="color:blue">#2</span> in this case. This will allow you to track the evolution of the issue on GitHub.
---
<!-- .slide: data-background="#ffffff" -->
## Best practices
- Communicate with your colleagues.
- Some commands such as **git rebase** change the history. It wouldn't be a good idea to use them on public branches.
- Don't accept pull requests right away.
 Sign in with Wallet


