# BBC micro:bit
**[Wiki Home](https://hackmd.io/@fablabedp/home)**
###### tags:`physical-computing` `microbit` `makecode`

hardware overview:
https://tech.microbit.org/hardware

Main MCU: Nordic Semiconductor nRF52833 (v2), nRF51822 (v1)
*nRF52833: Arm Cortex-M4 32 bit, 64MHz, 512KB Flash, 128KB RAM*
*nRF51822: Arm Cortex-M0 32 bit, 16MHz, 256KB Flash, 16KB RAM*
Interface MCU: Nordic nRF52833 or nRF52820 (v2.2), Freescale KL27 (v2), KL26 (v1)
Excellent list of resources for micro:bit: https://github.com/carlosperate/awesome-microbit
## Power
### Supply
https://tech.microbit.org/hardware/powersupply/
the microbit can be powered by:
- 3-5V via usb micro connector
- 3V via JST connector (connects directly to VCC on v1 board. on v2 passes through the regulator, and so should be 5V tolerant?)
- 3V via '3V' and 'GND' pins on Edge connector, or the two rectangular padas on rear right edge of board.
VCC is min 1.7 max 3.6V
*On v1 board should not connect a lipo battery to the JST connector as the voltage will likely exceed the 3.6V vcc max.*
### Consumption
KL26's on chip regulator on v1 board provides 120mA.
NCP114BMX330TCG Regulator on v2 board provides 300mA.
Board with all on-board peripherals in use consumes max 30mA
### Sleep mode
v2 board only
https://support.microbit.org/support/solutions/articles/19000120358-how-do-i-power-off-or-put-the-micro-bit-to-sleep-
- press and hold power/reset for 5 seconds
- if powered by usb, will enter 'sleep' mode
- if powered by battery or external power, will power off
- press reset to wake/power-on
## Programming
Programming is done by copying a hex file into the virtual external drive created by the microbit.
In Chrome or Edge webUSB can be used to connect directly to a web app to the board to program it or open a serial connection.
### MakeCode
https://makecode.microbit.org/
https://makecode.com/about
Programming by blocks, javascript or python. Can create projects that are python/javascript-only, or use a mixed project to permit interchanging between languages.
MakeCode is based on the Microsoft Programming Experience Toolkit (PXT).
https://github.com/microsoft/pxt
There are various versions of MakeCode for other "targets" such as the Adafruit Circuit Playground: https://makecode.adafruit.com
and a variety of other boards and platforms:
https://maker.makecode.com/
https://makecode.com/labs
Code in MakeCode is converted to Static TypeScript. When downloading the code it is converted to the target's native format and can be saved as a hex file. (in the case of the microbit, maybe this is in C/C++ for interpretation by the the DAL/CODAL rutnime? see https://tech.microbit.org/software/runtime/)
*MakeCode Python is not compatible with MicroPython, it is tailored to MakeCode and has a different API ("It is in fact just static TypeScript surfaced with Python syntax")
https://support.microbit.org/support/solutions/articles/19000111744-makecode-python-and-micropython*
#### Command Line Tool
PXT can be used via the commandline using node.js
https://makecode.com/cli
### MicroPython
Can program the microbit directly with MicroPython
https://github.com/bbcmicrobit/micropython
https://microbit-micropython.readthedocs.io/en/v2-docs/
Using the microbit web Python Editor, wich also supports webUSB
https://python.microbit.org/v/2
https://github.com/bbcmicrobit/PythonEditor
Can also use the Mu desktop Python Editor
https://codewith.mu/en/
Can also use the REPL (Read, Evaluate, Print Loop) via either editor, or via a serial connection in such as with PuTTY, or screen
### CircuitPython
CircuitPython is a version of MicroPython developed by Adafruit primarily for the SAMD21 boards but with some added features.
https://learn.adafruit.com/welcome-to-circuitpython/overview
Using CircuitPython on the microbit requires updating the firmware first:
https://circuitpython.org/board/microbit_v2/
### Arduino
It is possible to use the Arduino IDE with the microbit
https://learn.adafruit.com/use-micro-bit-with-arduino/install-board-and-blink
## Firmware
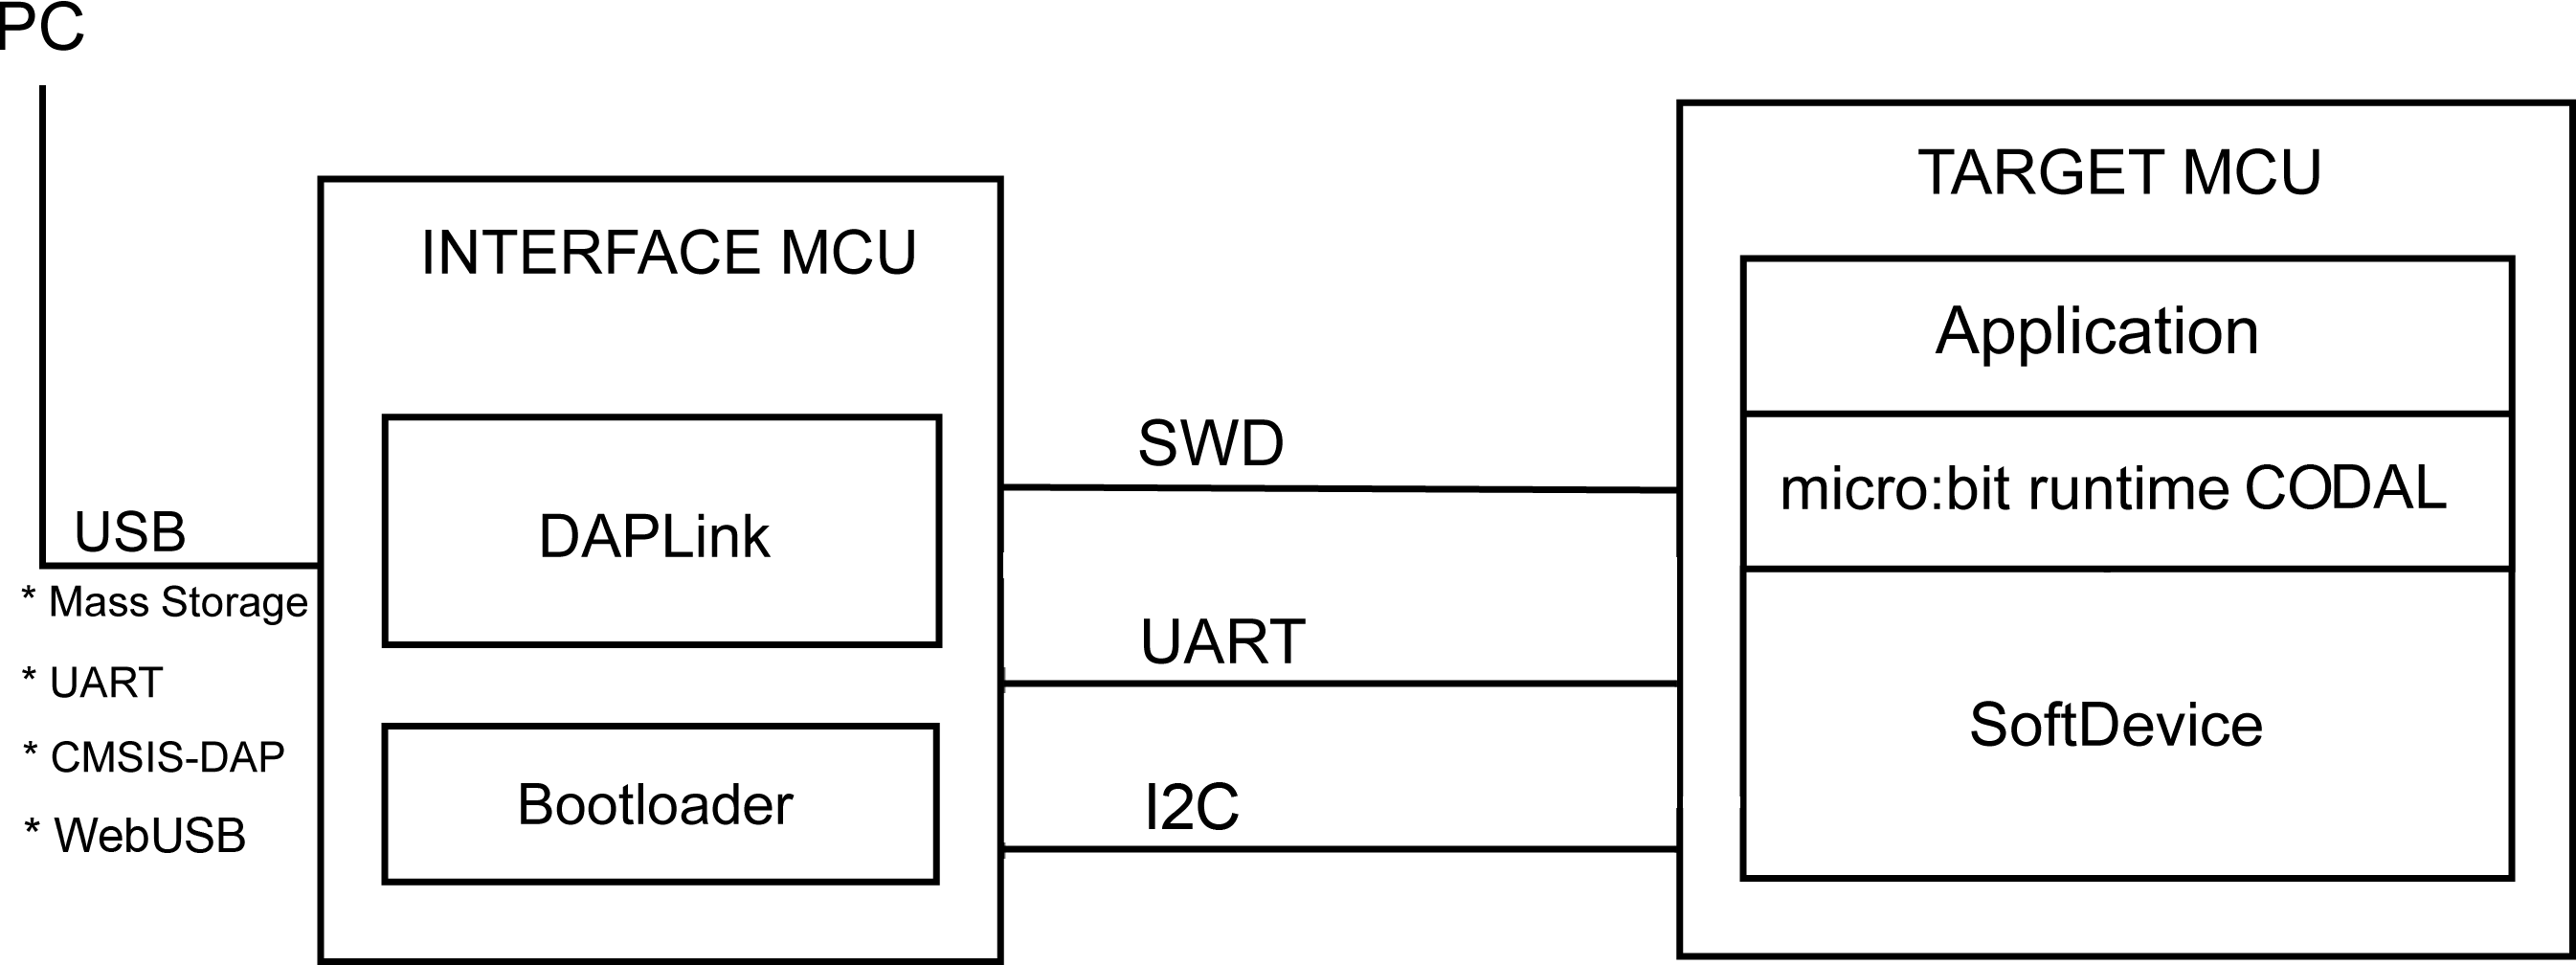
The microbit has an interface MCU that provides:
- MSC - USB mass storage device for drag-and-drop programming of the target MCU’s flash memory
- CDC - serial pass-through from the target MCU to the PC.
- HID - CMSIS-DAP compliant debug channel
- WebUSB
https://microbit.org/get-started/user-guide/firmware/
https://tech.microbit.org/software/daplink-interface/
The microbit can boot in two ways:
- interface mode, appears as the external drive `MICROBIT` - hex files are written to the target MCU flash
- bootloader mode, appears as the external drive `MAINTENANCE` - hex files are written to the interface MCU flash (in this case, the hex file must contain a DAPLink image)
- this will update the DAPLink firmware but not the bootloader on the interface MCU. If there is an issue with the bootloader, a full DAPlink image can be flashed onto the interface chip via another bootloader mode (https://tech.microbit.org/software/daplink-interface/#updating-the-daplink-full-image)
### DAPLink
Interface software for programming and debugging software on arm cortex cpus.
https://daplink.io/
https://github.com/ARMmbed/DAPLink
Nice quick overview by ladyada about SWD, how it is different from SPI, and how they developed adafruit_DAP for flashing the SAMD chips on their boards:
https://www.youtube.com/watch?v=bzihf4l7joc
https://github.com/adafruit/Adafruit_DAP
## Wireless
Supports Bluetooth 5.1 with Bluetooth Low Energy(BLE)
https://tech.microbit.org/bluetooth/
There is also a microbit-radio protocol that uses other standards provided by the Nordic chip. This is the protocol used by the default Radio functions in MakeCode, and provides a simpler way to send messages between microbits.
https://support.microbit.org/support/solutions/articles/19000083637-using-the-micro-bit-wirelessly-
https://lancaster-university.github.io/microbit-docs/ubit/radio/
In order to use bluetooth function in MakeCode, an extension needs to be added and it will remove the default Radio functions.
Introduction to networking, using the microbit-radio protocol:
https://microbit.nominetresearch.uk/networking-book-online/