# Selenium 的網頁測試應用(含免安裝解決方案)
<br>
## **概述**
Selenium 是支援 Python 的網路爬蟲套件,透過辨識頁面元素,能支援操作鍵盤輸入、下拉選單、滑鼠操作等動作,從而取代手動動作,實現自動化的網頁操作甚至產出測試報告
Selenium 由三部分構成:WebDriver+IDE+Selenium Grid
* **IDE** : 方便編輯**語法**或錄製操作流程,未必要用 Selenium 的
* **WebDriver** : Selenium 針對不同瀏覽器有支援的 WebDriver (或下載想用的瀏覽器開源 driver 來使用)
* **Selenium Grid** : 佈署多台電腦同時測試才會用到,本篇文章不說明
<br>

<br>
## **為 Selenium 安裝 driver**
查看自己瀏覽器版本並下載對應 WebDriver,或使用 Selenium IDE
[Chrome]( https://sites.google.com/chromium.org/driver/downloads )
[FireFox]( https://github.com/mozilla/geckodriver/releases )
[Edge]( https://developer.microsoft.com/en-us/microsoft-edge/tools/webdriver/ )
下載後呼叫使用→
```python=
from selenium import webdriver
driver = webdriver.Chrome("放置driver的路徑")
```
或直接 import Selenium 的 driver 來用→
```java=
import org.openqa.selenium.WebDriver;
import org.openqa.selenium.firefox.FirefoxDriver;
...
WebDriver driver = new FirefoxDriver();
```
<br>
## **Selenium 應用**
### **主要寫法分為「指定元素操作」、「ActionChains」**
### 針對指定元素呼叫方法
抓特定元素建成物件,再調用方法動作
```python=
from selenium import webdriver
from selenium.webdriver.support.select import Select # 使用 Select 對應下拉選單
import time
driver = webdriver.Chrome('./chromedriver')
driver.get('https://example.oxxostudio.tw/python/selenium/demo.html') # 開啟範例網址
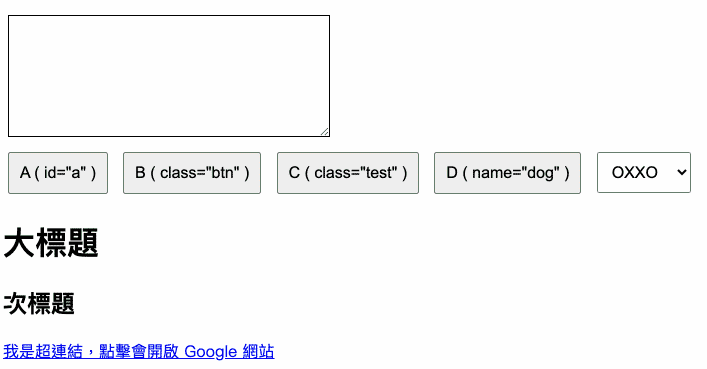
a = driver.find_element_by_id('a') # 取得 id 為 a 的網頁元素 ( 按鈕 A )
b = driver.find_element_by_class_name('btn') # 取得 class 為 btn 的網頁元素 ( 按鈕 B )
c = driver.find_element_by_css_selector('.test') # 取得 class 為 test 的網頁元素 ( 按鈕 C )
d = driver.find_element_by_name('dog') # 取得屬性 name 為 dog 的網頁元素 ( 按鈕 D )
h1 = driver.find_element_by_tag_name('h1') # 取得 tag h1 的網頁元素
link1 = driver.find_element_by_link_text('我是超連結,點擊會開啟 Google 網站') # 取得指定超連結文字的網頁元素
link2 = driver.find_element_by_partial_link_text('Google') # 取得超連結文字包含 Google 的網頁元素
select = Select(driver.find_element_by_xpath('/html/body/select')) # 取得 html > body > select 這個網頁元素
a.click() # 點擊 a
print(a.text) # 印出 a 元素的內容
time.sleep(0.5)
b.click() # 點擊 b
print(b.text) # 印出 b 元素的內容
time.sleep(0.5)
c.click() # 點擊 c
print(c.text) # 印出 c 元素的內容
time.sleep(0.5)
d.click() # 點擊 d
print(d.text) # 印出 d 元素的內容
time.sleep(0.5)
select.select_by_index(2) # 下拉選單選擇第三項 ( 第一項為 0 )
time.sleep(0.5)
h1.click() # 點擊 h1
time.sleep(0.5)
link1.click() # 點擊 link1
time.sleep(0.5)
link2.click() # 點擊 link2
print(link2.get_attribute('href')) # 印出 link2 元素的 href 屬性
```
<br>
**↓**
<br>
<br>
### 使用 ActionChains 將想做的動作串成「鍊」
```python=
from selenium import webdriver
from selenium.webdriver.common.action_chains import ActionChains
driver = webdriver.Chrome('./chromedriver')
driver.get('https://example.oxxostudio.tw/python/selenium/demo.html')
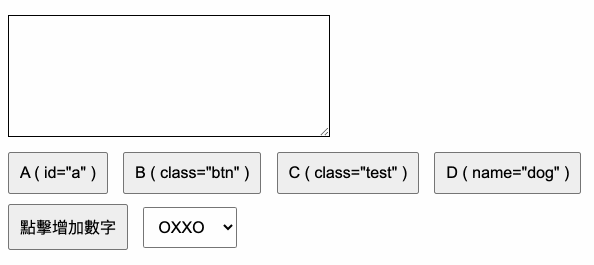
a = driver.find_element_by_id('a')
show = driver.find_element_by_id('show')
actions = ActionChains(driver)
actions.click(show).send_keys(['1','2','3','4','5']) # 輸入 1~5 的鍵盤值 ( 必須是字串 )
actions.pause(1) # 等待一秒
actions.click(a) # 點擊按鈕 A
actions.pause(1) # 等待一秒
actions.send_keys_to_element(show, ['A','B','C','D','E']) # # 輸入 A~E 的鍵盤值
actions.perform() # 送出動作
```
<br>
**↓**
<br>
<br>
## **常見解決方案**
要利用 Selenium 至少有下列方法:
* **安裝微軟 Power Automate 使用 Selenium IDE 流程**
* **安裝 Anaconda 直接寫 Python**
* **在 console pip install 裝來用**
* **裝 Selenium IDE 或 Katalon Recorder**
<br>
### 微軟 Power Automate 使用 Selenium IDE 流程
1. 以往只要在 Power Automate 線上建立**其他桌面流程**即可選擇 **Selenium IDE 流程**來錄製腳本
https://asia.flow.microsoft.com/zh-tw/
2. 然而**其他桌面流程**選項已消失(應該是整併到**桌面流程**內),而所有桌面流程均要求下載**電腦版 Power Automate**才可使用;透過**雲端流程**則無法選擇 **Selenium IDE 流程**
3. 相關限制如下
> 不支援多重要素驗證 (MFA),請使用不需要 MFA 的租用戶。
>
> 不支援這些 Selenium IDE 命令:Run、AnswerOnNextPrompt、ChooseCancelOnNextConfirmation、ChooseCancelOnNextPrompt、ChooseOkOnNextConfirmation、Debugger、ClickAt、DoubleClickAt、Echo、MouseOut、MouseUpAt,以及 MouseDownAt。
>
> Selenium IDE 動作或步驟要執行,就不能超過一分鐘。 請改用 Power Automate。
>
> **不支援按一下滑鼠右鍵。**
>
> 當您使用 Foreach 命令時,系統會產生額外的 Selenium IDE 流程輸入。 若要解決此問題,請在額外的欄位中輸入所有值。 這不會影響播放。
>
> **直接在 Selenium IDE 中播放可能不會如預期般運作。** 不過,在執行階段會正確播放。
結論,不是很推薦使用。若做功課有爬到這條路基本上不用優先考慮
<br>
### 安裝 Anaconda 直接寫 Python
1. [安裝 Anaconda](https://steam.oxxostudio.tw/category/python/info/anaconda.html)
2. 在 Anaconda Jupyter 下指令 !pip install selenium
3. 安裝 driver,瀏覽器開源的或官方的都可以
4. 撰寫 python 以執行一系列操作
例如 driver.get('URL') 來連線特定 URL

<br>
### 裝 Selenium IDE 或 Katalon Recorder
[Katalon Recorder](https://chrome.google.com/webstore/detail/katalon-recorder-selenium/ljdobmomdgdljniojadhoplhkpialdid)
[Selenium IDE](https://chrome.google.com/webstore/detail/selenium-ide/mooikfkahbdckldjjndioackbalphokd)


**(DEMO環節)**
<br>
## **其他酷東西**
### XPATH做元素定位(利用Ruto、ChroPath等插件工具)
XPATH:HTML 經過編譯成 XML 後找出的對應位置,且分為絕對位置與相對位置
> 相對位置://div[@class='ytp-tooltip-text-wrapper']
> 絕對位置: /html[1]/body[1]/ytd-app[1]/div[1]/ytd-page-manager[1]/ytd-watch-flexy[1]/div[5]/div[1]/div[1]/div[1]/div[1]/div[1]/div[1]/ytd-player[1]/div[1]/div[1]/div[10]/div[1]
**安裝[RUTO](https://chrome.google.com/webstore/detail/ruto-xpath-finder/ilcoelkkcokgeeijnopjnolmmighnppp?hl=zh-TW)**

**安裝[ChroPath](https://chrome.google.com/webstore/detail/chropath/ljngjbnaijcbncmcnjfhigebomdlkcjo?hl=zh-TW)**
F12後多出ChroPath頁籤方便查找元素:

<br>
### 拍截圖
```python=
body = driver.find_element_by_tag_name('body')
body.screenshot('./test.png')
```
### 跑 JavaScript
```python=
h1 = driver.find_element_by_tag_name('h1')
h3 = driver.find_element_by_tag_name('h3')
script = '''
let h1 = arguments[0];
let h3 = arguments[1];
alert(h1, h3)
'''
driver.execute_script(script, h1, h3) # 執行 JavaScript,印出元素
sleep(2)
Alert(driver).accept() # 點擊提示視窗的確認按鈕,關閉提示視窗
```
### 切換視窗
```python=
driver.switch_to.window("windowName")
```
### 使用既有 Profile
若要使用 Google Chrome 中既有的 Profile 來進行測試,可將其作為參數加入 WebDriver:
```python=
from selenium import webdriver
# 設定檔案路徑參數成為自訂的 WebDriver (命名為 options)
options = webdriver.ChromeOptions()
options.add_argument("--user-data-dir=C:UsersOfficeGuideAppDataLocalGoogleChromeUser Data")
options.add_argument("--profile-directory=Profile 1")
# 使用自訂的 WebDriver
browser = webdriver.Chrome(options=options)
```
<br>
### 列印 PDF 報表(Goodinfo!為例)
```python=
import json
from time import sleep
from selenium import webdriver
from selenium.webdriver.chrome.options import Options
options = Options()
settings = {"recentDestinations": [{"id": "Save as PDF", "origin": "local", "account": ""}],
"selectedDestinationId": "Save as PDF", "version": 2,
"isCssBackgroundEnabled": True, "scalingType": 3, "scaling": 100}
#此處記得設定您本地電腦可以存檔的路徑
prefs = {"printing.print_preview_sticky_settings.appState": json.dumps(settings),
"savefile.default_directory": "C:/Users/user/Downloads"}
options.add_experimental_option('prefs', prefs)
options.add_argument('--kiosk-printing')
#這兩句處理 driver,請設定事前存好的driver 或 remote call來用
webdriver_path = 'D:/Python/CultivationGrid/selenium/chromedriver.exe'
driver = webdriver.Chrome(executable_path=webdriver_path, options=options)
driver.get("https://goodinfo.tw/StockInfo/index.asp")
driver.find_element_by_id("txtStockCode").click()
driver.find_element_by_id("txtStockCode").clear()
driver.find_element_by_id("txtStockCode").send_keys("0050")
driver.find_element_by_xpath(u"//input[@value='股票查詢']").click()
driver.find_element_by_id("imgKC").click()
sleep(5)
driver.execute_script('window.print();')
driver.close()
```
<br>
### 若有多支py可用BeautifulReport產報表來看
1. 下載BeautifulReport
https://github.com/TesterlifeRaymond/BeautifulReport
2. 資料夾名稱改為 BeautifulReport,放到 python 的 library
例 C:\Users\你的使用者名稱\AppData\Local\Programs\Python\Python39\Lib\site-packages\
3.
```python=
from selenium import webdriver
from selenium.webdriver.common.by import By
from selenium.webdriver.common.keys import Keys
from selenium.webdriver.support.ui import Select
from selenium.webdriver.support.ui import WebDriverWait
from selenium.webdriver.common.action_chains import ActionChains
from selenium.webdriver.support import expected_conditions as EC
from BeautifulReport import BeautifulReport
from webdriver_manager.chrome import ChromeDriverManager
import time
import unittest
## 設定Chrome的瀏覽器彈出時遵照的規則
## 這串設定是防止瀏覽器上頭顯示「Chrome正受自動控制」
options = webdriver.ChromeOptions()
options.add_experimental_option("excludeSwitches", ["enable-automation"])
options.add_experimental_option('useAutomationExtension', False)
## 關閉自動記住密碼的提示彈窗
options.add_experimental_option("prefs", {
"profile.password_manager_enabled": False,
"credentials_enable_service": False
})
## 如果要將CASE拆成幾個不同的方法,需要用一個Unitest Class包覆起來,然後加上修飾符@classmethod
class Test(unittest.TestCase):
@classmethod
def setUpClass(self):
self.driver = webdriver.Chrome(chrome_options=options)
self.action = ActionChains(self.driver)
## 開啟Chrome新視窗,前往Youtube網址並最大化視窗
self.URL = "https://youtube.com"
self.driver.get(self.URL)
self.driver.maximize_window()
@classmethod
def tearDownClass(self):
self.driver.quit() #全部做完後關閉瀏覽器
## Test Case 的命名方式務必以「test_01_* ~ test_99_*」為主,讓爬蟲依照順序走
def test_01_search(self):
"""
測項1
"""
def test_02_open_target(self):
"""
測項2
"""
def test_03_back_to_list(self):
"""
測項3
"""
# basedir就是存放所有TEST Case的目錄,讓它爬 pattern = '*.py',所以要做哪個類別的測試就指定哪個前贅
basedir = "D:/auto_test/"
if __name__ == '__main__':
# 取得資料夾目錄底下,符合後面任何副檔名為.py,並進行所有test的測試項目
test_suite = unittest.defaultTestLoader.discover(
basedir, pattern='*.py')
# 測試結果加入到 BeautifulReport 套件內
result = BeautifulReport(test_suite)
# 結果產生Report 檔案名稱為 filename, 敘述為 description, log_path 預設放在跟目錄底下就行
result.report(filename='report',
description='我的第一個測試', log_path='D:/auto_test/')
```
**↓**

<br>
### 做好的腳本可以用 Robointern 在本地電腦排程執行
[Robointern](https://robointern.tech/#screens)
<br>
## **參考資料**
[Microsoft Build 建立及測試 Selenium IDE 流程](https://docs.microsoft.com/zh-tw/power-automate/desktop-flows/create-web)
[ Steam教育網 Selenium 函式庫 ]( https://steam.oxxostudio.tw/category/python/spider/selenium.html )
[Selenium 是什麼?用 Python Selenium 自動爬網頁抓報表,初學者必看的簡單教學 ]( https://igoamazing.com/python-selenium/#1_%E9%8C%84%E8%A3%BD%E4%B8%A6%E8%87%AA%E5%8B%95%E7%94%A2%E7%94%9F%E7%A8%8B%E5%BC%8F%E7%A2%BC )
[Python Selenium with VSCODE 教學筆記 ]( https://hackmd.io/@FortesHuang/S1V6jrvet#Python-Selenium-with-VSCODE-%E6%95%99%E5%AD%B8%E7%AD%86%E8%A8%98 )
###### tags: `Java`,`Python`,`Selenium`