HKCERT CTF 2022: Writeup on ★☆☆☆☆ (I)
===
## 美麗都大廈 / spyce (Web)
1. Open the website
2. Let's randomly click on something on the page, say "Hello, world"
3. The page shows "Hello from Spyce version 2.1!", and there is a link called "Source for this page", click on it.
4. The URL shows `path=%2Fhome%2Fspwnce%2Fwww%2Fdocs%2Fexamples%2Fhello.spy` in the query string
5. Change the query string to `path=/flag1`, and browse it
6. You get the flag!
## 海山樓 / Flawed ElGamal (Crypto)
### Challenge Summary
The server will be returning an encrypted flag, $(c_1, c_2)$, every time a player connects to the server. This is the public key used:
```python
p = 1444779821068309665607966047026245709114363505560724292470220924533941341173119282750461450104319554545087521581252757303050671443847680075401505584975539
g = 2
h = 679175474187312157096793918495021788380347146757928688295980599009809870413272456661249570962293053504169610388075260415234004679602069004959459298631976
```
Note that the ciphertext is computed by a flawed ElGamal such that $(c_1, c_2)$:
1. Generating a random $y \in [1, p-1]$,
2. Compute $s := h^y \ \text{mod}\ p$,
3. Compute $c_1 := g^y\ \text{mod}\ p$,
4. Compute $c_2 := m \cdot s$.
The goal is to obtain the flag, $m$.
### Solution
An important observation is that $c_2 := m \cdot s$ is not taken modulo $p$, therefore it is a multiple of $m$. If we get many ciphertexts $(c_1, c_2)$, $(c_1', c_2')$, ... by connecting to the server for multiple times, eventually we have
$$m = \gcd(c_2, c_2', ...).$$
We can use the Euclidean algorithm to compute the GCD of two numbers, given below:
```python
def gcd(a, b):
while b != 0:
a, b = b, a % b
return a
```
To compute GCD of multiple numbers ($a, b, ..., c$), we can apply GCD pairwise:
$$\gcd(a, b, ..., c) = \gcd(...\gcd(\gcd(a, b), ...), c).$$
After getting the number $m$, we can convert it into a string. From `chall.py`, the flag string is converted to a number by `m = int.from_bytes(flag, 'big')`. You may want to look at how an reverse operation can be done using [`int.to_bytes`](https://docs.python.org/3/library/stdtypes.html#int.to_bytes) in Python.
:::danger
**🏁 I am not getting the flag!** That means the `m` you got is incorrect. It is likely that the GCD you obtained is a small multiple of the actual $m$ - go get more $c_2$'s and compute GCDs further!
:::
## 沙田大會堂 / echo (Pwn)
1. Understand the source code
- The program reads and prints out what the user had typed.
- Repeat until the user input "--" and the global variable `can_leave` is not 0 (but by reading the code, `can_leave` is always 0?)
2. Find out the bug
- `scanf("%s", buf)` does not limit the length of user input, vulnerable to `Buffer overflow attack`.
- `printf(buf)` looks odd. Usually, printing out a string in c should be `printf("%s", buf)`.
- If a user has control of the content of the 1st argument of the printf function, the user can attack the program with the `Format string attack`.
- `Format string attack` can potentially achieve `arbitrary memory read` and `arbitrary memory write`.
3. Check the protection
- Run `Checksec` in gef, find out what protection methods are enabled
- Since PIE (Position Independent Executable) protection is enabled, the address of the `get_shell` function is randomized.
- Since Canary is enabled, `Buffer overflow attack` does not work unless we need the value of canary.
4. Attack
- Perform a `Format string attack` to leak one PIE address (an address that is under the effect of PIE), then calculate the address of the `get_shell` function. (The offset between the leaked address and the `get_shell` function is fixed)
- Perform a `Format string attack` to leak the canary value.
- Perform a `Format string attack` to overwrite the value of `can_leave` so that we can leave the loop and return from the main function (to trigger the `Buffer overflow attack`).
- Perform a `Buffer overflow attack` to overwrite the return address to the `get_shell` function.
5. Exploit
- Write a python solve script. Install the pwntools module that provides a lot of useful functions for playing pwn. (pwntools-related knowledge had mentioned in this/last year's hkcert ctf pre-competition workshop)
- Understand the attack mentioned in step 4, and then craft the corresponding payloads
- Try to call the `get_shell` function to get the shell and cat the flag.
- Here is the solve script for you to start with:
```python
from pwn import *
host = ??
port_number = ??
io = remote('<host>', port_nubmer)
elf = ELF('./chall')
# leak canary
payload0 = ??
io.sendlineafter(b'\nInput:\n', payload0)
# now the canary is leak on screen, script to get the canary value
canary = ??
# leak address
payload1 = ??
io.sendlineafter(b'\nInput:\n', payload1)
# now the address is leak on screen, script to get the leaked address
leaked_address = ??
pie_base = leaked_address - fixed_offset
canLeave = pie_base + elf.symbols['can_leave']
getShell = pie_base + elf.symbols['get_shell']
# overwrite canLeave to non-Zero
payload2 = ??
io.sendlineafter(b'\nInput:\n', payload2)
# Calling system (in get_shell function) requires stack be aligned.
# Add ret_gadget (to add rsp by 8) before calling get_shell to align the stack.
ret_gadget = getShell + 25
len_of_input_before_canary = ??
payload3 = b'a' * len_of_input_before_canary + p64(canary) + p64(0), + p64(ret_gadget), p64(getShell)
io.sendlineafter(b':\n', payload3)
io.sendlineafter(b':\n', b'--')
io.interactive()
```
## 米埔自然護理區 / Fiddler Crab (Reverse)
So you can use many ways to do this, but maybe you want to look in the traffic first to get a feel of what it does.
To do so, we can setup a proxy in between to stiff all the traffic, and possibly modify the content.
What it means is that you setup an intermediate server (aka proxy) in between the game server,
so the game client interacts with the proxy, and the proxy interacts with the game server. By this way, the proxy view and modify the data sent by both sides.
You can use whatever tools to do it, for HTTP request, you can use `mitmproxy`, but in here, a TCP proxy is better (with `mitmproxy` may be annoying to setup).
One of the possible tools will be [tcpproxy](https://github.com/ickerwx/tcpproxy).
It will be something like this:
```
python tcpproxy.py -ti <ip> -tp <port> -lp 8000 -im textdump -om textdump
```
Then you can connect your chess client to the local proxy instead:
```
./chess_client 127.0.0.1:8000
```
And you should see the traffic in between shown via the proxy.
After seeing the traffic, you should be able to see what the client send to the server, and vise versa.
You can also modify the data sent via some other module from tcpproxy, such as
```
python tcpproxy.py -ti <ip> -tp <port> -lp 8000 -im replace:search=<SEARCH>:replace=<REPLACE> -om textdump
```
You can see their source code on github to learn more about how it works.
If you try more, you will note not every modification works. What is the condition that make the replacement works? (Maybe related to the first few weird bytes?)
By this point you should be able to cheat by modifying the packets. Good luck!
## 珍寶海鮮舫 / SD Card (Forensics)
### Solution
Download `sdcard.zip`, extract it and found `sdcard.dd`. Put it into any digital forensic tool.
In the following writeup, I have used [Autopsy](https://www.autopsy.com/download/) for demostration. You will be able to find file named `f0000000.png` under `$CarvedFiles`.

In alternative, you may see that Autopsy can search files by entension. A file name `_lag.png` can be found.

Both `f0000000.png` and `_lag.png` are the same picture but with different names. I have extracted `f0000000.png` to continue my investigation.
:::info
If you are not using Autopsy, the image name may varies depending on the tool you used.
:::
We found that the image can be opened but nothing show up.

And the EXIF seems does not match with the content size.

We may continue the investigation flow in either ways:
* Steganography
* Corrupted image
The file extension in PNG, so we decided to investigate the file as an corrupted image. You may read some inforatmion on PNG chuncks.
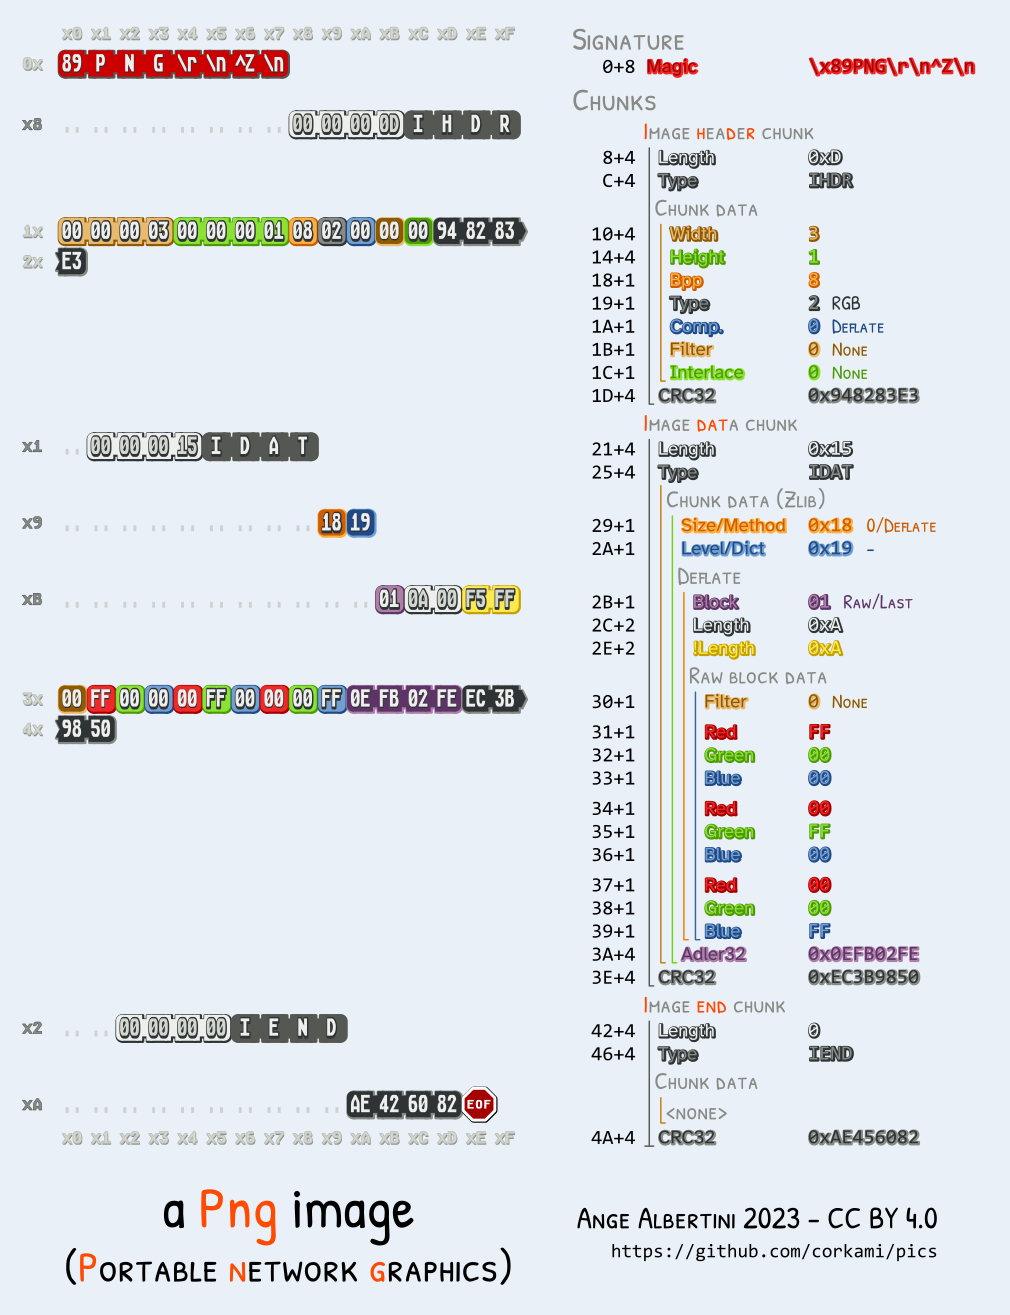
[PNG](https://github.com/corkami/pics/blob/master/binary/PNG.png) © corkami, CC BY-NC-SA 2.0
We decided to put `f0000000.png` into [PNG file chunk inspector](https://www.nayuki.io/page/png-file-chunk-inspector) for investigation. Multiple IHDR chunk was found.

We know that a legal PNG image should contain only 1 IHDR chunck, we can open a Hex Editor to edit the image `f0000000.png`.
I used [HexEd.it](https://hexed.it/) for editing. You may wish to use HxD for the modification.

From the information from PNG file chunk inspector, we know that there are 2 option of IHDR chunck to remove:
* Byte 8 - 32 (0x00000008 - 0x00000020)
* Byte 33 - 57 (0x00000021 - 0x00000039)
The first check IHDR check (Byte 8 - 32) shows the image has 1 pixel. This is more spcious and we decided to remove it first. Note that an IHDR chunk should be exactly 25 bytes.

Once you have the first IHDR chunk removed, save the image and open it. You will be able to open the image now.

I have the partial image included in my writeup so that you should try the guide yourself.
