Filmic module for darktable
===========================
### Introduction
The Filmic module is aimed at reproducing the color and luminance response of analog film, dealing with dynamic range issues (high dynamic range from modern cameras), and gamut clipping issues (oversaturation in deep shadows and highlights).
It accomplishes this in three steps:
* apply a parametric logarithmic shaper to rescale the luminance values in a perceptually uniform space (where each stop has the same range of values),
* create an "S" tonecurve to bring back the contrast, the saturation and adjust the grey value,
* do a selective desaturation on extreme values, to push the colors to pure black and pure white.
Overall, it allows the compression of the dynamic range (and to a lesser degree, the gamut) inside a smaller range while preserving the mid-tones as accurately as possible.
### Place in the workflow
This module should be enabled after the white balance has been adjusted, in order to balance the RGB ratios. Then, if needed, the exposure module should be used to correct the mid-tones in a linear way. Proper exposure settings can be checked using the global color picker Lab readings and are achieved when:
1. no pixel has a luminance higher than 100 %
2. no pixel has a luminance lower than 0 % *(that is not always possible)*
3. no pixel on the subject has a luminance lower than 16-18 % and higher than 92-96 % *(excepted deliberate use of low-key or high-key)*
4. white skins have an average luminance of 65-85 %
5. black skins have an average luminance of 25-45 %
6. tanned skins have an average luminance of 45-65 %
7. non-human subjects have an average luminance around 50 % *(excepted deliberate use of low-key or high-key)*
Color corrections should come after this module for better readability.
Controls
--------
### logarithmic shaper
#### What does it do ?
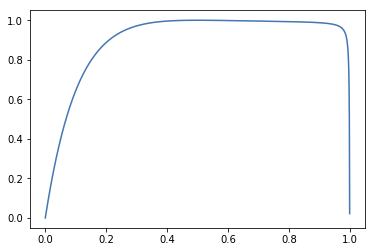
The logarithmic shaper raises the lightness of the mid-tones, recovers the low-lights, and remaps the whole dynamic range inside the available luminance bounds (0-100 %).
#### Tutorial
The middle-grey luminance is the luminance of the scene-referred 18% gray. Most of the time, this value should stay at 18%, for example in controlled lighting. If you have a color-chart shot (IT8 chart or colorchecker), you can use the color-picker on the right of the grey slider to sample the luminance of the grey patch. In back-light situations, this value can be lowered and the color-picker can be used to sample the average luminance of the subject. This setting has an effect on the picture that is analogous to the lightness setting.
> Usual values: 15-18 % in general, 5-15 % in back-lit scenes, never higher than 20-22 % (that would mean the picture is globaly over-exposed and need to be fixed in exposure module).
The white relative exposure is the upper bound of the dynamic range. It should be adjusted such that the pure white is remapped at the extreme right of the histogram. To do so automatically, you can use the color-picker oh the white exposure slider and sample the whole image. The software will then record the maximum value over the area, assume it is pure white, and adjust the parameter adequately to remap it to the right bound of the histogram. This setting has an effect on the picture that is analogous to the white point setting in the levels module. When you have no pure white in the picture, for example if the maximum luminance is skin, you need to give the white some more room to avoid over-exposure of the skin.
> Usual values: 2-3 EV when the gray is set at 18 %. Up to 6-7 EV when the grey is lower.
The black relative exposure is the lower bound of the dynamic range. If you know beforehand the dynamic range of your camera at the current ISO (for example, from the website dxomark.com or dpreview.com), you can enter the value here (dynamic range = white exposure - black exposure).
*Example: If you have a white exposure of 3.26 and your camera has a dynamic range of 14,01 EV. The black exposure should be set to -10.75.*
Using the color-picker, the software will detect the minimum value of the selected area, assume it is pure black and adjust the parameter adequately. This setting has an effect on the picture that is analogous to the black point setting in the levels module.
On the contrary to the white exposure, which is mostly determined technically by the picture maximum value (assuming you have pure white), the black exposure setting is up to you and to the amount of details you need to recover from the shadows, at the expense of the global contrast.
> Usual values: -6-12 EV when the grey is set at 18 %. Up to -4-5 EV when the grey is lower.
In natural light setups, especially in landscapes, you can use the color-picker labelled "auto-tune levels" to try automatically set all these values at once. The auto-tuner will make some assumptions that give fair and quick results most of the time, but may need some adjustments.
The safety factor allows for shrinking or enlarging the dynamic range (that is, the black and white exposures) all at once, both in the current settings and in the automatic detection.
#### How does it work ?
The gray level acts as a pre-amplification: RGB values below input gray will be lifted far more by the logarithmic shaper than the RGB values above. Then, the black and white exposures act as normalization parameters, such that the white is remapped to 100 % and the black to 0%.
#### Known issues and solutions
In noisy pictures, or in pictures that suffer from poor demosaicing (RAW from X-trans sensors), the black level will often be detected at -16 EV (minimum of the range). You need to correct that manually to obtain realistic values.
When the dynamic range is really off-center (e.g. white at +2 EV and black at -13 EV), the filmic S curve can have a really hard time building a proper S curve. It is then recommended to keep the dynamic range more or less centered (white = - black). To do so, you can either decrease the grey level to increase the white exposure (which can work well in landscape photography, but might make skin tones too bright) or use the black level from the exposure module to slide the RGB values to the right (negative values in the black slider).
### filmic S curve
#### What does it do ?
The filmic S curve is essentially a tone curve, as in the tone curve module. The difference is, here, it is set in a semi-automatic way using the parameters of the log shaper and some "human-readable" intent related to the behaviour of film. The "S" curve it produces tries to emulate the light response of classic film. The other important thing it does is remapping the grey value of the logarithm to the expected grey value of the output (display or file).
Finally, it will desaturate the extreme luminances to make them slide toward pure black and pure white. While this is emulating the film color rendition, and has an arguably better look, it is mostly useful to prevent gamut clipping.
#### Tutorial
First of all, it is important to understand that some parameters combinations will fail to produce a valid S curve. The curve graph will help you to diagnose problems, such as cusps, reversed S branches, etc.
The contrast sets up the slope of the linear part of the S curve. It needs to be high enough to avoid inversed S branches that would invert the contrast.
> Usual values: between 1.5 and 2.
The latitude controls the range of the linear part in the center of the curve. A low latitude will give curly branches which will make the image look more faded at the extremities, with smooth transitions. A high latitude will give more contrast at the extremes. The latitude has an upper bound at 95 % of the dynamic range. Also, in some setups, a high latitude removes curly branches and smooth transitions at the extremities, giving flat and linear ends that will clip values. To avoid that, reduce the latitude, the contrast or both.
> Usual values: 1/4-1/3 of the dynamic range.
The balance shadows/highlight allows more room to one extremity of the histogram, in order to preserve more details. It is also useful to avoid flat, clipped ends in some latitude/contrast setups.
> Usual values: 0 ± 10 %.
The saturation setting controls how much the extreme luminances will be desaturated to reverse the side-effects of the RGB tone curve, to avoid gamut-clipping as well as to give a more classic filmic look. This will mostly have an effect in deep shadows. When set too harshly (values << 5 %), the desaturation produces a banding effect on colors in shadows: this is a sign you went too far.
> Usual values: 5-33 %. 100 % means almost no desaturation (unperceptible), but there is always a little.
>
The intent choice controls the interpolation of the curve. The "contrasted" intent uses a cubic spline interpolation that produces gracious rounded curves leading to more contrast at the extreme luminances. However, it is quite sensible to the input parameters and often degenerate, producing cups and flat clipped ends. The "linear" intent uses a strictly monotonic Hermite spline interpolation. The branches of the "S" are less gracious, more linear, resulting in less contrast at the extremities, but this spline is more robust and easier to control. The "faded" intent uses a Catmull-Rom centripetal spline that is guaranteed to avoid cusps, strange behaviours, and is the most robust. However, it doesn't look as good and give a sort of "retro" faded look. The "optimized" intent is an average between the linear and contrasted intents that produces a good trade-off most of the time.
#### How does it work ?
When the user inputs parameters, the software will interpret them as nodes on an (x, y) graph. Then, it will create an RGB curve going through these nodes using several interpolation methods. Then, it will use a luminance mask based on the logarithm shaper parameter to selectively desaturate the extreme luminance values as follow:
#### Known issues and solutions
When your dynamic range is not more or less zero-centered, and the black exposure is very far from the white, the curve doesn't look like an "S" and the contrast control becomes very touchy. This is why you should keep your dynamic range as centered as possible.
In some setups, some settings (mostly contrast and latitude) will have fulcrum values where the aspect of the curves differs strongly between two very close setting values. This is because some settings put nodes in bad places (< 0, for example), so the faulty nodes are removed and then the interpolations of the curves change.
### Destination/Display
These are the parameters of the screen or the output color profile for which we need to remap the white, grey and black levels at the output of the logarithmic shaper.
The middle grey value should never be touched if your output/display profile is a standard RGB profile where the grey is defined as 18 %.
The output power factor is the gamma of your screen or the gamma set in your ICC output profile. Unless you use ProphotoRGB (gamma = 1.8) or linear spaces (gamma = 1.0), you should not change that parameter.
The output grey target to remap the logarithmic grey point is computed as follow: (output grey)^(1/gamma).
The white and black luminance should always stay as is, unless you want a "retro" faded look with raised blacks and dampened whites.
###### tags: `darktable`