# mPython with ESP32 / Thonny
## [社團介紹](https://hackmd.io/@Zoyam/B1muGtUpL)/[總課綱](https://hackmd.io/@Zoyam/H1oC9wzdd)/[上課影片](https://youtu.be/wEN8Z80FZvQ)/[範例程式](https://drive.google.com/drive/folders/13Gs1j_lh_5NnKZ4zqfTwqhZUU_d5uFpO?usp=sharing)/[mPython讀書會](https://hackmd.io/8iwg8KPVQAauwI51V00mDg?view)
## 0-1、參考資料
* 硬體篇
1. [重要-中文-MicroPython on ESP8266 學習筆記索引(注意腳位後即可使用在ESP32上)](http://yhhuang1966.blogspot.com/2019/04/micropython.html)
2. [重要-英文-RandomNerdTutorials-MicroPython](https://randomnerdtutorials.com/getting-started-micropython-esp32-esp8266/)
3. [重要-中文-1Z MicroPython ESP32入門課](http://www.1zlab.com/wiki/micropython-esp32/pins-and-gpio/)
7. [MicroPython官方技術文件-EN](http://docs.micropython.org/en/latest/esp32/general.html)
8. [MicroPython翻譯技術文件-CN(星瞳科技)](https://docs.singtown.com/micropython/zh/latest/esp32/esp32/tutorial/index.html)
9. [Adafruit-MicroPython-LIVE](https://learn.adafruit.com/micropython-smart-holiday-lights/software)
10. [DFRobot-ESP32系列教程汇总](https://mc.dfrobot.com.cn/thread-271930-1-1.html)
11. [進階-完整課程1Z實驗室](http://www.1zlab.com/)
12. [進階-MicroPython 小車基本控制](https://github.com/maloyang/MicroPython-Car)
13. [模組參考-micro:bit全攻略-高師大教室](https://nkust.gitbook.io/micro-bit/micropython-chao-yin-bo-hcsr04)
14. [阿玉web:bit-MicroPython介紹](https://sites.google.com/site/wenyuwebbit/09-micropython-xie-zuo/03-kong-zhi-chang-yong-de-ying-ti)
15. [JIMI 陪你玩 ROBOT](https://jimirobot.tw/category/esp32micropython/)
16. DFRobot-[秦皇岛岛主](https://mc.dfrobot.com.cn/home.php?mod=space&uid=63899&do=thread&view=me&order=dateline&from=space&page=1)、gada888、沧海笑、[KIKI](https://mc.dfrobot.com.cn/thread-303185-1-1.html)、[網頁PWM控制LED](https://mc.dfrobot.com.cn/thread-25900-1-1.html)
24. [获取天气](https://mc.dfrobot.com.cn/thread-26029-1-1.html)[BLE](https://mc.dfrobot.com.cn/thread-302037-1-1.html)、[ble初体验](
https://mc.dfrobot.com.cn/thread-26317-1-1.html?fromuid=839413)、[HTTP Webserver](https://mc.dfrobot.com.cn/thread-274383-1-1.html)、[HTML](https://mc.dfrobot.com.cn/thread-274214-1-1.html?fromuid=839413)
* 軟體篇
1. [重要-Python 初學 1~4講](https://medium.com/ccclub/tagged/python-%E5%85%A5%E9%96%80)
18. [朝陽大學-唐元亮Python入門](http://yltang.net/tutorial/python/0/)
19. [重要-Python 3 教程-RUNOOB ](https://www.runoob.com/python3/python3-conditional-statements.html)
20. [重要-Mixly GUI microPython編程環境](https://mixly.readthedocs.io/zh_CN/latest/basic/02Installation-update.html#windows)
21. [重要-陳會安老師-Web Blockly for microPython/ESP8266](http://blockly.is-best.net/?fbclid=IwAR0uBr-Jxd8msuafx7elgUaoUst5QTpJEAo3c9uFwpdRUt3hN_-5kLPKFBE&i=2)
22. [HTTP METHOD解釋](https://blog.toright.com/posts/1203/%E6%B7%BA%E8%AB%87-http-method%EF%BC%9A%E8%A1%A8%E5%96%AE%E4%B8%AD%E7%9A%84-get-%E8%88%87-post-%E6%9C%89%E4%BB%80%E9%BA%BC%E5%B7%AE%E5%88%A5%EF%BC%9F.html)
23. [GitBook](http://tw.gitbook.net/python/python_quick_guide.html)
24. [政大-數據分析Python課程](http://moocs.nccu.edu.tw/course/123/intro)
* 影音篇
1. [重要-中文-清大資工謝旻錚教授-Scratch and Python](https://www.youtube.com/watch?v=DXhpMA0dMK8&list=PLj6E8qlqmkFuTOo4H19ZeOLPxZk1pOvQ2&index=15)
13. [重要-英文-MICROPYTHON ON ESP32 WITH Thonny-install](https://www.youtube.com/watch?v=lvmNLuHj25o&list=PL0SrfCGiNprTUxnsCDnIS4Y2DogPIOdwn)
14. [重要-英文-IOT with MicroPython by Using ESP32 & ESP8266 Step by Step](https://www.youtube.com/watch?v=eI2hnZOdLj8&list=PLOYsAys6a6mmt4_0zXXZ2_WzDLUkggGXC)
15. [德文-Micropython mit ESP32](https://www.youtube.com/watch?v=RUcm45J5mcg&list=PL4dxj1rGc3b3chUkad0Vuh2wDN-sRRJ_f)
16. [英文-Adafruit直播microPython使用教學](https://www.youtube.com/watch?v=6rYnWM-xdI4&list=PLjF7R1fz_OOXrI15wuXeESA0aA4VzcWSi&index=1)
17. [重要-PyCamera](http://www.xn--bnq31s.xn--fiqs8s/gitbook/upycraft_cn/4.6.1%20camera.py.html)
18. [重要-英文-MicroPython India](https://www.youtube.com/watch?v=elBtWZ_fOZU&list=PLw0SimokefZ3uWQoRsyf-gKNSs4Td-0k6&index=1)
19. [microPython Import介紹-名威科技](https://www.youtube.com/watch?v=PNV2hsE93X8)
---
## 1-1、材料包
| 品項 | 數量 | 備註 |
| - | - | - |
| [ESP32-DevKit(30Pins)](https://item.taobao.com/item.htm?spm=a1z0d.6639537.1997196601.222.3ee67484Ky8RxZ&id=544098298735) | 1 | 注意是30腳位DOIT開發板 |
|MicroUSB|1||
|母對母杜邦線 |10||
|RGB LED|1||
|蜂鳴器|1||
|超音波模組|1||
|WS2812模組|1||
----
## 1-2、ESP32認識
本次課程使用左下角DOIT ESP32

### IO介紹

[Ref.Github](https://github.com/Nicholas3388/LuaNode)
* [委託設計NODEMCU-32S-非本上課用版本](https://www.shenzhen2u.com/NodeMCU-32S)

#### IO腳位功能

– 雙核心 Tensilica 32 位元 LX6 微處理器
– 高達 240 MHz 時脈頻率
– 520 kB 內部 SRAM
– 28 個 GPIO
– 硬體加速加密(AES、SHA2、ECC、RSA-4096)
– 整合式 802.11 b/g/n Wi-Fi 收發器
– 整合式雙模藍牙v4.2 BR/EDR (傳統和 BLE)
– 支援 WiFi 802.11 b/g/n
– 支援 10 個電極電容式觸控
– 4 MB 快閃記憶體
-GPIO 34,35,36,39:Input only(不能作為輸出腳位)
-GPIO 0,6,7,8,9,10,11:系統用,勿使用(淺灰色標示)
-GPIO 18:重開機
* DHT11不可以用GPIO 5、26
* GPIO 12, 2燒錄時不可接任何裝置,請空接,燒錄完成後,再接回,否則會上傳失敗。
* WiFi啟動後,2,4,12,13,14,15,25,26,27僅能數位讀取,不可類比
參考自:[夜市小霸王](https://youyouyou.pixnet.net/blog/post/119410732)
---
### 開發板基本知識
#### 五分鐘了解開發板應用(I/O觀念)
{%youtube B4T8hzO0IYc %}
#### 十五分鐘了解microPython與Arduino差異(編/解譯器)
{%youtube m1miwCJtxeM %}

---
#### 重要模組

[參考資料1](https://microcontrollerslab.com/esp32-pinout-use-gpio-pins/)
[參考資料2](https://circuits4you.com/2018/12/31/esp32-devkit-esp32-wroom-gpio-pinout/)
---
## 2-1、環境設置
* 詳細請[參考文本](https://randomnerdtutorials.com/getting-started-thonny-micropython-python-ide-esp32-esp8266/)/[影片](https://www.youtube.com/watch?v=lvmNLuHj25o&list=PL0SrfCGiNprTUxnsCDnIS4Y2DogPIOdwn)
1. micro-USB 連接 ESP32 與 USB port(NB、PC)-使用UART介面溝通
3. 安裝[Thonny IDE](https://thonny.org/)、[CP210x driver](https://www.silabs.com/products/development-tools/software/usb-to-uart-bridge-vcp-drivers)
4. Tools-Options開啟設定
5. 選擇開發板/COM port/韌體版本
6. mpython下載最新韌體
7. 官網點選下載
8. 選擇ESP32 module
9. 選擇最新穩定且有支援BLE LAN的韌體版本 並下載
10. Port:選擇電腦認到這片開發板的COM port(可以去Windows裝置管理員看)
Firmwave:選擇剛下載好的最新版韌體
並點選安裝

11. 第一次燒錄需要在燒錄過程出現___的時候按壓BOOT_button按鍵(約一秒)即可看到程式繼續燒錄
12. 
13. 自動會第二次跑出視窗

14. 並開始寫入韌體 會看到1%~100%的過程 需要約10sec

15. 燒錄完成後先按一次Stop

16. 等待開發板重新開機啟動到下方Shell區有顯示>>> 就算完成 可以開始寫microPython了
17. 為了方便記得開啟以下欄位,在View(檢視)-Files(檔案)、Variables(變數)
---
## 2-2、電路原理
### 基本迴路
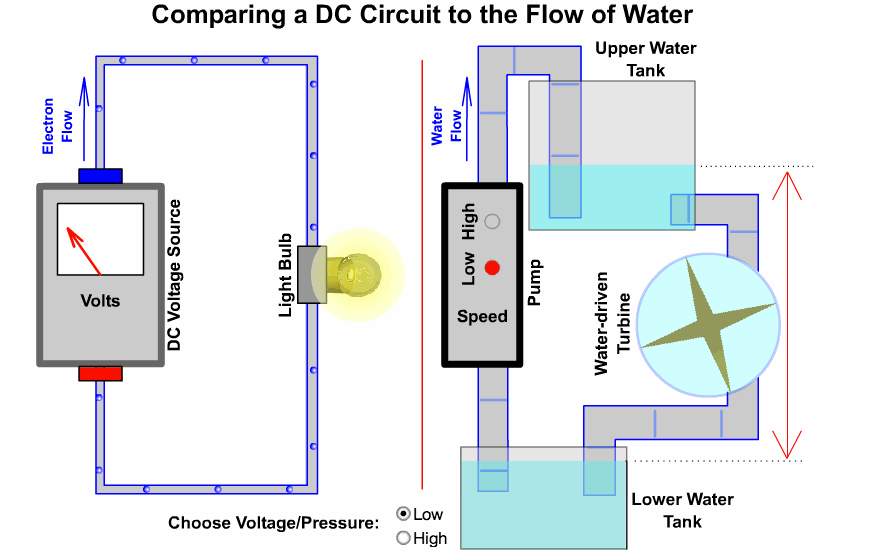
----
### 開發板硬體三核心
開發板使用方法
S = signal = 訊號
V = Vin = 輸入電壓(USB供電時為5V)
*3V3 = 3.3v*
G = GND = 接地
口訣:人要腳踩實地(G)先吃飯(V),才能接受指令做事(S)
----
#### 數位/類比訊號(Digital/Analog)

---
## 3-1、mPython基本語法
* [查閱官方技術文件](http://docs.micropython.org/en/latest/)

* [點選ESP32相關MicroPython語法](http://docs.micropython.org/en/latest/esp32/quickref.html)

* 入門-終端機:單行指令
```
help('modules')
```
* 進階-Script腳本檔:複雜多行指令

* 運算子-Mathematical operators

```
>>> 2+2*9-3
17
>>> 28594/2312
12.36765
>>> 214522236/7.5
2.860297e+07
>>> 23//2
11
>>> 25%3
1
```
* 關係運算子-Relational operators

```
>>> 2 == 3
False
>>> 4 == 4
True
>>> 3 > 2
True
>>> 489808234 != 2223
True
>>> 4.5 >= 4.5
True
```
* 資料結構-Data types

```
>>> a = 6
>>> b = 95.32
>>> c = 'Hello World!'
>>> d = True
```
* 印出-print() function
```
>>> print('LED is on')
LED is on
```
* 條件判斷-Conditional statements
```
if <expr1>:
<statement1>
elif <expr2>:
<statement2>
elif <expr3>:
<statement3>
(...)
else:
<statementn>
```
* <font color="#f00">Important:</font> Python’s standard indentation is **4 spaces**. **In MicroPython** indentation should be **only 2 spaces** to fit more code into the microcontroller memory.
* While and for loops
```
number = 1
while number <= 10:
print(number)
number = number + 1
print("over")
```
```
number = 1
for number in range(1, 11):
print(number)
print("over")
```
* User defined functions
```
def my_function(<arg1>, <arg2>, ...):
<statement>
(...)
return
```
```
def celsius_to_fahrenheit(temp_celsius):
temp_fahrenheit = temp_celsius * (9/5) + 32
return temp_fahrenheit
```
* Classes and objects

```
class MyClass:
(...)
```
```
class Person:
name = ""
age = 0
country = ""
def description(self):
print("%s is %d years old and he is from %s." %(self.name, self.age, self.country))
```
```
>>> person1 = Person()
```
```
>>> person1.name = "Rui"
>>> person1.age = 25
>>> person1.country = "Portugal"
```
```
>>> person1.description()
```
```
Rui is 25 years old and he is from Portugal.
```

* Modules
```
#import module_name
import machine
from machine import Pin
```
### 個人淺見:寫程式學技能就像寫一張國小國文考卷
* 
* 第一大題 字音字形(基本語法 定義 宣告)
* 第二大題 字詞解釋(了解Function參數)
* 第三大題 改錯字(Debug)
* 第四大題 克漏字(選擇適合的Function)
* 第五大題 照樣造句(參考網路資源修改)
* 第六大題 造句(目標開發)
* 第七大題 作文(自行開發)
----
##### Level 1-變數與基本運算
終端機試打
1 + 1
print("OpenRobotClub")
print("OpenRobotClub" * 3)
print("OpenRobotClub" + "1+1")
Open = 100
print(Open)
Open = Open + 100
print(Open)
1 == 1 判斷是否等於 等於時回傳 True
2 == 1 判斷是否等於 不等於時回傳 False
可以嘗試!=
True False 屬於布林值
Open = "開"
print(Open)
##### Level 2-資料結構與轉換
數值型態:int, float, bool
字串型態:str, chr
容器型態:list, dict, tuple
* Casting 資料型態轉換()
``` floatNum = 55.0
intNum = int(floatNum)
print(floatNum)
print(intNum)
print(type(floatNum))
print(type(intNum))
```
* 字串轉整數
```stringNum = "55"
intNum = int(stringNum)
print(stringNum)
print(intNum)
print(type(stringNum))
print(type(intNum))
```
* 可以試試 str() 、 float() 、 chr() Function的轉換
##### Level 3-條件判斷
如果...就___
```
if condition:
statement
```
注意:前方有四個空格(mPython兩格)為縮排使用,此為Python特色必須要精準無誤
C語言不同有: {}、;、宣告方式
範例:
```
score = int(input("請輸入成績"))
if score >= 60:
print("成績及格!")
如果...就___否則___
if condition:
statement1 for True condition
else:
statement2 for False condition
```
巢狀if敘述(兩層迴圈)
```
ID = input()
year = int(ID[1:3])
if year < 4:
print("Graduated")
elif year <= 7 and year >= 4:
if year == 7:
print("Freshman")
elif year == 6:
print("Sophomore")
elif year == 5:
print("Junior")
elif year == 4:
print("Senior")
else:
print("Not Registered Yet")
```
---
## 3-2、[系統介紹](https://randomnerdtutorials.com/getting-started-thonny-micropython-python-ide-esp32-esp8266/)
* View->Add Variables, Files
* 系統先跑boot.py一次後,會一直重複執行main.py
* 若要創作離開電腦主機,純用Power Bank或電池供電,可以把程式命名成main.py
* D2腳位內建有一個LED在板上
* EN/RESET可以讓ESP32斷電重開

---
## 4-1、LED應用


----
### 接線方法

### RGB LED 介紹
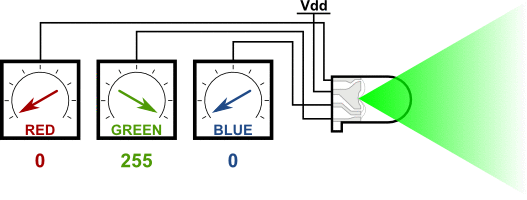
#### 共陰腳位
* 操作注意:
請把R接D4 G接D2 B接D15 -接GND
接腳金屬不能互相碰觸到會產生短路燒毀LED

----
### 基本控制方法(Digital)
```
from machine import Pin
p0 = Pin(0, Pin.OUT) # create output pin on GPIO0
p0.on() # set pin to "on" (high) level
p0.off() # set pin to "off" (low) level
p0.value(1) # set pin to on/high
p2 = Pin(2, Pin.IN) # create input pin on GPIO2
print(p2.value()) # get value, 0 or 1
p4 = Pin(4, Pin.IN, Pin.PULL_UP) # enable internal pull-up resistor
p5 = Pin(5, Pin.OUT, value=1) # set pin high on creation
```
### 進階控制方法(PWM)

```
from machine import Pin, PWM
pwm0 = PWM(Pin(0)) # create PWM object from a pin
pwm0.freq() # get current frequency
pwm0.freq(1000) # set frequency
pwm0.duty() # get current duty cycle
pwm0.duty(200) # set duty cycle
pwm0.deinit() # turn off PWM on the pin
pwm2 = PWM(Pin(2), freq=20000, duty=512) # create and configure in one go
```
----
### 運行測試
* 操作注意:
| 接法 | Board | Device |
| -------- | -------- | -------- |
| Red | D4 | R |
| GND | GND | - |
| Green | D2 | G |
| Blue | D15 | B |
接腳金屬不能互相碰觸到會產生短路燒毀LED
1. 請嘗試點亮三種顏色 如範例:1_6
2. 請嘗試同時點亮兩(含以上)顆燈 如範例:1_7
3. 請嘗試試作紅綠燈,可包含長亮、閃爍、變燈
* Hint: 注意腳位宣告以及接線是否一致
---
## 4-2、內建觸摸電容
{%youtube ikD_3Vemkf0 %}
### 控制方法
```
from machine import TouchPad, Pin
t = TouchPad(Pin(14))
t.read() # Returns a smaller number when touched
```
----
### 運行測試
範例程式:2_1
---
## 4-3、內建溫度感測
### 控制方法
```
esp32.hall_sensor() # read the internal hall sensor
esp32.raw_temperature() # read the internal temperature of the MCU, in Farenheit
esp32.ULP() # access to the Ultra-Low-Power Co-processor
```
----
### 運行測試
範例程式:2_2
---
## 4-4、蜂鳴器

### 接線方法

----
### 控制方法
from machine import Pin, PWM
pwm2=PWM(Pin(2)) #建立 GPIO 2 的 PWM 物件
pwm2.freq(300) #設定 PWM 物件之頻率
pwm2.duty(512) #設定 PWM 物件之工作週期
PWM 方法 說明
freq([Hz]) 傳入 0~1000 設定方波頻率 **(決定音高)** , 否則為讀取
duty([cycle]) 傳入 0~1023 設定 Duty cycle (512 為 50%) **(決定音量)** , 否則為讀取
deinit() 關閉 PWM 功能
----
### 運行測試
範例程式:3_1 1KHz
範例程式:3_2 Alarm
範例程式:3_3 119
---
## 4-5、超音波

### 接線方法

----
### 控制方法
匯入hcsr04.py到ESP32 microPython Device內


----
### 運行測試
範例程式:4_1
---
## 4-6、蜂鳴器x超音波綜合應用
----
### 接線方法

----
### 控制方法
移動手掌於兩個眼睛前方
----
### 運行測試
範例程式:4_2
---
## 4-7、[WS2812 RGB LED](https://makeryan.wordpress.com/2017/11/20/%E4%B8%80%E5%80%8B%E6%9C%8B%E5%8F%8B%E7%9A%84%E9%A1%98%E6%9C%9B-ws2812-5050-5v-led/)
----
### 接線方法

----
### 控制方法
```
from machine import Pin
from neopixel import NeoPixel
pin = Pin(0, Pin.OUT) # set GPIO0 to output to drive NeoPixels
np = NeoPixel(pin, 8) # create NeoPixel driver on GPIO0 for 8 pixels
np[0] = (255, 255, 255) # set the first pixel to white
np.write() # write data to all pixels
r, g, b = np[0] # get first pixel colour
```
----
### 運行測試
---
## 4-8、Wifi連線

### 運行測試
範例程式:6_1_0
## 4-9、IFTTT設定
* Google搜尋IFTTT

* 自訂帳號或串接google gmail帳戶登入

* 確認帳號登入後 點選上方導覽列的Create

* 點選Add

* 輸入webhooks

* 點選接收要求

* 輸入觸發事件名稱 這裡用Touch做舉例

* 設定觸發條件完成 接下來設定觸發後的行為

* 選擇LINE

* 選擇傳送訊息

* 會使用官方帳號Line Notify傳訊息

* 使用內網會被擋住 無法進入line網站確認 此時請使用測試網路或外網(手機分享之網路)

* 輸入Line 帳號 密碼 (帳號需用手機App綁定 教學在上方Line連結綁定Email)

* 輸入用戶確認碼到手機LINE App

*

* 設定資料欄或者是否同時傳送圖片(梗圖)

* 自行決定是否要放入梗圖(須提供.png .jpg等副檔名之URL)

*

*

*


*

*

---
## 4-10、IFTTT-Line Webhooks with Ultrasonic
Webhooks介紹

----
### 接線方法
搭配超音波模組 進行觸發測試

----
### 運行測試
範例程式:6_1_0
---
## 4-11、IFTTT-Google Sheet Webhooks


可再修正相關設定


----
### 運行測試
* 可以觸摸D27腳位測試電容值差異
範例程式:6_3_0
---
## 4-12、IoT-Web Server in MicroPython
* 使用ESP32擔任網頁伺服器 設計開關按鈕
* 透過點選按鈕達到無線的控制效果
[操作影片](https://www.youtube.com/watch?v=i8b-ZM2VeeU&list=PLw0SimokefZ3uWQoRsyf-gKNSs4Td-0k6&index=16)

----
### 運行測試
[實作影片](https://www.youtube.com/watch?v=i8b-ZM2VeeU&list=PLw0SimokefZ3uWQoRsyf-gKNSs4Td-0k6&index=16)
* 須設定wifi_credentials.py檔案內的SSID 與 Password
* wifi_credentials.py存入MicroPython Device內(即ESP32內部空間)
* 筆電或桌機須與ESP32連結的網路,在同樣的子網域內
* 執行6_4_0webserver_sta_socket.py
* 並輸入network congif第一個IP到瀏覽器內

* 即會看到

* 此時可以把6_4_0webserver_sta_socket.py另存新檔,檔名命名成main.py存入MicroPython Device內(即ESP32內部空間)
* 後續即可在連的上同樣區網的WIFI環境底搭配一般電源(電池、變壓器等)下,使用電腦、手機等裝置內的瀏覽器輸入IP達到控制ESP32 上 D2腳位的LED功能。
範例程式:6_4_0
### Web Server Tutorial
{%youtube GVMuER7A770 %}
#### [microcontrollers](https://microcontrollerslab.com/esp32-esp8266-micropython-web-server/)
#### [randomnerdtutorials](https://randomnerdtutorials.com/esp32-esp8266-micropython-web-server/)

---
## [課程問卷](http://gg.gg/n6x2d)
QR code

---
## Arduino vs. microPython
Arduino使用C语言编写,是没有命令行模式的,每次更改代码都需要重新编译,下载。
micropython是脚本语言,解释执行,可以执行文件,也可以命令行交互,在有线通信,无线通信,音视频,图像处理等方向比arduino方便很多倍。
由于当前高速cpu已经越来越廉价,比如8266能跑80M,160M,才十元钱,这在以前是无法想象的。所以硬件革命了,相应的软件使用方式会更多元,以前在PC上才能使用的功能和语言,以后直接可以在单片机上使用。
以前需要编写很多代码才能实现的功能,现在一两个命令就能实现了。(比如i2c扫描外部设备)目前micropython国内还处于起步阶段,后续应该会有一个长足的增长。所以,micropython相对arduino的优势:
1. 解释执行,不用编译
2. micropython可以集成更多高级功能,使用比C语言更便捷
3. 众多的外围库,和arduino一样方便操作外围硬件
4. 在高级功能领域在编程语言上有原生优势
5. 学习python语言更万金油,能做网站,能开发pc程序,能做测试,能做嵌入式等等,让您一门语言玩遍所有的东西。特别适合开源硬件领域,创客领域,教育领域。