

# Building a Landing Page with AI and Next.js
An effective landing page is essential to the success of any online business. Landing pages act as the front door to your product or service and prompt visitors to take a specific action that could convert them into potential customers.
With the rise of AI-powered tools, building a compelling landing page has never been easier. Using [Vercel's](https://vercel.com/) AI UI generator called [v0](https://v0.dev/), you can now translate your ideas directly into production-ready code.
In this article, we'll explore v0 and how to use it with Next.js to create engaging landing pages in just minutes. We'll walk through the process of building a landing page for a component library as an example and use a [sample project](https://github.com/TropicolX/component-library-landing-page) built with v0 and Next.js as a reference.

By the end of this article, you'll have a solid idea of how to utilize v0 to create the first iteration of your web apps.
Let's get started!
## Prerequisites
To get the most out of this tutorial, having the following will be helpful:
* **Basic Familiarity with HTML, CSS, and JavaScript:** Knowing how to work with basic HTML, CSS, and JavaScript will help you understand how the generated code works.
* **Experience with React (or a similar framework):** While v0 generates the React code, being comfortable with its component-based structure will help when integrating the code into your Next.js project. You can learn more about Next.js by building a real-life project in this [tutorial series](https://strapi.io/blog/epic-next-js-14-tutorial-learn-next-js-by-building-a-real-life-project-part-1-2).
* **A Vercel Account:** You'll need a [Vercel account](https://vercel.com/signup) to access v0.
## What is v0?
Vercel's v0 is an AI-powered tool for creating web user interfaces. It uses generative AI technology to translate text and image prompts into React code with [Tailwind CSS](https://tailwindcss.com/) and [shadcn/ui](https://ui.shadcn.com/) styling. Using v0 can drastically reduce the time and effort involved in converting the first iteration of your ideas into production-ready code.
## Features of v0
Some of v0's primary features include:
* **Natural Language UI Description:** The core of v0 is its ability to understand your descriptions. Simply type in what you envision for your UI (e.g., "A hero section with a large headline, a signup form, and an image on the right"), and v0 will generate the corresponding code.
* **Using an Image as Input:** v0 can also interpret images like screenshots and design wireframes and turn them into code.
* **Copying and Pasting Generated UI Code:** Once satisfied with a generated UI element, you can copy the code directly into your project.
* **Generation Modes:** v0 offers two generation modes: Speed mode (free) and Quality mode (paid). Speed mode is intended for fast generations, while Quality mode uses more time and resources to produce higher-quality output.
* **Community Generations:** v0 includes an explore section where users can share their generated UIs. You can explore or fork these generations to use them as inspiration or a starting point for your project.
## How does v0 work?
Generating user interfaces with v0 involves two main steps:
1. **Create a generation:** A generation is a session between the user and v0. To create one, you need to submit an initial prompt that describes the UI element, section, or page you want using natural language.
2. **Iterate and refine:** After creating your generation, you get an initial user interface which can make further adjustments to by using additional prompts or other tools, and then review and export the generated code.
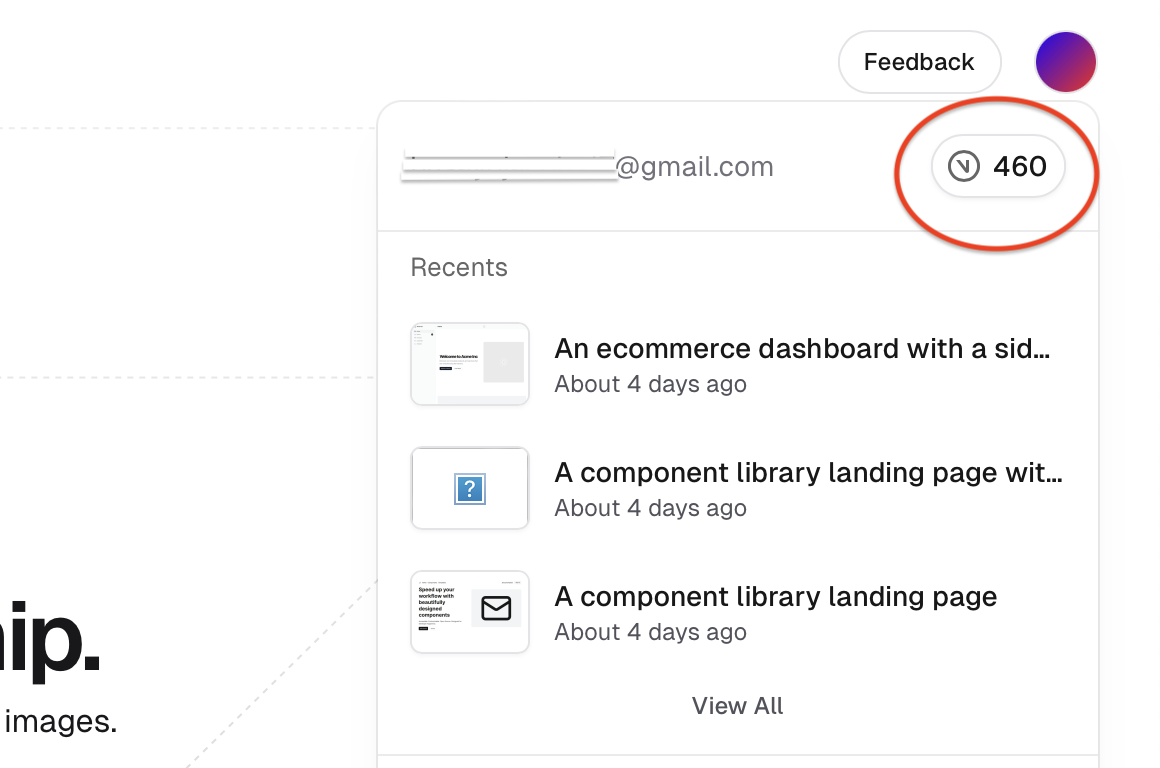
Another key element to how v0 operates is its credit system. In this system, each initial generation costs 15 credits, and any revisions or additional prompts made to refine your generation will cost 5 credits.
When you first sign up for v0, you get 700 free credits, which gives you plenty of room to experiment as you familiarize yourself with the app. You can keep track of your credits in the profile dropdown in the upper right corner of the website.
## v0 Pricing Plans
v0 offers three main [price plans](https://v0.dev/pricing):
* **Free:** This plan is ideal for individuals just getting started with v0. It includes the base generation mode (speed mode) and 200 free monthly credits. The plan also includes basic commercial terms that allow you to use your generated code for commercial purposes.
* **Premium:** This plan suits those requiring additional features beyond the free plan. For $20 per month, you get the quality generation mode, image-based generations, and private generations. Additionally, the plan comes with 5000 credits and the option to purchase additional credits.
* **Enterprise:** v0 designed this plan for teams and companies that need more credits and advanced features beyond the premium plan. It includes features like data privacy, customized onboarding, prioritized support, and more.
For this tutorial, we will be using the free plan and the features that come with it.
## **Navigating v0's user interface**
The three main pages in v0 you'd be working with are the following:
1. Home page
2. Generation page
3. Profile page
### v0's Home Page
The home page is your starting point. The most prominent element on this page is a form. This form lets you enter a text prompt describing the UI you wish to create, and set your generation preferences.
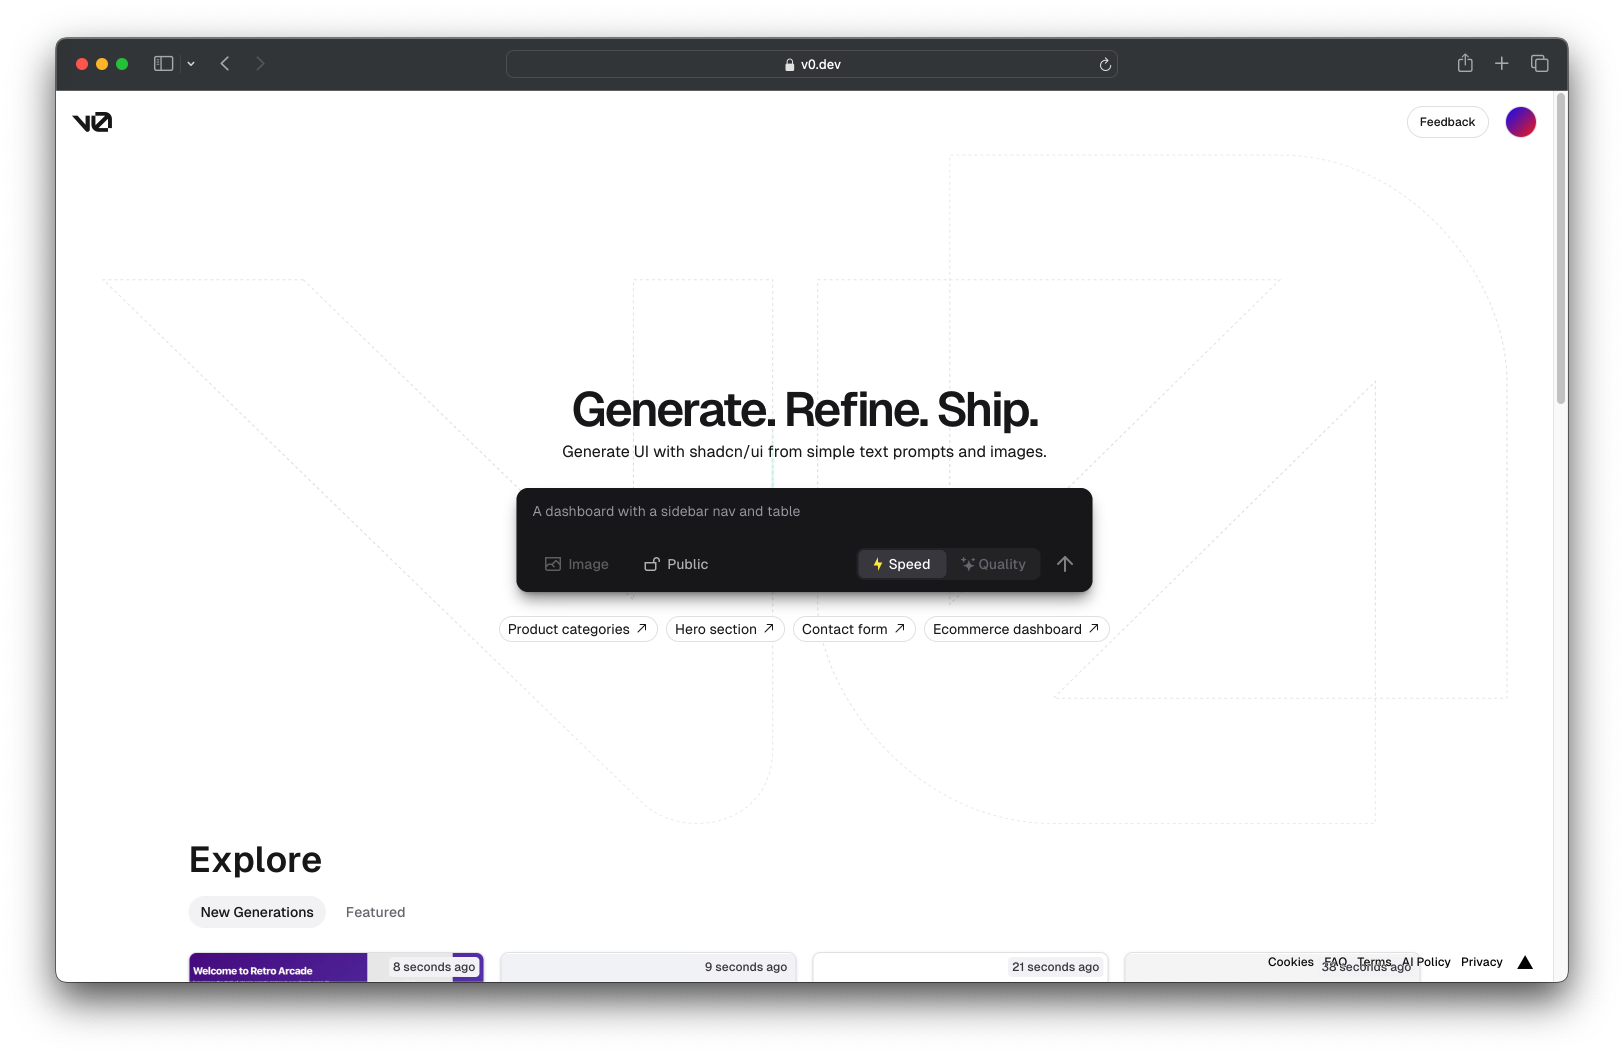
Below the form, you'll find the "Explore" section, where you can browse through community generations.

### v0's Generation Page
After submitting a prompt using the form on the home page, the v0 app will direct you to the generation page. From here, you can:
* Preview the generated UI
* Add new components or modify the existing UI
* Export your generated code
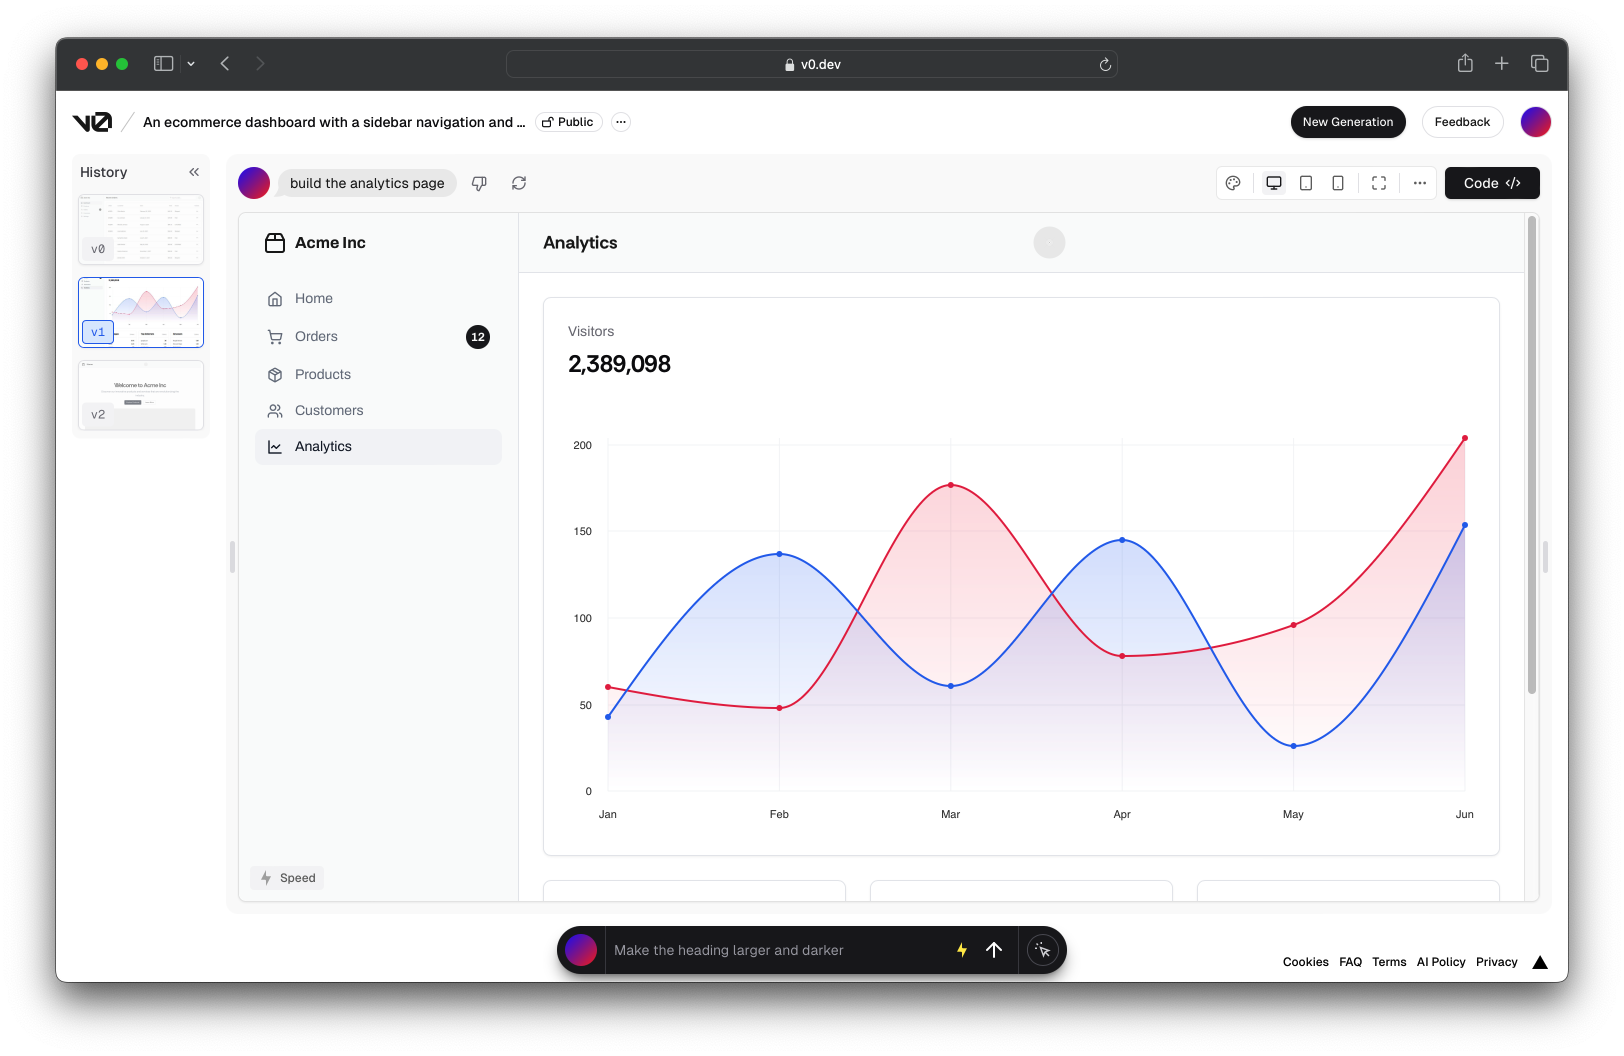
The generation page also features a panel on the left that keeps track of all the versions of your generation so you can revert to them if needed. Once you start building your landing page, you'll explore the generation page in more detail.
### v0's Profile Page
Finally, you have the profile page, which you can use to view all your past generations. To navigate there, click the "Profile" link in the menu dropdown.
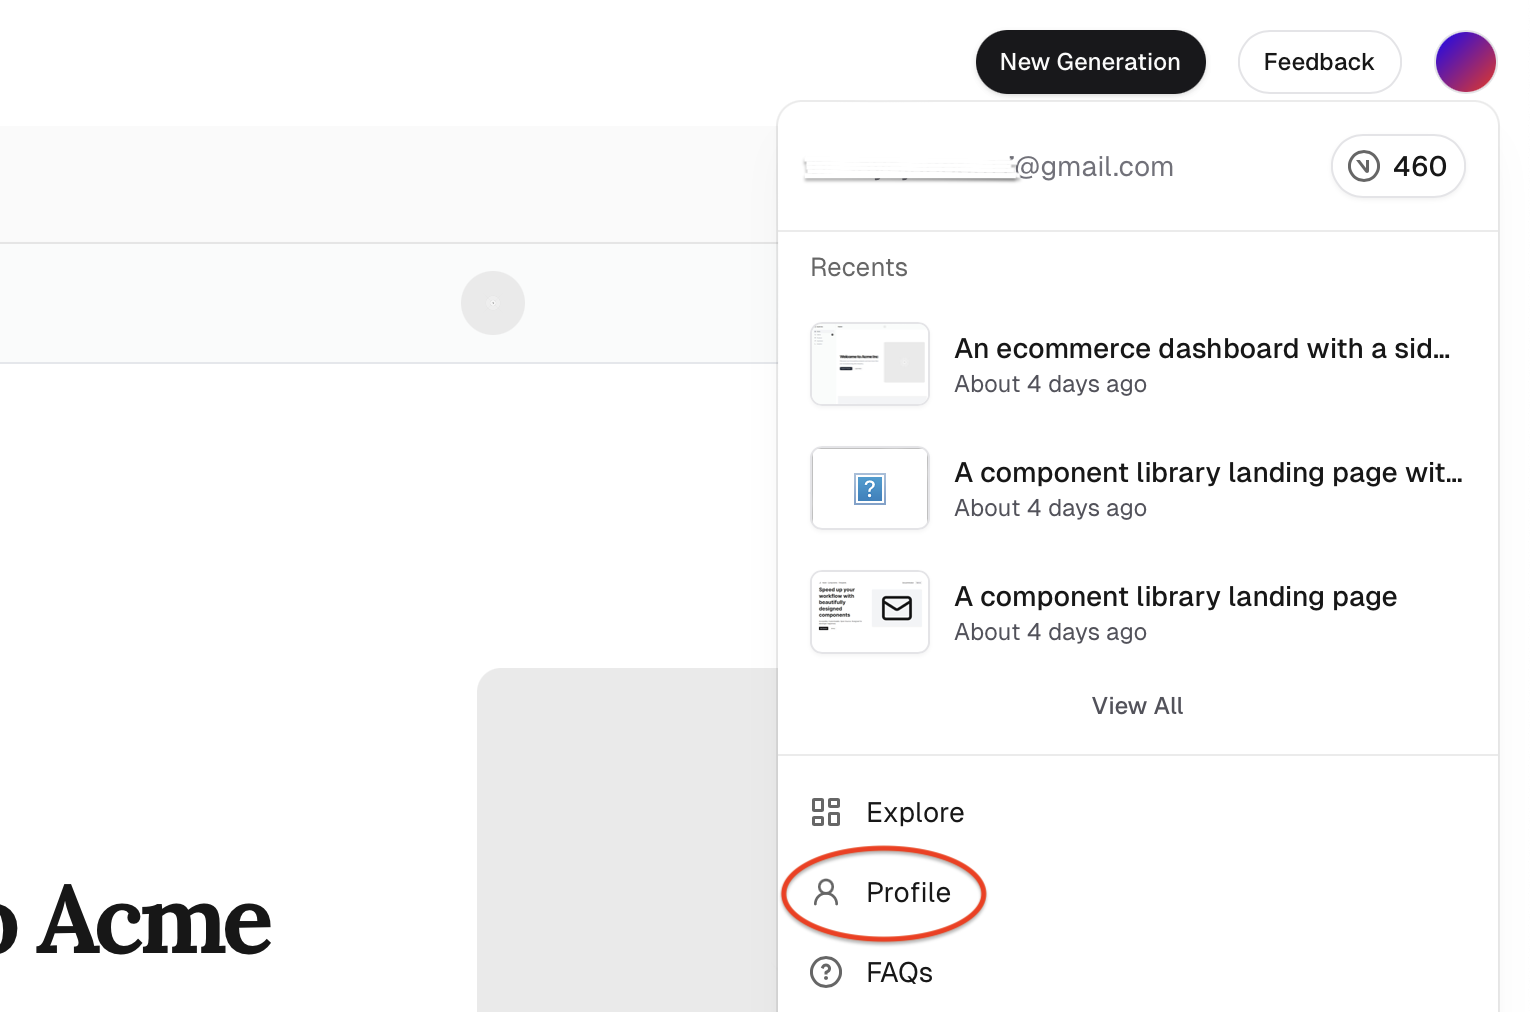
You can also use the profile page to view all your starred generations and edit your profile.

## Building The Landing Page
### Draft Outline for Landing Page
As previously mentioned, you'll be creating a landing page for a component library. It will have the following sections:
* **Header:** This is the top section of the page containing navigation links and a logo.
* **Hero section:** This will include a striking image, a compelling title, and a call to action.
* **Logo cloud:** This section showcases logos of trusted brands or partners.
* **Components section:** This area highlights the major components the component library provides.
* **Templates section:** This section will display the available UI templates.
* **Features section:** This section will highlight the key aspects of your component library.
* **Newsletter form:** A form that allows visitors to subscribe to your newsletter and get updates.
* **Footer:** This is the bottom area of the page, which usually contains additional information like links and contact details.
Having an outline for your landing page is helpful so you can have a general idea of what you want it to look like before you begin building.
### Generate an Initial UI Layout
To start building your landing page, head over to v0's home page and enter a text prompt that describes the first few sections of your UI. For example, you could enter the following prompt to create the header and hero section of the landing page:
> "*A component library landing page with a simple navbar and a hero section with text content on the left and an image on the right*""

Notice how the prompt is particular about the structure of the UI? The more descriptive your prompts are, the more accurate the results will be.
Next, click the submit button and wait for the generation to start. v0 will generate three draft UIs. Once that's done, you can select the interface that best matches the structure you're looking for.
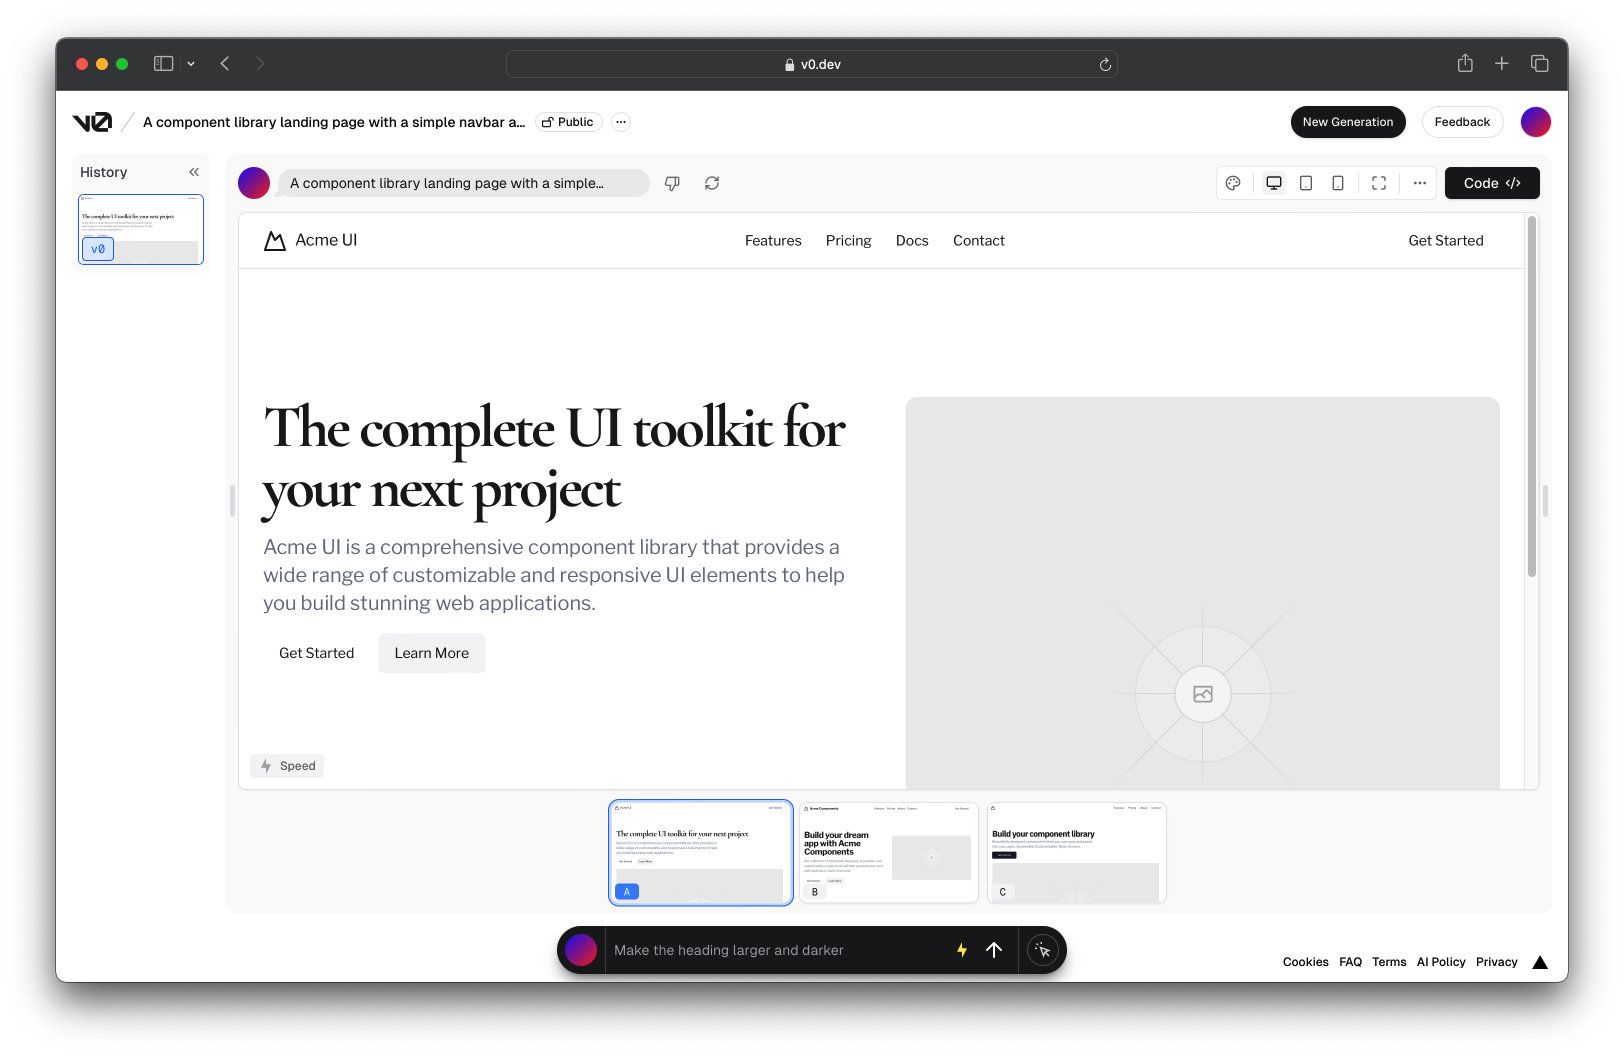
Additionally, you can refine your generation further with additional prompts using the text box at the bottom center of the page.
### Optional: Use image as an Input
An alternative method for getting an initial draft for your UI is to use an image as an input. This feature can be helpful when you already have a design sketch, wireframe, or screenshot of a website you like. v0 takes the image as a reference, interprets the visuals, and turns it into UI code.
Let's regenerate the header and hero section of the landing page using a screenshot of the [reference project](https://component-library-landing-page.vercel.app/).
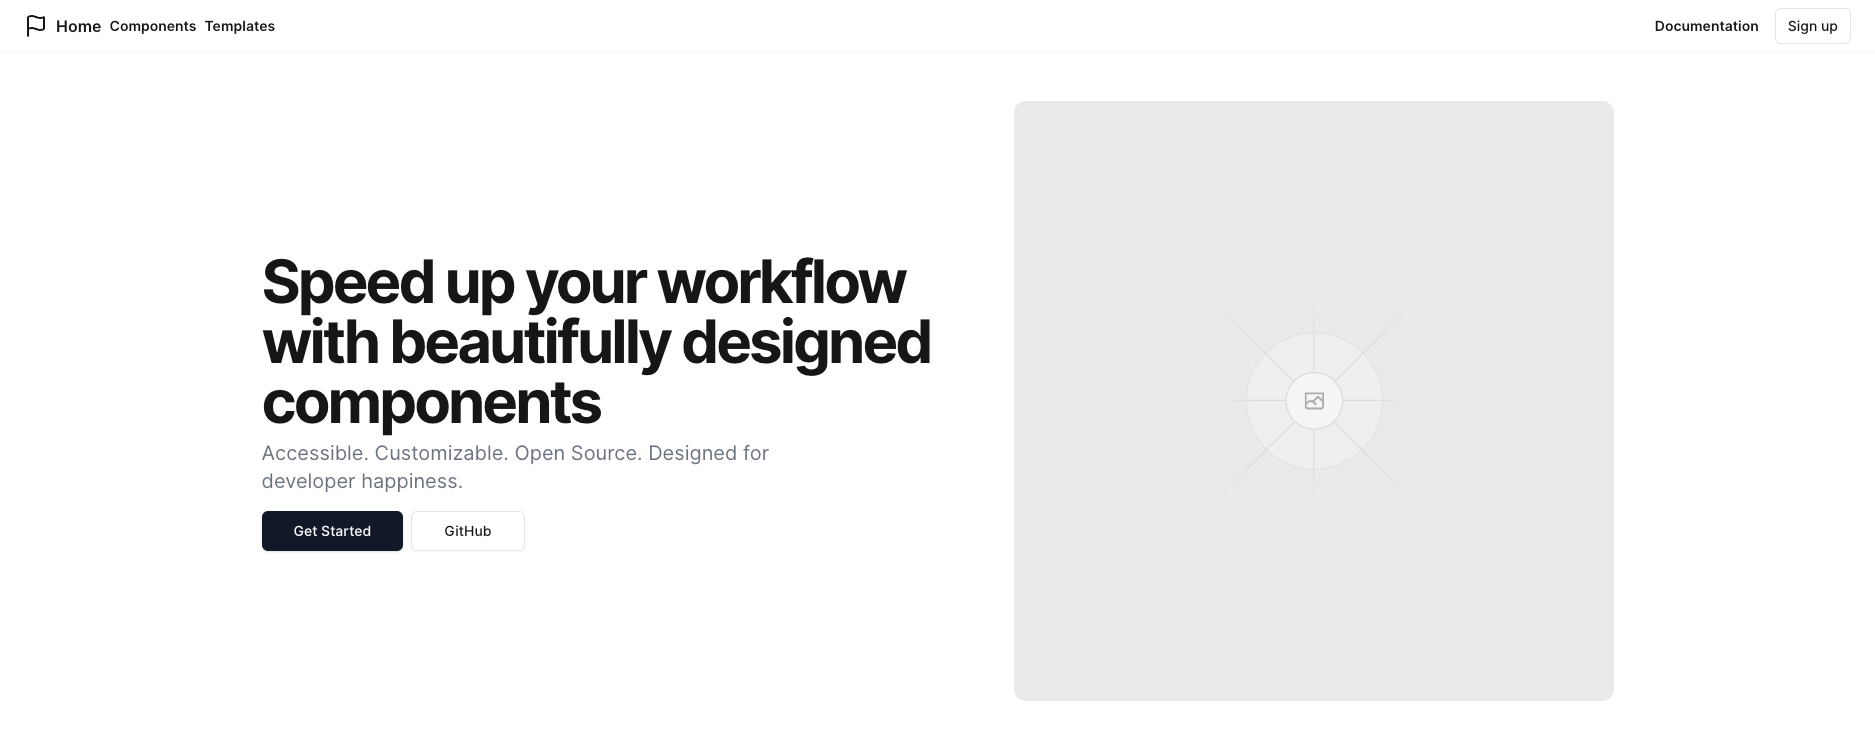
Navigate to the home page and click the "Image" button to upload the screenshot.

Next, you can add a short description like "A component library landing page" and submit.
And with that, you should get a layout similar to the image reference.
> **Note**: Image generation is a premium v0 feature. The free plan allows you to use an image generation just once. To have access to unlimited image generations, you'll need to subscribe to the premium plan.
### Regenerate Output
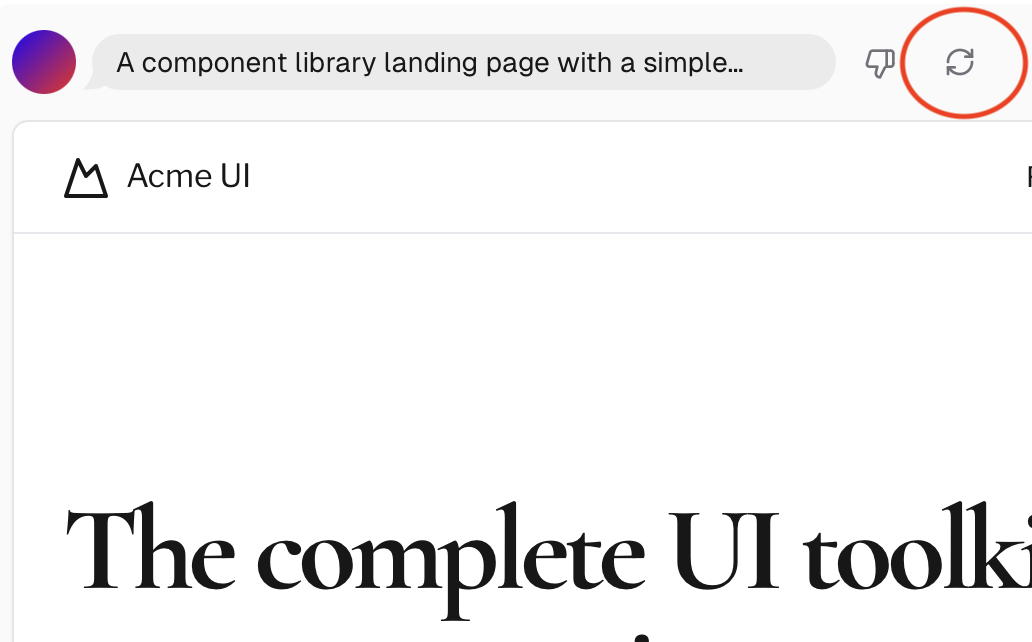
Sometimes, the output you generate may not be what you envisioned. In these cases, you can use the "Regenerate" feature to create new UI variations based on the same prompt.
Imagine you generated an interface that had glaring issues with the layout and structure like the one above. You can get new variations by clicking the "Regenerate" button above the UI preview as shown in the image below.
In addition to getting closer to your desired UI, you can also use the regenerate feature to discover new designs and layouts.
### Apply Theming
Another valuable feature of v0 is its theme editor. It's a simple tool for customizing the visual style of your UI. You can use it to change your components' headings and content font. You can also modify the border radius of your UI elements to get sharper or softer edges on elements like buttons and cards.
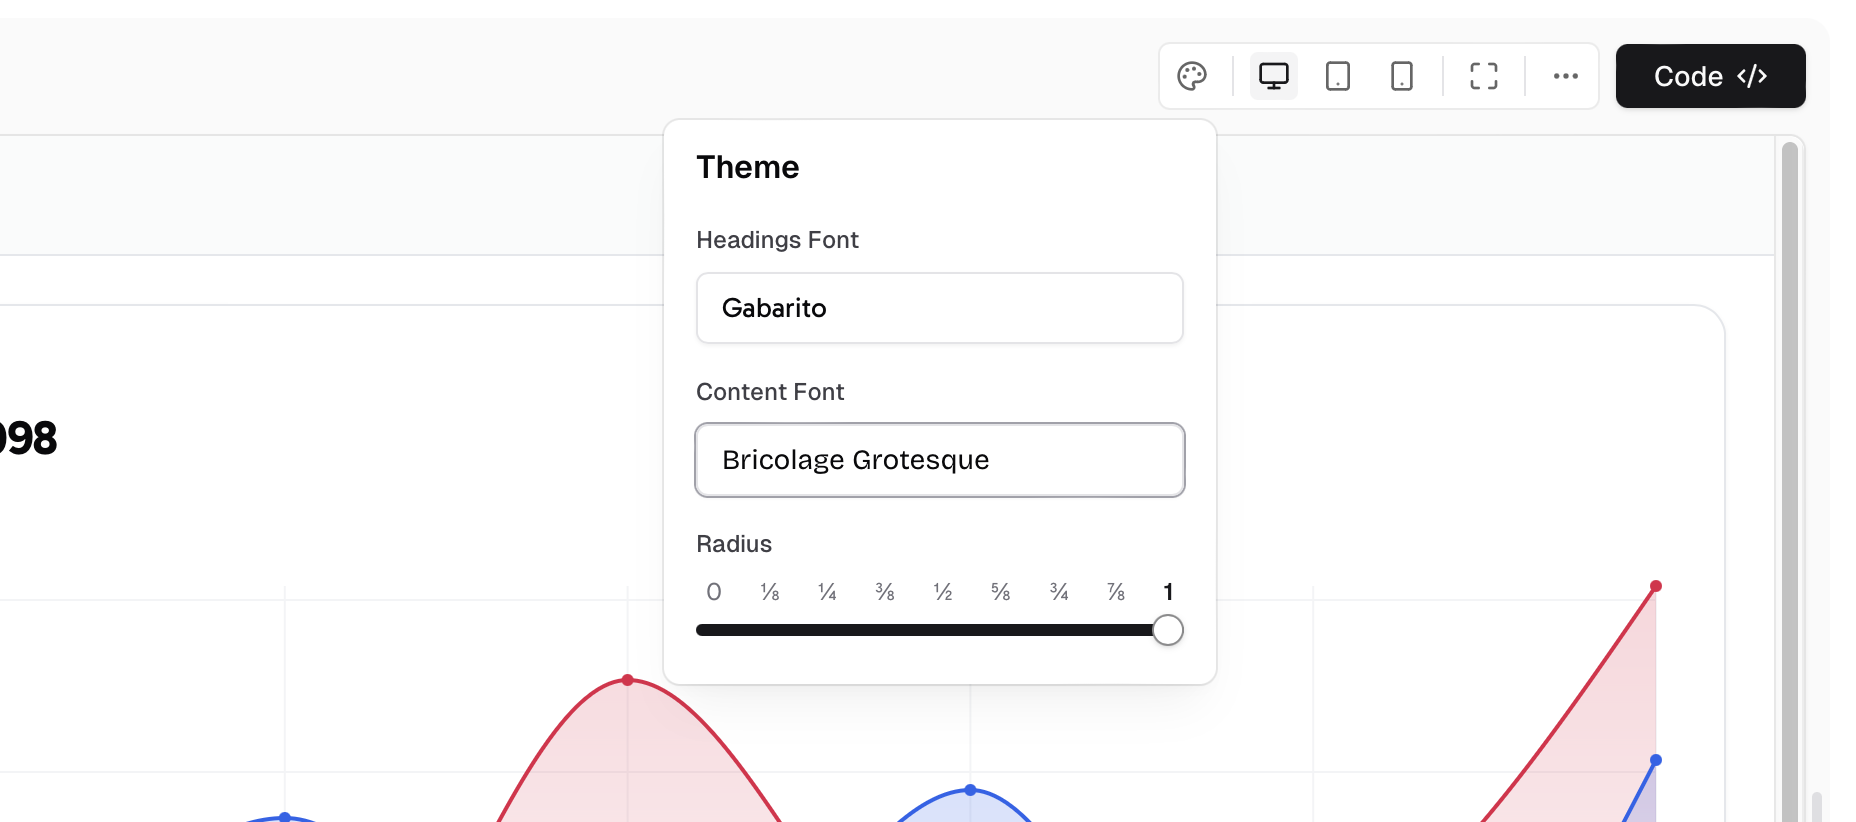
To access the theme menu, click on the button with the artist palette icon in the upper right corner of the page.
### Add UI Elements and Sections Using Prompts
With your base layout in place, you can begin adding the other landing page sections. Here are some example prompts you can use:
* **Logo:** "add a black banner under the hero section with four company logos adjacent to each other."
* **Components section:** "Add a components section with a left-aligned title, a subtext, and a 3-column grid containing six components. Each component has an image, title, and number of components, e.g., 'Hero' '30 components".
* **Templates section:** "Add a 'Templates' section with a left-aligned title and three template items. Each item should have two images on the right, a title, a description, and a 'view template' button on the left. The items should also be arranged in a one-column grid. Lastly, add a 'View Templates' button below".
* **Features section:** "Add a 'Why Our Templates & Components' section with a left-aligned title and three cards with the same height. Each card should consist of a real icon, the feature title, and then a short description of 2 lines all centered. Lastly, add a 'View Templates' button below".
* **Newsletter form:** "Add a 'New Templates Bi-Weekly' newsletter section".
* **Footer:** "A footer with copyright information and links to social media."
Don't hesitate to experiment with different prompts and regenerations until you achieve your desired result. Additionally, to help position and size elements correctly, try using words like "above," "below," and "left" and size modifiers like "large" and "small."
### Fork Your v0 Generations
Forking isn't just limited to community generations. You can also fork your generations to create copies you can build upon. This feature allows you to experiment with different directions for your design or create variations without affecting the original generation.
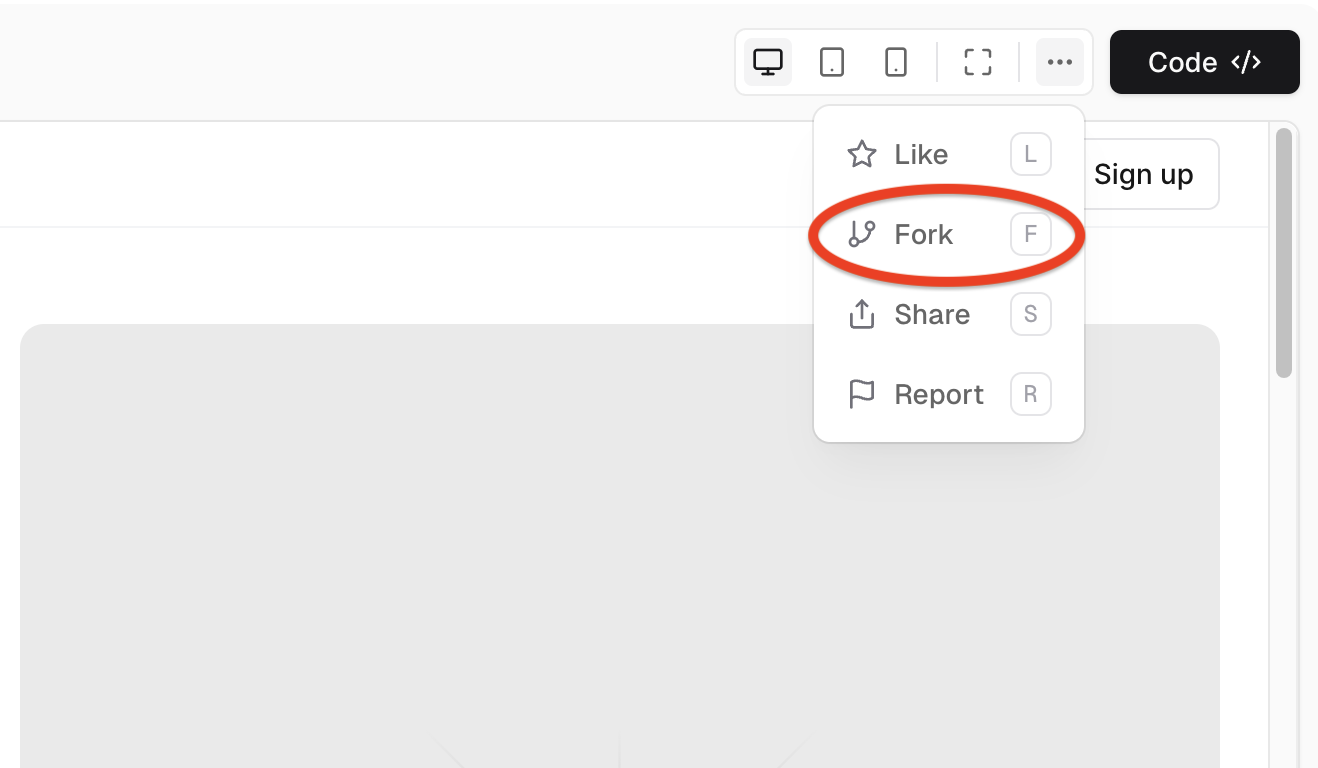
To fork a generation, click on the three dots beside the "Code" button and select "Fork."
### Update and Finalize the UI
Once you've added all the sections of your landing page, you can work on refining specific components. Here are some examples of how you can utilize text prompts to improve the design:
* **Updating Fonts and Colors:** You can choose a different font style or color scheme. For example, "Change the font to 'Roboto' and use a blue color scheme with white text" will change the landing page appropriately.
* **Adjusting Component Layout**: To fine-tune the positioning of elements, you can use prompts like "Move the call-to-action button to the center" or "Align the features section to the left."
Ensure your fonts, colors, and components complement each other well on the landing page.
### Using the Pick and Edit Tool
The "Pick and Edit" tool is a helpful feature that lets you select certain parts from your created UI and alter them directly. This tool is useful for quickly making changes to specific elements without regenerating the entire UI or editing the source code. Using the pick and edit feature, you can easily:
* Change text content and formatting.
* Adjust element sizes and padding.
* Change colors and styles.

To access the pick and edit feature, click on the rightmost button in the form at the bottom center of the page. Next, simply select the element you want to alter, and the tool will provide a text box to enter a prompt. Once you submit the prompt, the selected UI will be updated.
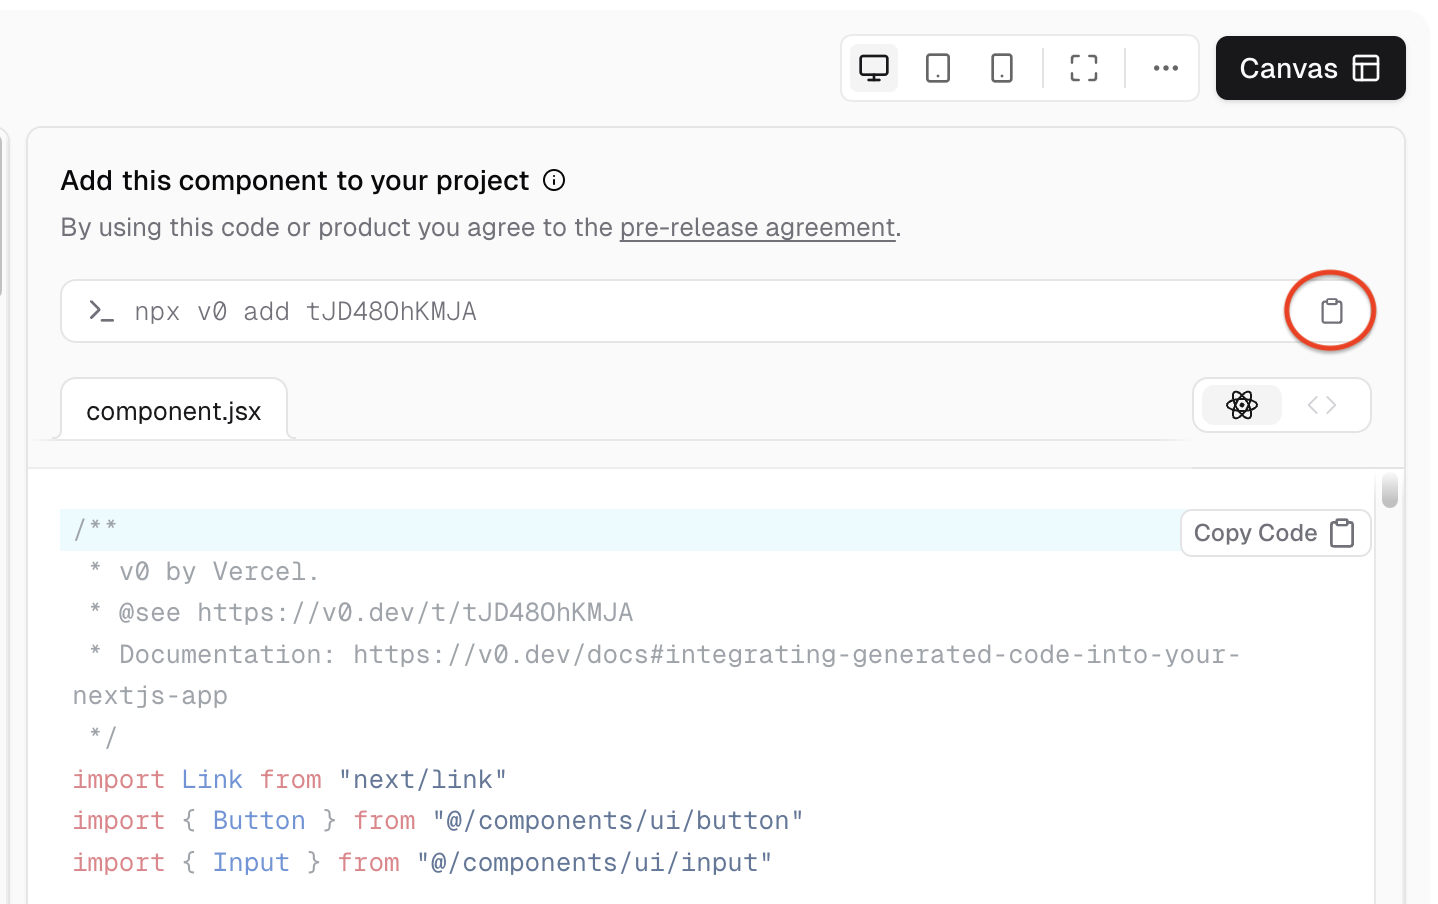
### Review and Export Generated Code
When you're done working on the UI, carefully check the preview of your landing page within v0. Ensure everything is positioned correctly, the styling is consistent with your vision, and there are no apparent flaws.
Once you're happy with the preview, you can export the resulting code to use in your Next.js project by following these steps:
* **Step 1: Create a Next.js Project**
Create a Next.js Project. Run the following command into your terminal to create a new Next.js project with Tailwind CSS and ESLint:
```bash
npx create-next-app@latest component-library-landing-page --tailwind --eslint
```
* **Step 2: Update CSS Code**
Open the `globals.css` file in the `app` folder and add the following code to overwrite the default global styles:
```css
@tailwind base;
@tailwind components;
@tailwind utilities;
:root {
--foreground-rgb: 0, 0, 0;
--background-rgb: 255, 255, 255;
}
body {
color: rgb(var(--foreground-rgb));
background: rgb(var(--background-rgb));
}
@layer utilities {
.text-balance {
text-wrap: balance;
}
}
```
* **Step 3: Initialize Project for v0**
Navigate to the root project directory and run this command to initialize the project for `v0`:
```bash
npx v0@latest init
```
* **Step 4: Copy v0 CLI Command**
Open the code view on the generation page by clicking the "Code" button in the top right corner and copy the CLI command.
* **Step 5: Run v0 Command Inside Project Folder**
Navigate to the root directory of your Next.js project in your terminal and run the copied command.
Once you complete these steps, your generated code should be in your project's `component` directory as a component file. You can now use the code as a React component.
## Update Next.js Project Media Media (Images, GIFs)
With the generated code in your Next.js project, you can now enhance your landing page with media assets to replace the placeholder images that v0 generated and bring your landing page to life.
Use image compression, WebP, SVG, and other modern image formats to improve performance and load times.
### Test for Responsiveness, Performance, and Functionality
Once you have integrated your code as well as embedded media, make sure that your landing page works well on most devices, is responsive, and is optimized. The following are some tests you may consider running:
* **Responsiveness:** Check the landing page across various devices. Use the developer tools in your browsers to simulate other screen sizes.
* **Functionality:** Test every functionality that your landing page has. Validate actions like form submission and any interactive elements if needed.
* **Performance:** Conduct a performance analysis of your landing page using tools like Lighthouse within Chrome DevTools.
* **Cross-Browser Testing:** Check that the design and functionality are consistent across the major browsers.
* **Accessibility Testing:** Make sure the landing page is accessible by using semantic HTML, image alt text, and keyboard navigation.
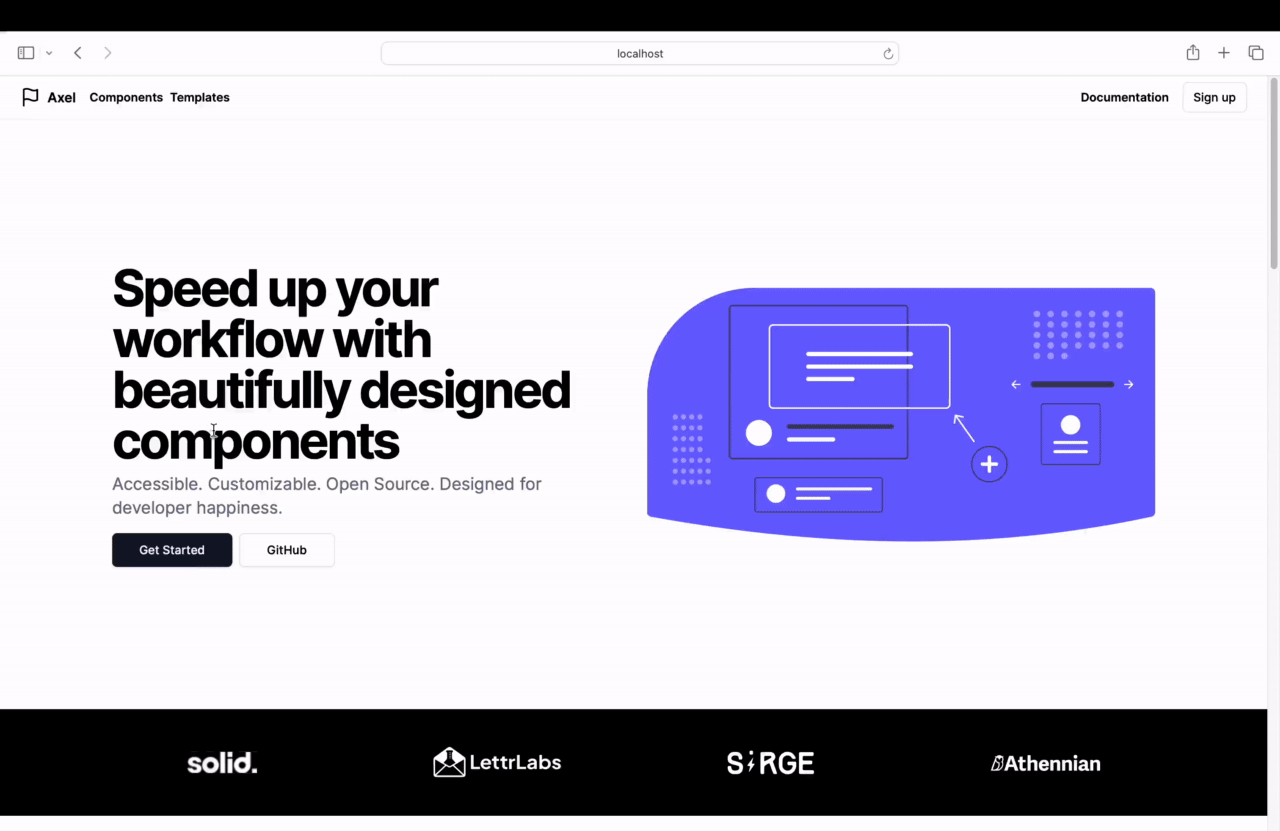
## Demo of Landing Page
With these testing steps complete, your landing page should be ready for deployment and should look similar to the one below:
## Conclusion
In this tutorial, we've looked at how you can use v0 in combination with Next.js to create compelling landing pages. Let's recap the key steps:
* **Understanding v0's features:** Understand the basic features of v0 and how to prompt, iterate, and refine generations to get customized UI code.
* **Building the UI:** Draft an outline of the UI and then start adding the sections of your landing page including the navbar, hero, and others.
* **Finalizing the design:** Clean up the design with additional prompts and the pick and edit tool.
* **Integrating code into Next.js:** Add the generated code into a Next.js project, add images, and test for performance and functionality.
v0 is just one component of a larger ecosystem of AI-driven web development tools. As AI technology advances, web development will become more accessible and intuitive. We encourage you to experiment with other AI tools and keep pushing the envelope with AI-assisted development.
## Additional Resources
* [Github Repository](https://github.com/TropicolX/component-library-landing-page)
* [v0 Documentation](https://v0.dev/docs)
* [v0 FAQ](https://v0.dev/faq)
 Sign in with Wallet


