# NTU Malware Reverse Lab 3 write up
###### tags: `NTU_MR` `Malware Reverse Engineering and Analysis` `NTU`
[TOC]
| Name| 何秉學 |StuID| R11921A16|
| -------- | -------- | -------- | -------- |
## Review Packing and Unpacking
* How does packing and unpacking work?
作者會把原本的code section和data section,放在UPX1,並且用unpacking stub(裡面存放解殼的程式),把UPX1的內容一點一點的還原回UPX0(也就是空區段),並跳回正常程式的執行進入點(original entry point, `OEP`),最後跳回去的動作叫做`Tail Jump`或`Long Jump`,另外,多長的jump才是長,可能要依照經驗值判斷,或是直接跳過去後分析程式在幹嘛

* 實際上執行脫殼的時候,除了`OEP`的重建外,還需要重建`Imports`,這兩者都處理好後才算是脫殼完成
* 當分析脫殼執行到如下圖這樣的情況時,就離終點不遠了,也就是`jmp`的地址離目前的程式很遠,且之後的程式有很多空指令或垃圾`byte`,<font color="FF0000">**此為`UXP`殼的特徵**</font>

* 可以用`PEiD`這個工具(或是用`Entropy`之類的,但是不一定準確)判斷樣本有沒有加殼,或是加了甚麼殼,上圖是沒有加殼的一般程式,下圖是加了`UPX`的加殼程式


* 若是要處理`Import Table Reconstruction`,可以用`OllyDump`、`ImpRec`或是`Scylla`這些工具來進行,在`Practice`中是用`Scylla`演示(且可以搭配`x32dbg`或`x64dbg`進行)
* 老師有說在`Long Jump`之前會搭配`pop` instruction,這可能可以當作解析`OEP`的線索
* `Tail Jump`,不一定是用`jmp`,也可以是`call` instruction;另外,跳轉的地址也不一定是一個明確的地址,也可能用暫存器存起來,這部分可以注意一下
## Practice - `upx_exercise.exe`
### Observation
* First things first, we can observe the file by executing it directly. Obviously, you should enter correct `CTF` key by analyzing.

### Unpacking
#### Static analysis - `IDA Pro`
* You are not allowed to disassembly by doing nothing, because it was packed by `UPX`. Therefore, our objective is to unpack it and try to analyze it original code to get the `CTF Flag`.

#### Dynamic analysis - `x32dbg`
* In `UPX-based` packing, it has a feature that in order to not let the data be flushed during unpacking, it must store all data to the stack by using <font color="FF0000">`pushad`</font> instruction.

* Then, you'll see a lot of `jmp` instruction to unpack the original code.

* Scrolling down the code, you'll see a <font color="FF0000">`popad`</font> instruction at `0x0134AEDE` , a <font color="FF0000">`jmp`</font> instruction at `0x010EAEEC`, and a lots of `null` instruction which all three are satisfied all features that `UPX-based` packing method has.
It'll restore all data that stored in stack and jump to `upx_exercise.134244D`.

* Set the break-point and press `run` button in `x32dbg`, then press `step into` button to observe the code.
* Now, the code has already unpacked, then we can use <font color="FF0000">**`Scylla`**</font> to do `Import Reconstruction`.


* Press `IAT Autosearch`(Import Address Table) button to search and then press `Get Imports` button. Finally, you will get all imports that this file used, and `Scylla` will help you to rebuild it.

Press `Dump` button to get `IAT` file.

* Press `Fix Dump` and choose the file what we dump to reconnect the `IAT` and this file. You'll see the log said `Import Rebuild success` and you'll get a new file named `upx_exercise_dump_SCY.exe` that repaired by `Scylla`.

### Analyze
#### Re-static analysis - `IDA Pro`
* Used `IDA` to reanalyze the unpacking file.
* Used string searching to find the string `nope` that appear in your `cmd`.

* Used cross reference to find which part has used it.


* The main part is shown as below
```cpp
...
sub_E01EB0(std::cin, &Memory);
LOBYTE(v116) = 1;
MEMORY[0] = 0;
v96 = 0xFCC1D3C4;
v97 = 0xD8D2C8DE;
v98 = 0xD8D3E8E0;
v99 = 0xD8C2EFB0;
v100 = 0xC2ECB3C1;
v101 = 0xB3EBE1D8;
v102 = 0xD5F3D8BE;
v103 = 0xB3EFD8DE;
v104 = 0xF5C2E3D5;
v105 = 0xFAD6D6D8;
v64 = 1;
HIBYTE(v95) = 1;
v65 = 0;
v93 = 0;
while ( v65 < 40 )
{
v66 = (char *)&Memory;
if ( v111 >= 16 )
v66 = (char *)Memory;
v67 = v66[v65] ^ 0x87;
v68 = *((unsigned __int8 *)&v96 + v65);
v94 = 0;
if ( v67 != v68 )
v64 = v94;
HIBYTE(v95) = v64;
v93 = ++v65;
}
v69 = "Congratz?!";
if ( !v64 )
v69 = "Nope!";
...
```
* From `v96` to `v105`, it stored 40 bytes and it seems do something in while loop 40 times. In addition, `v67 = v66[v65] ^ 0x87;` this line used `xor` instruction that seems a encrypt part. And then it compared `&v96 + v65` and `v67` that encrypt the string what you input.
* If all the strings you input after process `xor` to `0x87` are strictly the same with `v96` to `v105`, then it'll print `Congratz?!`, otherwise, print `Nope`.
* Used [online_xor](https://xor.pw/#) to get `v96` to `v105` encrypted strings.

And then used [online_hex2ascii]() to get the `CTF Flag`.

* The answer is <font color="FF0000">`**CTF{YOU_goT_7hE_F4kE_fl49_tRY_h4RdEr_QQ}**`</font>, though it is not a real answer.
* Note that, the demo from TA is finished, therefore, I still don't know the real flag is.
## Homework - `upx_Revil.exe`
### Static Analysis Observation
* Use `IDA` to analyze this sample and obviously packed sample

* Use the skill above then you can answer the question easily.
## Homework - `custom_packer_Revil.exe`
### Static Analysis Observation - `DetectItEasy`
* Though I used the tool, `DetectItEasy` to check if this sample was packed or not, the answer is not quite explicit.

* Through the write up made by [Security Joe](https://github.com/securityjoes/conferences/tree/main/Confidence%202022/watch_out_and_just_skip_the_packer), it's not a simple `UPX` sample.
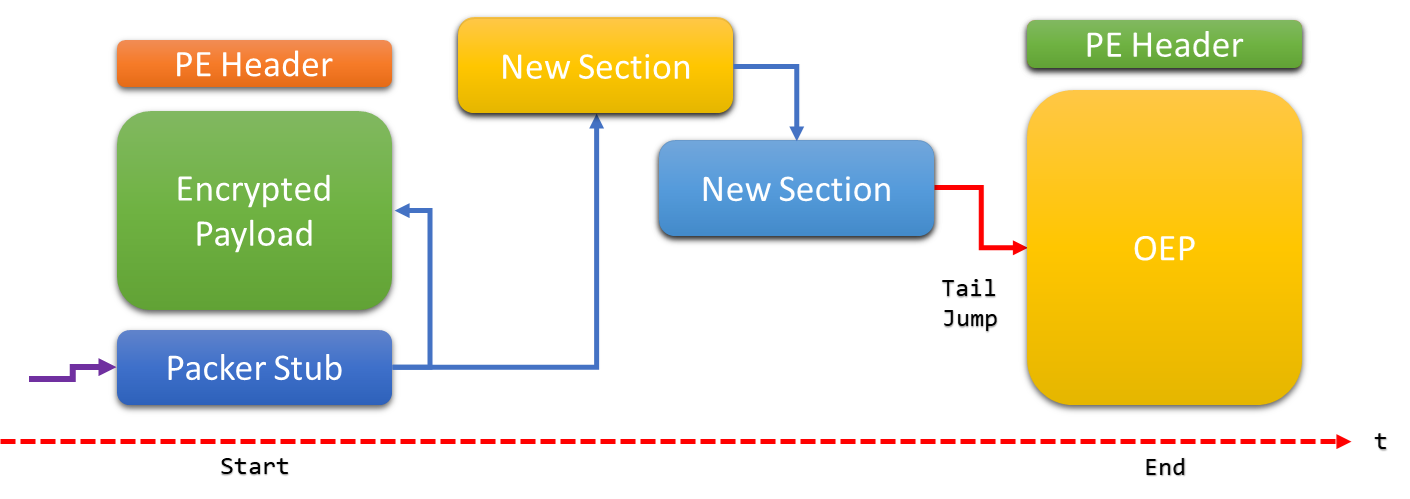
> This packer can be classified as a <font color="FF0000">hybrid packer</font> because during its execution it injects several pieces of `shellcode` to finally replace the complete memory image of the PE. A diagram that explains this kind of packer is shown below.
```!
This kind of packer will do a self injection in its own memory space.Basically, it'll allocate or creating a new memory section in the same process and it can write shellcode or complete PE files to execute.
```
* Basically, it's going to read the encrypted content, and gonna save or gonna copy that to the new section(the <font color="FFAA00">yellow</font> block)
### Analyze & Find `OEP`
1. Finding first injected `shellcode` (`LocalAlloc`)
* Set the break point at `0x00404DB6` and step into this line

* And you'll find the module that you are analyzing is `kernel32.dll`.

* This is not what we care, so we press the button(`Execute till return`) to skip this module.

And then step into this operation to go back to the custom packer REvil from windows library.
* Follow the memory address in dump

Then continue to execute the code, you will see there are 3 nested loop. Please pay attention to the dump. When I finish the loop, the dump memory is different(Fig.2).


These loops are aim to moving the `shellcode` to memory section, just as the same what we talked about before.
* While you are continuing to execute forward, you can see the dump memory has changed at `0x00404E38`.

\* Note that you can dump these memory to a new file by right click and select `Follow in Memory Map`, and then right click again then choose <font color="FF0000">`Dump memory to File`</font>
\* Note that the file you dump is actually a `shellcode`. How to know?
2. Finding second injected `shellcode` (`VirtualAlloc`)
* Find the expression by pressing `Ctrl+G` and type `VirtualAlloc`.

Set the break point at the first line and do the same thing above. Pressing `Execute till return` and check the memory by right click `EAX` and choose `Follow in Dump`.

Finally, press `step into` to return
* Like the same outcome above. While you are continuing to execute, you'll notice that memory have changed when you step over `0x02B95269`.

\* Note that this is 2nd `shellcode` that can check in disassembler.

* And obviously, `0x02B9527D` is the 2nd tail jump that will jump to <font color="00BFFF">blue</font> `shellcode` block from <font color="FFCC00">yellow</font> `shellcode` block.

* You can see that the jumping address is quite different with current address(the following image is not my actually circumstances)

3. Payload decryption (`VirtualAlloc`)
* In this section, it'll use `VirtualAlloc` again. So, we just press `Run` button to get in there. And follow the instruction above.

* Go back → Follow `EAX` address in dump → Step into → You'll see 3 nested loop again → Set break point → Run → The memory changed in dump again(<font color="FF0000">this is our payload in memory</font>)

* Dump these code in a new file like above.

4. Code substitution (`VirtualProtect`)
* In this section, it'll use `VirtualProtect` `API`, so that we just follow the instruction above.
* Find `VirtualProtect` by `Ctrl+G` → Set break point and press `Run` button
**Interesting things**
Check out [the page](https://learn.microsoft.com/en-us/windows/win32/api/memoryapi/nf-memoryapi-virtualprotect) talking about `VirtualProtect`.
> Changes the protection on a region of committed pages in the virtual address space of the calling process.
To change the access protection of any process, use the VirtualProtectEx function.
And you can especiallly take a look at
> [in] flNewProtect
The memory protection option. This parameter can be one of the memory protection constants.
Follow [the page](https://learn.microsoft.com/en-us/windows/win32/Memory/memory-protection-constants), you can notice that 0x40 is <font color="FF0000">**`PAGE_EXECUTE_READWRITE`**</font>
You can see the whole parameters about `VirtualProtect` in `stdcall`.

**They want to modify the original section(replace)**
* Continue the instruction mentioned above: go back → step into
5. Finding the "Tail jump"
* Scrolling~~ down and find a looooog jump at `0x001C091E` and step into.

6. Finding the `OEP`
`0x00404161` is your `OEP`

## Homework
1. Analyze the malware found in the file `workshop_samples.zip` -> `upx_REvil.exe`, generate 'yourself' `writeups` (with screenshots) and answer the follow questions:
1.1 Where is the memory address of the **tail jump**?
Ans:
When you see the machine instruction `popad`, the tail jump address is <font color="FF0000">`0x00283F8C`</font>

1.2 Where is the **`OEP`** of the packed sample?
Ans:
The **`OEP`** address is <font color="FF0000">`0x00264161`</font>
2. Analyze the malware found in the file `workshop_samples.zip` -> `custom_packer_REvil.exe`, generate 'yourself' `writeups` (with screenshots) and answer the follow questions:
2.1 Where is the memory address of the **tail jump**?
Ans:
Scrolling~~ down and find a looooog jump at `0x001C091E` and step into.

2.2 Where is the **`OEP`** of the packed sample?
Ans:
<font color="FF0000">`0x00404161`</font> is your `OEP`

 Sign in with Wallet
Connect another wallet
Sign in with Wallet
Connect another wallet