---
tags: maker101, topic
---
# Identify the parts
The first things we do when starting a project like this are to make sure that we have all the pieces (and that we know which pieces are which!) and read through all the instructions -- before doing anything else!
<!-- youtube(https://youtu.be/-Va7g1q24col) -->
**TEST LINK**
<!-- youtube(https://www.youtube.com/watch?v=EPZ64mnSwJw&feature=youtu.be) -->
So let’s look at the robot parts!
### The micro:bit
Find your micro:bit -- the "brains" of your robot. The micro:bit is packed with functionality (some of which we'll use in later tutorials). Check out the Resources and Going Further section to learn more about this microcontroller and what you can do with it.
For now, though, take a look at the features on the front
-> [](https://cdn.sparkfun.com/assets/learn_tutorials/1/2/0/4/image12.png) <-
and the back
-> [](https://cdn.sparkfun.com/assets/learn_tutorials/1/2/0/4/image12.png) <-
*Prefer the simpler this is the front this is the back thing I had (we can redo images to make them nicer). Rationale: this isn't about understanding the coolness of the micro:bit in infinite detail (yet). All will be revealed in time, but from the POV of an 11 YO that's just a whole lot of STUFF that comes before the instructions.*
### The SparkFun Moto:bit
The micro:bit is pretty powerful on its own, but when you plug it into the moto:bit, a type of accessory called a "carrier board" it can do even more.
This picture identifies the parts of the moto:bit that will be important while building your robot.
-> [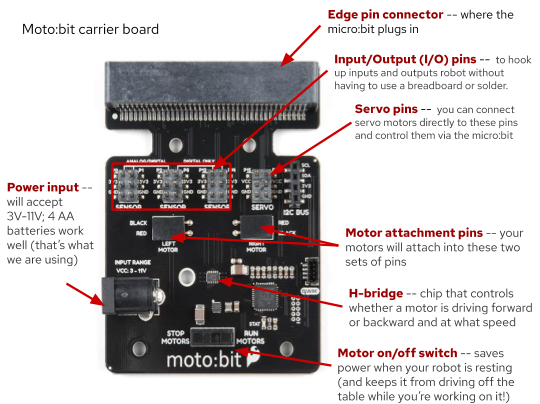](https://cdn.sparkfun.com/assets/learn_tutorials/1/2/0/4/image12.png) <-
### Robot Chassis
The chassis of a robot is the body, or structure that everything else gets attached to!
->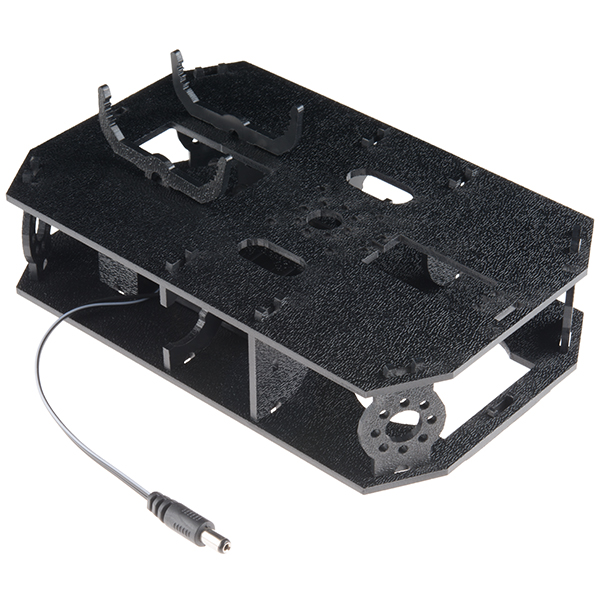<-
This chassis (the SparkFun Shadow Chassis) is made out of laser-cut plastic parts that we're going to put together.
Before we can put the chassis together, though, we need to snap out a few small parts from the two main pieces of the chassis.
[[video goes here]]
<!-- youtube(https://youtu.be/-Va7g1q24co?t=192) -->
<div class="alert alert-warning"><b>NOTE:</b> Don’t use pliers (or hammers or drills or …). These should come out easily if you twist them a little in the frame as they are just held in by a thin piece.</div>
You should end up with seven new-and-shiny pieces, like these:
-> [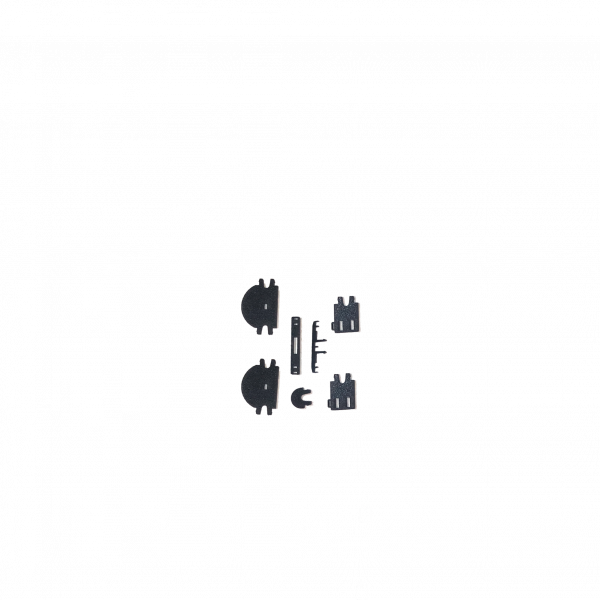](https://cdn.sparkfun.com/assets/learn_tutorials/1/2/0/4/image10.png) <-
### Identify, Count & Label (and read the instructions!)
Finally, lay out all the parts on your worktable, placing all parts of the same type together and counting them.
***Why?***
Well, unfortunately, sometimes instructions don’t do a great job of specifying which of the somewhat-similar-but-slightly-different parts you should use on a given step (and sometimes there aren’t pictures to help out). But if the instructions call for a certain number of that part, you can sometimes use the number of each part you received to help you figure out which part to use.
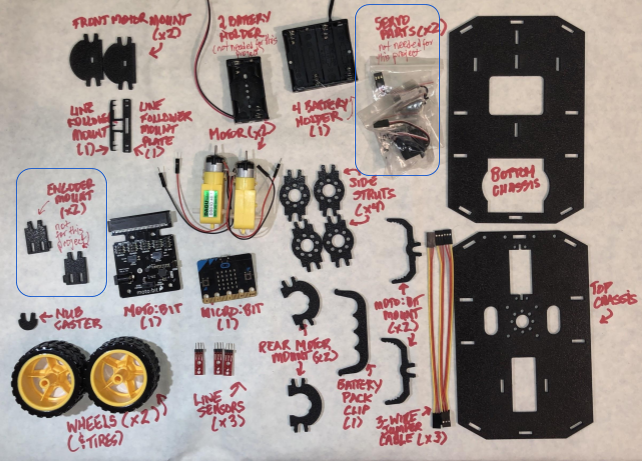
Take a look at this picture, which should show almost the same pieces you have (you will also have some cool stickers, a 6” microUSB cord, 4 AA batteries, and 2 AAA batteries):
-> [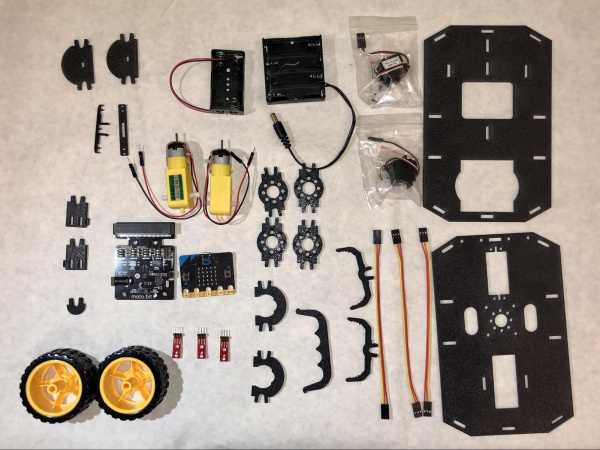](https://cdn.sparkfun.com/assets/learn_tutorials/1/2/0/4/image34.jpg) <-
Suppose the instructions said:
> Attach one side strut to each of the four corners of the bottom chassis.
>
(Don’t worry, these instructions will be more clear than that, we hope!)
Even if you didn’t know which part was supposed to be the “side strut” (and how could you?), you could figure it out because there’s only one part that you have four of!
It’s also a good idea to lay your parts out and count them before starting just in case the manufacturer made a mistake and you’re missing a piece -- it’s easier if you find this out before you’re very-nearly-done and excited to show off your cool project.
Another thing I do to help minimize my frustration -- especially when I’m working with parts I’ve never worked with before -- is labeling them. You may notice that the parts in the picture above are on a white sheet of paper, which serves two purposes: first, it protects my table, and second, it gives me a place to label my parts.
Before starting assembly, you should read through all the instructions (really). When I’m doing my read-through, I also try to figure out which part is which, and I label them on my paper (along with the quantity). The final result looks something like this:
-> [](https://cdn.sparkfun.com/assets/learn_tutorials/1/2/0/4/image17.png) <-
### A Note on Orientation
Along with laying out, counting, identifying, and labeling all the pieces in advance, I also like to do whatever I can to make things a little easier when I assemble projects. One way that I do that is by giving myself some obvious orientation clues when I’m working with parts that I might have a chance to put on upside down or backwards. (Video tip on chassis orientation and identification:
<!-- youtube(https://youtu.be/-Va7g1q24co?t=268) -->
This can be done in any number of ways -- by marking on one corner of each piece with a pen, adding a sticker, or using some tape. The important thing is to do it consistently -- if you’re marking the upper lefthand corner, do that on *all* the pieces. Or if you’re using a green mark to indicate the top of the part and red to indicate the bottom, do *that* on all the pieces.
For the robot, the directions reference (see the picture below)
* the Top Chassis and the Bottom Chassis
* the “front” of the robot (the end the front bumper would be on if it had one) and the back
* the “top” of each chassis (the textured side) and the bottom (the smooth side)
* and the Left and Right of each chassis, which is relative to the “front”
I use pieces of tape to mark my chassis -- always on the front, left corner on the top surface. The Top Chassis has a red “L” and the Bottom Chassis has candy cane-striped tape. It doesn’t have to be pretty to work.
**[INSERT L / R PHOTO]** -- is here https://drive.google.com/file/d/1FmFqoSS2Ekkc0uqDArh89duEH8cR49TW/view?usp=sharing
Since you have the neat stickers that came with your robot, you could use one of them to mark the front left corner (and remember which one you used!), put the other on the right front corner, then use a piece of tape to mark the Lower Chassis front left corner.
This may sound like a lot to do before you start, but if you’ve ever tried to put something together and you can’t find the right part -- or worse, you had the right part, but you put it in the wrong place or upside-down -- this will make sense.
 Sign in with Wallet


