# Q&A - Advanced Linux and C Language related
###### tags: `2022/09` `C Q&A` `C Language`
:::info
<ins>(2022/9/11)</ins> Collections of Q&A related to C language.
Latest update on 2022/12/27.
:::
---
**Table of Contents**
[TOC]
---
## ++**User Space Programming**++ related topics
---
### ++**User Space API - getcpu() / sched_getcpu()**++
++A :++ from this article - [NUMA Get Current Node/Core](https://stackoverflow.com/questions/16862620/numa-get-current-node-core), it is recommended to use `sched_getcpu()` iso `getcpu()`.
==++**sched_getcpu() is the most stable way to get cpuid**++. Since, you were explicitly looking for both cpu and node id, that's why I replied with getcpu(). Actually, ++**getcpu() don't have libc wrapper**++, you need to use syscalls() system call. And, ++**this is another of reason sched_getcpu() is better than getcpu()**++, along with portability issues.==
#### ++**Below is the example to show the C programming and compiling tips.**++
`getcpu-ex1.c`
```c=
#include <stdio.h>
#include <utmpx.h>
#include <numa.h>
int sched_getcpu();
int main(void) {
int cpu = sched_getcpu();
int node = numa_node_of_cpu(cpu);
printf("CPU : %d, Node : %d\n", cpu, node);
return 0;
}
```
`Terminal`
```shell=
$ sudo apt-get install libnuma-dev
$ gcc getcpu-ex1.c -o getcpu-ex1 -lnuma
$ ./getcpu-ex1
CPU : 0, Node : 0
```
#### ++**Try getcpu() - fails**++
In [man sched_getcpu](http://devdoc.net/linux/man7.org-20170728/man3/sched_getcpu.3.html), it says the following. Let's give it a try, but not working. Seems it requires to call `getcpu` through `syscall`.
```note
The call
cpu = sched_getcpu();
is equivalent to the following getcpu(2) call:
int c, s;
s = getcpu(&c, NULL, NULL);
cpu = (s == -1) ? s : c;
```
`getcpu-ex2.c`
```c=
clude <stdio.h>
#include <utmpx.h>
#define _GNU_SOURCE
#include <sched.h>
int getcpu();
int main(void) {
int c, s, cpu;
s = getcpu(&c, NULL, NULL);
cpu = (s == -1) ? s : c;
printf("CPU : %d\n", cpu);
return 0;
}
```
`Terminal`
```
$ gcc getcpu-ex2.c -o getcpu-ex2
/tmp/ccbE4ZCd.o: In function `main':
getcpu-ex2.c:(.text+0x2e): undefined reference to `getcpu'
collect2: error: ld returned 1 exit status
```
#### ++**Try getcpu() - Success**++
Follow this article [Linux System Call Tutorial with C](https://linuxhint.com/linux_system_call_tutorial_c/) to find below example which works with `getcpu()`.
`getcpu-ex3.c`
```c=
#include <stdio.h>
#include <unistd.h>
#include <sys/syscall.h>
#include <sys/types.h>
int main() {
unsigned cpu, node;
// Get current CPU core and NUMA node via system call
// Note this has no glibc wrapper so we must call it directly
syscall(SYS_getcpu, &cpu, &node, NULL);
// Display information
printf("This program is running on CPU core %u and NUMA node %u.\n\n", cpu, node);
return 0;
}
```
`Terminal`
```shell=
$ gcc getcpu-ex3.c -o getcpu-ex3
$ ./getcpu-ex3
This program is running on CPU core 1 and NUMA node 0.
```
Further study
+ [System Call (系統呼叫)](https://hackmd.io/@combo-tw/Linux-%E8%AE%80%E6%9B%B8%E6%9C%83/%2F%40combo-tw%2FBJPoAcqQS)
+ [vDSO: 快速的 Linux 系統呼叫機制 - 資料整理: jserv](https://hackmd.io/@sysprog/linux-vdso)
---
## ++**Kernel Space Programming**++ related topics
___
### ++**Memory Management :**++ 8086 / 80286 / 80386 and onwards
==This article, [Chapter 2. Memory Addressing](https://notes.shichao.io/utlk/ch2/), is by far the most comprehensive article about x86 memory management I ever found.==
|CPU |Mode|Addressing|Capacity-Physical|Capacity-Virtual|
|:----|:-------:|:--:|:---:|:-----:|
|8086 |Real mode|CS(16bits<<4):IP(16bits)| 1MB (20bits) | NA |
|80286|Real mode|CS(16bits<<4):IP(16bits)| 1MB (20bits) | NA |
| |Protected Virtual Address mode (PVAM)| 32bits pointer <br>`=` <br>Selector (16bits) + Offset(16bits) <br>`=>`<br> Segment Base Address (24bits) + Offset(16bits) |16MB| 1GB |
|80386|Real mode|CS(16bits<<4):IP(16bits)| 1MB (20bits) | NA |
| |Protected mode|32(16+16)/48(16+32)-bit pointer |4GB (32bits)|64TB (4GB/Segment X 16K Segments)|
| |Virtual 8086 mode|same as 8086|1MB|NA |
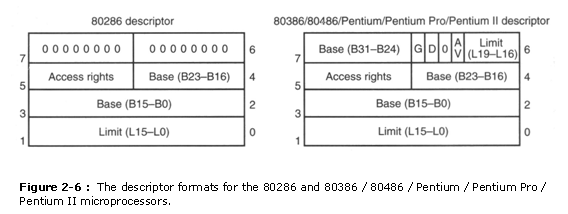
Figure below shows the format of a descriptor for the 80286 through the Pentium II. Note that each descriptor is 8 bytes in length, so the global and local descriptor tables are each a maximum of 64K bytes in length. Descriptors for the 80286 and the 80386 through the Pentium II differ slightly, but the 80286 descriptor is upward-compatible (with reserved 2 bytes). ==Though we can see the 'ugly' structure of descriptor in 80386, to be backward compatible with 80286.==
___
### ++**Memory Management :**++ Segment Selectors and Segment Descriptors
|Item |CPU |Description |Example |Components |Location |
|:----|:---------:|:------:|:------:|:------:|:------:|
|Segment Register|8086|A 16-bit value of Segmentation is the process in which the main memory of the computer is logically divided into different segments and each segment has its own base address. It shifts 4 bits left, then adding Offset Registers to get physical address.|CS, DS, SS, ES|16 bit Segment Registers|CPU Segment Registers|
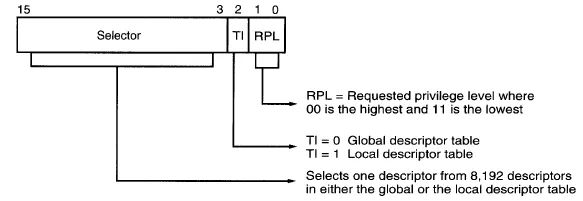
|Segment Selector |80286|Still a 16-bit value, but it now indexes a table of up to 16M (24bits) Segment Descriptors|CS, DS, SS, ES|**16 bits** consistes of <br>**1) 13-bit index** value that is used to index the Segment Descriptor table; <br>**2) 1 bit Table Indicator**: This is a 1-bit flag that indicates whether the Segment Descriptor table is located in the Global Descriptor Table (GDT) or the Local Descriptor Table (LDT); <br>**3) 2 bit Requested Privilege Level (RPL)**: This is a 2-bit field that specifies the privilege level of the code or data that is accessing the segment |CPU Segment Registers referring to Segment Descriptor Table in Memory, using `lgdt` instruction |
|Segment Descriptor |80286|Expanded to 24 bits for Base Address and contains additional information such as the segment size and the privilege level of the segment||24 bits|
|Segment Selector |80386|Still 16 bits, same as 80286, add 2 more Segment Selector Registers, FS and GS. The Segment Descriptor has been further expanded to 32 bits|CS, DS, SS, ES, FS, GS|**16 bits, same as 80286**|Same as 80286|
|Segment Descriptor |80386|Has been further expanded to 32 bits Base Address||32 bits|
|Offset Register|8086|Store the offset through which the actual address is calculated.|(CS:)IP <br>(DS:)BX, DI, SI <br>(SS:)SP, BP <br>(ES:)BX, DI, SI|16 bits|CPU Offset Registers|
|Offset Register|80286|Store the offset through which the actual address is calculated.|(CS:)IP <br>(DS:)BX, DI, SI <br>(SS:)SP, BP <br>(ES:)BX, DI, SI|16 bits|CPU Offset Registers|
|Offset Register|80386|Store the offset through which the actual address is calculated.|(CS:)EIP <br>(DS:)EBX, EDI, ESI <br>(SS:)ESP, EBP <br>(ES:)EBX, EDI, ESI|32 bits|CPU Offset Registers|
Segment Selector Format - 80286 and onwards
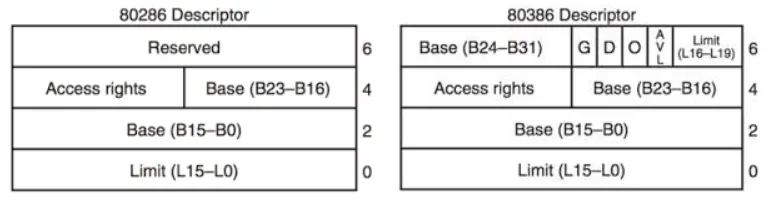
Segment Descriptor Format between 80286 (total 6 bytes, 2 bytes are reserved) and 80386 (total 8 bytes)
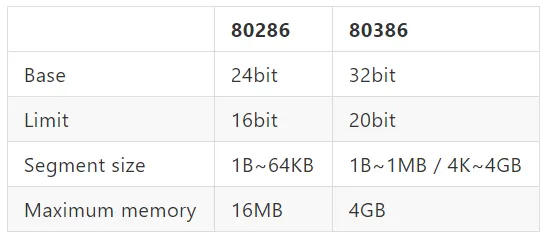
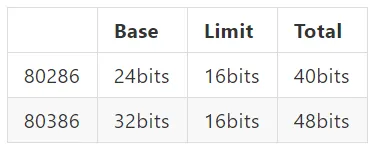
Capacity between 80286 and 80386
GDTR / LDTR Base and Limit
References:
* [Chapter 2. Memory Addressing](https://notes.shichao.io/utlk/ch2/)
* [Memory Segmentation in 8086 Microprocessor](https://www.geeksforgeeks.org/memory-segmentation-8086-microprocessor/)
* [x86 Memory Layout and Access](https://ftp.utcluj.ro/pub/users/cemil/asm/CH04.PDF)
* [處理器中的記憶體分段 (Memory Segmentation)
前言](https://medium.com/@cousin3516/%E8%99%95%E7%90%86%E5%99%A8%E4%B8%AD%E7%9A%84%E8%A8%98%E6%86%B6%E9%AB%94%E5%88%86%E6%AE%B5-memory-segmentation-b28bc10b437)
* [記憶體分段架構 - NTU CSIE](https://www.csie.ntu.edu.tw/~wcchen/asm98/asm/proj/b85506061/chap2/segment.html)
---
## ++**Mixed C and Assembly Programming**++ related topics - x86
Find another [Hackmd x86assemlby](https://hackmd.io/@MarconiJiang/x86assembly) for more info related to embedded assembly in C language.
---
## ++**Mixed C and Assembly Programming**++ related topics - ARM
---
### ++Q: **Mixed C and Assembly Programming**++ in Embedded Systems - 3 ways of implementation : Instruction intrinsics, inline and embedded assembler
++A:++
+ 3 ways of implementation - [ARM Mixed C and Assembly programming](https://developer.arm.com/documentation/dui0471/m/mixing-c--c----and-assembly-language/instruction-intrinsics--inline-and-embedded-assembler)
++Instruction intrinsics++, and ++inline++ and ++embedded assembler++ are built into the compiler to enable the use of target processor features that cannot normally be accessed directly from C or C++.
++**Instruction intrinsics**++
Instruction intrinsics provide a way of easily incorporating target processor features in C and C++ source code without resorting to complex implementations in assembly language. They have the appearance of a function call in C or C++, but are replaced during compilation by assembly language instructions.
++**Inline assembler**++
The inline assembler supports interworking with C and C++. Any register operand can be an arbitrary C or C++ expression. The inline assembler also expands complex instructions and optimizes the assembly language code.
Note
The output object code might not correspond exactly to your input because of compiler optimization.
++**Embedded assembler**++
The embedded assembler enables you to use the full ARM assembler instruction set, including assembler directives. Embedded assembly code is assembled separately from the C and C++ code. A compiled object is produced that is then combined with the object from the compilation of the C and C++ source.
The following table summarizes the main differences between instruction intrinsics, inline assembler, and embedded assembler.
Table 3-1 Differences between instruction intrinsics, inline and embedded assembler
|Feature |Instruction Intrinsics |Inline assembler |Embedded assembler|
|:---|:---|:---|:---|
|Instruction set |ARM and Thumb. |ARM and Thumb. (a) |ARM and Thumb.|
|ARM assembler directives |None supported. |None supported. |All supported.|
|C/C++ expressions |Full C/C++ expressions. |Full C/C++ expressions. |Constant expressions only.|
|Optimization of assembly code |Full optimization. |Full optimization. |No optimization.|
|Inlining |Automatically inlined. |Automatically inlined. |Can be inlined by linker if it is the right size and linker inlining is enabled.|
|Register access |Physical registers, including PC, LR and SP. |Virtual registers except PC, LR and SP.|Physical registers, including PC, LR and SP.|
|Return instructions |Generated automatically. |Generated automatically. BX, BXJ, and BLX instructions are not supported. |You must add them in your code.|
|BKPT instruction |Supported. |Not supported. |Supported.|
(a) The inline assembler supports Thumb instructions in ARMv6T2, ARMv6-M, and ARMv7.
---
### ++Q: **Mixed C and Assembly Programming**++ in Embedded Systems - ARM describes how to write a mixture of C, C++, and assembly language code for the ARM architecture
++A:++
+ [ARM - Mixing C, C++, and Assembly Language
Describes how to write a mixture of C, C++, and assembly language code for the ARM architecture](https://developer.arm.com/documentation/dui0471/m/mixing-c--c----and-assembly-language) : It contains the following sections:
+ [Instruction intrinsics, inline and embedded assembler](https://developer.arm.com/documentation/dui0471/m/mixing-c--c----and-assembly-language/instruction-intrinsics--inline-and-embedded-assembler?lang=en)
+ [Access to C global variables from assembly code](https://developer.arm.com/documentation/dui0471/m/mixing-c--c----and-assembly-language/access-to-c-global-variables-from-assembly-code?lang=en)
+ [Including system C header files from C++](https://developer.arm.com/documentation/dui0471/m/mixing-c--c----and-assembly-language/including-system-c-header-files-from-c--?lang=en)
+ [Including your own C header files from C++](https://developer.arm.com/documentation/dui0471/m/mixing-c--c----and-assembly-language/including-your-own-c-header-files-from-c--?lang=en)
+ [Mixed-language programming](https://developer.arm.com/documentation/dui0471/m/mixing-c--c----and-assembly-language/mixed-language-programming?lang=en)
+ [Rules for calling between C, C++, and assembly language](https://developer.arm.com/documentation/dui0471/m/mixing-c--c----and-assembly-language/rules-for-calling-between-c--c----and-assembly-language?lang=en)
+ [Rules for calling C++ functions from C and assembly language](https://developer.arm.com/documentation/dui0471/m/mixing-c--c----and-assembly-language/rules-for-calling-c---functions-from-c-and-assembly-language?lang=en)
+ [Information specific to C++](https://developer.arm.com/documentation/dui0471/m/mixing-c--c----and-assembly-language/information-specific-to-c--?lang=en)
+ [Calls to assembly language from C](https://developer.arm.com/documentation/dui0471/m/mixing-c--c----and-assembly-language/calls-to-assembly-language-from-c?lang=en)
+ [Calls to C from assembly language](https://developer.arm.com/documentation/dui0471/m/mixing-c--c----and-assembly-language/calls-to-c-from-assembly-language?lang=en)
+ [Calls to C from C++](https://developer.arm.com/documentation/dui0471/m/mixing-c--c----and-assembly-language/calls-to-c-from-c--?lang=en)
+ [Calls to assembly language from C++](https://developer.arm.com/documentation/dui0471/m/mixing-c--c----and-assembly-language/calls-to-assembly-language-from-c--?lang=en)
+ [Calls to C++ from C](https://developer.arm.com/documentation/dui0471/m/mixing-c--c----and-assembly-language/calls-to-c---from-c?lang=en)
+ [Calls to C++ from assembly language](https://developer.arm.com/documentation/dui0471/m/mixing-c--c----and-assembly-language/calls-to-c---from-assembly-language?lang=en)
+ [Passing a reference between C and C++](https://developer.arm.com/documentation/dui0471/m/mixing-c--c----and-assembly-language/passing-a-reference-between-c-and-c--?lang=en)
+ [Calls to C++ from C or assembly language](https://developer.arm.com/documentation/dui0471/m/mixing-c--c----and-assembly-language/calls-to-c---from-c-or-assembly-language?lang=en)
---
### ++Q: **Mixed C and Assembly Programming**++ in Embedded Systems - using ++in-line assembly++ for different CPU architectures, and providing examples in more generic form
++A:++
+ [Embedded Systems/Mixed C and Assembly Programming - wikibooks](https://en.wikibooks.org/wiki/Embedded_Systems/Mixed_C_and_Assembly_Programming) describes the mixed C and assembly programming in embedded system using ++in-line assembly++ for different CPU architectures, and providing examples in more generic form.
++**Inline Assembly**++
One of the most common methods for using assembly code fragments in a C programming project is to use a technique called inline assembly. Inline assembly is invoked in different compilers in different ways. Also, the assembly language syntax used in the inline assembly depends entirely on the assembly engine used by the C compiler. ++**==Microsoft C\++==, for instance, only accepts inline assembly commands in ==MASM syntax==**++, while ++**==GNU GCC== only accepts inline assembly in ==GAS syntax (also known as AT&T syntax)==**++.
ARM : Can refer to [Main page: Embedded Systems/ARM Microprocessors](https://en.wikibooks.org/wiki/Embedded_Systems/ARM_Microprocessors)
Practically everyone using ARM processors uses the standard calling convention. This makes mixed C and ARM assembly programming fairly easy, compared to other processors. The simplest entry and exit sequence for Thumb functions is:
```
an_example_subroutine:
PUSH {save-registers, lr} ; one-line entry sequence
; ... first part of function ...
BL thumb_sub ;Must be in a space of +/- 4 MB
; ... rest of function goes here, perhaps including other function calls
; somehow get the return value in a1 (r0) before returning
POP {save-registers, pc} ; one-line return sequence
```
The standard C calling convention for ARM is specified in detail by ARM PLC in "Procedure Call Standard for the ARM Architecture".
The simplest entry and exit sequence for 32-bit ARM functions is very similar to Thumb functions:
```
an_example_ARM32_subroutine:
PUSH {r4-r11, lr} ; one-line function prologue
; ... first part of function ...
BL subroutine_name ;Must be in a space of +/- 4 MB
; ... rest of function goes here, perhaps including other function calls
; ...
POP {r4-r11, pc} ; one-line exit sequence (function epilogue)
```
==[ARM GCC Inline Assembler Cookbook](http://www.ethernut.de/en/documents/arm-inline-asm.html) is a good small article to read through before doing Inline Assembly.== It starts with a simple example
```
/* NOP example */
asm("mov r0,r0");
```
More than one assembler instruction in a single inline asm statement.
```
asm(
"mov r0, r0\n\t"
"mov r0, r0\n\t"
"mov r0, r0\n\t"
"mov r0, r0"
);
```
So far, the assembler instructions are much the same as they'd appear in pure assembly language programs. However, registers and constants are specified in a different way, if they refer to C expressions. The general form of an inline assembler statement is
```
asm(code : output operand list : input operand list : clobber list);
```
Also talk about the solution is to add the ==++**volatile**++== attribute to the asm statement to instruct the compiler to exclude your assembler code from code optimization. Remember, that you have been warned to use the initial example. Here is the revised version:
```
/* NOP example, revised */
asm volatile("mov r0, r0");
```
Reuse your assembler language parts by defining them as macros and put them into include files. Using such include files may produce compiler warnings, if they are used in modules, which are compiled in strict ANSI mode. To avoid that, you can write __asm__ instead of asm and __volatile__ instead of volatile. These are equivalent aliases. Here is a macro which will convert a long value from little endian to big endian or vice versa:
```
#define BYTESWAP(val) \
__asm__ __volatile__ ( \
"eor r3, %1, %1, ror #16\n\t" \
"bic r3, r3, #0x00FF0000\n\t" \
"mov %0, %1, ror #8\n\t" \
"eor %0, %0, r3, lsr #8" \
: "=r" (val) \
: "0"(val) \
: "r3", "cc" \
);
```
Macro definitions will include the same assembler code whenever they are referenced. This may not be acceptable for larger routines. In this case you may define a ==++**C stub function**++==. Here is the byte swap procedure again, this time implemented as a C function.
```
unsigned long ByteSwap(unsigned long val)
{
asm volatile (
"eor r3, %1, %1, ror #16\n\t"
"bic r3, r3, #0x00FF0000\n\t"
"mov %0, %1, ror #8\n\t"
"eor %0, %0, r3, lsr #8"
: "=r" (val)
: "0"(val)
: "r3"
);
return val;
}
```
---
### ++Q: **Mixed C and Assembly Programming**++ ARM Cortex-M MCU ++in-line assembly++ example Youtube
This [Youtube - Lecture 32. Mixing C and Assembly with ARM Cortext-M MCU](https://www.youtube.com/watch?v=7Xe9pCrzH98) provides clear explanation with some examples.
{%youtube 7Xe9pCrzH98 %}
---
## ++References++
+ Mixed C and Assembly programming
+ [ARM Mixed C and Assembly programming - Instruction intrinsics, inline and embedded assembler](https://developer.arm.com/documentation/dui0471/m/mixing-c--c----and-assembly-language/instruction-intrinsics--inline-and-embedded-assembler)
+ [ARM - Mixing C, C++, and Assembly Language
Describes how to write a mixture of C, C++, and assembly language code for the ARM architecture.](https://developer.arm.com/documentation/dui0471/m/mixing-c--c----and-assembly-language)
+ [Embedded Systems/Mixed C and Assembly Programming - wikibooks](https://en.wikibooks.org/wiki/Embedded_Systems/Mixed_C_and_Assembly_Programming)
+ System Calls
+ [System Call (系統呼叫)](https://hackmd.io/@combo-tw/Linux-%E8%AE%80%E6%9B%B8%E6%9C%83/%2F%40combo-tw%2FBJPoAcqQS)
+ [vDSO: 快速的 Linux 系統呼叫機制 - 資料整理: jserv](https://hackmd.io/@sysprog/linux-vdso)
---
[:arrow_left:Previous article - Q&A Linux](https://hackmd.io/@MarconiJiang/QnA_Linux)
[:arrow_right:Next article - Q&A AI](https://hackmd.io/@MarconiJiang/QnA_C_highlevel)
[:arrow_up:back to marconi's blog](https://marconi1964.github.io/)