---
tags: Linux作業系統實務(CentOS)
---
# Linux作業系統實務 筆記
# Week 1
>光碟映像 (ISO 檔案)下載
http://ftp.iij.ad.jp/pub/linux/centos-vault/7.6.1810/isos/x86_64/
http://ftp.iij.ad.jp/pub/linux/centos-vault/7.6.1810/isos/x86_64/CentOS-7-x86_64-LiveKDE-1810.iso
補充
QEMU 是Linux上原生的程式 用以虛擬機操作 如vmware、VirtualBox
不過,QEMU的虛擬化技術與vmware和VirtualBox等軟體有所不同,它使用了全虛擬化和半虛擬化技術的組合,可以實現更高效的虛擬化和模擬。
* 什麼是QEMU-KVM?[參考](https://hosomikai317.blogspot.com/2018/07/qemu-kvm-qemu-kvm.html#:~:text=%E4%B9%9F%E5%B0%B1%E6%98%AFQEMU%2DKVM%E3%80%82-,%E4%BB%80%E9%BA%BC%E6%98%AFQEMU%2DKVM%3F,-%E5%BE%9E%E5%89%8D%E9%9D%A2%E7%9A%84)
KVM負責CPU虛擬化+記憶體虛擬化,但KVM並不能模擬其他設備。KVM的開發者選擇了比較成熟的開源虛擬化軟體QEMU來作為工具,QEMU模擬IO設備(網卡,磁碟等),對其進行了修改,最後形成了QEMU-KVM。
----
> linux講求穩定性,最新的版本並不一定是最好的
Linux 的各種發行版本(distribution)
1. redhat 公司
* fedora 用於測試新功能,通常數個月就會更新新版本
**較不穩定 屬於社群版本**
* centos 在fedora上測試過後 較穩定的功能 將加入centos
**較穩定 屬於社群版本**
* redhat 經過centos上較長期測試的功能 最終將加入到redhat
**最穩定 屬於公司(付費)版本 有售後服務**
2. ubuntu 系列
LTS(Long-term support) 長期支援
確保10年以內 將持續維護該版本、解決bug
CentOS 可分為3種版本
* major(主要版本,ex: CentOS 7),
* minor(次要版本,ex: CentOS 7.2),
* patch(修復和更新的版本,ex: CentOS 7.2.1511)
從centos7(含)以後 只支援64 bits,memory address較長 存取一次資料的長度單位就是64 bits,速度更快,可以存取更多資料
為甚麼選擇 CentOS 7 ?
1. 市占率高
2. 穩定
3. 適合伺服器架設
> 若要進行程式測試、開發 通常使用 Ubuntu,但大同小異
Ubuntu 特性: 更新時間快、維護時間短
----

kernal 負責管理 記憶體(memory)、行程(process)、網路(socket)、驅動程式(driver)、檔案系統(file system)
shell app 與 kernal 間 溝通的橋樑
不同的發行版本使用的kernal都一樣,依據公司、社群的需求 將kernal與app打包 形成新的發行版本 以滿足不同的目的
由於kernal相同 各版本的指令有一定的重疊
通用指令 ex: `ls`(list)、`cp`(copy)、`mv`(move) ...
差異 ex:安裝軟體
* centos:`yum`
* ubuntu:`apt-get`
----
### VirtualBox 和 VMware 在 NAT 上的差異
都是使用 NAT 的情況下
兩者都可以 ping 網際網路上的主機(ex:8.8.8.8) 和 host
但是**只有** VMware 可以從host ping 虛擬機(CentOS7)
**<center>VirtualBox</center>**
<center><img src="https://i.imgur.com/ihxwCsT.jpg" width="760"></center>
另外一張 Virtual NIC 不使用NAT模式,使用Host-only,讓Host(Windows)可以跟VM(CentOS7)進行通訊
**<center>VMware</center>**
<center><img src="https://i.imgur.com/5eK9Aeq.jpg" width="500"></center>
---
# Week 2
### VirtualBox 新增第2張網卡並使用Host-only模式,讓Host可以跟VM進行通訊

若Host-only Adapter無法選擇,可依照下圖步驟修復問題

---
### 調整文字大小
除了透過UI調整設定外(下圖)

也可透過 `Ctrl` `-` 縮小文字,若 `Ctrl` `+` 無法放大文字,可改用 `Ctrl` `Shift` `+`

[來源](https://blog.xuite.net/auster.lai/twblog/585262211)
---
### `[user@localhost ~]$ `的意義
`user`是 目前使用者的身分
`@` at
`localhost` 是 主機名稱
`~` **家目錄**
`cd` change directory 切換目錄
使用`cd ~ `到家目錄
`pwd` print work directory 打印當前位置
在家目錄使用`pwd`會顯示 `/home/user` 代表 在 `/` 跟目錄下的home資料夾下的user資料夾
`cd -` 回到上一個目錄

---
### ifconfig: command not found.
`ifconfig`指令 在 新的發行版本中可能被移除
但 仍可透過以下方法使用`ifconfig`
`sudo yum install net tools`
`sudo` 暫時的使用管理者權限,只有管理者可以安裝軟體,安裝完後便回到原本身分
`su` 切換成超級使用者(永久),提示符號為 #
一般使用者的提示符號為 $

---
### 關閉防火牆
1. `gedit /etc/etc/selinux/config`
將下圖選取部分改為`disable`(原本是enforcing)

2. 重新開機`reboot`
3. 檢查`getenforce` 若 出現`Disabled`代表成功
---
當使用yum安裝套件時,無法同時安裝多個套件
透過 `kill -9 [PID]` 可強制 停止安裝先前的套件
PID 是指 Process ID,Process是已開始執行的程式 未執行的稱為Program
以下是查看(與yum相關的)PID的方式

---
### systemctl
`systemctl [action] [server]`
`systemctl status firewalld`
查看firewalld伺服器的狀態 (d:daemon)
`systemctl stop firewalld`
關閉firewalld伺服器
關閉後 再次查看狀態 -> Active: inactivetive: inactive
`systemctl disable firewalld`
下次重開機時 停止啟用firewalld伺服器

---
### SSH
安裝`yum install openssh-server` (CentOS7已安裝 不須執行該指令)
啟用`systemctl start sshd`

用 putty 連線(ssh)到遠端機器

---
### HTTP server
1. `yum install httpd -y`
安裝軟體時 加上 `-y` 參數 可跳過需要輸入y以確認的步驟 位置:install後 軟體名稱前後皆可
2. `system start httpd`
`system status httpd` 檢查是否啟動
3. cd /var/www/html
網頁伺服器的首頁在/var/www/html
`echo "hi" > hi.htm` 將"hi"導向到hi.htm,製作一個簡單的網頁
4. 可以直接在Windows上開啟瀏覽器
`[IP]/檔案`
ex: `192.168.245.130/hi.htm`

---
# Week 3
延伸-網頁server
bridge-network
IPv6 website
chatgpt -> LINE
### 建立IPv6 Website
vmware 設定橋接模式


> 注意! 若下一步無法選擇橋接模式可能是跳過了 [Change Settings]

> 號碼不要跟其他的衝突就好(ex:號碼1原本就存在了)
>

> 選擇上一步新增的網卡
---
### 啟動網頁伺服器
檢查`getenforce` 是否 disable
systemctl start httpd
systemctl status httpd
ifconfig -> 取得IP 2402:7500:a16:e906:5857:a357:19da:4ac4

使用任意裝置連線到 http://[2402:7500:a16:e906:5857:a357:19da:4ac4]/hi.htm
> 注意 http://[IPv6_address]/file.htm IPv6_address需要加上中括號[ ]

---
### chatgpt -> LINE
參考[ChatGPT LINE機器人](https://mrmad.com.tw/chatgpt-line-robot-creation-teaching)

---
## 課本 第一章 Linux介紹
### 1-1 Linux上的軟體-套件
Linux 前身 UNIX
Linux 出現 -> 1991 Linus Torvalds 修改、重新撰寫初 PC版UNIX
以自由軟體授權
> 自由軟體
> 可自由散布、不須收費,**但並不是完全免費**,ex:提供服務、諮詢來賺錢

核心包含
driver 驅動程式:管理硬體 ex: 如何寫東西到硬碟
memory management 記憶體管理: ex: 虛擬記憶體空間
process management 行程管理
network 網路
...
[kernel 版本](https://www.kernel.org/)
mainline: 最新
stable: 穩定版
longterm: 長期維護版

若kernel發生問題 可以單獨抽換kernel
shell: 核心跟應用程式的介面 可以更換、客製化修改
圖形介面:GNOME、KDE

### 1-2 發行版本
根據使用的不同 衍生出不同的發行版本
#### RedHat 公司 (已被IBM收購) 產品著重:企業級Linux伺服器
1. RedHat
2. Fedora 追求新鮮 更新快 (市場主流)
3. CentOS 講求穩定 (市場主流)
4. Ubuntu 適合研究、創新 (以Debian為基礎)
5. Debian
6. SuSE 德國
### 1-3 自由軟體
Richard Stallman 提出並創立了自由軟體基金會
從維護、服務、教育訓練中得到商業利益
軟體授權的目的在於確保以下權利:
可自由使用軟體
可自由散布軟體
可修改軟體以符合自己需求
可散布修改後的軟體
#### GPL(General Public License)授權
修改完要散布 不能藏私
ex: gcc、圖形軟體GIMP、開機管理程式GRUB 都屬於GPL授權
> 作業 gcc
```clike!
// 檔案名稱test.c
#include <stdio.h>
int main(void){
printf("hello world\n");
return 0 // 0代表正常執行,其他數字都是異常
}
```
`echo $?` 顯示上一個執行結果是否發生錯誤
`gcc -o test test.c` 編譯
`./test` 執行, 不能只寫`test`, 沒有明確指定是哪個test可能會執行錯檔案
`.` 當前目錄
# Week 4
Snapshot


### 建立Python3 環境
> 無法連線Putty請注意以下3點

#### 安裝 wget
> 免開啟瀏覽器 下載對應檔案
sudo yum install wget -y
> 移除 sudo yum remove [software_package] ex:sudo yum remove wget
sudo yum install wget -y

#### 安裝 [miniconda](https://docs.conda.io/en/latest/miniconda.html)
`wget https://repo.anaconda.com/miniconda/Miniconda3-latest-Linux-x86_64.sh`

> wget tips

也可以透過`echo $?`檢查回傳值 判斷網站是否正常運作中
> 超級使用者 切換 一般使用者
`exit`

bash Miniconda3-latest-Linux-x86_64.sh
依照指示安裝完後
/home/user/miniconda3/bin/conda config --set auto_activate_base false
#### 將miniconda加入環境變數
```
cd
gedit .bashrc
```
加入 export PATH=$PATH:/home/user/miniconda3/bin

重開終端機 測試`conda`

> Linux 找軟體的步驟
先從PATH底下的路徑找,如果都找不到 --> command not found
#### 初始化 conda
conda init
conda create -n mypython3.10 python=3.10
進入環境 conda activate mypython3.10
> 若報錯 輸入`conda init` 或 重開終端機

離開環境 conda deactivate
#### 安裝 ffmpeg
[參考](https://sysadminxpert.com/install-ffmpeg-on-centos-7/)
##### 安裝第3方軟體資料庫
sudo yum install epel-release
sudo yum localinstall --nogpgcheck https://download1.rpmfusion.org/free/el/rpmfusion-free-release-7.noarch.rpm
sudo yum install ffmpeg ffmpeg-devel
sudo yum install vlc
程式碼 參考https://github.com/smallko/test-whisper
gen.py 網路下載.mp4產生字幕 (根據影片語言)
gen_sub.py Youtube_URL 產生字幕
gen_sub.py Youtube_URL 產生英文字幕
建立 sub.py [code](https://github.com/smallko/test-whisper/blob/main/gen_sub.py)
sudo yum install git -y
conda activate mypython3.10
pip install git+https://github.com/openai/whisper.git
pip install pytube
python sub.py
---
# Week 5
> linux 磁碟切割至少要`2`個分割區:`根目錄`、`swap`
su -> `#`、 normal -> `$`
管理者帳號 linux:`root`、Windows:`administrator`
09:23~
### 命令提示字元
超級使用者 -> `#`
一般使用者 -> `$`
#### 操作
`Ctrl` `a` 跳到最前面
`Ctrl` `e` 跳到最後面
`alt` `d` 刪除光標後的字元
`Ctrl` `e` + `alt` `d` 整行刪除
> 編輯命令
Ctrl + a:移到命令行首
Ctrl + e:移到命令行尾
Ctrl + f:按字符前移(右向)
Ctrl + b:按字符後移(左向)
Alt + f:按單詞前移(右向)
Alt + b:按單詞後移(左向)
Ctrl + xx:在命令行首和光標之間移動
Ctrl + u:從光標處刪除至命令行首
Ctrl + k:從光標處刪除至命令行尾
Ctrl + w:從光標處刪除至字首
Alt + d:從光標處刪除至字尾
Ctrl + d:刪除光標處的字符
Ctrl + h:刪除光標前的字符
Ctrl + y:粘貼至光標後
Alt + c:從光標處更改為首字母大寫的單詞
Alt + u:從光標處更改為全部大寫的單詞
Alt + l:從光標處更改為全部小寫的單詞
Ctrl + t:交換光標處和之前的字符
Alt + t:交換光標處和之前的單詞
Alt + Backspace:與 Ctrl + w 相同類似,分隔符有些差別
重新執行命令
Ctrl + r:逆向搜索命令歷史
Ctrl + g:從歷史搜索模式退出
Ctrl + p:歷史中的上一條命令
Ctrl + n:歷史中的下一條命令
Alt + .:使用上一條命令的最後一個參數
控制命令
Ctrl + l:清屏
Ctrl + o:執行當前命令,並選擇上一條命令
Ctrl + s:阻止屏幕輸出
Ctrl + q:允許屏幕輸出
Ctrl + c:終止命令
Ctrl + z:掛起命令
Bang (!) 命令
!!:執行上一條命令
!blah:執行最近的以blah 開頭的命令,如!ls
!blah:p:僅打印輸出,而不執行
!$:上一條命令的最後一個參數,與 Alt + . 相同
!$:p:打印輸出!$ 的內容
!*:上一條命令的所有參數
!*:p:打印輸出!* 的內容
^blah:刪除上一條命令中的blah
^blah^foo:將上一條命令中的blah 替換為foo
^blah^foo^:將上一條命令中所有的blah 都替換為foo
————————————————
版权声明:本文为CSDN博主「x²+(y-√³x²)²=1」的原创文章,遵循CC 4.0 BY-SA版权协议,转载请附上原文出处链接及本声明。
原文链接:https://blog.csdn.net/qq_45083975/article/details/105274397
gedit 圖形化文字編輯器 (`gedit [file]`)
`tab` 自動補全
`touch [file]` 更新檔案時間戳記、(檔案不存在時)產生空白檔

在linux下 透過檔案權限、屬性 判斷檔案類型(ex: 是不是執行檔)、Windows下 則是看副檔名ex: `.exe`、`.com` 、`.tat` --> 執行檔
賦予檔案可執行的權限: chmod +x [file]
x (executable)
Linux:
echo "echo h1" > aaa.txt
cat aaa.txt
./aaa.txt
> Permission denied
chmod +x aaa.txt
./aaa.txt
> hi

### BIOS (Basic Input Output System)
Linux 開機程式、 09:54~09:59 ~ 10:04
BootLoader
----
Linux 跑的第1支程式:systemd
> [user@localhost Desktop]$ pstree
systemd─┬─ModemManager───2*[{ModemManager}]
├─NetworkManager─┬─dhclient
│ └─2*[{NetworkManager}]
├─VGAuthService
├─2*[abrt-watch-log]
├─abrtd
├─accounts-daemon───2*[{accounts-daemon}]
├─akonadi_control─┬─4*[akonadi_agent_l───{akonadi_agent_l}]
│ ├─akonadi_maildis
│ ├─akonadi_nepomuk
│ ├─akonadiserver─┬─mysqld───30*[{mysqld}]
│ │ └─13*[{akonadiserver}]
│ └─{akonadi_control}
├─alsactl
├─at-spi-bus-laun─┬─dbus-daemon
│ └─3*[{at-spi-bus-laun}]
├─at-spi2-registr───2*[{at-spi2-registr}]
├─atd
├─auditd─┬─audispd─┬─sedispatch
│ │ └─{audispd}
│ └─{auditd}
├─bluetoothd
├─boltd───2*[{boltd}]
├─chronyd
├─colord───2*[{colord}]
├─crond
├─cupsd
├─2*[dbus-daemon]
├─dbus-launch
├─dconf-service───2*[{dconf-service}]
├─gam_server
├─gdm─┬─X───{X}
│ ├─gdm-session-wor─┬─startkde─┬─kwrapper4
│ │ │ └─ssh-agent
│ │ └─2*[{gdm-session-wor}]
│ └─3*[{gdm}]
├─gssproxy───5*[{gssproxy}]
├─gvfs-udisks2-vo───2*[{gvfs-udisks2-vo}]
├─gvfsd───2*[{gvfsd}]
├─ibus-daemon─┬─ibus-dconf───3*[{ibus-dconf}]
│ └─2*[{ibus-daemon}]
├─ibus-x11───2*[{ibus-x11}]
├─imsettings-daem───3*[{imsettings-daem}]
├─kactivitymanage───5*[{kactivitymanage}]
├─kded4───7*[{kded4}]
├─kdeinit4─┬─abrt-applet───2*[{abrt-applet}]
│ ├─klauncher
│ ├─ksmserver─┬─kwin
│ │ └─{ksmserver}
│ ├─tracker-extract───13*[{tracker-extract}]
│ ├─tracker-miner-a───3*[{tracker-miner-a}]
│ ├─tracker-miner-u───3*[{tracker-miner-u}]
│ └─xsettings-kde───4*[{xsettings-kde}]
├─kglobalaccel
├─klipper
├─kmix───{kmix}
├─knotify4───{knotify4}
├─konsole─┬─bash───pstree
│ └─{konsole}
├─krunner───{krunner}
├─kuiserver
├─kwalletd
├─lsmd
├─lvmetad
├─master─┬─pickup
│ └─qmgr
├─obexd
├─plasma-desktop─┬─ksysguardd
│ └─5*[{plasma-desktop}]
├─polkit-kde-auth───2*[{polkit-kde-auth}]
├─polkitd───6*[{polkitd}]
├─pulseaudio───2*[{pulseaudio}]
├─rngd
├─rpcbind
├─rsyslogd───2*[{rsyslogd}]
├─rtkit-daemon───2*[{rtkit-daemon}]
├─smartd
├─sshd
├─start_kdeinit
├─systemd-journal
├─systemd-logind
├─systemd-udevd
├─tracker-store───7*[{tracker-store}]
├─tuned───4*[{tuned}]
├─udisksd───4*[{udisksd}]
├─upowerd───2*[{upowerd}]
├─vmtoolsd───{vmtoolsd}
├─vmtoolsd───2*[{vmtoolsd}]
└─wpa_supplicant
----
### 進入單人模式
> 忘記超級使用者密碼 怎麼進入單人模式 [參考](https://www.unixmen.com/reset-root-password-centos-7/)
重新開機

3 . 10.0 patch
主要版本.次要版本-更新次數
選第1個核心 後按e


rw init
ctrl x
chroot /sysroot
passwd root
### 3-1 Linux 開機流程
Linux 核心載入 負責與硬體溝通
執行init 啟動系統中所配置的服務程式(ex: 網頁伺服器)
開機執行的第1支程式 以前:init 現在:systemd
進一步查看開機資訊:`dmesg | more`
dump message
`|` pipe 將前面的輸出當成後面的輸入
`more` 分頁
netstat -tulnp
t : tcp, u : udp, l : listen, n : 不解析, p : 程式的process id
0.0.0.0 任一NIC的ID

----

#### Shell 的按鍵
TAB 快速完成指令
ESC 取得先前指令最後的參數
Ctrl + L 清除畫面
Ctrl + C 中斷工作
Ctrl + D 送出跳行特殊字元
Ctrl + Z 暫停工作
查詢指令功能 man [命令]
pwd : print working directory
# Week 6
## 第4章 檔案管理
> Linux: 萬物皆檔案
其中考 **課本習題**
Linux的檔案系統

swap、root 視為兩個磁碟分割區
或是可以把跟目錄下的 子資料夾 切個成 獨立的磁碟分割區
磁碟分割區 可以針對安全、效能選擇 檔案系統
不同的分割區可以使用不同的檔案系統,不同的檔案系統有不同特色例如: 適合存大型檔案
### 4-1 Linux的主要目錄
補10:23 FHS (Filesystem Ierarchy Standard)
### dev
鍵盤、滑鼠、終端機
scsi: sda、sdb、sdc...sdz、sdaa、sdab
sda1 分割區1
sda2 分割區2
printer
lp-
### bin
binary 二進制檔 通常是執行檔
一般使用者的工具

### sbin
管理者的工具

### home
家目錄
可以使用 `sudo useradd [userName]` 新增使用者,同時在`/home`下可以看到所有使用者的家目錄

### usr
unit resource
放置第3方執行檔、函式庫lib
### var
variable 可變動的
ex: log檔 (記錄檔)、網頁server的家目錄、email 52補?
使用 動態函式庫 編譯後的檔案較小 但是執行時必須有動態函式庫和執行檔
使用 靜態函式庫 編譯後的檔案較大(會把靜態函式庫內容編譯到) 但是執行時只需要執行檔本身
### lib / lib64

lib名稱.so.版本 (動態函式庫)
lib名稱.a.版本 (靜態函式庫)
### **etc**
管理系統設定、配置
使用者帳號密碼
resolv.conf 管理DNS伺服器的檔案
### boot
管理開機
kernel載入OS
 30
### root
管理者 家目錄
### tmp
任何人對這個folder都有讀寫能力
對於 tom的家目錄`/home/tom`只有 tom 能夠存取(其他人:Permission Deny)
### mnt
mount掛載 -> mapping
掛載隨身碟
### media
掛載CD/DVD
### proc
process 行程
## 4-2 目錄相關指令
pwd: print working directory
ls: list
ls -l 詳細資訊 7項

### 權限
1:- file
:d directory
:l 連結
:c 字元設備 ex:字母、滑鼠
:d 塊狀設備 ex:硬碟、隨身碟 都是一塊一塊存取
...

234 456 789
owner group other
r 可讀
w 可寫
x 可執行
mkdir test
ls -l
ls -l **-d** test 查看屬性
ls -l -h [folder] 把大數縮寫 10000 -> 10K
. 當前目錄 ls . 可以寫成 ls
.. 上一層目錄
ls -a
a:all
隱藏檔案、目錄
cd / 絕對路徑
cd ~ 家目錄
cd - 上個目錄
## 4-2 目錄相關指令
cp [src] [dst]
cp -r [src_dir] [dst]
#### 擴展
touch {a..z} = touch a、touch b、...touch z 快速產生多個檔案
touch {a..c}{1..3} = touch a1、touch a2 ... touch c3
#### tree 樹狀顯示
sudo yum install tree

#### rm 移除
rm [file]
rm -r [folder]
rm -f 強制刪除
f: force
rm -i 詢問
i: inquery
#### mv 移動
mv [ori_path] [new_path]
更改檔案名稱
mv [old_name] [new_name]
## 4-4 檔案相關指令
### cat
cat -n 行號
cat <<[sign] > [file] 在CLI寫入檔案
cat [file1] [file2] 合併顯示
cat [file1] [file2] > [file3] 合併顯示並儲存
### more [file] 只能往下
### less [file] 可以往上、往下、搜尋
### head
head -n 3 /etc/passwd
印出前3行
### tail
tail -n 3 /etc/passwd
印出倒數3行

tail -f [file] 動態顯示(持續追蹤)檔案內容
f: follow追蹤
echo "123" >> [file]
>> append追加
### touch
生成空白檔案
# Week 7
## 第五章 進階檔案處理
link 類似 windows的捷徑
分為2種:
hard link (hlink)硬連結
symbolic link (slink)符號連結
> windows 下 捷徑可以連結到任 檔案 或 資料夾
CentOS 7 的檔案系統是XFS(較新)
舊版:
ext2
ext3
ext4
>類似windows的 FAT16、FAT32、NFTS、EXFAT
特色: FAT32 只能保存4GB
NTFS: 跨平台可以有問題(ex: 只能讀,無法寫)
EXFAT: 適合跨平台
XFS 64位元日誌型檔案系統
支援日誌
大檔案傳效能
檔案系統大小 最大8EB
EXT4 <- EXT3 <- EXT2
** EXT3 <- EXT2 日誌系統(避免掃描整個硬碟所需的時間)**
EXT4 <- EXT3 效能提升、Extent file writing(範圍性寫入檔案的新技術,減少檔案在寫入磁碟時的游離區塊的程度)
檔案以區塊為單位儲存 不論檔案多小都至少需要1區塊(區塊大小可在磁碟格式化時設定ex: 1K、4K)
區塊太小: 游離程度高 浪費時間
區塊太大: 浪費空間
檔案資訊記錄檔inode 是一種meta data(用來描述資料的資料)

用來描述檔案的屬性、資訊 包含
檔案大小
擁有者(安全性)
擁有群組
時間: ctime(修改時間)、atime...
block location...
stat [fileName]
查看檔案進階資訊
[user@centos7-2 0418]$ touch a.txt
[user@centos7-2 0418]$ stat a.txt
File: ‘a.txt’
Size: 0 Blocks: 0 IO Block: 4096 regular empty file
Device: fd00h/64768d Inode: 3642413 Links: 1
Access: (0664/-rw-rw-r--) Uid: ( 1000/ user) Gid: ( 1000/ user)
Access: 2023-04-18 10:19:49.325561197 +0800
Modify: 2023-04-18 10:19:49.325561197 +0800
Change: 2023-04-18 10:19:49.325561197 +0800
Birth: -
[user@centos7-2 0418]$
檔案權限表示
Access: (0664/-rw-rw-r--) Uid: ( 1000/ user) Gid: ( 1000/ user)
421
(參考)[https://dywang.csie.cyut.edu.tw/dywang/linuxsecurity/node39.html]
0664 最前面的0 3個bit 分別是 SUID/SGID/SBIT
which passwd
which + [fileName] 找尋執行檔
[user@centos7-2 0418]$ which passwd
/bin/passwd
[user@centos7-2 0418]$ ls -l /bin/passwd
-rwsr-xr-x. 1 root root 27832 Jun 10 2014 /bin/passwd
在執行期間變成最高權限,執行後變回原本的權限
-rwsr-xr-x , s is for SGID 作用: 可以把執行的權限暫時提升成root, 程式結束後
[user@centos7-2 0418]$ stat /bin/passwd
File: ‘/bin/passwd’
Size: 27832 Blocks: 56 IO Block: 4096 regular file
Device: fd00h/64768d Inode: 46581 Links: 1
Access: (4755/-rwsr-xr-x) Uid: ( 0/ root) Gid: ( 0/ root)
Access: 2023-03-21 10:28:22.417999569 +0800
Modify: 2014-06-10 14:27:56.000000000 +0800
Change: 2023-02-14 11:18:01.805604810 +0800
Birth: -
查看資料夾本身屬性 ls -d (沒有-d 代表查看資料夾內的檔案和子資料夾)
[user@centos7-2 0418]$ ls -l -d /tmp
drwxrwxrwt 20 root root 480 Apr 18 10:24 /tmp
t is for: SBIT
SBIT Sticky Bit: 任何人都可以新增檔案或資料夾
SBIT 具有防刪除屬性,只有檔案擁有者或root可刪除檔案或資料夾
> `su - [userName]` 切換成其他使用者
```
[user@centos7-2 0418]$ stat /tmp
File: ‘/tmp’
Size: 480 Blocks: 0 IO Block: 4096 directory
Device: 25h/37d Inode: 39702 Links: 20
Access: (1777/drwxrwxrwt) Uid: ( 0/ root) Gid: ( 0/ root)
Access: 2023-04-10 21:44:46.773828169 +0800
Modify: 2023-04-18 10:24:06.546309907 +0800
Change: 2023-04-18 10:24:06.546309907 +0800
Birth: -
```
其中
Access: (1777/drwxrwxrwt) Uid: ( 0/ root) Gid: ( 0/ root)
1777 的 1 代表:SBIT
Access: 2023-04-10 21:44:46.773828169 +0800
Modify: 2023-04-18 10:24:06.546309907 +0800
Change: 2023-04-18 10:24:06.546309907 +0800
Access存取,只要讀(ex: cat a.txt) access time 就會修改
Modify修改(內容變動) ex: echo "hi" > a.txt
Change 變動(包含 內容、屬性變動) 除了內容改變會變動外,屬性變動(ex: chmod 666 a.txt)也會變更change time
> ls -l a.txt 所顯示的時間是modify time 若需要查看其他時間使用stat a.txt
調整時間
ntpdate 手動校時
ntp: network time potocol
`ntpdate tock.stdtime.gov.tw` 注意 時區 也要調整
`timedatectl set-timezone Asia/Taipei` 調整時區
---
touch file1 file2
`ls -i file1 file2` 查看inode
[user@centos7-2 0418]$ touch file1 file2
[user@centos7-2 0418]$ ls -i file1 file2
2776462 file1 1009752 file2
[user@centos7-2 0418]$
---
slink
以不同inode指向目的檔案的inode
1. 目的檔案的inode被刪除便無法指向目的檔案 -> 無效連結
2. 可跨分割區
touch data
echo "hello" > data
ln -s [targetFile] [linkName]
ln: link, -s:slink
`ln -s data slink`
ls -i data slink
cat data == cat slink
rm data
cat slink -> error
```
[user@centos7-2 link]$ touch data
[user@centos7-2 link]$ echo "hello" > data
[user@centos7-2 link]$ ln -s data slink
[user@centos7-2 link]$ ls -i data slink
38059114 data 38059123 slink
[user@centos7-2 link]$ cat data
hello
[user@centos7-2 link]$ cat slink
hello
[user@centos7-2 link]$ rm data
[user@centos7-2 link]$ cat slink
cat: slink: No such file or directory
[user@centos7-2 link]$ ls -i slink
38059123 slink
[user@centos7-2 link]$
```
----
### hlink
echo "hello" > data
ln data hlink 建立hlink
ln -s data slink
ls -l hlink slink data
hlink全限 跟data相同 (可變動ex: chmod 666 hlink,data也會變)
slink為 (無法變動slink的權限 但是data的會變)
```
[user@centos7-2 link]$ touch data
[user@centos7-2 link]$ echo "hello" > data
[user@centos7-2 link]$ ln -s data slink
[user@centos7-2 link]$ ln data hlink
[user@centos7-2 link]$ ls -l
total 8
-rw-rw-r-- 2 user user 6 Apr 18 11:17 data
-rw-rw-r-- 2 user user 6 Apr 18 11:17 hlink
lrwxrwxrwx 1 user user 4 Apr 18 11:17 slink -> data
[user@centos7-2 link]$
```
2 代表連結的數量(slink不計)

---
`file`

df (單位block)
df -h (單位M、G...)
dd if=/dev/zero of=3M bs=1M count=3
# Week8
(df)
使用自動分割 關注 / 的 Avail、Use

du
du - estimate file space usage
檔案(含目錄)大小
> df - report fiel system disk space usage
partition 磁碟分割區大小
du -h
最後一項 是 summation

du -h -s 只看summation


當前目錄下 第一層 子資料夾的大小 `du -h --max-depth 1`

:::spoiler sudo du -h --max-depth 1 /etc
[user@centos7-2 ~]$ sudo du -h --max-depth 1 /etc
0 /etc/.java
20K /etc/NetworkManager
4.0K /etc/UPower
64K /etc/X11
32K /etc/abrt
12K /etc/akonadi
12K /etc/alsa
4.0K /etc/alternatives
16K /etc/audisp
16K /etc/audit
0 /etc/auto.master.d
140K /etc/bash_completion.d
0 /etc/binfmt.d
4.0K /etc/bluetooth
4.0K /etc/certmonger
0 /etc/cgconfig.d
0 /etc/chkconfig.d
0 /etc/cifs-utils
12K /etc/cron.d
12K /etc/cron.daily
4.0K /etc/cron.hourly
0 /etc/cron.monthly
0 /etc/cron.weekly
44K /etc/cups
12K /etc/cupshelpers
236K /etc/dbus-1
36K /etc/dconf
12K /etc/default
8.0K /etc/depmod.d
12K /etc/dhcp
0 /etc/dracut.conf.d
0 /etc/egl
0 /etc/exports.d
4.0K /etc/fcoe
8.0K /etc/festival
0 /etc/firefox
16K /etc/firewalld
0 /etc/flatpak
16K /etc/fonts
3.4M /etc/gconf
0 /etc/gcrypt
0 /etc/gdbinit.d
20K /etc/gdm
4.0K /etc/geoclue
0 /etc/ghostscript
0 /etc/glvnd
0 /etc/gnupg
8.0K /etc/groff
72K /etc/grub.d
4.0K /etc/gss
12K /etc/gssproxy
8.0K /etc/highlight
4.0K /etc/hp
0 /etc/ipa
36K /etc/iproute2
20K /etc/iscsi
20K /etc/java
0 /etc/jvm-commmon
0 /etc/jvm
16K /etc/kde
4.0K /etc/kernel
0 /etc/krb5.conf.d
16K /etc/ld.so.conf.d
4.0K /etc/libblockdev
8.0K /etc/libnl
204K /etc/libreport
56K /etc/logrotate.d
8.0K /etc/lsm
132K /etc/lvm
0 /etc/maven
16K /etc/modprobe.d
0 /etc/modules-load.d
0 /etc/multipath
12K /etc/my.cnf.d
4.0K /etc/ndctl
12K /etc/ntp
0 /etc/oddjob
8.0K /etc/oddjobd.conf.d
104K /etc/openldap
0 /etc/opt
172K /etc/pam.d
0 /etc/pkcs11
1012K /etc/pki
4.0K /etc/plymouth
0 /etc/pm
8.0K /etc/polkit-1
0 /etc/popt.d
148K /etc/postfix
52K /etc/ppp
12K /etc/prelink.conf.d
104K /etc/profile.d
20K /etc/pulse
4.0K /etc/purple
4.0K /etc/python
4.0K /etc/qemu-ga
60K /etc/rc.d
12K /etc/request-key.d
48K /etc/rpm
4.0K /etc/rsyslog.d
8.0K /etc/rwtab.d
20K /etc/samba
4.0K /etc/sasl2
0 /etc/scl
80K /etc/security
19M /etc/selinux
8.0K /etc/setroubleshoot
60K /etc/setuptool.d
76K /etc/sgml
12K /etc/skel
16K /etc/smartmontools
80K /etc/speech-dispatcher
604K /etc/ssh
0 /etc/ssl
0 /etc/sssd
0 /etc/statetab.d
0 /etc/sudoers.d
404K /etc/sysconfig
0 /etc/sysctl.d
36K /etc/systemd
0 /etc/target
0 /etc/terminfo
0 /etc/tmpfiles.d
16K /etc/tuned
7.6M /etc/udev
4.0K /etc/udisks2
8.0K /etc/virtuoso
248K /etc/vmware-tools
4.0K /etc/wpa_supplicant
268K /etc/xdg
0 /etc/xinetd.d
4.0K /etc/xml
52K /etc/yum.repos.d
24K /etc/yum
16K /etc/openal
72K /etc/httpd
37M /etc
:::
---
stdin 0
stdout 1
stderr 2
echo hi 1 > hi.txt
1 是 stdout 可省略
[user@centos7-2 0425]$ echo hi 1 > hi.txt
[user@centos7-2 0425]$ cat hi.txt
hi 1
[user@centos7-2 0425]$ echo hello > hi.txt
[user@centos7-2 0425]$ cat hi.txt
hello
[user@centos7-2 0425]$ ls
hi.txt
[user@centos7-2 0425]$ ls aaa
ls: cannot access aaa: No such file or directory
[user@centos7-2 0425]$ ls aaa 2 > err.txt
ls: cannot access aaa: No such file or directory
ls: cannot access 2: No such file or directory
[user@centos7-2 0425]$ ls aaa 2>err.txt
[user@centos7-2 0425]$ ls
err.txt hi.txt
[user@centos7-2 0425]$ cat err.txt
ls: cannot access aaa: No such file or directory
[user@centos7-2 0425]$ ls aaa >err.txt
ls: cannot access aaa: No such file or directory
[user@centos7-2 0425]$
:::spoiler ls aaa hi.txt 1>a.txt 2>b.txt
[user@centos7-2 0425]$ ls
err.txt hi.txt
[user@centos7-2 0425]$ ls aaa hi.txt 1>a.txt 2>b.txt
ls aaa 錯誤 --> b.txt
hi.txt 正確 --> a.txt
[user@centos7-2 0425]$ cat a.txt
hi.txt
[user@centos7-2 0425]$ cat b.txt
ls: cannot access aaa: No such file or directory
:::
:::spoiler ls aaa hi.txt > c.txt 2>&1
[user@centos7-2 0425]$ ls
[user@centos7-2 0425]$ ls aaa hi.txt > c.txt 2>&1
ls aaa 錯誤 --> &1 也就是 stdout的位置 也就是 c.txt
hi.txt 正確 --> c.txt
[user@centos7-2 0425]$ cat c.txt
ls: cannot access aaa: No such file or directory
ls: cannot access hi.txt: No such file or directory
:::
:::spoiler ls aaa hi.txt 2>&1 >c.txt
[user@centos7-2 0425]$ ls aaa hi.txt 2>&1 >c.txt
ls: cannot access aaa: No such file or directory
ls aaa 錯誤
hi.txt 正確
先把 stderr 導向 stdout 但是 此時stdout 還是螢幕不是 c.txt 所以順序不能相反
[user@centos7-2 0425]$ ls
c.txt hi.txt
[user@centos7-2 0425]$ cat c.txt
hi.txt
:::
不管輸出結果正確/錯誤 都不顯示
順序不能顛倒
ls aaa hi.txt >/dev/null 2>&1
只能透過 echo $? 檢查執行 正確/錯誤

---
管道
將 |左邊 的stdout作為 |右邊 的stdin
只有接收stdin的指令可以放在 |右邊
touch {a..c}.aaa
find 搜尋檔案
find -name "*.aaa"
錯誤用法
find -name "*.aaa" | rm
因為 rm 不接受stdin
可以使用 xargs 解決
find -name "*.aaa" | xargs rm
find -name "*.aaa" | xargs rm -f

----
有名管道
mkfifo testfifo
ls -l testfifo

以下兩個指令分別在不同視窗執行(同路徑) 先後順序不影響結果
echo "hello world" | cat
cat < testfifo echo

---
> 追加 >>

> 清空

---
### 搜尋檔案
which 搜尋執行檔
which [執行檔]
echo $PATH 中 逐個尋找

---
locate 搜尋執行檔、檔案
到 資料庫 中尋找 使用前 需要先`updatedp`

---
find [參考 期末考2~3題](https://blog.gtwang.org/linux/unix-linux-find-command-examples/)
速度最慢 但是 可以針對特定規則搜尋
1. 檔案名稱 `-name`
find [從哪裡開始找] -name [檔案名稱]
檔案名稱建議加上" "
從 . 開始找可以省略
`find -name "a.txt"`
`find / -name "a.txt" `

2. 不分大小寫 `-iname`
`find -name "a.txt"`

3. 檔案類型 `-type`
`find -type d -name "htop*"` 注意: 使用萬用字元
`find -type p` 也可以找管道
`find -type f -name "a.txt"` f是default可略

4. 檔案權限 `-perm`
`find -perm 0644`
?
5. 執行指令 `-exec`
find . -type f -name "*.txt" -exec rm {} \;
刪除 *.txt
find . -type f -name "*.txt" 會填充到 {}
\; 結尾 固定用法

刪除空白檔案
find . -type f -empty -exec rm {} \;
刪除空白資料夾
錯誤 find . -type d -empty -exec rm {} \;
正確 find . -type d -empty -exec rm -rf {} \;
尋找隱藏檔案/目錄
find . -typef f -name ".*"
find . -typef d -name ".*"
6. **時間**
今天4/25
-mtime 1 --> 4/24
-mtime -1 --> 4/24~4/25
-mtime +1 --> 4/22~4/23
-3 3天以上 +1 1天以內
7. **檔案大小**
find . -size 50M
find . -size +50M -size -100M
---
1. 將檔案壓縮並打包
tar cvfz [file.tar.gz] ./*

時間戳記:
touch timebase
stat timebase
touch file4
find -type f -cnewer timebase
2. 將有變動的檔案壓縮並打包
tar cvfz [file-2.tar.gz] `find -type f -cnewer timebase`
3. 還原
tar xvfz [file.tar.gz]
tar xvfz [file-2.tar.gz]

# Week9
通配符/正則表達式
通配符 匹配檔案名稱
`*` 0或多個 任意值、任意字母
`?` 1個 任意值、任意字母
`#` 1個 數字
正則表達式 匹配檔案內容
`*` 匹配前面的字母 0次或多次
`?` 匹配前面的字母 0次或1次
`+` 匹配前面的字母 1次或多次
> Linux三劍客 awk / grep / sed
### grep 匹配檔案內容、名稱
grep [keyword] [file1] [file2] ...
用法1 grep "a*" a.txt
用法2 cat a.txt | grep "a*"
grep -n 顯示匹配的行號
grep -i 不分大小寫
grep -v 反向匹配
grep -r 遞迴搜尋 資料夾、子資料夾
grep -A n 往後(After)多顯示n行
grep -B n 往後(Before)多顯示n行

ps -ef | grep sleep | grep -v grep

grep -A 1 -B 1 "AbC" a.txt

`alias`
grep 預設 是grep --color=auto
\grep 可以 跳脫 alias

### regex
`^` head 以...為開頭

### passwd
/etc/passwd 存放系統帳號、相關資訊 包含帳號、密碼(編碼過)、uid、gid(group id)、comment(註解)、home directory、shell
`$` head 以...為結尾

可以用 `wc -l` word count計算行數 --> 有多少個系統帳號
匹配空白行
cat a.txt | grep -n "^$"

:::spoiler sudo cat sshd_config
```
$OpenBSD: sshd_config,v 1.100 2016/08/15 12:32:04 naddy Exp $
# This is the sshd server system-wide configuration file. See
# sshd_config(5) for more information.
# This sshd was compiled with PATH=/usr/local/bin:/usr/bin
# The strategy used for options in the default sshd_config shipped with
# OpenSSH is to specify options with their default value where
# possible, but leave them commented. Uncommented options override the
# default value.
# If you want to change the port on a SELinux system, you have to tell
# SELinux about this change.
# semanage port -a -t ssh_port_t -p tcp #PORTNUMBER
#
#Port 22
#AddressFamily any
#ListenAddress 0.0.0.0
#ListenAddress ::
HostKey /etc/ssh/ssh_host_rsa_key
#HostKey /etc/ssh/ssh_host_dsa_key
HostKey /etc/ssh/ssh_host_ecdsa_key
HostKey /etc/ssh/ssh_host_ed25519_key
# Ciphers and keying
#RekeyLimit default none
# Logging
#SyslogFacility AUTH
SyslogFacility AUTHPRIV
#LogLevel INFO
# Authentication:
#LoginGraceTime 2m
#PermitRootLogin yes
#StrictModes yes
#MaxAuthTries 6
#MaxSessions 10
#PubkeyAuthentication yes
# The default is to check both .ssh/authorized_keys and .ssh/authorized_keys2
# but this is overridden so installations will only check .ssh/authorized_keys
AuthorizedKeysFile .ssh/authorized_keys
#AuthorizedPrincipalsFile none
#AuthorizedKeysCommand none
#AuthorizedKeysCommandUser nobody
# For this to work you will also need host keys in /etc/ssh/ssh_known_hosts
#HostbasedAuthentication no
# Change to yes if you don't trust ~/.ssh/known_hosts for
# HostbasedAuthentication
#IgnoreUserKnownHosts no
# Don't read the user's ~/.rhosts and ~/.shosts files
#IgnoreRhosts yes
# To disable tunneled clear text passwords, change to no here!
#PasswordAuthentication yes
#PermitEmptyPasswords no
PasswordAuthentication yes
# Change to no to disable s/key passwords
#ChallengeResponseAuthentication yes
ChallengeResponseAuthentication no
# Kerberos options
#KerberosAuthentication no
#KerberosOrLocalPasswd yes
#KerberosTicketCleanup yes
#KerberosGetAFSToken no
#KerberosUseKuserok yes
# GSSAPI options
GSSAPIAuthentication yes
GSSAPICleanupCredentials no
#GSSAPIStrictAcceptorCheck yes
#GSSAPIKeyExchange no
#GSSAPIEnablek5users no
# Set this to 'yes' to enable PAM authentication, account processing,
# and session processing. If this is enabled, PAM authentication will
# be allowed through the ChallengeResponseAuthentication and
# PasswordAuthentication. Depending on your PAM configuration,
# PAM authentication via ChallengeResponseAuthentication may bypass
# the setting of "PermitRootLogin without-password".
# If you just want the PAM account and session checks to run without
# PAM authentication, then enable this but set PasswordAuthentication
# and ChallengeResponseAuthentication to 'no'.
# WARNING: 'UsePAM no' is not supported in Red Hat Enterprise Linux and may cause several
# problems.
UsePAM yes
#AllowAgentForwarding yes
#AllowTcpForwarding yes
#GatewayPorts no
X11Forwarding yes
#X11DisplayOffset 10
#X11UseLocalhost yes
#PermitTTY yes
#PrintMotd yes
#PrintLastLog yes
#TCPKeepAlive yes
#UseLogin no
#UsePrivilegeSeparation sandbox
#PermitUserEnvironment no
#Compression delayed
#ClientAliveInterval 0
#ClientAliveCountMax 3
#ShowPatchLevel no
#UseDNS yes
#PidFile /var/run/sshd.pid
#MaxStartups 10:30:100
#PermitTunnel no
#ChrootDirectory none
#VersionAddendum none
# no default banner path
#Banner none
# Accept locale-related environment variables
AcceptEnv LANG LC_CTYPE LC_NUMERIC LC_TIME LC_COLLATE LC_MONETARY LC_MESSAGES
AcceptEnv LC_PAPER LC_NAME LC_ADDRESS LC_TELEPHONE LC_MEASUREMENT
AcceptEnv LC_IDENTIFICATION LC_ALL LANGUAGE
AcceptEnv XMODIFIERS
# override default of no subsystems
Subsystem sftp /usr/libexec/openssh/sftp-server
# Example of overriding settings on a per-user basis
#Match User anoncvs
# X11Forwarding no
# AllowTcpForwarding no
# PermitTTY no
# ForceCommand cvs server
```
:::
移除`# 說明`、空白行

匹配 a 或 A 開頭
grep "^[aA]"
匹配 AbC 或 ABC
grep "A[bB]C"
匹配 a0c、a1c、a2c...
grep "a[0-9]c"
延伸: [a-z]、[A-Z]、[a-z A-Z]、[0-9 a-z A-Z]
`grep "^ab+"` grep 看不懂 + 要使用 egrep (e: extended)

## 硬體設備管理
/dev/hda IDE硬碟(傳統硬碟) (hda、hdb、...、hdz、hdaa、hdab...)
### 新增一顆硬碟 --> fdisk 磁碟切割 -->mkfs 格式化硬碟 --> mount掛載硬碟
dmesg (dump message)
dmesg | grep sd
fdisk dev/sda
n
p
enter
p
w
q

mkfs -t xfs /dev/sdb1
cd /
mkdir mydata
mount /dev/sdb1 /mydata
df -h
cd /mydata
dd if=/dev/zero of=100M bs=1M count=100
df -h
---
# 0509


## 第7章
**7-3**

7-1 新增群組
GID(Group ID)
groupadd [groupName]
:::spoiler cat /etc/group
```
root:x:0:
bin:x:1:
daemon:x:2:
sys:x:3:
adm:x:4:
tty:x:5:
disk:x:6:
lp:x:7:
mem:x:8:
kmem:x:9:
wheel:x:10:user
cdrom:x:11:
mail:x:12:postfix
man:x:15:
dialout:x:18:
floppy:x:19:
games:x:20:
tape:x:33:
video:x:39:
ftp:x:50:
lock:x:54:
audio:x:63:
nobody:x:99:
users:x:100:
utmp:x:22:
utempter:x:35:
input:x:999:
systemd-journal:x:190:
systemd-network:x:192:
dbus:x:81:
polkitd:x:998:
printadmin:x:997:
cgred:x:996:
libstoragemgmt:x:995:
colord:x:994:
rpc:x:32:
dip:x:40:
ssh_keys:x:993:
abrt:x:173:
rtkit:x:172:
pulse-access:x:992:
pulse-rt:x:991:
pulse:x:171:
mysql:x:27:
rpcuser:x:29:
nfsnobody:x:65534:
gluster:x:990:
tss:x:59:
geoclue:x:989:
chrony:x:988:
ntp:x:38:
sssd:x:987:
setroubleshoot:x:986:
gdm:x:42:
sshd:x:74:
slocate:x:21:
postdrop:x:90:
postfix:x:89:
stapusr:x:156:
stapsys:x:157:
stapdev:x:158:
tcpdump:x:72:
user:x:1000:user
apache:x:48:
jackuser:x:985:
rd:x:1001:
```
群組名稱 x GID
:::
刪除 groupdel [GroupName]
新增帳號
Default: `useradd [userName]`
> 在/home下建立一個叫做 [userName] 的家目錄、群組
```
[user@localhost ~]$ cd /home
[user@localhost home]$ ls
user
[user@localhost home]$ sudo useradd mike
[user@localhost home]$ ls
mike user
```
:::spoiler [user@localhost home]$ cat /etc/group
```
root:x:0:
bin:x:1:
daemon:x:2:
sys:x:3:
adm:x:4:
tty:x:5:
disk:x:6:
lp:x:7:
mem:x:8:
kmem:x:9:
wheel:x:10:user
cdrom:x:11:
mail:x:12:postfix
man:x:15:
dialout:x:18:
floppy:x:19:
games:x:20:
tape:x:33:
video:x:39:
ftp:x:50:
lock:x:54:
audio:x:63:
nobody:x:99:
users:x:100:
utmp:x:22:
utempter:x:35:
input:x:999:
systemd-journal:x:190:
systemd-network:x:192:
dbus:x:81:
polkitd:x:998:
printadmin:x:997:
cgred:x:996:
libstoragemgmt:x:995:
colord:x:994:
rpc:x:32:
dip:x:40:
ssh_keys:x:993:
abrt:x:173:
rtkit:x:172:
pulse-access:x:992:
pulse-rt:x:991:
pulse:x:171:
mysql:x:27:
rpcuser:x:29:
nfsnobody:x:65534:
gluster:x:990:
tss:x:59:
geoclue:x:989:
chrony:x:988:
ntp:x:38:
sssd:x:987:
setroubleshoot:x:986:
gdm:x:42:
sshd:x:74:
slocate:x:21:
postdrop:x:90:
postfix:x:89:
stapusr:x:156:
stapsys:x:157:
stapdev:x:158:
tcpdump:x:72:
user:x:1000:user
apache:x:48:
jackuser:x:985:
rd:x:1001:
mike:x:1002:
```
將 使用者mike 加入 mike 群組
:::
帳號 /etc/passwd (存放 一般使用者、系統 帳號, UID(User ID 一般使用者從1000開始))
密碼 /etc/shadow
> /etc/passwd 不會放 密碼!
>
User UID
root **0**
user 1000
mike 1001
`mike:x:1001:1002::/home/mike:/bin/bash`
```
mike(userName):x:1001(UID):1002(GID):(註解):/home/mike(家目錄):/bin/bash(shell)
```
可以由shell區分 一般使用者、系統帳號
一般使用者 /bin/bash
系統帳號 /sbin/nologin
cat /etc/shadow | grep user
`id mike` 查看mike相關訊息
useradd
-c 註解
-g 主要群組or GID
-G 附屬群組or GID
-d 目錄 指定家目錄
-e 日期 (expire)
-u UID
groupadd sales
groupadd manager
useradd -c "Tom Lin" -g rd -G manager tom
cat /etc/passwd | grep tom
id tom

設定密碼
(互動式)passwd tom
echo "tom" | passwd --stdin tom
把密碼設為tom
停止帳號
1. vim /etc/passwd

或是把shell改成/sbin/nologin
chmod a+x a.txt
所有人都可執行
chmod g-x a.txt
使群組無法執行
chmod u-w a.txt
使擁有者無法寫
ls -ld dir
查看資料夾本身的權限 **-d**
john

# 0516
cd ~
mkdir testdir -p
-p : 如果資料夾已經存在則忽略 不報錯 避免腳本執行中斷
ls -ld testdir
** -d: 查看資夾本身的屬性,沒有-d 只能查看資料夾內容 **
chmod u-r testdir
移除"擁有者"的"可讀"權限
chown 使用者.帳號群組 檔案
chown 使用者:帳號群組 檔案
chown -R 使用者.帳號群組 目錄
chown -R 使用者.帳號群組 目錄

[高階屬性設定](https://blog.gtwang.org/linux/how-to-make-file-immutable-on-linux-chattr-command/)
attribute


> [user@localhost testdir2]$ sudo chattr -i date.txt
[user@localhost testdir2]$ lsattr date.txt
---------------- date.txt
a鎖
可以透過 echo "hello" >> a.txt 新增,但是不能使用其他方法 例如vim
## 第8章
:::spoiler cat /proc/meminfo
MemTotal: 4026320 kB
MemFree: 738440 kB
MemAvailable: 2778120 kB
Buffers: 19476 kB
Cached: 2052744 kB
SwapCached: 328 kB
Active: 1240808 kB
Inactive: 1380192 kB
Active(anon): 221264 kB
Inactive(anon): 351948 kB
Active(file): 1019544 kB
Inactive(file): 1028244 kB
Unevictable: 0 kB
Mlocked: 0 kB
SwapTotal: 4063228 kB
SwapFree: 4061436 kB
Dirty: 20 kB
Writeback: 0 kB
AnonPages: 548476 kB
Mapped: 176556 kB
Shmem: 24432 kB
Slab: 430672 kB
SReclaimable: 281428 kB
SUnreclaim: 149244 kB
KernelStack: 7968 kB
PageTables: 33248 kB
NFS_Unstable: 0 kB
Bounce: 0 kB
WritebackTmp: 0 kB
CommitLimit: 6076388 kB
Committed_AS: 2670516 kB
VmallocTotal: 34359738367 kB
VmallocUsed: 184056 kB
VmallocChunk: 34359310332 kB
HardwareCorrupted: 0 kB
AnonHugePages: 194560 kB
CmaTotal: 0 kB
CmaFree: 0 kB
HugePages_Total: 0
HugePages_Free: 0
HugePages_Rsvd: 0
HugePages_Surp: 0
Hugepagesize: 2048 kB
DirectMap4k: 182080 kB
DirectMap2M: 4012032 kB
DirectMap1G: 2097152 kB
:::
:::spoiler cat /proc/cpuinfo
processor : 0
vendor_id : GenuineIntel
cpu family : 6
model : 141
model name : 11th Gen Intel(R) Core(TM) i7-11800H @ 2.30GHz
stepping : 1
microcode : 0x34
cpu MHz : 2304.002
cache size : 24576 KB
physical id : 0
siblings : 1
core id : 0
cpu cores : 1
apicid : 0
initial apicid : 0
fpu : yes
fpu_exception : yes
cpuid level : 27
wp : yes
flags : fpu vme de pse tsc msr pae mce cx8 apic sep mtrr pge mca cmov pat pse36 clflush mmx fxsr sse sse2 ss syscall nx pdpe1gb rdtscp lm constant_tsc arch_perfmon rep_good nopl xtopology tsc_reliable nonstop_tsc eagerfpu pni pclmulqdq ssse3 fma cx16 pcid sse4_1 sse4_2 x2apic movbe popcnt tsc_deadline_timer aes xsave avx f16c rdrand hypervisor lahf_lm abm 3dnowprefetch ssbd ibrs ibpb stibp ibrs_enhanced fsgsbase tsc_adjust bmi1 avx2 smep bmi2 erms invpcid avx512f avx512dq rdseed adx smap avx512ifma clflushopt clwb avx512cd sha_ni avx512bw avx512vl xsaveopt xsavec xgetbv1 arat avx512vbmi umip pku ospke avx512_vbmi2 gfni vaes vpclmulqdq avx512_vnni avx512_bitalg avx512_vpopcntdq spec_ctrl intel_stibp flush_l1d arch_capabilities
bogomips : 4608.00
clflush size : 64
cache_alignment : 64
address sizes : 45 bits physical, 48 bits virtual
power management:
:::
也可以使用free查看記憶體狀態
free -h
-h : 使用常用單位 K、M...
:::spoiler free -h
total used free shared buff/cache available
Mem: 3.8G 912M 720M 23M 2.2G 2.6G
Swap: 3.9G 1.8M 3.9G
:::

ps -f
-f : 詳細內容
PID : Process ID
PPID: Parent PID
# 5/23
ACL [參考](https://ithelp.ithome.com.tw/articles/10221185)
Access Control List 存取控制列表
9:22-24
對於某個檔案只有A擁有寫入檔案的權限、其他使用者只有讀的權限,若使用者B需要修改檔案同時避免A、B以外其他人修改檔案時無法達到完整的權限切割,需要使用ACL
getfacl a.txt
get(查看), f: file, acl:access control list
setfacl -m u:mary:rw- a.txt
set(設定), f: file, acl:access control list
-m : modify
u: user
給予 mary rw 權限
mask 是 保護機制(protection)
getfacl a.txt 可以看到
mask::r-- 代表最高權限就是r而已 就算 是 mary 也不能寫入
### 在腳本中讀取檔案內容
```
for user in `cat user.txt`
do
echo $user
done
```
---
九、系統管理工作 (實務:重要)
** 排程、9-2、9-4**
> SRE Site Reliavility Engineer 網站可靠性工程(運維)
> MTBF: Mean Time Between Failure
> MTTR: Mean Time To Repair
> spf : single point failure
> fault tolerance 容錯率
9.1 防火牆
iptables (舊 但常用)
每次新增規則都要重啟服務(會中斷)
FirewallD (新)
動態設定防火牆 新增規則不須重啟
提供多個zone可作選擇
zone: 針對不同的場合、情境 使用不同的防火牆規則
firewall-cmd --state 查看防火牆是否運行
firewall-cmd --get-zones 查看可選的zone
default zone:
block 隔離
dmz 非軍事區
external 外部網路
home 家
internal 內部網路
public 公開環境
trusted 可信任的環境
work 工作環境
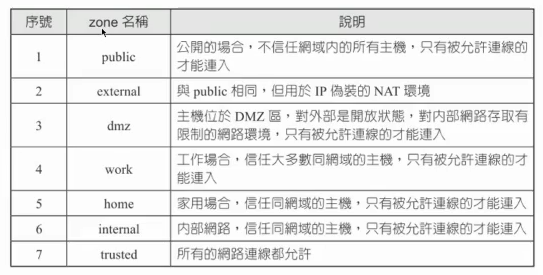
firewall-cmd --get-active-zones 查看目前套用的zone
firewall-cmd --zone=public --list-all 查看public zone的規則

重要
interfaces 網路卡
services : dhcpv6-client ssh 代表外網可以透過22 port連線(只有22port可以連線 是一種白名單模式)
ports
protocols
firewall-cmd --zone=public --add-service=http 將80 port也加入白名單
firewall-cmd --zone=public --remove-service=http 將80 port移除白名單
### ssh port change
修改/etc/ssh/sshd_config中的 Port (改成2222)
systemctl restart sshd 重啟服務
netstat -tunlp | grep sshd 查看 ssh使用的port
firewall-cmd --zone=public --add-port=2222/tcp 使修改後的port在防火牆上生效 (要移除規則 使用remove-port)
firewall-cmd --zone=public --list-all 查看
在設定規則時 使用 --permanent 才會在重開機後仍然保留規則
setup

System services 管理開機時哪些服務需要自動啟動
crond.service 跟時間相關的
## 9-2
打包 tar 一群檔案打包成單一檔案(tar包) 打包檔案不會縮小 壓縮才會
壓縮
XXX:檔名
gzip --> XXX.tar.gz (XXX.tgz)
bzip --> XXX.tar.bz2
xzip --> XXX.tar.xz
副檔名只是參考用不影響
[參考](http://note.drx.tw/2008/04/command.html)
使用 zip 的範例
zip -r test.zip a.txt
產生test.zip
還原unzip test.zip
打包檔案
tar -cvf test.tar file1 file2 file3 也可使用通配符ex:file*
c:creat
v:berbose
f:打包後的檔案名稱
還原:tar xvf test.tar
x:還原
查看內容:tar tvf test.tar
t:test
使用 gzip 的範例
touch a.txt
gzip a.txt
ls
gunzip a.txt.gz
tar -czvf test.tar.gz file* 打包並壓縮所有test字樣開頭的檔案
tar -xzvf test.tar file* 解壓縮
# 5/30
date
產生跟日期有關的資訊
date +%Y%%d
設定格式
touch `date +%Y%%d`
會先執行 ` ` 並把 `內容` 取代成結果
或是touch $(date +%Y%%d)也一樣
NTP(network time protocol) 時間校正time synchronization
> cluster 集群 由多台server組成 可分成:
master 主
slave 從
使用 ntpdate 透過NTP跟time server校正時間
sudo ntpdate watch.stdtime.gov.tw
> 在使用ntpdate前要先確認時區! timedatectl set-timezone Asiz/Taipei
>透過history可以查看 先前的命令
若要執行 history 中第 n 條命令 可以使用 !n ex: !988
!keyword ex: !time 就可以找到 timedatectl set-timezone Asiz/Taipei
使用hwclock -w
-r: read from bios
-w: write to bios
設定到硬體(bios)時間(下次開機時就不需重設)
> 大部分的log檔都放在 /var/log 下
> 如果安裝完serve卻無法連接? 如何debug:
1. systemctl status 伺服器 查看狀態,如果已經running,但還是無法連接
2. 查看防火牆、selinux
3. 檢查port number (netstat -tunlp | grep httpd)
> /var/log/httpd 下
access_log 紀錄存取資訊
192.168.153.1 - - [30/May/2023:09:41:08 +0800] "GET / HTTP/1.1" 403 4897/ "-" "Mozilla/5.0 (Windows NT 10.0; Win64; s64) AppleWebKit/537 (...) Chrome/113.0.0.0 Safari/537.36"
來源IP 跳轉IP [時間] "動作 位置 協定" 狀態碼 "Mozillz..."客戶端OS、瀏覽器、user agent
位置若是 / 代表首頁
> 狀態碼 status code
1xx information
2xx success
3xx 跳轉
4xx server error
5xx client error
access_log 紀錄error資訊
### 9-3 設定系統時間與時區
[參考](https://blog.gtwang.org/linux/centos-linux-change-system-timezone-command-tutorial/)
查看可用時區 timedatectl list-timezones
更改系統時區 sudo timedatectl set-timezone Asia/Taipei
date 顯示系統時間
參數

ex: date + "%Y/%m/%d %H:%M:%S"
--> 2023/05/23 11:57:42
### 9-4
crond 排程
*: don't care
分 時 日 月 周 cmd
1 * * * * 每小時的第1分鐘
*/1 * * * * 每1分鐘執行一次
*/2 * * * * 每2分鐘執行一次
* 1 * * * 每小時的第0分鐘
* */1 * * * 每1小時執行一次
/2: 代表每2時間(分、時、日..)執行一次
29 9 15 8 * (8/15 09:29 執行一次)
0 17 10 * * (每個月10日 下午5點整)
0 4 * * 6 (每個星期六 零晨4點整)
1,31 17 10 * * (每個17號 17點 1分、31分都執行一次)
1-10 17 10 * * (每個17號 17點 1分、2分...、10分都執行一次)
0 * * * * (每小時第0分鐘)
0 23-1/2,8 * * * 23,4,3,5,7,8
*/20 6-12 * 12 * 在12月時,6~12小時間 每20分鐘 執行一次
crontab -e
-e edit
-l list
*/1 * * * * echo "`date +%H:%M:%S`" >> /tmp/time.log
tail -f /time.log
-f: follow 追蹤
* * * * * sleep 30; /root/a.sh 每隔 30 秒執行一次
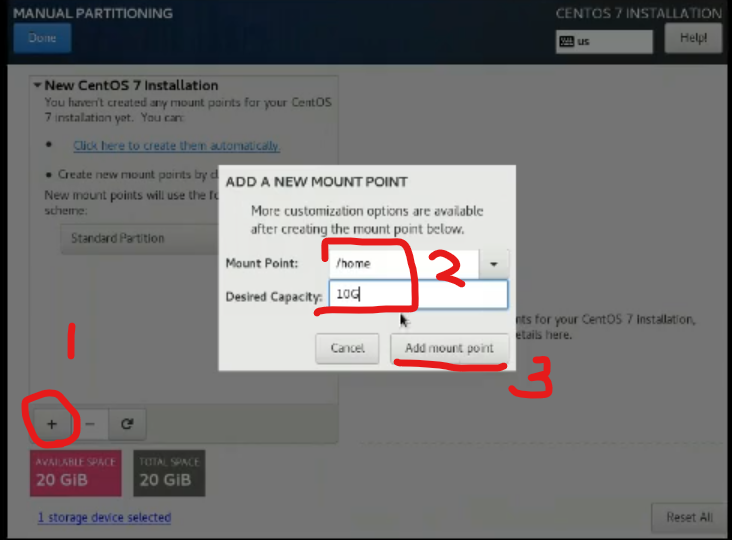
磁碟配額 #補第3節課

選擇手動切割

選擇標準切割
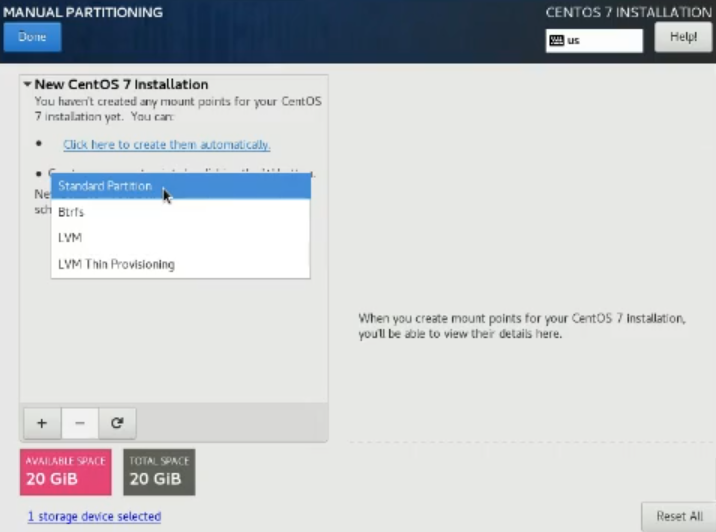
將特定資料夾獨立
step 1
vim /etc/fstab

step 2
reboot
step 3
/etc/mtab 檢查是否有quota字樣

step 4
設定個別使用者配額
cd /home
touch aquota.user
xfs_quota -xc 'limit bsoft=10m bhard=12m user' /home
step 5
檢查結果
xfs_quota -xc 'report -h' /home

測試(生成20M的內容)
dd if=/dev/zero of=/home/user/20m bs=1M count=20
20M超過上限(12M) 所以報錯
