# 2020q3 Homework14 (quiz14)
contributed by < `JimmyLiu0530` >
> [GitHub](https://github.com/JimmyLiu0530/NCKU-sysprog2020q3-quiz14)
###### tags: `進階電腦系統理論與實作`
## 測驗1: LeetCode [1409. Queries on a Permutation With Key](https://leetcode.com/problems/queries-on-a-permutation-with-key/)
給定一個待查陣列 `queries`,陣列中的元素為 1 到 m 之間的正整數。請你根據以下規則處理所有待查項 $queries[i]$ (從 $i=0$ 到 $i=queries.length-1$):
1. 起初排列 $P=[1,2,3,...,m]$
2. 對於目前 $i$,請你找出待查項 $queries[i]$ 在排列 $P$ 中的位置(索引自 0 開始),然後將其從原位置移動到排列 $P$ 的起始位置 (即索引為 0 處)。注意 $queries[i]$ 在 P 中的位置就是 $queries[i]$ 的查詢結果。
請你以陣列形式返回待查陣列 `queries` 的查詢結果。
範例 1
- 輸入
> $queries=[3,1,2,1],m=5$
- 輸出
> $[2,1,2,1]$
- 解讀: 待查陣列 `queries` 處理如下:
- 對於 $i=0→queries[i]=3,P=[1,2,3,4,5]→$ `3` 在 $P$ 中的位置是 ==`2`==,接著我們把 `3` 移動到 $P$ 的起始位置,得到 $P=[3,1,2,4,5]$
- 對於 $i=1→queries[i]=1,P=[3,1,2,4,5]→$ `1` 在 $P$ 中的位置是 ==`1`==,接著我們把 `1` 移動到 $P$ 的起始位置,得到 $P=[1,3,2,4,5]$
- 對於 $i=2→queries[i]=2,P=[1,3,2,4,5]→$ `2` 在 $P$ 中的位置是 ==`2`==,接著我們把 `2` 移動到 $P$ 的起始位置,得到 $P=[2,1,3,4,5]$
- 對於 $i=3→queries[i]=1,P=[2,1,3,4,5]→$ `1` 在 $P$ 中的位置是 ==`1`==,接著我們把 `1` 移動到 $P$ 的起始位置,得到 $P=[1,2,3,4,5]$
- 因此,返回的結果陣列為 $[2,1,2,1]$
範例 2
- 輸入
> $queries=[4,1,2,2],m=4$
- 輸出
> $[3,1,2,0]$
- 解讀: 待查陣列 `queries` 處理如下:
- 對於 $i=0→queries[i]=4,P=[1,2,3,4]→$ `4` 在 $P$ 中的位置是 ==`3`==,接著我們把 `4` 移動到 $P$ 的起始位置,得到 $P=[4,1,2,3]$
- 對於 $i=1→queries[i]=1,P=[4,1,2,3]→$ `1` 在 $P$ 中的位置是 ==`1`==,接著我們把 `1` 移動到 $P$ 的起始位置,得到 $P=[1,4,2,3]$
- 對於 $i=2→queries[i]=2,P=[1,4,2,3]→$ `2` 在 $P$ 中的位置是 ==`2`==,接著我們把 `2` 移動到 $P$ 的起始位置,得到 $P=[2,1,4,3]$
- 對於 $i=3→queries[i]=2,P=[2,1,4,3]→$ `2` 在 $P$ 中的位置是 ==`0`==,接著我們把 `2` 移動到 $P$ 的起始位置,得到 $P=[2,1,4,3]$
- 因此,返回的結果陣列為 $[3,1,2,0]$
範例 3
- 輸入
> $queries=[7,5,5,8,3],m=8$
- 輸出
> $[6,5,0,7,5]$
- 解讀: 待查陣列 `queries` 處理如下:
- 對於 $i=0→queries[i]=7,P=[1,2,3,4,5,6,7,8]→$ `7` 在 $P$ 中的位置是 ==`6`==,接著我們把 `7` 移動到 $P$ 的起始位置,得到 $P=[7,1,2,3,4,5,6,8]$
- 對於 $i=1→queries[i]=5,P=[7,1,2,3,4,5,6,8]→$ `5` 在 $P$ 中的位置是 ==`5`==,接著我們把 `5` 移動到 $P$ 的起始位置,得到 $P=[5,7,1,2,3,4,6,8]$
- 對於 $i=2→queries[i]=5,P=[5,7,1,2,3,4,6,8]→$ `5` 在 $P$ 中的位置是 ==`0`==,接著我們把 `5` 移動到 $P$ 的起始位置,得到 $P=[5,7,1,2,3,4,6,8]$
- 對於 $i=3→queries[i]=8,P=[5,7,1,2,3,4,6,8]→$ `8` 在 $P$ 中的位置是 ==`7`==,接著我們把 `8` 移動到 $P$ 的起始位置,得到 $P=[8,5,7,1,2,3,4,6]$
- 對於 $i=3→queries[i]=3,P=[8,5,7,1,2,3,4,6]→$ `3` 在 $P$ 中的位置是 ==`5`==,接著我們把 `3` 移動到 $P$ 的起始位置,得到 $P=[3,8,5,7,1,2,4,6]$
- 因此,返回的結果陣列為 $[6,5,0,7,5]$
提示:
- $1 \leq m \leq 10^3$
- $1 \leq queries.length \leq m$
- $1 \leq queries[i] \leq m$
最直覺的思路:維護一個陣列 `pos[]`,記錄目前所有數字的位置。初始時,數字的位置對應其本身的數值減 `1` (即數字自 `1` 開始,而索引自 `0` 起),也就是:
```c
pos[1] = 0; // 數字 1 在第 0 位
pos[2] = 1; // 數字 2 在第 1 位
pos[3] = 2; // 數字 3 在第 2 位
...
pos[n] = n - 1; // 數字 n 在第 n-1 位
```
接著我們循序走訪 `queries` 陣列中的每個數字,利用 `pos` 陣列查看目前數字所在的位置,並將該位置計入預計回傳的結果。由於數字會從目前位置移動到陣列的首位,因此,目前數字的位置變為 0,其他小於目前數字的位置都要加 1,位置大於目前數字的位置保持不變。重複此步驟,直到處理完所有 `queries` 中的數字。
為了縮減時間複雜度,我們可引入 [Fenwick tree](https://en.wikipedia.org/wiki/Fenwick_tree):
> [Binary indexed tree](https://www.csie.ntu.edu.tw/~sprout/algo2016/homework/week11.pdf): Fenwick tree 是個處理前綴時很有效率的資料結構,也稱為 Binary indexed tree,或簡稱 BIT。以下簡稱它為 BIT。對於一個長度為 n 的陣列,BIT 可以在 $O(n)$ 的時間初始化,在 $O(log\ n)$ 的時間詢問一個前綴的訊息 (例如前綴和),以及在 $O(log\ n)$ 的時間修改其中一個值。
> 雖然複雜度和線段樹相同,但 BIT 的時間常數比線段樹小得多,空間也比較小 (只需要多開一個大小恰好為 n 的陣列即可),程式碼也非常精簡 。一般來說,如果問題的性質可以使用 BIT,效率會和使用線段樹有明顯的差別。
`lowbit`: 二進位最後一個 1 的位置所代表的數值。
範例:
- $13 = 1101_2 →$ `lowbit(13)` = $0001_2$ = $1$
- $12 = 1100_2 →$ `lowbit(12)` = $0100_2$ = $4$

> 節點 $i$ 儲存 $[i-lowbit(i)+1,i]$ 的和。
> $i$ 的父節點為 $i-lowbit(i)$
> 第一列為原陣列 (即 $[1,7,3,0,...]$),第二到第四列依次填入數字
> 方便起見,此處的陣列的索引為自 `1` 開始
建構 BIT:
- prefixSum(13) = prefixSum($00001101_2$)
> = BIT[13] + BIT[12] + BIT[8]
> = BIT[$00001101_2$] + BIT[$00001100_2$] + BIT[$00001000_2$]

樹的示意圖

> BIT 的 binary 並不是指二元樹,而是指「二進位」。
更新操作:

> 位於索引 5 的數值 `5` 增加 2 而成為 `7`。
BIT 時間複雜度 (n 為 input array 的長度):
- 建立: $O(n)$
- 修改: $O(log\ n)$
- 查詢: $O(log\ n)$
考慮以下程式碼為可能解法:
```c=
/* Fenwick tree */
#define lowbit(x) (x & -x)
static inline int sum(int *tree, int index)
{
int ret = 0;
for (; index; index -= lowbit(index))
ret += tree[index];
return ret;
}
static inline void update(int *tree, int size, int index, int delta)
{
for (; index < size; index += lowbit(index))
tree[index] += delta;
}
int *processQueries(int *queries, int queries_size, int m, int *ret_size)
{
int map[m + 1];
for (int i = 1; i <= m; ++i)
map[i] = i + queries_size;
int tree_size = queries_size + m + 1;
int tree[tree_size];
memset(tree, 0, sizeof(tree));
for (int i = m; i; i--)
update(tree, tree_size, i + queries_size, 1);
*ret_size = queries_size;
int *ret = malloc(sizeof(int) * queries_size);
for (int i = 0; i < queries_size; ++i) {
ret[i] = sum(tree, map[queries[i]]) + PPP;
update(tree, tree_size, map[queries[i]], -1); /* set to zero */
map[queries[i]] = QQQ;
update(tree, tree_size, map[queries[i]], 1); /* move to front */
}
return ret;
}
```
請補完上述程式碼,使其得以符合 LeetCode 題目的行為。
參考資料:
- [花花醬 LeetCode 1409. Queries on a Permutation With Key](https://www.youtube.com/watch?v=DwtijVbS3G0&feature=youtu.be)
### 程式說明
先來解釋如何將本題轉換成 prefix sum 的問題,以一個初始,未經搬移的例子來看:
假設給定 $queries=[3,1,2,1]$, $m=5$, $P=[1,2,3,4,5]$。令一個陣列 `arr` 為 $[0,0,0,0,0,1,1,1,1,1]$,其中有 `queriesSize + 1` 個 `0`,`m` 個 `1`。
| 數字 i | i 在 P 中的位置 | prefixSum(queriesSize + i) - 1 |
| :-: | :-: | :-: |
| 1 | 0 | 0 |
| 2 | 1 | 1 |
| 3 | 2 | 2 |
| 4 | 3 | 3 |
| 5 | 4 | 4 |
(註: prefixSum(x) 為 `arr[x]` 的 prefix sum)
根據上面的表格,我們可以發現數字 `i` 在 $P$ 中的位置會等於 `queriesSize + i` 的 prefix sum 再減 `1`。因此,我們就可以根據這樣的關係建立一個 `arr` 陣列的 fenwick tree,好讓我們快速的求得 prefix sum。
然而,數字 `i` 在 $P$ 中的位置不是永遠等於 `queriesSize + i` 的 prefix sum 再減 `1`,加總的範圍會隨著 $P$ 中元素的搬移而改變,因此,需要一個 `map[]` 來記錄每個數字的加總範圍。上述的表格應修改為:
| i | 數字 i 在 P 中的位置 | map[i] | prefixSum(map[i]) - 1 |
| - | :-: | :-: |:-: |
| 1 | 0 | 5 | 0 |
| 2 | 1 | 6 | 1 |
| 3 | 2 | 7 | 2 |
| 4 | 3 | 8 | 3 |
| 5 | 4 | 9 | 4 |
line 18-25,這部分都在做初始化。一開始,讓每個數字 `i` 的對應到 `queries_size + i`。
接著,建立一棵關於陣列 `arr[]= [0,0,...,0,1,1,..,1]` (其中有 `queriesSize + 1` 個 `0`,`m` 個 `1`) 的 fenwick tree (`tree[]`)。建立的方式就是不斷地呼叫函式 `update()` 來依序更新索引 `queries_size + m` 到 `queries_size` 之間的元素。
line 29-34,建立好 `tree` 後,循序走訪 `queries[i]`,利用 `tree` 取得該數字的位置,並將該位置存入預計回傳的陣列 `ret`,最後再回傳此陣列即可。
首先,因為一個數字在陣列 $P$ 中的位置會等於它前面共有多少個數字 (假設從索引 0 開始),
> e.g. 陣列 [1,2,3], `3` 的索引為 2,也是 `3` 前面數字的總數。
因此透過呼叫函式 `sum()` 來取得到此數字為止共有幾個數字,再扣掉 1 (自己),即為在此數字前面有多少個數字,也就是該數字的索引。因此,`PPP = -1`。
接下來,如何在 Fenwick tree 上實作出「將該數字移至最前面」的效果?
我們將「移至最前面」拆成兩部分來看:
1. 抽 (extract)
也就是把該數字移除。要做到這樣的效果等同於執行下列程式碼:
```c
update(tree, tree_size, map[queries[i]], -1);
```
代表將 `tree` 中所有有統計到該數字的元素減 `1`。
2. 放 (place)
放有兩個點要去考慮: 1. 擺放的位置 以及 2. 放在該位置後 `tree` 要做什麼調整。
先回顧一下一開始 `arr` 是如何假設的:
> arr = [0,0,...,0,1,1,..,1]
- 原來前面這 `queriesSize + 1` 個 `0` 就是為了給這些數字擺放而預留的位置! 而且會越放越前面,因此重新設定該數字的 `map` 來產生移動至首位的效果,所以 `QQQ = queries_size - i`。
- 決定擺放的位置後,透過呼叫函式 `update()` 更新整棵 `tree`,方法如同上述將該數字移除,只是顛倒過來變成加 1。
```c
update(tree, tree_size, map[queries[i]], 1);
```
#### 時間、空間複雜度分析
> n = queriesSize, m is given.
| | time complexity | space complexity |
| - | :-: | :-: |
| **without fenwick tree** | $O(m*n)$ | $O(m)$ |
| **with fenwick tree** | $O(m\ log m)$ | $O(m+n)$ -> $O(m)$, due to $n \leq m$ |
以下為隨機產生一組長度為 618 的 `queries` 且 `m` = 1000,分別對有無 BIT 的程式進行效能評估:
```
Performance counter stats for './withBIT' (50 runs):
0.26 msec task-clock # 0.678 CPUs utilized ( +- 9.39% )
0 context-switches # 0.311 K/sec ( +- 48.45% )
0 cpu-migrations # 0.000 K/sec
53 page-faults # 0.206 M/sec ( +- 0.24% )
943,018 cycles # 3.670 GHz ( +- 0.41% )
1,103,028 instructions # 1.17 insn per cycle ( +- 0.13% )
171,313 branches # 666.745 M/sec ( +- 0.16% )
7,448 branch-misses # 4.35% of all branches ( +- 0.61% )
0.0003790 +- 0.0000401 seconds time elapsed ( +- 10.59% )
```
```
Performance counter stats for './withoutBIT' (50 runs):
1.36 msec task-clock # 0.924 CPUs utilized ( +- 1.42% )
0 context-switches # 0.000 K/sec
0 cpu-migrations # 0.000 K/sec
51 page-faults # 0.038 M/sec ( +- 0.27% )
5,688,614 cycles # 4.179 GHz ( +- 0.27% )
10,201,334 instructions # 1.79 insn per cycle ( +- 0.01% )
1,648,571 branches # 1211.107 M/sec ( +- 0.02% )
26,166 branch-misses # 1.59% of all branches ( +- 0.23% )
0.0014730 +- 0.0000207 seconds time elapsed ( +- 1.41% )
```
可以發現沒有使用 BIT 所花的時間約是有使用的 4 倍。
### 延伸問題
#### 1. Binary Indexed Tree 有哪些應用?請舉例並分析
- Binary Indexed Tree (簡稱 BIT) 最基礎的應用就是計算前綴和 (prefix sum),並且可以利用這種樹的特性來加速解決某些特定的問題,本題就是其中一個例子。
- 初始化: $O(n)$
- 修改/更新: $O(log\ n)$
- 前綴和: $O(log\ n)$
- BIT 也可以應用在任何**區間**的修改以及求前綴和 (區間不必從 `0` 開始)。想法如下:
假設原陣列為 `a[]`。令一組新的陣列 `b[]`,其中 b[i] = a[i] - a[i-1],則 `a[i]` 就可以表示成 b[1]+b[2]+...+b[i]。 (註:`b[]` 稱作為 `a[]` 的一階差分數列)
首先,對區間 [x,y] 修改時,只有 `b[x]` 以及 `b[y+1]` 兩點會有變化,
> 因為 b[x] = ==a[x]== - a[x-1] (b[x] 的修改會跟 a[x]的修改相同)
> b[x+1] = ==a[x+1]== - ==a[x]== (這兩項都有被修改,相減後會抵消掉)
> ...
> b[y] = ==a[y]== - ==a[y-1]==
> b[y+1] = a[y+1] - ==a[y]== (b[y+1] 的修改會跟 a[y]的修改差一個正負號 (e.g. `+1` 變 `-1`))
> (註: ==黃底==代表有被修改)
因此這兩點分別執行 `update()` 即可完成對區間 [x,y] 的修改。
更進一步就可以將 `i` 的前綴和 `sum(i)` 寫成 (b[1])+(b[1]+b[2])+(b[1]+b[2]+b[3])+...+(b[1]+b[2]+...+b[i]) = (n+1)*sum(b[i]) - sum(b[i]*i),如此一來,只要利用兩個 BIT,一個維護 `b[i]` 的前綴和,另一個維護 `b[i]*i` 的前綴和。最後,區間 [x,y] 的和即可透過 `sum(y) - sum(x-1)` 得到。
[練習題-區間求和](https://zerojudge.tw/ShowProblem?problemid=d799)
- BIT 還可以用來求出[逆序對](https://zh.wikipedia.org/wiki/%E9%80%86%E5%BA%8F%E5%AF%B9)的個數:
所謂逆序對就是假設 $A$ 為一個 `n` 個數字的有序集,其中所有數字皆不相同。如果存在正整數 `i`, `j` 滿足 $1 \leq i < j \leq n$ 而且 $A[i] > A[j]$,則 $<A[i], A[j]>$ 這組有序對稱為 $A$ 的一個逆序對。此問題是想在一個有序集中,計算共有幾個逆序對。
> 舉例: 數組<2,3,8,6,1> 共有 **5** 個逆序對,分別是 <2,1> <3,1> <8,1> <8,6> <6,1>。
```c=
/* 無 BIT 協助 */
int inversionCnt(int *A, int arraySize)
{
int ans = 0;
int max = -1;
/* 找出陣列 A 中最大的數字 */
for (int i = 0; i < arraySize; i++) {
if (A[i] > max)
max = A[i];
}
int record[max + 1]; // record[i] 紀錄當前在陣列 A 中,數字 i 的右邊有幾個數字比它小
memset(record, 0, sizeof(record));
/* 對於所有陣列 A 中的數字 A[i],
都要去看是否存在以 A[i] 為左值的逆序對 (即 <A[i], A[j]>, j > i),
也就是說, A[i] 的右邊有幾個數字比它小,
就有幾個以 A[i] 為左元素的逆序對。
*/
for (int i = arraySize - 1; i >= 0; i--) {
ans += record[A[i]];
for (int j = A[i]; j <= max; j++)
record[j]++;
}
return ans;
}
------------------------------------------------------
/* 有 BIT 協助: 透過 BIT 的特性就可以不用像上面的解法每次遍歷一個數字時,
都要更新"所有"比該數字還大的索引的元素 */
*/
int inversionCnt_BIT(int *A, int arraySize)
{
int ans = 0;
/* 找出陣列 A 中最大的數字 */
for (int i = 0; i < arraySize; i++) {
if (A[i] > max)
max = A[i];
}
int tree[max + 1]; // BIT
memset(tree, 0, sizeof(record));
for (int i = arraySize - 1; i >= 0; i--) {
ans += sum(tree, A[i]);
update(tree, A[i], 1);
}
return ans;
}
```
#### 2. 研讀 [Fenwick Treeの定数倍高速化](https://yosupo.hatenablog.com/entry/2016/12/04/121927),探究上述程式碼改進的機會
#### 3. 新增隨機產生的測資
為了測試此程式的正確性,盡可能的產出夠亂的測資,因此採用下列兩種方式來產生隨機的測資:
1. [Fisher Yates Shuffle](https://en.wikipedia.org/wiki/Fisher%E2%80%93Yates_shuffle)
此 Fisher Yates 洗牌演算法在 quiz1 有提過,當時是用在 linked list 的洗牌,因此將類似的概念運用於陣列的洗牌。
呼叫 `Fisher_Yates_shuffle` 函式即可隨機產生一組 `queries`,並回傳其大小。
```c=
void swap(int **ind, int i, int j)
{
int tmp = *(*ind + j);
*(*ind + j) = *(*ind + i);
*(*ind + i) = tmp;
}
int Fisher_Yates_shuffle(int **ind, int *m)
{
srand(time(NULL));
*m = (rand() % 1000) + 1; /* 1 <= m <= 10^3 */
int size = (rand() % (*m)) + 1; /* 1 <= size <= m */
*ind = (int *)malloc(sizeof(int) * size);
/* initialize queries to [1,2,...,size] */
for (int i = 0; i < size; i++) {
*(*ind + i) = i+1;
}
for (int i = 0; i < size - 1; i++) {
int j = rand() % (size - i) + i; /* i <= j <= n-1 */
swap(ind, i, j);
}
return size;
}
```
2. Randomly Create Queries
此方法採直覺式的隨機產生 `m`、`size` 以及 `queries`。
```c=
int randomCreateArr(int **ind, int *m)
{
srand(time(NULL));
*m = (rand() % 1000) + 1; /* 1 <= m <= 10^3, choose a random m */
int size = (rand() % (*m)) + 1; /* 1 <= size <= m, choose a random queries size */
*ind = (int *)malloc(sizeof(int) * size);
for (int i = 0; i < size; i++)
*(*ind + i) = rand()%(*m) + 1;
return size;
}
```
不管是利用上述何種隨機的方法產生出測資,將這組測資執行在 with 及 without BIT 的程式上,藉由去看兩者得到的結果是否相同來判斷答案是否正確。若不相同,代表至少其中一個程式產生錯誤的答案,因此輸出 "Two results don't have the same answer." 並結束程式; 否則輸出 "Two results have the same answers."。
實際總共跑了一百萬次,最終得到 "Two results have the same answers.",再加上測試過一些 edge testcases,像是
- `m` = 1, `queries` = [1]
- `m` = 2, `queries` = [2], [1, 2], [1, 1], [2, 2]
- `m` = 1000, `queries` = [1000, 1000, ..., 1000], [1000, 999, ..., 1], [1, 2, ..., 1000]
皆得到正確答案,因此不嚴謹地說這兩個程式皆正確。
參考資料:
- [LeetCode edge cases](https://www.reddit.com/r/cscareerquestions/comments/9vyek3/leetcode_edge_cases/)
---------------------------------------------------------
## 測驗2: Garbage Collector
CS:APP 第 9 章提到 garbage collector (以下簡稱 GC),其中 [Mark and Sweep](https://en.wikipedia.org/wiki/Tracing_garbage_collection) 是經典的演算法,後者分為 mark 和 Sweep 兩個階段:
- Mark 階段:
從 root set(stack & globals list)遞迴地走訪可到達的記憶體區段,並將之標記。
- Sweep 階段:
走訪所有記憶體區段(ptr_map 中所有節點),並將沒被標記到的從 heap 中釋放。
示意如下:

實作 `Mark`:
1. 建立存取清單 `todo` 將所有 root 中的物件加入。
2. 當 `todo` 中有物件時,執行以下3~4。
3. 從 `todo` 中選任一物件 `v` ,將其除外於 `todo`。
4. 如果 `v` 未被標記,則標記 `v` ,並將所有 `v` 包含的物件放到 `todo`中。
實作 `Sweep`:
1. 物件 `p` 從 `heap` 的最底層物件開始。
2. 當 `p` 還不是 `top` 的時候,執行以下3~5。
3. 如果 `p` 已被標記,則將其改為未標記。
4. 反之,將 `p` 的記憶體區塊加到 `free list` 中,準備清除。
5. 將 `p` 改為在 heap 中上一層的物件。 (`using p <- p + sizeof(p)`)
問題點 1:
- 需要清除時,通常表示沒有記憶體空間。
- 但是, Mark 階段需要記憶體空間去創造訪問清單。
- 存取清單無法預測大小,因此無法預先保留。
:::info
解決方法
- 應用 `pointer reversal`,用 `depth first search` 取代存取清單。
:::
問題點 2:
- 有些物件沒有指標的空間。
:::info
解決方法
- 使用一個暫存器記憶其 `parent` 位置,就算不用 `pointer reversal` 也能執行 `depth firsth search`。
:::
- [ ] Tri-Color 演算法與 Golang
> Reference: [Golang realtime garbage collector](https://www.youtube.com/watch?v=n59VtiRx34s)
上述的 mark and sweep 演算法有個缺點。每次在執行 `mark` 時,都需要將程式的執行予以暫停。
- 標記時,需要讓所有 object 維持不變,才能保持不出錯。
- 舉例: 以下程式具備物件 $obj_0$, $obj_1$, $obj_2$, $obj_3$
時間 `t0`:執行 `mark`,將 `reachable` 物件標記。

時間 `t1`:因為沒有暫停程式的執行,出現 obj4 指向 obj3。

時間 `t2`: 執行 `sweep`,刪除物件 obj3, obj4 產生錯誤。
因此,為了讓 mark and sweep 過程不需暫停程式的運作, 延伸出 Tri-colored 演算法,描述如下:
- 使用 Breadth-first 的策略
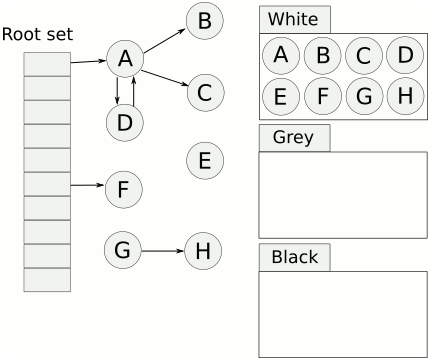
- 將物件用三種顏色來標記:
- 白色:未標記,未來會被清掃的候選人。
- 灰色:reachable,但是尚未確定是否參考白色的物件。
- 黑色:reachable,確定沒有參考白色的物件。
- 將新增物件標記為灰色
- 最主要目的為保持 ==tri-color invariant==。
- tri-color invariant: 黑色的物件永遠不會參考白色的物件。也就是說,當灰色集合為空時,白色集合中的物件即可被釋放,因為再也沒有物件可以參考到他們了。
- 只要一直維持 tri-color invariant,GC 就能在不停止程式的形況下繼續標記。
以下是改寫自 [Baby’s First Garbage Collector](http://journal.stuffwithstuff.com/2013/12/08/babys-first-garbage-collector/) 的虛擬機器和 GC 實作:
```c=
#include <assert.h>
#include <stdio.h>
#include <stdlib.h>
#define GC_INITIAL_THRESHOLD 8
#define STACK_MAX 256 /* maximum stack size for the virtual machine */
typedef enum { OBJECT_TYPE_INT, OBJECT_TYPE_PAIR } ObjectType;
typedef struct sObject {
union {
int value;
struct { struct sObject *head, *tail; };
};
struct sObject *next; /* the next object chained to it */
ObjectType type;
unsigned char mark; /* zero: unreached, non-zero: retained */
} Object;
typedef struct {
/* GC related */
Object *first_object;
size_t object_num, object_max;
size_t stack_size;
Object *stack[STACK_MAX];
} VM;
void assert(int condition, const char* message) {
if (!condition) {
printf("%s\n", message);
exit(1);
}
}
VM *new_vm() {
VM *vm = malloc(sizeof(VM));
assert("VM allocation failed" && vm);
if (vm) {
vm->stack_size = 0; vm->first_object = 0; vm->object_num = 0;
vm->object_max = GC_INITIAL_THRESHOLD;
}
return vm;
}
void vm_push(VM *vm, Object *value) {
assert("stack overflow" && vm->stack_size < STACK_MAX);
vm->stack[vm->stack_size++] = value;
}
Object *vm_pop(VM *vm) {
assert("stack underflow" && vm->stack_size > 0);
return vm->stack[--vm->stack_size];
}
void gc(VM *);
Object *new_object(VM *vm, ObjectType type) {
if (vm->object_num == vm->object_max)
gc(vm);
Object *obj = malloc(sizeof(Object));
assert("Object allocation failed" && obj);
if (obj) {
obj->mark = 0;
obj->type = type;
obj->next = vm->first_object;
vm->first_object = obj; /* tri-color: gray objects */
AAA;
}
return obj;
}
Object *vm_push_int(VM *vm, int value) {
Object *obj = new_object(vm, OBJECT_TYPE_INT);
if (obj) {
obj->value = value;
vm_push(vm, obj);
}
return obj;
}
Object *vm_push_pair(VM *vm) {
Object *obj = new_object(vm, OBJECT_TYPE_PAIR);
if (obj) {
obj->tail = vm_pop(vm);
obj->head = vm_pop(vm);
vm_push(vm, obj);
}
return obj;
}
void free_vm(VM *vm) {
vm->stack_size = 0;
gc(vm);
free(vm);
}
static void gc_mark(Object *obj) {
if (obj->mark)
return; /* for recursive reference */
obj->mark = 1; /* tri-color: black objects */
if (obj->type == OBJECT_TYPE_PAIR) {
gc_mark(obj->head);
gc_mark(obj->tail);
}
}
static void gc_mark_all(VM *vm) {
for (size_t i = 0; i < vm->stack_size; ++i)
gc_mark(vm->stack[i]);
}
static void gc_sweep(VM *vm) {
Object **obj = &(vm->first_object);
while (*obj) {
if (!(*obj)->mark) {
Object *unreached = *obj; /* tri-color: white objects */
/* first_object / previous->next = unreached->next */
*obj = unreached->next;
free(unreached);
BBB;
} else {
(*obj)->mark = 0;
obj = &(*obj)->next;
}
}
}
void gc(VM *vm) {
gc_mark_all(vm);
gc_sweep(vm);
/* adjust GC threshold */
vm->object_max = vm->object_num ? vm->object_num * 2 : GC_INITIAL_THRESHOLD;
}
void test1() {
puts(__func__);
VM *vm = new_vm();
vm_push_int(vm, 1); vm_push_int(vm, 2);
gc(vm);
assert("GC should skip preserved objects" && vm->object_num == 2);
free_vm(vm);
}
void test2() {
puts(__func__);
VM *vm = new_vm();
vm_push_int(vm, 1); vm_push_int(vm, 2);
vm_pop(vm); vm_pop(vm);
gc(vm);
assert("GC should collect unreached objects" && vm->object_num == 0);
free_vm(vm);
}
void test3() {
puts(__func__);
VM *vm = new_vm();
vm_push_int(vm, 1); vm_push_int(vm, 2);
vm_push_pair(vm);
vm_push_int(vm, 3); vm_push_int(vm, 4);
vm_push_pair(vm);
vm_push_pair(vm);
gc(vm);
assert("GC should reach nested objects" && vm->object_num == CCC);
free_vm(vm);
}
void test4() {
puts(__func__);
VM *vm = new_vm();
vm_push_int(vm, 1); vm_push_int(vm, 2);
Object *a = vm_push_pair(vm);
vm_push_int(vm, 3); vm_push_int(vm, 4);
Object *b = vm_push_pair(vm);
a->tail = b;
b->tail = a;
gc(vm);
assert("GC should deal with recursive reference" && vm->object_num == DDD);
free_vm(vm);
}
int main() {
test1();
test2();
test3();
test4();
return 0;
}
```
參考的程式執行輸出如下: (預期「不會」觸發 assertion)
```
test1
test2
test3
test4
```
請補完程式碼,使 GC 符合預期行為。
### 程式說明
之所以要做 Garbage collection 的原因主要是因為記憶體有限,再加上 programmer 有時會忘記釋放動態配置變數的記憶體資源,所以定期或不定期的去做 garbage collect,讓那些不會再被使用到的資源得以釋放。
那何謂『使用中』的資源?我們對此的定義如下:
1. 任何被在 scope 內的變數參考到的物件 或是
2. 任何被另一個正在使用中的物件參考到的物件
只要滿足上述兩點的任一點,即可認定此物件為正在使用,因此不會被 GC 釋放。
#### objects
首先,我們先訂定物件的類型: ints 以及 pairs,其中 pairs 可以是兩個 ints、一個 int 加上另外一對 pair,抑或是兩對 pairs。
```c
typedef enum { OBJECT_TYPE_INT, OBJECT_TYPE_PAIR } ObjectType;
```
因為在 VM 中物件的類型一定是兩種其中一種,因此可以利用 tagged union 來實作物件的結構 (struct)。
```c
typedef struct sObject {
ObjectType type;
union {
int value;
struct { struct sObject *head, *tail; };
};
} Object;
```
#### virtual machine
virtual machine 在此的角色為提供一個 stack 讓那些目前在 scope 內的變數儲存,來模擬實際上使用記憶體空間的樣子。
先建構 VM 的基本結構:
```c
#define STACK_MAX 256
typedef struct {
size_t stack_size;
Object *stack[STACK_MAX];
} VM;
```
接著需要一個建立及初始化 VM 的函式:
```c
VM* newVM() {
VM *vm = malloc(sizeof(VM));
assert("VM allocation failed" && vm);
if (vm) {
vm->stack_size = 0;
}
return vm;
}
```
一旦我們有了 VM 後,我們就能夠對 VM 做一些操作,像是 push、pop:
```c
void vm_push(VM *vm, Object *value) {
assert("stack overflow" && vm->stack_size < STACK_MAX);
vm->stack[vm->stack_size++] = value;
}
Object *vm_pop(VM *vm) {
assert("stack underflow" && vm->stack_size > 0);
return vm->stack[--vm->stack_size];
}
```
接下來我們可以建立一些物件,並將這些物件存入 VM:
```c
Object *new_object(VM *vm, ObjectType type) {
Object *obj = malloc(sizeof(Object));
assert("Object allocation failed" && obj);
if (obj) {
obj->type = type;
}
return obj;
}
Object *vm_push_int(VM *vm, int value) {
Object *obj = new_object(vm, OBJECT_TYPE_INT);
if (obj) {
obj->value = value;
vm_push(vm, obj);
}
return obj;
}
Object *vm_push_pair(VM *vm) {
Object *obj = new_object(vm, OBJECT_TYPE_PAIR);
if (obj) {
obj->tail = vm_pop(vm);
obj->head = vm_pop(vm);
vm_push(vm, obj);
}
return obj;
}
```
#### mark
在 mark 階段,我們需要走遍所有可到達的物件,並設定其 mark bit 為 1。因此,第一件事要新增 mark bit 到物件的結構中:
```c
typedef struct sObject {
unsigned char mark; /* zero: unreached, non-zero: retained */
...
} Object;
```
需隨之更動的還有在建立新的物件時,需將此位元初始化為 `0`。
> 我們在設計 Object 這個 structure 的時候,可以更進一步考慮 ` Unaligned Memory Access `的議題。透過注意 structure 中 fields 排列,能夠讓程式更有效率。
> 參考 [quiz2](https://hackmd.io/xfsLDF6gTRu8hkSk6by4MQ#Unaligned-Memory-Access)
> 參考 [kernel.org/Unaligned-Memory-Accesses](https://www.kernel.org/doc/Documentation/unaligned-memory-access.txt)
> [name=Julian Fang]
:::success
:point_right: 感謝 `Julian Fang` 同學的建議,修正 `sObject` 結構中 fields 的排列:
```c
typedef struct sObject {
union {
int value;
struct { struct sObject *head, *tail; };
};
struct sObject *next;
ObjectType type;
unsigned char mark;
} Object;
```
並利用 GDB 檢驗是否存在 unaligned memory access 的情況發生:

我們發現每個 fields 皆滿足 natural alignment,因此無 unaligned memory access。
:::
```c
Object *new_object(VM *vm, ObjectType type) {
Object *obj = malloc(sizeof(Object));
assert("Object allocation failed" && obj);
if (obj) {
obj->mark = 0; /* here */
obj->type = type;
}
return obj;
}
```
新增完後,就可以去標記所有走得到的物件,也就是說從第一個物件開始走訪 stack:
```c
static void gc_mark_all(VM *vm) {
for (size_t i = 0; i < vm->stack_size; ++i)
gc_mark(vm->stack[i]);
}
```
接著裡頭會呼叫 `gc_mark` 函式。除了要將目前這個物件標示為 marked,還需要考慮此物件是否參考其他物件,所以若此物件的類型是 `OBJECT_TYPE_PAIR`,那麼就需要遞迴地標記其參考的物件。
此外,要注意的是如果存在兩物件互相參考 (形成 loop),而且沒有特別去處理這種情況的話,會導致遞迴無法終止,進而造成 stack overflow。因此,需加上限制 (終止) 條件,也就是說如果此物件已標示過,那麼直接 return。
```c
static void gc_mark(Object *obj) {
if (obj->mark)
return; /* for recursive reference */
obj->mark = 1; /* tri-color: black objects */
if (obj->type == OBJECT_TYPE_PAIR) {
gc_mark(obj->head);
gc_mark(obj->tail);
}
}
```
#### sweep
標記完所有可到達的物件後,即可釋放那些未被標記的物件。但是現在有一個問題是: 那些未標記的物件本身就不可到達,那我們該如何釋放他們?
其中一個辦法是 VM 自己維護一個 linked list ,裡頭紀錄所有曾經被配置記憶體的物件,所以修改物件的結構:
```c
typedef struct sObject {
unsigned char mark;
struct sObject *next; /* the next object chained to it */
...
} Object;
```
VM 也需要紀錄 linked list 的開頭:
```c
typedef struct {
Object *first_object;
...
} VM;
```
在建立新的物件時,也需要更新此 linked list:
```c
Object *new_object(VM *vm, ObjectType type) {
...
if (obj) {
...
obj->next = vm->first_object;
vm->first_object = obj;
}
return obj;
}
```
如此一來,可以透過走訪 linked list 上的所有物件,釋放那些未被標記 (mark==0) 的物件:
```c
static void gc_sweep(VM *vm) {
Object **obj = &(vm->first_object);
while (*obj) {
if (!(*obj)->mark) {
Object *unreached = *obj; /* tri-color: white objects */
/* first_object / previous->next = unreached->next */
*obj = unreached->next;
free(unreached);
} else {
(*obj)->mark = 0;
obj = &(*obj)->next;
}
}
}
```
最後,將 `gc_mark_all` 函式跟 `gc_sweep` 函式包在一個函式 `gc` 中,因此呼叫 `gc` 即可。
```c
void gc(VM *vm) {
gc_mark_all(vm);
gc_sweep(vm);
}
```
那我們現在有 GC 的實作了,何時該呼叫此函式?
這裡沒有所謂絕對的時間點,主要還是取決於使用者打算讓這個 VM 達到什麼目的,以及讓它跑在什麼樣的硬體上。為了說明簡單,我們設定只要經過某特定次數的 allocation 後,就會觸發 GC。
因此,需要在 VM 的結構宣告兩個變數,一個是紀錄目前 VM 有幾個物件,另一個則紀錄呼叫 GC 所需的物件數。
```c
typedef struct {
...
size_t object_num, object_max;
...
} VM;
```
並在 `newVM()` 初始化這些變數:
```c
#define GC_INITIAL_THRESHOLD 8
VM *new_vm() {
...
if (vm) {
...
vm->object_num = 0;
vm->object_max = GC_INITIAL_THRESHOLD;
}
return vm;
}
```
建立新的物件時,需要增加 VM 的 `object_num`。因此,`AAA = ++vm->object_num`。
```c
Object *new_object(VM *vm, ObjectType type) {
...
if (obj) {
...
++vm->object_num;
}
return obj;
}
```
同理,在刪除物件時也需要減少 VM 的 `object_num`。因此,`BBB = --vm->object_num`。
```c
static void gc_sweep(VM *vm) {
Object **obj = &(vm->first_object);
while (*obj) {
if (!(*obj)->mark) {
...
--vm->object_num; /* here */
} else {
(*obj)->mark = 0;
obj = &(*obj)->next;
}
}
}
```
最後,每執行完一次 GC 會更新一次 `object_max`:
```c
void gc(VM *vm) {
gc_mark_all(vm);
gc_sweep(vm);
/* adjust GC threshold */
vm->object_max = vm->object_num ? vm->object_num * 2 : GC_INITIAL_THRESHOLD;
}
```
在執行輸出預期「不會」觸發 assertion的情況下,`CCC` 及 `DDD` 就只是去計算 VM 清理前有幾個可到達的物件而已,因此 `CCC=7`, `DDD=4`。
### 延伸問題
#### 1. 指出上述程式碼不足和實作錯誤之處
- 那些 non-freed 物件在 sweep 階段需要重新設定其 `mark`,以供下一次 mark 階段使用。
- 修改:
- 將記錄物件是否被標示 `mark` 的型態從原本的 unsigned char 改成 usigned int。
- 使用無號整數 `round` 來紀錄第幾次的 GC。
- 在第 `round` 次 GC 後新增的物件,其 `mark` = `round`。
- 在 sweep 階段只要經過某物件,則遞增此物件的 `mark`,不過最多遞增一次 (考慮到物件間的遞迴參考)。
- 藉由檢查物件的 `mark` 是否與 `round` 相同來判斷該物件是否可到達。
- 如此一來,那些 non-freed 物件就不需要重新設定其 `mark`,省去一個操作。
> 參考 [babys-first-garbage-collector](http://journal.stuffwithstuff.com/2013/12/08/babys-first-garbage-collector/) 底下 `gasche` 所提出的方法。
> 針對 reset mark 的部份,可能要留意空間跟時間的 Trade off。每個物件所需要的標記空間成長,從 1 byte 變成 4 bytes,並且可以遇見錯誤的發生。
> 使用 garbage collection 的程式有一個目標是長期運行,使用一個 unsigned int 取代 unsigned char ,可能是一個立竿見影減少 reset 動作的方法,但在長期之下,可以預見錯誤的發生。(試想一個大型的程式,累積新增/刪除 4,294,967,295 個物件是有可能的)
> [name=Julian Fang]
:::success
:point_right: 雖然 `round = 4,294,967,295` 的下一輪其值就會因為 overflow 變回 `0`,但我認為這不會影響 GC 標記物件的正確性,只要物件的 `mark` 不等於當前 `round` 就是代表走不到,因此就需要被清除。
:::
- 每次 mark 時,需要暫停程式。
- Sol: tri-color algo.
#### 2. 針對 [Tri-color](https://en.wikipedia.org/wiki/Tracing_garbage_collection#Tri-color_marking) 演算法,改進上述程式碼,使得符合演算法設計
上面已提過 tri-color 演算法的基本概念,這邊提供 tri-color 演算法的 pseudo code:
```
Mark:
all objects are initialized to WHITE
color all objects in the root set (local, global variables) GRAY
while there exits GRAY objects do
for each GRAY object (say x) do
for each WHITE object (say y) referenced by x
color y GRAY
end for
if all edges from x lead to no WHITE objects
color x BLACK
end if
end for
end while
```
```
Sweep:
release all WHITE objects
```
相關的程式碼請至 [github](https://github.com/JimmyLiu0530/NCKU-sysprog2020q3-quiz14)。
> 針對 Tri-color 的版本,我們應該嘗試將 Mutator 及 GC 分為兩個不同的 Thread 才能讓實驗更加貼近現實。
> 在新增物件時,透過查詢 GC 的狀態來決定 Mutator 新增物件的標記,而非以定值的方式實作,能更好的驗證 Tri-color 演算法的實作。
> ```clike
> static void gc_mark_all(VM *vm) {
> /* add new objects during GC, and color them gray */
> vm_push_int(vm, 5, 'g'); vm_push_int(vm, 6, 'g');
> vm_push_pair(vm, 'g');
> ```
> 可以嘗試修改。
> 總結與延伸 GC 部份,這份實作有完整解釋原本程式碼的原理。並且有實作基於原本程式碼的 Tri-color 版本。
>
> 這份程式碼可以了解 GC 的原理。實際上我們在探討 GC 的時候,可能會需要包裝實作 GC 版本的 malloc, calloc 等等實作,透過替換或是 overload 的手法。
> 也要考慮 GC 的實作原則,以支援 C 語言的 GC 為例:
> 以 Conservative 保守原則實作,會將符合指標大小的變數假設為指標,並嘗試找尋其指向的物件。有機會導致不用的物件被留下。
> 以 Precise 精準原則實作,只將 static type 為指標的變數視為指標,會更加精確。但同時限制 C 語言的行為。
> [name=Julian Fang]
---------------------------------------------------------
## 測驗3: Gap Buffer
[Gap Buffer](https://en.wikipedia.org/wiki/Gap_buffer) 是種動態陣列的實作方式,廣泛用於文字編輯器一類的程式。其手法是將「空白」(gap, 指字串沒有填滿緩衝區的部分) 移動到緩衝區中間,如下圖:

當我們執行插入或刪除動作時,緩衝區中的 gap 會隨之移動,而移動的方法是將 gap 其中一邊的文字複製到另一邊去。例如,下面一句話中,初始情況下空白在緩衝區的最後:
```
This is a smple txt.[ ]
```
> 這裡我們使用中括號 (即 ==[ ]==) 表示空白。
當我們想要在 `smple` 中插入 `a` 字元時,編輯器首先把空白移動到 `s` 後面:
```
This is a s[ ]mple txt.
```
然後在 `s` 後面插入 `a`:
```
This is a sa[ ]mple txt.
```
若我們想在 `txt` 中插入一個 `e`,則需要同樣的步驟:
```
This is a sample t[ ]xt.
This is a sample te[ ]xt.
```
這種方法所基於的假設是,編輯文本時通常為連續接受輸入 (即新增、刪除的操作都發生在附近),其他時間則較少更動。因為如果這些操作發生距離太遠, 會使需要複製的文字增加,降低效率。
部分 Emacs 變種使用 Gap Buffer,包括古老的 [Emacs on TECO](https://www.emacswiki.org/emacs/TecoEmacs)、現代的 [GNU/Emacs](https://www.gnu.org/software/emacs/) 及早期 [Gosling Emacs](https://en.wikipedia.org/wiki/Gosling_Emacs) (Java 之父 James Gosling 在 1981 年用 C 語言撰寫的 Emacs 編輯器,後來 Richard Stallman 取用部分程式碼打造出 GNU Emacs),和 [Scintilla](https://www.scintilla.org/) (包括 [Code::Blocks](http://www.codeblocks.org/) 許多整合開發環境裡頭使用的程式碼編輯器元件) 也使用 Gap Buffer。某些 Emacs 版本改用 [Linked Line](http://web.mit.edu/~yandros/doc/craft-text-editing/Chapter-6.html)。
一個實作案例:假設文字編輯器的編輯區已有 `Hi, world!` 字串,然後游標 (cursor) 在 `,` 前面,我們用下方表示法:
```
Hi<cursor>, world!。
```
gap buffer 會先建立下方的陣列,在此我們假設 gap 的長度是 4 且僅有一個 (事實上可能有不少這種 gap),`\xx` 表示 ASCII 編碼為 16 進位 xx 的字元:
```
[0] [1] [2] [3] [4] [5] [6] [7] [8] [9] [a] [b] [c] [d]
'H' 'i' \00 \00 \00 \00 ',' ' ' 'w' 'o' 'r' 'l' 'd' '!'
```
當使用者刪去一個字元後,變成這樣:
```
[0] [1] [2] [3] [4] [5] [6] [7] [8] [9] [a] [b] [c] [d]
'H' \00 \00 \00 \00 \00 ',' ' ' 'w' 'o' 'r' 'l' 'd' '!'
```
使用者輸入 `ello`,變成這樣:
```
[0] [1] [2] [3] [4] [5] [6] [7] [8] [9] [a] [b] [c] [d]
'H' 'e' 'l' 'l' 'o' \00 ',' ' ' 'w' 'o' 'r' 'l' 'd' '!'
```
然後使用者右移游標,變成這樣:
```
[0] [1] [2] [3] [4] [5] [6] [7] [8] [9] [a] [b] [c] [d]
'H' 'e' 'l' 'l' 'o' ',' \00 ' ' 'w' 'o' 'r' 'l' 'd' '!'
```
需要注意的是,當遇到緩衝區填滿的情況,需要重新配置記憶體再複製資料內容,所以 gap buffer 對於大檔案的處理會有效率疑慮。
走訪上述的編輯過程:
```
Hi<cursor>[ ], world!
H<cursor>[ ], world!
Hello<cursor>[ ], world!
Hello,<cursor>[ ] world!
```
考慮以下 Gap Buffer 實作程式碼:
```c=
#include <stdlib.h>
#include <limits.h>
#include <stdio.h>
#include <string.h>
#include <unistd.h>
typedef struct {
char *buf;
size_t size;
size_t lb, rb;
} gapbuf_buffer_t;
typedef enum {
GAPBUF_SUCCESS = 0,
GAPBUF_ENOMEM, /* Out of memory */
GAPBUF_ERANGE, /* Range error */
GAPBUF_EARG, /* Invalid argument */
GAPBUF_EMAX /* Max error number */
} gapbuf_error_t;
gapbuf_error_t gapbuf_insert(gapbuf_buffer_t *gb,
const char *buf,
const size_t n);
gapbuf_error_t gapbuf_delete(gapbuf_buffer_t *gap, size_t n);
/* Calculates the capacity of the gap buffer given a requested size. */
static size_t _gapbuf_calc_buf_capacity(const size_t n)
{
size_t v = n - 1;
v |= v >> 1;
v |= v >> 2;
v |= v >> 4;
v |= v >> 8;
v |= v >> 16;
#if (__WORDSIZE == 64)
v |= v >> 32;
#endif
v++;
return v;
}
/**
* Grows the buffer such that `n` more characters fit in the gap.
*
* The functions tests if adding `n` chars to the buffer would
* overflow and then reallocates buffer capacity if necessary.
*
* @param gap Pointer to the gap buffer instance.
* @param n The additional number of chars to provision for.
*
* @return Nonzero on any failure. Consult `errno`.
*/
static int _gapbuf_provision_buf_capacity(gapbuf_buffer_t *gap, const size_t n)
{
/* check if we need to extend the size of the buffer */
if (gap->lb + n >= gap->rb) {
/* allocate new buffer */
size_t new_siz = _gapbuf_calc_buf_capacity(gap->size + n);
char *new_buf;
if (!(new_buf = malloc(new_siz)))
return -1; /* ENOMEM */
/* copy contents */
size_t new_rb = K333 - gap->size;
size_t rlen = gap->size - K444;
if (gap->buf) {
memcpy(new_buf, gap->buf, gap->lb);
memcpy(new_buf + new_rb, gap->buf + gap->rb, rlen);
}
/* update gap buffer struct */
char *tmp = gap->buf;
gap->buf = new_buf;
gap->rb = new_rb;
gap->size = new_siz;
free(tmp);
}
return 0;
}
gapbuf_error_t gapbuf_alloc(gapbuf_buffer_t **gb,
const char *content,
const size_t len)
{
if (!(*gb = malloc(sizeof(gapbuf_buffer_t))))
return GAPBUF_ENOMEM;
(*gb)->size = 0;
(*gb)->lb = 0, (*gb)->rb = 0;
(*gb)->buf = NULL;
K111;
return GAPBUF_SUCCESS;
}
gapbuf_error_t gapbuf_free(gapbuf_buffer_t *gb)
{
if (gb) {
free(gb->buf);
free(gb);
}
return GAPBUF_SUCCESS;
}
size_t gapbuf_read(const gapbuf_buffer_t *gb, char *buf, const size_t bufsiz)
{
if (!(gb && buf) || (buf && !bufsiz))
return GAPBUF_EARG;
/* copy lhs */
size_t lsiz = gb->lb;
size_t n = (bufsiz < lsiz) ? bufsiz : lsiz;
memcpy(buf, gb->buf, n);
/* copy rhs */
size_t rsiz = (bufsiz > 0) ? K222 : 0;
n = (n < rsiz) ? n : rsiz;
memcpy(buf + gb->lb, gb->buf + gb->rb, n);
/* terminate string */
size_t total_len = gb->lb + rsiz;
size_t term_index = total_len < bufsiz ? total_len : bufsiz;
buf[term_index] = '\0';
return term_index;
}
gapbuf_error_t gapbuf_insert(gapbuf_buffer_t *gb,
const char *buf,
const size_t n)
{
if (!(gb && buf))
return GAPBUF_EARG;
if (_gapbuf_provision_buf_capacity(gb, n) != 0)
return GAPBUF_ENOMEM;
memcpy(gb->buf + gb->lb, buf, n);
gb->lb += n;
return GAPBUF_SUCCESS;
}
gapbuf_error_t gapbuf_delete(gapbuf_buffer_t *gb, size_t n)
{
if (n > gb->lb) /* cannot move beyond left boundary */
return GAPBUF_ERANGE;
gb->lb -= n;
return GAPBUF_SUCCESS;
}
gapbuf_error_t gapbuf_fwd(gapbuf_buffer_t *gb, size_t n)
{
if (n + gb->rb > gb->size)
return GAPBUF_ERANGE;
memmove(gb->buf + gb->lb, gb->buf + gb->rb, n);
gb->lb += n;
gb->rb += n;
return GAPBUF_SUCCESS;
}
gapbuf_error_t gapbuf_rwd(gapbuf_buffer_t *gb, size_t n)
{
if (n > gb->lb)
return GAPBUF_ERANGE;
memmove(gb->buf + gb->rb - n, gb->buf + gb->lb - n, n);
gb->lb -= n;
gb->rb -= n;
return GAPBUF_SUCCESS;
}
#define my_assert(test, message) \
do { \
if (!(test)) \
return message; \
} while (0)
#define my_run_test(test) \
do { \
char *message = test(); \
tests_run++; \
if (message) \
return message; \
} while (0)
int tests_run = 0;
static char *test_gapbuf_alloc_happy_path()
{
printf("%s... ", __func__);
char *expected = "0123456789";
gapbuf_buffer_t *gap;
my_assert(gapbuf_alloc(&gap, expected, strlen(expected)) == GAPBUF_SUCCESS,
"Could not allocate buffer");
my_assert(gap->size == 16, "Unexpected allocation size");
char data[32];
size_t n = gapbuf_read(gap, data, 32);
data[n] = '\0';
gapbuf_free(gap);
my_assert(strncmp(expected, data, n) == 0,
"Initialization string is not consistent");
printf("OK\n");
return 0;
}
static char *test_gapbuf_alloc_zero_length()
{
printf("%s... ", __func__);
gapbuf_buffer_t *gap;
my_assert(gapbuf_alloc(&gap, "", 0) == GAPBUF_SUCCESS,
"Could not allocate empty buffer");
my_assert(gap, "Empty buffer allocation failed");
my_assert(gap->size == 0, "Unexpected allocation size");
my_assert(gapbuf_insert(gap, "asdf", 4) == GAPBUF_SUCCESS,
"Could not insert into empty buffer");
char data[8];
size_t n = gapbuf_read(gap, data, 8);
my_assert(strncmp("asdf", data, n) == 0, "String inconsistency");
gapbuf_free(gap);
printf("OK\n");
return 0;
}
static char *test_gapbuf_read_into_insufficient_buffer()
{
printf("%s... ", __func__);
gapbuf_buffer_t *gap;
my_assert(gapbuf_alloc(&gap, "0123456789", 10) == GAPBUF_SUCCESS,
"Could not allocate buffer");
char too_short[4];
size_t n = gapbuf_read(gap, too_short, 4);
my_assert(strncmp("0123456789", too_short, n) == 0,
"String inconsistency for short buffer");
printf("OK\n");
return 0;
}
static char *test_suite()
{
my_run_test(test_gapbuf_alloc_happy_path);
my_run_test(test_gapbuf_alloc_zero_length);
my_run_test(test_gapbuf_read_into_insufficient_buffer);
return 0;
}
int main()
{
char *result = test_suite();
if (result != 0) {
printf("%s\n", result);
} else {
printf("ALL TESTS PASSED\n");
}
printf("Tests run: %d\n", tests_run);
return result != 0;
}
```
參考的執行輸出如下:
```
test_gapbuf_alloc_happy_path... OK
test_gapbuf_alloc_zero_length... OK
test_gapbuf_read_into_insufficient_buffer... OK
ALL TESTS PASSED
Tests run: 3
```
請參照程式碼註解,補完程式碼。
### 程式說明
#### 答案討論
我認為 `K222 = gb->size - gb->rb`, `K333 = gap->rb + new_size` 以及 `K444 = gap->rb`。
> 答案給 K222 = gb->size - gb->rb - 1, K333 = gap->lb + new_size 以及 K444 = (gap->rb + 1)。
**說明**:
因為顯然 `lb`、`rb` 用來記錄 gap 的起始、終止位置,那麼就會有下列四種可能,以下面例子為例:
```
[0] [1] [2] [3] [4] [5] [6] [7] [8] [9] [a] [b] [c] [d]
'H' 'i' \00 \00 \00 \00 ',' ' ' 'w' 'o' 'r' 'l' 'd' '!'
```
1. `lb` = `1`, `rb` = `5`
2. `lb` = `1`, `rb` = `6`
3. `lb` = `2`, `rb` = `5`
4. `lb` = `2`, `rb` = `6`
在 `_gapbuf_provision_buf_capacity` 函式中,考慮此函式中部分程式碼:
```c
if (gap->buf) {
memcpy(new_buf, gap->buf, gap->lb);
memcpy(new_buf + new_rb, gap->buf + gap->rb, rlen);
}
```
我們可由第二行推敲出 `gap->lb` 代表 gap 左邊 buffer 的大小,因此不可能是 1. 跟 2.。
根據第三行欲將 gap 右邊的 buffer 整個複製到新的 buffer,所以 `gap->buf + gap->rb` 會指到 gap 右邊 buffer 的起始位置,也就是說 `gap->rb` 為 gap 右邊 buffer 第一個字元的索引 (index),因此不會是 1. 跟 3.
綜合上述的推論,唯一有可能的就是第 4 種,也就是說 `lb` 指向左邊 buffer 最後一個字元的下一個,`rb` 則指向右邊 buffer 第一個字元。既然如此,`rlen` 應為 `gap->size - gap->rb`。
至於我認為 `new_rb` 應為 `rb + new_siz - gap->size` 的原因是因為 gap 右邊 buffer 新的起始位置 (`new_rb`) 應該會是原本的起始位置 (`rb`) 加上這次新增多少空間給 gap (`new_siz - gap->size`)。
不過,另我不解的是實際去執行這兩種答案都能得到成功的結果?
> 已補充解釋在最下方。
經過老師的提點後,試著利用 `valgrind` 工具來找出問題點。(程式碼都有上傳到 github)
首先,先針對我認為的答案作測試:
```shell
$ gcc -o gapBuffer2 -g gapBuffer2.c
$ valgrind -q --leak-check=full ./gapBuffer2
```
輸出結果:
```
test_gapbuf_alloc_happy_path... OK
test_gapbuf_alloc_zero_length... OK
test_gapbuf_read_into_insufficient_buffer... OK
ALL TESTS PASSED
Tests run: 3
==10944== 48 (32 direct, 16 indirect) bytes in 1 blocks are definitely lost in loss record 2 of 2
==10944== at 0x483B7F3: malloc (in /usr/lib/x86_64-linux-gnu/valgrind/vgpreload_memcheck-amd64-linux.so)
==10944== by 0x109418: gapbuf_alloc (gapBuffer2.c:85)
==10944== by 0x109A74: test_gapbuf_read_into_insufficient_buffer (gapBuffer2.c:219)
==10944== by 0x109B52: test_suite (gapBuffer2.c:233)
==10944== by 0x109B8F: main (gapBuffer2.c:239)
==10944==
```
根據產生的報告回朔至 `test_gapbuf_read_into_insufficient_buffer` 函式,原來是忘記手動釋放 gap buffer 的記憶體資源,造成總共 48 bytes 的記憶體洩漏。因此,新增釋放記憶體的程式碼到該函式即可解決此問題,如下所示:
```c
static char *test_gapbuf_read_into_insufficient_buffer()
{
printf("%s... ", __func__);
gapbuf_buffer_t *gap;
my_assert(gapbuf_alloc(&gap, "0123456789", 10) == GAPBUF_SUCCESS,
"Could not allocate buffer");
char too_short[4];
size_t n = gapbuf_read(gap, too_short, 4);
my_assert(strncmp("0123456789", too_short, n) == 0,
"String inconsistency for short buffer");
gapbuf_free(gap); /* here */
printf("OK\n");
return 0;
}
```
所以大致上看起來我認為的答案似乎無誤。再來就是測驗原本答案的版本:
```shell
$ gcc -o gapBuffer1 -g gapBuffer1.c
$ valgrind -q --leak-check=full ./gapBuffer1
```
輸出結果:
```
==13418== Invalid read of size 2
==13418== at 0x4842B30: memmove (in /usr/lib/x86_64-linux-gnu/valgrind/vgpreload_memcheck-amd64-linux.so)
==13418== by 0x1095C2: gapbuf_read (gapBuffer1.c:114)
==13418== by 0x1098BF: test_gapbuf_alloc_happy_path (gapBuffer1.c:188)
==13418== by 0x109B1E: test_suite (gapBuffer1.c:231)
==13418== by 0x109BAF: main (gapBuffer1.c:239)
==13418== Address 0x4a554f0 is 0 bytes after a block of size 16 alloc'd
==13418== at 0x483B7F3: malloc (in /usr/lib/x86_64-linux-gnu/valgrind/vgpreload_memcheck-amd64-linux.so)
==13418== by 0x10930D: _gapbuf_provision_buf_capacity (gapBuffer1.c:62)
==13418== by 0x109652: gapbuf_insert (gapBuffer1.c:129)
==13418== by 0x10949C: gapbuf_alloc (gapBuffer1.c:90)
==13418== by 0x109880: test_gapbuf_alloc_happy_path (gapBuffer1.c:184)
==13418== by 0x109B1E: test_suite (gapBuffer1.c:231)
==13418== by 0x109BAF: main (gapBuffer1.c:239)
==13418==
==13418== Invalid read of size 2
==13418== at 0x4842B3F: memmove (in /usr/lib/x86_64-linux-gnu/valgrind/vgpreload_memcheck-amd64-linux.so)
==13418== by 0x1095C2: gapbuf_read (gapBuffer1.c:114)
==13418== by 0x1098BF: test_gapbuf_alloc_happy_path (gapBuffer1.c:188)
==13418== by 0x109B1E: test_suite (gapBuffer1.c:231)
==13418== by 0x109BAF: main (gapBuffer1.c:239)
==13418== Address 0x4a554f4 is 4 bytes after a block of size 16 alloc'd
==13418== at 0x483B7F3: malloc (in /usr/lib/x86_64-linux-gnu/valgrind/vgpreload_memcheck-amd64-linux.so)
==13418== by 0x10930D: _gapbuf_provision_buf_capacity (gapBuffer1.c:62)
==13418== by 0x109652: gapbuf_insert (gapBuffer1.c:129)
==13418== by 0x10949C: gapbuf_alloc (gapBuffer1.c:90)
==13418== by 0x109880: test_gapbuf_alloc_happy_path (gapBuffer1.c:184)
==13418== by 0x109B1E: test_suite (gapBuffer1.c:231)
==13418== by 0x109BAF: main (gapBuffer1.c:239)
==13418==
test_gapbuf_alloc_happy_path... term index is 9
OK
==13418== Invalid read of size 1
==13418== at 0x4842A39: memmove (in /usr/lib/x86_64-linux-gnu/valgrind/vgpreload_memcheck-amd64-linux.so)
==13418== by 0x1095C2: gapbuf_read (gapBuffer1.c:114)
==13418== by 0x1099EE: test_gapbuf_alloc_zero_length (gapBuffer1.c:208)
==13418== by 0x109B48: test_suite (gapBuffer1.c:232)
==13418== by 0x109BAF: main (gapBuffer1.c:239)
==13418== Address 0x4a55594 is 0 bytes after a block of size 4 alloc'd
==13418== at 0x483B7F3: malloc (in /usr/lib/x86_64-linux-gnu/valgrind/vgpreload_memcheck-amd64-linux.so)
==13418== by 0x10930D: _gapbuf_provision_buf_capacity (gapBuffer1.c:62)
==13418== by 0x109652: gapbuf_insert (gapBuffer1.c:129)
==13418== by 0x1099C9: test_gapbuf_alloc_zero_length (gapBuffer1.c:205)
==13418== by 0x109B48: test_suite (gapBuffer1.c:232)
==13418== by 0x109BAF: main (gapBuffer1.c:239)
==13418==
test_gapbuf_alloc_zero_length... term index is 3
OK
==13418== Invalid read of size 2
==13418== at 0x4842B30: memmove (in /usr/lib/x86_64-linux-gnu/valgrind/vgpreload_memcheck-amd64-linux.so)
==13418== by 0x1095C2: gapbuf_read (gapBuffer1.c:114)
==13418== by 0x109AB9: test_gapbuf_read_into_insufficient_buffer (gapBuffer1.c:222)
==13418== by 0x109B72: test_suite (gapBuffer1.c:233)
==13418== by 0x109BAF: main (gapBuffer1.c:239)
==13418== Address 0x4a55650 is 0 bytes after a block of size 16 alloc'd
==13418== at 0x483B7F3: malloc (in /usr/lib/x86_64-linux-gnu/valgrind/vgpreload_memcheck-amd64-linux.so)
==13418== by 0x10930D: _gapbuf_provision_buf_capacity (gapBuffer1.c:62)
==13418== by 0x109652: gapbuf_insert (gapBuffer1.c:129)
==13418== by 0x10949C: gapbuf_alloc (gapBuffer1.c:90)
==13418== by 0x109A94: test_gapbuf_read_into_insufficient_buffer (gapBuffer1.c:219)
==13418== by 0x109B72: test_suite (gapBuffer1.c:233)
==13418== by 0x109BAF: main (gapBuffer1.c:239)
==13418==
test_gapbuf_read_into_insufficient_buffer... term index is 4
OK
*** stack smashing detected ***: terminated
已經終止 (核心已傾印)
```
首先,先看第一個 `Invalid read of size 2`,一樣追朔到第 114 行 `memcpy` 非法讀取 2 btyes。此報告又顯示讀取的對象是由此程式第 62 行所配置的 16 bytes 記憶體,也就是用來儲存字串的 gap buffer。因此我打算從第一個測試 `test_gapbuf_alloc_happy_path` 函式開始檢查。
在執行完第 184 行後,gap buffer (gp) struct 內容為:
- `gp->buf` 指向前 10 個元素為 0~9 的字元陣列
- `gp->lb` = 10
- `gp->rb` = 16
- `gp->size` = 16
並且再來會去執行 `gapbuf_read` 函式。
在 `gapbuf_read` 函式中,`bufsiz` = 32。
```c=103
size_t gapbuf_read(const gapbuf_buffer_t *gb, char *buf, const size_t bufsiz)
{
if (!(gb && buf) || (buf && !bufsiz))
return GAPBUF_EARG;
/* copy lhs */
size_t lsiz = gb->lb;
size_t n = (bufsiz < lsiz) ? bufsiz : lsiz;
memcpy(buf, gb->buf, n);
/* copy rhs */
size_t rsiz = (bufsiz > 0) ? gb->size - gb->rb - 1 : 0;
n = (n < rsiz) ? n : rsiz;
memcpy(buf + gb->lb, gb->buf + gb->rb, n);
/* terminate string */
size_t total_len = gb->lb + rsiz;
size_t term_index = total_len < bufsiz ? total_len : bufsiz;
printf("term index is %zu\n", term_index);
buf[term_index] = '\0';
return term_index;
}
```
在 copy lhs 的部份,變數的值如下列所示:
- `lsiz` = `gb->lb` = 10
- `n` = (bufsiz < lsiz) ? bufsiz : lsiz = 10
在 copy rhs 的部份,變數的值如下列所示:
- `rsiz` = `gb->size` - `gb->rb` - 1 = -1
- `n` = (n < rsiz) ? n : rsiz = -1
然而當我們接著執行第 114 行的 `memcpy` 時,此時的 `n` 值為 `-1`,所以使 `memcpy` 變成 undefined behavior。
同樣的,第二及第三個 test 也會有這樣的狀況。因此,此答案有誤。
此外,錯誤訊息還包含 [Stack Smashing](https://stackoverflow.com/questions/1345670/stack-smashing-detected):
> Stack Smashing here is actually caused due to a protection mechanism used by gcc to detect buffer overflow errors.
簡單來說,Stack Smashing 是一種當分配空間不足時,程式仍繼續執行,但是在程式結束後才會出現的錯誤提示。
我認為這可能是上述 undefined bevavior 造成的問題,畢竟我們不清楚到底那個 `memcpy` 會做什麼事,因此極有可能造成 buffer overflow。
順帶一提,原本答案的程式跑出來的結果之所以會正確嚴格來說並非真正的正確,而是因為 `gapbuf_read` 回傳的 `term_index` 剛好把錯誤的地方截掉。
以第一個測試 `test_gapbuf_alloc_happy_path` 來說,執行完 `gapbuf_read` 函式後,`data` 應為 "0123456789",但卻得到 "012345678",照理來說,`expected` 跟 `data` 做字串比較不應得到 0,之所以能得到 0 是因為 `gapbuf_read` 回傳 `9`,也就是說 `expected` 跟 `data` 只會比較前 9 個字元,所以兩者才會相同。
----------------------------------------------------------
#### 函式說明
一個一個函式來說明其功能:
- `_gapbuf_calc_buf_capacity`
- 主要將要求的 buffer size 調整成比該數大的最小 2 的冪次方。
- e.g., 若要求 buffer 大小為 10,則最終會配置大小為 16 的 buffer。
- `_gapbuf_provision_buf_capacity`
- 在做 buffer 的插入之前,會先去執行此函式檢查 gap 空間是否足夠插入此字串
- 若不足,則會呼叫 `_gapbuf_calc_buf_capacity` 計算欲配置的大小。
- 若記憶體空間不足無法配置,則回傳 -1。
- 否則配置之後再將原本 buffer 中 gap 左右兩邊的字串分別複製到新的 buffer 裡,更新 gap buffer 的相關資訊 (e.g., `lb`, `rb`, `size`),釋放原本 buffer 的記憶體資源,並回傳 0。
- 否則,直接回傳 0。
- `gapbuf_alloc`
- 配置一個大小為 `len`,內容為 `content` 的 gap buffer。
- 如果有錯誤,則回傳相對應的錯誤訊息,以供 caller 輸出。
- K111 =
```c
/* 同時要檢查 len 以及 content,
* 為了避免像是測試 2 要求配置一個長度為 0、字串內容為 "" 的 gap buffer。 */
if (content && len) return gapbuf_insert(*gb, content, len)`
```
- `gapbuf_free`
- 釋放 gap buffer 的記憶體資源。
- `gapbuf_insert`
- 將大小為 `n` 的字串`buf` 插入到 gap buffer 的 gap。
- 如同前面提到,一開始會呼叫 `_gapbuf_provision_buf_capacity` 函式,
- 若記憶體不足,無法配置新 buffer,則回傳 `GAPBUF_ENOMEM`。
- 將字串 `buf` 的內容複製到 buffer,並更新其 `lb`,最後回傳 `GAPBUF_SUCCESS` 表示成功。
- `gapbuf_delete`
- 從 buffer 左邊字串的尾端開始刪除,總共刪除 `n` 個字元。
- 因為事實上 gap 中的內容是可以忽略的,因此刪除 `n` 個字元如同將 buffer 的 `lb` 左移 `n`。
- `gapbuf_read`
- 確定 arguments 正確後,左右兩半邊的字串各自複製到 `buf` 中。
- 最後,在 `buf` 的尾端加上 `'\0'`,表示字串的終止。
### 延伸問題
#### 1. 透過 gcc builtins 和硬體指令去改進 `_gapbuf_calc_buf_capacity` 的效能
```c
static size_t _gapbuf_calc_buf_capacity(const size_t n)
{
if (n == 1)
return 1;
int v;
#if (__WORDSIZE == 64)
v = 64 - __builtin_clz(n - 1);
return (1 << v);
#endif
v = 32 - __builtin_clz(n - 1);
return (1 << v);
}
```
#### 2. 以上述程式碼為基礎,開發簡易的文字編輯器
#### 3. 學習 [Mazu-Editor](https://github.com/jserv/mazu-editor) 實作手法,探究其原理