# 01.5-SpringBoot basics-Lesson5 Data Persistence & Security
###### tags: `Udacity`
[ToC]
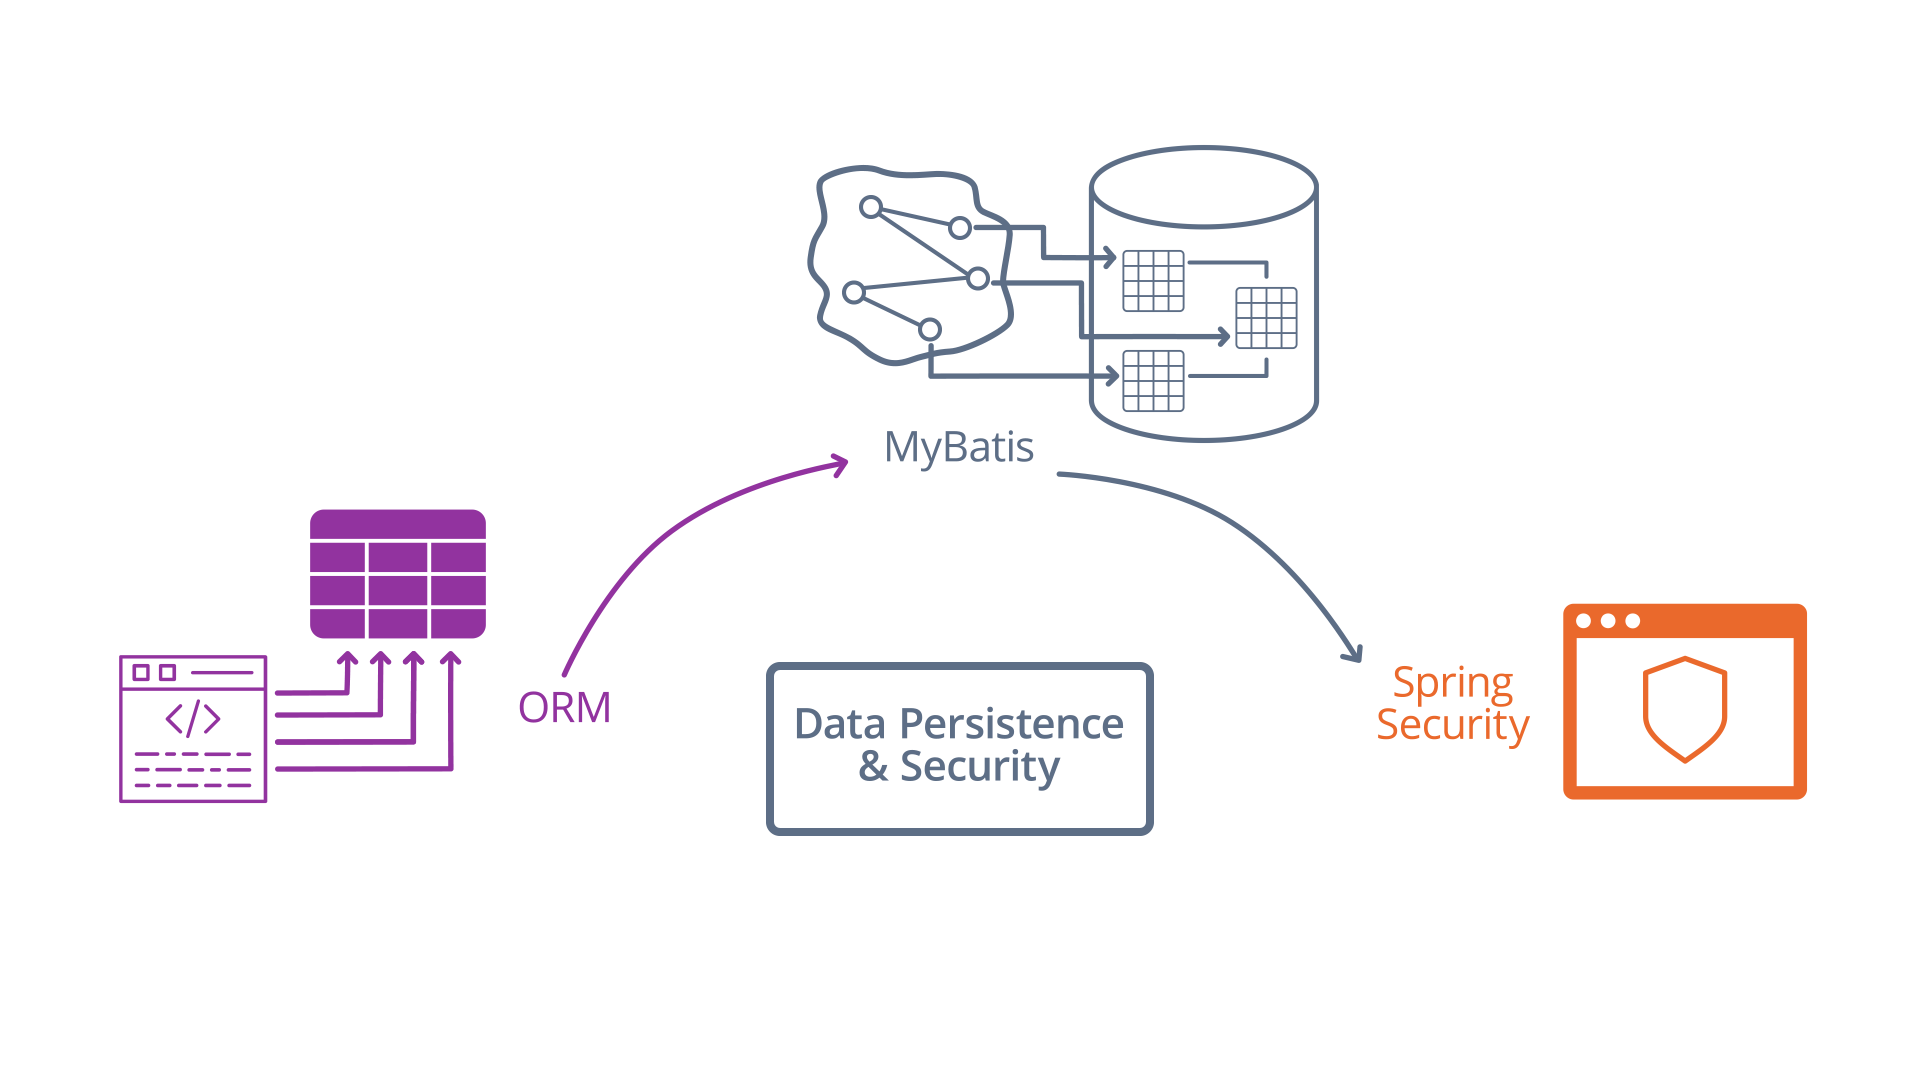
# 1.Data Persistence & Security
{%youtube RwSu3hThoKE %}
The Lesson Outline
Lesson Outline
* **ORM is the Norm**: We introduce ORM, or object-relational-mapping, a software pattern that leverages the similarities between Java classes and SQL tables to eliminate boilerplate in data access code.
* **MyBatis Mappers**: We introduce MyBatis, a dead-simple ORM tool for Java that integrates well with Spring. We discuss the "Mapper" classes MyBatis wants us to design to access the database.
* **Practical Example - User Credentials and Authentication**: As a motivating example for using ORM, we discuss how to implement basic login security with a User table, MyBatis, and Spring Security. We walk through a lengthy sample project that implements the entirety of this motivating example.
==Shannon Note==
>ORM : Object Relational Mapping, 這是一個方式去思考SQL table rows as Java Classes和個別的物件,你會學到如何去設計Java Classes去match data.簡單來說它是一個幫助使用者更簡單 安全的去從資料庫讀取資料,它的特性為透過程式語言去操作資料庫語言
>
>ORM優點:
>1. 安全性: 可以避免SQL injection
>2. 簡化性: 他可以簡化SQL語法
>3. 通用性: 未來如果有資料庫轉移的問題,比較不會遇到要改寫程式的狀況
>
>ORM缺點:
>1. 效能: 因為多了把程式語言轉譯成SQL語言
>2. 學習曲線高: 對初學者來說需要學SQL語法跟程式語言
>3. 複雜查詢維護性低: 就可能會用到原生地SQL語法
>
> Concurrence: two or more events or circumstances happening or existing at the same time.
>
>資料參考: 資料庫設計概念 - ORM https://ithelp.ithome.com.tw/articles/10207752
# 2.Big Picture
{%youtube dk0nqMNfyes %}
The Growing Layers of Our Application

Adding a database to our application is a way to externalize data persistence problems. When storing data in memory at runtime, we struggle to deal with:
* Storage Space
* Concurrency (衝突?)
* Persistence of Data
Using a database allows us to isolate these concerns from the rest of our application, so we can focus on the business logic of our application.
There are many ways to manage the communication between an application and a database. For this course, we'll be using the library MyBatis to transform Java objects to SQL query parameters and to transform SQL query results into Java objects.
We'll create MyBatis Mappers as Spring beans, so we can inject them into any other beans that need them. For example, if we think about an online-shopping example, we might have a UserMapper that manages credentials and profile information and a CartMapper that manages the contents of an individual user's cart. We can inject the UserMapper into a Checkout Service that also receives the CartMapper to apply the charges in a User's cart to that User's stored payment information.
Later in this lesson, we'll combine our MyBatis mappers with Spring Security to authenticate each user's session automatically. To continue our earlier example, this means we could inject the UserMapper in some kind of Authentication Service to check client credentials on login.
>
==Shannon Note==
>JDBC : Java DataBase Connectivity
>* 跟IoC搭配起來不好用
>
>MyBatis: 可以自動地把object轉換到SQL Query Parameters and SQL query Results back into objects.像是insert into users values到Database,又或是透過select * from來取得object裡面的內容
>
>* Onion Archetecture
* 第一層External Request
* 第二層Controller
* 第三層Services
* 第四層Mappers: 主要用object class去代表table的data,然後透過object mapper class去寫query。
>* User Login with Spring Security
* 我們可以透過Spring Security去連接Mapper, 我們就可以告訴透過存在Database裡面的存證去檢查login。
* Spring Security可以自動追蹤users也可以給予user權限
# 3.Intuition
Developing Your Intuition About ORM and Security
{%youtube w3JAmWpBmRM %}
What Data Should be Stored in a Database?
* Data shared across multiple user sessions, like a product inventory
* Persistent data that should remain accessible after being logged out, like user profile or shopping cart
How Should Data be Structured?
* Intuitively. Most data can be stored in a similar format to the data objects that represent it in Java, with attributes matching column names.
* Differing. Some data must be stored differently for security reasons, such as encrypted passwords. Other data may require a different format for efficient storage, such as large files.
Thinking about Security
The main question to ask is: “*What pages can a user access*?”
* User-Specific Data
* Generally Accessible (Unsecured) Data
* May Vary by Domain
# 4.ORM is the Norm
{%youtube p_Oe8ehn2Co %}
The first step in using ORM is to define the data model. Consider the relationship between:
* A User
* Their Shopping Cart
* The Store Inventory
We can represent their relationship in SQL with this image below.
Relationship Between SQL Tables

A primary feature of ORM is that this type of relationship should have a natural mapping to Java classes. We can represent this same data in Java using a simple class diagram.
Class Diagram Corresponding to SQL Tables

The data types of these class attributes correspond to the data types of the SQL columns. Some Java types can be mapped to many different SQL types, and some SQL types can be mapped to multiple Java types, but in this case the type mappings are obvious. For a full list of the MyBatis type mapping, consult the MyBatis 3 TypeHandlers list.
Once you have defined your data types, MyBatis can automatically map Java objects to SQL statements.
ORM Process Visualization

Key Terms
* ORM: Object-Relational Mapping. A general term describing a set of technology that can be used to automatically convert data between database representation and application representation.
* Mapping: Drawing a relationship between a field in a Java class and a column in a SQL table.
* One to One: A relationship between two objects in which one entity is on each side of the relationship.
* Many to Many: A relationship between two objects in which multiple copies of each entity can be related to multiple copies of the other entity.
# 5.Exercise: ORM is the Norm
Welcome to big business! You’ve been hired to implement the data model for a Taco Delivery service. Yum!
The diagram below depicts a relationship between customers, tacos, and deliveries. Each `Customer` can have as many `Order`s as they want. Each `Order` must have one or more entries for `TacoOrder`. The `TacoOrder` entries have a name, price, and count. Lastly, you can optionally schedule each `Order` for a `Delivery`.
**Your job is to make a class for each of these tables**. There should be a `Customer`, `Order`, `TacoOrder`, and `Delivery` class. The variables in the classes should match the variables in the tables.
Taco Delivery Database Diagram

# 6.Solution: ORM is the Norm
{%youtube gjHZVhrRgnA%}
You should have created four classes for this exercise: `Customer`, `Order`, `TacoOrder`, and `Delivery`. These class files should live in a new `data` folder in the `course1` folder. The variables in each class should correspond to the variables in the database tables. Here are some sample implementations:
Customer.java
```typescript
public class Customer {
private Integer id;
private String userName;
private String password;
/* getters and setters not shown */
}
```
Order.java
```typescript
public class Order {
private Integer id;
private Integer customerId;
/* getters and setters not shown */
}
```
TacoOrder.java
```typescript
public class TacoOrder {
private Integer orderId;
private String tacoName;
// this will work here, but you should often use BigDouble for prices
// if you plan to do any math with them
private Double tacoPrice;
private Integer count;
/* getters and setters not shown */
}
```
Delivery.java
```typescript
public class Delivery {
private Integer id;
private Integer orderId;
// there are a few types you can use for this.
// java.sql.Timestamp contains both date and time
private Timestamp time;
/* getters and setters not shown */
}
```
# 7.MyBatis Mappers
{%youtube VE6Iub-0fOI%}
[sample code click here](https://github.com/udacity/nd035-c1-spring-boot-basics-examples/tree/master/udacity-jwdnd-c1-snippets-master/src/main/java/com/udacity/jwdnd/c1/snippets/l4)
MyBatis provides a shallow ORM layer over JDBC (Java Database Connectivity). That means it helps map your Java objects to queries that save and retrieve data using JDBC.
[What is ORM(Object Relational Mapping?](http://blog.twbryce.com/what-is-orm/)
MyBatis is mostly used through interface definitions. MyBatis automatically generates classes that implement the interface and makes them available as Spring beans. This is an example interface that defines a MyBatis Mapper.
```typescript
@Mapper
public interface UserMapper {
@Select("SELECT * FROM USERS WHERE username = #{username}")
User getUser(String username);
}
```
補充: https://codertw.com/%e7%a8%8b%e5%bc%8f%e8%aa%9e%e8%a8%80/410426/
This code uses `#{username}` to identify the username parameter. It's like Thymeleaf parameters, but for SQL!
For more information on the template syntax MyBatis uses for SQL, check out mybatis official documentation.
[mybatis documentation click here](https://mybatis.org/mybatis-3/sqlmap-xml.html#Parameters)
There are additional annotations for @Insert, @Update, and @Delete as well.
See the further research section below the next video for more info on ways to configure MyBatis.
{%youtube 2mdPKfvdNZQ%}
[sample code click here](https://github.com/resisttheurge/udacity-jwdnd-c1-snippets/tree/master/src/main/java/com/udacity/jwdnd/c1/snippets/l4)
The `@Insert` annotation automatically references attributes on the user object. Note username, firstName, lastName are all referenced directly here, because they are attributes of the user object.
```typescript
@Mapper
public interface UserMapper {
@Insert("INSERT INTO USERS (username, salt, password, firstname, lastname) " +
"VALUES(#{username}, #{salt}, #{password}, #{firstName}, #{lastName})")
//設定Primary key是誰
@Options(useGeneratedKeys = true, keyProperty = "userId")
//他會回傳userid, 因此回傳值設定int
int insert(User user);
}
```
This example also demonstrates the `@Options` annotation. `@Insert` normally returns an integer that is the count of rows affected. By using the `@Options` annotation, we're telling MyBatis that we want to automatically generate a new key and put it in userId. Now the method will return the new userId once the row has been inserted.
All we have to do to use these methods is inject beans for this interface into our services and MyBatis will automatically create the code for the JDBC requests!
MyBatis Mappers Lie at the Center of Out Onion Architecture

Key Terms
* `@Select`, `@Insert`, `@Update`, `@Delete`: Annotations representing SQL statements to be executed. Each annotation takes a string for a SQL statement of the corresponding type. For example, a `@Select` annotation takes a string for a SQL SELECT statement.
* `@Options`: Annotation providing access to switches and configuration options for JDBC statements.
Further Research
* For a full list of the available MyBatis annotations and some example usage, see the MyBatis Java API documentation.
* For an informal overview of result mapping with MyBatis annotations, see this Medium article
# 8.Exercise: MyBatis Mappers
Exercise: MyBatis Mappers
Earlier in this lesson we created some classes to help support our burgeoning Taco delivery business. Let’s create a `@Mapper` interface that we can use to create new deliveries once our customer has successfully placed an order. As a reminder, here’s our Delivery class:
```typescript
public class Delivery {
private Integer id;
private Integer orderId;
private Timestamp time;
/* getters and setters not shown */
}
```
You’ll be presented with the DeliveryMapper interface, and it’s your job to declare methods to SELECT, INSERT, and DELETE Delivery records. Annotate each method with the appropriate annotations to perform the Select, Insert, and Delete operations as described here:
* The `findDelivery` (or `select`) method should take the `id` of our `Delivery` class and return the corresponding Delivery object.
* The `insert` method should take a `Delivery` object and create a new record with the `orderId` and `time`. It should generate a new `id` and return that `id`.
* The `delete` method should take an `id` and delete that record from the database. It doesn’t need to return anything.
# 9.Solution:MyBatis Mappers
{%youtube mF50Rvgl6eQ%}
We created three new methods in our interface. In this solution they’re named `findDelivery`, `insert`, and `delete`, but they can be named anything.
```typescript
@Mapper
public interface DeliveryMapper {
@Select("SELECT * FROM Delivery WHERE id = #{id}")
Delivery findDelivery(Integer id);
@Insert("INSERT INTO Delivery (orderId, time) VALUES(#{orderId}, #{time})")
@Options(useGeneratedKeys = true, keyProperty = "id")
Integer insert(Delivery delivery);
@Delete("DELETE FROM Delivery WHERE id = #{id}")
void delete(Integer id);
}
```
The first annotation is a simple `@Select` like we saw earlier in the lesson, and the second annotation is pretty similar to the earlier example as well.
It uses `INSERT` to create a new row in the Delivery table. Note that it only needs to provide the orderId and time values, because the id itself is generated. The `@Options` annotation indicates to generate the key for the `id` property and return it from the method. Also note that our `VALUES` portion of the query just provides orderId and time directly. MyBatis can figure out that they are attributes of our `Delivery` object.
Lastly, `@Delete` is very similar to the `@Select`, but make sure you use the right annotation for it!
==Shannon Note==
>如果id是自己產生的,有設定@Option,在insert的時候就不需寫ID Value,寫了@option就需要寫一個方法來收到新增的delivery id。
>
>如果使用@Delete他的回傳值是void,透過輸入id來執行@delete
```typescript
//用來設定要不要自動產生主key編號
boolean useGeneratedKeys() default false;
//用來表示object屬性為key
String keyProperty() default "";
//用來表示database cloumn為key
String keyColumn() default "";
```
https://youtu.be/MWAX6ppeBoc
# 10.User Credentials
Practical Example: User Credentials and Authentication
{%youtube MWAX6ppeBoc%}
User support is a common feature in web applications, which means that a user can register an account and use credentials to login to the application in the future.
It's important to design databases with the assumption that they will someday be breached, and so we cannot store passwords or other secret credentials in plain text. Two approaches to storing passwords are:
* **Encryption**: Modifying data before storing it, with the intention of using another algorithm to return the data to its original form once it needs to be used.
* **Hashing**: Modifying data before storing with the intention of never returning it to its original form. The modified data will be compared to other modified data only.
Hashing and Encryption should occur in a service dedicated to that purpose, rather than on the front end or in the controller. Remember separation of concerns and our onion architecture! The idea is that all user flows originate externally, travel through a controller, then through one or more services, finally through a data access bean to the database, and then all the way back up the chain. Structuring applications this way makes it easy to follow dependencies and separate concerns, so that's how we're going to build applications from now on.
For a more in-depth discussion of salting and hashing passwords, see the further research section below the videos for this section.
{%youtube SkL2UWkBiH8%}
For the full lecture sample code from this video and the next, [check here](https://github.com/udacity/nd035-c1-spring-boot-basics-examples/tree/master/udacity-jwdnd-c1-l4-spring-security-basics-master)
Below is an example of how to hash user passwords in the database. First, we have the User class and the UserMapper. When our UserService creates a new user, it uses a hashing service to convert the password to a hashed value before saving it.
User.java
```typescript
public class User {
private Integer userId;
private String username;
private String salt;
private String password;
private String firstName;
private String lastName;
/* constructor, getters, and setters omitted */
}
```
UserMapper.java
```typescript
@Mapper
public interface UserMapper {
@Select("SELECT * FROM USERS WHERE username = #{username}")
User getUser(String username);
@Insert("INSERT INTO USERS (username, salt, password, firstname, lastname) VALUES(#{username}, #{salt}, #{password}, #{firstName}, #{lastName})")
@Options(useGeneratedKeys = true, keyProperty = "userId")
int insert(User user);
}
```
Method in UserService.java
```typescript
public int createUser(User user) {
SecureRandom random = new SecureRandom();
byte[] salt = new byte[16];
//產生一個random value
random.nextBytes(salt);
//用Base64 encoder對Salt去加密成一個形式以至於讓我們的hashservice能夠understand
String encodedSalt = Base64.getEncoder().encodeToString(salt);
//然後將加密好的Salt還有密碼透過hashService進行hash
String hashedPassword = hashService.getHashedValue(user.getPassword(), encodedSalt);
//透過userMapper去insert新的帳號
return userMapper.insert(new User(null, user.getUsername(), encodedSalt, hashedPassword, user.getFirstName(), user.getLastName()));
}
```
The hashing service itself has a single method that takes some data and salt and creates a string representing the hashed value.
* **Salt**: random data that is combined with the input string when hashing so that the resultant hashed values are unique for each row. This means that two users with the same password would not have the same hash in the database.
Method in HashService.java
```typescript
public String getHashedValue(String data, String salt) {
byte[] hashedValue = null;
KeySpec spec = new PBEKeySpec(data.toCharArray(), salt.getBytes(), 5000, 128);
try {
SecretKeyFactory factory = SecretKeyFactory.getInstance("PBKDF2WithHmacSHA1");
hashedValue = factory.generateSecret(spec).getEncoded();
} catch (InvalidKeySpecException | NoSuchAlgorithmException e) {
logger.error(e.getMessage());
}
return Base64.getEncoder().encodeToString(hashedValue);
}
```
When a user logs in, we have no way to retrieve their original password, but we can re-hash their user input and see if it matches the hashed value in our database. Below is an example AuthenticationService that implements the AuthenticationProvider class. This allows Spring to integrate our provider with many different authentication schemes, but we can see in our `supports` method that we specify that we only support UsernamePasswordAuthentication.
The `authentication` method takes an Authentication object from spring and returns an authentication token if the user's credentials are correct.
AuthenticationService.java
```typescript
@Service
public class AuthenticationService implements AuthenticationProvider {
private UserMapper userMapper;
private HashService hashService;
public AuthenticationService(UserMapper userMapper, HashService hashService) {
this.userMapper = userMapper;
this.hashService = hashService;
}
//這個authenticate method是專門給spring security去檢查憑證
@Override
public Authentication authenticate(Authentication authentication) throws AuthenticationException {
//收到user提交的帳號及密碼
String username = authentication.getName();
String password = authentication.getCredentials().toString();
//透過usermapper去檢查是否真的有這個username
User user = userMapper.getUser(username);
if (user != null) {
//取得在資料庫這位user的salt
String encodedSalt = user.getSalt();
//拿到salt後跟這位陌生人提交的密碼進行hash
String hashedPassword = hashService.getHashedValue(password, encodedSalt);
//如果密碼依樣
if (user.getPassword().equals(hashedPassword)) {
//這個usernamePasswordAuthenticationToken.class代表著特定username和password的成功授權
//ArrayList 先保留空 超過課程範圍
return new UsernamePasswordAuthenticationToken(username, password, new ArrayList<>());
}
}
return null;
}
//這個support告訴Spring可以處理那些authentication
@Override
public boolean supports(Class<?> authentication) {
return authentication.equals(UsernamePasswordAuthenticationToken.class);
}
}
```
{%youtube qiriiWEZ7ps%}
[For the full lecture sample code from the past two videos, check here](https://github.com/udacity/nd035-c1-spring-boot-basics-examples/tree/master/udacity-jwdnd-c1-l4-spring-security-basics-master)
In order for Spring to actually use our `AuthenticationService`, we need to extend our Web Security configuration. We do that with an adapter for the `WebSecurityConfigurer`. This example overrides two configure methods:
* **configure(AuthenticationManagerBuilder auth)**: used to tell Spring to use our `AuthenticationService` to check user logins
* **configure(HttpSecurity http)**: used to configure the `HttpSecurity object` by chaining methods to express security requirements
SecurityConfig.java
```typescript
@Configuration
@EnableWebSecurity
public class SecurityConfig extends WebSecurityConfigurerAdapter {
private AuthenticationService authenticationService;
public SecurityConfig(AuthenticationService authenticationService) {
this.authenticationService = authenticationService;
}
//主要是告訴Spring去使用我們的AuthenticationService去確認user logins
@Override
protected void configure(AuthenticationManagerBuilder auth) {
auth.authenticationProvider(this.authenticationService);
}
//被用來去設定HttpSecurity object by chaining methods去表示Security的需求
@Override
protected void configure(HttpSecurity http) throws Exception {
//不用登入的人可以看得URL
http.authorizeRequests()
//這個代表signup, css, js的網址一般人可以取得
.antMatchers("/signup", "/css/**", "/js/**")
//permitAll: tell spring permit all requests to those URLs without authorization
.permitAll()
//anyRequest: to match any request that wasn't matched by this first call
.anyRequest()
//authenticated: tells spring to authenticate any requests that haven't been matched otherwise
.authenticated();
//login是給別人登入的地方所有人都可以取得
http.formLogin()
.loginPage("/login")
.permitAll();
//如果想要跳去signup, css, js, login以外的地方都會跳回去/home
http.formLogin()
.defaultSuccessUrl("/home", true);
}
}
```
We can see that the second `configure` method does four things:
* Allows all users to access the /signup page, as well as the css and js files.
* Allows authenticated users to make any request that's not explicitly covered elsewhere.
* Generates a login form at /login and allows anyone to access it.
* Redirects successful logins to the /home page.
[To see the **HashService** class used in this example, click here.](https://github.com/resisttheurge/udacity-jwdnd-c1-l4-spring-security-basics/blob/master/src/main/java/com/udacity/jwdnd/spring_security_basics/service/HashService.java)
Key Terms
* **Onion Pattern**: Sometimes also called Tiered Architecture, Multi-tiered Architecture, or n-tiered Architecture. This is a design pattern that separates areas of the application into controller, service, and data layers (and sometimes more). User flows originate from the controller tier, which passes them to the service tier, which then reaches a data access bean.
* **Encryption**: Modifying data before storing it, with the intention of using another algorithm to return the data to its original form once it needs to be used.
* **Hashing**: Modifying data before storing with the intention of never returning it to its original form. The modified data will be compared to other modified data only.
* **Salt**: random data that is combined with the input string when hashing so that the resultant hashed values are unique for each row. This means that two users with the same password would not have the same hash in the database.
Further Research
* [Spring Security Java Configuration](https://docs.spring.io/spring-security/site/docs/current/reference/html5/#jc)
* [HttpSecurity JavaDoc](https://docs.spring.io/spring-security/site/docs/current/api/org/springframework/security/config/annotation/web/builders/HttpSecurity.html)
* If you'd like to learn more about encryption, hashing, and salts, [check out this high-level explanation.](https://www.thesslstore.com/blog/difference-encryption-hashing-salting/)
==Shannon Note==
>* plan text 明文 encrypted text 密文
Two apporaches to storing passwords are:
>* Encryption: 加密後可以解密回來
>* Hashing: 加密後不可以解密回來
>
>`UserService.java`介紹
>UserService主要目的是在檢查這位使用者是否為本人,然後因為implements >`AuthenticationProvider`,所以需要實作兩個方法*
>* `authenticate`
* Spring Security確認收到的憑證,憑證通常來自form,然後要告訴`authenticate`會接收到一個`Authentication`的object然後回傳相同的類,Spring期望我們去讀取authentication object裡面的來自input的credential去確認她是valid。如果確定是本人就可以login,拿到權限
>* `Support`
* 告訴Spring可以處理那些authentication
>
> SecurityConfig.java
>* @Configuration : Spring will use this as a source of configuration for the IoC context.
>* @EnableWebSecurity : 讓Spring know that this class secifically is configuring Spring Security.
>* 他繼承Abstract class `WebSecurityConfigurerAdapter`
* 主要是讓我們去寫一個Adaptere給Spring WebSecurityConfigurer
* 實作兩個方法 different types of `configure` method
* 第一個`configure` method
* 參數: AuthenticationManagerBuilder
* 內容: 透過AuthenticationManagerBuilder(Builder)上的方法來添加一個configure parts of the authentication scheme for our app
* 第二個`configure` method
* 他定義Spring如何接收authorization要求
>
>SecureRandom:https://www.cnblogs.com/deng-cc/p/8064481.html
# 11.Exercise: User Credentials
Exercise: User Credentials and Authentication
Our Taco Delivery service has been getting bombarded with fake orders, so it’s time to make sure only authenticated users can submit orders. Here’s our `SecurityConfig` class with a `configure` method already defined.
**Your job is to fill in the method so it fulfills the following goals:**
1. Permit all requests to the /order page, as well as to all files in our /css and /js directories.
2. Allow authenticated requests to any pages not specifically identified.
3. Allow unauthenticated users to access the automatically-generated login page at /login; and
4. Redirect users to the /tacos page once they’re logged in, so they can immediately pick out which delicious tacos to buy.
# 12.Solution: User Credentials
{%youtube _atMetazuAQ%}
Here is an example `configure` method that meets our requirements:
```typescript
@Override
protected void configure(HttpSecurity http) throws Exception {
http.authorizeRequests()
.antMatchers("/order", "/css/**", "/js/**").permitAll()
.anyRequest().authenticated();
http.formLogin()
.loginPage("/login")
.permitAll();
http.formLogin()
.defaultSuccessUrl("/tacos", true);
}
```
The first method chain permits all requests to the `/order` page or to our `css` and `js` directories, and then it allows authenticated users to make any kind of request. The next chain permits all users to access the auto-generated login page at `/login`. Remember that Spring creates this for us. Lastly, the third method chain redirects successful logins to the `/tacos `page by default.
# 13.Exercise: Final Review
**Exercise: Final Review**
For this final review, you'll be updating your chat app from the last lesson to support user registration and login, as well as to store chat messages in a database rather than the in-memory list we created last lesson. That means you're going to have do a couple of things:
**Re-enable Spring Security**. Last lesson, we commented out the Spring Security dependencies in the project pom.xml file. This time we need to add it back! As a reminder, these are the two dependencies you need to un-comment (or add back to your project if you deleted them last time):
```typescript
<dependency>
<groupId>org.springframework.boot</groupId>
<artifactId>spring-boot-starter-security</artifactId>
</dependency>
<dependency>
<groupId>org.springframework.security</groupId>
<artifactId>spring-security-test</artifactId>
<scope>test</scope>
</dependency>
```
**Define the database tables for the app.** But wait, you say, didn't you tell us that we didn't have to know how to design SQL tables? That's right, I did! You won't have to design the tables yourself, but you do have to add the definitions I give you to your project. Specifically, you have to create a `schema.sql` file in the `src/main/resources` directory of your project. Here's the code you need to put in that file:
```typescript
CREATE TABLE IF NOT EXISTS USERS (
userid INT PRIMARY KEY auto_increment,
username VARCHAR(20),
salt VARCHAR,
password VARCHAR,
firstname VARCHAR(20),
lastname VARCHAR(20)
);
CREATE TABLE IF NOT EXISTS MESSAGES (
messageid INT PRIMARY KEY auto_increment,
username VARCHAR NOT NULL,
messagetext VARCHAR NOT NULL
);
```
We haven't talked about this file much, but it's been in all of the examples we've looked at this lesson. Spring Boot will, by default, look for this file when the server starts and execute it if it's present. You can use this behavior for a variety of useful database-related tasks, but all we're using it for here is to create two tables in the database - `USERS` and `MESSAGES`.
**Create Java classes that match the database tables**. If we want to take advantage of MyBatis, we need to create a `User` class that matches the data in the `USERS` table above, and we need to update the `ChatMessage` class from last lesson's final review to match the `MESSAGES` table above. For the latter, you only need to add a single field, but I'll let you figure out which one.
**Create MyBatis mapper classes to handle interacting with the database**. As we discussed this lesson, we need to create specialized `@Mapper`-annotated interfaces to access our database tables. You'll need two for this project - one for the `USERS` table and one for the `MESSAGES` table.
**Add user registration and login support to the application, and require a login to access the `/chat` URL**. For this, I recommend looking at the example code from the practical example earlier in the lesson. [Here's the link to the full project for reference](https://github.com/udacity/nd035-c1-spring-boot-basics-examples/tree/master/udacity-jwdnd-c1-l4-spring-security-basics-master). You'll have to implement the following elements from that example in this project as well:
* The `AuthenticationService`, `HashService`, and `UserService` classes
* The `LoginController` and `SignupController` classes
* The `SecurityConfig` class
* The `login.html` and `signup.html` HTML templates
* And (optionally) the `/css` and `/js` folders found in `src/main/resources/static`.
Most of these can be copied almost verbatim, but it's good practice for you to check and make sure you understand what needs to be copied, what needs to be changed, and why.
**Update the `MessageService` to use the database instead of an in-memory list of messages**. That means it's going to have to use the `MessageMapper` you created!
**Update the `chat.html` template to remove the username input from** the message submission form. If we want the user to log in before seeing the chat page, we shouldn't make them enter their own username. Plus, we don't want to have users impersonating each other!
**Update the `ChatController` to get the currently-logged-in user's username upon message submission**. You'll have to do some research for this one! It's common to need the currently-logged-in user's credentials when processing requests, so the solution shouldn't be too hard to find. You also need to attach the username to the message before passing it off to the `UserService` - but again, that's up to you to figure out.
**[BONUS] add a logout button to the chat template**. It may not seem incredibly important right now, but generally it's actually very necessary to allow users to log out from an application. Many people across the world browse the internet from public computers in libraries and internet cafes, and even more share the same computer with friends and family. Our security implementation won't be worth much if the next person who uses the app continues to use the previous person's account! For this bonus task, you'll again have to do some research, this time into how Spring Security handles logout actions. I believe in you!
And that's it for this final review! I know these instructions might seem intimidating - but once you're actually implementing them, I think you'll find that it's less work than it seems. Good luck!
Final Review Exercise
It's time to add data persistence and security to our chat application! Update your previous final review project according to the tasks below, and refer back to the instructions above for the high-level goals and code snippets to include in your project.
1. Re-enable Spring Security
2. Create a `schema.sql` file in `src/main/resources` and add the `USERS` and `MESSAGES` table definitions from the instructions above.
3. Create java classes to model the SQL tables you defined.
4. Add user registration and login support using Spring Security
5. Restrict access to the `/chat` URL to logged-in users.
6. Update the `MessageService` class to use the mappers you created to add and retrieve messages to and from the database instead of an in-memory list.
7. Update the `chat/html` template to remove the username input field from the message submission from.
8. Update the `ChatController` to retrieve the currently-logged-in user's username from Spring Security when handling a message submission
9. Manually test your app! Are you restricted from accessing the chat page withou logging in? Can you register a new user? Can you log in with that user's credentials? When that user sends a message, does their registered username show up next to the message? Can you log in as another user and verify that it still shows up with the first user's username?
# 14. Final Review
**Exercise: Final Review**
For this final review, you'll be updating your chat app from the last lesson to support user registration and login, as well as to store chat messages in a database rather than the in-memory list we created last lesson. That means you're going to have do a couple of things:
**Re-enable Spring Security**. Last lesson, we commented out the Spring Security dependencies in the project `pom.xml` file. This time we need to add it back! As a reminder, these are the two dependencies you need to un-comment (or add back to your project if you deleted them last time):
```java
<dependency>
<groupId>org.springframework.boot</groupId>
<artifactId>spring-boot-starter-security</artifactId>
</dependency>
<dependency>
<groupId>org.springframework.security</groupId>
<artifactId>spring-security-test</artifactId>
<scope>test</scope>
</dependency>
```
**Define the database tables for the app**. But wait, you say, didn't you tell us that we didn't have to know how to design SQL tables? That's right, I did! You won't have to design the tables yourself, but you do have to add the definitions I give you to your project. Specifically, you have to create a `schema.sql` file in the `src/main/resources` directory of your project. Here's the code you need to put in that file:
```java
CREATE TABLE IF NOT EXISTS USERS (
userid INT PRIMARY KEY auto_increment,
username VARCHAR(20),
salt VARCHAR,
password VARCHAR,
firstname VARCHAR(20),
lastname VARCHAR(20)
);
CREATE TABLE IF NOT EXISTS MESSAGES (
messageid INT PRIMARY KEY auto_increment,
username VARCHAR NOT NULL,
messagetext VARCHAR NOT NULL
);
```
We haven't talked about this file much, but it's been in all of the examples we've looked at this lesson. Spring Boot will, by default, look for this file when the server starts and execute it if it's present. You can use this behavior for a variety of useful database-related tasks, but all we're using it for here is to create two tables in the database - `USERS` and `MESSAGES`.
**Create Java classes that match the database tables**. If we want to take advantage of MyBatis, we need to create a `User` class that matches the data in the `USERS` table above, and we need to update the `ChatMessage` class from last lesson's final review to match the `MESSAGES` table above. For the latter, you only need to add a single field, but I'll let you figure out which one.
**Create MyBatis mapper classes to handle interacting with the database**. As we discussed this lesson, we need to create specialized `@Mapper`-annotated interfaces to access our database tables. You'll need two for this project - one for the `USERS` table and one for the `MESSAGES` table.
**Add user registration and login support to the application, and require a login to access the /chat URL**. For this, I recommend looking at the example code from the practical example earlier in the lesson. [Here's the link to the full project for reference](https://classroom.udacity.com/nanodegrees/nd035/parts/f318240c-0513-47b3-bf26-09db96482caf/modules/236a1f20-5234-458b-b59b-41ffc1eb9751/lessons/1f405ee4-30ce-423a-85e8-c0a3c1ab956a/concepts/2c2b8d10-56a9-4860-9fd9-b08fb14c4356). You'll have to implement the following elements from that example in this project as well:
* The `AuthenticationService`, `HashService`, and `UserService` classes
* The `LoginController` and `SignupController` classes
* The `SecurityConfig` class
* The `login.html` and `signup.html` HTML templates
* And (optionally) the `/css` and `/js` folders found in `src/main/resources/static`.
Most of these can be copied almost verbatim, but it's good practice for you to check and make sure you understand what needs to be copied, what needs to be changed, and why.
**Update the MessageService to use the database instead of an in-memory list of messages**. That means it's going to have to use the MessageMapper you created!
**Update the `chat.html` template to remove the username input from the message submission form**. If we want the user to log in before seeing the chat page, we shouldn't make them enter their own username. Plus, we don't want to have users impersonating each other!
**Update the `ChatController` to get the currently-logged-in user's username upon message submission**. You'll have to do some research for this one! It's common to need the currently-logged-in user's credentials when processing requests, so the solution shouldn't be too hard to find. You also need to attach the username to the message before passing it off to the `UserService` - but again, that's up to you to figure out.
**[BONUS] add a logout button to the chat template**. It may not seem incredibly important right now, but generally it's actually very necessary to allow users to log out from an application. Many people across the world browse the internet from public computers in libraries and internet cafes, and even more share the same computer with friends and family. Our security implementation won't be worth much if the next person who uses the app continues to use the previous person's account! For this bonus task, you'll again have to do some research, this time into **how Spring Security handles logout actions**. I believe in you!
==Shannon Note==
>小提示
* https://stackoverflow.com/questions/22557741/logout-link-with-spring-and-thymeleaf
* https://docs.spring.io/spring-security/site/docs/3.2.0.RC2/apidocs/org/springframework/security/config/annotation/web/configurers/LogoutConfigurer.html#logoutUrl%28java.lang.String%29
* https://www.baeldung.com/spring-security-logout
And that's it for this final review! I know these instructions might seem intimidating - but once you're actually implementing them, I think you'll find that it's less work than it seems. Good luck!
# 14.Solution: Final Review
{%youtube DW8_R1VXTy8%}
[For the full solution code, check here.](https://github.com/udacity/nd035-c1-spring-boot-basics-examples/tree/master/udacity-jwdnd-c1-l4-final-review-solution-master)
Glossary
* **ORM**: Object-Relational Mapping. A general term describing a set of technology that can be used to automatically convert data between database representation and application representation.
* **JDBC**: Java Database Connectivity API, which is a specification for making SQL requests from Java.
* **MyBatis**: A thin ORM over JDBC that automatically generates code to execute SQL statements over JDBC and maps the results to Java objects.
* **Mapping**: Drawing a relationship between a field in a Java class and a column in a SQL table.
* **One to One**: A relationship between two objects in which one entity is on each side of the relationship.
* **Many to Many**: A relationship between two objects in which multiple copies of each entity can be related to multiple copies of the other entity.
* **@Select, @Insert, @Update, @Delete**: Annotations representing SQL statements to be executed. Each annotation takes a string for a SQL statement of the corresponding type. For example, a `@Select` annotation takes a string for a SQL `SELECT` statement.
* **@Options**: Annotation providing access to switches and configuration options for JDBC statements.
* **Onion Pattern**: Sometimes also called Tiered Architecture, Multi-tiered Architecture, or n-tiered Architecture. This is a design pattern that separates areas of the application into controller, service, and data layers (and sometimes more). User flows originate from the controller tier, which passes them to the service tier, which then reaches a data access bean.
* **Encryption**: Modifying data before storing it, with the intention of using another algorithm to return the data to its original form once it needs to be used.
* **Hashing**: Modifying data before storing with the intention of never returning it to its original form. The modified data will be compared to other modified data only.
* **Salt**: random data that is combined with the input string when hashing so that the resultant hashed values are unique for each row. This means that two users with the same password would not have the same hash in the database.
# 15.Lesson Conclusion
{%youtube 935ABFsq7fg%}
This lesson covered a lot! First we covered persistent data and learned:
* How to Identify Persistent Data
* Where to Store Persistent Data (SQL, in This Case)
* How to Use MyBatis, a Simple ORM Framework to Access Our Database
* How to Integrate MyBatis with Spring Through Simple Annotations
We also took a peek at Security!
* Explored a Real-World Example of Database Access
* Configured Simple Username/Password Authentication
* Connected Spring Security’s Configuration with Our User Credentials
We’ve also taken our chat program to the next level by adding persistent storage and authentication to it!
 Sign in with Wallet
Connect another wallet
Sign in with Wallet
Connect another wallet