---
title: Assignment 0 | Setup
tags: assignment
---
#### [⬅️ Return to course website](https://cs.brown.edu/courses/csci1951v/)
# **Assignment 0: Setup**
:::info
**Released: September 6th**
**Due: September 13th at 11:59pm ET**
Note: Annotations on the reading are due by September 10 at 11:59pm
:::
<!-- INFO BOXES
:::success GREEN
This is for any step by step instructions that students should follow.
:::
:::info BLUE
This is for important assignment information throughout the assignment:
**Released: September 8th, 6:00pm ET**
**Due: September 15th, 11:59pm ET**
:::
:::warning YELLOW
Use this info box for disclaimers.
:::
:::danger
Use this info box for important points that students should not miss!
:::
:::spoiler Dropdown list
Use this
:::
-->
<!-- TYPESCRIPT CODE BLOCKS
```typescript
const list = [10, 20];
console.log(list.map(x => (x * x)))
```
-->
<!-- HOW TO MAKE AN IMAGE GO ON RIGHT OF LEFT OF TEXT
<img style="float: right/left;" src="https://i.imgur.com/l9y1lVq.gif">
-->
<!-- HOW TO CHANGE COLOR IN MARKDOWN
<span style="background:aliceblue">some text with a **lightblue** background</span>
<span style="color:red">some **red** text</span>
-->
<!-- These are a list of shortcuts available. -->
*[HTML]: Hyper Text Markup Language
*[W3C]: World Wide Web Consortium
*[NPM]: Node Package Manager
*[IDE]: Integrated Development Environment
*[MERN]: MongoDB, Express, React, NodeJS
*[Yarn]: Yet Another Resource Negotiator
## **Introduction**
The Hypertext/Hypermedia Cafe is about to open! The first food item we are making: donuts!
On our mission to create the most delicious donuts in the world, we must first collect all the ingredients! This is the setup assignment, so it is comparatively much shorter than future assignments. You will be setting up the CS1951V development environment for the programming assignments in the course, and ensuring that you are completely setup with everything before we start.
Throughout the rest of the course we will be working towards building a hypermedia system, which will require understanding what hypermedia is and what its principles are. We will also become famliar with developing a modern full-stack web application using the MERN stack - <ins>M</ins>ongoDB, <ins>E</ins>xpress, <ins>R</ins>eact, <ins>N</ins>ode.
We look forward to getting started! If you have any questions about this assignment, please come to TA hours or message on Slack.
Because this is the setup assignment, it's fine for all Slack messages about it to be public. For future assignments, be sure to reference the course communication policy to see if your message should be public or private.
### **Checklist**
- [ ] [**Join the Slack**](https://join.slack.com/t/2023cs1951v/shared_invite/zt-226peb2s4-QaRjVUBW5XqArSi6Yhgkjw) and send a message in the ==#introductions== channel on Slack
- [ ] Read the **[course communication guide](https://hackmd.io/@CS1951V-2023/communication)**
- [ ] **[Read and sign the collaboration policy](https://forms.gle/QGbdtA9orWndY5am9)**
- [ ] Accept **[assignment0-setup](https://classroom.github.com/a/0ONeUof1)** on GitHub classroom
- [ ] Set up CS1951V Development Environment
- [ ] Check that your backend setup is working
- [ ] Check that your frontend setup is working
- [ ] Deploy your bio to the course website
- [ ] [**Sign up for labs!**](https://brownhere.app/) Use code `XXMOJD` on brownhere.app, and fill out the availability survey. There are 4 mandatory labs throughout the semester. You can see the specific dates on the course calendar, but the times available are:
- Lab A: Thursday 4-6pm ET
- Lab B: Friday 3-5pm ET
:::warning
**Note**: If you cannot make either of these lab times, please send a Slack direct message to the HTA, Nick.
:::
- [ ] Read and annotate [**As We May Think**](https://dl-acm-org.revproxy.brown.edu/doi/pdf/10.1145/227181.227186)
- [ ] We will be using a browser extension called hypothes.<!---->is for reading and annotation throughout the course. hypothes.<!---->is setup instructions are available [**here**](https://docs.google.com/document/d/1zG4-AXBBw-PWxLJLGv3B7d9mTrxzp2DqERa-LGc5rYg/edit#heading=h.pemg9uknfd7l).
- Your own annotations: by Sunday 11:59 pm. Comments on others': due by next class
- [ ] Watch [**Intermedia Demo**](https://youtu.be/bGGxdF0Pn4g?t=414) from 6:54 to 20:26
- [ ] Watch [**Dash Demo**](https://youtu.be/2xL78f_McgQ?si=7tNDH7ju54jd5On1)
## **Join the Slack workspace**
<img style="float: left; height: 100px; margin-top: 10px; margin-right: 20px;" src="https://i.imgur.com/c1Jg7jo.gif">
Slack will be our main form of communication throughout the semester. **Course updates and other announcements will be sent through our Slack,** and this Slack workspace will also allow you to interact with other students and the teaching staff. Channels have already been set up for discussion about assignments, labs, readings, and so on.
**Slack will also function as our Piazza/EdStem for this course.** Topic-specific questions can be posted in the corresponding channel and will be answered by the staff.
Click [**here**](https://join.slack.com/t/2023cs1951v/shared_invite/zt-226peb2s4-QaRjVUBW5XqArSi6Yhgkjw) to join our workspace! Once you do, **send a message in the ==#introductions== channel briefly introducing yourself so we can check you off for joining the Slack.** Include your name, where you're from, and some of your interests / hobbies!
Please read the **[course communication guide](https://hackmd.io/@CS1951V-2023/BkbPw75pn)** for an overview of when to use email versus Slack, when to post questions privately versus publicly, and when to post on Slack versus attending TA hours.
## **Sign the Collaboration and Generative AI Policies**
All of our course assignments will be project- and assignment-based, so **it is very important that all of the work that you do this semester is your own.** That being said, general discussions with other students about lecture material and overall concepts are not only allowed but **encouraged**. We want everyone to clearly understand what is allowed to be openly discussed during the semester, so please read closely and complete the collaboration policy agreement **[here](https://forms.gle/PxQMFwgpLjKZTaQFA)**.
<!--
## **GitHub Classroom**
We will be using GitHub Classroom for the the coding assignments. This is how you will access template code and hand in course projects.
You should be able to see your cs login listed under Student Identifiers. If you see your login, select it and continue. If not, select `skip this step` for now, but reach out to the TAs on Slack to let them know that you are not listed. -->
## **CS1951v Development Environment**
### **MERN**
<div style="text-align:center; margin-bottom: 20px"><img style="border-radius:5px; width:400px" src="https://i.imgur.com/IRbmqLO.png" /></div>
In CS1951V, we will be developing full-stack web applications using the MERN stack, which stands for MongoDB, Express, React, and Node/Next.js. The MERN architecture allows you to easily construct a 3-tier architecture (frontend, backend, database) using just JavaScript/TypeScript. The interactions between these technologies are shown below:
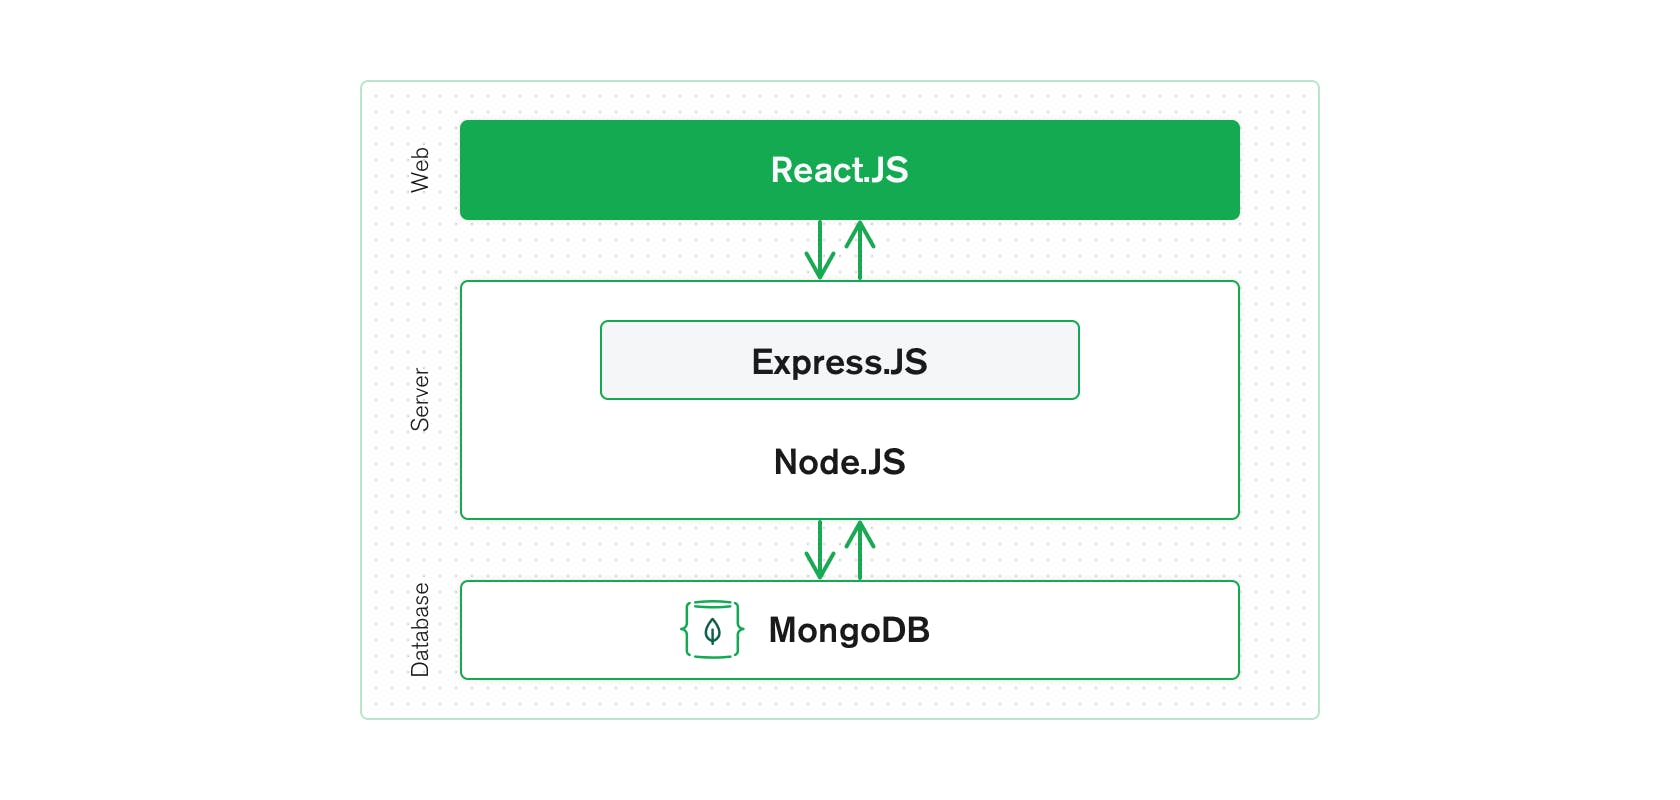
Using this stack will allow you to build and deploy full-stack applications easily and efficiently, and will also give you firsthand experience working with these widely used technologies. For a more detailed introduction to the MERN stack, click **[here](https://www.mongodb.com/mern-stack)**.
### **TypeScript**
In addition to the MERN stack, we will be using TypeScript as our primary programming language throughout the course. It is more organized than JavaScript, and makes debugging a far easier task for both you and the TAs!
TypeScript is a strict syntactical superset of JavaScript. It adds type checking to JavaScript, so if you have experience with JavaScript but not TypeScript, there's no need to worry! Additionally, by learning and using TypeScript, you will also naturally become more familiar with JavaScript.
* If you are already familiar with JS, [check out this guide](https://www.typescriptlang.org/docs/handbook/typescript-in-5-minutes.html).
* If you are coming from OOP languages (i.e. Java), [check out this guide](https://www.typescriptlang.org/docs/handbook/typescript-in-5-minutes-oop.html).
* If you are coming from functional languages, [check out this guide](https://www.typescriptlang.org/docs/handbook/typescript-in-5-minutes-func.html).
:::info
:::spoiler **Basic example of TypeScript vs. JavaScript**
In JavaScript, the following code would not return an error because it allows accessing properties which aren’t present. In TypeScript, due to the static type checking, it would!
```typescript
const ingredients = { sugar: 10, flower: 20, eggs: 2 };
// Why is this NaN? Spelling is hard!
const dough = ingredients.sugar + ingredients.folwer + ingredients.eggs;
```
TypeScript would return the following error:
```Property 'folwer' does not exist on type '{ sugar: number, flower: number, eggs: number }'. Did you mean 'flower'?```
:::
## **Setting Up Your Development Environment**
The following will show you how to set up a MERN stack development environment. There are a number of technologies that you will need to install, so please follow the instructions below carefully! The technologies that we will be using in this course include:
- Visual Studio Code
- Node / Node Package Manager (NPM)
- Git Command Line Interface (CLI)
- Code Styling / Linting
:::warning
**Disclaimer**: If you run into errors during any of the installations found in this assignment, your first step should be to attempt to debug the issue yourself using a search engine. If you cannot figure out the problem yourself, you should then post in Slack or come to TA hours.
:::
### **Visual Studio Code**
<div style="text-align:center; margin-bottom: 20px"><img style="border-radius:5px;" src="https://i.imgur.com/kvWdZfy.png" /></div>
We highly recommend using Visual Studio Code for course assignments. Visual Studio Code is a code editor that is optimized for building and debugging modern web applications. On top of this, it has built-in Git commands that will make it easier to work with Github Classroom, and has a bunch of incredibly helpful extensions that can be used to improve your workflow.
:::warning
**Note**: If you don’t have Visual Studio Code, it will be more difficult for the TAs to give you effective support during hours. Also, you will have to configure linting on your own.
:::
:::success
Download **Visual Studio Code** [here](https://code.visualstudio.com/download).
:::
#### Opening a Project and Terminal in Visual Studio Code
Once you have Visual Studio Code installed, you can open a project by selecting `File -> Open...`, and then selecting the source folder of a given project.
To open a terminal in that project’s directory, select `Terminal -> New Terminal`, and a new terminal window will appear at the bottom of your editor. This terminal can be used to run commands in Visual Studio Code itself without having to leave your editor.
:::warning
**Note**: You can switch the type of terminal (zsh, bash, PowerShell) by clicking the `down arrow` icon near `+` icon in VS Code terminal.
:::
Now that you have your editor setup, let’s install the software environment we will be using throughout the semester!
#### Installing required extensions
To make sure we take full advantage of VS Code, there are a few required and optional extensions to install:
* [Prettier](https://marketplace.visualstudio.com/items?itemName=esbenp.prettier-vscode) [required]
* [ESLint](https://marketplace.visualstudio.com/items?itemName=dbaeumer.vscode-eslint) [required]
* [Todo Tree](https://marketplace.visualstudio.com/items?itemName=Gruntfuggly.todo-tree) [recommended]
* [GitLens](https://marketplace.visualstudio.com/items?itemName=eamodio.gitlens) [recommended]
* [IntelliCode](https://marketplace.visualstudio.com/items?itemName=VisualStudioExptTeam.vscodeintellicode) [recommended]
Feel free to explore other VS Code extensions you like! You can even install custom color themes to style your editor as you wish.
#### Configuring VS Code
This is a **critical step** in setting up your development environment, so don't skip it!
*Turn on Autosave*
1. Click the `Manage` ⚙️ icon on the bottom-left side of the editor, and select `Settings`. Alternatively, use `(Ctrl + ,)`.
2. Locate the `Files: Auto Save` option and select `onFocusChange`. This will autosave any changes you have made whenever you click/tab away.

*Set Tab Size*
1. Locate the `Editor: Tab Size` option and input `2`. This is the industry standard tab size for JavaScript.

*Configure default formatter*
1. In the search bar, search the keyword `format`.
2. Locate the `Editor: Default Formatter` option and select `Prettier - Code formatter`.

3. Underneath the `Default Formatter` option, locate `Editor: Format On Save` option. Make sure the box is selected, as this will automatically reformat your code and ensure you have the right style on each save.

### **Node.js**
#### What is Node?
Node is a JavaScript runtime built in Chrome’s V8 engine. In other words, **Node is JavaScript outside of the browser**. Traditionally, JavaScript can only be executed within the browser, which is the client-facing side of web applications that every user has access to. However, Node allows you to run JavaScript code on the backend of your application as opposed to on the browser itself.
**This allows you to use JavaScript for both the front and backend components of your web applications**, making development much simpler and more straightforward!
All Node applications should contain a `package.json` file which specifies:
- The packages on which your project depends
- Versions of a package that your project can use
- Additional metadata such as author, description, and useful scripts for building and running the application
We will be using the latest **LTS (Long Term Service)** version of Node.js, as that is the recommended version for most use cases. As of September, the latest LTS is **18.x**, so we will be using that for this semester. (We recommend using Node **18.17.1** to ensure everyone is on the same version.)
:::success
:::spoiler **macOS Installation**
**Using Homebrew**
[Install Homebrew](https://brew.sh/) (if you don't have it already), and run the following in your terminal:
`brew install node@18`
**Using Installer**
Download the installer [here](https://nodejs.org/en/).
:::
:::success
:::spoiler **Windows Installation**
**Using WinGet**
Run the following in your terminal:
`winget install OpenJS.NodeJS.LTS -v 18.17.1`
**Using Installer**
Download the installer [here](https://nodejs.org/en/).
:::
Alternate installation methods (including for Linux) can be found [**here**](https://nodejs.org/en/download/package-manager/).
To verify that you have installed Node correctly, run the following line of code in your terminal:
`node --version`
You should see a version of Node in the terminal.
If there is no error, you have installed Node correctly!
:::info
:::spoiler **Recommended tool if you need to run multiple versions of Node**
We are using the latest LTS version of Node for this course (18.x), but we understand if you need to run multiple different versions if you have projects that you are working on that does not support Node 18.
Luckily there is a tool that allows us to easily switch between versions of Node / NPM. It is called NVM (Node Version Manager). There is a Linux/MacOS version available [**here**](https://github.com/nvm-sh/nvm) and a Windows version available [**here**](https://github.com/coreybutler/nvm-windows).
The README in them is straightforward, and should allow you to easily switch between Node versions. Let us know if you have any questions getting this setup!
Here are the basic terminal commands once you have it installed:
- `nvm list`: Get a list of the versions currently installed
- `nvm install 18`: Install the latest version of Node 18
- `nvm use 18`: Use Node 18
:::
:::warning
If you are having trouble installing Node, please come to TA hours or post in the ==#assignments== Slack channel.
:::
### **npm**
`npm` stands for ***node package manager*** and it is a package manager for the JavaScript programming language. In other words, it's a package and registry for JavaScript software packages. It was created and maintained by npm, Inc. before the company was acquired by GitHub, a subsidiary of Microsoft. The intention behind developing `npm` was to help JavaScript developers easily share packaged modules of code and it is relied on by over 11 million developers worldwide today. `npm` has command line tools to help you install the different packages and dependencies that you will need throughout this course. npm comes preinstalled with Node, so there is no additional setup necessary.
:::info
**`npm` Commands that we Use**
1. **`npm install`:** We use this command to install all modules that are listed on the `package.json` file and their dependencies. You can use `npm i` as a shorthand version for this.
2. **`npm run dev:`** This command runs the dev script from your `package.json` file and is used to start a development server.
3. **`npm run build` :** This command is used to create an optimized production build. In other words, it creates a build directory with a production build of your app.
:::
### **Git**
Simply put, Git is a version control system that lets you manage and keep track of your source code history. GitHub is a cloud-based hosting service that lets you manage Git repositories. If you are brand new to GitHub, consider watching this **[video](https://www.youtube.com/watch?v=w3jLJU7DT5E)**.
:::success
**Installation**
1. Install Git [**here**](https://git-scm.com/downloads).
2. To verify that you have installed correctly, the following terminal command should not return an error.
`git --version`
:::spoiler **If you are running Windows**
If you are running Windows, installing Git will include **Git Bash**. This will be the shell that you should be using throughout the course. The stencil code and handout instructions will assume you are using Git Bash as your shell if you are on Windows.
Git Bash should be an option in your start menu - you should use this instead of using "Command Prompt" or "Powershell". You can also configure Git Bash to be your default shell in the Windows Terminal app or inside of VSCode.
:::
:::info
:::spoiler **[Optional] GitHub Desktop App**
You can use the GitHub Desktop app (in addition to the Git CLI, which is installed above), which is free to download [here](https://desktop.github.com/). This allows you to work with GitHub without having to manually run Git commands in your terminal. Some people have a preference for this, so feel free to check it out!
VSCode also has advanced Git source control features built into the editor, just check out the source control tab! The optional GitLens extension adds even more of these features.
:::
:::warning
If you are having trouble installing Git, please come to TA hours or post in the ==#assignments== Slack channel.
:::
## **Checking Your Environment Setup**
Now that you have everything installed, we need to check that everything is working properly! To do so, we have created an assignment on GitHub to test both a React frontend environment and a Node/Express backend environment. ==Accept **[unit0-setup](https://classroom.github.com/a/0ONeUof1)** on GitHub classroom.== If you can successfully run the application after following the steps below, then you’re good to go!
:::success
**To-Do**: Clone the `unit0-setup` repository onto your computer. We recommend that you create a `cs1951v` folder so that this assignment and future ones are organized into one folder.
Now that you have made a copy of the `unit0-setup` repository on your local machine, you can open it with VS Code. Once you have opened it, make sure your active repository is the assignment's root directory - in this case: `unit0-setup-[<yourGitHubUsername>]`.
:::
For this assignment and throughout the course we will be differentiating between the frontend and backend in the same way: **All of the backend code will be stored in a folder called `server` and all of the frontend code will be installed in a folder called `client`.** Our recommendation is to have one terminal open for each whenever you are working on the assignments!
<div style="text-align:center; margin-bottom: 20px" ><img style="border-radius:5px; border:solid black 2px;"
height=200
src="https://i.imgur.com/2Jaf6cY.png" /></div>
:::warning
**Disclaimer**: The following repository uses technologies from the MERN stack mentioned above, specifically React for the frontend and Node/Express for the backend. We understand that we haven’t introduced these topics yet. Please do not worry about understanding the entire codebase of these starter applications at this moment as this is just for setup. We will be providing in-depth resources on these topics before you start using these technologies yourself.
:::
### **Backend**
To test your backend environment setup, we will test that your setup works with a very basic React application. It contains a simple App file that uses an Express router to send a request to a local address.
<!-- BACKEND -->
:::success
**To-Do**
1. Open a new terminal window. `cd` into the `server` folder, which is where we handle the backend environment in our projects.
3. We want to install the necessary backend applications packages and build the application with the following npm commands:
`npm install`
`npm run dev`
You should see some error messages like this - scary, right?
```bash
$ nodemon src/app.ts
[nodemon] 2.0.12
[nodemon] to restart at any time, enter `rs`
[nodemon] watching path(s): *.*
[nodemon] watching extensions: ts,json
[nodemon] starting `ts-node src/app.ts`
Error 0: Invalid secret key / secret key not present! Did you forget to add it to the .env file?
[nodemon] app crashed - waiting for file changes before starting...
```
:::
This happens because we haven't set up the environment variables yet.
:::info
What is an **environment variable**?
Sometimes we have **sensitive information** that we need to include in our code - your password, your SSH key, or even the port number that your app is running on - that's the reason why we keep those information in a seperate `.env` file and call them environment variables.
:::
We will be using environment variables throughout the semester, noticeably a Database URI (connection string to your database). You will now create your first environment variables by adding a secret key and a port number.
:::success
**To-Do**
1. Kill the current process by pressing `Ctrl+C` into the terminal window.
2. Make sure you are in the root of the `server` folder and use the following command to create the `.env` file:
`touch .env`
3.
The following snippet contains the environment variables for this assignment. Open the `.env` file we just created and then copy and paste this snippet:
```
SECRET_KEY='hypermedia'
PORT=8000
```
4. Now, let's try it again - run `npm run dev` now and that should start a server running on localhost:8000.
5. Type the URL `localhost:8000` into your web browser. If you see the message **`Your backend setup is complete!`**, then your backend environment is set up correctly! Since we are going to use our backend service later, don't kill the process yet.
:::
<!-- FRONTEND -->
### **Frontend**
To test your frontend environment setup, we will test that your setup works with a very basic React application. It contains a simple `App.tsx` file that displays some HTML using React.
:::success
**To-Do**
1. Open a new terminal and `cd` into the `client` folder, which is where the frontend code lives:
`cd client`
2. Now that you are in the correct folder, you can install the necessary packages for the project with the following npm command:
`npm install`
:::
:::warning
Please make sure your backend is running at the same time! Otherwise your frontend will not respond to any request you are about to make.
:::
:::success
**To-Do**
3. The web application can be launched using the npm command:
`npm run dev`
Running this command should automatically open up `localhost:3000` in your web browser. If it doesn’t, you can manually open it by going to the URL `localhost:3000` in your web browser.
**Note**: To stop running the React web application, hit `Ctrl+C` in the terminal that it is running from.
:::
If you see the following message, your frontend environment is correctly set up, and you should be set up for the rest of the course!
<div style="text-align:center; margin-bottom: 20px"><img style="border-radius:5px;" src="https://i.imgur.com/U85F1iv.png" /></div>
:::warning
If you cannot get the application to run, please come to TA hours or seek help in the ==#assignments== Slack channel.
:::
<div style="text-align:center; margin-bottom: 20px"><img style="border-radius:5px;" src="https://i.imgur.com/x3fElmj.gif" /></div>
### Linting
To test whether your linter is working, please navigate to `client > src > pages > index.tsx`. You should see a file that is intentionally formatted incorrectly. **Press `Ctrl+S` to save the file.** You should now see the file going through some stylistic changes, and the code format should look much cleaner.
If you do not see any changes after you save, that means some steps in your linting set up is not completed. Please try it again, or you can alternatively run `npm run format` via the command line to get Prettier to fix all your files.
:::warning
If you cannot get the linter to run, please come to TA hours or post in the ==#assignments== Slack channel.
:::
### **Deploying your bio to the CS1951v Website!**
Now, you can get some practice working with TypeScript objects! But more importantly, you can get to know your classmates. You will be making a basic API call to deploy your profile onto our [**course website**](https://cs1951v-2023.vercel.app/)!
First, go to `client > src > lib > profile.ts` and read the `IProfile` interface. Then, you should properly fill out this placeholder text:
```typescript=
export const profile = {
role: "student",
name: "Your name",
// more key-value pairs...
}
```
with all your information!
:::warning
If you need a way to upload your profile or restaurant image, you can use https://imgur.com/upload, and then right click the image > "Open image in new tab" to get the direct link URL ending in `.png`, `.jpg`, etc. **Make sure your url ends with `.png`, `.jpg`, `.jpeg`, or `.gif`, otherwise it will not pass our regex check!**
Andy and Norm request that your profile picture shows your face, so they can try to learn names and faces.
:::
:::info
Throughout this course, we will be following the convention of prefixing our interface names with `I`. This helps to distinguish an interface from an instance of that interface (e.g. the interface `IProfile` v.s. the instance `profile`).
:::
Now, you can see Typescript in action! To tell the typechecker that `profile` should be an instance of `IProfile`, you can add a *type annotation* like so:
```typescript=
export const profile: IProfile = {
// your filled out fields...
}
```
Now, if you are missing a field or one of the fields is an incorrect type, you will get a *type error*! This is an example of how Typescript prevents bugs and makes your Javascript codebase significantly easier to maintain.
If you edited your profile, you will now see a profile and a button at the same `localhost:3000` site that you had set in your frontend environment setup. If you have saved the `profile.ts` file, then it should look something like this:
<div style="text-align:center; margin-bottom: 20px"><img style="border-radius:5px;" src="https://i.imgur.com/fkEgW1f.png" /></div>
If that works, and if you are happy with your profile, **you are ready to deploy your bio to the course website!** Click the "Deploy your bio to the website" button, and check the course website to see you and your classmates :)
:::info
Our website is hosted at https://cs1951v-2023.vercel.app/. Go check it out!
:::
:::warning
If you get an error, check that your `profile` object has valid data for all the required fields. If you're stuck for more than a few minutes, message in the ==#assignments== channel!
:::
### Congrats!
You're now set up for the rest of the programming assignments 😎 Happy coding!
:::warning
Don't forget the reading and annotation assignments!
:::
 Sign in with Wallet
Connect another wallet
Sign in with Wallet
Connect another wallet