# 計算機網路 - Linux TC (Traffic Control)
[TOC]
## 參考影片
TC 可以在 ingress 或 egress 的時候對封包的接收/發送進行排程。雖然根據 Jiri Benc 的介紹中有提到 TC ingress,但若查詢 [`tc(8)`](https://man7.org/linux/man-pages/man8/tc.8.html) 文件會發現:TC 中能用於控制 egress 的功能比 ingress 多得很多。而 Arch Linux 文件中的 [*Advanced traffic control*](https://wiki.archlinux.org/title/Advanced_traffic_control) 也提到:
> *Qdiscs on ingress traffic provide only policing with no shaping.*
而在許多資料中,都會以 egress 作為介紹 TC 的例子。所以這邊會以 egress 為主。不過 [這裡](https://evacastro.gitbooks.io/internet/content/control_de_trafico.html#controlAdmision) 有一個 TC ingress 的簡介 (雖然是西班牙文) (裡面 *Disciplinas de cola de entrada* 的部分)。不過下面的圖片大部分會引用這份文件。
除此之外,[*Traffic Control HOWTO*](https://tldp.org/HOWTO/html_single/Traffic-Control-HOWTO/) 跟 [*QoS in Linux with TC and Filters*](http://linux-ip.net/gl/tc-filters/tc-filters.html) 也是不錯的說明。而 [`tc-htb`](https://www.man7.org/linux/man-pages/man8/tc-htb.8.html) 的[官方網站](http://luxik.cdi.cz/~devik/qos/htb/) 中有一篇 [*HTB Linux queuing discipline manual - user guide*](http://luxik.cdi.cz/~devik/qos/htb/userg.pdf),內容如其標題是 HTB 這個 qdisc 的使用說明。這個使用說明中也有順便提到不少 `tc` 的細節。
最後,TC 當中的 *filter* 部分,雖然一開始的功能只是「將封包依照某些特徵分流給不同的 class」處理,但實際上這個分類機制已經演進成一個稱為 classfier-action 的子系統,可以像 netfilters 那樣,對滿足特定條件的封包執行某些操作。這些操作在 TC 的術語中稱為 *action*,而「將封包分配給不同的 class」則只是這 *action* 中的一個例子。而關於 filter 機制,在 *Jamal Hadi Salim* 寫的 [*Linux Traffic Control Classifier-Action Subsystem Architecture*](https://people.netfilter.org/pablo/netdev0.1/papers/Linux-Traffic-Control-Classifier-Action-Subsystem-Architecture.pdf) 中有非常詳細的介紹。而這篇文章是他本人在 Netdev 0.1 中的 *Linux Traffic Control Classifier-Action Subsystem Architecture* 演講的總結 (下面有這個演講的影片)。
### DevConf 2017 - Day 2 14:30 - 15:30 - multiple cams - Doing Network Magic with the tc Tool
{%youtube 0R89bT7HHdk %}
### Netdev 0.1 - Linux Traffic Control Classifier-Action Subsystem Architecture
{%youtube cyeJYjZHv5M %}
### Netdev 0x13 - Demystifying The TC Ugly or Universal 32bit Key Packet Classifier
{%youtube kykJx8hP0lw %}
### TC Flower Offload at Netdev 2.2
{%youtube R7-RV_4Hr3E %}
### 其他
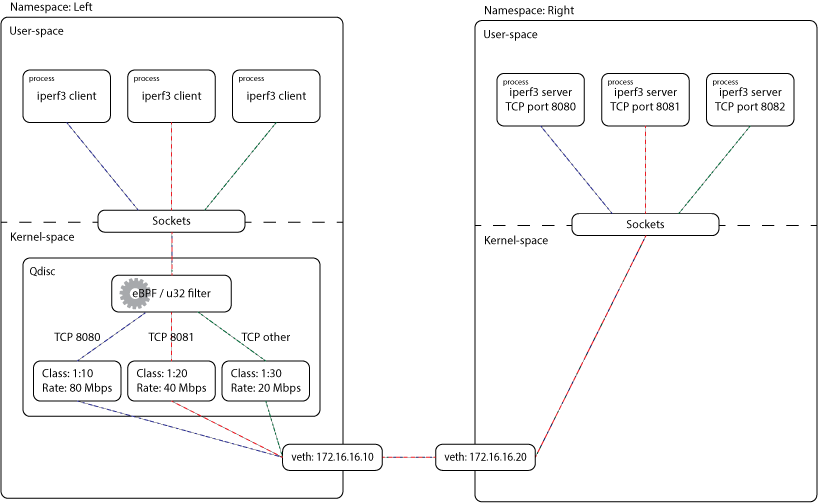
[*Use Traffic Control to Simulate Network Chaos in Bare metal & Kubernetes*](https://songrgg.github.io/operation/use-traffic-control-simulate-network-chaos/) 是一篇用 Docker 來實驗 `tc` 功能的例子。除此之外,[xdp-project/bpf-examples](https://github.com/xdp-project/bpf-examples) 中的 [tc-basic-classifier](https://github.com/xdp-project/bpf-examples/tree/master/tc-basic-classifier) 也是一個例子:
## 環境設置
```clike
L_IP=172.16.16.10
R_IP=172.16.16.20
L_CIDR="${L_IP}/24"
R_CIDR="${R_IP}/24"
L_NS="left"
R_NS="right"
L_DEV="$L_NS-veth"
R_DEV="$R_NS-veth"
sudo ip netns add "$L_NS"
sudo ip netns add "$R_NS"
sudo ip link add "$L_DEV" type veth peer "$R_DEV"
sudo ip link set "$L_DEV" netns "$L_NS"
sudo ip link set "$R_DEV" netns "$R_NS"
sudo ip -n "$L_NS" addr add "$L_CIDR" dev "$L_DEV"
sudo ip -n "$R_NS" addr add "$R_CIDR" dev "$R_DEV"
sudo ip -n "$L_NS" link set "$L_DEV" up
sudo ip -n "$L_NS" link set lo up
sudo ip -n "$R_NS" link set "$R_DEV" up
sudo ip -n "$R_NS" link set lo up
```
## 簡介:Qdisc 與 Class
一個 Qdisc 可以是一個 classless qdisc,像下面這樣:

或者可以是一個 classful Qdisc,意思是這個 Qdisc 裡面會包含其他 class,而這些 class 的內部又包含一個 Qdisc。所以可能會像這樣:
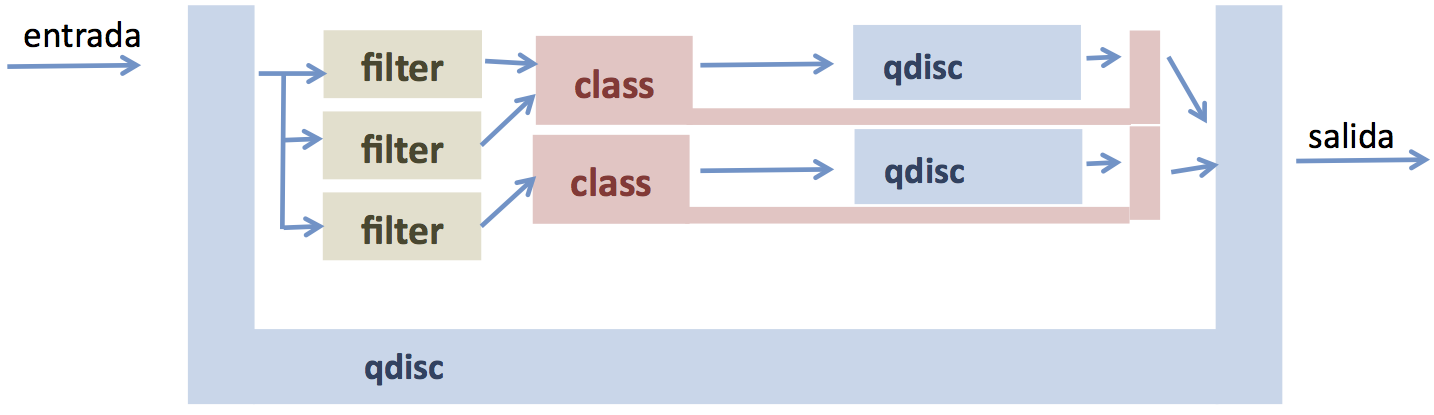
可以想像封包進入一個 classful Qdsic 之後,應該要有某些機制決定這個封包該分給哪個 class。而這件事則是 *filter* 來決定的。一個這樣的 class 內部的 qdisc 又可以是...沒錯!一個 classless Qdisc 或一個 classful Qdisc ,因此這個問題就回到一開始。然後就這樣遞迴地定義下去。根據 [`tc(8)`](https://man7.org/linux/man-pages/man8/tc.8.html) 中的敘述:
> *Some qdiscs can contain classes, which contain further qdiscs - traffic may then be enqueued in any of the inner qdiscs, which are within the classes.*
一個 class 中除了包含 Qdisc 之外,裡面也可以繼續包含更多更細的 class,這些 class 又可能繼續包含其他 class ... 最後「最內層」的 class 再包含 Qdisc。所以就形成了類似以下的~~俄羅斯娃娃~~遞迴結構 (圖片來源:[*QoS in Linux with TC and Filters*](http://linux-ip.net/gl/tc-filters/tc-filters.html)):
```
.-------------------------------------------------------.
| |
| HTB |
| |
| .----------------------------------------------------.|
| | ||
| | Class 1:1 ||
| | ||
| | .---------------..---------------..---------------.||
| | | || || |||
| | | Class 1:10 || Class 1:20 || Class 1:30 |||
| | | || || |||
| | | .------------.|| .------------.|| .------------.|||
| | | | ||| | ||| | ||||
| | | | fq_codel ||| | fq_codel ||| | fq_codel ||||
| | | | ||| | ||| | ||||
| | | '------------'|| '------------'|| '------------'|||
| | '---------------''---------------''---------------'||
| '----------------------------------------------------'|
'-------------------------------------------------------'
```
或是另外一個稍微複雜的例子 ([圖片來源](http://linux-ip.net/pages/diagrams.html)):

而當封包進入「封包進入 Qdisc -> 分成多個 class -> 每個 class 底下又再細分多個 class ... 分到最底下的 class 之後放進它裡面的 qdisc 中」。即使在建立這個 class 時,沒有指定要用哪種 Qdisc,那些位於最內層 class 也會自動有個預設的 Qdisc。以 HTB 為例,在 [*HTB Linux queuing discipline manual - user guide*](http://luxik.cdi.cz/~devik/qos/htb/manual/userg.htm) 中有提到:
> *Now we can optionally attach queuing disciplines to the leaf classes. If none is specified the default is pfifo.*
而如果這個最內層的 class 當中新增了另外一個 class,那麼這個預設的 Qdisc 就會被移除。所以只有那些「裡面沒有更多 class」的 class 底下可以有 Qdisc。這點在 [*Traffic Control HOWTO*](https://tldp.org/HOWTO/html_single/Traffic-Control-HOWTO/) 有提到:
> *Any newly created class contains a FIFO. This qdisc can be replaced explicitly with any other qdisc. The FIFO qdisc will be removed implicitly if a child class is attached to this class.*
這種一層包一層的 class 關係畫起圖來不太方便,所以有時候也會畫成樹的樣子。樹的節點間的親子關係表示 class 或 qdisc 的包含關係。比如說 Jiri Benc 的 *Doing Network Magic with the tc Tool* 演講中就是使用這種畫法:

## 簡介:Handle
每個 qdisc 跟 class 都會有一個用以識別的編號,稱為 *handle*,或直接稱呼它叫 *ID*。而這個編號的形式會是 `x:y`,其中 `x` 稱為 *major number*,而 `y` 稱為 *minor number*。這一樣可以在 `tc(8)` 的文件中找到:
> *All qdiscs, classes and filters have IDs, which can either be specified or be automatically assigned. IDs consist of a major number and a minor number, separated by a colon - major:minor. Both major and minor are hexadecimal numbers and are limited to 16 bits. There are two special values: root is signified by major and minor of all ones, and unspecified is all zeros.*
或是 HTB 的文件中:
> *handles are written x:y where x is an integer identifying a qdisc and y is an integer identifying a class belonging to that qdisc.*
因為不同的 interface 可以各自有各自的 Qdisc,所以這個編號只在同一個 interface 中唯一:
> *handles are local to an interface, e.g., eth0 and eth1 could each have classes with handle 1:1.*
除此之外,這個編號並不是任意給定的,而是會依照 Qdisc 與 class 之間的包含關係來決定數值。
### Qdisc 的 Handle
對於一個 Qdisc 來說,他的 handle 中的 minor 部分一定會是 0。也就是形式會是 `x:0`。因為一定會是 0,所以有有時候也會看到直接簡寫為如`x:` 的形式:
> *The handle for a qdisc must have zero for its y value and the handle for a class must have a non-zero value for its y value. The "1:" above is treated as "1:0".*
而在 HTB 的文件中,也可以找到如下的敘述:
> *handles are written x:y where x is an integer identifying a qdisc and y is an integer identifying a class belonging to that qdisc. The handle for a qdisc must have zero for its y value and the handle for a class must have a non-zero value for its y value. The "1:" above is treated as "1:0"*
一個 Qdisc 底下的 class 的 handle,規定必須跟其所屬的 Qdisc 具有同一個 major number。也就是說:若一個 Qdisc 的 handle 是 `a:0`,則其底下的 class 的 handle 都會具有 `a:b` 的形式,其中 `b` 是一個正數。這個在 `tc(8)` 的文件中也可以找到:
> **QDISCS** *A qdisc, which potentially can have children, gets assigned a major number, called a 'handle', leaving the minor number namespace available for classes...*
### Class 的 Handle
另外,class 的 handle 名稱形式固定是 `x:y`,其中 `x` 是其所屬的 Qdisc 的 handle,而 `y` 則是一個不重複的編號:
> *handles are written x:y where x is an integer identifying a qdisc and y is an integer identifying a class belonging to that qdisc. The handle for a qdisc must have zero for its y value and the handle for a class must have a non-zero value for its y value. The "1:" above is treated as "1:0".*
## Qdisc
### `tc qdisc show` --- 顯示目前的 Qdisc
若想知道一個 namespace 中的所有 interface 上面所連接的 qdisc 的相關資訊,可以使用 `tc qdisc` 中的 `show` 命令。比如說,如果想知道 `$L_NS` 中的 interface 所連接的 qdisc,可以用以下的命令。
```shell
$ sudo tc -n "$L_NS" qdisc show
```
會輸出類似以下的結果:
```clike
qdisc noqueue 0: dev lo root refcnt 2
qdisc noqueue 0: dev left-veth root refcnt 2
```
在這個例子中,`left-veth` 這個 interface 連接著一個 `noqueue` qdisc。而
### 新增一個 Qdisc
接下來會在 `$L_NS` 中的

以上面的環境來說,可以使用:
```shell
$ sudo tc -n "$L_NS" qdisc add dev "$L_DEV" root handle 1: htb default 30
```
在 `"$L_NS"` 中的 `"L_DEV"` 的 root 上加上一個 `handle` 為 `1:0` 的 HTB。這時候如果再執行一次:
```shell
$ sudo tc -n "$L_NS" qdisc show
```
會發現 `left-veth` 這個 interface 的 root qdisc 從原先的 `noqueue` 變成了 `htb`:
```clike
qdisc noqueue 0: dev lo root refcnt 2
qdisc htb 1: dev left-veth root refcnt 2 r2q 10 default 0x30 direct_packets_stat 0 direct_qlen 1000
```
另外,如果想知道某個 namespace 中的某個 interface 上連接的 qdisc 的相關資訊,則可以用以下的方法:
```shell
$ sudo tc -n "$L_NS" qdisc show dev "$L_DEV"
```
這時候就會出現:
```clike
qdisc htb 1: root refcnt 2 r2q 10 default 0x30 direct_packets_stat 1 direct_qlen 1000
```
Qdisc 的 handle 是上面 `handle` 選項中的 `1:`。這個 `1:` 其實是 `1:0` 的意思:
## Class
雖然裡面的圖是這樣:

但實際上是下面這樣:

只是那個 Class 1:1 很畫起圖來有點亂,所以就省略掉。
### `tc class show`
```shell
$ sudo tc -n "$L_NS" class show dev "$L_DEV"
```
這時候會什麼都沒有。
### 新增一個 class
為了方便,定義:
```clike
LIMIT=100mbit
START_RATE=5mbit
P8080_LIMIT=80mbit
P8081_LIMIT=40mbit
DEFAULT_LIMIT=20mbit
```
### Root Class:與 Qdisc 直接相連的 Class
一個 class 可以以一個 classful qdisc 直接相連作為父親。比如說:
```shell
$ sudo tc -n $L_NS class add dev $L_DEV parent 1:0 classid 1:1 htb rate "$LIMIT"
```
像這樣直接與 qdisc 相連的 class 稱作一個 *root class*:
> *The first line creates a "root" class, 1:1 under the qdisc 1:. The definition of a root class is one with the htb qdisc as its parent.*
如果這時候使用
```shell
$ sudo tc -n "$L_NS" class show dev "$L_DEV"
```
就會出現:
```clike
class htb 1:1 root prio 0 rate 100Mbit ceil 100Mbit burst 1600b cburst 1600b
```
### 與其他 Class 連接的 Class
除此之外,也可以以一個 class 作為父親,形成一系列 class 的階層:
```shell
$ sudo tc -n $L_NS class add dev $L_DEV parent 1:1 classid 1:10 htb rate "$START_RATE" ceil "$P8080_LIMIT"
$ sudo tc -n $L_NS class add dev $L_DEV parent 1:1 classid 1:20 htb rate "$START_RATE" ceil "$P8081_LIMIT"
$ sudo tc -n $L_NS class add dev $L_DEV parent 1:1 classid 1:30 htb rate "$START_RATE" ceil "$DEFAULT_LIMIT"
```
以這邊為例,在 handle 為 `1:1` 的 class 底下又新增了 3 個 class,他們的 handle 分別是 `1:10`、`1:20` 與 `1:30`。
```shell
$ sudo tc -n "$L_NS" class show dev "$L_DEV"
```
```clike
class htb 1:1 root rate 100Mbit ceil 100Mbit burst 1600b cburst 1600b
class htb 1:10 parent 1:1 prio 0 rate 5Mbit ceil 80Mbit burst 1600b cburst 1600b
class htb 1:20 parent 1:1 prio 0 rate 5Mbit ceil 40Mbit burst 1600b cburst 1600b
class htb 1:30 parent 1:1 prio 0 rate 5Mbit ceil 20Mbit burst 1600b cburst 1600b
```
可以加上 `-g` 選項。這樣一來就會畫出樹狀階層:
```shell
$ sudo tc -g -n "$L_NS" class show dev "$L_DEV"
```
```
+---(1:1) htb rate 100Mbit ceil 100Mbit burst 1600b cburst 1600b
+---(1:10) htb prio 0 rate 5Mbit ceil 80Mbit burst 1600b cburst 1600b
+---(1:20) htb prio 0 rate 5Mbit ceil 40Mbit burst 1600b cburst 1600b
+---(1:30) htb prio 0 rate 5Mbit ceil 20Mbit burst 1600b cburst 1600b
```
### Root Class 與其他 Class 的差異
而這兩者的差別是:root class 之間沒辦法做 borrowwing:
> *A root class, like other classes under an htb qdisc allows its children to borrow from each other, but one root class cannot borrow from another.*
最後,如同前面的描述,在一個 Qdisc 當中的 class 形成的諸多 tree 當中,所有的 leaf class 最終需要有一個 qdisc 來把分類之後的封包排進去傳送。而如果沒有指定,這個預設的 qdisc 會是 pfifo:
> *Now we can optionally attach queuing disciplines to the leaf classes. If none is specified the default is pfifo.*
這時候如果使用:
```shell
$ sudo tc -n "$L_NS" qdisc show dev "$L_DEV"
```
就會出現:
```clike
qdisc htb 1: root refcnt 2 r2q 10 default 0x30 direct_packets_stat 2 direct_qlen 1000
```
## Filter

### 簡介
有了 Qdisc 的構造之後,可以藉由 filter 選擇該網封包送往哪個 qdisc。以下面的圖為例,有 3 個 filter 可以決定進入這個 qdisc 的封包要送往哪個 class:

### `tc filter show`
```shell
$ sudo tc -n "$L_NS" filter show dev "$L_DEV"
```
### 新增 filter
```
$ sudo tc -netns $L_NS filter add dev $L_DEV protocol ip parent 1:0 prio 1 u32 match ip dport 8080 FFFF flowid 1:10
```
```shell
$ sudo tc -n "$L_NS" filter show dev "$L_DEV"
```
```clike
filter parent 1: protocol ip pref 1 u32 chain 0
filter parent 1: protocol ip pref 1 u32 chain 0 fh 800: ht divisor 1
filter parent 1: protocol ip pref 1 u32 chain 0 fh 800::800 order 2048 key ht 800 bkt 0 flowid 1:10 not_in_hw
match 00001f90/0000ffff at 20
```
```shell
$ sudo tc -netns $L_NS filter add dev $L_DEV protocol ip parent 1:0 prio 1 u32 match ip dport 8081 FFFF flowid 1:20
```
```shell
$ sudo tc -n "$L_NS" filter show dev "$L_DEV"
```
```clike
filter parent 1: protocol ip pref 1 u32 chain 0
filter parent 1: protocol ip pref 1 u32 chain 0 fh 800: ht divisor 1
filter parent 1: protocol ip pref 1 u32 chain 0 fh 800::800 order 2048 key ht 800 bkt 0 flowid 1:10 not_in_hw
match 00001f90/0000ffff at 20
filter parent 1: protocol ip pref 1 u32 chain 0 fh 800::801 order 2049 key ht 800 bkt 0 flowid 1:20 not_in_hw
match 00001f91/0000ffff at 20
```
## 測試
### 啟動 iperf3 伺服器
如果在 `$R_NS` 啟動三個 `iperf3` 的伺服器:
```shell
$ sudo ip netns exec "$R_NS" iperf3 -s -p 8080 &> /dev/null &
$ sudo ip netns exec "$R_NS" iperf3 -s -p 8081 &> /dev/null &
$ sudo ip netns exec "$R_NS" iperf3 -s -p 8082 &> /dev/null &
```

### 建立 `iperf3` 連線
並且在 `$L_NS` 使用 3 個 client 跟剛剛建立的 `iperf` 伺服器建立連線:
```shell
$ sudo ip netns exec "$L_NS" iperf3 -t 4 -c "$R_IP" -p 8080
$ sudo ip netns exec "$L_NS" iperf3 -t 4 -c "$R_IP" -p 8081
$ sudo ip netns exec "$L_NS" iperf3 -t 4 -c "$R_IP" -p 8082
```
就會出現類似以下的結果:
```
Connecting to host 172.16.16.20, port 8080
[ 5] local 172.16.16.10 port 40998 connected to 172.16.16.20 port 8080
[ ID] Interval Transfer Bitrate Retr Cwnd
[ 5] 0.00-1.00 sec 9.70 MBytes 81.4 Mbits/sec 0 112 KBytes
[ 5] 1.00-2.00 sec 9.20 MBytes 77.1 Mbits/sec 0 112 KBytes
[ 5] 2.00-3.00 sec 8.95 MBytes 75.1 Mbits/sec 0 112 KBytes
[ 5] 3.00-4.00 sec 9.20 MBytes 77.1 Mbits/sec 0 112 KBytes
- - - - - - - - - - - - - - - - - - - - - - - - -
[ ID] Interval Transfer Bitrate Retr
[ 5] 0.00-4.00 sec 37.0 MBytes 77.7 Mbits/sec 0 sender
[ 5] 0.00-4.01 sec 36.6 MBytes 76.5 Mbits/sec receiver
iperf Done.
```
```
Connecting to host 172.16.16.20, port 8081
[ 5] local 172.16.16.10 port 50650 connected to 172.16.16.20 port 8081
[ ID] Interval Transfer Bitrate Retr Cwnd
[ 5] 0.00-1.00 sec 4.92 MBytes 41.2 Mbits/sec 0 62.2 KBytes
[ 5] 1.00-2.00 sec 4.47 MBytes 37.5 Mbits/sec 0 62.2 KBytes
[ 5] 2.00-3.00 sec 4.66 MBytes 39.1 Mbits/sec 0 62.2 KBytes
[ 5] 3.00-4.00 sec 4.66 MBytes 39.1 Mbits/sec 0 76.4 KBytes
- - - - - - - - - - - - - - - - - - - - - - - - -
[ ID] Interval Transfer Bitrate Retr
[ 5] 0.00-4.00 sec 18.7 MBytes 39.2 Mbits/sec 0 sender
[ 5] 0.00-4.01 sec 18.3 MBytes 38.3 Mbits/sec receiver
iperf Done.
```
```
Connecting to host 172.16.16.20, port 8082
[ 5] local 172.16.16.10 port 56912 connected to 172.16.16.20 port 8082
[ ID] Interval Transfer Bitrate Retr Cwnd
[ 5] 0.00-1.00 sec 2.94 MBytes 24.6 Mbits/sec 0 153 KBytes
[ 5] 1.00-2.00 sec 2.49 MBytes 20.9 Mbits/sec 0 153 KBytes
[ 5] 2.00-3.00 sec 2.17 MBytes 18.2 Mbits/sec 0 153 KBytes
[ 5] 3.00-4.00 sec 2.17 MBytes 18.2 Mbits/sec 0 153 KBytes
- - - - - - - - - - - - - - - - - - - - - - - - -
[ ID] Interval Transfer Bitrate Retr
[ 5] 0.00-4.00 sec 9.77 MBytes 20.5 Mbits/sec 0 sender
[ 5] 0.00-4.01 sec 9.14 MBytes 19.1 Mbits/sec receiver
iperf Done.
```