---
tags: sensors
---
# DSP Basics
## What is DSP?
> Digital signal processing (DSP) is the use of digital processing, such as by computers or more specialized digital signal processors, to perform a wide variety of signal processing operations. The digital signals processed in this manner are a sequence of numbers that represent samples of a continuous variable in a domain such as time, space, or frequency.

When we get data from our sensors, we have to be aware that the signals we read **will never ever be perfect**. Every sensor you use will have this issue, and the processing of the readings you make will help you get the actual signal you are looking for.
:::info
**Same same but different**
This class is part of a dsp lectures introduction in python available at [this repository](https://github.com/oscgonfer/sensors_dsp_lectures)
:::
## Thresholding
When we go over a value, do something:

:::spoiler Arduino example
```
int reading; // the reading from the analog input
const int threshold = 20; // the threshold
int inputPin = A0;
int LED = 8;
void setup() {
pinMode(LED, OUTPUT);
}
void loop() {
reading = analogRead(inputPin);
digitalWrite(LED, LOW);
if (reading >= threshold) {
digitalWrite(LED, HIGH);
}
delay(1); // delay in between reads for stability
}
```
:::
:::spoiler Nodered example
```
npm install node-red-contrib-hystheresis
```

:::
### Hysteresis
Dealing with noisy signals and thresholds can provoke our outputs to switch on and off continuously. For this we will use a **hysteresis**:
<p><a href="https://commons.wikimedia.org/wiki/File:Hysteresis_sharp_curve.svg#/media/File:Hysteresis_sharp_curve.svg"><img src="https://upload.wikimedia.org/wikipedia/commons/thumb/a/aa/Hysteresis_sharp_curve.svg/1200px-Hysteresis_sharp_curve.svg.png" alt="Hysteresis sharp curve.svg"></a><br>By <a href="//commons.wikimedia.org/wiki/User:Alejo2083" title="User:Alejo2083">Alessio Damato</a> - <span class="int-own-work" lang="en">Own work</span>, <a href="http://creativecommons.org/licenses/by-sa/3.0/" title="Creative Commons Attribution-Share Alike 3.0">CC BY-SA 3.0</a>, <a href="https://commons.wikimedia.org/w/index.php?curid=528681">Link</a></p>
:::spoiler Arduino example
```
int reading; // the reading from the analog input
const int threshold = 20; // the threshold
const int hysteresis = 2;
int inputPin = A0;
int LED = 8;
void setup() {
pinMode(LED, OUTPUT);
digitalWrite(LED, LOW);
}
void loop() {
reading = analogRead(inputPin);
if (reading >= threshold + hysteresis/2) {
digitalWrite(LED, HIGH);
} elseif (reading <= threshold - hysteresis/2) {
digitalWrite(LED, LOW);
}
delay(1); // delay in between reads for stability
}
```
:::
:::spoiler Nodered example
```
npm install node-red-contrib-hysteresis
```

:::
## Filtering
Filtering is used when we want to **reduce the amount of noise that a signal has**. We call **noise to the unwanted (and, in general, unknown) modifications that a signal may suffer** during capture, storage, transmission, processing, or conversion. The process of removing the noise from a signal is called **filtering**.

Let's look at an example. Since we need to store information from the past, we will use an [array](https://www.arduino.cc/reference/en/language/variables/data-types/array/):
:::spoiler Arduino example
```
/*
Smoothing
Reads repeatedly from an analog input, calculating a running average and
printing it to the computer. Keeps ten readings in an array and continually
averages them.
The circuit:
- analog sensor (potentiometer will do) attached to analog input 0
created 22 Apr 2007
by David A. Mellis <dam@mellis.org>
modified 9 Apr 2012
by Tom Igoe
This example code is in the public domain.
http://www.arduino.cc/en/Tutorial/Smoothing
*/
// Define the number of samples to keep track of. The higher the number, the
// more the readings will be smoothed, but the slower the output will respond to
// the input. Using a constant rather than a normal variable lets us use this
// value to determine the size of the readings array.
const int numReadings = 10;
int readings[numReadings]; // the readings from the analog input
int readIndex = 0; // the index of the current reading
int total = 0; // the running total
int average = 0; // the average
int inputPin = A0;
void setup() {
// initialize serial communication with computer:
Serial.begin(9600);
// initialize all the readings to 0:
for (int thisReading = 0; thisReading < numReadings; thisReading++) {
readings[thisReading] = 0;
}
}
void loop() {
// subtract the last reading:
total = total - readings[readIndex];
// read from the sensor:
readings[readIndex] = analogRead(inputPin);
// add the reading to the total:
total = total + readings[readIndex];
// advance to the next position in the array:
readIndex = readIndex + 1;
// if we're at the end of the array...
if (readIndex >= numReadings) {
// ...wrap around to the beginning:
readIndex = 0;
}
// calculate the average:
average = total / numReadings;
// send it to the computer as ASCII digits
Serial.println(average);
delay(1); // delay in between reads for stability
}
```
:::
:::spoiler Nodered example


:::
## Combination
:::success
The _filt-hy_!


:::
## Gradients
Also know as derivative, is the difference of the current sample (or samples) with it predecessor:

:::spoiler Arduino example
```
int reading; // the reading from the analog input
int previousReading = 0; // the previous reading from the analog input
const int threshold = 20; // the threshold
const int hysteresis = 2;
int inputPin = A0;
int LED = 8;
void setup() {
pinMode(LED, OUTPUT);
digitalWrite(LED, LOW);
}
void loop() {
reading = analogRead(inputPin);
int gradient = reading - previousReading;
if (gradient >= threshold + hysteresis/2) {
digitalWrite(LED, HIGH);
} elseif (gradient <= threshold - hysteresis/2) {
digitalWrite(LED, LOW);
}
previousReading = reading;
delay(1); // delay in between reads for stability
}
```
:::
## More hardcore DSP (just for reference)
### Our new (dsp) best friend: convolution
Convolution is a DSP technique used in many fields, from 1-d signal analysis to more advanced image processing and video analysis in deep learning algorithms (CNN = Convolutional Neural Networks). It is very important to be familiar with it and how it works.
From [DSP Guide](https://www.dspguide.com/ch6/4.htm):
> Convolution is a formal mathematical operation, just as multiplication, addition, and integration. Addition takes two numbers and produces a third number, while convolution takes two signals and produces a third signal. Convolution is used in the mathematics of many fields, such as probability and statistics. In linear systems, convolution is used to describe the relationship between three signals of interest: the input signal, the impulse response, and the output signal.

> Figure 6-8 illustrates (...) a flow diagram of how convolution occurs. Think of the input signal, x[n], and the output signal, y[n], as fixed on the page. The convolution machine, everything inside the dashed box, is free to move left and right as needed. The convolution machine is positioned so that its output is aligned with the output sample being calculated. Four samples from the input signal fall into the inputs of the convolution machine. These values are multiplied by the indicated samples in the impulse response, and the products are added. This produces the value for the output signal, which drops into its proper place. For example, y[n] is shown being calculated from the four input samples: x[3], x[4], x[5], and x[6].
> To calculate y[7], the convolution machine moves one sample to the right. This results in another four samples entering the machine, x[4] through x[7], and the value for y[7] dropping into the proper place. This process is repeated for all points in the output signal needing to be calculated.
As we will see later on, how we shape the function h[n] is very important, and can be used for many different purposes:
- Filters
- Inverters and attenuators
- Calculate derivatives
- Feature extraction ...
> One problem with convolution occurs when the convolution machine is located fully to the left or right of the input signal. In this position, it is trying to receive input from samples: x[-3], x[-2], x[-1] and x[0]. The problem is, three of these samples: x[-3], x[-2] and x[-1] do not exist! This same dilemma arises in (d), where the convolution machine tries to accept samples to the right of the defined input signal, points x[9], x[10] and x[11].
> One way to handle this problem is by inventing the nonexistent samples. This involves adding samples to the ends of the input signal, with each of the added samples having a value of zero. This is called **padding the signal** with zeros. Instead of trying to access a nonexistent value, the convolution machine receives a sample that has a value of zero. Since this zero is eliminated during the multiplication, the result is mathematically the same as ignoring the nonexistent inputs.
#### Build your own
Let's build our own filter. The easiest one of them is just a box, or what we call the rolling average, rolling window, moving average... [more info here](https://en.wikipedia.org/wiki/Moving_average):

_Image source: [Water programming](https://waterprogramming.wordpress.com/)_
:::spoiler Arduino example
```
const int numReadings = 10;
const int filterSize = 4;
const int outputSize = numReadings + filterSize; // We will use padding
int readings[numReadings]; // the readings from the analog input
float freadings[outputSize]; // the filtered readings from the analog input (with padding)
int readIndex = 0; // the index of the current reading
int inputPin = A0;
// the filter
int filter[filterSize] = {1, 1, 1, 1};
float* convolution (int _filter[], int _rbuffer[]) {
static float results[outputSize];
// Fill it up with zeroes
for (int index = 0; index<outputSize;index++){
results[index] = 0;
if (filterSize <= index< numReadings+filterSize){
results[index] = (float)_rbuffer[index-filterSize];
}
}
// Convolution
for (int index = 0; index<outputSize-filterSize;index ++){
int value = 0;
for (int filterindex = 0; filterindex<filterSize; filterindex ++) {
value += results[index+filterindex]* _filter[filterindex];
}
results[index] = value / filterSize;
}
return results;
}
void setup() {
// initialize serial communication with computer:
Serial.begin(9600);
// initialize all the readings to 0:
for (int thisReading = 0; thisReading < numReadings; thisReading++) {
readings[thisReading] = 0;
}
}
void loop() {
readings[readIndex] = analogRead(inputPin);
readIndex = readIndex + 1;
if (readIndex >= numReadings) {
readIndex = 0;
float *freadings = convolution (filter, readings);
}
// Print the arrays
for (int i=0; i<numReadings; i++){
Serial.print(readings[i]);
Serial.print(",");
Serial.println(freadings[i]);
}
delay(1); // delay in between reads for stability
}
```
:::

#### Exponential smoothing
[Exponential smoothing](https://en.wikipedia.org/wiki/Exponential_smoothing) adds an exponential weighting function to our moving average filter. In this case, recent observations are given relatively more weight in forecasting than the older observations.
```
// the filter
int filter[filterSize] = {0, 0.2, 0.5, 1};
```

We can also do this with a function (in this case the basic one), where `α` is `0 < α < 1`:

Or more complex ones ([double](https://en.wikipedia.org/wiki/Exponential_smoothing#Double_exponential_smoothing), [triple](https://en.wikipedia.org/wiki/Exponential_smoothing#Triple_exponential_smoothing)).
#### Caveats
Important facts about **filtering**:
- Not all the noise will be removed. The size of the window will determine how much you clean the signal.
- If you clean the signal too much, you loose amplitude in it and you loose your original signal
- Some filters can introduce phasing (see below)
- If you use convolution, you need to pad your signal, or trim it accordingly
### Detecting peaks
We can now start to do very interesting things. If we use a kernel with this shape:
```
// the filter
int filter[filterSize] = {0, 0, 1, 1}; // rising edge
int filter[filterSize] = {1, 1, 0, 0}; // falling edge
int filter[filterSize] = {0, 1, 1, 0}; // peak
```
We can detect when a rising/falling edge occurs using a threshold. This can even save people's lives if done well:
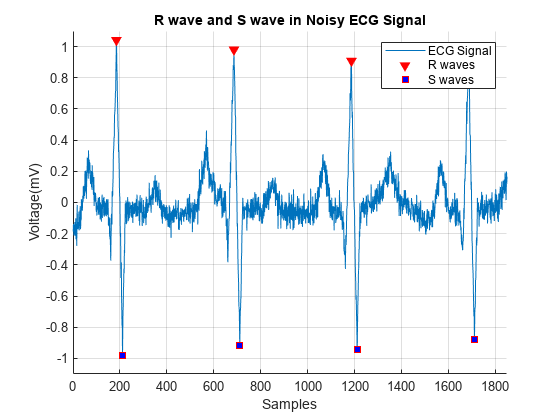
_Image source: Mathworks_
:::spoiler Arduino example
```
const int numReadings = 10;
const int filterSize = 4;
const int outputSize = numReadings + filterSize; // We will use padding
int readings[numReadings]; // the readings from the analog input
float freadings[outputSize]; // the filtered readings from the analog input (with padding)
int readIndex = 0; // the index of the current reading
int inputPin = A0;
int threshold = 20;
int LED = 8;
// the filter
int filter[filterSize] = {0, 1, 1, 0};
float* convolution (int _filter[], int _rbuffer[]) {
static float results[outputSize];
// Fill it up with zeroes
for (int index = 0; index<outputSize;index++){
results[index] = 0;
if (filterSize <= index< numReadings+filterSize){
results[index] = (float)_rbuffer[index-filterSize];
}
}
// Convolution
for (int index = 0; index<outputSize-filterSize;index ++){
int value = 0;
for (int filterindex = 0; filterindex<filterSize; filterindex ++) {
value += results[index+filterindex]* _filter[filterindex];
}
results[index] = value / filterSize;
}
return results;
}
void setup() {
// initialize serial communication with computer:
Serial.begin(9600);
// initialize all the readings to 0:
for (int thisReading = 0; thisReading < numReadings; thisReading++) {
readings[thisReading] = 0;
}
pinMode(LED, OUTPUT);
digitalWrite(LED, LOW);
}
void loop() {
readings[readIndex] = analogRead(inputPin);
readIndex = readIndex + 1;
// if we're at the end of the array...
if (readIndex >= numReadings) {
// ...wrap around to the beginning:
readIndex = 0;
float *freadings = convolution (filter, readings);
}
// Print the arrays
for (int i=0; i<numReadings; i++){
Serial.print(readings[i]);
Serial.print(",");
Serial.println(freadings[i]);
if (freadings[i]> threshold){
digitalWrite(LED, HIGH);
} else {
digitalWrite(LED, LOW);
}
}
delay(1); // delay in between reads for stability
}
```
:::
 Sign in with Wallet


