###### tags: `單元測試`
# 關於單元測試
## 開始之前先推薦一本書
Kent Beck的測試驅動開發:案例導向的逐步解決之道
https://www.books.com.tw/products/0010883019
## 🤔為甚麼要寫測試
### 測試即文件
> 「所有專案都是由兩個人以上所開發的」
一個是你,另一個是別人 (或是N個月後的你)。
當一個不清楚細節的人進到專案裡面時,他可以透過閱讀測試案例來了解該程式碼背後的用意。
### 提高信心/降低修改程式碼的恐懼
大規模重構的時候可以放膽去做,改完一跑測試馬上知道有沒有通過。
### 程式碼品質
- 單一責任原則
- 模組化
- 思考程式碼真正要做的功能
<!-- 當編寫組件時要牢記測試,最終會創建孤立的,更可重用的組件。如果您開始為組件編寫測試,但發現它們不容易測試,則表明您可以重構組件,這最終可以改善它們。 -->
---
## 👀測試的方法論
<!-- 方法論不是這篇文章的重點,所以就用一張圖解釋。 -->

## 🔺測試金字塔
### 甚麼是測試金字塔?
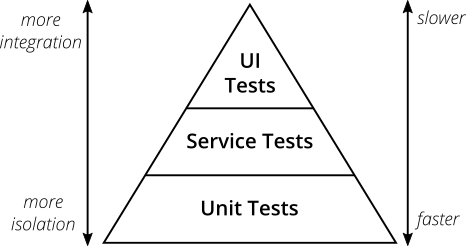
> **測試金字塔**。邁克•科恩(Mike Cohn)在他的著作 “*Succeeding with Agile*” 中提出了這個概念 (2009 年)。
測試金字塔表示測試的組成應該由三層組成 (由下到上)
1. UI測試 (E2E 測試)
2. 整合測試
3. 單元測試
### 兩個重要概念
1. 撰寫不同粒度的測試
2. 測試在越高的層次, 所要進行的測試比例要越少
而撰寫的數量應該要是 單元測試 > 整合測試 > E2E 測試
而不是像一個**冰淇淋甜筒**
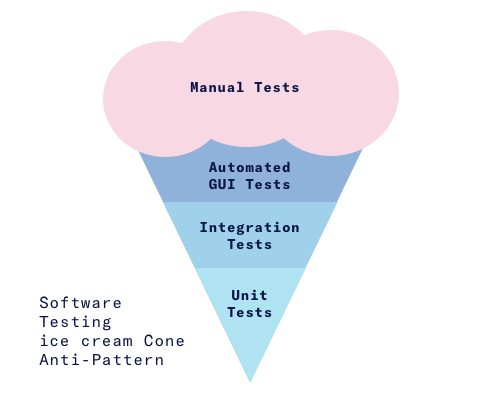
應該要比較像這樣

> ### 不需要太執著於名稱
> 不要對科恩測試金字塔中各個圖層的名稱過於重視。它們可能會引起誤解
> 最重要的是找到適合自己和團隊的術語,明確的編寫不同類型的測試
> **在現在前端 SPA 框架盛行的時代,UI測試也可以是單元測試**
---
## 🙋甚麼是單元? (提問)
<!-- 如果你問三個人,可能會收到四種答案,在某種程度上是沒有正確規範的。
以前端的角度來說,「Function」、「Class method」、「Module」或「Component」都是可測試的標的 -->
## F.I.R.S.T 原則
#### Fast
測試如果跑得不夠快,就不會讓人想常常跑,不常跑的測試最後也就失去的它意義了。
所以實務上會使用mock工具,mock其他依賴的物件或環境,來加速測試的執行。
#### Independent
測試要相互獨立,一個測試不會依賴其他測試,如果互相依賴的話,一個測試的失敗會影響其他測試也跟著失敗,那麼在找問題點的時候將會變得更困難。
#### Repeatable
測試應該要可以在任何環境中重複執行。減少因環境因素而產生測試失敗的問題。
#### Self-validating
測試應該要輸出 Boolean,讓人能夠分辨哪些測試通過與沒通過。作者在書中提到的這點,現今有許多 IDE 都已經能夠輔助做到這一點,例如 vscode 便能夠顯示通過與沒通過的單元測試。
#### Thorough 徹底
測試不應該只追求涵蓋率 100%,更應該追求測盡所有的使用情境。包括 boundary value、數量龐大的資料集、資安、大數、例外處理與非預期的函數數量或輸入。
## ⚠️測試要(不要)做甚麼?
#### 不要測試框架
Vue.js、vue-router、Vuex,這些東西通常作者都已經寫過測試了,我們不需要去測試它。
#### 不要測試第三方庫
如果你使用的第三方 library 並沒有良好的測試的話可能就得考慮該不該使用它,一旦用了你就得相信它
#### 不要過於關注 function 的細節,應該要測試的是可以觀察到的行為。
原因是因為重構的時候有可能會改變內部的實作細節,那麼你的單元測試就壞掉了,然後你就會對那些愚蠢的測試失敗感到厭煩。
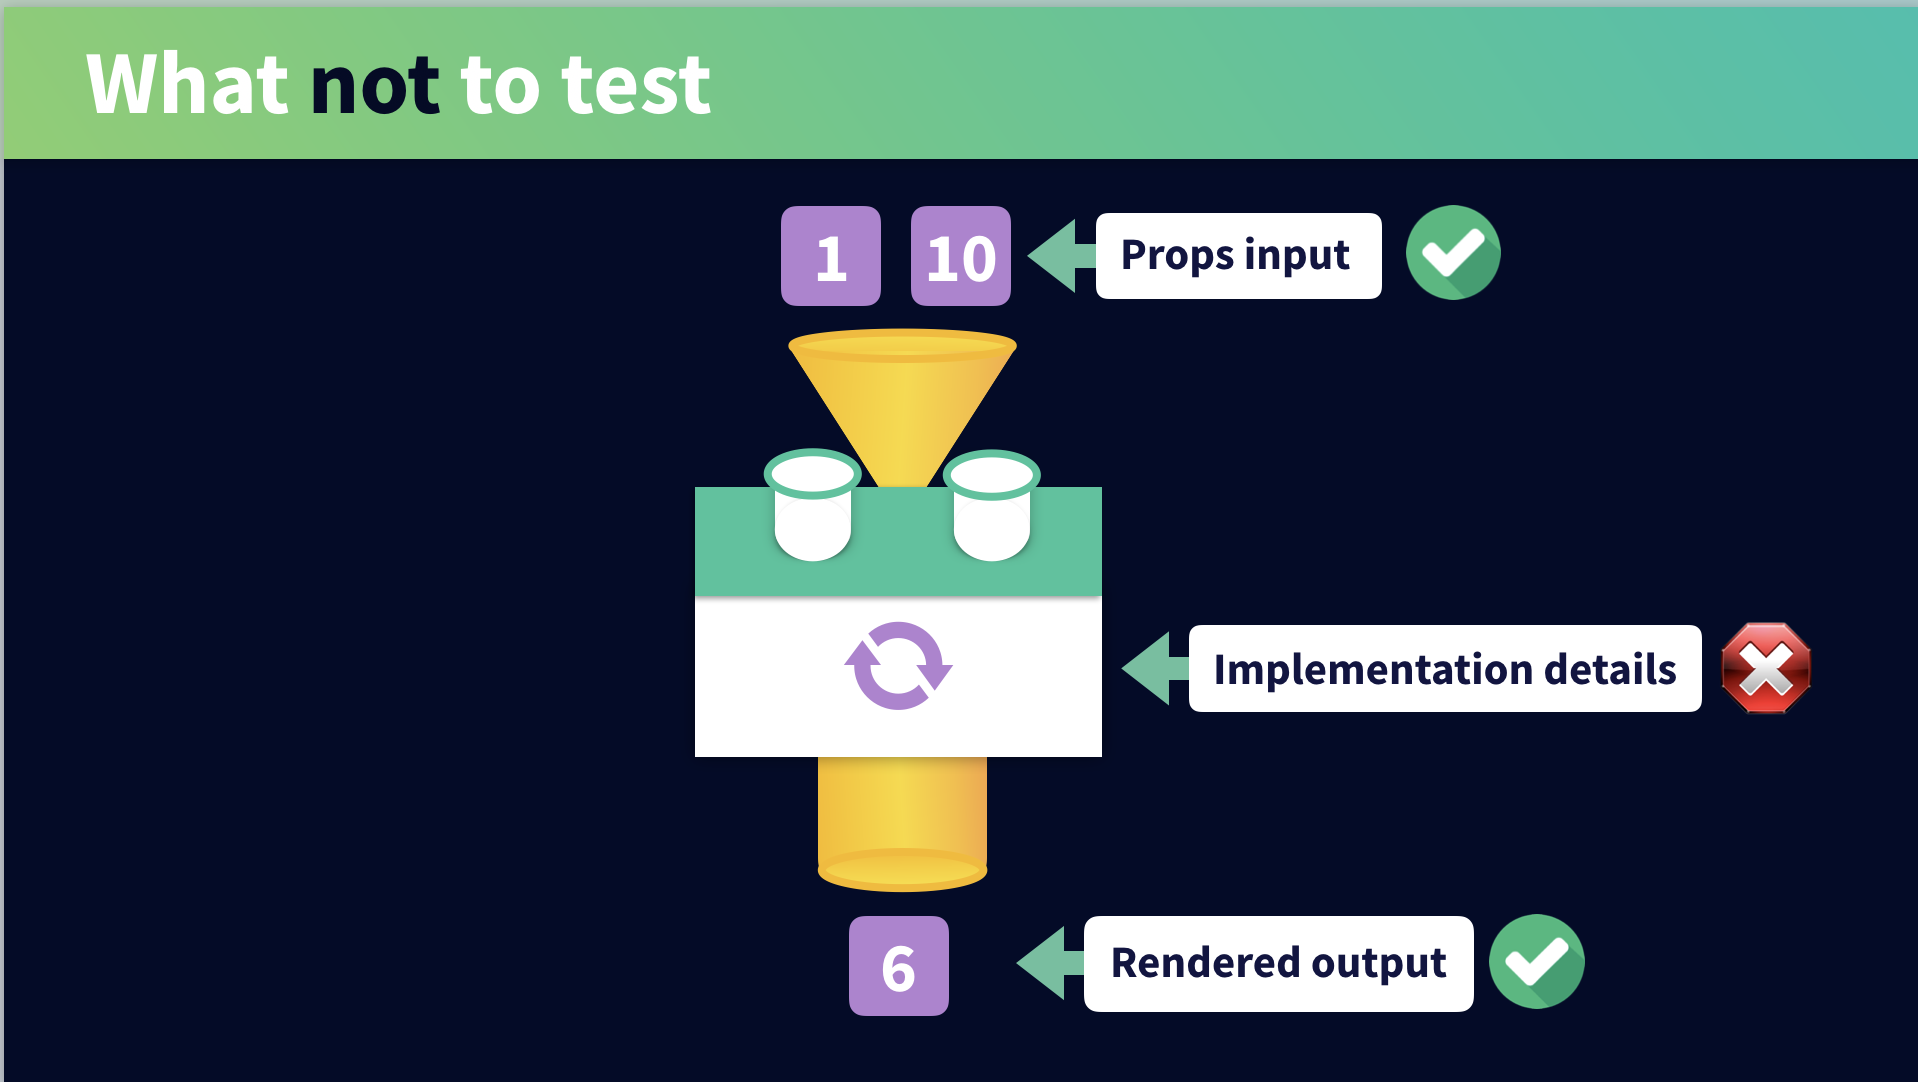
#### 不盲目的追求測試覆蓋率
這一點其實跟上一點是有相關的,因為我們應該更在意的是測試輸入與輸出,而不是細節的代碼,所以覆蓋率可能不會太高,覆蓋率越高也不代表就是完美的,**測試是重質不重量**。
## 🏁單元測試的步驟: 3A
* Arrange: 設置測試資料
* Act: 調用您的被測方法
* Assert: 斷言預期返回的結果
---
## ⚒️工具
要在 Vue.js 中進行測試的話需要安裝 `@vue/test-utils` 和 `jest`,
### [vue-test-utils](https://vue-test-utils.vuejs.org/)
Vue.js 的官方單元測試函式庫。提供許多 API 給開發者進行測試。
例如: monut()、shallowMount()、setProps、destroy...
### [Jest](https://jestjs.io/en/)
Jest是一個令人愉悅的JavaScript測試框架,專注於簡單性。
它適用於使用以下項目的項目:Babel,TypeScript,Node,React,Angular,Vue等!
**他號稱...**
- zero config
- snaoshots
- isolated
- great api
- etc.
---
# 實作
## 安裝
請參考下面兩個連結
https://vue-test-utils.vuejs.org/zh/guides/getting-started.html#%E5%AE%89%E8%A3%85
https://vue-test-utils.vuejs.org/zh/guides/#%E7%94%A8-jest-%E6%B5%8B%E8%AF%95%E5%8D%95%E6%96%87%E4%BB%B6%E7%BB%84%E4%BB%B6
裝完之後就會一個 npm script `test:unit`,但這個是下一次跑一次的指令
所以我們可以多一行 `"test:unit:watch": "vue-cli-service test:unit --watch"`
這樣就可以持續跑著 jest,修改完儲存馬上再跑一次。
## 測試檔案擺放位置
Jest 推薦你在被測試代碼的所在目錄下創建一個 `__tests__` 目錄
```
📂src
┣ 📂components
┃ ┗ 📜Button.vue
┃ ┗ 📂__tests__
┃ ┗ 📜Button.spec.js // xxx.spec.js or xxx.test.js 皆允許
┣ 📂views
┃ ┗ 📜login.vue
┃ ┗ 📂__tests__
┃ ┗ 📜login.test.js
┗ 📂other
```
---
## Jest API
### describe
describe 創造一整個區塊,裡面包含許多測試用例 (test case),表示一組相關的測試。
```javascript=
describe("測試 foo 函式", () => {
//...
});
```
### test/it
test/it 區塊稱為測試用例,表示一個單獨的測試,是測試中的最小單位。
```javascript=
describe("測試 foo 函式", () => {
it("輸入 a, b,應該返回 c", () => {
//...
});
});
```
### expect 斷言
所謂斷言,就是判斷源碼的實際執行結果與預期結果是否一致,如果不一致就拋出一個錯誤。
```javascript=
describe("測試 foo 函式", () => {
it("輸入 a, b,應該返回 c", () => {
expect(foo(a, b)).toBe(c);
});
});
```
expect() 後面還有許多方法可用,常用的有
- .toBe()
- .toEqual()
- .toMatch()
- .not()
- .toBeTruthy(), .toBeFalsy()
- .toBeCalled()
- ...
更多請參考 [Expect](https://jestjs.io/docs/en/expect)
### beforeEach、afterEach
在每一個測試案例之前/之後,執行某一段程式。
常用來先執行某些重複的行為,例如: 初始化待測物件、銷毀待測物件
### beforeAll、afterAll
在全部測試案例之前/之後,執行某一段程式。
---
## Vue test utils API
### mount
回傳一個被掛載和渲染的組件的 `wrapper`
### shallowMount
和 `mount` 一樣,回傳一個被掛載和渲染的組件的 `wrapper`,不同的是 `shallowMount` 會忽略子組件,只掛載組件本身。
<!-- 單元測試可以粗略地分成社交型與孤立型,所謂社交型是 -->
如果你想單獨測試組件的話用 shallowMount,想測試整組的話用 mount
### Wrapper
Wrapper 是一個包含掛載組件或是 vnode,也包含了測試他們(被掛載組件或是 vnode)的方法
使用 mount or shallowMount 後可以產生 wrapper
而 wrapper 常用的方法有
### vm
Vue 的實例,wrapper.vm 可以訪問一個實例中的所有方法和屬性
### .findComponent(), .findAllComponents()
在 wrapper 中尋找要測試的組件
### .setProps(), .setData()
設置 props、data
### .exists(), .contains()
### .destory()
### .emitted()
更多請參考 [Wrapper](https://vue-test-utils.vuejs.org/api/wrapper/)
---
## 先來個簡單的例子
測試一個加總的函式
<!-- 先建立兩支檔案 `sum.ts`、`sum.spec.ts` -->
```javascript=
// sum.ts
export function sum(a: number, b: number): number {
return a + b;
}
```
```javascript=
// sum.spec.ts
import { sum } from "@/functions/sum.ts";
describe("測試加總函式", () => {
it("1 + 2 應該要等於 3", () => {
expect(sum(1, 2)).toBe(3);
});
});
```
<!-- ### 再一個例子
去重 -->
## UI 組件測試
### 測試渲染
給定 props 「a」 產生 「b」 結果
EX: **測試給定 props 「loggedIn」 後產生的畫面**
```html=
<template>
<div>
<button ref="logOutButton" v-if="loggedIn">登出</button>
<button ref="logInButton" v-else>登入</button>
</div>
</template>
<script>
export default {
props: {
loggedIn: Boolean
}
};
</script>
```
```javascript=
import Vue from 'vue';
import { shallowMount } from '@vue/test-utils';
import Header from '@/components/Header.vue';
describe('測試 Header.vue', () => {
it('當 props loggedIn 為 true 時,顯示登出按鈕,反之則顯示登入按鈕', async () => {
const wrapper = shallowMount(Header, {
propsData: { loggedIn: true },
});
await Vue.nextTick();
expect(wrapper.findComponent({ ref: 'logOutButton' }).exists()).toBe(true);
wrapper.setProps({ loggedIn: false });
await Vue.nextTick();
expect(wrapper.findComponent({ ref: 'logInButton' }).exists()).toBe(true);
});
});
```
<!-- ### 測試非同步行為 -->
**注意**上面的程式碼有用到
<!-- 在編寫測試程式時你將會遇到兩種非同步行為:
1. 來自 Vue 的更新
2. 來自外部行為的更新 -->
```javascript=
await Vue.nextTick()
```
是因為 setProps 之後,為了斷言這個變化,測試需要等待Vue 完成更新,有兩種辦法,一種就是使用 await Vue.nextTick(),一個更簡單且明確的方式則是 await 那個你變更狀態的方法,例如下面這樣直接 await 非同步行為
```javascript=
await wrapper.setProps({ loggedIn: false });
expect(wrapper.findComponent({ ref: "logInButton" }).exists()).toBe(true);
```
需要被 await 的方法有:
- setData
- setValue
- setChecked
- setSelected
- setProps
- trigger
### 測試操作
**測試 onclick 後觸發 emit 事件**
```html=
<template>
<div>
<button ref="logOutButton" v-if="loggedIn" @click="$emit('logout')">
登出
</button>
<button ref="logInButton" v-else @click="$emit('login')">登入</button>
</div>
</template>
```
```javascript=
import Vue from "vue";
import { shallowMount } from "@vue/test-utils";
import Header from "@/components/Header.vue";
describe("測試 Header.vue", () => {
//...
it("點擊登出按鈕 emit logout 事件", () => {
const wrapper = shallowMount(Header, {
propsData: { loggedIn: true },
});
const target = wrapper.findComponent({ ref: "logOutButton" });
target.trigger("click");
expect(wrapper.emitted("logout"));
});
it("點擊登出按鈕 emit login 事件", () => {
const wrapper = shallowMount(Header, {
propsData: { loggedIn: false },
});
const target = wrapper.findComponent({ ref: "logInButton" });
target.trigger("click");
expect(wrapper.emitted("login"));
});
});
```
看到這裡有沒有覺得可以簡化一下了
優化後的版本
```javascript=
//...
const factory = (values = {}) => {
return shallowMount(Header, {
propsData: {
...values
}
});
};
describe("測試 Header.vue", () => {
// ...
it("點擊登出按鈕 emit logout 事件", () => {
const wrapper = factory({ loggedIn: true });
wrapper.findComponent({ ref: "logOutButton" }).trigger("click");
expect(wrapper.emitted("logout"));
});
it("點擊登出按鈕 emit login 事件", () => {
const wrapper = factory({ loggedIn: false });
wrapper.findComponent({ ref: "logInButton" }).trigger("click");
expect(wrapper.emitted("login"));
});
});
```
### 不純 UI 組件測試 (非同步操作)
<!-- #### computed
-->
### 模擬使用者輸入
```javascript=
<template>
<div>
<form @submit.prevent="handleSubmitAsync">
<input v-model="username" data-username>
<input type="submit">
</form>
<div
class="message"
v-if="submitted"
>
Thank you for your submission, {{ username }}.
</div>
</div>
</template>
<script>
export default {
name: "FormSubmitter",
data() {
return {
username: "",
submitted: false
};
},
methods: {
handleSubmit() {
this.submitted = true;
},
handleSubmitAsync() {
return this.$http
.get("/api/v1/register", { username: this.username })
.then(() => {
this.submitted = true;
})
.catch(e => {
throw Error("Something went wrong", e);
});
}
}
};
</script>
```
```javascript=
import { shallowMount } from "@vue/test-utils";
import FormSubmitter from "@/components/FormSubmitter.vue";
import flushPromises from "flush-promises";
let url = "";
let data = "";
const mockHttp = {
get: (_url, _data) => {
return new Promise((resolve, reject) => {
url = _url;
data = _data;
resolve();
});
}
};
describe("FormSubmitter", () => {
it("reveals a notification when submitted", async () => {
const wrapper = shallowMount(FormSubmitter, {
mocks: {
$http: mockHttp
}
});
wrapper.find("[data-username]").setValue("alice");
wrapper.find("form").trigger("submit.prevent");
await flushPromises();
expect(wrapper.find(".message").text()).toBe(
"Thank you for your submission, alice."
);
expect(url).toBe("/api/v1/register");
expect(data).toEqual({ username: "alice" });
});
});
```
### Vuex
todo
---
# 總結
對於一個從來沒寫過測試的我來說,寫測試真的是很難開始,而且網路上的測試教學文章不多,還好最後有找到一個還不錯的 [Vue测试指南](https://lmiller1990.github.io/vue-testing-handbook/zh-CN/)
## 何時寫測試
在 Vue 的文件裡面有提到當一個應用開始建立起來並且有真實的用戶對這個應用產生興趣,那麼單元測試就是必要的了。
而我會想要寫測試會是因為我覺得這一段 code 我沒有那麼有把握,因此我寫測試來降低我對於 bug 出現的恐懼。
## 寫測試的感覺
我覺得比較像是在做程式碼的保險措施,當程式碼越過那條你所設下的界線的時候他就會響起警報,還蠻有趣的。
---
# 參考
## 🔗參考資料
- https://martinfowler.com/articles/practical-test-pyramid.html#TestStructure
- https://watirmelon.blog/testing-pyramids/
- http://otischou.tw/2019/08/02/unit-test.html
- https://dev.to/briwa/a-series-of-my-unfortunate-mistakes-when-writing-tests-h8m?utm_source=additional_box&utm_medium=internal&utm_campaign=regular&booster_org=&fbclid=IwAR3H9GfX7CRSka0VzTOBTVjwQhAaArk99ARl-6BjimahFw9XST_rgaiR1Ek
- https://medium.com/@envive.tw/%E5%89%8D%E8%A8%80-%E6%9A%B4%E8%B5%B0gandhi-%E4%B8%8D%E7%9F%A5%E9%81%93%E5%A4%A7%E5%AE%B6%E6%9C%89%E6%B2%92%E6%9C%89%E7%8E%A9%E9%81%8E%E4%B8%80%E6%AC%BE%E9%81%8A%E6%88%B2%E5%8F%AB%E5%81%9A-civilization-%E6%96%87%E6%98%8E%E5%B8%9D%E5%9C%8B-441891b116d7
- https://medium.com/@envive.tw/%E5%BE%9E%E7%AF%84%E4%BE%8B%E5%AD%B8%E7%BF%92-vue-js-%E7%9A%84-unit-test-44e6f9f1b903
- [使用 Jest 進行 Front-End Unit Test(線上 React 讀書會版)](https://speakerdeck.com/patw0929/shi-yong-jest-jin-xing-front-end-unit-test-xian-shang-react-du-shu-hui-ban)
- [2017-07-20
[vue]如何為vue補上單元測試來確保品質(vue單元測試系列-1)](https://dotblogs.com.tw/kinanson/2017/07/20/075338)
- [探討單元測試和整合測試的涵蓋範圍](https://ithelp.ithome.com.tw/articles/10229734)
- [Defining Test Boundaries – An example](https://www.simpleorientedarchitecture.com/defining-test-boundaries/)
- [UnitTest](https://martinfowler.com/bliki/UnitTest.html)
## 😂有趣的討論
- [[懶人包]DHH: TDD is dead. Long live testing. 懶人包整理](https://dotblogs.com.tw/hatelove/2014/05/03/relative-articles-of-dhh-tdd-is-dead)
## 💯技術文件
- [Vue测试指南](https://lmiller1990.github.io/vue-testing-handbook/zh-CN/#%E8%BF%99%E6%9C%AC%E6%8C%87%E5%8D%97%E6%98%AF%E4%BB%80%E4%B9%88%EF%BC%9F)


