# 【vMaker Edge AI專欄 #16】AIPC開箱實測 ─ Yolov8斜物件偵測
作者:Jack OmniXRI, 2024/04/15
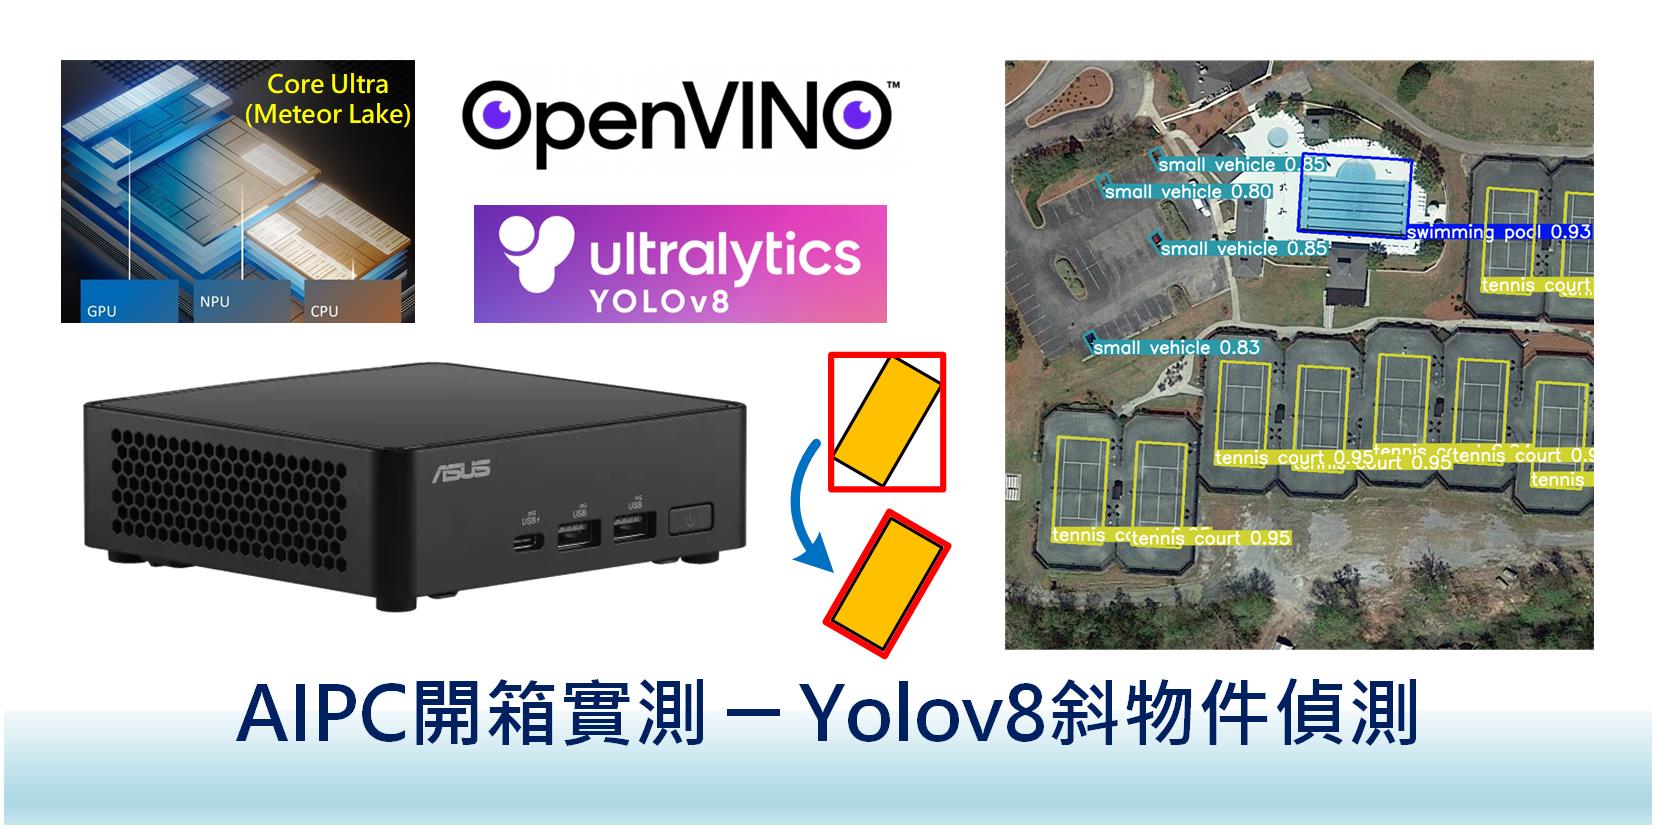
去(2023)年11月英特爾總裁季辛格親自來台北出席 Intel Innovation Taipei 2023,同時展示了最新一代的 AIPC 的 CPU Core Ultra (內部代號:Meteor Lake)。這是Intel首次將神經網路處理單元(Neural Network Processing Unit, NPU)放進 CPU 中,除了讓算力大幅提升,功耗降低外,且很容易搭配自家推論優化工具 OpenVINO Toolkit 的使用,讓目前最流行的大語言模型(LLM)及生成式智慧(AIGC, GenAI)應用也能更順暢地被運行。
今年1月 CES 2024 已有許多廠商展出 AIPC 筆電產品[1],但目前市面上尚無桌機相關產品,不過已有部份廠商推出迷你電腦(NUC),如華碩(ASUS)的NUC 14 Pro[2], 東擎(ASRock)的NUCS/NUC BOX 155H/125H[3]。此次本文將使用ASUS NUC 14 Pro來進行開箱測試。
以往在AI電腦視覺應用中,物件偵測(Object Detection)是很常見的技術,其中又以YOLO系列最具代表性。當影像進行推論後,通常會將找到的物件標示一個矩形邊界盒(Bounding Box),不過當物件較多且傾斜一個角度時,很容易出現和相鄰物件重疊,不易識別的問題。因此就有旋轉邊界盒(Oriented Bounding Boxes, OBB)偵測技術被提出[4],將找到的物件計算出旋轉角度後,再標示一個旋轉的邊界盒,如此就能產生一個更貼近原始物件的外框,讓辨識上能更清楚地呈現結果。
接下來就從 AIPC 硬體規格、安裝工作環境、旋轉物件偵測及在不同硬體運行效能分析比較等方面幫大家做一個完整的介紹。如果大家手上沒有AIPC,也不用擔心,本文的OpenVINO範例在 Intel Core(6到14代), Atom, Pentium 甚至 Xeon(Google Colab), Arm(Apple M1, M2) 等系列 CPU 及內顯 iGPU (HD Graph, Iris, Arc)都能執行,只是效能會有所不同而已。
## 1. AIPC 硬體規格簡介
本次使用的硬體為【**Asus NUC 14 PRO**】[2],主要就是使用 Intel Core Ultra CPU, 自帶 GPU 及 NPU,非常適合進行AI推論應用,基本規格如下所示。
- CPU: Intel® Core™ Ultra 5 125H, 3.6GHz, 4 x Performance-core, 8 x Efficient-core, 2 x Low Power-core (with GPU / NPU)
- GPU: Intel® Arc™ GPU
- NPU: 10 TOPS
- RAM: DDR5 5600 32GB
- SSD: Samsung MZVL2512HDJD-00B07 512GB
- Wireless: Intel® Wi-Fi 6E AX211, 2x2, and Bluetooth® 5.3
- LAN: 2.5G Ethernet, 10/100/1000/2500 Mbps
- Size: 117mm x 112mm x 37mm
- Weight: 600g
- I/O Port:
- 1 x USB 3.2 Gen2x2 Type C (20Gbps)
- 3 x USB 3.2 Gen2 Type A
- 1 x 2.0 Type-A
- 2 x Thunderbolt 4 Type-C Ports
- 2 x HDMI 2.1 (TMDS) ports
- 1 x RJ45 LAN Port
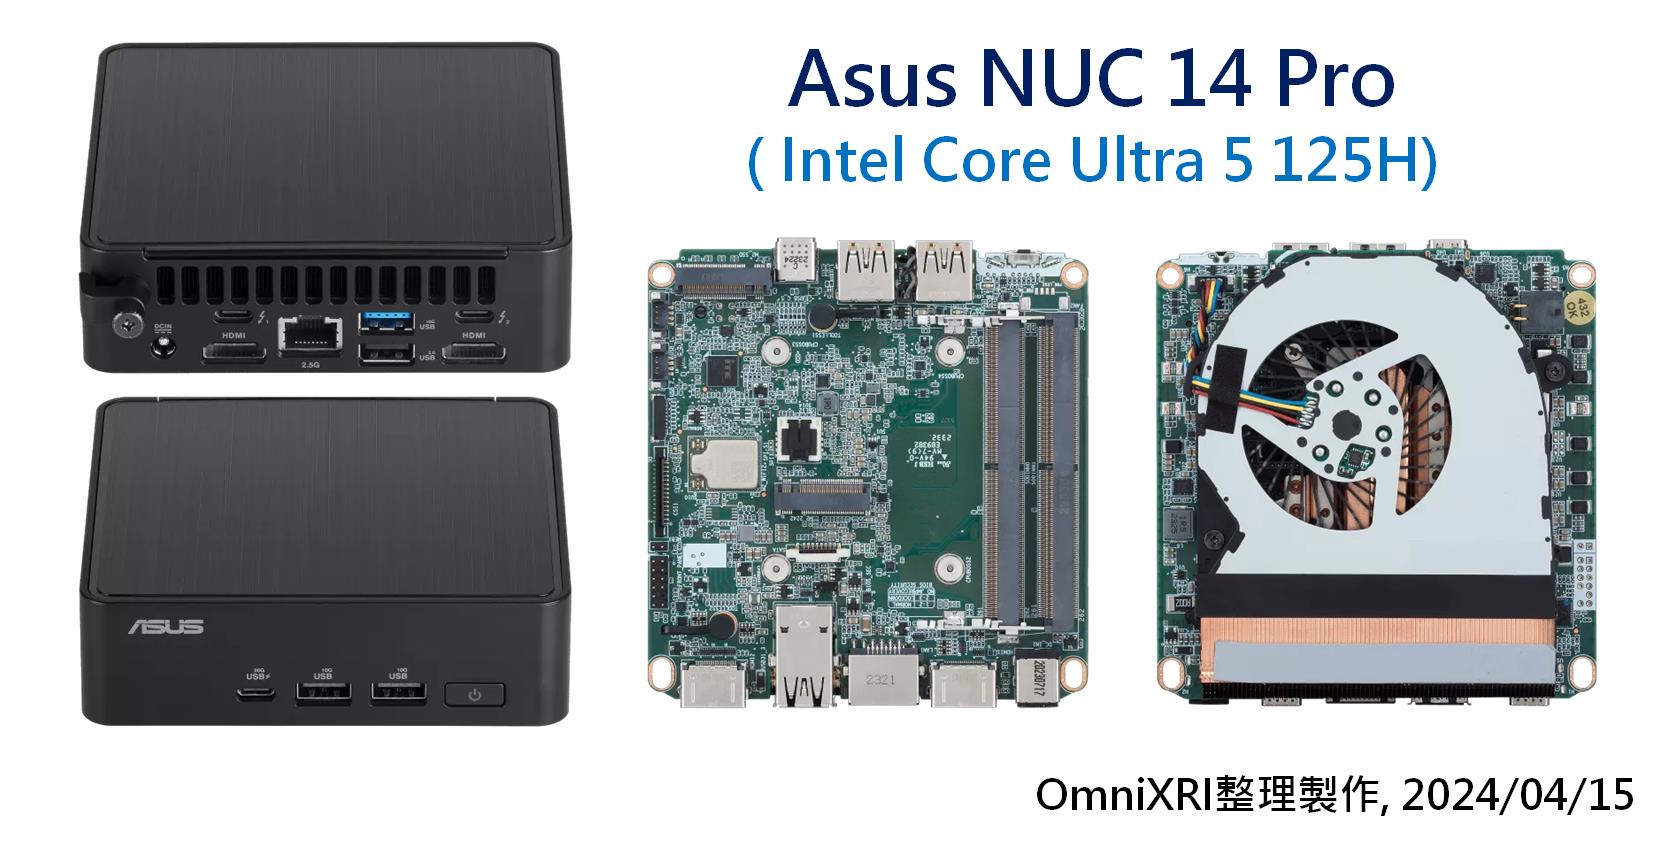
Fig. 1 Asus NUC 14 Pro外觀及內部參考圖。[2]
## 2. 安裝 OpenVINO Notebooks 推論環境
Intel OpenVINO Toolkit[5]是目前最適合用於 Core Ultra 的推論工具,它可完美整合各種AI框架(如TensorFlow, PyTorch, ONNX)開發的模型及AI推論用的硬體,讓Intel CPU, 內顯(iGPU), 外顯(dGPU), 神經加速器(NPU), 都能充份發揮運算效能。
為了更方便學習 OpenVINO, Intel 也於2021.4版後推出 Jupyter Notebook 型式的範例(在[1]中稱為Interactive Tutorials (Python)),並開源在 Github,稱為 Notebooks[6]。目前提供近160種範例,其中有超過一半是 AIGC 及 LLM 相關應用,最新版還提供了快速查找頁面[7],方便大家可依不同分類查找。
目前想使用 Notebooks 的範例,有兩種方式。一是使用雲端執行,只要範例上有 【Open in Colab】 或 【Launch in Binder】符號,點擊後即可快速體驗,不過缺點是受限於雲端資源提供有限,不是所有範例都可在雲端執行。另一是安裝在本地(硬碟)端,可完整享用所有範例,缺點是有很多範例要大量下載模型需要花費很多時間等待。
以下簡單說明 Windows 環境安裝步驟[8],其它作業系統則可參考 Github 說明[6]。
1. 安裝 Python (3.8 ~ 3.10) 皆可,點擊 [3.10.11](https://www.python.org/ftp/python/3.10.11/python-3.10.11-amd64.exe)此連結可直接下載安裝,若已有 Python 則本步驟可略過。
2. 安裝 Git,點擊[2.35.1](https://github.com/git-for-windows/git/releases/download/v2.35.1.windows.2/Git-2.35.1.2-64-bit.exe)此連可直接下載安裝,若已有 Git 則本步驟可略過。
3. 點擊 [Microsoft Visual C++ Redistributable](https://aka.ms/vs/16/release/vc_redist.x64.exe),此連可直接下載安裝,若已有安裝則本步驟可略過。
4. 接下來開啟命令列模式,按 Windows鍵+R ,輸入 cmd,注意不要使用 PowerShell。
5. 由於C:\通常為SSD,容量可能不足,建議可先切換到其它磁碟空間(如x:\),安裝 venv後(若已安裝venv可略過),再操作建立 Python 虛擬環境動作,預設名稱為 openvino_env,使用者可自行更換。
```
x:
pip install venv
python -m venv openvino_env
```
6. 啟動剛才建立好的虛擬環境 openvino_env,啟動成功,提示符號會變成 (openvino_env)x:\> 。
```
openvino_env\Scripts\activate
```
7. 從 Github 上取得 Notebooks,並進入對應路徑。請注意預設會取得最新版本的 Notebooks ,若有需要其它版本請自行切換。
```
git clone --depth=1 https://github.com/openvinotoolkit/openvino_notebooks.git
cd openvino_notebooks
```
8. 安裝完整 Notebooks ,此步驟會依網路傳輸速度不同,約需10~40分鐘。
```
python -m pip install --upgrade pip wheel setuptools
pip install -r requirements.txt
```
9. 啟動 Jupyter Lab ,此時會自動開啟系統預設網頁瀏覽器,左側即會顯示所有範例,可雙擊後進入。若沒有自動開啟,則可手動開啟,再輸入網址 ```localhost:8888``` 即可。若要結束操作,則除了關閉瀏覽器外,還在命令列視窗按兩次 Ctrl+C ,才可回到(openvino_env)x:\openvino_notebooks> 。
```
jupyter lab openvino_notebooks
```
10. 若要結束 Python 虛擬環境可執行下列命令或直接關閉視窗亦可。
```
deactivate
```
11. 下次再進入啟動動時僅需執行下列指令即可。
```
x:
openvino_env\Scripts\activate
cd openvino_notebooks
jupyter lab openvino_notebooks
```
註:如需更完整的安裝及問題排除,可參考Github[8]。
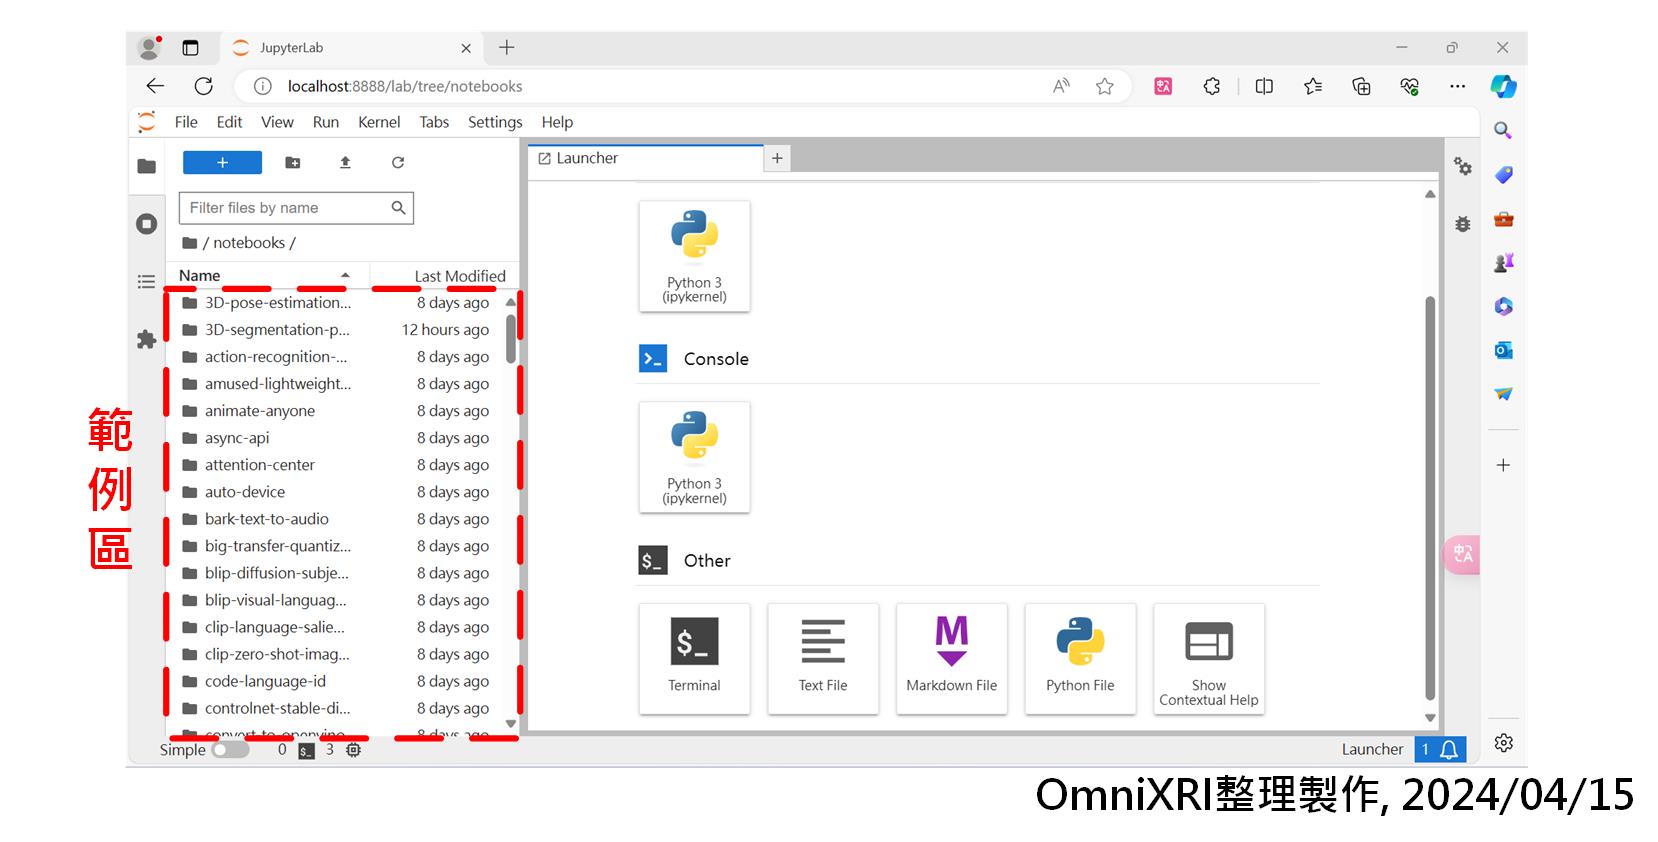
Fig. 2 Intel OpenVINO Notebooks Jupyter Lab啟動畫面。(OmniXRI整理製作,2024/04/15)
## 3. 旋轉物件偵測簡介
目前 Notebooks latest 版中在「yolov8-optimization」檔案夾下提供下列幾個範例。
- 影像實例分割 yolov8-instance-segmentation.ipynb
- 關鍵點(姿態)偵測 yolov8-keypoint-detection.ipynb
- 一般物件偵測 yolov8-object-detection.ipynb
- 旋轉物件偵測 yolov8-obb.ipynb
其中旋轉邊界盒(Oriented Bounding Boxes, OBB)偵測範例「yolov8-obb.ipynb」只有latest版中有提供,在2023.1~2024.0版只有前三項範例,且檔名前多了「230-」識別文字。
「yolov8-obb.ipynb」這個範例有提供Colab雲端版[9],如果只是想體驗的朋友可直接點擊連結。這裡為了驗證AIPC,所以會採用本地端執行。
由於OBB的資料集標註時多了一個旋轉角度,所以大多數的資料集(如ImageNet, MS COCO)和標註工具(如 LabelImg, Labelme)都沒有支援。Yolov8使用了一個公開資料集 [DOTAv1](https://github.com/ultralytics/ultralytics/blob/main/ultralytics/cfg/datasets/DOTAv1.yaml)進行模型預訓練,主要為空拍影像,共分15類物件,如下所示。如果有需要標註此類影像時,可選用 Roboflow [10] 雲端平台來完成工作。
```
0: plane 飛機
1: ship 船舶
2: storage tank 儲存槽
3: baseball diamond 棒球場
4: tennis court 網球場
5: basketball court 籃球場
6: ground track field 田徑場
7: harbor 港口
8: bridge 橋樑
9: large vehicle 大車
10: small vehicle 小車
11: helicopter 直升機
12: roundabout 圓環
13: soccer ball field 足球場
14: swimming pool 游泳池
```
啟動 Jupyter Lab,進到「yolov8-optimization」檔案夾,雙擊「yolov8-obb.ipynb」,就能開啟這個範例。執行前可先點選選單上「Edit」-「Clear Outputs of All Cells」,清除所有輸出內容,這樣比較好觀察輸出過程的動作。接著再點擊「Kernel」-「Restart Kernel and Run All Cells ...」就能一口氣把程式執行完畢。
「yolov8-obb.ipynb」中已有完整註解說明,這裡簡單摘要一下程式大致動作。
1. Prerequisites: 安裝 Intel OpenVINO、NNCF、Yolov8 必要套件及運行程式必要函式庫。
2. Get PyTorch model: 下載欲執行的 PyTorch 模型,這裡預設是「yolov8l-obb」,如果想下載更小一點的模型,可參考[4]。
3. Prepare dataset and dataloader: 載入 DOTA8 少部份資料集以利後續測試使用。
4. Run inference: 執行推論。這裡要指定推論裝置「device="cpu"」,主要是要驗證PyTorch在未優化前在CPU上推論效能。推論完成會順便把耗時顯示出來。
5. Convert PyTorch model to OpenVINO IR: 將PyTorch模型轉換成OpenVINO IR格式,即xml存放網路結構,bin儲放權重值。
6. Select inference device: **選擇推論裝置**。若在Colab上,只能選'CPU',即Xeon。而本地端則可選擇'CPU','GPU'(這裡指內顯iGPU Iris)和'NPU',通常可以設'AUTO'讓程式自動去挑選合適(效能高)的裝置進行推論。
7. Compile model: 編譯模型。
8. Prepare the model for inference: 準備用於推理的模型。
9. Run inference: 使用IR進行推理。
10. Quantization: 使用 NNCF 對模型進行量化,使其從浮點數32或16位元(FP32/FP16)降至整數8位元(INT8)。這裡需要花一些時間,通常只需準備一個小的資料集進行調校即可。
11. Compare inference time and model sizes: 比較推理時間和模型大小。這裡會調用 OpenVINO 的 benchmark_app 來協助分析效能。
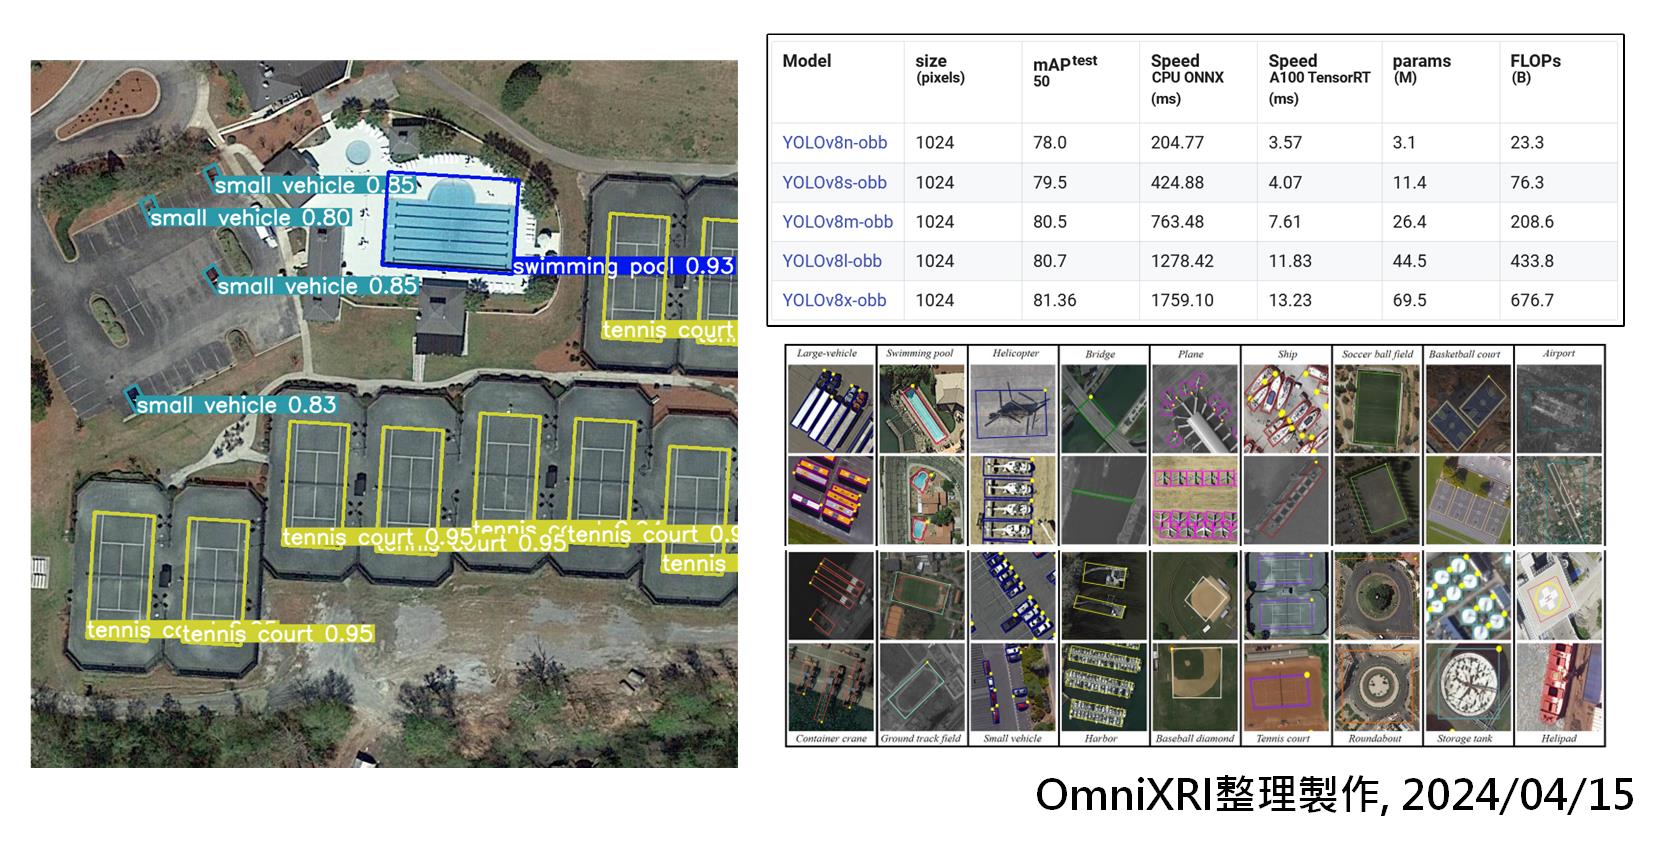
Fig. 3 左:OBB 推論結果,右上:推論模型,右下:DOTA 資料集分類。(OmniXRI整理製作,2024/04/15)
## 4. 運行效能分析比較
接下來就根據上述程式,切換步驟6的選擇裝置,再進行測試,來了解整體運作效益。主要測試項目及結果如所示。
- PyTorch 純 CPU 測試結果: 預處理7ms, 推論2046ms, 後處理6.0ms,相當於 0.49 FPS。(註:模型不經量化及壓縮)
- 效能測試工具: openvino benchmark_app
- OpenVINO 模型壓縮率(FP16 to INT8 with NNCF): 1.997%
- 模型權重數字格式採 FP32 / INT8 進行比較
- 分別使用 AUTO / CPU / iGPU 進行比較,其中AUTO執行時自動採用 iGPU 為主,**NPU 部份在此範例無法正常運行,故不列出**。
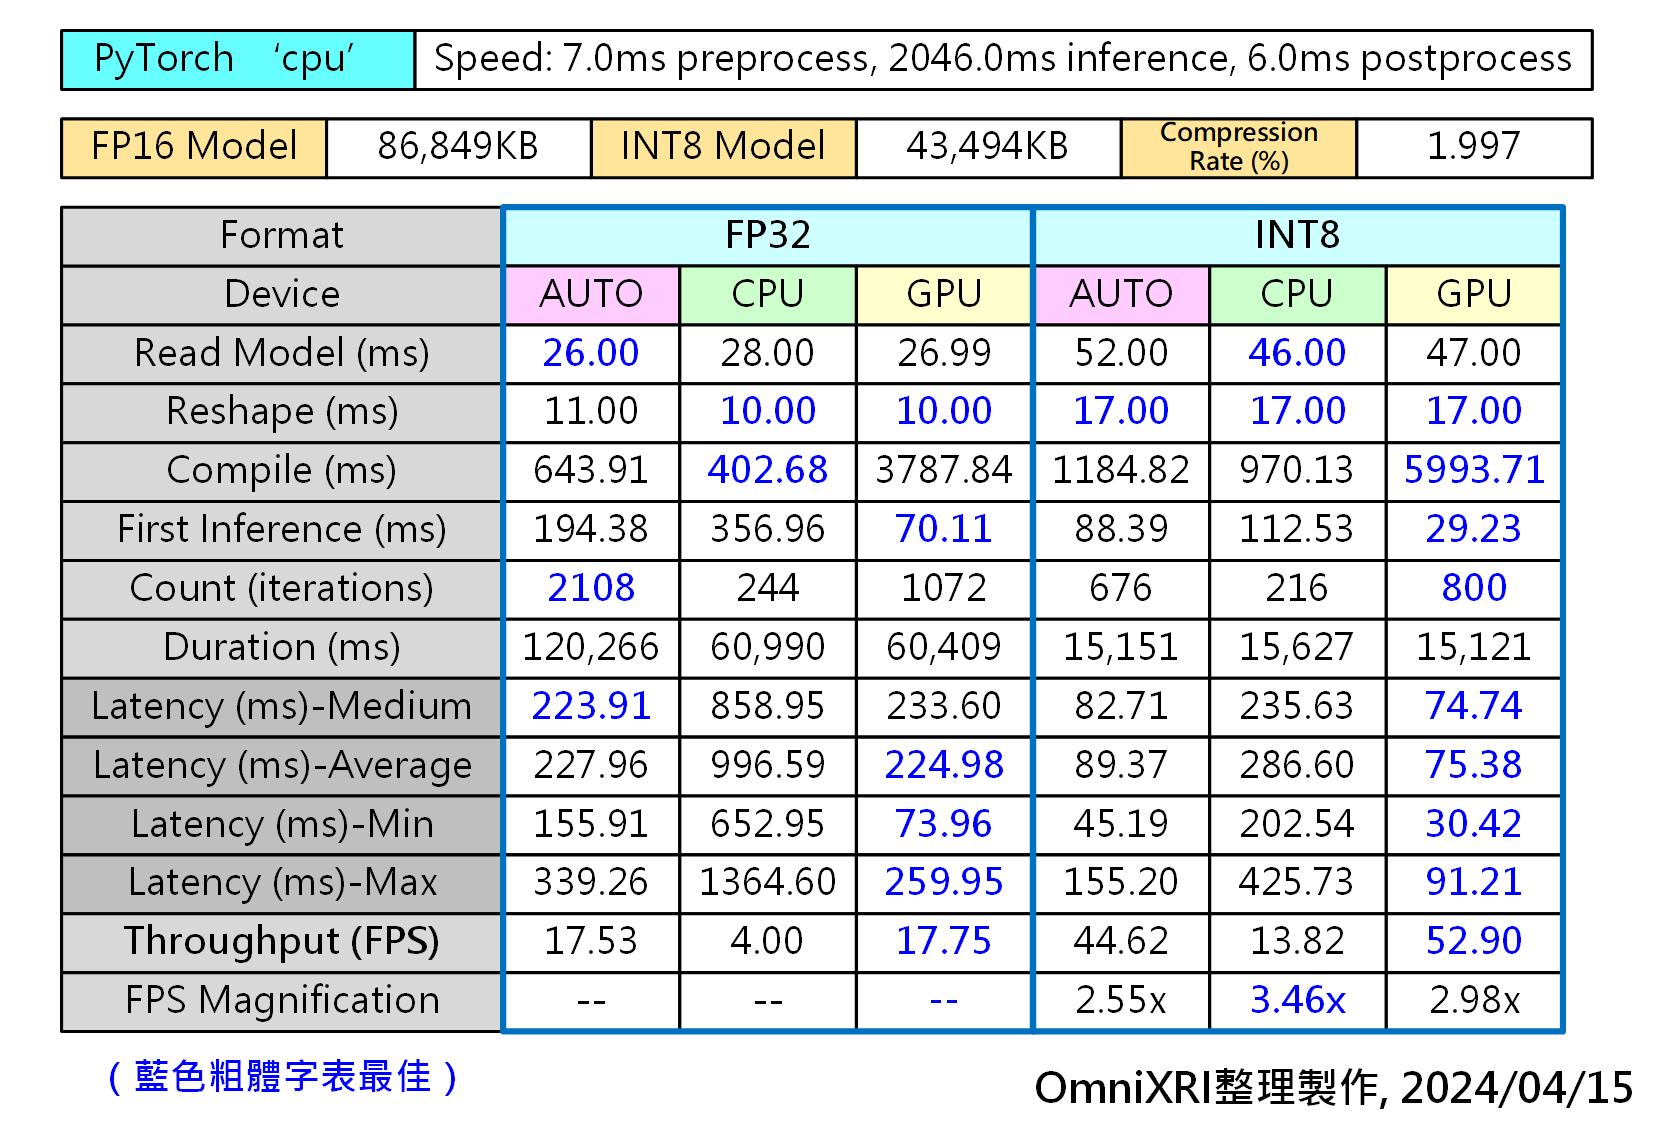
Fig.4 Yolov8-OBB 在不同硬體推論效能比較表。(OmniXRI整理製作,2024/04/15)
由上表結果可知,在推論精度保持接近程度時,可得到下列結果。
- 在純 CPU 下運行 FP32 模型時,OpenVINO 速度比 PyTorch 快約8倍
- FP32 模型經 OpenVINO INT8 量化及 NNCF 模型壓縮後推論速度可提升2至3倍。
- iGPU 相較 CPU 推論速度快3到4倍,但缺點是載入編譯時間非常長。
- 將 Device 改成 AUTO 時,OpenVINO 會先自動調用 CPU 來加快啟動時間,待 iGPU 開始運行時再交回控制權,如此就能有接近 iGPU 的推論效能,也能有接近 CPU 的啟動速度。
以上範例,當 Device 選擇 NPU 時,會產生 ```get_shape was called on a descriptor::Tensor with dynamic shape``` 的錯誤,猜想可能是有用到OpenVINO無法軟轉換的元素。
為了讓大家了解 NPU 的推論效能,這裡改用一般物件偵測範例「yolov8-object-detection.ipynb」進行比較,這個範例最後會使用一小段影像進行偵測,並顯示每秒處理影像數量(FPS)。
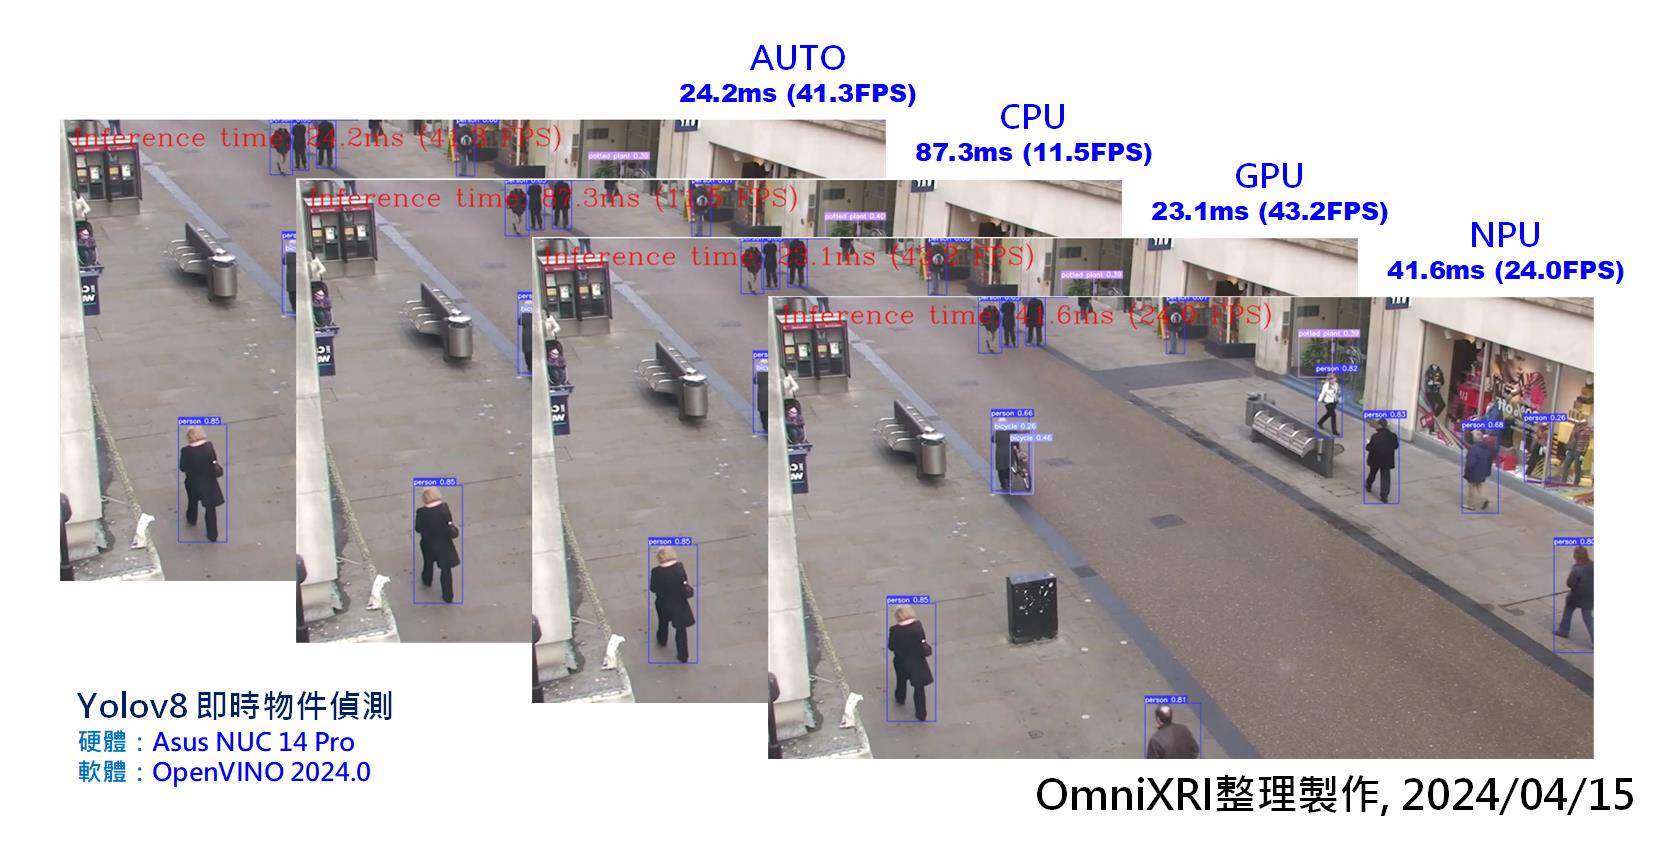
Fig. 5 Yolov8 物件偵測在不同硬體效能評比。(OmniXRI整理製作,2024/04/15)
由上圖可看出,推論效能和先前得到結果接近, iGPU 表現最佳, NPU 次之, CPU 最慢, AUTO 略低於 iGPU 效能。整體來說 iGPU 大約是 CPU 的4倍,是 NPU 的2倍效能。
另外補充一下,推論效能的倍數在不同模型及硬體下,可能會略有不同,這和模型的結構及大小都有關連,這裡的測試數據僅供參考。
## 小結
目前AIPC還在起步階段,在Intel OpenVINO的協助下,已可以輕鬆的調用CPU, iGPU 和 NPU進行推論。雖然NPU在效能上已比CPU來得高,但仍不如iGPU,NPU主要重點是放在低功耗,相信不久的將來NPU的效能就會有大幅提升,那麼高性能低功耗的邊緣推論設備就能變得無處不在,只要發揮大家的創意,那麼生活就會變得更聰明更佳便利。
## 參考文獻
[1] 許哲豪,【vMaker Edge AI專欄 #14】 從CES 2024 看Edge AI及TinyML最新發展趨勢
https://omnixri.blogspot.com/2024/02/vmaker-edge-ai-14-ces-2024-edge-aitinyml.html
[2] 華碩(ASUS), NUC 14 Pro
https://www.asus.com/displays-desktops/nucs/nuc-mini-pcs/asus-nuc-14-pro/
[3] 東擎(ASRock), NUCS BOX 155H/125H, NUC BOX 155H/125H
https://www.asrockind.com/zh-tw/faned-embedded-box-pc
[4] Ultalytics, Oriented Bounding Boxes Object Detection
https://docs.ultralytics.com/tasks/obb/
[5] Intel, OpenVINO Toolkit Document
https://docs.openvino.ai
[6] Intel, Github - OpenVINO Notebooks
https://github.com/openvinotoolkit/openvino_notebooks
[7] Intel, Github - OpenVINO Notebooks at GitHub Pages
https://openvinotoolkit.github.io/openvino_notebooks/
[8] Intel, Github - OpenVINO Notebooks - Windows Installation Guide
https://github.com/openvinotoolkit/openvino_notebooks/wiki/Windows
[9] Intel, Github - Colab - YOLOv8 Oriented Bounding Boxes Object Detection with OpenVINO™
https://colab.research.google.com/github/openvinotoolkit/openvino_notebooks/blob/latest/notebooks/yolov8-optimization/yolov8-obb.ipynb
[10] Roboflow, How to Train an Ultralytics YOLOv8 Oriented Bounding Box (OBB) Model
https://blog.roboflow.com/train-yolov8-obb-model/
## 延伸閱讀
[A] 許哲豪,如何運行Intel OpenVINO Open Model Zoo(OMZ)範例於Google Colab上
https://omnixri.blogspot.com/2024/02/intel-openvino-open-model-zooomzgoogle.html
**本文同步發表在[【台灣自造者 vMaker】](https://vmaker.tw/archives/category/%e5%b0%88%e6%ac%84/jack-omnixri)**
---
OmniXRI 整理製作,歡迎點贊、收藏、訂閱、留言、分享
###### tags: `vMaker` `Edge AI`


