---
tags: ggg, ggg2020,ggg298
---
[toc]
# GGG 298, jan 2020 - Week 3 - conda for software installation!
Titus Brown and Shannon Joslin, Jan 22, 2020
Learning objectives:
* learn the basics of software installation, software dependencies, and isolation environments
* learn about conda and how to use it
* learn about bioconda and how to use it
Other references:
* [ANGUS 2019 lesson](https://angus.readthedocs.io/en/2019/conda_tutorial.html)
* [Why you need Python Environments and How to Manage Them with Conda](https://www.freecodecamp.org/news/why-you-need-python-environments-and-how-to-manage-them-with-conda-85f155f4353c/)
## Why is software installation hard?
It's a confusing ecosystem of operating systems (Mac OS X, many versions of Linux, Windows)
Many software has many dependencies (e.g. just consider base language -- C++, Java, Python, R, and their different versions)

This leads to confusing situations where different versions of underlying software are need to run two different programs -- what if you wanted to run Macs14 and sourmash both, but one wanted 'python' to mean python2 and the other wanted 'python' to mean python3?

Decoupling user-focused software from underlying operating systems is a Big Deal - imagine, otherwise you'd have to rebuild software for every OS! (This is kind of what conda does for you, actually - it's just centralized!)
Also, lot of software installation currently requires (or at least is much easier with) sysadmin privileges, which is inherently dangerous.
**Why do you need isolated software install environments? Some specific reasons:**
* your work relies on a bunch of specific versions (perhaps old versions?)
* working with a collaborator who really likes a particular feature!
* experiment with new packages without messing up current workflow (reproducibility!)
* publication ("here's what I used for software", repeatability!)
* sometimes workflows rely on incompatible software packages! see [my twitter question](https://twitter.com/ctitusbrown/status/1218252506335080449)
Conda tries to solve all of these problems, and (in my experience) largely succeeds. That's what we'll explore today.
Conda is a solution that seems to work pretty well, and can be used by any user. Downsides are that it can get big to have everyone install their own software system, but it's not that big... (The farm admins like it, too!)
Note that conda emerged from the Python world but is now much broader and works for many more software packages.
## Getting started with conda
### Installing conda
(Everyone taking GGG 298 should already have done this, using the instructions in an e-mail titled "farm accounts" that we sent!)
Follow [these instructions](https://docs.conda.io/projects/conda/en/latest/user-guide/install/) to install miniconda. Please use the 64-bit version when working with Python 3.x.
### Installing on farm:
Or, if you're working on farm,
the short version for installing it on farm is:
```
wget https://repo.anaconda.com/miniconda/Miniconda3-latest-Linux-x86_64.sh -O miniconda.sh
echo source ~/.bashrc >> ~/.profile
bash miniconda.sh
```
and then answer yes to everything, and select all the default paths.
### Checking that you can run it
To ensure you've successfully installed conda, log out of the farm by typing
```
exit
```
Then log back in. Once you are back on the farm, you should see a prompt like:
```
(base) ggg298-43@farm:~$
```
Try running:
```
conda --version
```
If that succeeds, you're in good shape for the rest of this tutorial!
### Set up your channels
To make sure all our software installs correctly, let's start by configuring software sources:
```
conda config --add channels defaults
conda config --add channels bioconda
conda config --add channels conda-forge
```
### Creating your first environment & installing FastQC!
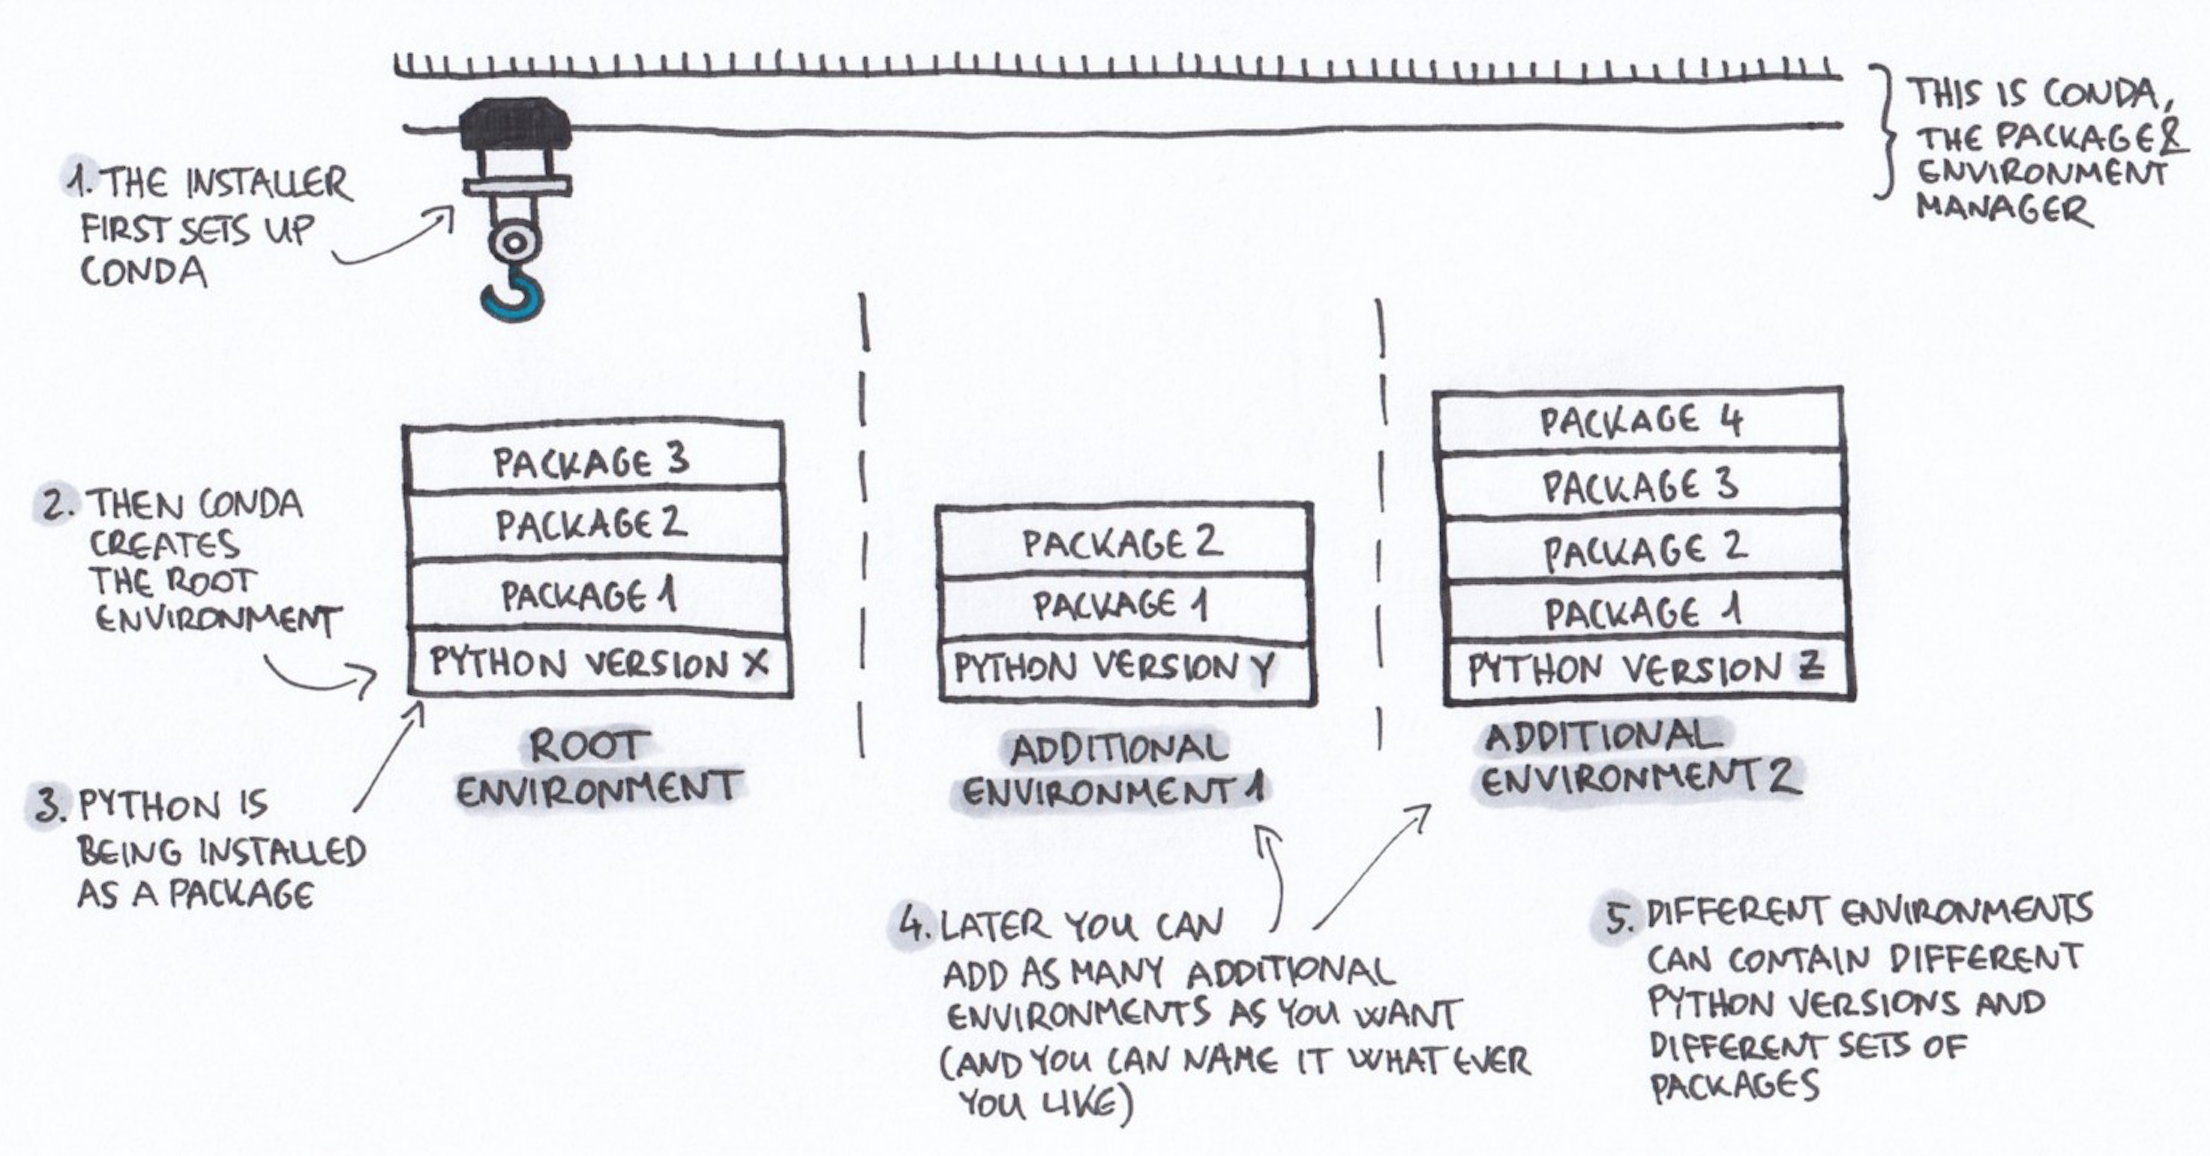
#### What is an environment?
A environment is a directory that contains a specific collection of packages/tools that you have installed. For example, you may have one environment with Python 2.7 and its dependencies, and another environment with Python 3.4 for legacy testing. If you change one environment, your other environments are not affected. You can easily `activate` new environments, which is how you switch between them.
#### Installation!
Let's install some software! We'll start with FASTQC.
[FastQC](http://www.bioinformatics.babraham.ac.uk/projects/fastqc/) is a super useful tool for looking at [FASTQ files](https://en.wikipedia.org/wiki/FASTQ_format). But it's super annoying for me to install because it uses Java, which I don't use that much. Let's install FastQC by using conda (which will automatically install Java, and a whole lot of other stuff!)
Here's the command to `create` a new conda environment, named 'fqc', with fastqc installed.
```
conda create -y --name fqc -c conda-forge -c bioconda fastqc
```
Here we are asking conda to use the **bioconda** channel to look for software; bioconda has a lot (most? all?) of bioinformatics software in it. We'll talk more about this below.
Now, activate the new environment:
```
conda activate fqc
```
Your prompt should change to have `(fqc)` at the beginning.
Let's run fastqc on a data file! We'll use the [first data file from week 1's RNAseq workflow](https://hackmd.io/kXHoB6g4R92OIOwoNR2vkg), and we'll put it in a directory for this week, just to keep things clean --
```
mkdir ~/298class3/
cd ~/298class3
curl -L https://osf.io/5daup/download -o ERR458493.fastq.gz
```
Just to remind you, this is a FASTQ file with many millions of reads in it; to count lines use `wc -l`,
```
gunzip -c ERR458493.fastq.gz | wc -l
```
and to visualize the first few lines,
```
gunzip -c ERR458493.fastq.gz | head
```
Now we can run fastqc on the file:
```
fastqc ERR458493.fastq.gz
```
and voila! You'll get some output, in two files: `ERR458493_fastqc.html` and `ERR458493_fastqc.zip`, that you can download and look at.
(To download files a command like
```
scp -P 2022 ggg298-43@farm.cse.ucdavis.edu:298class3/ERR458493_fastqc.html .
```
should work. You can also use:
* CyberDuck
* Mobaxterm
* https://fetchsoftworks.com/
)
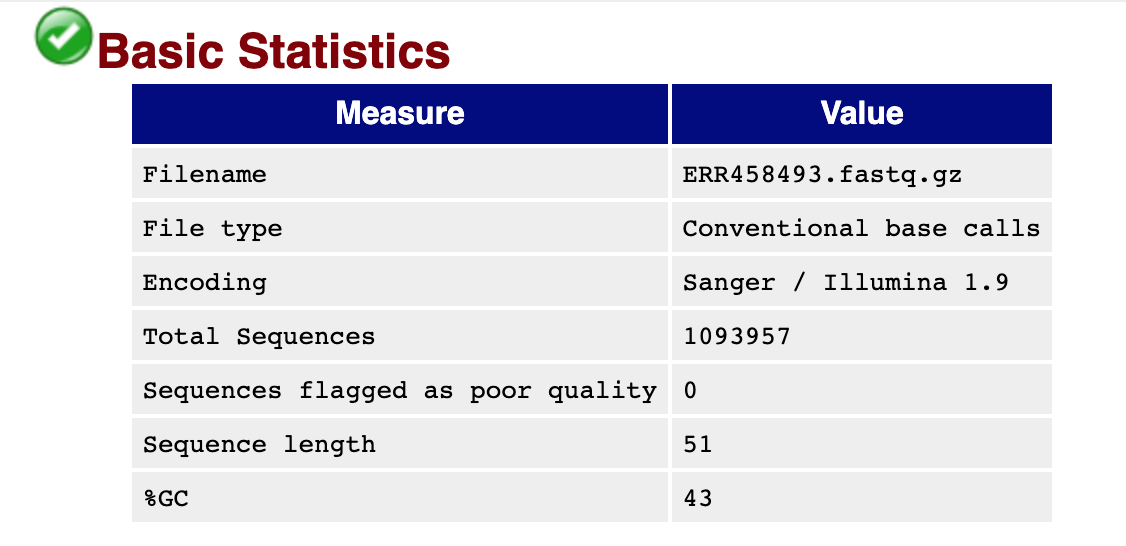
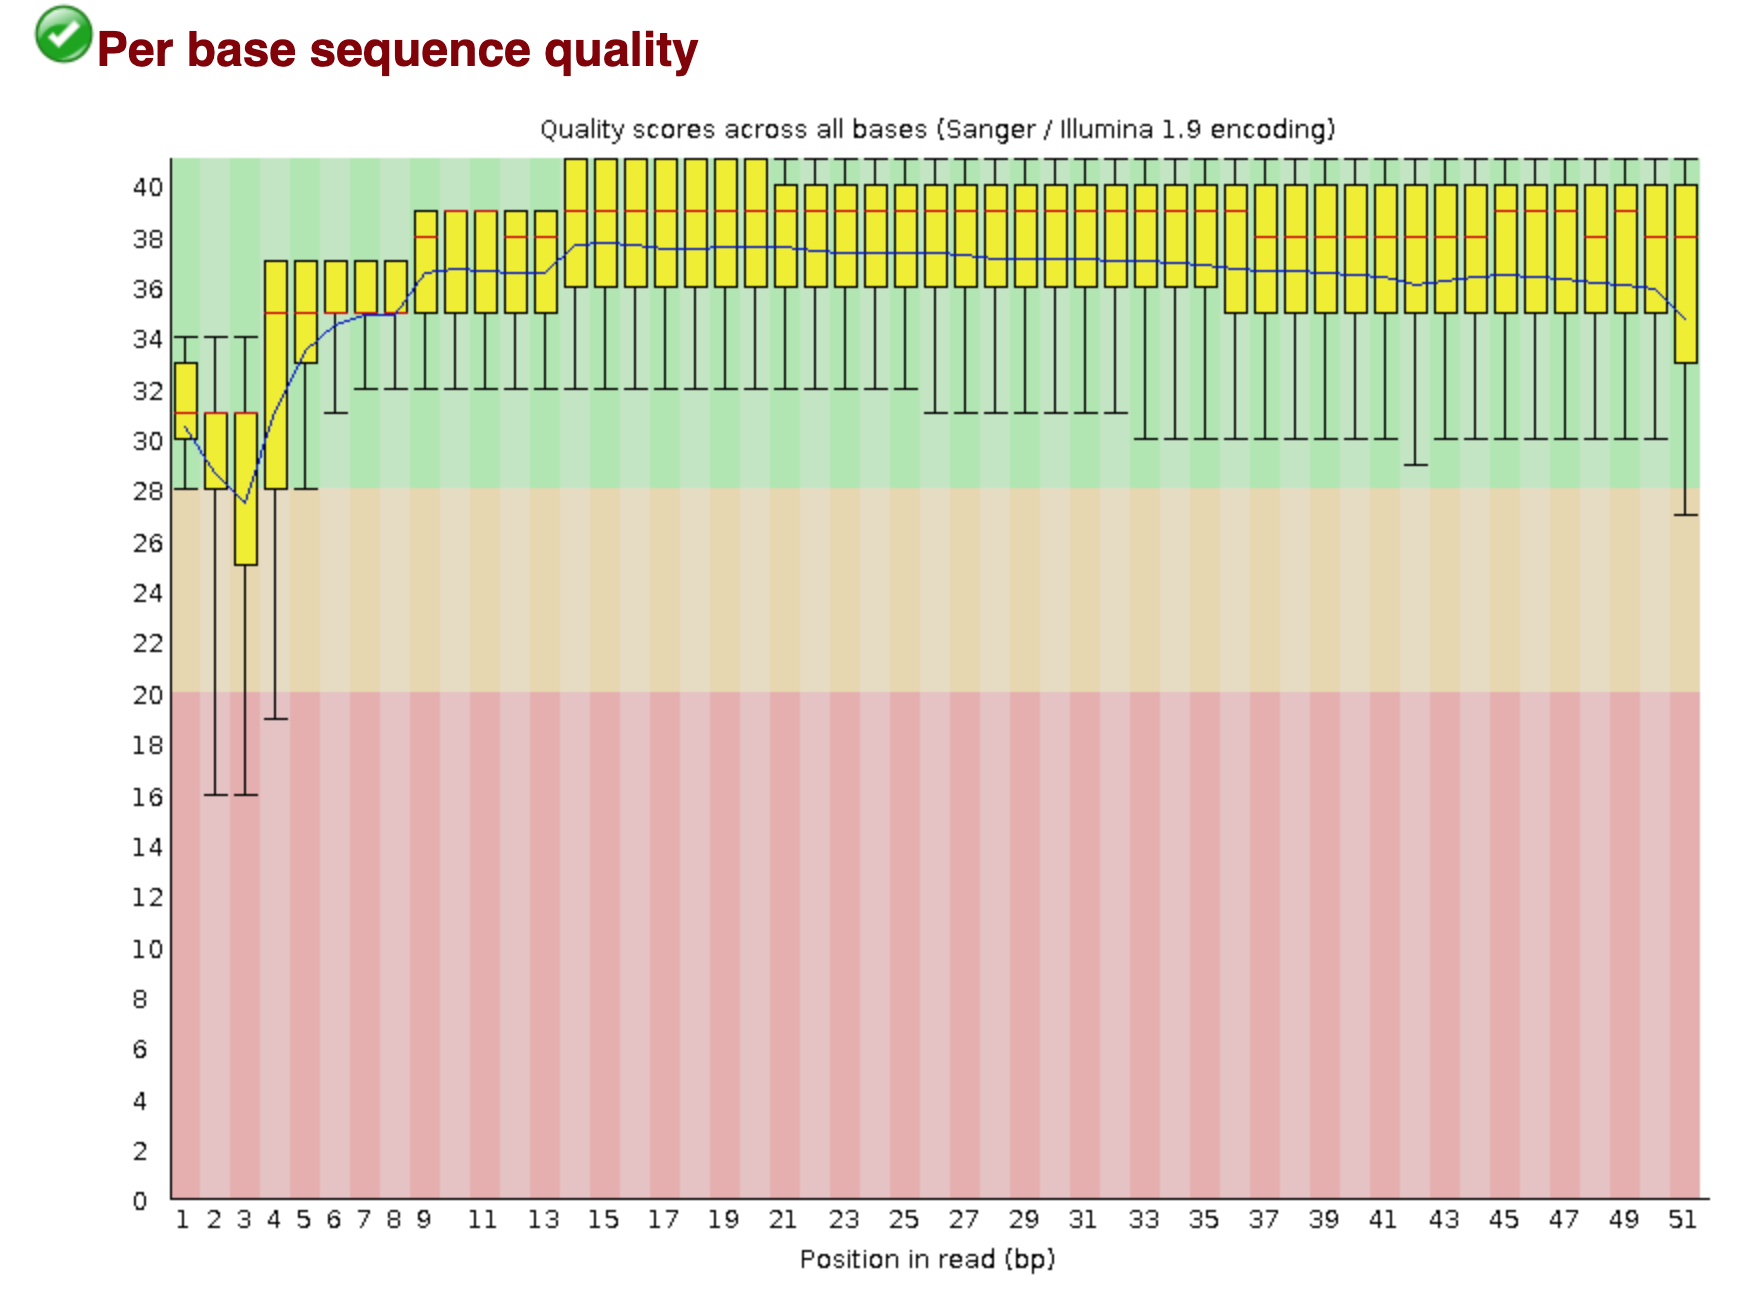
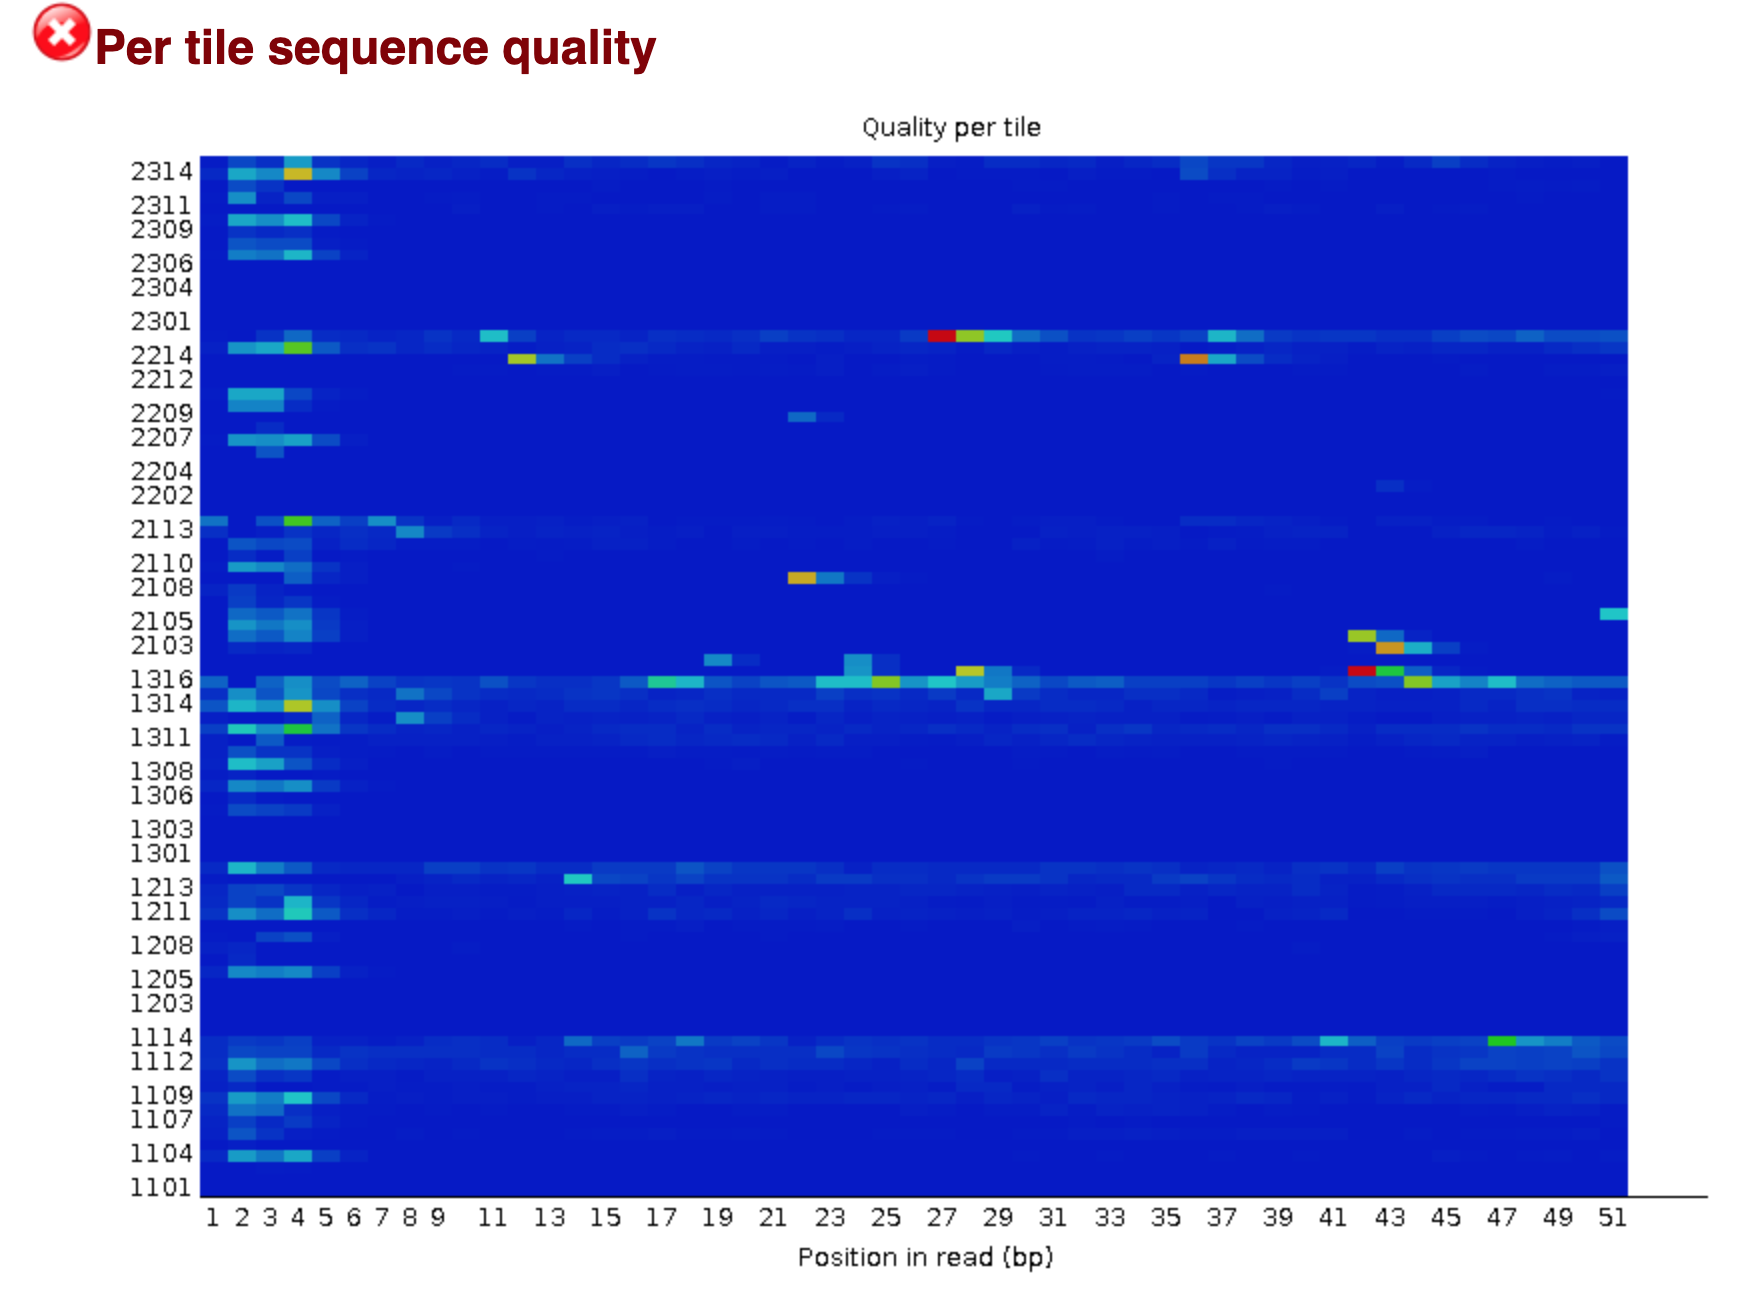
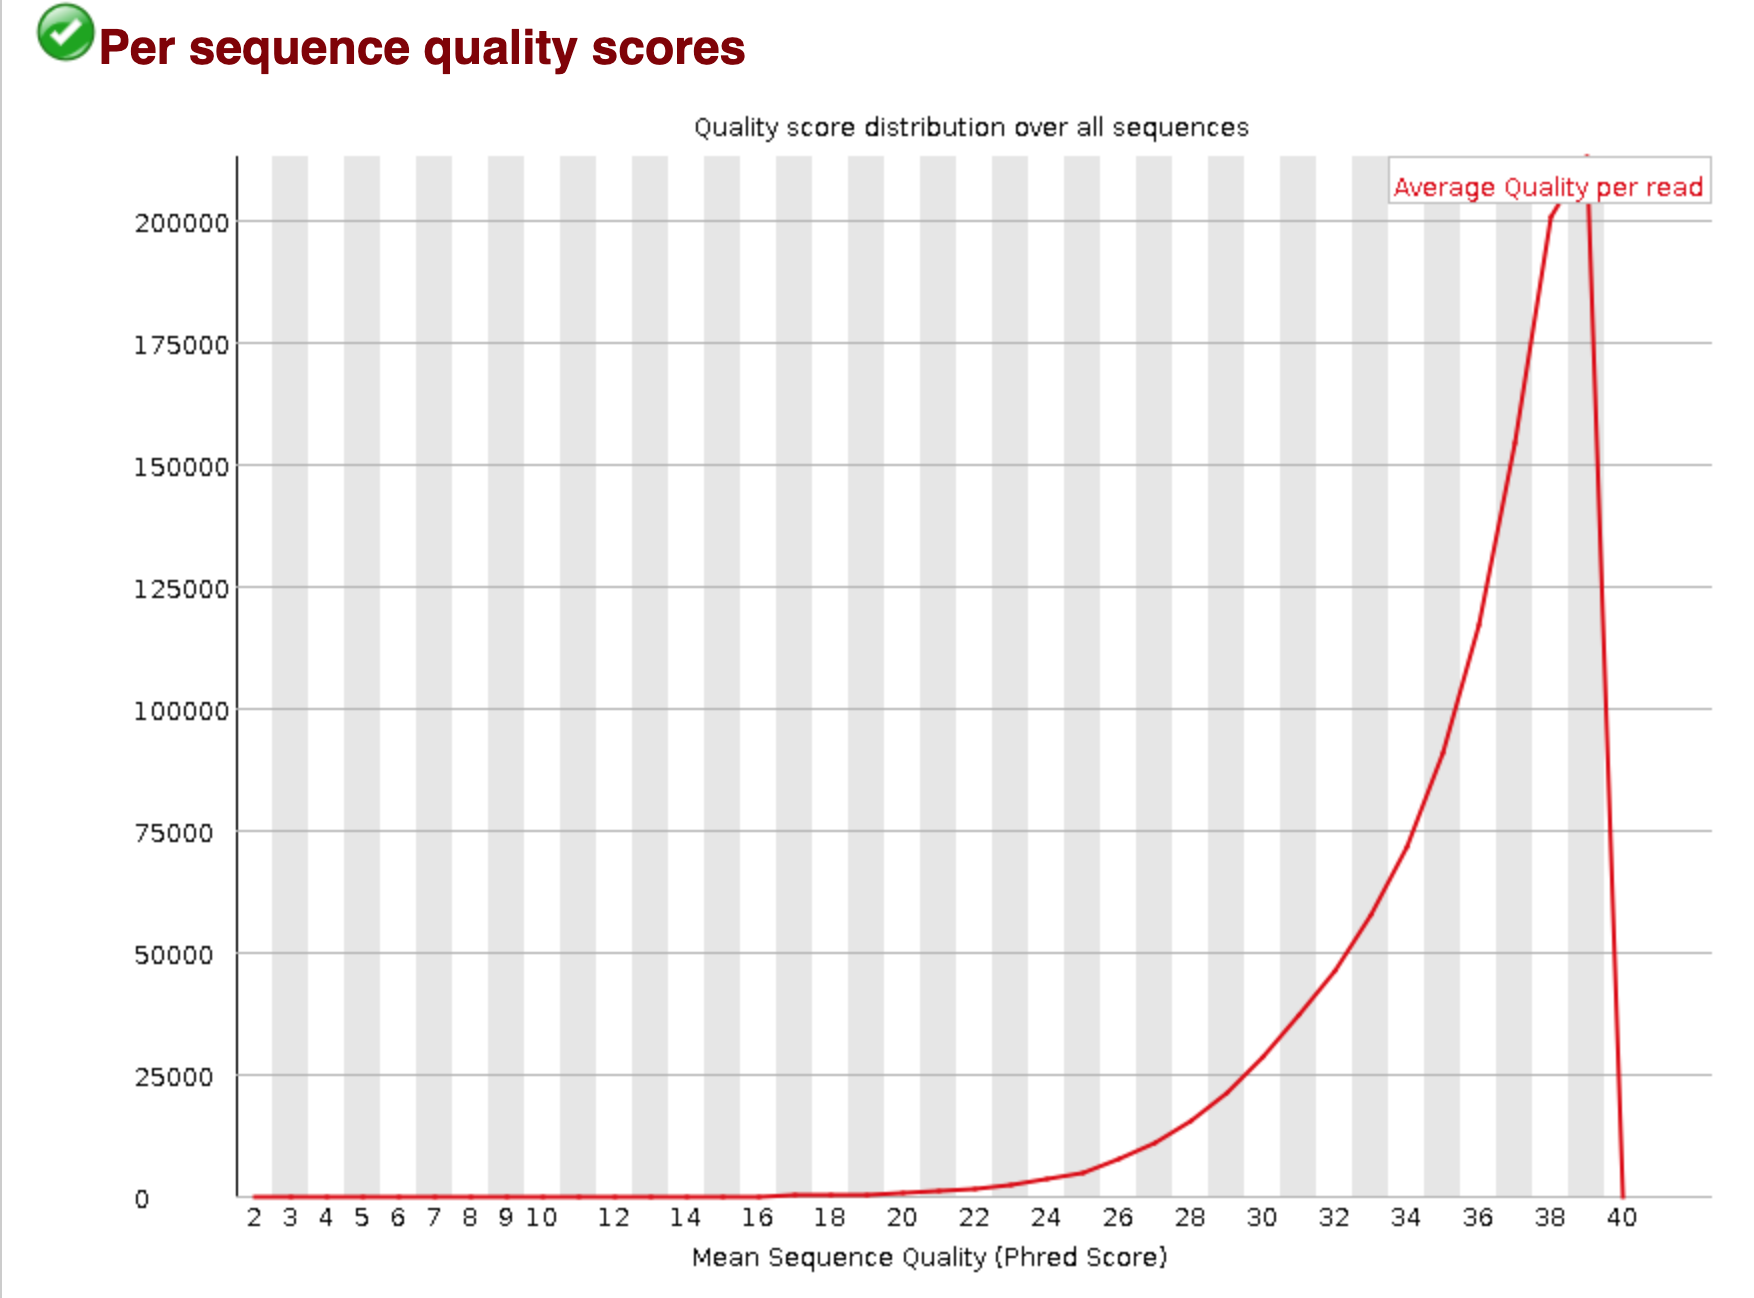
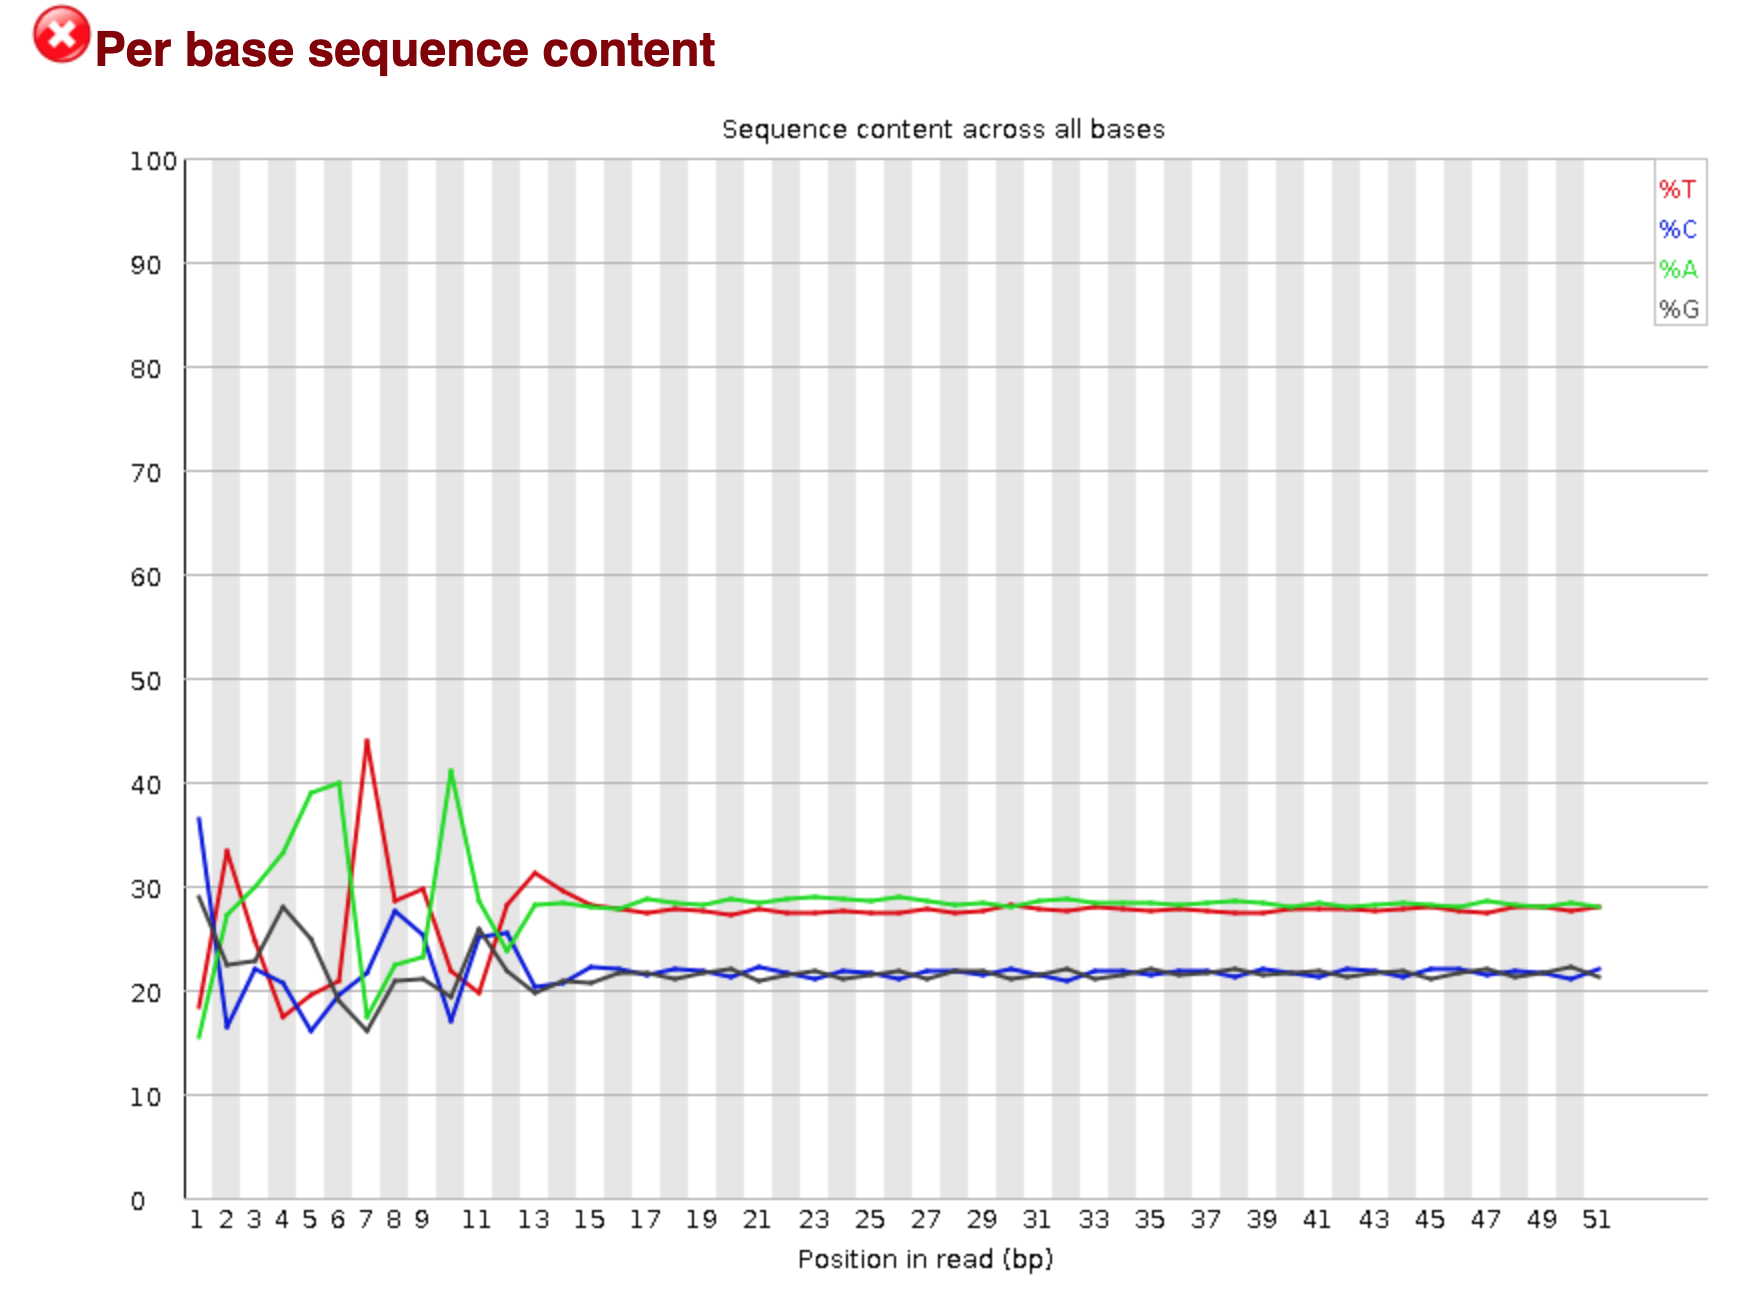
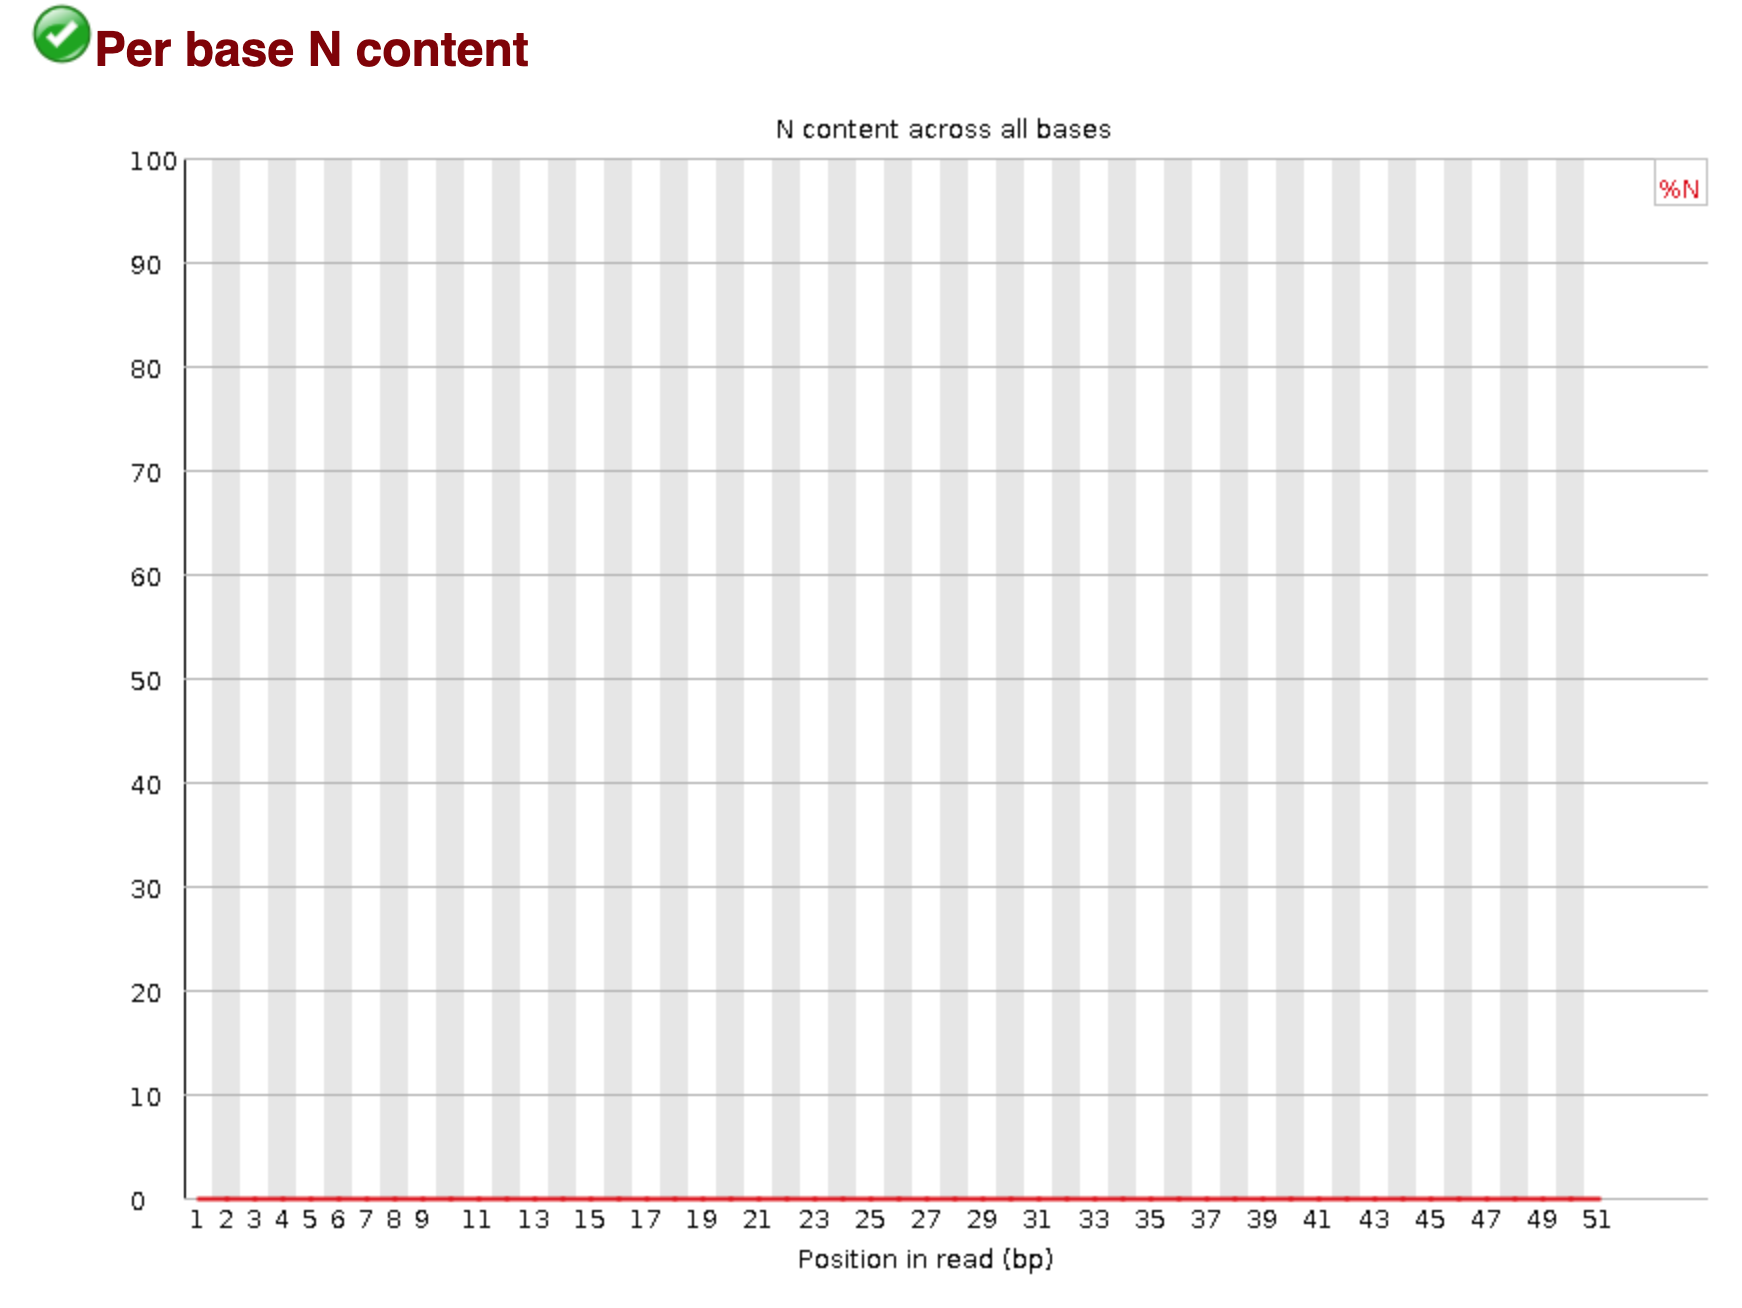
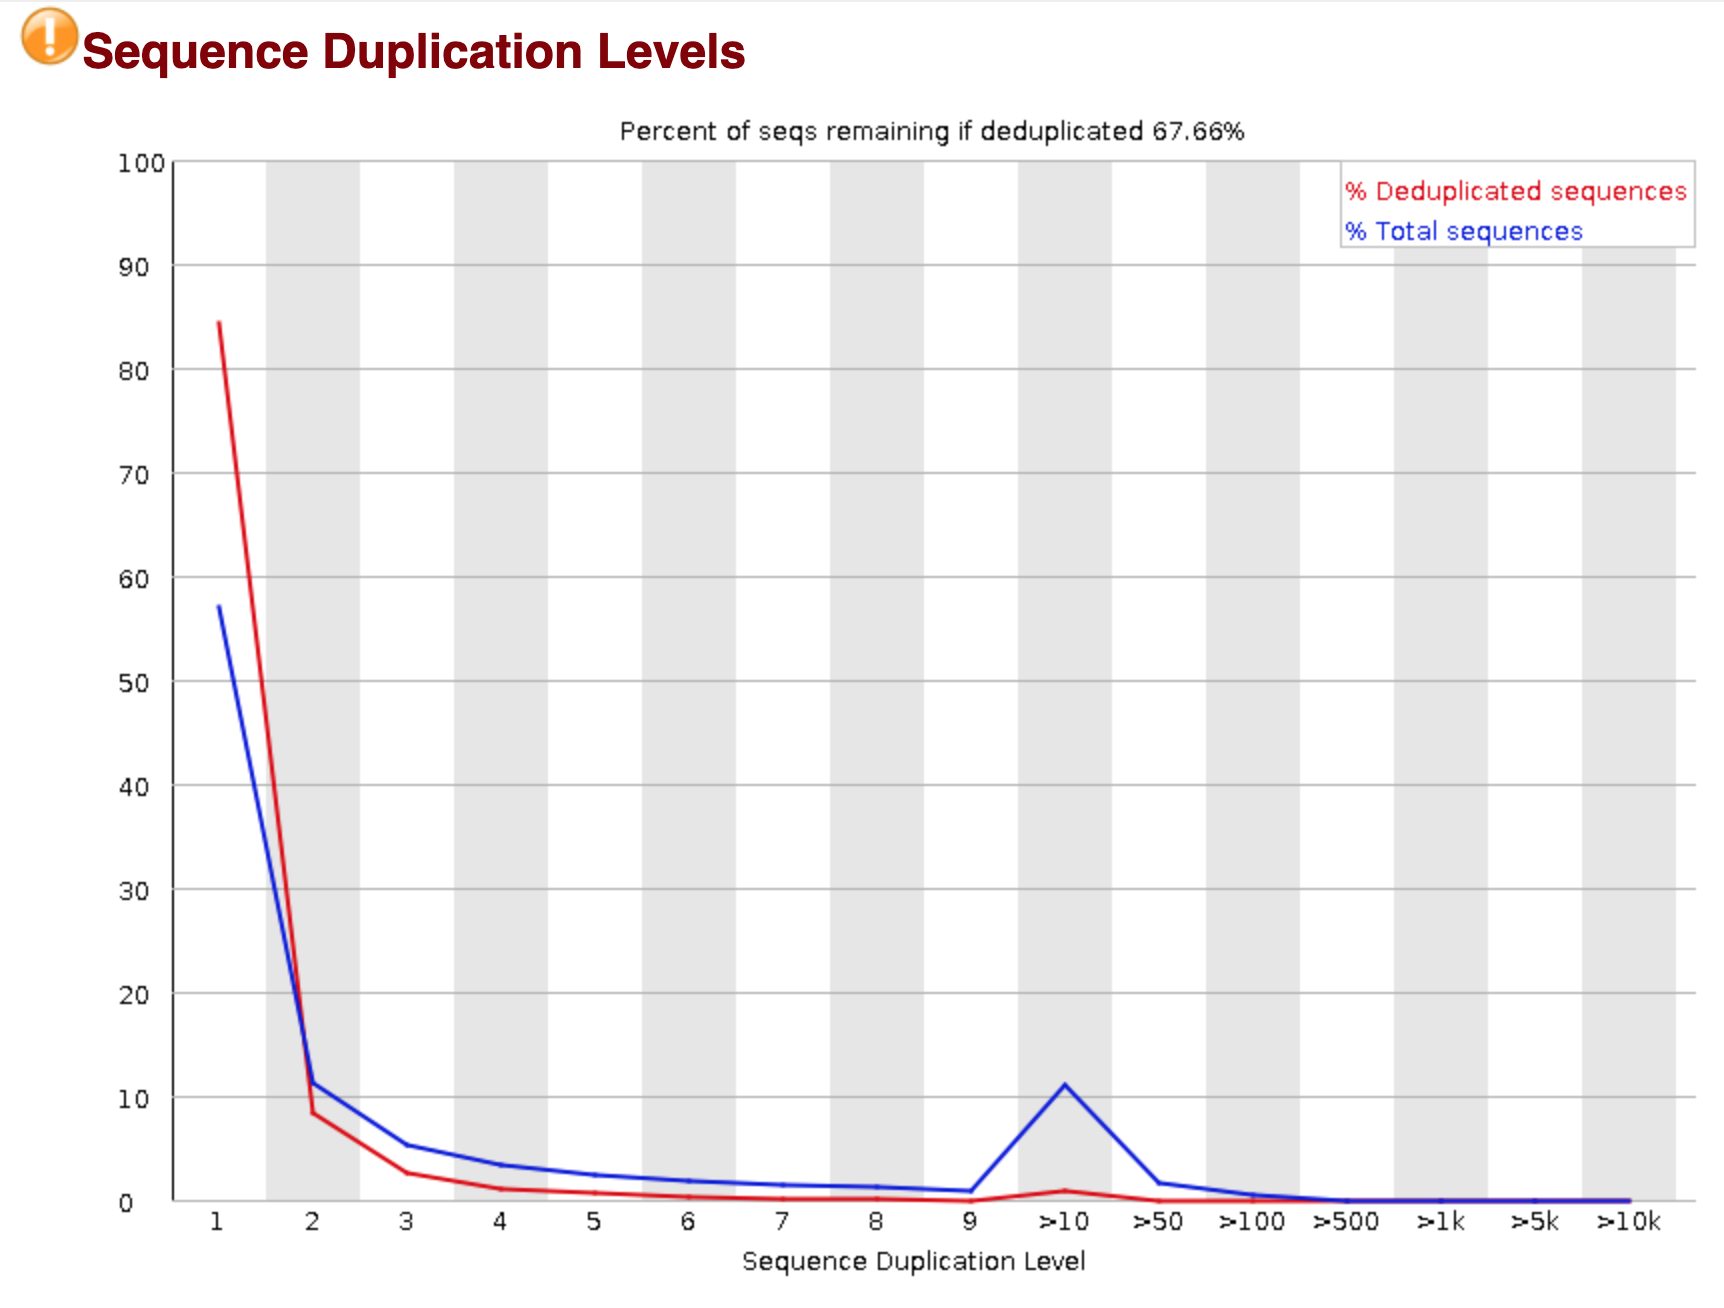
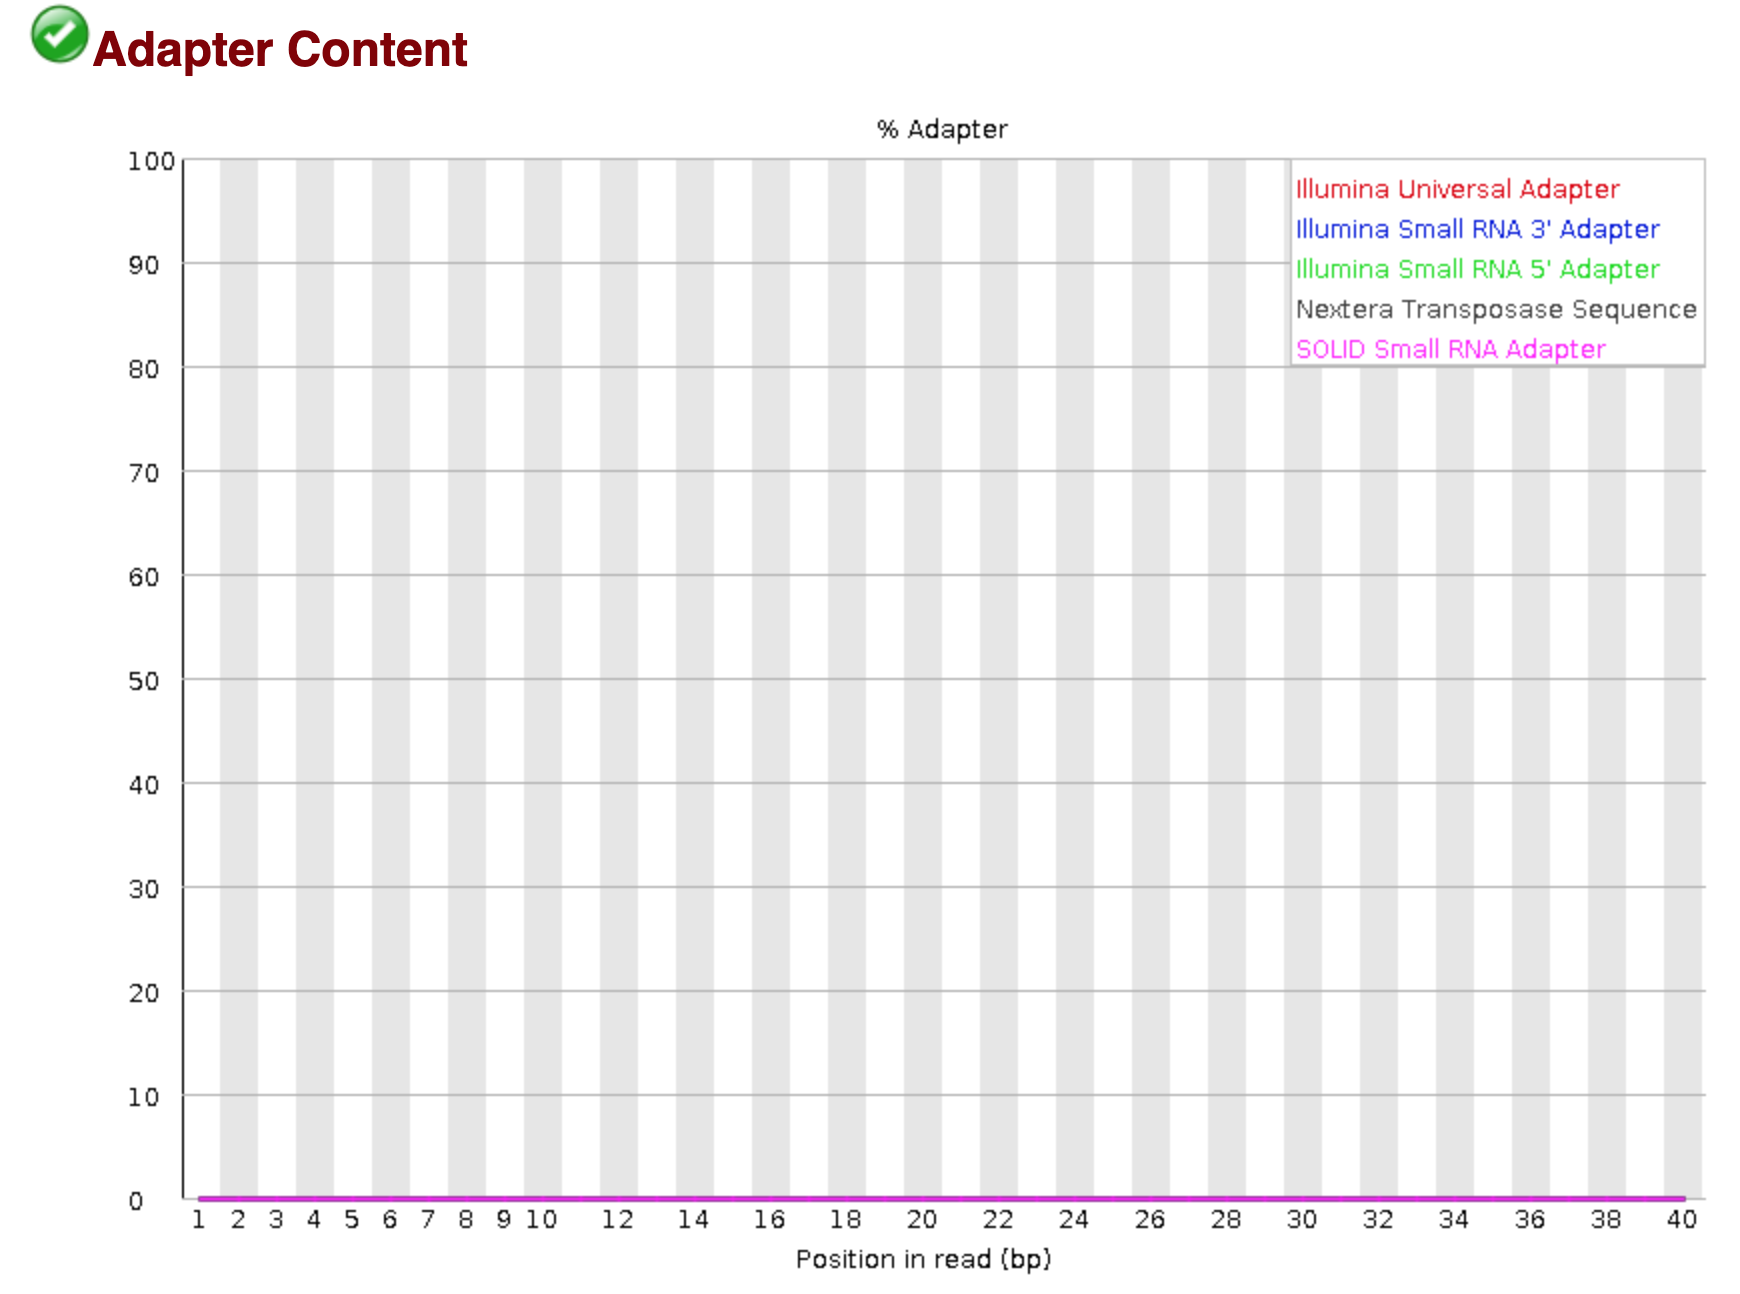
You should see output that looks like this:


## Installing more software in your current environment
Once you're in an environment, you can install new software with `conda install -y <software_name>` like so:
```
conda install -y -c conda-forge -c bioconda trimmomatic
```
and that should work too!
Generally you want to avoid installing too many packages in one environment, as it starts to get slow to figure out whether or not something can be installed. We'll talk more about this below.
You can list software with `conda list`:
```
conda list
```
which is less useful than you might think, given how many packages we've installed... in the future you will be able to list only the user-requested packages and *not* the dependencies needed for them, but for now, there's no good way to do that.
### Finding and specifying versions
To see what version of a particular piece of software you have installed, run:
```
conda list fastqc
```
and look at the second column. (Note that `conda list` doesn't need an exact match, so e.g. you can find all packages with 'fast' in the name by doing `conda list fast`).
As of Jan 2020, conda installs fastqc version 0.11.8. You can force conda to install _exactly_ this version in the future like so,
```
conda install -c conda-forge -c bioconda fastqc=0.11.8
```
Unfortunately there's no good way to know if a new version of a software package is "significant" or not, unless they use [semantic versioning](https://semver.org/)... Generally if there's a big number update (1.0 -> 2.0) the software will work quite differently, but there's no guarantee on that.
For example, our software sourmash 1.0 was very different from 2.0, but sourmash 3.0 is virtually identical to 2.0 in usage (but not in implementation). The next version, sourmash 4.0, will start breaking things again. *shrug* :)
### Making and using environment files
What if you want to specify collections of software?
conda has a nice human-readable format for that, called an **'environment file'**. These are supposed to be reasonably portable files that you can ship around to different computers and have them automatically install the right stuff. You can see one [here](https://github.com/ngs-docs/2020-ggg-201b-variant-calling/blob/master/binder/environment.yml) for variant calling in GGG 201(b), and one [here](https://github.com/spacegraphcats/spacegraphcats/blob/master/environment.yml) for our spacegraphcats software.
(These are [YAML files](https://en.wikipedia.org/wiki/YAML), which are in a format that's structured for computers to read but not super difficult for humans to write. You'll see these used occasionally in configuration files for bioinformatics software, too.)
If you have a complicated environment that you want to save, you can make an environment file from your current environment like so:
```
conda env export > export.yml
```
To look at the environment files we've just setup, do:
```
cat export.yml
```
and you can create a new environment from this file like so:
(don't run this!)
```
conda env create -n fqc2 -f export.yml
```
This would create a new environment called `fqc2` that has all the same things installed in it as `fqc` does (because that's where we ran `conda env export`!)
### Updating, removing, etc software
You can update software with `conda update`, and remove software with `conda remove`. Generally there's not too much need for these commands tho, as we recommend just creating new environments with a pinned version, OR the latest version.
### Creating multiple environments
As you can probably infer from the above, you can have multiple environments with different (potentially incompatible) things installed in each one.
The default is `base` and as far as I know there's nothing particularly special about it, other than that's where the base `conda` command lives.
You can list environments with `conda env list`:
```
conda env list
```
It will list all of the available environments as well as denote the environment you are currently in with an \*.
Switch environments with `conda activate <environment_name>`, and remove environments with `conda env remove -n <environment_name>`.
Note that switching environments *doesn't switch your directory*, it just switches *the software you're running.*. Whoa.
### Tech interlude: what is conda doing?
What conda does when it switches environments is change the PATH (and other environment variables) so that the software packages are searched for in different places.
Try changing environments and each time doing `echo $PATH`. You should see that the first element in the PATH changes each time you switch environments!
(You can also use `type <program>` or `which <program>` to see where a program is located.)
Also note that the `base` environment is not automatically included in all your other environments; by default, environments are not nested.
### Challenges with using one big environment
We generally recommend using a task-specific environments for each task (e.g. one environment for your RNA-seq work and another for transcriptome assembly), because this can dramatically simplify installation and speed up new conda installs. This is because conda needs to make sure that any new package (and all of its dependencies) you would like to install doesn't conflict with all the existing packages.
### How Titus uses conda
That having been said, my experience is that I rely on a core set of packages for my daily work, and so I usually have my "daily work" environment where I have a bunch of stuff installed, and then when I'm working on data analysis, I don't want to constantly install new things or switch environments.
So I usually have a default environment that I work in, and when I use non-standard software (stuff I use infrequently or for specific tasks) I create software-specific environments to work in.
snakemake (which we'll be talking about next week!) helps with this by letting you use rule-specific environments. More soon!
### Finding packages within conda
To search for all available versions of a particular package from the command line, do:
```
conda search <software>
```
## Using the 'bioconda' channel
[Bioconda](https://bioconda.github.io/) is a "software channel" for conda, that lets you install a lot of stuff.
You can install stuff directly from it as above, by specifying the bioconda channel explicitly: `conda install -c bioconda ...`. Or, you can add it to your "default" set of channels to search, like so:
```
conda config --add channels defaults
conda config --add channels bioconda
conda config --add channels conda-forge
```
this sets up your .condarc file -- take a look,
```
cat ~/.condarc
```
This will automatically make conda install search for packages in bioconda.
### Mac OS X and Linux, but not Windows
Note conda itself works on Windows, OS X and Linux!
But unfortunately bioconda packages are only available for OS X and Linux, and not Windows :(
### How to engage with bioconda
bioconda is a community-driven library of software. It relies upon people (like you!) to package software; this involves writing a recipe, like [the sourmash recipe](https://github.com/bioconda/bioconda-recipes/blob/master/recipes/sourmash/meta.yaml).
Some tips and tricks for using bioconda:
* Bioconda is community maintained, please be respectful and friendly - no one is working _for_ you, and no one is making money doing this.
* Help advocate for your favorite software to be added to bioconda, and/or do it yourself! (e.g. [gtdbtk](https://github.com/Ecogenomics/GTDBTk/issues/30#issuecomment-431707687)) - we can help!
* File bug reports, but be respectful and helpful. See [a sterling example :)](https://github.com/GATB/bcalm/issues/44).
### Exercise: install and run salmon!
Our goal is to find and install salmon, and then run [the quantification step from week 1](https://hackmd.io/kXHoB6g4R92OIOwoNR2vkg).
The commands we want to run are:
```
cd ~/298class3
# download reference transcriptome
curl -O https://downloads.yeastgenome.org/sequence/S288C_reference/orf_dna/orf_coding.fasta.gz
# index reference transcriptome for salmon
salmon index --index yeast_orfs --transcripts orf_coding.fasta.gz
# quantify with salmon
salmon quant -i yeast_orfs --libType U -r ERR458493.fastq.gz -o ERR458493.fastq.gz.quant --seqBias --gcBias
```
Please do the following:
(1) figure out what software to install
(2) create a new environment named 'slm' that has that software installed
(3) activate that environment and run the above commands
(4) verify that they create a results directory named 'ERR458493.fastq.gz.quant/'
Extra credit: What version of salmon did you install?
## Tricky things to think about
### It can take a long time to install lots of software
This is because conda needs to make sure to resolve version incompatibilities before proceeding.
Solution: use isolated environments to install single packages, instead.
### Conda and R
conda and R do not necessarily work well together - see [Vince Buffalo's blog post](http://vincebuffalo.org/notes/2017/08/28/notes-on-anaconda.html), although maybe this [has changed?](https://takehomessage.com/2020/01/07/virtual-environment-r-development/))
This is probably more a matter of growing the community engagement and support for R than anything else...
### Explicit package listing
You can grab an explicit list of version pinned software that is OS specific like so -
```
conda list --explicit > package-files.txt
conda create --name myenv --file spec-file.txt
conda install --name myenv --file spec-file.txt
```
this will guarantee _identical_ environments.
See [the conda docs](https://docs.conda.io/projects/conda/en/latest/user-guide/tasks/manage-environments.html#building-identical-conda-environments) for more information.
## Reference list of Conda Commands
| Conda commands | action |
| -------- | -------- |
| `conda install <package_name>` | install a package |
| `conda list` | list installed packages |
| `conda search <package_name>` | search for a package––this can be the full or partial name of a package |
| `conda info` | list of information about the currently active environment |
| `conda list` | list out all the installed packages in the currently active environment |
| `conda remove <package_name>` | remove a conda package |
| `conda config --get channels` | list out the active channels and their priorities |
| `conda update` | update all the installed packages |
| `conda config --remove channels <channel>` | remove unwanted channel |
| `conda env list` | list the different environments you have set up |
| `conda activate <new_environment_name>` | activate the a new conda environment conda (this also works for activating our `base` environment |
| `conda info --envs` | list the locations of conda directories |
## More Reading on Conda
+ Conda [Documentation](https://conda.io/en/latest/)
+ Drawing credit: Gergely Szerovay. Read original article [here](https://www.freecodecamp.org/news/why-you-need-python-environments-and-how-to-manage-them-with-conda-85f155f4353c/)
## @CTB TODO:
Add a discussion of disk, vs environment, vs login shell; multiple terminals, all looking at same disk.
 Sign in with Wallet


