# 114-1 Metaverse 課程講義:Advanced
---
# 2025/12/4 3DGS & 4DGS
## 常用連結
**3dgs**
https://github.com/MrNeRF/LichtFeld-Studio
https://github.com/MrNeRF/LichtFeld-Studio/wiki/
https://superspl.at/editor
**unity**
https://github.com/aras-p/UnityGaussianSplatting
https://github.com/ninjamode/Unity-VR-Gaussian-Splatting
**4dgs**
https://github.com/hustvl/4DGaussians
**mobile app**
https://lumalabs.ai/interactive-scenes
## 相關影片/網站
[Lichtfeld Studio: The Best Open-Source 3D Gaussian Splatting Software? (Full Tutorial)](https://www.youtube.com/watch?v=aX8MTlr9Ypc)
[LichtFeld Studio Beginner Tutorial - Using Colmap to create a dataset for LichtFeld Studio](https://www.youtube.com/watch?v=-3TBbukYN00)
[LichtFeld Studio Beginner Tutorial - Using Reality Scan to create a dataset for LichtFeld Studio](https://www.youtube.com/watch?v=JWmkhTlbDvg)
[【輕鬆懂】NeRF v.s. 3D Gaussian Splatting 一次看](https://www.aiposthub.com/e3-80-90-e8-bc-95-e9-ac-86-e6-87-82-e3-80-91nerf-v-s-3d-gaussian-splatting-e4-b8-80-e6-ac-a1-e7-9c-8b/)
[4DGS(CVPR 2024)原理介绍与Windows环境下复现流程记录](https://zhuanlan.zhihu.com/p/18900492638)
[Animated Gaussian Splatting in Unreal Engine 5](https://80.lv/articles/animated-gaussian-splatting-in-unreal-engine-5)
## 0. 3DGS vs NeRF


> (來源:[【輕鬆懂】NeRF v.s. 3D Gaussian Splatting 一次看](https://www.aiposthub.com/e3-80-90-e8-bc-95-e9-ac-86-e6-87-82-e3-80-91nerf-v-s-3d-gaussian-splatting-e4-b8-80-e6-ac-a1-e7-9c-8b/))
## 1. Reconstruct Database (Colmap)
* **下載** [Colmap](https://github.com/colmap/colmap/releases)
* **新建專案**:創建新的database、放入你拍攝的照片資料夾

* **Feature Extraction**:找特徵點位置與向量 (SIFT)

* **Feature Matching**:Paring pictures

* **Start Reconstruction**


* **Undistortion** (Output path 可選擇新增'dense'資料夾)

* **檢查**是否有image及sparse的資料夾

## 2. Training (LichtFeld Studio)
* **Prepare your greatest device!**

* 按照連結的Instructions,**下載** [LichtFeld Studio](https://github.com/MrNeRF/LichtFeld-Studio/wiki/Build-Instructions-%E2%80%90-Windows)
* 於 Build 資料夾中會看到執行檔

* 下載 [Example Dataset](https://github.com/MrNeRF/LichtFeld-Studio/wiki/Example-Dataset)
**For Windows**
1. Download zip
```shellcode
curl -L -o tandt_db.zip https://repo-sam.inria.fr/fungraph/3d-gaussian-splatting/datasets/input/tandt_db.zip
```
2. unzip
```powershell
mkdir data
tar -xf tandt_db.zip -C data
```
3. Check

* 將資料夾丟進LichtFeld Studio (自己準備的話、可以丟一整個dense資料夾)


* Start Training! (可以選擇自己的checkpoints step)

* 操作方式

* **Result**

* **Export**


## 2.5 Cropping and Cleanup (SuperSplat)
* **使用 LichtFeld Studio Cropping**

1. Show Crop Box:顯示Crop範圍
2. Use Crop Box:僅顯示Crop範圍的3dgs
3. 改變Rotation、Bounds的數值值到Crop到正確位置
4. Crop Active PLY:執行 Cropping
5. **Export**

* **至 [SuperSplat](https://superspl.at/editor)**
1. Open Splat mode、Hide Splats

2. 透過 Select Tools 選取雜點

3. Delete Selection

4. 校正Transform

5. **Result**

## 3. Rendering (Unity)
* `git clone https://github.com/ninjamode/Unity-VR-Gaussian-Splatting.git`
* Create GaussianSplatAsset


* 建立一個新物件、添加 Gaussian Splat Renderer、並將Asset拉進去

* 打開 Optimize for Quest

* **測試結果!**

## 4. 4DGS?

**Pipeline**

> (來源:[4DGS(CVPR 2024)原理介绍与Windows环境下复现流程记录](https://zhuanlan.zhihu.com/p/18900492638))
In Unreal Engine
[Animated Gaussian Splatting in Unreal Engine 5](https://80.lv/articles/animated-gaussian-splatting-in-unreal-engine-5)
## 5. Luma AI
* (手機) 下載 [Luma AI: 3D Capture](https://play.google.com/store/apps/details?id=ai.lumalabs.polar)
* (筆電) 前往 [Luma AI](https://lumalabs.ai/interactive-scenes)


---
# 2025/12/4 AI Conversation
## 目錄
- Chapter 1. Conversational AI 基礎介紹
- Chapter 2. Unity 與環境準備
- Chapter 3. 呼叫 OpenAI API
- Chapter 4. Responses API(含 Structured Output)
- Chapter 5. Realtime API(即時語音 / 多模態)
- Chapter 6. Prompt Engineering 與資料檢索技巧
- Chapter 7. 語音對話 Pipeline(依 Conversational AI 模組分類)
---
<br>
## Chapter 1. Conversational AI 基礎介紹
### 1.1 什麼是 Conversational AI?
- Conversational AI 是能與人自然互動的人工智慧系統
- 傳統 Conversational AI 架構:
ASR(語音辨識)→ NLU(語意理解)→ DM(對話管理)→ NLG(語言生成)→ TTS(語音合成)
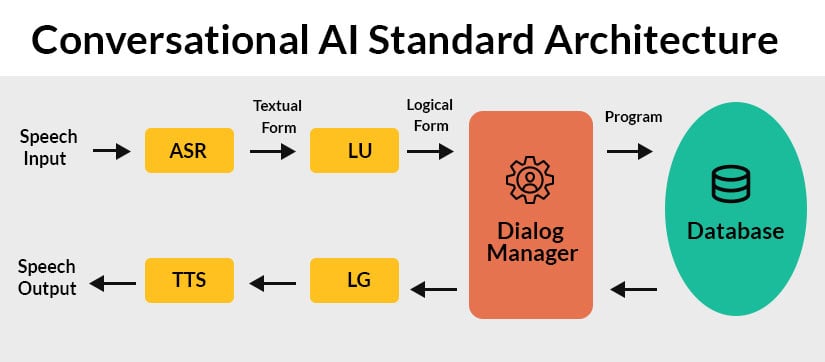
- 大型語言模型(LLM)可以同時涵蓋 NLU、DM、NLG,降低系統複雜度
### 1.2 Unity 在對話式 AI 中的角色
- 適合 VR / MR / AR / 3D 互動應用
- 建置於 PC、Android、iOS、Quest 3
- 適用:AI NPC、虛擬助教、智能導覽、沉浸式教學
---
<br>
## Chapter 2. Unity 與環境準備
### 2.1 Unity 推薦版本
- Unity 2022 以上
- Quest:需使用 IL2CPP + Android Build Target
### 2.2 Project Settings 設定
- API Compatibility Level → `.NET Standard 2.1`
- Scripting Backend → IL2CPP
### 2.3 建議安裝套件
- TextMeshPro
- Newtonsoft JSON(解析 JSON)
- UnityWebRequest(使用 REST API 的話需要)
### 2.4 OpenAI API Key 設定建議
- 不要以任何形式 ( 包含 inspector 上的資訊 ) 把 API key 上傳到網路 ( git, cloud ) 上,若有上傳專案的需求應該在上傳之前把 api key 都刪除
- 可以使用 .env 的方式去儲存 api key 並確保 .env 沒有被上傳到網路
- 若公開發佈應使用 Proxy Server
---
<br>
## Chapter 3. 呼叫 OpenAI API
### REST API vs OpenAI .NET SDK
**REST API(搭配 UnityWebRequest)**
優點:
- 最穩定、平台支援度最高(含 Quest)。
- 直接使用官方 HTTP 端點,支援最新 Responses / Realtime 等功能。
缺點:
- 需自行組裝 JSON、解析回傳結果。
**OpenAI .NET SDK**
優點:
- 類別結構清楚,程式碼較精簡。
缺點:
- IL2CPP / Android / Quest 可能有相容性問題。
- 新功能有時不如 REST 版本即時。
---
### 3.1 使用 REST API 呼叫 Responses(UnityWebRequest 範例)
```csharp
IEnumerator RequestResponsesAPI(string prompt)
{
string url = "https://api.openai.com/v1/responses";
string json = "{""
+ "\\"model\\": \\"gpt-5-nano\\","
+ "\\"input\\": \\"" + prompt + "\\","
+ "\\"response_format\\": { \\"type\\": \\"text\\" }"
+ "}";
UnityWebRequest req = new UnityWebRequest(url, "POST");
byte[] bodyRaw = System.Text.Encoding.UTF8.GetBytes(json);
req.uploadHandler = new UploadHandlerRaw(bodyRaw);
req.downloadHandler = new DownloadHandlerBuffer();
req.SetRequestHeader("Content-Type", "application/json");
req.SetRequestHeader("Authorization", "Bearer " + API_KEY);
yield return req.SendWebRequest();
Debug.Log(req.downloadHandler.text);
}
```
---
### 3.2 使用 OpenAI .NET SDK 呼叫 Responses
```csharp
var client = new OpenAIClient(API_KEY);
var response = await client.Responses.CreateAsync(new ResponseOptions
{
Model = "gpt-5-nano",
Input = "請用一句話介紹量子疊加",
ResponseFormat = ResponseFormat.Text
});
string text = response.Output[0].Content[0].Text;
Debug.Log(text);
```
> [!Note] 何時選 REST / SDK?
>
> **較適合 REST API 的情境**
>
> - Quest 3 / Quest 2
> - Android / iOS
> - VR / MR 專案
> - 需要 SSE streaming
> - 想第一時間用到最新 API 功能
>
> **較適合 SDK 的情境**
>
> - 僅在 PC / Mac(非 IL2CPP)
> - Unity Editor 示範工具
> - 開發階段快速原型
---
### 3.3 Responses API 與 Realtime API 的角色
- **Responses API**:
- 走 HTTP REST,適合一次性請求 / 工具呼叫 / 結構化輸出。
- 適合 NPC 行為控制、任務生成、遊戲事件、一般文字聊天。
- **Realtime API**:
- 走 WebSocket / WebRTC,支援語音串流與即時多模態對話。
- 適合語音助理、VR 語音 NPC、需要玩家打斷的即時對話。
詳細說明與進階用法分別在 Chapter 4 / Chapter 5。
---
### 3.4 安裝 OpenAI .NET SDK (如果要使用 SDK 來呼叫 API 的話)
#### 下載並安裝 NuGetForUnity
連結:[NuGetForUnity](https://openupm.com/packages/com.github-glitchenzo.nugetforunity/#modal-manualinstallation)
>
#### 使用 NugetForUnity 安裝 OpenAI .Net SDK
>
>
>[!Note]參考資訊
>- **Nuget是什麼?**
> NuGet 是 .NET 平台的套件管理系統就像 Unity 有 Package Manager、Node.js 有 NPM 一樣,.NET 程式(包含 C#)使用 NuGet 來下載外部函式庫(library)
---
<br>
## Chapter 4. Responses API(含 Structured Output)
### 4.1 Responses API 是什麼?
- 新一代通用 API,可視為 Chat Completions + Assistants 的整合版本。
- 支援:文字輸出、工具呼叫、檔案、程式碼執行、搜尋等。
- 適合做「會做事的聊天 agent」,也是 Unity 中 NPC 腦袋的好選擇。
### 4.2 Responses API 回應形式(Modalities)
- **Text**:一般文字回答。
- **JSON / Structured Output**:透過 `json_schema` 嚴格控制輸出格式。
- **Streaming(SSE)**:逐 token / chunk 輸出,用於打字機效果。
- **Tool calls**:模型可主動呼叫你定義的工具函式。
### 4.3 Responses API 一般回應(Non‑Streaming)
Responses API 的最基本使用方式是一次回傳完整結果,適用以下情境如:
- 一般 NPC 對話
- 任務資料生成
- 遊戲事件觸發
#### 4.3.1 一般請求範例
```json
{
"model": "gpt-5-nano",
"input": "幫我用一句話介紹量子疊加",
"response_format": {"type": "text"}
}
```
#### 4.3.2 一般回應結果
```json
{
"id": "resp_123",
"output": [
{
"type": "output_text",
"content": [
{"type": "text", "text": "量子疊加是量子系統能同時處於多種狀態的現象。"}
]
}
]
}
```
#### 4.3.3 NPC 對話情境:含 task 說明的 prompt(範例)
以下展示 Responses API 在 Unity NPC 對話中常用的 prompt 設計方式,包含 **任務描述(task)**:
```json
{
"model": "gpt-5-nano",
"input": [
{"role": "system", "content": "你是一位友善且樂於協助玩家的 NPC 導遊,語氣輕鬆親切。請根據玩家說的話給出自然、沉浸式、具角色風格的回應。"},
{"role": "user", "content": "嗨,我第一次來這個村莊,能帶我走走嗎?"}
],
"response_format": {"type": "text"}
}
```
此格式適合:
- 讓 NPC 維持一致的角色個性
- Unity 中進行多輪對話
- 讓 API 理解「任務」是提供 NPC 口吻的回應
- 適合與後續 Structured Output 或動作控制搭配
---
### 4.4 Responses API Streaming(SSE)
Streaming 版本會以 SSE(Server‑Sent Events)逐段傳回文字。
- chunk 通常是詞組,3–10 字元
- 不像 Realtime API 是逐 token
- 適合打字機效果
#### 4.4.1 Streaming 請求方式
```json
{
"model": "gpt-5-nano",
"input": "介紹量子疊加",
"stream": true
}
```
#### 4.4.2 SSE 回應事件類型
以下是 Responses API Streaming 常見事件:
> **response.started**
>
> ```json
> {"type":"response.started","response":{"id":"resp_123"}}
> ```
>---
> **response.output\_text.delta**
>
> ```json
> {"type":"response.output_text.delta","delta":"量子疊加"}
> {"type":"response.output_text.delta","delta":"是一種可以同時存在"}
> {"type":"response.output_text.delta","delta":"多種狀態的現象。"}
> ```
>---
> **response.output\_text.completed**
>
> ```json
> {"type":"response.output_text.completed","text":"量子疊加是量子系統能同時處於多種狀態的現象。"}
> ```
>---
> **error**
>
> ```json
> {"type":"error","error":{"message":"Invalid request"}}
> ```
<br>
### 4.5 Structured Output(JSON Schema)
Structured Output 讓模型被「強制」輸出符合你定義的 JSON Schema。
#### 4.5.1 請求範例(REST)
```json
{
"model": "gpt-5-nano",
"input": "玩家揮手並說 hello",
"response_format": {
"type": "json_schema",
"json_schema": {
"name": "npc_action",
"schema": {
"type": "object",
"properties": {
"action": { "type": "string" },
"emotion": { "type": "string" },
"reply": { "type": "string" }
},
"required": ["action", "reply"]
}
}
}
}
```
#### 4.5.2 模型回覆範例
```json
{
"action": "WaveBack",
"emotion": "Happy",
"reply": "你好,很高興見到你!"
}
```
#### 4.5.3 適用場景
- NPC 行為控制(動作、表情、語音內容)。
- 任務 / 關卡資料生成。
- 對話選項、分支劇情(例如 `choices: [...]`)。
- AI 行為樹或狀態機節點描述。
> [!Warning]Realtime API 目前**應該不支援** Structured Output,
> 需要穩定 JSON 結構時,請優先使用 Responses API
> [!Note]參考資訊
> 如果要更細緻的去操控 Structured Output 請參考 [Structured model Output 官方參考資料](https://platform.openai.com/docs/guides/structured-outputs/examples?utm_source=chatgpt.com)
### 4.6 何時使用 Responses API?
- 重點在「內容」或「控制資料」而非即時語音。
- 需要 JSON / 結構化結果,方便程式解析。
- 需要串接資料庫 / 工具 / RAG / 外部服務。
> [!Note]參考資訊
> 詳細如何使用Response API 請參考 [Response API 官方參考資料](https://platform.openai.com/docs/api-reference/responses?utm_source=chatgpt.com)
---
<br>
## Chapter 5. Realtime API(即時語音 / 多模態)
### 5.1 Realtime API 是什麼?
- 使用 WebSocket / WebRTC 的即時多模態 API。
- 支援:
- 語音輸入(audio in)
- 語音輸出(audio out)
- 即時轉錄(transcription)
- 文字輸入 / 回覆
- 適合做低延遲語音代理、VR NPC、語音助理。
### 5.2 Responses vs Realtime 比較
| 能力 | Responses API | Realtime API |
| ----------------- | --------------- | -------------------- |
| 呼叫方式 | REST (HTTP) | WebSocket / WebRTC |
| 語音輸入 | 需另呼叫 Whisper | 原生支援語音串流 |
| 語音輸出 | Audio API 另呼叫 | 原生語音 chunk 串流 |
| Structured Output | 支援 json\_schema | 不支援 |
| 可否打斷 AI | 一次請求不可中途斷 | 可在說話中途打斷 / 重啟 |
| 多模態 | 圖片、工具、JSON | 語音、文字 |
### 5.3 Realtime API 回傳事件類型介紹
以下整理 Realtime API 可能出現在 WebSocket 中的所有主要事件,並附上用途與 JSON 格式範例,方便 Unity 中解析。
---
### 5.3.1 系統級事件(System Events)
<br>
>### **session.created**
>Realtime 連線成功後,伺服器回傳 session 資訊。
>```json
>{
> "type": "session.created",
> "session": {
> "id": "sess_123",
> "model": "gpt-4o-realtime-preview"
> }
>}
>```
>用途:
>- 確認連線成功
>- 可從中得知預設模型、參數
<br>
### 5.3.2 語音輸入事件(Audio Input Events)
<br>
> ### **input\_audio\_buffer.append**
> 代表你上傳(append)一段語音 chunk。
>
> ```json
> {
> "type": "input_audio_buffer.append",
> "audio": "<base64 audio chunk>"
> }
> ```
>
> 用途:
>
> - 送出新的語音片段給模型
>---
> ### **input\_audio\_buffer.completed**
>
> 代表你「停止提供語音」,模型可以開始處理。
>
> ```json
> {
> "type": "input_audio_buffer.completed"
> }
> ```
>
> 用途:
>
> - 告訴模型「我講完了」
> - 模型會根據語音內容開始推理
>---
> ### **input\_audio\_transcription.completed**
>
> 代表模型已完成語音轉文字。
>
> ```json
> {
> "type": "input_audio_transcription.completed",
> "text": "你好,我想問現在幾點。"
> }
> ```
>
> 用途:
>
> - 語音轉文字結果(替代 Whisper)
> - 可顯示在 UI 文字框
>
<br>
### **5.3.3 文字訊息事件(Text Output Events)**
<br>
> ### **response.output\_text.delta**
>
> 模型幾乎以逐字輸出文字
>
> #### 範例:
>
> ```json
> { "type": "response.output_text.delta", "delta": "你" }
> { "type": "response.output_text.delta", "delta": "好" }
> { "type": "response.output_text.delta", "delta": "," }
> { "type": "response.output_text.delta", "delta": "我" }
> { "type": "response.output_text.delta", "delta": "是" }
> { "type": "response.output_text.delta", "delta": "你" }
> { "type": "response.output_text.delta", "delta": "的" }
> { "type": "response.output_text.delta", "delta": "助" }
> { "type": "response.output_text.delta", "delta": "手" }
> { "type": "response.output_text.delta", "delta": "。" }
> ```
>
> Realtime API 追求極低延遲,因此:
>
> - 會在模型還在思考時就先送出 token
> - 每個片段非常短,有時甚至不是完整字或詞
> - 讓 Unity / VR 能同步顯示文字或語音
> - 也能在任何時候中斷 AI 說話
> ---
> ### **response.output\_text.completed**
>
> 模型完成文字生成。
>
> ```json
> {
> "type": "response.output_text.completed",
> "text": "你好,我是你的助手。"
> }
> ```
>
> 用途:
>
> - 完整文字訊息(非流式)
<br>
### **5.3.4 語音輸出事件(Audio Output Events)**
<br>
> ### **response.output\_audio.delta**
>
> 代表 AI 語音輸出的音訊 chunk。
>
> ```json
> {
> "type": "response.output_audio.delta",
> "audio": "<base64 audio chunk>"
> }
> ```
>
> 用途:
>
> - 分段播放 TTS 語音(低延遲)
> - 適合 Unity 用 AudioClip 逐段寫入
>
> ---
>
> ### **response.output\_audio.completed**
>
> 語音輸出完成。
>
> ```json
> {
> "type": "response.output_audio.completed"
> }
> ```
>
> 用途:
>
> - 可停止 AudioSource queue
<br>
### **5.3.5 Response 完成事件(Response Lifecycle)**
<br>
> ### **response.started**
>
> 模型開始處理輸入。
>
> ```json
> {
> "type": "response.started",
> "response": { "id": "resp_123" }
> }
> ```
>
> ---
>
> ### **response.completed**
>
> 模型完成此次回應(包含文字 / 語音)。
>
> ```json
> {
> "type": "response.completed",
> "response": { "id": "resp_123" }
> }
> ```
>
> 用途:
>
> - 用來判斷本輪對話是否完整結束
<br>
### **5.3.6 錯誤事件(Error Events)**
<br>
> ### **error**
>
> 模型或 WebSocket 發生錯誤。
>
> ```json
> {
> "type": "error",
> "error": {
> "message": "Invalid audio format",
> "code": "invalid_audio"
> }
> }
> ```
>
> 用途:
>
> - 顯示錯誤訊息
> - 重新連線或重新送出語音
>
<br>
### **5.3.7 停止事件(Interruption Events)**
<br>
>
> ### **response.interrupted**
>
> 代表 AI 的語音被用戶打斷。
>
> ```json
> {
> "type": "response.interrupted",
> "response": { "id": "resp_123" }
> }
> ```
>
> 用途:
>
> - 玩家隨時可說話中斷 AI
> - AI 將停止語音生成
>[!Note]參考資訊
> 更詳細關於 Realtime API 的事件類型說明請參考 [Client events 官方文件](https://platform.openai.com/docs/api-reference/realtime-client-events?utm_source=chatgpt.com)
<br>
### 5.4 何時使用 Realtime API?
- 需要「講話」而不只是「打字」
- 需要玩家可以打斷 AI 的說話流程
---
<br>
## Chapter 6. Prompt Engineering 與資料檢索技巧
### 6.1 Prompt Engineering:對話記憶(Conversation History)
**C# List 管理對話歷程範例**
```csharp
List<Message> history = new();
history.Add(new("user", userText));
history.Add(new("assistant", aiResp));
```
- 可將 history 傳給 Responses API,使模型理解前文脈絡。
#### Responses 傳送 history 的範例
```json
{
"model": "gpt-5-nano",
"input": [
{"role": "system", "content": "你是一位友善的 NPC 導遊。"},
{"role": "user", "content": "你好,我剛到這個村莊。"},
{"role": "assistant", "content": "歡迎!今天需要我帶你去哪裡嗎?"},
{"role": "user", "content": "帶我去市場。"}
],
"response_format": {"type": "text"}
}
```
#### Unity C#(REST)傳 history 範例
```csharp
var history = new List<object>
{
new { role = "system", content = "你是一位友善的 NPC 導遊。" },
new { role = "user", content = "你好,我剛到這個村莊。" },
new { role = "assistant", content = "歡迎!今天需要我帶你去哪裡嗎?" },
new { role = "user", content = "帶我去市場。" }
};
var request = new
{
model = "gpt-5-nano",
input = history,
response_format = new { type = "text" }
};
string json = JsonConvert.SerializeObject(request);
```
以上方式可讓 Responses API 理解完整脈絡,並產生自然連貫的 NPC 對話反應。
---
### 6.2 Prompt Engineering:System Prompt(角色設定)
```json
{"role":"system", "content":"你是一個友善的 NPC 導遊。"}
```
- 用來定義 NPC 的個性、語氣、說話範圍。
- 可加入 **風格**、**限制**、**技能列表**,提升角色一致性。
---
### 6.3 Prompt Engineering:常用技巧
#### **明確任務描述(Clear Tasking)**
告訴模型「你要它做什麼」→ 比如 NPC 回覆要簡潔、有沉浸感、保持角色一致。
```json
{"role":"system", "content":"任務:以村莊 NPC 身分回覆玩家,語氣友善、有點神秘感,避免講太長。"}
```
---
#### **限制輸出風格(Style Constraints)**
```json
{"role":"system", "content":"你的回覆限制:不超過 20 字、避免專業術語、加入一個表情符號。"}
```
---
#### **使用範例(Few‑Shot Examples)**
```json
{"role":"assistant","content":"歡迎來到綠楓村!想去哪裡走走?✨"}
{"role":"user","content":"我想看看有什麼特別的地方。"}
{"role":"assistant","content":"市場最熱鬧,要我帶你去嗎?🧺"}
```
---
#### **限制知識範圍(Knowledge / Canon Rules)**
避免 NPC 亂講故事之外的內容。
```json
{"role":"system","content":"你只能使用此村莊背景資訊,不得創造歷史事件或國家設定。"}
```
---
#### **要求思考步驟(Chain‑of‑Thought / Guided Reasoning)**
NPC 思考 → 再轉成人類能理解的回答。
```json
{"role":"system","content":"請先在心中推理(不要展示),再給簡短 NPC 回覆。"}
```
---
<br>
### 6.4 RAG:檢索增強生成(Retrieval Augmented Generation)
> #### **OpenAI 是否提供內建 RAG?**
> - OpenAI 在 **Assistants API** 時代曾內建 RAG 工具(vector store / file search)。
> - **但在 2024–2025 的新版 API(Responses / Realtime)中不再強調內建 RAG**,通常需自行實作:
> - 本地資料庫(ScriptableObject / JSON)
> - 第三方向量資料庫(Pinecone / Weaviate / Chroma)
> - 也可自行建立 embedding + cosine similarity
>
### **6.4.1 RAG 基本架構**
下面是遊戲 / Unity 中常用的 RAG 架構,輕量且可完全離線運作。
```
玩家輸入 → (1) Embedding → (2) 搜尋最接近的資料 → (3) 將資料塞入 prompt → GPT 回覆
```
- **Embedding API**:將玩家提問轉成向量。
- **本地向量資料庫**(List / ScriptableObject):查找相似資料。
- **Responses API**:最終生成 NPC 回覆。
---
### **6.4.2 建立本地資料庫(ScriptableObject)**
```csharp
[System.Serializable]
public class LoreEntry
{
public string id;
public string content;
public float[] embedding;
}
[CreateAssetMenu]
public class LoreDatabase : ScriptableObject
{
public List<LoreEntry> entries;
}
```
---
### **6.4.3 產生資料庫 Embedding (.NET SDK)**
> 在 Unity Editor 離線生成 embedding,避免遊戲執行時消耗成本。
```csharp
public async Task<float[]> CreateEmbedding(string text)
{
var client = new OpenAIClient(API_KEY);
var res = await client.Embeddings.CreateAsync(new EmbeddingCreateOptions
{
Model = "text-embedding-3-large",
Input = text
});
return res.Data[0].Embedding;
}
```
---
### **6.4.4 查找最相似資料(Cosine Similarity)**
```csharp
float Cosine(float[] a, float[] b)
{
float dot = 0f, magA = 0f, magB = 0f;
for (int i = 0; i < a.Length; i++)
{
dot += a[i] * b[i];
magA += a[i] * a[i];
magB += b[i] * b[i];
}
return dot / (Mathf.Sqrt(magA) * Mathf.Sqrt(magB));
}
LoreEntry SearchTop1(float[] userEmbedding, LoreDatabase db)
{
float bestScore = -1f;
LoreEntry best = null;
foreach (var e in db.entries)
{
float score = Cosine(userEmbedding, e.embedding);
if (score > bestScore)
{
bestScore = score;
best = e;
}
}
return best;
}
```
---
### **6.4.5 將檢索結果塞進 Prompt → Responses API**
```csharp
string InjectContext(string retrieved)
{
return $"以下是與玩家問題最接近的資料:{retrieved}
請根據這些資訊用 NPC 的口吻回答玩家。";
}
// 最終請求
var req = new
{
model = "gpt-5-nano",
input = new object[]
{
new { role = "system", content = "你是一位 NPC 導遊。" },
new { role = "system", content = InjectContext(bestLore.content) },
new { role = "user", content = userInput }
},
response_format = new { type = "text" }
};
```
---
### **6.4.6 完整 RAG 流程(Unity 實務整合)**
```csharp
async Task<string> NPC_RAG_Reply(string userInput)
{
// 1. 建立使用者 embedding
float[] userEmbedding = await CreateEmbedding(userInput);
// 2. 查找最接近的資料
var bestLore = SearchTop1(userEmbedding, loreDB);
// 3. 準備 prompt
string promptContext = InjectContext(bestLore.content);
// 4. 呼叫 Responses API
var req = new
{
model = "gpt-5-nano",
input = new object[]
{
new { role = "system", content = "你是一位 NPC 導遊。" },
new { role = "system", content = promptContext },
new { role = "user", content = userInput }
},
response_format = new { type = "text" }
};
string json = JsonConvert.SerializeObject(req);
string res = await PostJSON("https://api.openai.com/v1/responses", json);
return ExtractText(res);
}
```
---
### 6.5 Prompt 情境範例(NPC 對話)
#### **NPC 對話基礎模板**
```json
{"role":"system","content":"你是一位 NPC,語氣友善。請以沉浸式方式回答玩家問題。"}
```
#### **任務觸發模板**
```json
{"role":"system","content":"若玩家提到 '市場'、'商品'、'買東西' 等關鍵字,回覆應引導到市場相關任務。"}
```
#### **情緒驅動模板**
```json
{"role":"system","content":"若玩家語氣低落,請以安慰方式回覆;若玩家興奮,回覆能量提升。"}
```
#### **禁止與限制模板**
```json
{"role":"system","content":"不得提及遊戲外資訊、不得打破第四面牆、不得回答與村莊設定無關的世界觀內容。"}
```
---
### 6.6 小型資料庫查找(本地 JSON / ScriptableObject)
即使沒有真正的 RAG 服務,也可以用 Unity 本地資料達到類似的功能。
#### **本地 JSON**
```json
{
"locations": [
{"name":"市場", "desc":"這裡是村子裡最熱鬧的地方。"},
{"name":"神木", "desc":"矗立千年的大樹,被村民視為守護者。"}
]
}
```
#### **ScriptableObject 資料庫**
```csharp
[CreateAssetMenu]
public class LocationDB : ScriptableObject
{
public List<LocationInfo> locations;
}
```
#### **Unity 查詢後塞到 prompt**
```
你查詢到的資料:<desc>。請用 NPC 的語氣回覆玩家。
```
---
<br>
## Chapter 7. 語音對話 Pipeline
以下以 **傳統 Conversational AI 的 5 大模組**(ASR → NLU → DM → NLG → TTS)重構語音對話流程,並同時介紹傳統做法 vs Realtime API 整合流程。
---
### **7.1 ASR(Automatic Speech Recognition:語音辨識)**
ASR 模組負責將玩家語音 → 文字。
**Whisper(非 Realtime)**
1. Unity 錄音 → 產生 WAV / FLAC
2. 使用 Whisper API(/v1/audio/transcriptions)
3. 回傳純文字給 Unity
**Realtime API(內建 ASR)**
Realtime API 會自動:
- 接收語音 chunk
- 自動判斷語音起訖(VAD)
- 自動轉文字 → 發送事件:`input_audio_transcription.completed`
---
### **7.2 NLU(Natural Language Understanding:語意理解)**
模型要理解玩家的目的、意圖與語境。
**傳統流程(非 Realtime)**
- Whisper → 回傳文字
- 將文字塞入 Responses API(例如 gpt-5-nano)
- 由模型負責語意理解
**Realtime API**
- 聽到語音後模型即時做 NLU
- 常見事件:`response.output_text.delta`(模型理解後即時回覆)
---
### **7.3 DM(Dialogue Management:對話管理)**
DM 模組負責:
- 決定 NPC 下一步動作
- 回覆風格
- 情境保持(context)
- 依照任務邏輯做分歧
**傳統 DM(基於 Responses API)**
- 使用 System Prompt 定義 NPC 角色
- 使用 history 維持上下文
- 可用 Structured Output 產生行為控制,例如:
```json
{
"action":"Wave",
"emotion":"Happy",
"reply":"你好!歡迎來到這裡。"
}
```
- DM 邏輯可由遊戲程式 + prompt 雙方共同決定
**Realtime DM**
- Realtime API 無 Structured Output
- DM 需改為程式端配合事件流判斷(e.g., 打斷、語音停頓)
- 可以使用 transcript 再去給有 structured ouput 的模型做決策
---
### **7.4 NLG(Natural Language Generation:語言生成)**
**Responses API(傳統)**
- 模型計算後一次回傳完整文字(或 streaming chunk)
- 若要控制格式 → 使用 Structured Output(Responses API 專屬)
**Realtime API(即時)**
- 以 token 級速度輸出:`response.output_text.delta`
- 可做到同步字幕、同步 NPC 嘴型
---
### **7.5 TTS(Text‑To‑Speech 語音生成)**
**傳統 TTS 流程**
- Responses(文字) → Audio TTS API → wav/mp3
- Unity 建立 AudioClip → AudioSource 播放
**Realtime TTS(語音 chunk 流式輸出)**
- Realtime 直接回傳:`response.output_audio.delta`
- Unity 可邊收邊播,延遲比傳統 TTS 低很多
---
### **7.6 VAD(Voice Activity Detection:語音起訖偵測)**
VAD 用來判斷「玩家什麼時候在講話」、「何時停下」。
**Unity 簡易 VAD(程式端)**
依音量判斷:
```csharp
float ComputeVolume(float[] samples){
float sum=0f;
foreach(var s in samples) sum+=s*s;
return Mathf.Sqrt(sum/samples.Length);
}
```
- 連續高於門檻 → 認定正在講話
- 連續低於門檻 → 認定講完了
**Realtime API 的 VAD**
- 內建自動判斷語音起訖
- 不需額外做 VAD,但可搭配自製 VAD 控制何時送 `input_audio_buffer.completed`
- 啟用 Server_VAD 範例:
```json
{
"type": "session.update",
"session": {
"voice": "gpt-voice",
"vad": {
"mode": "server"
}
}
}
```
>[!Note]參考資訊
如果要做更多VAD的參數設定可以參考[官方 document](https://platform.openai.com/docs/guides/realtime-vad)
---
### **7.7 傳統語音 Pipeline vs Realtime 整合(總覽)**
| 模組 | 傳統 Pipeline(Responses + Whisper + TTS) | Realtime API |
| --- | ------------------------------- | --------------- |
| ASR | Whisper API | 內建即時 ASR |
| NLU | Responses API | 內建 NLU |
| DM | Structured Output、system prompt | 事件流、無結構化輸出 |
| NLG | Responses / SSE | token 級即時輸出 |
| TTS | Audio API(延遲較高) | 即時語音 chunk(低延遲) |
| VAD | 程式端自行實作 | 內建 |
---
### **7.8 何時用傳統?何時用 Realtime?**
#### **選傳統 Pipeline(Whisper + Responses + TTS)** 若:
- 需要 Structured Output 控制 NPC 動作
- 需要可預測與穩定的 JSON 回傳
- 想精細調整每個 AI 模組(ASR / NLU / DM / NLG / TTS)
- 不追求語音極低延遲
#### **選 Realtime API** 若:
- 要語音助理、VR NPC、需被玩家打斷的即時對話
- 需要語音輸入 / 語音輸出同時處理
- 想要最低延遲(token 級輸出 + 即時 TTS)
- 希望由 API 自動處理 VAD / ASR / TTS
---
 Sign in with Wallet


