# Hashicorp Vault Incident Response and Forensics
| Student | Email| Role |
| :---: | :----: | :---: |
| Khaled Ismaeel | `k.ismaeel@innopolis.university` | Research |
| Vitaliy Korbashov | `v.korbashov@innopolis.university` | Research |
| Hussein Al-Khalissi | `h.alkhalissi@innopolis.university` | Wazuh setup |
| Tankoua Jorest Brice | `j.tankouanjassep@innopolis.university` | Vault setup |
## 1. Abstract
Hashicorp Vault is quite a sensitive piece of software logic resposnible for managing critical secrets in large scale software. As it gains more traction, it will inevitably be evermore targeted by malicious adversaries. That, combined with Vault's novel and rather counter intuitive design, pose a significant challenge for forensic teams unfamiliar with the tool. In this project we aim to review Vault's forensic artifacts, highlight steps for forensic investgation involving Vault, and list several pitfalls. We accompany our review study with several minor experiments for demonstration.
## 2. Contents
[TOC]
## 3. Introduction
This chapter provides the background necessary for our project. First, we will review the tool under consideration, Hashicorp Vault. After that, we will recall general principles of incident response and forensics. We then proceed to state our project's goal.
### 3.1. HashiCorp Vault
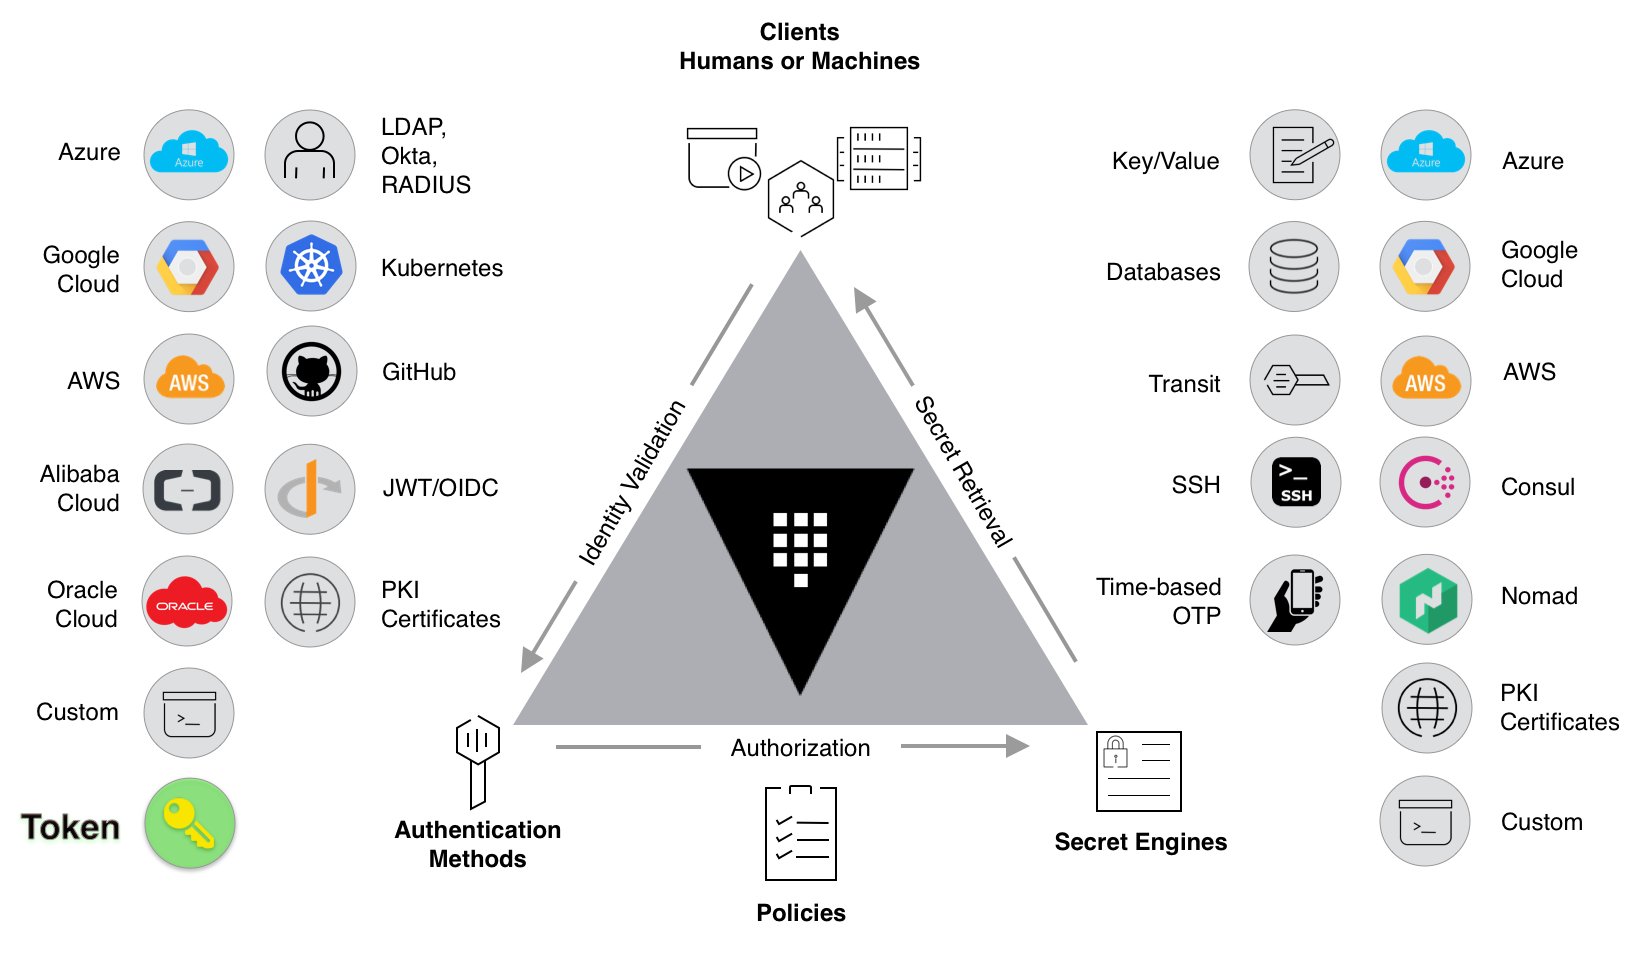
Vault is a popular tool for managing secrets, API keys, credentials, and other sensitive information. It provides a secure way to store and access sensitive data and offers a wide range of features suitable for enterprise use.
|  |
| :---: |
| _Figure 3.1.1: HashiCorp Vault and its various features and integrations, as depicted on the HashiCorp website [4]_ |
Vault's design allows for various deployment paradigms. It can be hosted as a classical standalone process, or it can be leveraged as a microservice to be deployed in containers and/or cloud infrastructure.
Besides its modern deployment architecture, Vault utilizes non-trivial cryptographic schemes to secure its data, both in transit and at rest.
Due to all the feature mentioned before, Vault has attracted significant market share since its launch in 2015. According to [5], more than 2900 companies utilize Vault, including big tech corporations like Adobe, Cisco, and Hulu.
### 3.2. Incident Response
_Incident response_ is an umbrella term for all the actions undertaken in reponse to a security threat (incident). The set of processes has been formalized in several standards with certain degrees of variation. One of the most notable standards are NIST SP-800-61 [8] and 2 [9].
|  |
| :---: |
| _Figure 3.2.1: incident response process diagram, as depicted in the NIST standard. The corresponding diagrams in the ISO standard are too elaborate to be contained in this report_ |
In the event of a security incident, incident response and forensic analysis are critical to identifying the root cause of the incident, the extent of the damage, and preventing future incidents. Numerous artifacts are leveraged during incident response:
- Process logs
- Virtualization-layer logs
- Kernel-level logs
- Process metrics
- Network metrics
- _etc_
It is essential to ensure that any piece of software is properly monitored and audited, so that enough data is available for later incident investigation.
Proper log/audit configuration is surely unique for every piece of software. Even though general patterns can be drawn (for example, `journalctl` in Linux can almost reliably trace logs of any mainstream software), incident response teams must be aware of the logging paradigm used by software in order to ensure all incident details are collected properly while minimizing effort.
### 3.3. Project Statement
Despite Vault's robust security mechanisms, several security incidents can still occur such as:
- Unauthorized access attempts
- Misconfiguration
- Policy violations
- Denial of service
- _etc_
While log collection and analysis is fairly intuitive in the general case, Vault is a unique piece of software and follows radically different paradigms for log creation and management, making its forensic response a non-trivial and unusual task.
The purpose of this project is to explore the incident response and forensics capabilities of Hashicorp Vault. Specifically, we will examine the logging and monitoring features of Vault and how they can be used to detect and respond to security incidents.
- Setting up a test environment with Vault
- Configuring access logging and monitoring features
- Conducting a test scenario where security events are logged by Vault
- Analyzing the audit logs and audit trails to determine the accuracy, completeness, and integrity of the logs.
By setting up a test environment and conducting attack simulations, we aim to explore the best practices and tools that can be used for incident response and forensics in a Vault-enabled environment
### 3.4. Report Navigation
The remainder of this report consists of two section: the theoretical section, _Methodology_, and the practical section, _Implementation_.
In the theoretical section, we will present and analyze the architecture of Vault, how it is different from mainstream software, and how it can be leveraged during a forensic investigation.
The practical section consists of several completely separate experiments. Each experiment explores a certain use case of Vault along with a demonstration of an incident and the correponding forensic investigation. These experiments are meant to be viewed as a guide, or a collation of best practices regarding Vault incident response.
## 4. Methodology
In this section we deduce the forensic processes most suitable for Vault. First, in _Forensic Artifacts_, we review Vault's internals, their uniqueness, and how they relate for forensics. In _Forensic Readiness_ we provide broad guidelines for setting up the Vault deployment so that it eases the process of forensic investigation in the case it is needed. Finally, _Vault Incident Response_ is a set of guides of to follow during investigation.
### 4.1. Forensic Artifacts
Vault's architecture is quite elaborate and unique in many senses. We will now visit a selected subset of Vault components which are most important from a forensic perspective.
#### 4.1.1. Vault High Level Architecture
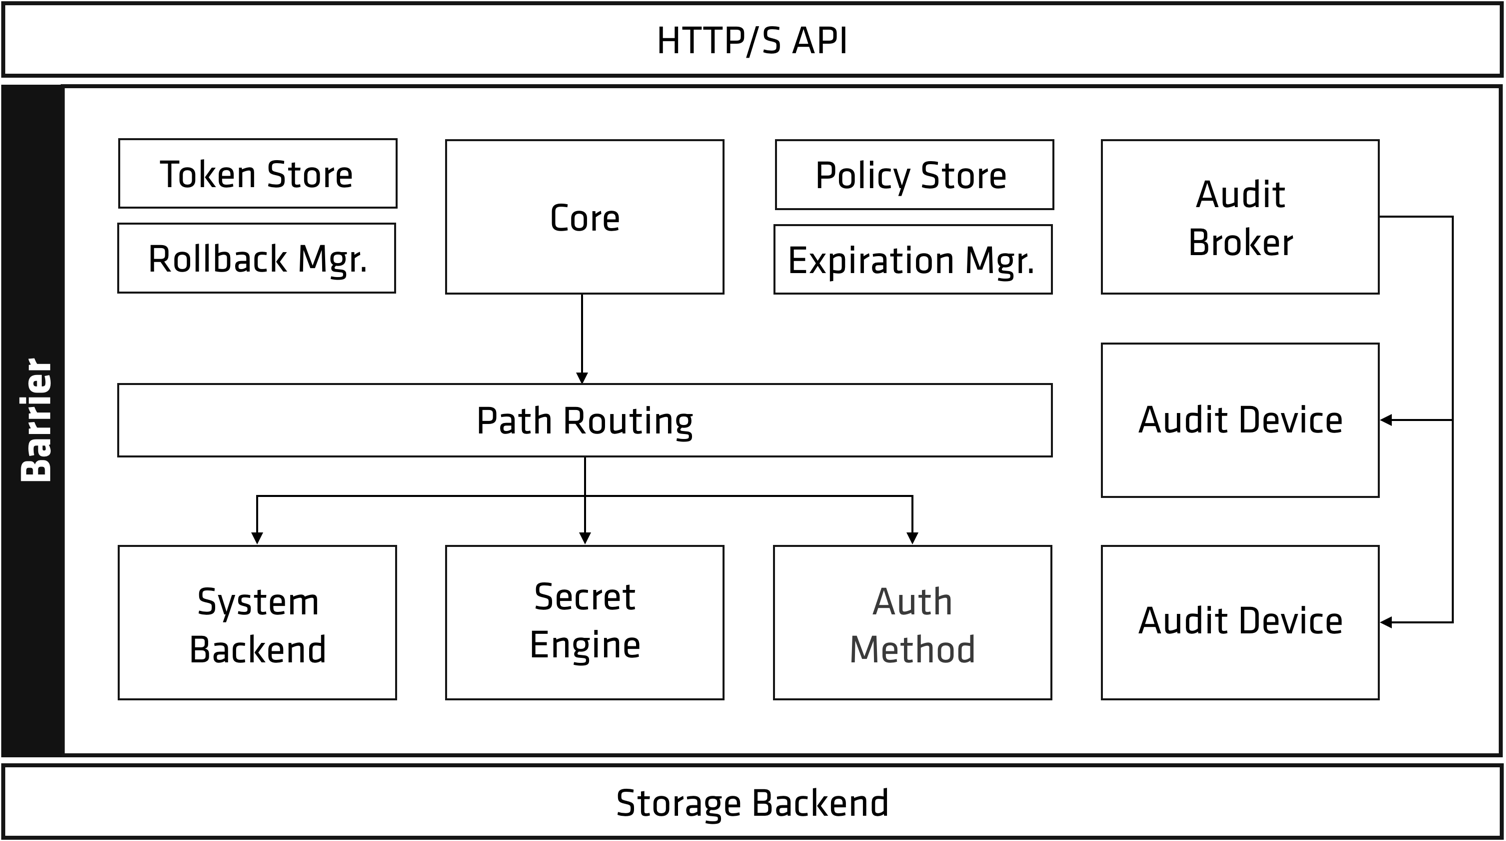
Vault inhibits a layered architecture, where the highest layer is an HTTPS API and, the core secret logic is the middle layer, and the storage logic is the bottom most layer, as depicted below.
|  |
| :---: |
| _Figure 4.1.1.1: high level view of Vault architecture, as depicted in Vault documentation_ |
Note that the diagram above does not correspond to a deployment; it is rather a logical description of the various components of Vault. The deployment logic will follow later.
**There are two cruicial points to be made here**:
1. Unlike other layered architectures, where trust increases towards the low levels, Vault has zero trust towards the storage backend.
To elaborate, all information communicated between Vault and the storage backend is encrypted (which implies that secrets are encrypted at rest). This relaxes constraints on the trusted computing base and protects against hardware-level attacks. However, this does complicate the forensic process by quite a bit, since all hardware "evidence" contains encrypted data only.
2. The audit logs have their own configuration, separate from the secret storage backend.
This is somewhat counter intuitive; as we will see later, a lot of moving parts are invovled in the Vault audit process. It also means that we don't expect audit logs and secret data to be stored in the same place, which further adds to the complexity of the forensic investigation.
#### 4.1.2. Vault Storage Backends
All of Vault's data is stored in a backend storage system, which can be either a file system, a cloud provider's storage service, or a database. Vault itself is stateless and does not store any data or secrets in memory, making it more secure and easier to manage.
The backend storage system is responsible for persisting all data, including secrets, policies, and audit logs. All data is encrypted using the encryption as a service approach mentioned earlier, ensuring that data is securely stored at rest. Additionally, Vault provides the option to enable transit encryption for data in transit, adding an extra layer of security.
##### 4.1.2.1. Popular Storage Options
HashiCorp Vault supports a wide range of backend storage services for securely storing and managing secrets and sensitive data. Below are some of the most commonly used backend storage options:
- **HashiCorp Consul KV**: Consul KV is a simple key-value store that can be used as a simple backend for Vault. Consul KV is built over Consul itself, so all its properties are retained. It is generally a good choice for smaller-scale deployments where a full-service mesh solution is not required.
- **Google Cloud Storage/Microsoft Azure Blob Storage/Amazon S3**: highly scalable and durable object storage services that can be used as a backend for Vault. They provide great availability and, as a result are a good choice for storing large amounts of data that needs to be accessed frequently.
- **Relation Databases** (MySQL, PostgreSQL, etc.): Vault can also use traditional relational databases as a backend for storing secrets and sensitive data. Vault supports popular databases and provides features such as automatic key rotation and secure storage of credentials.
- **Filesystem**: Vault can also use a local filesystem as a backend for storing secrets and sensitive data. This is a good option for smaller-scale deployments, or for development and testing environments, but not for production.
##### 4.1.2.2. Integrated Storage
One recent development in storage backends is the integrated storage, created in Vault 1.4.1. This backend does not depend on any third party software, supports high availability, and officially supported by HashiCorp. It is therefore a very common backend.
Integrated storage is implemented as a distributed storage managed by Raft consensus algorithm [10], the same algorithms used by Docker Swarm and other notable distributed systems. Although the algorithm is well reputed in theory, it does add several layers of complexity for the incident response team.
We discuss the integrated storage and its complexities in the next section in the context of Vault high availability mode.
#### 4.1.3. Vault High Availability
Vault supports to modes of deployment: normal and high availability. Essentially, high availability mode is a distributed deployment that focuses on features such as horizontal scalability, fault tolerance, and similar.
There are various configurations of a high availability Vault deployment, depending on the cloud provider you are using, your application, and so forth. One standard example, taken from the official Vault tutorials, is shown below.
|  |
| :---: |
| _Figure 4.1.3.1: sample high availability deployment of Vault. Note that there is exactly one active server and several standby servers. The exact semantics of this are described below_ |
Typically, a high availability deployment will look fairly similar to what is depicted above; multiple Vault server are synchronized and serving requests from behind a load balancer. This provides a certain level of fault tolerance where a server crash doesn't bring down the whole service.
All servers are in one of two states:
- Active
- Standby
Active servers are responsible for the entire Vault logic, while standby servers simply forward requests to active servers. In Enterprise versions of the software, the standby servers are also capable of serving read-only requests, improving overall I/O performance.
One important characteristic is that _all servers sharing a storage backend have at most one active server_. This is important to ensure consistency and simplify the architecture.
Following the trends in application deployment with Kubernetes and cloud providers, high availability Vault is indeed the more attractive variant of Vault.
However, this does pose a several difficulties for forensic investigation and incident response.
1. The server logs are not synchronized. This means that a forensics team has to collect and aggregate evidence from all servers to get a full picture of the incident.
2. Most probably, Vault servers will be running in containers. This adds an extra layer of log management: that of the container runtime.
#### 4.1.4. Vault Auditing
Vault maintains an audit log separate from the operational logs mentioned previously. The audit log keeps track of _every authenticated interaction with Vault_.
The log entries are all JSON objects with one of two types: request or response. This is convenient for the sake of log inspection during incident response and forensics; the data is already present in a widely-supported format.
Vault supports multiple types of audit devices:
- **File**: simply write log entries to a local file in the file system.
- **Syslog**: registers log entries in the local syslog agent. This is only supported on Unix-like systems.
- **Socket**: sends the log entries through a socket, be it a Unix socket, TCP socket, or UDP socket.
Secret data in the JSON entries are hashed with a salt using HMAC. This is good for security purposes. However, it means that the forensics team cannot make sense of the secret data. Instead, the team has to generate HMAC's from all secrets and cross-reference them with the observed value, which might not be possible some settings.
It is possible to configure multiple audit devices, in which case log entries are going to be written to all devices. A request is considered successful only if it has been written successfully to _at least one audit device_. This implies that audit devices are not guaranteed to be synchronized or even consistent (for example, in case packet loss occurs). This again complicates matters for the forensics team, as multiple audit logs have to be aggregated and sometimes even cross-referenced with networking logs to get a complete picture of the incident.
### 4.2. Forensic Readiness
In the context of Vault, forensic readiness is possible and can be achieved by enabling certain features and tweaking configurations. By utilizing these features/configurations ( responsible for collection and analysis of digital evidence) it is possible improve the forensic readiness of the system, which will in turn allow the investigation team to effectively respond to potential security incidents.
#### 4.2.1. Artifacts Overview
The most important evidence generated by Vault is audit logs. Vault provides detailed logging of all requests made to the system, as well as any changes to policies and configuration. These audit logs can be used to identify a plethora of security events The logs can be found in the Vault server's configured audit devices, which can include file, syslog, and other logging solutions.
In addition to the above, Vault also generates access logs that provide detailed information about user access to Vault as a part of the audit logging mechanism. These logs can be used to identify any suspicious behavior, such as unusual login patterns or requests for sensitive data.
One important thing to note is that Vault makes use of various keys and tokens to authenticate access to the system. These keys and tokens can be useful in forensic analysis to identify the source of a security incident or to track down any compromised credentials.
Another useful forensic artifact is the Vault's system and performance metrics. These metrics provide a detailed overview of the system's performance, including information about requests per second, response times, and memory usage. These metrics can be used to identify any anomalies that may indicate a security incident. The system and performance metrics are available through the Vault API or can be visualized using external monitoring tools.
#### 4.2.2. Audit Logging
Vault provides a robust auditing framework that logs all activity within the system. Audit logs are essential for forensic analysis as they provide a detailed record of all actions taken within the Vault environment. It is important to configure Vault's audit logging to capture all relevant events, including authentication attempts, secret access, and policy changes.
#### 4.2.3. Encryption
Encryption is a critical component of Vault's security architecture. All data stored within Vault, including audit logs, should be encrypted to ensure the confidentiality and integrity of the data. Vault provides a range of encryption options, including key management and data encryption, which should be configured to meet the organization's security requirements.
#### 4.2.4. Access Controls
Access controls are used to restrict access to sensitive data within Vault. Vault's access control policies should be configured to ensure that only authorized users and applications have access to the data they require. Access controls are critical for forensic readiness as they ensure that evidence is only accessible to authorized personnel.
#### 4.2.5. Monitoring
Monitoring is essential for detecting and responding to security incidents in real-time. Vault's monitoring features should be configured to provide alerts when suspicious activity is detected within the system. This includes monitoring of audit logs, system performance, and user activity.
### 4.3. Vault Incident Response
Vault, like any other system, is susceptible to security incidents. When an incident occurs, a prompt and efficient response is essential to prevent further damage and identify the root cause of the incident.
This section discusses/outlines:
- How to respond to a Vault-related security incident effectively and efficiently
- Actions that should be taken immediately after an incident
- How to preserve and collect evidence
- How to analyze the evidence for identification of the incident cause.
#### 4.3.1. Evidence Preservation
The immediate actions taken in response to a Vault security incident must focus on securing the existing Vault infrastructure to prevent further unauthorized access attempts or modifications. The primary objective is to preserve the integrity of the evidence present on the affected Vault nodes, as it will be essential for the subsequent forensic investigation.
The following actions seem appropriate to be performed immediately after a security incident:
1. Isolate the affected Vault node(s) from the network to prevent further unauthorized access attempts or modifications.
2. Disable the affected Vault node(s) from the cluster to avoid potential replication of the incident across other nodes.
3. Record the system time on all the affected nodes, as well as any logs or monitoring tools, to ensure that a clear timeline of events can be established during the subsequent forensic investigation.
4. Back up all relevant logs and system state information, as it may be crucial for forensic analysis and evidence collection.
5. Secure the potentially affected systems, secrets of which have been recently accessed. The affected services should have their secrets changed or at the very least be taken offline.
These immediate actions are critical to preserving the integrity of the evidence and ensuring that a thorough forensic investigation can be conducted.
#### 4.3.2. Evidence Collection
As mentioned before, Vault possesses some characteristics that radically distinguish it from classical server processes. Therefore, the evidence collection procedure has to keep that in mind.
Let us list the main points a forensic team has to go through to properly preserve evidence of a Vault deployment. Note that some steps might be unnecessary/inapplicable in some contexts.
**1. Determine the cluster type: classic deployment or high availability.**
This is crucial in order to properly reason about the storage of the various forensic artifacts. This step can be accomplished by consulting the DevOps/SRE teams or inspecting Vault configuration.
**2. Trace the storage backends.**
Vault can be configured with various storage backends. Determining these backends is important to locate application data. Again, this step is related to the business under consideration and can be determined by consulting the DevOps/SRE teams or inspecting the Vault configuration.
**3. Trace the audit logs.**
Audit logs can be stored/replicated in several manners, as we explained previously. This information again can be determined by consulting DevOps/SRE teams or manually inspecting the configuration.
**4. Export storage backends.**
One must first consult the DevOps/SRE teams, as it is possible that their configuration is healthy and working as expected, or it might have been compromised.
This action depends on the choice of the storage backend. If it is a local file, exporting is fairly straightforward; a simple imaging tool like `dd` will suffice. However, it's most probably the case that the storage backend is hosted by a third party provider (AWS, Azure, GCP, etc). In that case, one must follow the provider's process.
It's quite probable that Vault was configured with the integrated storage. That case is rather complicated, as storage is replicated in a manner specified by Raft consensus. One must export the images of _all_ servers in the cluster.
**5. Export audit logs.**
Again, consultation with the DevOps/SRE teams is crucial so check whether audit logs have been compromised or not.
In case logs are stored in files, imaging with `dd` will suffice.
If they have been written to the `syslog`, that log must be traced and exported. The most common case is that the system log is maintained by Systemd, in which case it can be exported with `journalctl` and similar utilities.
If they were written to a socket, that socket must be traced. Unix sockets can be traced with elementary Unix tools. TCP/UDP sockets might require more elaborate networking forensics to trace the connection.
**6. Export disk images.**
The details of this step depend on the deployment. In a classical deployment, imaging is straightforward with tool like `dd`. In high availability deployments, the disk images of _all_ Vault servers must be exported.
Note that cloud providers might provide some convenience features for exporting disk images.
**7. Export memory state.**
This step crucial since much of Vault logic is never exported unencrypted to the disk/log, and thus might provide invaulable insight.
In case of a classical deployment, standard memory exporting tools can be used. In containerized deployments, the memory image must be exported through the container runtime.
In case cloud providers are used for hosting the workload, they might provide options for exporting the memory image.
#### 4.3.3. Evidence Analysis
Evidence analysis in Vault is not straightforward since much of the data preserved in the previous step is encrypted/HMACed. Here are some broad strokes to help ease the forensic investigation process.
**1. Generate the HMAC of all secrets in the cluster.**
The HMACs of secrets are what's logged in the audit logs, not the secrets themselves. Generating these values can therefore ease audit inspection as HMAC values can be used to determine the secert under consideration.
The most convenient way to accomplish this, Vault provides an API endpoint at `/sys/audit-hash` to generate the HMACs. Alternatively, standard HMAC implementations are widely available, both in CLI form (OpenSSL CLI `-hmac` switch) and library form (OpenSSL `<hmac.h>` header).
**2. Obtain custody of encryption keys.**
Decrypting secrets in the storage backend can also provide insight into a possibly compromised instance of Vault.
The encryption keys can be obtained from the `transit/keys` endpoint.
**3. Aggregate audit logs.**
As mentioned previously, audit logs are not necessarily well-synchronized between all audit devices. They have to be aggregated to construct a meaningful timeline.
The logs can be aggregatd using high-level tools such as the ELK stack or Splunk. This seems to be the most convenient option. Alternatively, log entries are merely JSON entries, so they can be easily inspected with common tools like `jq` and Python.
**4. Cross-reference the audit log secrets.**
We can use the HMACs generated in step 1 to fill-in the raw values of the secrets in the audit log. Python scripting is probably the most convenient method of accomplishing this.
**5. Proceed to inspect the audit log.**
The audit log is perhaps the most straightforward and most useful artifact to inspect. With proper visualization and querying tools like ELK stack, this step can be accomplished by mere human. Alternatively elementary scripting can be used in this case.
A timeline can be constructed from this step and can be imported to whatever forensic tool you are using.
**6. Proceed to inspect the secret values.**
It's possible that a malicious secret has been injected in the Vault to compormise application logic. This can be verified by inspecting the secrets in the Vault. Depending on the application logic, the details of this step varies.
**7. Proceed to inspect logs from the underlying container runtime (if used).**
The container runtime might hold some valuable logs not maintained by either Vault or the Kernel. For example, information about container crashes might be saved there.
This can be exported via the container runtime CLI (`docker`, `podman`, etc). Orchestrators, such as Kubernetes, might hold valuable information, too.
**8. Perform forensic analysis on the disk and memory images.**
It's possible that Vault was compromised through an escalation of privilege (or other) exploit in the host system. This can be investigated by checking the system/kernel audit logs, file system, process memory maps, etc.
This step is not really particular to Vault, so we will refrain from specifying elaborate details.
## 5. Implementation
In this section, we are to describe the various setups experiments performed to demonstrate Vault capabilities.
### 5.1. Wazuh Escalation of Privlege Detection
In this experiment, we demonstrate how Wazuh can be used to detect escalation of privilege in a Kubernetes setting. Although this is not particular to Vault, it is still a very useful setup as Vault is, in most cases, deployed in a multi-container environment.
#### 5.1.1. Stack
In this experiment, we need the following:
- Kubernetes cluster configured with Kubectl.
- Wazuh deployed.
- Stratus red team.
#### 5.1.2. Setup
##### 5.1.2.1. EC2 Instance Details
***Public IPv4 address:*** 18.246.63.222
[SSH KeyPair](https://www.dropbox.com/s/3c6crc7upds6cor/HashiCorp_Vault_KeyPair.ppk?dl=0)
User: admin
Password: xIUAu7Do+OM73IB09jr8ngyZEkH*svWz
|  |
| :---: |
|  |
| _Figure 5.1.2.1.1: Wazuh_ |
In order to send the kubernetes logs to the wazuh manager we made use of the webhook accessible on wazuh's official documentation. This sends kubernetes logs over an encrypted communication.
:::spoiler `csr.conf`
```!cert
[ req ]
prompt = no
default_bits = 2048
default_md = sha256
distinguished_name = req_distinguished_name
x509_extensions = v3_req
[req_distinguished_name]
C = RU
ST = Tatarstan
L = Innopolis
O = SNE
OU = CCF Project
emailAddress = info@wazuh.com
CN = 10.1.1.31
[ v3_req ]
authorityKeyIdentifier=keyid,issuer
basicConstraints = CA:FALSE
keyUsage = digitalSignature, nonRepudiation, keyEncipherment, dataEncipherment
subjectAltName = @alt_names
[alt_names]
IP.1 = 10.1.1.31
```
:::
ROOT CA public and private keys:
```bash=
$ sudo openssl req -x509 -new -nodes -newkey rsa:2048 -keyout /var/ossec/integrations/kubernetes-webhook/rootCA.key -out /var/ossec/integrations/kubernetes-webhook/rootCA.pem -batch -subj "/C=RU/ST=Tatarstan/L=Innopolis/O=SNE"
```
CSR and server private key:
```bash=
$ sudo openssl req -new -nodes -newkey rsa:2048 -keyout /var/ossec/integrations/kubernetes-webhook/server.key -out /var/ossec/integrations/kubernetes-webhook/server.csr -config /var/ossec/integrations/kubernetes-webhook/csr.conf
```
Server Certificate:
```bash=
sudo openssl x509 -req -in /var/ossec/integrations/kubernetes-webhook/server.csr -CA /var/ossec/integrations/kubernetes-webhook/rootCA.pem -CAkey /var/ossec/integrations/kubernetes-webhook/rootCA.key -CAcreateserial -out /var/ossec/integrations/kubernetes-webhook/server.crt -extfile /var/ossec/integrations/kubernetes-webhook/csr.conf -extensions v3_req
```
For the webhook listener we will simply write a Python Flask application.
:::spoiler source code
```python=
#!/var/ossec/framework/python/bin/python3
import json
from socket import socket, AF_UNIX, SOCK_DGRAM
from flask import Flask, request
# CONFIG
PORT = 8080
CERT = '/var/ossec/integrations/kubernetes-webhook/server.crt'
CERT_KEY = '/var/ossec/integrations/kubernetes-webhook/server.key'
# Analysisd socket address
socket_addr = '/var/ossec/queue/sockets/queue'
def send_event(msg):
string = '1:k8s:{0}'.format(json.dumps(msg))
sock = socket(AF_UNIX, SOCK_DGRAM)
sock.connect(socket_addr)
sock.send(string.encode())
sock.close()
return True
app = Flask(__name__)
context = (CERT, CERT_KEY)
@app.route('/', methods=['POST'])
def webhook():
if request.method == 'POST':
if send_event(request.json):
print("Request sent to Wazuh")
else:
print("Failed to send request to Wazuh")
return "Webhook received!"
if __name__ == '__main__':
app.run(host='10.1.1.31', port=PORT, ssl_context=context)
```
:::
In order to log activities on a kubernetes cluster, we need to enable kubernetes audit policy. This policy tracks each requests sent to the kubernetes API server since it is kubernetes central component.
:::spoiler `/etc/kubernetes/audit-policy.yaml`
```yaml=
apiVersion: audit.k8s.io/v1
kind: Policy
rules:
# Dont log requests to the following API endpoints
- level: None
nonResourceURLs:
- '/healthz*'
- '/logs'
- '/metrics'
- '/swagger*'
- '/version'
# Limit requests containing tokens to Metadata level so the token is not included in the log
- level: Metadata
omitStages:
- RequestReceived
resources:
- group: authentication.k8s.io
resources:
- tokenreviews
# Extended audit of auth delegation
- level: RequestResponse
omitStages:
- RequestReceived
resources:
- group: authorization.k8s.io
resources:
- subjectaccessreviews
# Log changes to pods at RequestResponse level
- level: RequestResponse
omitStages:
- RequestReceived
resources:
# core API group; add third-party API services and your API services if needed
- group: ''
resources: ['pods']
verbs: ['create', 'patch', 'update', 'delete']
# Log everything else at Metadata level
- level: Metadata
omitStages:
- RequestReceived
```
:::
:::spoiler `/etc/kubernetes/audit-webhook.yaml`
```yaml=
apiVersion: v1
kind: Config
preferences: {}
clusters:
- name: wazuh-webhook
cluster:
insecure-skip-tls-verify: true
server: https://10.1.1.31:8080
# kubeconfig files require a context. Provide one for the API server.
current-context: webhook
contexts:
- context:
cluster: wazuh-webhook
user: kube-apiserver
name: webhook
```
:::
#### 5.1.3. Attack & Incident Response
##### 5.1.3.1. Privilege Escalation
In order to demonstrate wazuh incident detection and response capabilities, we made use of stratus red team which has a set of attacks for kubernetes environments.
|  |
| :---: |
| _Figure 5.1.3.1.1_|
```txt=
k8s.credential-access.dump-secrets
k8s.credential-access.steal-serviceaccount-token
k8s.persistence.create-admin-clusterrole
k8s.persistence.create-client-certificate
k8s.persistence.create-token
k8s.privilege-escalation.hostpath-volume
k8s.privilege-escalation.nodes-proxy
k8s.privilege-escalation.privileged-pod
```
|  |
| :---: |
| _Figure 5.1.3.1.2._ |
This command creates a privileged busybox pod
|  |
| :---: |
| _Figure 5.1.3.1.3._ |
For us to determine the necessary fields to be parsed by our decoders and rules, we made use of the kubernetes API available at [link](https://github.com/kubernetes/kubernetes/blob/master/api/openapi-spec/swagger.json)
|  |
| :---: |
| _Figure 5.1.3.1.4._ |
###### 5.1.3.1.1. Custom decoder to parse information
Our custom decoders are stored in the file `/var/ossec/etc/decoders/local_decoder.xml `
```!xml=
<decoder name="pods">
<parent>json</parent>
<regex type="pcre2">"kind": "\S+", "apiVersion": "\S+", "metadata": {"name": "(\S+)", "namespace": "(\S+)"</regex>
<order>pod,ns</order>
</decoder>
```
###### 5.1.3.1.2. Custom rule to detect privileged pods
Our custom rules are stored in the file `/var/ossec/etc/rules/local_rules.xml `
```!xml=
<group name="kubernetes_audit,">
<rule id="110000" level="0">
<decoded_as>json</decoded_as>
<description>Kubernetes audit log.</description>
</rule>
<rule id="110011" level="9">
<if_sid>110000</if_sid>
<regex type="pcre2">"verb": "create".+"securityContext": {"privileged": true}</regex>
<description>Kubernetes privileged pod present</description>
</rule>
</group>
```
###### 5.1.3.1.3. Detection on Wazuh dashboard
|  |
| :---: |
| _Figure 5.1.3.1.3.1: logs_ |
|  |
| :---: |
| _Figure 5.1.3.1.3.2: the privileged pod_ |
###### 5.1.3.1.4. Mapping attack to MITRE ATT&CK Matrix
Regarding MITRE ATT&CK matrix, the attack above can be mapped to an **Escape to Host** Technique
Definition from MITRE ATT&CK: "Adversaries may break out of a container to gain access to the underlying host. This can allow an adversary access to other containerized resources from the host level or to the host itself."
|  |
| :---: |
| _Figure 5.1.3.1.4.1: Mitre ATT&CK Matrix_ |
To match this activity to the corresponding Mitre Att&ck technique, the wazuh rule should be modified as follows
```!xml=
<rule id="110011" level="9">
<if_sid>110000</if_sid>
<regex type="pcre2">"verb": "create".+"securityContext": {"privileged": true}</regex>
<description>Kubernetes privileged pod created in {namespace: $(ns) pod: $(pod)}</description>
<mitre>
<id>T1611</id>
</mitre>
</rule>
```
After performing another attack we have the results shown below
|  |
| :---: |
| _Figure 5.1.3.1.4.2_ |
|  |
| :---: |
| _Figure 5.1.3.1.4.3_ |
##### 5.1.3.1.5 Active Response
|  |
| :---: |
| _Figure 5.1.3.1.5.4_ |
|  |
| :---: |
| _Figure 5.1.3.1.5.5_ |
`curl -LO "https://dl.k8s.io/release/$(curl -L -s https://dl.k8s.io/release/stable.txt)/bin/linux/amd64/kubectl"`
`sudo install -o root -g wazuh -m 0755 /var/ossec/active-response/bin/kubectl`
|  |
| :---: |
| _Figure 5.1.3.1.5.6_ |
We add our new command in the configuration file `vim /var/ossec/etc/ossec.conf`
```!xml=
<command>
<name>kubectl</name>
<executable>kubectl</executable>
<extra_args>delete pod $(pod) -n $(ns)</extra_args>
<timeout_allowed>yes</timeout_allowed>
</command>
```
The corresponding active response matching the privilege pod rule
```!xml=
<active-response>
<disabled>no</disabled>
<command>kubectl</command>
<location>local</location>
<rules_id>110011</rules_id>
<timeout>60</timeout>
</active-response>
```
|  |
| :---: |
| _Figure 5.1.3.1.5.1_ |
### 5.2 HashiCorp Vault, MSSQL, .NET Application
For this experiment we deploy a .Net application alongside Vault, so that it makes use of a secrets engine.
#### 5.2.1. Stack
- [Docker Compose](https://docs.docker.com/compose/)
- [Docker](https://docs.docker.com/get-docker/)
- [.NET 5.0+](https://dotnet.microsoft.com/download/dotnet/5.0)
- [.NET 7.0+](https://dotnet.microsoft.com/en-us/download/dotnet/7.0)
- [Python 3.10+](https://www.python.org/downloads/release/python-3100/)
- [VaultSharp](https://github.com/rajanadar/VaultSharp)
- [Our Application](https://github.com/husseinahmed-dev/CCF-Project.git)
#### 5.2.2. Vault Setup
Note: All of the described steps can be run as a one-script solution:
:::spoiler init_setup.sh
#!/bin/bash
export VAULT_ADDR='http://127.0.0.1:8200'
export VAULT_TOKEN='some-root-token'
#export VAULT_NAMESPACE='admin'
docker-compose up -d --build
sleep 30
vault auth enable approle
vault secrets enable -path='projects-api/database' database
vault secrets enable -path='projects-api/secrets' -version=2 kv
vault kv put projects-api/secrets/static 'password=Testing!123'
vault write projects-api/database/config/projects-database \
plugin_name=mssql-database-plugin \
connection_url='sqlserver://{{username}}:{{password}}@db:1433' \
allowed_roles="projects-api-role" \
username="sa" \
password="Testing!123"
vault write projects-api/database/roles/projects-api-role \
db_name=projects-database \
creation_statements="CREATE LOGIN [{{name}}] WITH PASSWORD = '{{password}}';\
USE HashiCorp;\
CREATE USER [{{name}}] FOR LOGIN [{{name}}];\
GRANT SELECT,UPDATE,INSERT,DELETE TO [{{name}}];" \
default_ttl="2m" \
max_ttl="5m"
vault policy write projects-api ./projects-role-policy.hcl
vault write auth/approle/role/projects-api-role \
role_id="projects-api-role" \
token_policies="projects-api" \
token_ttl=1h \
token_max_ttl=2h \
secret_id_num_uses=5
echo "projects-api-role" > ProjectApi/vault-agent/role-id
vault write -f -field=secret_id auth/approle/role/projects-api-role/secret-id > ProjectApi/vault-agent/secret-id
:::
##### 5.2.2.1. Vault Infrastructure
The below steps creates a Vault development environment alongside Microsoft SQL Server (MSSQL) database.
1. Prepare vault environment variables:
```bash
export VAULT_ADDR='http://127.0.0.1:8200'
export VAULT_TOKEN='some-root-token'
```
2. Run docker (*Vault+MSSQL*)
```bash
docker-compose up -d --build
```
##### 5.2.2.2 Secret Engines
Here we make sure to enable:
- KV secrets engine
- MSSQL database secrets engine
- AppRole auth mechanism.
1. Enable the *AppRole* authentication method in HashiCorp Vault
```bash
vault auth enable approle
```
2. Activate HashiCorp Vault's database secrets engine and assigns the directory "projects-api/database" for it.
```bash
vault secrets enable -path='projects-api/database' database
```
3. Activate HashiCorp Vault's Key-Value (KV) secrets engine and specifies the location of "projects-api/secrets"
```bash
vault secrets enable -path='projects-api/secrets' -version=2 kv
```
##### 5.2.2.3 Database Interactions
This step allows us to set up the database's root password storage in the KV secrets engine located at `projects-api/secrets` and configure database user creation settings in the `projects-api/database` MSSQL database secrets engine.
1. Maintain a secret key-value pair in the Key-Value (KV) secrets database.
```bash
vault kv put projects-api/secrets/static 'password=Testing!123'
```
2. Connect to the `projects-api/database` database and establish security permissions.
```bash
vault write projects-api/database/config/projects-database \
plugin_name=mssql-database-plugin \
connection_url='sqlserver://{{username}}:{{password}}@db:1433' \
allowed_roles="projects-api-role" \
username="sa" \
password="Testing!123"
```
3. Make that the `projects-api-role` in the "projects-api/database" has a proper role setting.
```bash
vault write projects-api/database/roles/projects-api-role \
db_name=projects-database \
creation_statements="CREATE LOGIN [{{name}}] WITH PASSWORD = '{{password}}';\
USE HashiCorp;\
CREATE USER [{{name}}] FOR LOGIN [{{name}}];\
GRANT SELECT,UPDATE,INSERT,DELETE TO [{{name}}];" \
default_ttl="2m" \
max_ttl="5m"
```
##### 5.2.2.3 Vault Policies
Lastly, we produce a Vault policy that restricts access to credential retrieval and static secrets solely from a database and also save to `ProjectApi/vault-agent` user's role and secret ID.
1. Create a policy named **`projects-role-policy.hcl`**
```bash
vault policy write projects-api ./projects-role-policy.hcl
```
*projects-role-policy.hcl*
```
path "projects-api/*" {
capabilities = ["read"]
}
```
2. This command configures Vault's `projects-api-role` AppRole.
```bash
vault write auth/approle/role/projects-api-role \
role_id="projects-api-role" \
token_policies="projects-api" \
token_ttl=1h \
token_max_ttl=2h \
secret_id_num_uses=5
```
3. The string `projects-api-role` should be saved in a file called `role-id` in the `ProjectApi/vault-agent` directory.
```bash
echo "projects-api-role" > ProjectApi/vault-agent/role-id
```
4. Create a Vault Secret ID for the `projects-api-role` AppRole.
```bash
vault write -f -field=secret_id auth/approle/role/projects-api-role/secret-id > ProjectApi/vault-agent/secret-id
```
#### 5.2.3. DotNet Application Setup
The functionality of the application is very basic - it simply retrieves a secret ID.
Note: all of the below steps are once again available as a one-script solution.
:::spoiler run_dotnet.sh
```bash=
#!/bin/bash
export VAULT_ADDR='http://127.0.0.1:8200'
export VAULT_TOKEN='some-root-token'
#export VAULT_NAMESPACE='admin'
cd ProjectApi
dotnet restore
VAULT_SECRET_ID=$(cat vault-agent/secret-id) dotnet run
```
:::
1. Prepare application environment variables
```bash
export VAULT_ADDR='http://127.0.0.1:8200'
export VAULT_TOKEN='hvs.CAESIB2qGGKhVdbtop1EC5k-hfvUCmfjeVW3RDPHQvapv9NDGh4KHGh2cy5XYU1McFZMMnJlTmJRYjhSazlQREpDanQ'
```
2. Bring back the configuration file-specified project dependencies.
```bash
cd ProjectApi
dotnet restore
```
3. Run the .NET application
```bash
VAULT_SECRET_ID=$(cat vault-agent/secret-id) dotnet runv
```
---
#### 5.2.4. Database Setup
The last infrastructure element to configure is the database - we basically need to set up a Secure Connection between HashiCorp Vault and the Databas,
To achieve that we need to:
* Activate the Vault agent for logging in.
* Generate the database connection string in the `appsettings.json` file.
```bash=
bash vault_agent_template.sh
```
1. Configure a role named "projects-api-role" within the "projects-api/database"
```bash
vault write projects-api/database/roles/projects-api-role \
db_name=projects-database \
creation_statements="CREATE LOGIN [{{name}}] WITH PASSWORD = '{{password}}';\
USE HashiCorp;\
CREATE USER [{{name}}] FOR LOGIN [{{name}}];\
GRANT SELECT,UPDATE,INSERT,DELETE TO [{{name}}];" \
default_ttl="2m" \
max_ttl="5m"
```
2. Run docker-compose on vault agent template
```bash
docker-compose -f docker-compose-vault-agent-template.yml up -d
```
---
#### 5.2.5. Configuring Vault Integration
This part shows how to:
* Activate the vault agent for logging in.
* Reload the application everytime the Consul template is updated.
```bash=
bash vault_agent_token.sh
```
1. Deploy and run docker-compose containers
```bash
docker-compose -f docker-compose-vault-agent-token.yml up -d
```
2. Consult-template features to be used for changing project files depending on values pulled from Vault.
```bash
cd ProjectApi && consul-template -config ./vault-agent/config-consul-template.hcl
```
---
**Display DB passwords with Vault**
```bash=
bash list_passwords.sh
```
```bash
vault list sys/leases/lookup/projects-api/database/creds/projects-api-role
```
---
**Wipe off any Vault-created database passwords**
```bash=
bash revoke_passwords.sh
```
```bash
vault lease revoke -prefix projects-api/database/creds
```
---
### 5.3 AWS Logging
The goal of this showcase is to forward logs of an on-premise Vault deployment using AWS instances of various services.
|  |
| :---: |
| _Figure 5.3_ |
#### 5.3.1 Setup
- Mongo database
- Vault
- Splunk
- Datadog
- HashiCorp Cloud Platform
Access to the **EC2 Instance Details**
***Public IPv4 address:*** 18.246.63.222
[SSH KeyPair](https://www.dropbox.com/s/3c6crc7upds6cor/HashiCorp_Vault_KeyPair.ppk?dl=0)
|  |
| :---: |
| _Figure 5.3.1.1_ |
**Vault Cluster Details:**
URL: https://vault-cluster-public-vault-61b59da2.fc9e557c.z1.hashicorp.cloud:8200/ui/
```bash
export VAULT_ADDR="https://vault-cluster-public-vault-61b59da2.fc9e557c.z1.hashicorp.cloud:8200"; export VAULT_NAMESPACE="admin"
```
```bash
export VAULT_TOKEN=hvs.CAESIGjBJDypkID1IQRhcnToAueV7v7PE86MCN31aTgbkIkXGiYKImh2cy4wUlJHYUVrdGVpa0hiNldPRFA4ZXpZVWQudm84cmkQfw
```
|  |
| :---: |
| _Figure 5.3.1.2_ |
#### 5.3.2 Log Forwarding
The below figure shows necessary settings for `Splunk`.
|  |
| :---: |
| _Figure 5.3.2.1_ |
Additionally, the below script is used to write logs from Mongo to files:
```python=
import pymongo
myclient = pymongo.MongoClient("mongodb://localhost:27017/")
mydb = myclient["ccf-project"]
mycol = mydb["hashicorp-vault-collection"]
file = open("hashicorp.log","w+")
for x in mycol.find():
print(x)
file.write("%s\r\n" % x)
```
This is the cron job is used to periodically retrieve logs from a remote instance:
|  |
| :---: |
| _Figure 5.3.2.2_ |
The main script for writing logs:
:::spoiler `1_vault_write_logs.py`
```python=
import subprocess
import re
import csv
from datetime import datetime
from pymongo import MongoClient
log_file = "docker_logs.txt"
csv_file = "parsed_logs.csv"
### Functions Definitions ###
def use_regex(input_text):
pattern = re.compile(r"^[0-9]{4}-[0-9]{2}-[0-9]{2}T[0-9]{2}:[0-9]{2}:[0-9]{2}(\.[0-9]+)?([Zz]|([\+-])([01]\d|2[0-3]):?([0-5]\d)?)?.*(TRACE|DEBUG|INFO|NOTICE|WARN|WARNING|ERROR|SEVERE|FATAL).*$", re.IGNORECASE)
return pattern.match(input_text)
### 1 ###
# Run the bash script to save docker logs
subprocess.run(["bash", "-c", "docker logs ccf-project_vault_1 > docker_logs.txt 2>&1"])
### 2 ###
# Open input and output files
with open(log_file, 'r') as input_file, open(csv_file, 'w') as output_file:
# Process each line in the input file
for line in input_file:
# Apply regex substitution pattern
parsed_line = re.sub(r'^([^ ]+) \[([^]]+)\] (.+)', r'\1, \2, \3', line)
# Write parsed line to the output file
output_file.write(parsed_line)
### 3 ###
def filter_log_file(file_path):
year_pattern = r'^\d{4}' # Regular expression pattern for matching a year at the beginning of a line
filtered_lines = []
with open(file_path, 'r') as file:
for line in file:
if re.match(year_pattern, line):
filtered_lines.append(line)
# Write the filtered lines back to the file
with open(file_path, 'w') as file:
file.writelines(filtered_lines)
# Usage example
log_file_path = csv_file
filter_log_file(log_file_path)
# Print a success message
print('Parsing completed. Parsed logs saved to', csv_file)
### 4 ###
# Prepare to write to MongoDBs
data = []
with open('parsed_logs.csv', 'r') as file:
csv_reader = csv.reader(file)
for row in csv_reader:
data.append(row)
print(data)
### 5 ###
# Write to MongoDB
def csv_to_mongodb(csv_file_path, mongodb_uri, mongodb_database, mongodb_collection):
# Connect to MongoDB
client = MongoClient(mongodb_uri)
db = client[mongodb_database]
collection = db[mongodb_collection]
# Open the CSV file
with open(csv_file_path, 'r') as file:
reader = csv.reader(file)
# Iterate over each row in the CSV file
for row in reader:
print(row)
# Extract the data from each column
timestamp_str, level, message = row[:3]
# Parse the timestamp string to a datetime object
timestamp = datetime.fromisoformat(timestamp_str[:-1])
# Create a document to insert into MongoDB
document = {
'timestamp': timestamp,
'level': level.strip(),
'message': message.strip()
}
# Insert the document into the MongoDB collection
collection.insert_one(document)
# Disconnect from MongoDB
client.close()
# Usage example
csv_file_path = 'parsed_logs.csv'
mongodb_uri = 'mongodb://34.215.234.156:27017'
mongodb_database = 'ccf-project'
mongodb_collection = 'hashicorp-vault-collection'
csv_to_mongodb(csv_file_path, mongodb_uri, mongodb_database, mongodb_collection)
```
:::
**Proof of Work**
Figures below show the content of the mongo database in the process of log collection:
| |
| :---: |
| |
| _Figure 5.3.3.1_ |
Lastly, this figures shows how logs can be accessed:
| |
| :---: |
| _Figure 5.3.3.2_ |
#### 5.3.3 Datadog
This section show the steps we made to setup Datadog on HashiCorp Cloud Platform.
| |
| :---: |
| _Figure 5.3.4.1_ |
| |
| :---: |
| _Figure 5.3.3.2_ |
| |
| :---: |
| _Figure 5.3.3.3_ |
| |
| :---: |
| _Figure 5.3.3.4_ |
| |
| :---: |
| _Figure 5.3.3.5_ |
---
#### 5.3.4 Splunk
This section show the steps we made to setup Splunk on HashiCorp Cloud Platform.
| |
| :---: |
| _Figure 5.3.4.1_ |
| |
| :---: |
| _Figure 5.3.4.2_ |
| |
| :---: |
| _Figure 5.3.4.3_ |
| |
| :---: |
| _Figure 5.3.4.4_ |
| |
| :---: |
| _Figure 5.3.4.5_ |
## 6. Conclusion
This report provided an analysis of the incident response and forensic capabilities of HashiCorp Vault, a powerful tool designed for managing secrets and sensitive data. In addition to that practical demonstrations were conducted in a controlled test environment and have effectively showcased how Vault can be utilized in incident response and forensics. Key aspects explored include the establishment of access logging, monitoring functionalities, and simulated attack scenarios, all of which contribute to highlighting the practical application of Vault.
### 6.1 Difficulties faced
Throughout the project, certain challenges were encountered in relation to incident response and forensic analysis within the context of HashiCorp Vault. These difficulties primarily stemmed from the unique characteristics of Vault and the specific requirements associated with securing and managing sensitive data.
One notable challenge was understanding and adapting to Vault's distinct logging and monitoring paradigm. Vault follows different logging practices compared to traditional software, necessitating a comprehensive understanding of Vault-specific logging mechanisms. This involved studying Vault's configuration, familiarizing ourselves with log formats, and implementing effective monitoring and alerting systems. Additionally, integrating Vault's logs with existing centralized logging infrastructure posed its own set of challenges, requiring careful configuration and troubleshooting.
Furthermore, incident response and forensic analysis within a Vault environment presented complexities in identifying and preserving critical forensic artifacts. The distributed and containerized deployments of Vault introduced intricacies to evidence collection and analysis, requiring a comprehensive understanding of Vault's deployment models and associated forensic considerations.
### 6.2 New skills acquired
Completing this project resulted in the acquisition of several new skills and knowledge areas relevant to incident response and forensic analysis in the context of HashiCorp Vault.
A thorough understanding of Vault's architecture and deployment models was developed, encompassing various deployment scenarios such as standalone processes, containerized environments, and cloud infrastructure. Exploring Vault's architecture enhanced our ability to assess its security implications and effectively respond to security incidents across different deployment configurations.
Additionally, expertise was gained in Vault-specific logging and monitoring practices. This included a deeper understanding of Vault's logging mechanisms, log formats, and the implementation of monitoring systems tailored to Vault's requirements. Integrating Vault's logs into centralized logging infrastructure and effectively leveraging them for incident response and forensic analysis became a newfound skill.
Overall, this project provided valuable hands-on experience in working with HashiCorp Vault, deepening our understanding of its unique features and challenges, and equipping us with the necessary skills for incident response and forensic analysis within a Vault-enabled environment.
### 6.3 Culmination
An important focus of this analysis has been the examination of audit logs, which have provided valuable insights into the accuracy, completeness, and integrity of recorded information. By thoroughly analyzing Vault's logging and monitoring features, a better understanding has been gained regarding their significant role in detecting and responding to security incidents. Furthermore, an evaluation of Vault's architecture and logging paradigms has shed light on the unique challenges faced when conducting forensic investigations involving Vault.
The findings underscore the critical importance of effective monitoring and auditing practices in gathering essential data for incident analysis. While Vault incorporates robust security mechanisms, organizations must be prepared to address security incidents, such as unauthorized access attempts and misconfigurations. This can be achieved by harnessing the logging and monitoring capabilities offered by Vault, thus ensuring a comprehensive approach to incident response and forensics.
## References
1. https://www.hashicorp.com/blog/learn-vault-client-dotnet
2. https://developer.hashicorp.com/vault/tutorials/app-integration/dotnet-httpclient
3. https://developer.hashicorp.com/vault/tutorials/app-integration/dotnet-vault-agent
4. https://developer.hashicorp.com/vault/tutorials/getting-started/getting-started-intro
5. https://enlyft.com/tech/products/hashicorp-vault
6. https://developer.hashicorp.com/vault/docs/audit/file
7. https://logit.io/sources/configure/hashicorp/
8. https://csrc.nist.gov/publications/detail/sp/800-61/rev-2/final
9. https://www.iso.org/standard/78973.html
10. https://developer.hashicorp.com/vault/tutorials/cloud-monitoring
11. https://raft.github.io/raft.pdf
12. https://wazuh.com/blog/auditing-kubernetes-with-wazuh/
 Google Drive
Gist
Clipboard
Google Drive
Gist
Clipboard
 Sign in via Google
 Sign in via Facebook
 Sign in via X(Twitter)
 Sign in via GitHub
 Sign in via Dropbox
 Sign in with Wallet