# Redux 的介紹與基礎概念
###### tags: `javascript`、`redux`
## 簡介
由於在 React 上要傳遞 `props` 的時候需要一層一層的 component 傳遞下去,像是假使 A、B、C、D 四個 component,D 包在 C 中,C 包在 B 中,B 包在 A中,A 要傳它的 `state` 到 D 的時候勢必得經過 B 與 C,但是問題是 B 與 C 並不需要 A 的 `state`,也就是說這樣到頭來專案一大,寫下來會變得有一堆沒必要的參數在 component 中傳來傳去的。
因此,Redux 的功用就來了,它有個全域變數的儲存地,稱為 store,可以儲存任何你想要放的值在裡面,也因此,任何 component 要拿 store 裡面的值就只要 call Redux 的方法就可以拿到值,而不用再像原生 React 這麼麻煩。
記得 Redux 是個獨立的 library,可以用在其他地方,也可以獨立使用,未必要與 React 合在一起使用,不過 React 與 Redux 常常會一起做使用。
## 套件安裝
安裝 Redux:`npm install --save redux`
安裝 React-redux:`npm install --save react-redux`
## 實際例子
拿一個部落格的例子,以下會有 6 個檔案,分別為:
1. `index.js`(store):所有 component 的父 component ,`APP` component 的檔案,並且在這個檔案 render `APP` component 到根節點(`#root`),且建立 store 的初始值並把 store 內的值傳給所有的子 component。
2. `action.js`(action):這個檔案在 Redux 實作當中,是要自行自定義的檔案,它不會用到任何 Redux 的語法,單純就是一個放每個 Type 的資料的地方,對於每個 Type 就建立一個自己的 function,而這些 function 會根據所設定的地方被觸發並且更動的時候,就會在第 5 個檔案當中的 `dispatch` 方法把值傳到 `reducer` 那邊去做判定,藉由那邊的判定就會改到對應的 store 的值。
3. `actionTypes.js`(action creactor):這個檔案很簡單,就是變更資料的 Type 的值,把它替換成變數,以防手殘打錯,debug 的時候不知道錯在哪。
4. `reducer.js`(reducer):類似 JavaScript 陣列的 `reducer()` 方法,在這邊是用來當作隨著要變更的資料的不同,去改變 store 裡面相對應的 object 的值,有點 router 的味道,但是就是每個 router 都會改到同一個資料池(store),只是在那個資料池當中去刪減或是變更值而已。
6. `Nav.js`:導覽列的 component,在這邊的例子要實作出藉由 Redux 的方式,去拿到過往使用 React 所要拿到的 `props`,但在 redux 當中,背後的原理是直接從 store 裡面拿取值。
7. `Home.js`:在部落格是作為首頁用,在這邊是要介紹它改變 store 的資料的那個部分,藉由 Redux 的 `connet` 方式來實作。
### 各個檔案語法介紹
`index.js` 檔案,Redux 的 store 初始化:
```jsx=
// React & React-router
import React from 'react';
import ReactDOM from 'react-dom';
import { HashRouter as Router, Route } from 'react-router-dom';
// Redux
import { Provider } from 'react-redux';
import { createStore, combineReducers } from 'redux';
import navReducer from './reducer.js';
// components of pages
import Nav from './nav/Nav.js';
import Home from './home/Home.js';
import About from './about/About.js';
import Posts from './posts/Posts.js';
import SinglePost from './singlePost/SinglePost.js';
import './style.css';
const reducers = combineReducers({
nav: navReducer
})
const store = createStore(reducers);
function App() {
return (
<Router>
<div>
<Nav />
<main>
<Route exact path="/" component={Home} />
<Route path="/about" component={About} />
<Route exact path="/post" component={Posts} />
<Route path="/post/:id" component={SinglePost} />
</main>
</div>
</Router>
);
}
ReactDOM.render(
<Provider store={store}>
<App />
</Provider>, document.getElementById('root')
);
```
這裡的重點只要看 7、8、9、19、23、41 的行數即可,其它都只是原先部落格的架構。
第 7 行是引進 React-redux 的 library,主要就是使用 `Provider` 的語法,這個語法使用在 41 行的 `React.render()` 那邊,把要放到根節點的 component 外面再包一層 `<Provider>`,然後傳一個 `store` 的 props 給 component,同時受用所有的子 component,也就是說所有的 component 都可以拿到 store 的值了。
第 8 行則是引進 Redux 的 library,主要就是 `combineReducers` 和 `createStore` 這兩個語法,`combineReducers` 是用做把所有的 reducers 合在一塊,因為實際上在 store 當中不止有一個分類,它可以擁有很多個分類,藉由 `combineReducers` 把所有分類合在一塊定義為 `reducers` 變數之後,再使用 `createStore` 語法來真正建立並初始化 store 的值。
而第 9 行則是引進 `reducer.js` 檔案的輸出值,這邊用 `navReducer` 的變數給引進來做使用,而 `reducer` 實際的語法下面接著來做說明。
不過在講到這個 `reducer` 以前,先看 `actions.js` 和 `actionTypes.js` 這兩個檔案。
`actionTypes.js` 檔案:
```javascript=
export const UPDATE_NAV_TEXT = 'UPDATE_NAV_TEXT';
```
單純就是輸出上面這一行,在接下來的一些檔案都會引入這個變數來幫助我們避免手殘打錯字沒注意到,而這個變數的值主要用在 `actions.js` 當中,它是區分每次我們所要更新的 store 的值,分成不同類,比如`'UPDATE_NAV_TEXT'` 這一類單純就是改 store 的 `navText` 值, `'UPDATE_TEST'` 這一類單純就是改 store 的 `test` 值。接著看 `actions.js` 的檔案:
```javascript=
import { UPDATE_NAV_TEXT } from './actionTypes.js';
export const updateNavText = (text) => {
return {
type: UPDATE_NAV_TEXT,
value: text
}
}
```
`updateNavText` 這個 function 用作回傳 `'UPDATE_NAV_TEXT'` 這類型的 `value` 值為何,傳進來的 `value` 值(`text`)會被傳到 `reducer` 中相對應負責的判定式,並且改動 store 的值,至於如何被傳到 `reducer` 下面其他檔案會再做說明。
`reducer.js` 檔案:
```javascript=
import { UPDATE_NAV_TEXT } from './actionTypes.js';
const state = {
navText: '123'
}
function reducer(globalState = state, action) {
switch (action.type) {
case UPDATE_NAV_TEXT:
return {
...globalState,
navText: action.value
}
case 'UPDATE_TEST':
return {
...globalState,
test: action.value
}
default:
return globalState
}
}
export default reducer;
```
首先這個 `reducer` 就是負責剛才上面提到的 `actions.js` 檔案被觸發的 function 是哪個並且處理完資料後回傳相對應要給 store 的值。
`reducer` 裡面是用 `action` 這個參數來接是哪個 function 被觸發,像 `action.type` 就是 `actions.js` 檔案中,function 裡面的 `type` 值。
在 `reducer` 當中是使用 `switch...case` 來做判定目前傳進來的 `action` 是哪一個 `type`,然後相對應的 `case` 就會做相對應的 store 值的處理,這邊使用 `...globalState` 這個運算展開子,藉由這樣的方式可以保存在 store 當中的既有值,只會更改我們要改的值。
而裡面的 `action.value` 也是在 `actions.js` 檔案中對應的 function 的 `value` 值。
另外兩個細節是,當 `globalState` 參數沒有值傳進來的時候,也就是說一開始 store 初始化沒有值的時候,就使用 `state` 變數設定的值做預設值。並且在沒有符合任何 `action.type` 的時候單純回傳 `globalState` 的值,也就是 store 的既有值。
接著來看 `Nav.js` 檔案,也就是讀取 store 值的檔案:
```jsx=
import React from 'react';
import { Link, Route } from 'react-router-dom';
import { connect } from 'react-redux';
import './Nav.css';
function Nav(props) {
return (
<nav>
<div className="nav-item">
<span className="nav-title">Blog</span>
<NavItem to="/" exact={true} name="home">
Home
</NavItem>
<NavItem to="/post" name="post">
Post
</NavItem>
<NavItem to="/about" name="about">
About
</NavItem>
</div>
<div>{props.navText}</div>
</nav>
);
}
const mapStateToProps = state => {
return {
navText: state.nav.navText
}
}
export default connect(mapStateToProps)(Nav);
```
上面的程式碼我把 `<NavItem />` component 省略了,因為不會講到。
首先引入 React-redux 的 `connect` 方法,這個方法有兩個參數,一個是 `mapStateToProps`,一個是 `mapDispatchToProps`,這邊只使用 `mapStateToProps` 的參數,這個參數的用意在於可以把 store 那邊的值給抓到這個 component (`Nav`)來,並且可以自定義 props 的名稱,也就是 28 行的 `navText` 可以自定義。
在 `mapStateToProps` 函式中,`state` 這個參數就是 store 本身的總集合,而 `state.nav.navText` 這裡的 `nav` 就是前面我們初始化 store 的 `index.js` 檔案那邊的 store 分類,而 `navText` 則是 `reducer.js` 檔案的 `state` 變數的 obejct。
而 `export` 出去的 `connect(mapStateToProps)(Nav)` 則是 `connect` 的語法。
另外,`mapStateToProps` 和 `state` 這些名稱都只是慣用的預設名稱,因此可以任意更改。
最後來看到 `Home.js` 檔案,也就是更改 store 的值的範例:
```jsx=
import React, { Component } from 'react';
import axios from 'axios';
import { connect } from 'react-redux';
import { updateNavText } from '../actions.js';
import './Home.css';
class Home extends Component {
constructor(props) {
super(props);
this.state = {
title: '',
body: '',
author: '',
};
}
render() {
const { title, body, author } = this.state;
return (
<div className="home">
<h1 className="home-title">The Blog</h1>
<p className="home-content">Hello, Welcome to the Blog.</p>
<div className="add-post">
<h2 className="add-post-header">新增文章</h2>
<form>
<div className="add-post-author">
<input type="text" className="input-text" name="author" value={author} placeholder="在此輸入文章作者" onChange={this.onChangeValue} />
</div>
<br />
<button onClick={() => {
this.props.updateNav(Math.random())
}}>Click me</button>
</form>
</div>
</div>
);
}
}
const mapDispatchToProps = dispatch => {
return {
updateNav: text => dispatch(updateNavText(text))
}
}
export default connect(null, mapDispatchToProps)(Home);
```
上面原本有一部分的程式碼被我省略,因為這邊不會講到。
這邊只要注意 3、4、30、40、46 這幾行。
首先第 3 行引進 Redux 的 `connect`,第 4 行引進 `actions.js` 的 `updateNavText`,也就是夾帶 `Type` 和 `value` 的那個 function。
30 行建立一個按鈕每當按下去就會觸發 props 為 `updateNav` 的函式。40 行所使用的就是剛才上面有講到對於 `connect` 來說的另外一個參數 `mapDispatchToProps`,這個參數負責更新 store 的值,每當 component 有設定這個參數的時候,你可以在 `mapDispatchToProps` 當中自定義一個函式,然後 props 去用這個函式去改動 store 的值。
`mapDispatchToProps` 函式裡面的運作模式就是,它會帶入一個叫 `dispatch` 的參數(可以自定義名稱),這個參數是一個 function,它背後所做的事情是用來觸發 `reducer`,每當有地方使用 props 的 `updateNav`(可以自定義名稱)的時候就會去觸發這個 `dispatch` 的 function,它會把 `updateNavText(text)` 的值給帶到 `reducer` 那邊去做判定。
而這裡的 `text` 引數是 `Math.random()`,也就是每次按按鈕都會隨機出現一個數字傳到 `updateNavText` 函式去,然後 `updateNavText` 函式當中的 `value` 值就變成那個數字,而`dispatch` 函式觸發 `reducer` ,因此 `reducer` 那邊就會去拿到這個數字進而更新了 store 的值。
在這邊補充一點就是 `updateNavText` 這個函式可以把它當成中繼站,有呼叫這個中繼站的地方才有辦法對 `reducer` 裡面對應的值做更改。
(上面這邊寫的有點亂,之後再做修正)
因此整個 Redux 的運作流程就是上面所說的這些,更清楚的話,以圖面來說就是像這樣:
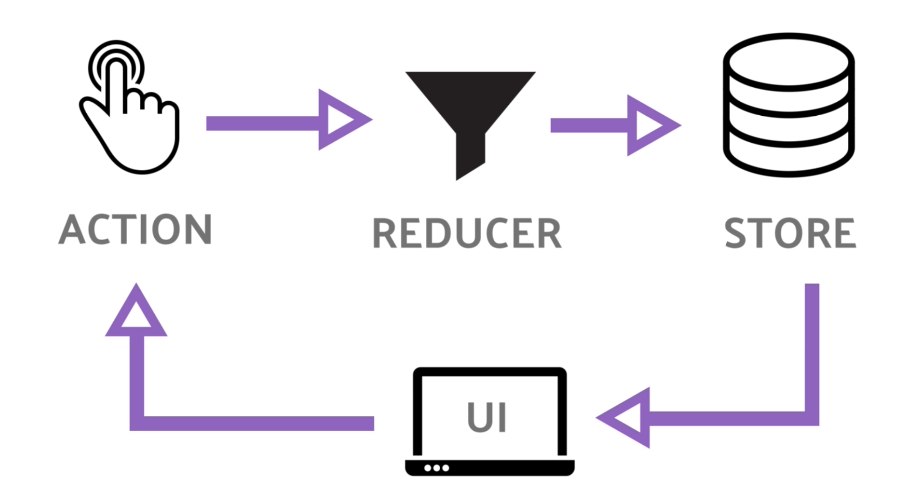
UI 建立 action-> action 觸發-> reducer 篩選-> 存到 store-> 顯示到 UI 畫面。
### Presentational Components & Container Components
上面的程式碼,我們可以把有關讀取與更改 store 的操作再獨立到一個檔案當中。以下示範讀取的部分,也就是對 `Nav.js` 檔案做更改。
首先先說明有兩種 component 類型,分別是 presentational component 和 container component,在 React 與 Redux 合用的時候,container component 是負責處理 Redux 語法的 component;而 presentational component 是負責呈現畫面的 component,也就是說在 presentational component 當中完全不會看到 Redux 的語法,但可以在 presentational component 裡面使用 props 來拿到 store 的值,也就是在使用 presentational component 的時候就和在使用 React 時一樣沒什麼改變,因為在 container component 裡面會經過一道處理,把 store 給 presentational component 做使用,兩種 component 的權責詳細可以看下面的圖片:

圖片來源:https://redux.js.org/basics/usage-with-react
接著我們來建立 `NavContainer.js` 這個檔案,並且把以下內容放進去:
```jsx=
import React from 'react';
import { connect } from 'react-redux';
import Nav from './Nav.js';
const NavContainer = props => {
return <Nav {...props} />
}
const mapStateToProps = state => {
return {
navText: state.nav.navText
}
}
export default connect(mapStateToProps)(NavContainer);
```
引進 `Nav` 組件進來,然後建立一個 `NavContainer` 把 store 的 state 作為 props 設定於 `Nav` 組件,這樣 `Nav` 組件就可以藉由 props 獲取 store 的資料了。
第 6 行用了一個很方便的方式,使用運算展開子把 props 裡面所有的值都設定到 component 裡。
而第 9 行就是和原先 `Nav.js` 檔案的一樣。
第 15 行注意輸出的 component 是 `NavContainer`,也就是說在 `index.js` 的檔案(父組件)原先 `import Nav from './nav/Nav.js';` 要改為 `import Nav from './nav/NavContainer.js';` 才是正確的,也就是變成這樣:
```jsx=
// React & React-router
import React from 'react';
import ReactDOM from 'react-dom';
import { HashRouter as Router, Route } from 'react-router-dom';
// Redux
import { Provider } from 'react-redux';
import { createStore, combineReducers } from 'redux';
import navReducer from './reducer.js';
// components of pages
import Nav from './nav/NavContainer.js';
import Home from './home/Home.js';
import About from './about/About.js';
import Posts from './posts/Posts.js';
import SinglePost from './singlePost/SinglePost.js';
import './style.css';
const reducers = combineReducers({
nav: navReducer
})
const store = createStore(reducers);
function App() {
return (
<Router>
<div>
<NavContainer />
<main>
<Route exact path="/" component={Home} />
<Route path="/about" component={About} />
<Route exact path="/post" component={Posts} />
<Route path="/post/:id" component={SinglePost} />
</main>
</div>
</Router>
);
}
ReactDOM.render(
<Provider store={store}>
<App />
</Provider>, document.getElementById('root')
);
```
注意 12 行和 29 行的改動就好,其它地方的程式碼照舊。
而 `Nav.js` 檔案則回歸最一開始沒有使用 Redux 的狀態即可,像下面這樣:
```jsx=
import React from 'react';
import { Link, Route } from 'react-router-dom';
import './Nav.css';
function Nav(props) {
return (
<nav>
<div className="nav-item">
<span className="nav-title">Blog</span>
<NavItem to="/" exact={true} name="home">
Home
</NavItem>
<NavItem to="/post" name="post">
Post
</NavItem>
<NavItem to="/about" name="about">
About
</NavItem>
</div>
<div>{props.navText}</div>
</nav>
);
}
export default Nav;
```
在上面這段程式碼當中,會完全看不出來有使用 Redux 的痕跡,但實際上 20 行那邊的 `props.navText` 拿到的值是 store 裡面儲存的值,只因為現在 store 作為 global state 了,所以可以從 props 拿到。
### 檔案的分類
`Home.js` 檔案也可以把 React 和 Redux 的語法拆開來,作法就和上面 `Nav.js` 例子一樣。
此外我們可以針對本地資料夾,也就是開發的資料夾做分類,分成 containers 和 components 兩類,containers 資料夾裡面放使用 Redux 語法的檔案,像 `NavContainer`、`HomeContainer`,而 components 則是放使用 React 語法的各種 components,像這個樣子:

components 資料夾的內部:

containers 資料夾的內部:

### 串接 API 的地方放到 global state
在上面的 Redux 例子當中,原先的程式碼,也就是 Blog 的程式碼是有串接一個 API 的,而這個串接 API 只放在兩個 components 裡面,不過假如之後有很多的 components 都需要串接 API 的話,那就會變的重複性很高,而且要每個都去設定 state 或是 function,那麼我們不如把串接 API 的部份換成 global state,也就是把值放到 store 裡面去,下面我們來介紹如何實踐,在介紹之前我們先看原始的串接 API 的程式碼。
拿到全部 Posts 的 API:
```jsx=
class Posts extends Component {
constructor(props) {
super(props);
this.state = {
posts: [],
};
}
componentDidMount() {
axios.get('https://qootest.com/posts')
.then((res) => this.setState({
posts: res.data,
}));
// 省略下面程式碼。
}
}
```
拿到單篇 Post 的 API:
```jsx=
class SinglePost extends Component {
constructor(props) {
super(props);
this.state = {
post: {},
};
}
componentDidMount() {
const { id } = this.props.match.params;
axios.get(`https://qootest.com/posts/${id}`)
.then((res) => this.setState({
post: res.data,
}));
// 省略下面程式碼。
}
}
```
我們可以先來把兩個 components 的 axios 那一行獨立出來,開一個新的檔案叫做 `WebAPI.js` 把它們放進去檔案裡:
```javascript=
import axios from 'axios';
export const getPosts = () => axios.get('https://qootest.com/posts');
export const getPost = (id) => axios.get(`https://qootest.com/posts/${id}`);
```
接著再回到原本有使用 axios 的 components,import `WebAPI.js`,修改之後長這樣:
```jsx=
import React, { Component } from 'react';
// 引進來
import { getPosts } from '../../WebAPI.js';
import { withRouter } from 'react-router-dom';
import './Posts.css';
class Posts extends Component {
constructor(props) {
super(props);
this.state = {
posts: [],
};
}
componentDidMount() {
getPosts()
.then((res) => this.setState({
posts: res.data,
}));
}
}
```
另外一個 component 也是同理,下面我們以抓取全部 Posts 的 API 做示範。
`actionTypes.js` 的檔案新增下面兩行:
```jsx=
export const UPDATE_NAV_TEXT = 'UPDATE_NAV_TEXT';
export const UPDATE_TEST = 'UPDATE_TEST';
export const GET_POSTS = 'GET_POSTS';
export const GET_POSTS_SUCCESS = 'GET_POSTS_SUCCESS';
```
在 `actions.js` 的檔案新增 `getPosts`、`getPostsSuccess`:
```javascript=
import * as actionTypes from './actionTypes.js';
export const updateNavText = (text) => {
return {
type: actionTypes.UPDATE_NAV_TEXT,
value: text
}
}
// 負責判定有沒有要開始拿資料了
export const getPosts = () => {
return {
type: actionTypes.GET_POSTS
}
}
// 成功抓到資料後讓 data 值給 store 去拿
export const getPostsSuccess = (data) => ({
type: actionTypes.GET_POSTS_SUCCESS,
data
})
```
`reducer.js` 的檔案新增 `actionTypes.GET_POSTS`、`actionTypes.GET_POSTS_SUCCESS` 兩個判定:
```javascript=
import * as actionTypes from './actionTypes.js';
const state = {
navText: '123',
// 新增兩個 store 初始化的值
isLoadingGetPosts: false,
posts: []
}
function reducer(globalState = state, action) {
switch (action.type) {
case actionTypes.UPDATE_NAV_TEXT:
return {
...globalState,
navText: action.value
}
case actionTypes.UPDATE_TEST:
return {
...globalState,
test: action.value
}
// here
case actionTypes.GET_POSTS:
return {
...globalState,
isLoadingGetPosts: true
}
case actionTypes.GET_POSTS_SUCCESS:
return {
...globalState,
isLoadingGetPosts: false,
posts: action.data
}
default:
return globalState
}
}
export default reducer;
```
新增一個 `PostsContainer.js` 的檔案負責 `Posts` component 的 Redux 語法:
```jsx=
import React from 'react';
import { connect } from 'react-redux';
import { withRouter } from "react-router-dom";
import Posts from '../components/posts/Posts.js';
import { getPosts } from '../WebAPI.js';
import * as actions from '../actions.js'
const PostsContainer = props => {
return <Posts {...props} />
}
const mapStateToProps = state => {
return {
isLoadingGetPosts: state.nav.isLoadingGetPosts,
posts: state.nav.posts
}
}
const mapDispatchToProps = dispatch => {
return {
getPostsList: () => {
// 先確認有沒有要開始 GET posts 了,
// 有的話,isLoadingGetPosts 的值會變成 true。
dispatch(actions.getPosts());
// 這裡的 getPosts() 是從 WebAPI.js 檔案 import 進來的。
getPosts().then(res => {
dispatch(actions.getPostsSuccess(res.data))
})
}
}
}
// 因為 Posts Component 原本就有使用 withRouter,所以放到這邊來,
// 原因在下面的「須留意的細節」有講到。
export default withRouter(
connect(mapStateToProps, mapDispatchToProps)(PostsContainer)
);
```
`Posts.js` 檔案則改成這樣:
```jsx=
import React, { Component } from 'react';
import './Posts.css';
class Posts extends Component {
constructor(props) {
super(props);
this.state = {
};
}
componentDidMount() {
this.props.getPostsList();
}
render() {
const { history, posts, isLoadingGetPosts } = this.props;
return (
<div className="posts">
<h1 className="posts-header">Blog Posts</h1>
<ul>
{isLoadingGetPosts && 'Loading...'}
{!isLoadingGetPosts &&
posts.map((postItem) => (
<li key={postItem.id}>
<button type="button"
className="posts-title"
onClick={() => {
history.push(`/post/${postItem.id}`);
}}
>
{postItem.title}
</button>
</li>
))
}
</ul>
</div>
);
}
}
export default Posts;
```
把原本放在 `componentDidMount()` 的 `axios` 串接 API 與 `setState()`的內容改為用 Redux 語法弄出來的 props 的 `getPostsList()`,在 `render()` 裡面的 `posts` prop 和 `isLoadingGetPosts ` prop 也是 `PostsContainer` 那邊來的。
這樣差不多就完成了,然後記得父組件引入相關的檔案要改一下檔案經更改或新增過後的新路徑。
### 須留意的細節
在 container 的檔案中(也就是有使用 Redux 語法的檔案),輸出 component 的時候需要包著 `connect` ,若還有需要再使用 `react-router-dom` 套件的 `withRouter` 方法的時候,要記得 `withRouter` 要包在最外圍,也就是像這樣:
```jsx=
export default withRouter(connect(null, mapDispatchToProps)(HomeContainer));
```
如果不這麼包,會出現意想不到的 bug,為了避免發生,最好還是把 `withRouter` 放在最外面。至於為何會有 bug,就得針對相關的 library 的原始碼做探討了。
## 儲存 store 的資料
當網頁被重新整理或網址改變後,store 裡面的 state 就會初始化,如果我們想要維持 state 的值不變,必須得使用某個方法來保存 state,可以使用 localStorage,詳細請參考:
1. [How can I persist redux state tree on refresh?](https://stackoverflow.com/questions/37195590/how-can-i-persist-redux-state-tree-on-refresh)
2. [Redux: Persisting the State to the Local Storage](https://egghead.io/lessons/javascript-redux-persisting-the-state-to-the-local-storage)
或是使用 `redux-persist` 套件。
### 使用 localStorage 的範例
`localStorage.js`:
```javascript=
export const loadState = () => {
try {
const serializedState = localStorage.getItem('state');
if (serializedState === null) {
// 一定要用 undefined,
// 如果使用 null 的話,會沒辦法讀取 store 原先初始化的資料。
return undefined;
}
return JSON.parse(serializedState);
} catch (err) {
return undefined;
}
}
export const saveState = (state) => {
try {
const serializedState = JSON.stringify(state);
localStorage.setItem('state', serializedState);
} catch (err) {
}
}
```
`App.js`:
```javascript=
import { loadState, saveState } from './localStorage.js';
const persistedState = loadState();
const reducers = combineReducers({
nav: navReducer
});
// store 第二個參數是初始化的時候要放在 state 的值,選擇性的參數
const store = createStore(reducers, persistedState);
// 每次 action 被 dispatched 的時候,就會 call sbuscribe 的 function,
// 簡單說把它當成 JavaScript 的 Event Listener
store.subscribe(()=> {
saveState(store.getState())
})
```
 Sign in with Wallet


