Hugo
  • NEW!
    NEW!  Connect Ideas Across Notes
    Save time and share insights. With Paragraph Citation, you can quote others’ work with source info built in. If someone cites your note, you’ll see a card showing where it’s used—bringing notes closer together.
    Got it
      • Create new note
      • Create a note from template
        • Sharing URL Link copied
        • /edit
        • View mode
          • Edit mode
          • View mode
          • Book mode
          • Slide mode
          Edit mode View mode Book mode Slide mode
        • Customize slides
        • Note Permission
        • Read
          • Only me
          • Signed-in users
          • Everyone
          Only me Signed-in users Everyone
        • Write
          • Only me
          • Signed-in users
          • Everyone
          Only me Signed-in users Everyone
        • Engagement control Commenting, Suggest edit, Emoji Reply
      • Invite by email
        Invitee

        This note has no invitees

      • Publish Note

        Share your work with the world Congratulations! 🎉 Your note is out in the world Publish Note No publishing access yet

        Your note will be visible on your profile and discoverable by anyone.
        Your note is now live.
        This note is visible on your profile and discoverable online.
        Everyone on the web can find and read all notes of this public team.

        Your account was recently created. Publishing will be available soon, allowing you to share notes on your public page and in search results.

        Your team account was recently created. Publishing will be available soon, allowing you to share notes on your public page and in search results.

        Explore these features while you wait
        Complete general settings
        Bookmark and like published notes
        Write a few more notes
        Complete general settings
        Write a few more notes
        See published notes
        Unpublish note
        Please check the box to agree to the Community Guidelines.
        View profile
      • Commenting
        Permission
        Disabled Forbidden Owners Signed-in users Everyone
      • Enable
      • Permission
        • Forbidden
        • Owners
        • Signed-in users
        • Everyone
      • Suggest edit
        Permission
        Disabled Forbidden Owners Signed-in users Everyone
      • Enable
      • Permission
        • Forbidden
        • Owners
        • Signed-in users
      • Emoji Reply
      • Enable
      • Versions and GitHub Sync
      • Note settings
      • Note Insights New
      • Engagement control
      • Make a copy
      • Transfer ownership
      • Delete this note
      • Save as template
      • Insert from template
      • Import from
        • Dropbox
        • Google Drive
        • Gist
        • Clipboard
      • Export to
        • Dropbox
        • Google Drive
        • Gist
      • Download
        • Markdown
        • HTML
        • Raw HTML
    Menu Note settings Note Insights Versions and GitHub Sync Sharing URL Create Help
    Create Create new note Create a note from template
    Menu
    Options
    Engagement control Make a copy Transfer ownership Delete this note
    Import from
    Dropbox Google Drive Gist Clipboard
    Export to
    Dropbox Google Drive Gist
    Download
    Markdown HTML Raw HTML
    Back
    Sharing URL Link copied
    /edit
    View mode
    • Edit mode
    • View mode
    • Book mode
    • Slide mode
    Edit mode View mode Book mode Slide mode
    Customize slides
    Note Permission
    Read
    Only me
    • Only me
    • Signed-in users
    • Everyone
    Only me Signed-in users Everyone
    Write
    Only me
    • Only me
    • Signed-in users
    • Everyone
    Only me Signed-in users Everyone
    Engagement control Commenting, Suggest edit, Emoji Reply
  • Invite by email
    Invitee

    This note has no invitees

  • Publish Note

    Share your work with the world Congratulations! 🎉 Your note is out in the world Publish Note No publishing access yet

    Your note will be visible on your profile and discoverable by anyone.
    Your note is now live.
    This note is visible on your profile and discoverable online.
    Everyone on the web can find and read all notes of this public team.

    Your account was recently created. Publishing will be available soon, allowing you to share notes on your public page and in search results.

    Your team account was recently created. Publishing will be available soon, allowing you to share notes on your public page and in search results.

    Explore these features while you wait
    Complete general settings
    Bookmark and like published notes
    Write a few more notes
    Complete general settings
    Write a few more notes
    See published notes
    Unpublish note
    Please check the box to agree to the Community Guidelines.
    View profile
    Engagement control
    Commenting
    Permission
    Disabled Forbidden Owners Signed-in users Everyone
    Enable
    Permission
    • Forbidden
    • Owners
    • Signed-in users
    • Everyone
    Suggest edit
    Permission
    Disabled Forbidden Owners Signed-in users Everyone
    Enable
    Permission
    • Forbidden
    • Owners
    • Signed-in users
    Emoji Reply
    Enable
    Import from Dropbox Google Drive Gist Clipboard
       Owned this note    Owned this note      
    Published Linked with GitHub
    • Any changes
      Be notified of any changes
    • Mention me
      Be notified of mention me
    • Unsubscribe
    --- title: curve-editor.md tags: mewa-user-guide description: Mewa - Video Creator & Compositor --- ## Animating parameters with Curve Editor ### What is the Curve Editor ### The curve editor is the heart of a video animation, its a very intuitive graphical tool where you can model the behaviour of one or more parameters over time as a curve, e.g. to animate an object in a video we change the position of the object. The ![](https://upload.wikimedia.org/wikipedia/commons/d/d2/ShowCurveEditorButton.png) button shows and hides the curve editor. ![](https://upload.wikimedia.org/wikipedia/commons/9/94/CurveEditorInMainWindow.png)*Curve editor window* In the [node graph](node-graph.md) each node has its own parameters shown at [parameters window]() where they can be modified. To see the node's parameters just click the node ''parameters button'' to make parameters window pop up. Every parameter has an input text box where the parameter value is shown. The shown value is always the parameter value at the current play frame. The play frame number is shown in the timeline and pointed by the play-head. If a curve is associated to the parameter, the parameter value will show the curve value at the current play frame. ![](https://upload.wikimedia.org/wikipedia/commons/5/53/ParameterControl.png) *Node parameter* Pressing down on the input box and draging makes the parameter value change proportionally to the dragging movement. This is how parameter values are adjusted. Some parameters show a progress line just above the input box (see node parameter image on the right). That's because that parameter limits its value within a range. As the parameter value changes the progress line above the input box indicates it's value relative to it's min and max values. To animate a parameter value throught time we use a curve. A curve can be modelled point by point and can be reused in any parameter. Parameters have a curve button (![](https://upload.wikimedia.org/wikipedia/commons/b/ba/AssociateCurveButton.png)). Clicking the curve button shows a menu with a list of available curves and the option to create a new curve.
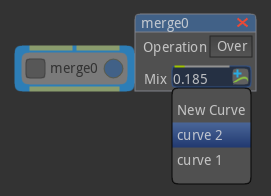
 ![](https://upload.wikimedia.org/wikipedia/commons/d/da/AssociatingCurveMenu.png)*Curve button menu* You can associate a parameter to an existing curve by clicking a curve from the curve button menu. To create a new curve click the *new curve...* option, the first option in the curve button menu. The created curve will be shown in the curve editor as a flat line, which means constant value. The name of the created curve contains the node name followed by the parameter name. ### The Curve Editor window ### Curves are modelled in the curve editor. To open or close the curve editor toggle the button *Curve Editor* ![](https://upload.wikimedia.org/wikipedia/commons/d/d2/ShowCurveEditorButton.png) located at the bottom left of the application window. To see the list all the available curves toggle the ''curve list view'' button ![](https://upload.wikimedia.org/wikipedia/commons/1/17/CurveListIcon.png) located on the top left of the curve editor window. The curve list view is shown on the left of the curve editor window. ![](https://upload.wikimedia.org/wikipedia/commons/2/2f/CurveEditorWithListView.png)*Curve Editor window* A curve can have as many points as needed and an interpolation option can be set for each point. As a curve is modified it's changes are propagated through all the parameters associated to the curve. In pratical this means we can visualize the result at the [output window](https://hackmd.io/VIsuWHCySFWk6j2shR36zw#Output-window) while changing a curve. ### Navigating the Curve Editor ### Changing the view scale, or zooming, is a common action when adusting curves. Higher levels of zoom are needed when adjusting curves to finer detail. #### Fit-in view #### The *Fit in view* button ![](https://upload.wikimedia.org/wikipedia/commons/9/9f/FitInViewButton.png) zooms the view to fit the selected points on the current view. If there are no points selected the *Fit in view* button will fit all points of the current selected curves. #### Scale axis view #### Moving the mouse while holding the shift key changes the curve editor view scale. Horizontal mouse movement, with shift key down, changes the X axis scale. Vertical mouse movement, with shift key down, changes the Y axis scale. #### Zoom and Pan #### You may navigate the Curve Editor space by using the Middle Mouse button to pan and the mouse wheel to zoom. ### Editing curves ### #### Creating an new curve #### The *new curve* button ![](https://upload.wikimedia.org/wikipedia/commons/8/82/NewCurveButton.png) creates a new curve with 1 point. The point is created at the frame number indicated by the play head. #### Working with curve points #### Manipulating the curve to obtain the desired curve is easilly achieved by moving and creating new points. To move a point use the left mouse button to drag the point to a new position position. It's also possible to move a selection of points. There are several ways to select points in a curve, the most usual way is by is clicking on the point you wish to select. To select multiple points you can * use the rubber band : press an empty area and drag to resize the rubberband rectangle. All points under the rubberband recatangle will be selected. * hold shift key while clicking on the points to select Left mouse clicking in a empty area clears any selection of points. To add points, * click over a curve line, both curve line or extrapolation line. Note that the mouse cursor changes it's icon to a point finger icon to indicate that the mouse is over a line and if you click a point will be created. * or use the context menu, right-mouse click and choose *New Point*. #### Deleting points #### To delete points select one or more points and: * click ![](https://upload.wikimedia.org/wikipedia/commons/c/c3/DeletePoint.png). * or, press *delete* key, * or, right-click over one of the selected points to open the context menu and choose *delete*. #### Curve interpolation #### Interpolation defines the shape of a curve between points. At the top of the curve editor is the interpolation buttons group which offers a list of pre-determined interpolation options. ![](https://upload.wikimedia.org/wikipedia/commons/d/db/InterpolationButtons.png) The 4 interpolation options are: * Linear interpolation * Ease in interpolation * Ease out interpolation * Ease in&out interpolation To change the interpolation between points, select one or more points, * Click one of the interpolation buttons * right click on a point to open the context menu and select an interpolation mode ![](https://i.imgur.com/oyLZ5W0.png) *Point context menu* #### Custom interpolation #### Custom interpolation can also be referenced as cubic interpolation as it provides cubic handlers to adjust a cubic interpolation curve. At the top of the curve editor window is the *show cubic handlers* switch: ![](https://upload.wikimedia.org/wikipedia/commons/6/6d/CubicHandlersSwitch.png) To use it select one or more points and choose to show the cubic handlers. When custom interpolation is chosen 2 tangent controls appear, also called handlers. Use these handlers to adjust the cubic interpolation to a desired form. #### Curve Extrapolation #### Extrapolation is the region of the curve outide the movable points. Extrapolation defines the shape of an animation curve before the first point and after the last point. The default extrapolation method is ''Constant extrapolation'', which simply holds the value steady. It looks as an horizontal line. #### Copy and paste points #### * Select the points to copy and press *Ctrl+C*, * move the play head to the frame which the copied points will be inserted, * press Ctrl+V to paste. Note that the curve's section after the play head is shifted to the right to give space for the new pasted points. ### Bar view ### At the top of the curve editor window is the *bar or curves* switch button ![](https://upload.wikimedia.org/wikipedia/commons/3/36/BarCurvesSwitch.png). The bar view displays curves as horizontal bars, which is very usefull when we only want to adust curve points horizontally (time scale) and not change its value. ![](https://i.imgur.com/SomcDgE.png) *Curves in time scale* ### Audio ### Mewa currently only supports *.wav* sound files. After importing the sound waves of the imported file are shown and kept visible at the center of the curve editor. ![](https://i.imgur.com/Q5cxQjm.png)*Audio wave in curve editor*

    Import from clipboard

    Paste your markdown or webpage here...

    Advanced permission required

    Your current role can only read. Ask the system administrator to acquire write and comment permission.

    This team is disabled

    Sorry, this team is disabled. You can't edit this note.

    This note is locked

    Sorry, only owner can edit this note.

    Reach the limit

    Sorry, you've reached the max length this note can be.
    Please reduce the content or divide it to more notes, thank you!

    Import from Gist

    Import from Snippet

    or

    Export to Snippet

    Are you sure?

    Do you really want to delete this note?
    All users will lose their connection.

    Create a note from template

    Create a note from template

    Oops...
    This template has been removed or transferred.
    Upgrade
    All
    • All
    • Team
    No template.

    Create a template

    Upgrade

    Delete template

    Do you really want to delete this template?
    Turn this template into a regular note and keep its content, versions, and comments.

    This page need refresh

    You have an incompatible client version.
    Refresh to update.
    New version available!
    See releases notes here
    Refresh to enjoy new features.
    Your user state has changed.
    Refresh to load new user state.

    Sign in

    Forgot password
    or
    Sign in via Google Sign in via Facebook Sign in via X(Twitter) Sign in via GitHub Sign in via Dropbox Sign in with Wallet
    Wallet ( )
    Connect another wallet

    New to HackMD? Sign up

    By signing in, you agree to our terms of service.

    Help

    • English
    • 中文
    • Français
    • Deutsch
    • 日本語
    • Español
    • Català
    • Ελληνικά
    • Português
    • italiano
    • Türkçe
    • Русский
    • Nederlands
    • hrvatski jezik
    • język polski
    • Українська
    • हिन्दी
    • svenska
    • Esperanto
    • dansk

    Documents

    Help & Tutorial

    How to use Book mode

    Slide Example

    API Docs

    Edit in VSCode

    Install browser extension

    Contacts

    Feedback

    Discord

    Send us email

    Resources

    Releases

    Pricing

    Blog

    Policy

    Terms

    Privacy

    Cheatsheet

    Syntax Example Reference
    # Header Header 基本排版
    - Unordered List
    • Unordered List
    1. Ordered List
    1. Ordered List
    - [ ] Todo List
    • Todo List
    > Blockquote
    Blockquote
    **Bold font** Bold font
    *Italics font* Italics font
    ~~Strikethrough~~ Strikethrough
    19^th^ 19th
    H~2~O H2O
    ++Inserted text++ Inserted text
    ==Marked text== Marked text
    [link text](https:// "title") Link
    ![image alt](https:// "title") Image
    `Code` Code 在筆記中貼入程式碼
    ```javascript
    var i = 0;
    ```
    var i = 0;
    :smile: :smile: Emoji list
    {%youtube youtube_id %} Externals
    $L^aT_eX$ LaTeX
    :::info
    This is a alert area.
    :::

    This is a alert area.

    Versions and GitHub Sync
    Get Full History Access

    • Edit version name
    • Delete

    revision author avatar     named on  

    More Less

    Note content is identical to the latest version.
    Compare
      Choose a version
      No search result
      Version not found
    Sign in to link this note to GitHub
    Learn more
    This note is not linked with GitHub
     

    Feedback

    Submission failed, please try again

    Thanks for your support.

    On a scale of 0-10, how likely is it that you would recommend HackMD to your friends, family or business associates?

    Please give us some advice and help us improve HackMD.


    Thanks for your feedback

    Remove version name

    Do you want to remove this version name and description?

    Transfer ownership

    Transfer to
      Warning: is a public team. If you transfer note to this team, everyone on the web can find and read this note.

        Link with GitHub

        Please authorize HackMD on GitHub
        • Please sign in to GitHub and install the HackMD app on your GitHub repo.
        • HackMD links with GitHub through a GitHub App. You can choose which repo to install our App.
        Learn more  Sign in to GitHub

        Push the note to GitHub Push to GitHub Pull a file from GitHub

          Authorize again
         

        Choose which file to push to

        Select repo
        Refresh Authorize more repos
        Select branch
        Select file
        Select branch
        Choose version(s) to push
        • Save a new version and push
        • Choose from existing versions
        Include title and tags
        Available push count

        Pull from GitHub

         
        File from GitHub
        File from HackMD

        GitHub Link Settings

        File linked

        Linked by
        File path
        Last synced branch
        Available push count

        Danger Zone

        Unlink
        You will no longer receive notification when GitHub file changes after unlink.

        Syncing

        Push failed

        Push successfully