# 第六講:不僅是個執行單元的 Process
> 本筆記僅為個人紀錄,相關教材之 Copyright 為[jserv](http://wiki.csie.ncku.edu.tw/User/jserv)及其他相關作者所有
* 直播:==[Linux 核心設計:不僅是個執行單元的 Process - 2018/12/15](https://www.youtube.com/watch?v=kcEcN43J3CQ)==
* 詳細共筆:[Linux 核心設計: 不僅是個執行單元的 Process](https://hackmd.io/@sysprog/linux-process)
* 主要參考資料:
* [Process Address Spaces and Binary Formats](https://www.cs.unc.edu/~porter/courses/cse506/s16/slides/address-spaces.pdf)
* [Native POSIX Threading Library (NPTL)](https://www.cs.unc.edu/~porter/courses/cse506/s16/slides/nptl.pdf)
* [Process Management](https://wiki.csie.ncku.edu.tw/embedded/ProcessManagement.pdf)
* [Linux 核心設計: Scheduler(2): 概述 CFS Scheduler](https://hackmd.io/@sysprog/B18MhT00t)
* [Scheduling (1)](https://www.cs.unc.edu/~porter/courses/cse506/s16/slides/scheduling.pdf)
* [Scheduling (2)](https://www.cs.unc.edu/~porter/courses/cse506/s16/slides/scheduling2.pdf)
* [Signals and Inter-Process Communication](https://www.cs.unc.edu/~porter/courses/cse506/s16/slides/ipc.pdf)
* [Thread & Synchronization](https://wiki.csie.ncku.edu.tw/embedded/2015q1w9/thread-sync.pdf)
* [Process Management: Abstracting Computing Resources](https://web.archive.org/web/20221028025241/https://www.pf.is.s.u-tokyo.ac.jp/wp-content/uploads/2018/10/AdvancedOperatingSystems4.pdf)
* [ARM-Linux 技術報告](http://wiki.csie.ncku.edu.tw/embedded/arm-linux)
---
本筆記旨在闡述 Linux 核心中 Process 的設計與實作,不僅探討其作為執行單元的角色,更深入其作為資源抽象容器的複雜性。我們將回顧 Linux 在 Process 設計上的演進、與 Microkernel (微核心) 思想的交織、Thread 的實作機制,以及相關的記憶體管理、排程、同步和訊號處理等關鍵議題。
---
## Process 的基本概念與資源抽象
一個 Process 不僅僅是一個正在執行的程式,它更是作業系統對計算資源的一種抽象。當我們執行一個程式時,作業系統會為其建立一個 Process,這個 Process 擁有自己獨立的 Virtual Address Space (虛擬位址空間),使其看起來像是獨佔了系統的所有記憶體。
### Virtual Address Space (VAS)
每個 Process 都在其 VAS 中運作,程式碼透過指標存取記憶體中的資源 (如變數、資料結構)。VAS 通常是一個看起來線性的、廣闊的定址範圍,例如從 `0x00000000` 到 `0xffffffff` (32位元系統)。作業系統負責將這些虛擬位址映射到實際的 Physical Memory (實體記憶體),並提供保護機制,防止 Process 存取不屬於自己的記憶體區域。

我們可以透過 `ldd` 命令查看一個程式執行時動態連結的共享函式庫及其在 VAS 中的載入位址。例如,`ldd /usr/bin/git` 可能會顯示 `libz.so` (壓縮函式庫)、`libpthread.so` (POSIX Thread 函式庫) 等及其對應的虛擬記憶體位址。這些位址通常分佈在 VAS 的不同區段。
```shell
$ ldd /usr/bin/git
linux-vdso.so.1 (0x00007ffc2c2db000)
libpcre2-8.so.0 => /lib/x86_64-linux-gnu/libpcre2-8.so.0 (0x00007ff1d6bc5000)
libz.so.1 => /lib/x86_64-linux-gnu/libz.so.1 (0x00007ff1d6ba9000)
libc.so.6 => /lib/x86_64-linux-gnu/libc.so.6 (0x00007ff1d6997000)
/lib64/ld-linux-x86-64.so.2 (0x00007ff1d706f000)
```
### vm_area_struct (VMA)
Linux 核心使用 `vm_area_struct` (簡稱 VMA) 來描述 VAS 中的一個個連續的記憶體區域。每個 VMA 記錄了:
* **起始與結束位址**:定義了該區域在 VAS 中的範圍。
* **權限 (Protection)**:如可讀 (read)、可寫 (write)、可執行 (execute)。例如,程式碼段通常是可讀可執行的,但不可寫;堆疊段 (stack) 則是可讀可寫的,但通常不可執行,以增強安全性。
* **映射來源**:可能映射到一個檔案 (如程式執行檔本身、共享函式庫、透過 `mmap` 映射的檔案) 或是一個匿名區域 (anonymous mapping,如stack、heap)。
* **其他簿記資訊 (Bookkeeping)**:如時間戳、資源使用情況等。
由於 VAS 通常很大且使用上是稀疏的 (sparse),Linux 核心採用了高效的資料結構來管理 VMA。早期可能使用**簡單的 Linked List**。

但隨著 VMA 數量增多,為了提升查找效率,引入了 **[Red-Black Tree (紅黑樹)](https://hackmd.io/@sysprog/linux-rbtree)** 這樣的平衡樹結構。此外,核心還會 **快取 (cache) 上一次查找的 VMA 指標**,利用時間局部性 (temporal locality) 來加速後續查找,據稱有約 35% 的命中率。
<center>
<img src="https://developer.ibm.com/developer/default/tutorials/l-completely-fair-scheduler/images/figure1.gif" alt="RBtree" />
</center>
> [!Note] Linux 6.1 後的 VMA 管理變革
> 上述 `Linked List` + `Red-Black Tree` + `vmacache` 架構,已在 **Linux 6.1 (2022 年底)** 迎來重大重構。
>
> 為了進一步解決多核心下的鎖競爭以及 CPU Cache Miss 問題,Linux 核心將管理 VMA 的資料結構統一替換為全新的 **Maple Tree** (一種專為範圍查找優化、且支援 RCU、對 CPU 快取極度友善的 B-Tree 變體)。
>
> 因為 Maple Tree 本身的查找效率極高,原先用來彌補紅黑樹效能瓶頸的 `vmacache` 失去了存在意義,已被正式移除。
> 延伸閱讀:[Process Address Spaces and Binary Formats](https://www.cs.unc.edu/~porter/courses/cse506/s16/slides/address-spaces.pdf)
---
## Linux 設計的演化與 Microkernel 的影響
Linux 的設計深受 UNIX 哲學影響,但其發展歷程充滿了基於現實需求的取捨 (trade-off) 與逐步演化 (evolution),並且也受到了 Microkernel 設計思想的啟發。
### Microkernel 簡介
Microkernel 的核心思想是將作業系統 **核心的功能最小化**,僅保留最基本的部分 (如行程間通訊 IPC, 基本排程, 記憶體管理),而將傳統上屬於核心的服務 (如檔案系統、網路堆疊、裝置驅動程式) 移至 User Space 以 Process 的形式執行,稱為 Server。
* **Mach Microkernel**:由美國卡內基梅隆大學 (CMU) 於 1980 年代開發,目標是提供一個與 UNIX 相容、物件導向、跨平台且適合分散式運算的基礎。Mach 的設計影響深遠,其開發者後來也對 Microsoft 和 Apple 的作業系統發展作出貢獻。Mach 的 Task (類似 UNIX Process) 和 Thread 是獨立的物件。
* **L4 Microkernel**:針對第一代 Microkernel (如 Mach) 的效能問題進行改進,致力於降低 IPC 成本和 Cache Footprint。L4 及其變種被廣泛應用於 **嵌入式系統** 和 **行動裝置** 中。
> 延伸閱讀:[Microkernel Evolution (2013)](https://www.slideshare.net/slideshow/microkernel-evolution/19018410)
### Linux 對 Microkernel 思想的借鑒
儘管 Linux 本身是一個 Monolithic Kernel (單體核心,或稱巨核心),即核心本身包含大部分系統服務,但它也採納了一些 Microkernel 的概念,將特定服務使用者空間化:
* **FUSE (Filesystem in Userspace)**:允許在 user space 開發和執行檔案系統。例如,Ceph 這種分散式儲存系統的客戶端可以透過 FUSE 介面運作。
* **X Window System 的 Video Device Driver**:部分顯示相關的驅動邏輯也運作在 user space。
* **Android 的設計**:雖然基於 Linux 核心,但其上層框架 (如 Binder IPC/RPC, Activity, Service) 帶有濃厚的 Microkernel 色彩。

Linux 核心的 `task_struct` 結構體非常龐大,包含了行程狀態、檔案系統資訊、訊號處理、記憶體管理、排程資訊、追蹤機制、thread 相關欄位等多方面內容,這與 Microkernel 追求核心精簡的理念形成對比。Linux 核心的擴充通常需要重新編譯,難以做到核心層面的二進位相容。
然而,Linux 生態系統透過將核心及相關底層技術 (如編譯器 GCC, Clang) 視為「公共財」,鼓勵社群和企業共同貢獻和維護,使得上層應用和框架可以與核心演進相對獨立地發展。
---
## Process 與 Thread 的關係及 Linux 實作
在 Linux 中,Process 和 Thread 的界線有時顯得模糊,這與其歷史發展和設計選擇有關。
### 早期 LinuxThread
早期 Linux (1996年左右) 透過 LinuxThread 套件實現多執行緒,採用的是 M:1 模型,即多個使用者層級的執行緒 (User-level Threads) 映射到單一個核心層級的執行單元 (Kernel-level Entity)。這種模型的缺點是,如果任何一個 user thread 執行了 Blocking I/O (阻塞式輸出入),整個 Process (包括其下的所有 thread) 都會被阻塞。此外,它也無法真正利用多核心處理器的並行能力。


### NPTL (Native POSIX Thread Library)
後來,主要由 IBM 貢獻的 [NPTL](https://en.wikipedia.org/wiki/Native_POSIX_Thread_Library) (約世紀初提出) 取代了 LinuxThread,成為 Linux 上 POSIX Thread 的標準實作。NPTL 採用 1:1 模型,即每個 user thread 都對應一個獨立的核心層級執行單元。這使得一個 thread 的阻塞不再影響其他 thread,並且能夠更好地利用 SMP (Symmetric Multiprocessing, 對稱多處理) 架構。


> 延伸閱讀:[Native POSIX Threading Library (NPTL)](https://www.cs.unc.edu/~porter/courses/cse506/s16/slides/nptl.pdf)
### `clone()` 系統呼叫
Linux 提供了一個強大的系統呼叫 `clone()`,**它是 `fork()` 和 `pthread_create()` 的基礎**。`clone()` 與 `fork()` 類似,都是建立一個新的執行單元,但 `clone()` 允許更細緻地控制父子執行單元之間共享哪些資源。
透過傳遞不同的 flags 給 `clone()`,可以決定新建立的執行單元 **是否與父執行單元共享**:
* 位址空間 (Address Space)
* 檔案系統資訊
* 已開啟的檔案描述符
* 訊號處理常式 (Signal handlers)
等等。
當 `clone()` 被用於建立一個共享位址空間但擁有獨立 thread ID (TID) 和 stack 的執行單元時,它實質上就建立了一個 thread。如果它建立了一個擁有全新獨立位址空間的執行單元,則類似於傳統的 `fork()` 建立 Process。
### `task_struct` 與 thread
在 Linux 核心內部,**Process 和 Thread 都由 `task_struct` 結構體來描述**。`task_struct` 是核心中用於管理所有執行單元的核心資料結構。一個 Process 可以看作是一個容器,其中包含一個或多個共享相同記憶體空間和大部分資源的 Thread (由 `task_struct` 表示)。每個 Thread **擁有自己獨立的程式計數器 (PC)、stack pointer、暫存器集合,以及排程屬性**。
參照 [linux/include/linux/sched.h](https://github.com/torvalds/linux/blob/master/include/linux/sched.h#L812)
```c
struct task_struct {
/* 存放與底層硬體架構相關的 thread 狀態資訊 */
struct thread_info thread_info;
...
/* 排程實體,內含 RB-tree node */
struct sched_entity se;
...
/* 所有 task 的 Linked-List */
struct list_head tasks;
...
/* 指向該行程的虛擬記憶體空間 (VAS) 描述子 */
struct mm_struct *mm;
struct mm_struct *active_mm;
...
/* 子行程, 兄弟行程的 Linked-List */
struct list_head children;
struct list_head sibling;
...
/* PID/PID hash table linkage. */
struct pid *thread_pid;
struct hlist_node pid_links[PIDTYPE_MAX];
struct list_head thread_group;
struct list_head thread_node;
...
/* CPU-specific state of this task、register 備份區、...*/
struct thread_struct thread;
}
```
#### 建立 Thread 的優缺點:
* **優點**:
* 建立成本遠低於建立一個完整的 Process (因為不需要複製整個位址空間)。
* Thread 間的 Context Switch 成本較低 (因為共享位址空間,不需要切換 MMU 的分頁表等)。
* Thread 間共享資料方便,因為它們在同一個位址空間內。
* **缺點**:
* 一個 thread 的錯誤 (如非法記憶體存取、除零) 可能導致整個 Process (包括其所有 thread) 崩潰。
* Thread 間的同步問題較為複雜,需要仔細設計以避免 Race Condition 和 Deadlock。
* Debugging 多執行緒程式,通常比單執行緒程式更困難。
> 現代程式語言如 Go (透過 Goroutine 和 Channel) 和 Java (內建 thread 和記憶體回收機制) 提供了更抽象和易用的多執行緒編程模型,簡化了開發者處理同步和資源共享的複雜性。
---
## Context Switch (上下文交換)
Context Switch 是作業系統 **暫停一個正在執行的 Process 或 Thread,並將 CPU 控制權轉移給另一個 Process 或 Thread 的過程**。這對於實現多工至關重要。
### Context Switch 的成本主要包括:
1. **保存當前執行單元的狀態**:包括通用暫存器、程式計數器 (PC)、stack pointer、狀態暫存器等。對於包含 FPU 或 SIMD 指令集的現代處理器,還可能需要保存這些擴展暫存器的狀態。
2. **載入下一個執行單元的狀態**:從其儲存的上下文中恢復上述暫存器內容。
3. **更新核心資料結構**:如排程佇列、Process 狀態等。
4. **位址空間切換 (如果需要)**:
* **Process 間切換**:需要切換 MMU (Memory Management Unit, 記憶體管理單元) 使用的分頁表 (Page Table),通常是透過修改特定控制暫存器 (如 x86 的 CR3) 來指向新 Process 的分頁表。這一步驟成本較高,因為可能導致 TLB (Translation Lookaside Buffer, 位址轉譯旁觀緩衝區) 的快取失效 (flush)。
* **同一 Process 內 Thread 間切換**:由於共享相同的位址空間,通常不需要進行分頁表切換,這使得 Thread 間的 Context Switch 比 Process 間的更快。
> Microkernel 架構有時會 **利用 Context Switch 的過程來優化 IPC**。例如,如果兩個 Task (任務) 需要交換少量資料,可以透過在 Context Switch 時不保存/恢復某些約定好的暫存器,**讓後一個 Task 直接從這些暫存器讀取前一個 Task 留下的資料**,從而避免了顯式的記憶體複製。
Linux 核心中 (因架構而異的實作),`switch_to()` 負責執行實際的上下文交換操作。 `switch_mm()` 負責執行 virtual memory 的上下文交換操作。
> 延伸閱讀:
> * [第七講:不只挑選任務的排程器 - 上下文交換 (Context Switch)](https://hackmd.io/@Jaychao2099/Linux-kernel-7#%E4%B8%8A%E4%B8%8B%E6%96%87%E4%BA%A4%E6%8F%9B-Context-Switch)
> * [Process Management](https://wiki.csie.ncku.edu.tw/embedded/ProcessManagement.pdf)
---
## Scheduling (排程)
排程器 (Scheduler) 是作業系統核心的一部分,負責決定在 CPU 上執行的下一個 Process 或 Thread。
### Linux Scheduler 的演進
* **O(1) Scheduler**:在 Linux 2.6 早期版本中使用,其目標是在常數時間內選出下一個要執行的任務,不論系統中有多少個任務。它為每個 CPU 維護一個 Run Queue (執行佇列),每個 Run Queue 包含多個優先權佇列。

* **CFS (Completely Fair Scheduler)**:自 Linux 2.6.23 起引入,成為預設排程器。CFS 的目標是為每個任務提供「公平」的 CPU 時間分配。它不再使用固定的時間片 (time slice),而是根據任務的 `nice` 值 (影響其虛擬執行時間 `vruntime`) 來決定哪個任務應該下一個執行。`vruntime` 最低的任務會被選中。CFS 使用 **紅黑樹** 來高效地管理 Run Queue 中的任務。

> 延伸閱讀:
> * [第七講:不只挑選任務的排程器 - CPU 排程器的演化](https://hackmd.io/@Jaychao2099/Linux-kernel-7#CPU-%E6%8E%92%E7%A8%8B%E5%99%A8%E7%9A%84%E6%BC%94%E5%8C%96)
> * [Linux 核心設計: Scheduler(2): 概述 CFS Scheduler](https://hackmd.io/@sysprog/B18MhT00t)
> * [Scheduling (1)](https://www.cs.unc.edu/~porter/courses/cse506/s16/slides/scheduling.pdf)
> * [Scheduling (2)](https://www.cs.unc.edu/~porter/courses/cse506/s16/slides/scheduling2.pdf)
### Run Queue 和 Wait Queue
* **Run Queue**:包含所有處於可執行狀態 (Runnable) 的 Process 或 Thread。每個 CPU 核心通常有其自身的 Run Queue。排程器從 Run Queue 中選擇下一個要執行的任務。
* **Wait Queue**:當一個任務因為等待某個事件 (如 I/O 完成、資源釋放) 而無法繼續執行時,它會被移出 Run Queue 並放入相應的 Wait Queue,進入阻塞 (Blocked) 狀態。一旦等待的事件發生,該任務會被喚醒並移回 Run Queue。
### Process 狀態
一個 Process 或 Thread 在其生命週期中會經歷多種狀態:
* **TASK_RUNNING**:正在執行或在 Run Queue 中等待執行。
* **TASK_INTERRUPTIBLE**:正在睡眠 (sleeping),等待某個條件成立或訊號到來。可以被訊號中斷。
* **TASK_UNINTERRUPTIBLE**:正在睡眠,等待某個條件成立,但不能被訊號中斷。通常用於等待短期且必須完成的 I/O 操作,以避免被中斷導致資料不一致。
* **TASK_STOPPED**:執行已停止,通常是被 SIGSTOP, SIGTSTP 等訊號暫停。
* **TASK_TRACED**:正在被另一個 Process (如除錯器 gdb) 追蹤。
* **EXIT_ZOMBIE**:行程已終止,但其 `task_struct` 仍保留在核心中,等待父行程透過 `wait()` 系統呼叫來獲取其退出狀態。
* **EXIT_DEAD**:行程已終止且父行程已回收其狀態,`task_struct` 即將被釋放。
<!--  -->
```graphviz
digraph ProcessStates {
rankdir=LR; // 從左到右排版
node [fontname="Microsoft JhengHei", fontsize=15, style=filled, fillcolor="lightblue"];
edge [fontname="Microsoft JhengHei", fontsize=15];
// 定義各個節點(狀態)
Ready;
// 隱形的 dummy node,只供排版用
Stop;
dummy1 [shape=point, width=0, height=0, label="", style=invis];
Running;
Interruptible;
Uninterruptible;
Zombie;
Dead;
// 用一個隱藏的起點(point 節點)代表「creation」
start [label="", shape=point];
start -> Ready [label="creation"];
Running -> Stop [label="signal"];
Stop -> Ready [label="signal"];
Ready -> dummy1 [style=invis];
dummy1 -> Running [style=invis];
Running -> Ready [label="scheduling", dir="both"];
Running -> Uninterruptible [label="event"];
Uninterruptible -> Ready [label="event"];
Running -> Interruptible [label="signal or event"];
Interruptible -> Ready [label="signal or event"];
Running -> Zombie [label="termination"];
Zombie -> Dead;
// 排版提示
{ rank = same; Stop; dummy1; Interruptible; Uninterruptible; }
}
```
### 優先權與排程策略
* **`nice` 值**:傳統 UNIX 概念,範圍從 -20 (最高優先權) 到 +19 (最低優先權)。`nice` 值越小 (越 "不友善"),優先權越高。CFS 會 **參考 `nice` 值來調整任務的 `vruntime` 增長速度**。
* **Real-time Priority (即時優先權)**:Linux 支援即時排程策略 (如 `SCHED_FIFO`, `SCHED_RR`),這些策略下的任務擁有比普通任務 (使用 `SCHED_OTHER`,即 CFS) 更高的優先權。即時優先權範圍通常是 0 到 99。
* **Dynamic Priority**:現代排程器通常會動態調整任務的優先權,以平衡系統的響應性 (responsiveness) 和吞吐量 (throughput)。
> 例如,對於 I/O-bound (輸出入密集型) 的任務,可能會暫時提升其優先權,以便在其 I/O 完成後能快速獲得 CPU 執行,從而提高系統整體效率和使用者介面 (UI) 的響應速度。
* **CPU Rebalancing**:在 SMP 系統中,排程器會嘗試將負載均勻分配到各個 CPU 核心上。這可能涉及到將任務從一個繁忙的 CPU 遷移 (migrate) 到一個較空閒的 CPU。任務遷移本身有成本 (如 Cache 失效),排程器需要權衡。
> NUMA (Non-Uniform Memory Access, 非均勻記憶體存取) 架構和 Hyper-threading (超執行緒) 技術會進一步增加排程的複雜性。
有些研究甚至嘗試將機器學習 (Machine Learning) 技術應用於排程決策中,根據歷史執行模式來預測任務行為,以做出更優的排程選擇。
---
## Signal (訊號)
Signal 是一種在 UNIX 和類 UNIX 系統中用於 Process 間 **非同步通訊** 和 **事件通知** 的機制。它類似於硬體中斷,但作用於軟體層面,通常是用來通知 Process 發生了某個特定事件。
### 常見 Signal
* **SIGFPE (Floating-Point Exception)**:發生浮點運算錯誤,如除以零。
* **SIGSEGV (Segmentation Violation)**:Process 嘗試存取其無權存取的記憶體區域 (例如,寫入一個唯讀區域,或讀取/寫入/執行一個未映射的位址)。
* **SIGINT (Interrupt)**:通常由使用者按下 `Ctrl+C` 產生,用於中斷當前執行的 Process。
* **SIGTERM (Terminate)**:請求 Process 正常終止。
* **SIGKILL (Kill)**:強制終止 Process,此訊號不能被捕獲或忽略。
* **SIGSTOP (Stop)**:暫停 Process 執行,不能被捕獲或忽略。
* **SIGTSTP (Terminal Stop)**:通常由使用者按下 `Ctrl+Z` 產生,請求終端前景 Process 暫停。
### Signal 的產生與處理
當核心檢測到一個事件 (如硬體異常、使用者操作、或另一個 Process 呼叫 `kill()` 系統呼叫) 需要通知某個 Process 時,它會向該 Process 發送一個 Signal。
Process 可以為特定的 Signal 註冊 **Signal Handler (訊號處理常式)**。當 Process 接收到一個它已註冊處理常式的 Signal 時,核心會:
1. 暫停該 Process 的當前執行。
2. 將執行流程切換到註冊的 Signal Handler。
3. Signal Handler 執行完畢後,通常會返回到 Process 被中斷的地方繼續執行 (除非 Signal Handler 中執行了 `exit()` 或 `longjmp()`)。

如果 Process 沒有為某個 Signal 註冊處理常式,核心會 **採取預設動作 (default action)**,例如終止 Process、忽略 Signal、或產生 Core Dump。
#### 範例:除零錯誤
當一個程式執行如 `return 0/0;` 這樣的操作時:
1. CPU 檢測到除零異常,觸發一個硬體中斷。
2. 核心的中斷處理常式 (Inturrupt handler)接管,識別出這是一個算術異常。
3. 核心向導致此異常的 Process 發送 `SIGFPE` 訊號。
4. 如果該 Process 沒有捕獲 `SIGFPE`,則執行預設動作,通常是終止 Process 並在控制台 (如 Shell) 打印錯誤訊息 (如 "Floating point exception")。這個訊息是由 Shell (作為父行程) 在收到子行程異常終止的通知後打印的。
Android 系統中的 `debuggerd` 服務就是一個利用 Signal 機制的例子。當應用程式發生 Crash 時,核心會發送 Signal,`debuggerd` (作為一個註冊的處理者或透過 `ptrace` 追蹤) 會介入,在應用程式完全終止前收集其狀態資訊 (如暫存器內容、stack 追蹤),用於後續的除錯分析。
> 延伸閱讀:[Signals and Inter-Process Communication](https://www.cs.unc.edu/~porter/courses/cse506/s16/slides/ipc.pdf)
---
## Thread Synchronization (執行緒同步)
在多執行緒環境中,多個 thread 共享相同的記憶體空間,這雖然方便了資料共享,但也帶來了 **同步問題**。如果多個 thread 同時存取和修改共享資料,而沒有適當的保護機制,就可能 **導致 Race Condition**,使得程式行為不可預測或產生錯誤結果。

### Reentrancy (可重入性)
一個函式被稱為 Reentrant (可重入的),如果它可以被多個執行流程 (如主程式流程和一個中斷服務常式,或者多個 thread) 安全地同時呼叫或交錯執行,而 **不會導致資料損壞或不正確的結果**。
#### 不可重入函式
通常使用了:
* **靜態 (Static) 或全域 (Global) 變數**:如果一個中斷服務常式修改了主程式流程正在使用的全域變數,就可能出錯。
* **返回指向靜態資料的指標**。
#### 範例:`strtok()` vs. `strtok_r()`
* **[strtok()](https://github.com/eblot/newlib/blob/master/newlib/libc/string/strtok.c)**:由 libc 提供,用於 **分割字串**。它在內部維護一個靜態指標來 **記錄下一次開始掃描的位置**,因此它是不可重入的。如果在一個 thread 呼叫 `strtok()` 的過程中,被另一個也呼叫 `strtok()` (處理不同字串) 的 thread 中斷,內部狀態就會混亂。
* **[strtok_r()](https://github.com/eblot/newlib/blob/master/newlib/libc/string/strtok_r.c)**:由 POSIX 標準提供,r 代表 reentrant,它 **額外接受一個由呼叫者提供的指標參數,用於保存上下文狀態**,從而使其可重入且 thread 安全。
> 許多舊的不可重入函式都有其對應的 `_r` 版本。
### Mutex (Mutual Exclusion, 互斥鎖)
Mutex 是最基本的同步原語之一。它用於 **保護 Critical Section** (臨界區段,即一段存取共享資源的程式碼)。一個 thread 在進入臨界區段前必須先獲取 (acquire 或 lock) Mutex,如果 Mutex 已被其他 thread 緒持有,則該 thread 會阻塞等待。離開臨界區段時,thread 必須釋放 (release 或 unlock) Mutex。
#### 基礎 mutex 函式
```c
int pthread_mutex_init(pthread_mutex_t *mutex, const pthread_mutexattr_t *mutexattr);
int pthread_mutex_lock(pthread_mutex_t *mutex);
int pthread_mutex_trylock(pthread_mutex_t *mutex);
int pthread_mutex_unlock(pthread_mutex_t *mutex);
int pthread_mutex_destroy(pthread_mutex_t *mutex);
```
* **使用範例**:
```c=
#include <pthread.h>
...
pthread_mutex_t my_mutex; // 須為全域變數
...
int main() {
int tmp = pthread_mutex_init(&my_mutex, NULL); // 初始化 mutex
...
// create threads
...
pthread_mutex_lock(&my_mutex); // 取得鎖
do_something_private(); // critical section
pthread_mutex_unlock(&my_mutex); // 釋放鎖
...
return 0;
}
```
#### Linux 提供了多種 Mutex 實作,以平衡效能和功能:
* 考慮死鎖檢測 (Deadlock detection) 的速度與正確性。
* 是否允許同一個 thread 多次鎖定同一個 Mutex (Recursive Mutex)。
* 處理 [優先權反轉 (Priority Inversion)](http://www.slideshare.net/jserv/priority-inversion-30367388) 問題。
* 處理持有鎖的 thread 意外終止的情況。
### Futex (Fast Userspace Mutex)
Futex (Fast Userspace Mutex) 是 Linux 提供的一種高效同步機制。其「快」(Fast) 的核心設計在於 **只在必要時才進入核心**,最大程度地減少了因 System Call 產生的昂貴開銷。
#### 運作原理:區分競爭與否
樂觀地 **假設鎖在大多數情況下是無競爭的**,並為此「快速路徑」提供極致的效能。
1. **無競爭情況 (Uncontended Case - The "Fast Path")**
* 當一個 thread 嘗試鎖定一個未被持有的 Mutex 時,它可以在 **user space** 內透過 **原子操作 (atomic operations)** 直接完成鎖定。
* 同樣地,解鎖一個後面沒有其他 thread 在等待的 Mutex,也僅需在 user space 完成。
* 在此情況下,**完全無需系統呼叫**,因此沒有進入核心模式的效能損耗。
2. **競爭情況 (Contended Case - Kernel Intervention)**
只有當 user space 的原子操作無法解決競爭時,才會請求核心協助。
* **等待 (Wait):** 當 thread A 嘗試鎖定一個已被 thread B 持有的 Mutex,thread A 會發出 `sys_futex` 系統呼叫,請求核心將其 **放入等待佇列 (wait queue) 並使其睡眠**。
* **喚醒 (Wake):** 當 thread B 釋放 Mutex 時,它會再次發出 `sys_futex` 系統呼叫,通知核心去 **喚醒** 正在等待佇列中的一個或多個 thread (如 thread A)。
#### Futex 與核心排程器 (Scheduler) 的互動
Futex 的 wait/wake 操作與 Linux 核心的 CPU 排程器緊密相關,這也是其高效的關鍵:
* **進入睡眠 (`futex_wait`)**: 當一個 thread 因等待鎖而進入睡眠時,核心不僅是將它放入 waiting queue,**排程器還會收回其 CPU 時間配額**,並將 CPU 資源分配給其他處於 ready queue 的 thread。
* **被喚醒 (`futex_wake`)**: 當鎖被釋放,被喚醒的 thread 會被核心從 waiting queue 移至 **ready queue**,排程器便會重新將它納入 CPU 的排程考量中。
<center>
<img src="https://hackpad-attachments.s3.amazonaws.com/embedded2016.hackpad.com_K6DJ0ZtiecH_p.537916_1461038745673_thr.png" alt="futex" width="50%" />
</center>
#### 進階議題:避免優先權反轉 (Priority Inversion)
Futex 的核心層實作也考慮到了複雜的同步問題。例如,為了避免高優先權的 thread 被一個持有鎖的低優先權 thread 無限期阻塞 (Priority Inversion),核心的 Futex 機制支援 **優先權繼承 (Priority Inheritance)** 等策略,確保系統的即時性和回應性。
> 延伸閱讀:[並行程式設計: 實作輕量級的 Mutex Lock](https://hackmd.io/@sysprog/concurrency-mutex)
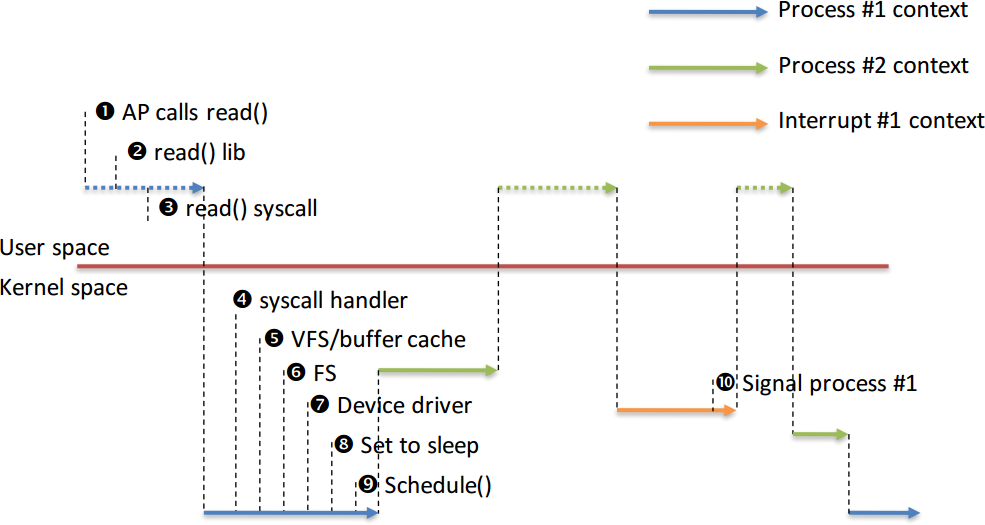
### Kernel Preemption (核心搶佔)
**早期 Linux 核心是不可搶佔的**,即一個任務一旦進入核心模式執行 (例如,透過系統呼叫),它會一直執行直到它自願放棄 CPU (例如,等待 I/O) 或從核心模式返回。這可能導致高優先權任務長時間得不到執行,造成較大的排程延遲 (dispatch latency)。
**現代 Linux 核心支援核心搶佔**,意味著:
* 即使一個任務正在核心模式下執行,它也可能被一個更高優先權的任務搶佔 (除非它持有了禁止搶佔的鎖,如 Spinlock,或者處於不可搶佔的特定區域)。
* 核心搶佔有助於降低系統延遲,提高即時任務的響應性。
:::info
**「核心可被中斷 (interruptible)」$\neq$「核心可被搶佔 (preemptive)」**:
* **不可搶佔核心**:中斷發生後,Interrupt handler 執行完畢,控制權總是返回給 **被中斷的任務**。
* **可搶佔核心**:中斷發生後,Interrupt handler 執行完畢,如果此時有一個 **更高優先權的可執行任務**,排程器可能會選擇執行它,而不是返回給原先被中斷的任務。
:::
<center>
<img src="https://hackpad-attachments.s3.amazonaws.com/embedded2016.hackpad.com_K6DJ0ZtiecH_p.537916_1461039425394_preempt.png" alt="image" width="70%" />
</center>
> 延伸閱讀:[Linux 核心搶佔](https://hackmd.io/@sysprog/linux-preempt) - jserv
#### Background tasks 實作範例 (kernel thread):
```c=
static struct task_struct *tsk;
static int thread_function(void *data) {
int time_count = 0; // 初始化計數器
do {
// 使用 printk 函數向 kernel 日誌打印信息
printk(KERN_INFO "thread_function: %d times\n", ++time_count);
msleep(1000);
} while(!kthread_should_stop() && time_count <= 30);
// 當其他地方調用 kthread_stop(tsk) 時,停止 loop
return time_count;
}
// 初始化函式,當 kernel module 被 insmod 時會被調用
static int hello_init() {
/*
* 創建並啟動一個新的 kernel thread
* 返回新創建 thread 的 task_struct 指標,如果失敗則返回一個錯誤指針。
* (指向函數的指針, 函數的參數, thread 的名稱)
*/
tsk = kthread_run(thread_function, NULL, "mythread%d", 1);
if (IS_ERR(tsk)) {
return PTR_ERR(tsk); // 出錯時返回 錯誤碼
}
return 0; // 創建成功,返回 0
}
// 卸載函式 (exit function)
static void hello_exit(void) {
if (tsk) {
kthread_stop(tsk);
printk(KERN_INFO "Kernel thread stopped.\n");
}
}
```
### Work Queue (工作佇列)
Work Queue 是 Linux 核心中用於 **延遲執行某些工作的一種機制**,特別是那些 **不適合在中斷上下文中執行的**、**可能睡眠的或耗時較長的** 工作。
* 當 Interrupt handler 或其他核心程式碼需要執行一個這樣的任務時,它可以將該任務 (封裝為一個 `work_struct`) 提交到一個 Work Queue。
* 每個 Work Queue 都關聯一個或多個專用的 Kernel Thread (稱為 Worker Thread)。
<center>
<img src="https://hackpad-attachments.s3.amazonaws.com/embedded2016.hackpad.com_K6DJ0ZtiecH_p.537916_1461040784455_f3.png" alt="image" />
</center>
* Worker Thread 會從 Work Queue 中取出任務並在 Process Context (行程上下文,允許睡眠) 中執行它們。
<center>
<img src="https://hackpad-attachments.s3.amazonaws.com/embedded2016.hackpad.com_K6DJ0ZtiecH_p.537916_1461039802354_wq.png" alt="image" />
</center>
> 類似於 Tasklet 或 Softirq 的延遲處理機制,但 Work Queue 提供的彈性更大,因為其處理函式可以睡眠。
#### Work Structure 和 Handler 範例:
```c=
#include <linux/kernel.h>
#include <linux/module.h>
#include <linux/workqueue.h>
MODULE_LICENSE("GPL");
static struct workqueue_struct *my_wq; // work queue
typedef struct { // work
struct work_struct my_work;
int x;
} my_work_t;
my_work_t *work1, *work2;
// work queue 會執行的函式 (工作處理函式)
static void my_wq_function(struct work_struct *work) {
// 轉換回自訂的 `my_work_t` 指標,才能存取到自訂的資料成員 x
my_work_t *my_work = (my_work_t *)work;
printk(KERN_INFO "my_work.x %d\n", my_work->x);
kfree((void *)work);
}
```
#### 建立 work queue 範例:
```c=21
// 模組初始化函式,在模組載入時執行
int init_module() {
int ret; // queue_work() 回傳值,檢查工作是否成功排入 work queue
my_wq = create_workqueue("my_queue"); // 建立 work queue
if (my_wq) { // 成功建立 work queue
// --- 處理第一個工作項目 work1 ---
work1 = (my_work_t *)kmalloc(sizeof(my_work_t), GFP_KERNEL);
if (work1) {
// 初始化 work1,設定處理函式
INIT_WORK((struct work_struct *)work1, my_wq_function);
work1->x = 1; // 設定自訂資料成員 x 的值
// 將 work1 加入 `my_wq`,等待執行
ret = queue_work(my_wq, (struct work_struct *)work1);
}
// --- 處理第二個工作項目 work2 ---
// work2 同理
// ... (省略)
} else {
printk(KERN_ERR "Failed to create workqueue\n"); // work queue建立失敗
return -ENOMEM; // 回傳錯誤碼
}
return 0; // 初始化成功
}
```
#### 銷毀 work queue 範例
```c=46
int exit_module() {
if (my_wq) {
destroy_workqueue(my_wq); // 銷毀 work queue
printk(KERN_INFO "Workqueue destroyed.\n");
}
return 0; // 卸載成功
}
```
> 參照:[第十講:中斷處理和現代架構考量 - Workqueue](https://hackmd.io/fm7sqgSbTPCazZRXPLrNEw?view#Workqueue)
> 延伸閱讀:[Thread & Synchronization](https://wiki.csie.ncku.edu.tw/embedded/2015q1w9/thread-sync.pdf)
---
## Process 的生命週期與管理
### `fork()` 系統呼叫
`fork()` 是 UNIX 系統中建立新 Process 的主要方式。
* 呼叫 `fork()` 後,會建立一個幾乎與父行程 (Parent Process) 完全相同的子行程 (Child Process)。
* 子行程擁有父行程記憶體空間的副本 (邏輯上的,物理複製通常延遲到 Copy-On-Write 時)、相同的檔案描述符 (共享檔案 offset)、相同的訊號處理常式等。
* **主要區別**:
* 子行程有自己唯一的 Process ID (PID)。
* 子行程的 Parent Process ID (PPID) 是父行程的 PID。
* `fork()` 對父行程返回子行程的 PID,對子行程返回 0。如果失敗,則返回 -1。
* `fork()` 的返回值是區分父子行程執行路徑的關鍵。
```c=
int pid = fork();
if (pid == 0) {
// child code
} else if (pid > 0) {
// parent code
} else // error
```
### `exec()` 系列系統呼叫
`exec()` 系列函式 (如 `execl`, `execv`, `execve` 等) 用於 **執行一個新的程式**。
* 當一個 Process 呼叫 `exec()` 時,其當前的 Process Image (包括程式碼、資料、stack 等) 會被 **替換** 為新程式的 Process Image。
* 如果 `exec()` 成功,它 **永遠不會返回** 到呼叫它的程式中,因為原來的程式已被新程式取代。只有當 `exec()` 失敗時,它才會返回 -1。
* PID 不會改變,但 Process 的內容完全變成了新程式的內容。
* 通常,`fork()` 之後會緊跟著在子行程中呼叫 `exec()` 來執行一個不同的程式。
### Copy-On-Write (COW)
為了提高 `fork()` 的效率,特別是當子行程馬上就要呼叫 `exec()` 的情況下,Linux 採用了 Copy-On-Write 技術。
* 當 `fork()` 發生時,核心並不立即複製父行程的整個位址空間給子行程。
* 相反,父子行程暫時共享相同的實體記憶體頁面,但這些頁面會被標記為唯讀 (Read-Only)。
* 只有當父行程或子行程嘗試**寫入**這些共享頁面時,核心才會真正複製該頁面,為寫入方分配一個新的實體頁面副本,並更新其分頁表條目。
因此,只有那些實際被修改的頁面才會被複製,大大減少了 `fork()` 的開銷。
```graphviz
digraph COW {
rankdir=LR;
fontsize=12;
// -------------------
// 寫入前 (Before Write)
// -------------------
subgraph cluster_before {
label="寫入前 (Before Write)";
labelloc=t;
style=rounded;
color=gray70;
fontcolor=black;
node [shape=box, style=filled, fillcolor=lightgrey, fontname="Helvetica"];
P1_before [label="Process P1"];
P2_before [label="Process P2"];
node [shape=cylinder, style=filled, fillcolor=lightblue, fontname="Helvetica"];
Page_shared [label="頁面 A\n(refcount = 2)"];
}
// -------------------
// 寫入後 (After Write)
// -------------------
subgraph cluster_after {
label="寫入後 (After Write)";
labelloc=t;
style=rounded;
color=gray70;
fontcolor=black;
node [shape=box, style=filled, fillcolor=lightgrey, fontname="Helvetica"];
P1_after [label="Process P1"];
P2_after [label="Process P2 (欲寫入)"];
node [shape=cylinder, style=filled, fillcolor=lightblue, fontname="Helvetica"];
Page_orig [label="頁面 A\n(refcount = 1)"];
Page_copy [label="頁面 A' (copy)\n(refcount = 1)"];
}
// 連線:寫入前的狀態
P1_before -> Page_shared [arrowhead=normal];
P2_before -> Page_shared [arrowhead=normal];
// 連線:寫入後的狀態
P1_after -> Page_orig [arrowhead=normal];
P2_after -> Page_copy [arrowhead=normal];
// 標示從寫入前到寫入後的動作
P2_before -> P2_after [style=dashed, arrowhead=none, label=" fork / write ", fontsize=10, fontcolor=gray40];
}
```
### `exit()` 系統呼叫與行程終止
當一個 Process 完成其工作或遇到無法恢復的錯誤時,它會呼叫 `exit()` (或從 `main` 函式返回,[C Runtime Library](https://hackmd.io/@Jaychao2099/crt) 會間接呼叫 `exit()`) 來終止自己。
核心在處理 `exit()` 時會執行以下步驟:
1. 釋放 Process 所佔用的大部分資源,如記憶體、開啟的檔案等。
2. 將 Process 的狀態設置為 `EXIT_ZOMBIE`。此時,Process 已停止執行,但其 `task_struct` (包含退出狀態碼、PID 等資訊) 仍保留在核心中。
3. 向父行程發送 `SIGCHLD` 訊號,通知它子行程已終止。
### `wait()` 系列系統呼叫
父行程通常會呼叫 `wait()` 或 `waitpid()` 來等待其子行程終止,並獲取子行程的退出狀態。
* 如果父行程在子行程終止前呼叫 `wait()`,則父行程會阻塞,直到某個子行程終止。
* 如果子行程已經是 Zombie 狀態,`wait()` 會立即返回子行程的 PID 和退出狀態,並徹底清理該 Zombie Process (釋放其 `task_struct`)。
<center>
<img src="https://hackmd.io/_uploads/r1kSCbcGlx.png" alt="image" width="30%" />
</center>
> 延伸閱讀:
> * [UNIX 作業系統 fork/exec 系統呼叫的前世今生](https://hackmd.io/@sysprog/unix-fork-exec)
> * [Process Management: Abstracting Computing Resources](https://web.archive.org/web/20221028025241/https://www.pf.is.s.u-tokyo.ac.jp/wp-content/uploads/2018/10/AdvancedOperatingSystems4.pdf)
### Orphan Process 與 Zombie Process
* **Zombie Process**:已終止但其父行程尚未透過 `wait()` 回收其狀態的 Process。Zombie Process 不消耗 CPU 資源,但會佔用核心中的一個 `task_struct` 表項。如果大量 Zombie Process 積累,可能耗盡 PID 資源。
* **Orphan Process (孤兒行程)**:如果一個父行程在子行程之前終止,則該子行程會成為孤兒行程。在 UNIX 系統中,孤兒行程會 **被 `init` Process (PID 為 1 的行程,現在通常是 `systemd`)「收養」**,即 `init` Process 成為其新的父行程。`init` Process 會定期呼叫 `wait()` 來清理它收養的所有已終止的子行程。
### Kernel Thread
除了 user space 的 Process 和 Thread,Linux 核心本身也會建立一些在核心空間執行的 Kernel Thread。
* Kernel Thread 擁有自己的 `task_struct` 和 kernel stack,但它們不擁有使用者位址空間 (其 `task_struct` 中的 `mm` 指標通常為 NULL)。
* 它們可以直接呼叫核心函式,並在核心模式下執行。
* 用於執行各種背景任務,如 I/O 處理 (如 `kworker` 執行 Work Queue 中的任務)、排程輔助 (如負載平衡、任務遷移)、記憶體回收等。
* 在 `ps` 命令輸出中,Kernel Thread 的名稱通常被方括號 `[]` 包圍,例如 `[kthreadd]`, `[kswapd0]`。
* `kthreadd` (PID 通常為 2) 是所有其他 Kernel Thread 的祖先,新的 Kernel Thread 通常是從 `kthreadd` fork 出來的。
```shell
$ ps aux
USER PID %CPU %MEM VSZ RSS TTY STAT START TIME COMMAND
root 1 0.0 0.1 21504 12864 ? Ss 00:03 0:00 [systemd]
root 2 0.0 0.0 0 0 ? S 00:03 0:00 [kthreadd]
root 4 0.0 0.0 0 0 ? S< 00:03 0:00 [ktworker/0:0H]
...
```
---
## 記憶體管理相關機制
### `mmap()` 系統呼叫
`mmap()` (memory map) 是一個強大的系統呼叫,用於在呼叫 Process 的虛擬位址空間中建立一個新的記憶體映射區域 (VMA)。
```c
mmap(void *addr, size_t length, int prot, int flags, int fd, off_t offset);
```
* **參數**:
* 映射的起始位址建議
* 長度
* 保護權限 (PROT_READ, PROT_WRITE, PROT_EXEC)
* 映射類型 (MAP_SHARED, MAP_PRIVATE, MAP_ANONYMOUS ...)
* **一個檔案的某個部分** 映射到記憶體中。之後,對這段記憶體的讀寫操作就相當於對檔案對應部分的讀寫。這是實現記憶體映射檔案 (Memory-Mapped Files) 和共享記憶體的常用方法。
* **一個匿名區域** 映射到記憶體中,不與任何特定檔案關聯。常用於分配大塊記憶體 (例如,供 `malloc` 的底層實作使用)。
* **一個裝置** 映射到記憶體中 (Memory-Mapped I/O)。
* 檔案描述符
* 檔案內偏移量
#### 效能優勢 (特別是大型檔案):
* 避免了傳統 `read()`/`write()` 系統呼叫中資料在 kernel buffer 和 user space buffer 之間的多次複製。
* 可以利用作業系統的 Demand Paging 機制,只有在實際存取某個頁面時,該頁面才會從磁碟載入到實體記憶體。
* 多個 Process 可以將同一個檔案映射到各自的位址空間 (使用 `MAP_SHARED`),從而實現高效的共享記憶體。
> `munmap()` 系統呼叫用於解除先前由 `mmap()` 建立的記憶體映射。
### Demand Paging (請求分頁)
Demand Paging 是一種虛擬記憶體管理技術,其中頁面 **只在實際需要時才從輔助儲存 (如硬碟) 載入到實體記憶體中**。
1. 當 Process 首次建立或透過 `mmap()` 建立新的映射時,核心通常只會更新 VMA 結構和建立分頁表條目 (Page Table Entry, PTE),但不會立即分配實體記憶體頁面或從磁碟讀取資料。這些 PTE 可能會被標記為「不存在 (not present)」。
2. 當 Process 嘗試存取一個標記為「不存在」的虛擬頁面時,會 **觸發一個 Page Fault 異常**。
3. 核心的 Page Fault Handler 會介入,檢查該存取是否合法:
* 如果 **存取非法**,則向 Process 發送 `SIGSEGV`。
* 如果 **存取合法**,核心會分配一個實體記憶體頁面,如果該虛擬頁面對應檔案,則從磁碟讀取相應內容到該實體頁面,然後更新 PTE 使其指向該實體頁面並標記為「存在」。
4. Page Fault 處理完成後,導致異常的指令會被重新執行,此時存取就能成功。
Demand Paging 的好處是減少了程式啟動時間和記憶體使用量,因為只有實際用到的頁面才會被載入。
### `sbrk()` 系統呼叫
`sbrk()` 是早期 UNIX 系統中用於 **調整 Process 的 Data Segment 大小的系統呼叫**。Data Segment 通常用於存放全域變數和靜態變數,以及動態分配的記憶體。`sbrk()` 透過移動 Data Segment 的末端指標 (稱為 "program break") 來擴展或收縮 Heap 的大小。
雖然現代 Linux 系統更傾向於使用 `mmap()` 來進行記憶體分配,但 `sbrk()` 仍然被一些 C 函式庫的 `malloc` 實作所使用,以保持相容性。
> **延伸閱讀**:[第八講:記憶體管理 - 使用者空間與核心空間的互動](https://hackmd.io/@Jaychao2099/Linux-kernel-8#5-%E4%BD%BF%E7%94%A8%E8%80%85%E7%A9%BA%E9%96%93%E8%88%87%E6%A0%B8%E5%BF%83%E7%A9%BA%E9%96%93%E7%9A%84%E4%BA%92%E5%8B%95)
---
## 實驗與觀察工具
理解 Process 的行為和效能,除了理論知識,實驗觀察也非常重要。
### `ps` 和 `htop`:
常用的命令列工具,用於查看系統中正在執行的 Process 列表及其狀態 (PID, PPID, CPU 使用率, 記憶體使用量, 狀態等)。`htop` 提供了更友好的互動式介面。

### `/proc` 檔案系統:
Linux 提供的一個虛擬檔案系統,掛載在 `/proc` 目錄下。它將核心內部的許多資料結構和統計資訊以檔案的形式暴露給 user space。
* `/proc/[pid]/`:每個執行中 Process 對應一個以其 PID 命名的目錄,其中包含該 Process 的詳細資訊。
* `/proc/[pid]/maps`:顯示該 Process 的記憶體映射區域 (VMA)。
* `/proc/[pid]/status`:包含該 Process 的狀態、記憶體使用、訊號等詳細資訊。
* `/proc/[pid]/sched`:包含排程相關資訊。
* `/proc/interrupts`:顯示中斷統計。
* `/proc/meminfo`:顯示系統記憶體使用情況。
> [!Tip] 可用 `sudo cat ...` 直接在終端顯示。
### `pstree`:
以樹狀結構顯示 Process 及其父子關係。
```shell
$ pstree 1
systemd─┬─2*[agetty]
├─cron
├─dbus-daemon
├─init-systemd(Ub─┬─SessionLeader───Relay(271)───bash───pstree
│ ├─SessionLeader───Relay(407)───bash───htop
│ ├─init───{init}
│ ├─login───bash
│ └─{init-systemd(Ub}
├─rsyslogd───3*[{rsyslogd}]
├─systemd───(sd-pam)
├─systemd-journal
├─systemd-logind
├─systemd-resolve
├─systemd-timesyn───{systemd-timesyn}
├─systemd-udevd
├─unattended-upgr───{unattended-upgr}
└─wsl-pro-service───7*[{wsl-pro-service}]
```
### [LMBench](https://lmbench.sourceforge.net/):
一個廣泛使用的效能評測工具套件,包含一系列微基準測試 (micro-benchmarks),用於測量作業系統各方面的效能,如 Context Switch 延遲、記憶體頻寬、系統呼叫開銷、網路延遲等。LMBench 通常透過大量重複執行特定操作並統計時間來推斷效能指標,其設計思想是透過實驗「觀察」系統行為。

### [Cheddar](http://beru.univ-brest.fr/cheddar/):
一個針對即時系統的排程分析和模擬工具,可以幫助分析和驗證排程策略。
<center>
<img src="https://hackpad-attachments.s3.amazonaws.com/embedded2016.hackpad.com_K6DJ0ZtiecH_p.537916_1461046113504_undefined" alt="image" width="80%" />
</center>
### Ftrace, `trace-cmd`, KernelShark:
* **Ftrace**:Linux 核心內建的追蹤框架,可以用於追蹤核心函式呼叫、事件、延遲等。
* **`trace-cmd`**:Ftrace 的 user space 控制工具,用於啟動/停止追蹤、設定過濾器、記錄追蹤資料到檔案 (`trace.dat`)。
* **KernelShark**:`trace.dat` 檔案的圖形化分析工具,可以幫助視覺化核心執行流程和事件。
這些工具對於深入理解核心內部運作、除錯效能問題、分析排程行為等非常有價值。例如,可以透過追蹤 `sched_switch` 事件來觀察 Context Switch 的發生和排程決策。
> 延伸閱讀:[ARM-Linux 技術報告](http://wiki.csie.ncku.edu.tw/embedded/arm-linux)
---
## 總結
學習 Linux 核心的 Process 管理是一個複雜但回報豐厚的過程,它不僅涉及到作業系統的理論,還緊密關聯著硬體架構、編譯器、函式庫以及系統的整體設計哲學。透過結合理論學習、程式碼閱讀 (尤其是如 `task_struct` 這樣的核心資料結構和相關的標頭檔)、以及動手實驗和使用追蹤/分析工具,才能更全面地掌握這一核心議題。
---
回[主目錄](https://hackmd.io/@Jaychao2099/Linux-kernel)


