# CSS基本知識
{%hackmd BJrTq20hE %}
## 迷你 css 庫
- sakura:
```jsx=
<link rel="stylesheet" href="https://cdn.jsdelivr.net/npm/sakura.css/css/sakura.css" type="text/css" />
```
- pico:
```jsx=
<link rel="stylesheet" href="https://cdn.jsdelivr.net/npm/@picocss/pico@1/css/pico.min.css">
```
## CSS權重分數:先看權重,再看先後:
- html tag:1分
- class:10分
- inline style:100分
- id:1000分
- !important:10000分
```scss=
th {
font-weight: 600 !important;
}
```
#### ==!important > inline > id > 使用 class 的選擇器 > class > element==
### CSS鏈接語法:
1. 外部連接套用
```html
<link rel="stylesheet" href="css/style.css"/>
```
2. 嵌入套用
```jsx
<style type="text/css" media="【媒體類別】">
```
## 選擇器
### 基本選擇器
- [標籤選擇器](https://developer.mozilla.org/zh-TW/docs/Web/CSS/Type_selectors) elementame
- [Class 選擇器](https://developer.mozilla.org/zh-TW/docs/Web/CSS/Class_selectors) .classname
- [ID 選擇器](https://developer.mozilla.org/zh-TW/docs/Web/CSS/ID_selectors) #idname
- 通用選擇器 `*` :將樣式套用於全部元素標籤中,通常在 reset css 時才會用到此方法。
`* { margin: 0px; padding: 0px; }`
- 群組選擇器( `,` ):當有多個class使用相同的css樣式,即可用群組選擇器
利用「逗號」串連多個選擇器一併管理的用法,這樣可以將多處不同樣式一次指定,避免重複撰寫相同的 class 內容。
`h1,h2,h3 { color: #333333; }`
- 屬性選擇器(attribute selector)
- [屬性選擇器](https://developer.mozilla.org/zh-TW/docs/Web/CSS/Attribute_selectors) [attr=value]:
選擇具有某html屬性的元素標籤
例如下列範例的意思就是選擇具有href屬性的a元素
元素名稱[屬性名稱]
`a[href] { color: #ff0000; }`
元素名稱[屬性名稱][屬性名稱] (指定多個屬性,需同時擁有)
`a[href][title] { color: #00ff00; }`
- 準確屬性選擇器(Exact attribute value selector):
只選擇具有特定屬性值的元素標籤
例如下列範例的意思就是選擇target屬性值為_blank的a元素
元素名稱[屬性名稱=“屬性值”]
`a[target="_blank"] { color: #00ffff; }`
元素名稱[屬性名稱=“屬性值”][屬性名稱=“屬性值”]
`a[href="https://www.google.com.tw/"][target="_blank"] { color: #cccccc; }`
- 部份屬性選擇器(Partial value attribute selector):
- 元素名稱[屬性名稱`^=`“特定開頭”]:
選擇具有特定屬性,且屬性值是以“特定開頭”的元素標籤
例如下列範例就是具有class名稱開頭為green的p元素會變成綠色
發現結果第三行是黑色,第四行才是綠色
也就是說不只單字的開頭,還要放在第一個值,這個寫法才會生效
`p[class^="green"] { color: #34bf49; }`
- 元素名稱[屬性名稱`$=`“特定結尾”]:
選擇具有特定屬性,且屬性值是以“特定結尾”的元素標籤
例如下列範例就是具有class名稱結尾為purple的p元素會變成紫色
我們發現第三行仍然是黑色沒有變成紫色
也就是說不只單字的結尾,還要放在最後一個值,這個寫法才會生效
`p[class$="purple"] { color: #7d3f98; }`
- 元素名稱[屬性名稱`*=`“特定字眼”]:
選擇具有特定屬性,且屬性值包含“特定字眼”的元素標籤
例如下列範例就是選擇所有class名稱包含big(不論位置在開頭/中間/結尾)的元素標籤都適用
`[class*="big"] { border: 1px solid #333; }`
- 元素名稱[屬性名稱`~=`“特定單詞”]:
當元素的屬性值可用空白隔開設定多個值時,若其中有一個值為特定單詞(一定要完全符合),則套用樣式
我們可以發現下列範例的最後三行才是藍色文字,其他都不符合套用規則
`[class~="blue"] { color: #037ef3; }`
- [狀態選擇器](https://developer.mozilla.org/zh-TW/docs/Web/CSS/Pseudo-classes) a:active,、a:visited、e:checked
- 深度選擇器:`:deep`
- scoped:限制CSS作用範圍,作用是避免父元件的 CSS 樣式會污染到子元件的 CSS 樣式。
- deep selector:跳脫CSS作用範圍,可以把父元件的 CSS 樣式穿透到子元件的 CSS 樣式,即使父元件的 CSS 設定了 scoped。[link](https://blog.csdn.net/qq_45327886/article/details/120200842)
- 其他應用情況:修改第三方套件的樣式
當我們以元件的方式來載入第三方套件,並且想修改它的樣式,就有機會要用 deep selector。
### 複合選擇器
- [鄰接同層選擇器](https://developer.mozilla.org/zh-TW/docs/Web/CSS/Adjacent_sibling_selectors) ( `+` ):
可選擇有相同的父元素,緊接在一個元素後的「第一個」相鄰兄弟元素(同一層中),例如下列範例中,只有 h1 的下一個 p
是紅色的,其他第二個之後的 p 仍然是黑色的([看測試demo](https://codepen.io/lin-hsienli/pen/XyRZOj))。
(只要是跟h1相鄰的都有作用)
`h1 + p { color: #ff0000; }`
- [通用同層選擇器](https://developer.mozilla.org/zh-TW/docs/Web/CSS/General_sibling_selectors) ( `~` ):( 兄元素「之後所有的」弟元素 )
可選擇有相同的父元素,兄元素「之後所有的」弟元素,例如剛剛那個範例若改成~選擇器,h1 上面再多加一個
p ,結果是除了h1 上面的那個 p ,底下的 p 全部變成紅色的了(**[看測試demo](https://codepen.io/lin-hsienli/pen/WYjzwb)**)。
`h1 ~ p { color: #ff0000; }`
- [直屬選擇器](https://developer.mozilla.org/zh-TW/docs/Web/CSS/Child_selectors) ( `>` ):(所有的子元素都有作用,但不包含孫元素)
與子孫選擇器(任意的後代元素皆選)不同,子選擇器是只選擇子元素,子元素的子元素(孫元素)的樣式並不受影響,但假如改寫成子孫選擇器,所有的
li 元素都會變成紅色的
`.main-menu > li { color: #ff0000; }`
- [後代(子孫)選擇器](https://developer.mozilla.org/zh-TW/docs/Web/CSS/Descendant_selectors) A` `B: ( 空一格 )
利用元素間的親子關係,依序由「父元素→子元素→孫元素 」的形式特定出範圍的選擇器。
注意:必須依序以「半形空格」分隔並列出元素標籤
`#main-list ul li a { color: #ff0000; }`
但假如能明確的辨識出目的元素,不會與其他用途的標籤混淆,省略中間的元素直接寫目的元素也是可以的,例如上列可以改為:
`#main-list a { color: #ff0000; }`
- .a.b:(沒有空格)
代表需要同時存在才滿足
`.example.noSpace { color: green; }`
```jsx=
<p class="example noSpace ">
```
- 父層選擇器(`:has`):[link](https://sentry.io/answers/is-there-a-css-parent-selector/)
```scss=
li:has(> a.active) { /* styles to apply to the li tag */ }
```
或是利用 js 的 parentNode
```jsx=
const icon = document.querySelector('.btn .icon');
const btn = icon.parentNode;
btn.style.padding = "0.25rem 0.5rem";
```
### 虛擬元素
- [虛擬類別](https://developer.mozilla.org/zh-TW/docs/Web/CSS/Pseudo-classes)
- 選取子元素的「child」型虛擬類別:
※ 注意:這邊的E寫的是子元素本身的標籤(子元素可以省略不寫,但虛擬類別與父元素之間要有半形空格),若不指定元素標籤的話,就會不區分元素類型只依順序計算。
E`:first-child` (選取第一個子元素 E )
E`:last-child` (選取最後一個子元素 E )
E`:nth-child(n)` (選取第 n 個子元素 E )
可以將 :nth-child(n) 中的 n 寫成算式(an+b),例如3n、n+1
[如果寫成3n+2](http://csscoke.com/2013/09/21/%E4%BD%BF%E7%94%A8css3-nth-childn-%E9%81%B8%E5%8F%96%E5%99%A8%E8%A9%B3%E8%A7%A3/):結果就是隔3行

如果寫成n+2:結果就是從2開始往後數

E:nth-child(`odd`) (選取第奇數個子元素 E,第 1、3、5、7…個)
E:nth-child(`even`) (選取第偶數個子元素 E,第 2、4、6、8…個)
E:nth-last-child(n) (選取倒數第 n 個子元素 E )
E:only-child (選取唯一的子元素 E )
- 選取兄弟元素的「of-type」型虛擬類別:[查看Demo(範例1)](https://codepen.io/lin-hsienli/pen/wRodeq)
- 這些虛擬類別,可以選擇同一階層且「同一類元素」中符合條件者:
E`:first-of-type`(選取每個類別的第一個元素 E,不包含第二個以後…,各種類別分開計算)
E`:last-of-type` (選取每個類別的最後一個元素 E )
E`:nth-of-type(n)` (選取每個類別的第 n 個元素 E )
E`:nth-last-of-type(n)` (選取每個類別的倒數第 n 個元素 E )
E`:only-of-type` (選取唯一的類別元素 E )
- 嵌套效果選擇器 (類似 scss 嵌套):
- `:is()`、`:where()`
```scss=
// 一般寫法
.container .class1 article,
.container .class2 article,
.container .class3 article,
.container .class4 article {
color: #f00;
}
// 簡化
.container :is(.class1, .class2, .class3, .class4) article {
color: #f00;
}
// 效果同 scss,如下
.container {
.class1, .class2, .class3, .class4 {
article {
color: #f00;
}
}
}
```
:is() 跟 :where() 的不同:
基本上是完全一樣,唯一的差異是 :where() 的權重是0,因此可以被輕易複寫。
- 否定虛擬類別:[查看Demo範例](https://codepen.io/lin-hsienli/pen/maOwoz)
這個類別可以根據要排除的條件,一次選取其餘全部的元素,例如要做元素間的間距時很方便(除了第一個元素,其餘都設定 margin-top )。
- E`:not(s)` (不含條件 s 的元素 E )
>
※ 注意:s條件可以是「虛擬類別」、「id/class選擇器」或「類型選擇器」
```sass=
.my-list :not(:last-child) {
color: #f00;
}
.wrap :not(.text-b) {
color: #00f;
}
.block :not(p) {
text-decoration: underline;
color: #0f3;
}
```
- 目標虛擬類別:[查看Demo範例](https://codepen.io/lin-hsienli/pen/gZLxqa)
- E`:target` ( 選取「點擊時」 href 路徑所指向的目標元素 E )
>
※ 注意:這個虛擬類別,可以選取連結「目的地」的元素,而非連結本身的元素
先設定好 a 元素的連結 # 名稱,再將對應的 id 名稱綁在要顯示的區塊 ul 上,接著將 ul 元素預設隱藏( display: none; ),只有在點擊 a 連結時,對應的目的地 ul 元素(ul:target)才會顯示出來( display: block; ),要注意的就是 :target 並不是綁在 a 元素,而是綁定在 a 元素連結指向的「ul 元素」。
如此,就用純 css 的寫法完成了一個簡易的展開收合 Menu。
```sass=
ul {
list-style: circle;
display: none;
}
ul:target {
display: block;
}
```
- 表單虛擬類別:[查看Demo範例](https://codepen.io/lin-hsienli/pen/pqNpGr)
可以依據「輸入表單的狀態」選擇元素的虛擬類別,可用來設定表單元素相鄰的 label 元素之樣式。
- E`:enabled` (有效的表單元素 E )
- E`:disabled` (禁用的表單元素 E )
- E`:checked` (被選中的表單元素 E,例如單選/複選核取框)
純css動態切換狀態: https://codepen.io/Idered/pen/AeBgF?editors=1100
- E`:invalid`:驗證錯誤時的樣式
- CSS 虛擬 (偽) 元素列表
| 選擇器 | 名稱 | 說明 | |
|-----------------|-------|--------------|---|
| E::first-line | 偽元素 | E 元素的第一行 | |
| E::first-letter | 偽元素 | E 元素的第一個字 | |
| E::before | 偽元素 | E 元素之前新增文字內容 | |
| E::after | 偽元素 | E 元素之後新增文字內容 | |
>
before、after用途為:可以在指定元素的前後插入其他內容,例如:插入內容,或加上特效
注:一定要加入content屬性才會有作用!!!
## CSS Module:
1. 新增一個檔案,命名為 `Hello.module.css`
2. 引入檔案,`import styles from "./Hello.module.css";`
3. 會發現 class 後綴會增加亂數(唯一性)。

### 進階運用:[link](https://molly1024.medium.com/css-modules-%E6%98%AF%E4%BB%80%E9%BA%BC-%E7%82%BA%E4%BB%80%E9%BA%BC%E6%88%91%E8%A6%81%E6%94%B9%E7%94%A8-css-modules-what-is-css-modules-why-should-you-use-it-aeb7d2955c58)
1. composes
1. `:global`:全局選擇器(等同於一般 className 的寫法,不會增加後綴亂碼)
在 `CSS Module` 中加入共用樣式,`:global(.className)`
```sass=
<h2 className="wrap">this is global</h2>
...
// 寫法一:
:global(.wrap) {
color: green;
}
// 寫法二:
:global {
.class1 {
需要添加修改的属性1:属性值1;
}
}
```
3. hover / focus 怎麼加
4. 使用變數
5. composes 繼承其他 css 設定
### CSS區塊,Div & Span:
1. Div:
Div 是一個區塊級容器 (block-level container),這代表在 `</div>` 標籤後會自動換行。
置中:Margin左右設為Auto,即可置中,但需要設寬度
2. Span:
Span 跟 Div 類似,不同的是,Span 可以涵蓋更細層的元素。所以,我們甚至可以用 `<span>` 來調整單一文字的樣式。另外,在 `</span>` 之後並不會換行。
## CSS顯示(Display):[說明](https://medium.com/ui-ux%E7%B7%B4%E5%8A%9F%E5%9D%8A/display-%E5%B1%AC%E6%80%A7%E4%B8%AD%E5%B8%B8%E7%94%A8%E7%9A%84%E9%A1%9E%E5%88%A5-77eb86714d8a)
1. `display:block;` 若沒有定義該元素長寬,則會100%佔滿所在空間,會自動換行
常見元素標籤:div、ul li、p、h1
水平置中方法:mx-auto
3. `display:inline;` 該元素佔有的空間為其內容本身(文字或圖片)之長寬,無法改變寬高,不會自動換行。
常見元素標籤:span、a、imput、img
水平置中方法:text-align : center
inline屬性的DOM( 如span )會產生自己的inline box,該line box浮於畫面之上,不與其他元素疊加

如果改成block或inline-block才會有影響

總結: [https://yachen168.github.io/article/LineBox.html](https://yachen168.github.io/article/LineBox.html)
- inline 元素會自己產生出 inline box 空間,而會因為字體不同產生行距與自己的高度
- 但他產生的字體行距與 inline box 空間,不會影響父層高度
- 若要讓行內標籤能自適應推擠到外層區塊元素,他本身必須變成區塊元素,也就是 display:block
###
4. `display: inline-block`:與 inline 一樣不會自動換行,但卻是以 block 元素盒子的方式顯示 (可以設定寬高)
5. `display: table-cell`:與 table 元素中的 th、td 顯示方式相同,是比較早期 RWD 常見的做法(現在有 flex 可以用)。
6. `display: list-item`: 以 block 元素盒子的方式配置,但以條列式項目方式顯示,和 li 一樣
7. `display: flex`:[link](https://leahlin912.github.io/2019/03/28/CSS-%E5%9C%A8%E5%AE%B9%E5%99%A8%E4%B8%AD%E5%88%86%E9%85%8D%E4%B8%A6%E8%A1%8C%E7%A9%BA%E9%96%93(flex)/) 希望容器之內的物件可以並行接續排列,並且每個物件都有固定比例占據該容器
8. `display: none` 不會讓元素出現在 formatting structure 中,很像不在畫面上,會完全消失
9. `visibility: hidden` 生成的 box 是看不見的,完全透明,不會 draw 任何內容,但會影響佈局,也就是會在畫面上佔用空間,但會看不到元素的樣子。(隱藏時,畫面不會跳動)

## CSS浮動(float):[範例](https://leahlin912.github.io/2019/03/26/CSS-%E6%B5%AE%E5%8B%95%E5%AE%9A%E4%BD%8D(float)%E3%80%81%E6%B8%85%E9%99%A4%E6%B5%AE%E5%8B%95(clear)/)
當Div設定float時,其元件會依據設定的方向並排對齊,而其他Div也會因浮動產生位的影響。
將文字繞著一個圖案顯現。這是用 float (浮動) 這個屬性來達成的。也可調整div的浮動方向。
- float 屬性有三個可能的值:left、right、和 none。
## CSS清除(Clear):
clear (清除) 屬性是用來抵銷 float 屬性的作用。可能的值為:
- left:消除左邊的浮動。
- right:消除右邊的浮動。
- both:消除左邊及右邊的浮動。
- none:不消除任何一邊的浮動。
## 長度單位:
| **類別** | **單位** | **意義** |
|--------|--------|------------------------------|
| 相對單位 | em | 目前大寫 "M" 的高度 |
| | ex | 目前小寫 "x" 的高度 |
| | px | pixel, 相對畫素、解析度 |
| | % | 相對於目前設定的百分比(可超過100%) |
| | vh | 視窗高度,1vh等於視窗高度的1% |
| | vw | 視窗寬度,1vw等於視窗寬度的1% |
| | vmin | vw和vh中較小的那個(也是百分比) |
| | vmax | vw和vh中較大的那個 |
| 絕對單位 | cm | 公分 (centimeters);1cm = 10mm |
| | mm | 公釐 (millimeters) |
| | in | 英吋 (inchs);1in = 2.54cm |
| | pt | 點 (poits);1pt = 1/72in |
| | pc | 大點;picas;1pc = 12pt = 4.23mm |
常用的文字單位:
- 絕對數值:px 像素 ( Pixel ) 。 px 是相對於顯示器屏幕解析度而言的,1 px 並不是一個固定的長度,而是根據載具及其使用方式而定。
- 相對數值:em。em 是基於基數來計算出來的相對字體大小,如未設置,則瀏覽器的默認字體尺寸為 16px。
>
任意瀏覽器的默認字體高都是16px。所有未經調整的瀏覽器都符合:1em=16px。
為了簡化font-size的換算,需要在css中的body選擇器中聲明 Font-size=62.5%,這就使em值變為 16px*62.5%=10px, 這樣12px=1.2em, 10px=1em, 也就是說只需要將你的原來的 px數值除以10,然後換上em作為單位就行了。
- 相對數值:`rem`。CSS3 新增的一個相對單位,這個單位與 em 的區別在於可以只修改根元素就成比例地調整所有字體大小,避免字體大小逐層復合的連鎖反應。
>
設定根元素 html {font-size:10px;},則
body {font-size: 1.4rem;} 的字級大小則會是 1.4*10=14px
>
推薦使用相對數值 rem,對於 RWD網頁字級設定時只要調整 html 根元素的字體大小,便可使所有網頁文字同時等比例縮放,不必逐一修改。
## 容器單位
- [IT邦](https://ithelp.ithome.com.tw/articles/10338897)
| 單位 | 說明 |
| --- | --- |
| cqw | 表示容器查询宽度(Container Query Width)占比。1cqw等于容器宽度的1%。假设容器宽度是1000px,则此时1cqw对应的计算值就是10px。 |
| cqh | 表示容器查询高度(Container Query Height)占比。1cqh等于容器高度的1%。 |
| cqi | 表示容器查询内联方向尺寸(Container Query Inline-Size)占比。默认情况下,Inline-Size指的就是水平方向,对应的是宽度,因此,1cqi通常可以看成是容器宽度的1%。 |
| cqb | 表示容器查询块级方向尺寸(Container Query Block-Size)占比。默认情况下,Block-Size指的就是垂直方向,对应的是高度,因此,1cqb通常可以看成是容器高度的1%。 |
| cqmin | 表示容器查询较小尺寸的(Container Query Min)占比,例如容器尺寸是300px*400px,则100cqmin对应的是尺寸较小的宽度300px,而非高度。 |
| cqmax | 表示容器查询较大尺寸的(Container Query Min)占比。 |
- 使用情境:當需要製作一個會根據容器的大小來做排版變化的元件時,如下:[DEMO](https://codepen.io/im1010ioio/pen/RwEdLXx)
- Container 設定
1. `container-type`:有設定就會變成容器元素
- `inline-size`:左右方向,高度會被內容撐高。
- `size`:上下左右方向,我猜想是因為設定後它已被預期會改變高度,所以不會被內容撐高,會失去其高度,要再設定其高度。
2. `container-name`:如果元件裡面有多個 container 需要設定,可以加上命名來各自設定。
3. `container`可簡寫:`container: <container-name> / <container-type>`
```scss=
.container {
container-type: inline-size;
container-name: toolbar;
// or 簡寫如下
container: toolbar / inline-size
width: 30vw;
.toolbar {
display: flex;
}
}
/* 當名為「toolbar」的容器小於 150px, .toolbar 改為直式排列 */
@container toolbar (width < 150px) {
.toolbar {
flex-direction: column;
width: 200px;
}
}
```
## CSS Outline(外輪廓):

與下面盒子模式不同在於:
outline是純裝飾性質,不會佔用空間,而margin會占有空間 [範例](http://jsfiddle.net/g8FXT/)
- 設定方式同 border:
```scss=
border: 1px solid red;
outline: 1px solid red;
```
## CSS盒子模式,Box model:

- `Margin`:又稱為外距,Padding又稱為內距
1. 外距調整的時候,只會移動位置,不會調整大小,數值可以為負
2. 內距調整的時候,會把內容推開,方框會變大,如果想要維持大小不變,則方框尺寸要修改來扣掉padding尺寸,數值只能大於等於0
要設定 padding, border-width, margin...等值時,我們常用四個方位的簡稱來取代四個值,其意義如下:
| **值** | **範例** | **套用範圍** |
|-------|-------------------------------|-------------------------------------|
| 1 | margin: 50px | 所有邊均為50px |
| 2 | margin: 10px 5em | [上、下邊 10px] [左、右邊 5em] |
| 3 | padding: 3px 5em 10px | [上邊 3px] [左、右邊 5em] [下邊 10px] |
| 4 | border-width: 2px 3px 5px 4px | [上邊 2px] [右邊 3px] [下邊 5px] [左邊 4px] |
| | | 順時鐘方向 |
置中小撇步:對於有設定width的block元素來說,margin可設成auto讓整個元素自動水平置中
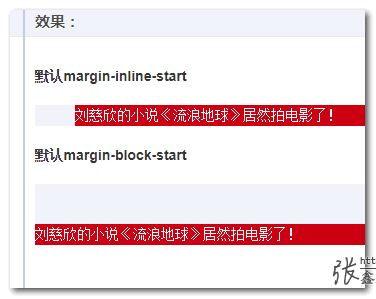
- `margin-inline-start`:[來源](https://www.zhangxinxu.com/wordpress/2018/10/diff-css-margin-inline-margin-block/)
margin-inline 和 margin-block 指的是方向。
```scss=
.inline-start {
margin-inline-start: 40px;
}
.block-start {
margin-block-start: 40px;
}
```
## 邊框(Border):[範例](https://www.1keydata.com/css-tutorial/tw/border.php)
在 CSS 中常見的邊框 (border) 屬性有以下幾種:
- [border-style](https://www.1keydata.com/css-tutorial/tw/border.php#borderstyle) 實線、虛線、雙線、點線、凹線(inset)、凸線(outset)、崁入線、浮出線

example: `border:15px red outset;`
- [border-width](https://www.1keydata.com/css-tutorial/tw/border.php#borderwidth)
- [border-color](https://www.1keydata.com/css-tutorial/tw/border.php#bordercolor)
- [border-top-, border-left-, border-bottom-, border-right-](https://www.1keydata.com/css-tutorial/tw/border.php#borderdirection)
```scss=
// 單一屬性設定
border-width: 1px;
border-style: solid;
border-color: #000;
```
- [border](https://www.1keydata.com/css-tutorial/tw/border.php#border):若四邊的邊框屬性(寬度、樣式、顏色)都一樣,那我們可以用一個 border 屬性來描述
```scss=
border: 1px solid #000;
// 單一屬性簡寫:
border-right: 1px solid #000;
```
- border-collapse: collapse; :表格框呈現線型
- box-sizing: border-box; 把邊框占用的空間往內扣,預設是content-box (box的尺寸是針對內容,邊框占用的空間往上加)
- [用boder畫出三角形圖案](https://www.webdesigns.com.tw/css_triangle.asp):
```scss=
.box {
width: 100px;
height: 100px;
border-right: 20px solid #7700BB;
border-left: 20px solid #E63F00;
border-top: 20px solid #00DDDD;
border-bottom: 20px solid #9999FF;
}
```

- border-image: [https://codepen.io/dipscom/pen/EveJLL](https://codepen.io/dipscom/pen/EveJLL)
### [border-radius](https://developer.mozilla.org/zh-TW/docs/Web/CSS/Shorthand_properties),也會使用連貫的1~4個值來代表四個角落:
| | **單值語法:border-radius: 1em — 這唯一的值代表了所有角落。** |
|------|------------------------------------------------------------------------|
|| 雙值語法:border-radius: 1em 2em — 第一個值代表左上和右下,第二個值則是右上及左下角。 |
|| 三值語法:border-radius: 1em 2em 3em — 第一個值代表左上,第二個值代表右上及左下,第三個值則是右下的角落。 |
|| 四值語法:border-radius: 1em 2em 3em 4em — 這四個值分別代表左上、右上、右下、左下,由左上開始的順時針排序。 |
>
PS:也可以套用在圖片上,達成裁切的效果(可變成圓圖)by border-radius: 50%
- 進階用法:border 也可以畫曲線(畫橢圓)
`border-radius: 125px 10px 20px 185px / 25px 205px 205px 25px;`
也可使用 [Open Props](https://open-props.style/#getting-started) CSS 庫
## inpu樣式:
- 初始化顏色:讓表單預設顏色與主題一致
```scss=
body {
accent-color: #080; /* use your favorite color */
}
```
- 可設定屬性:
```scss=
input {
border~: 沿用上面border的樣式寫法
caret-color: auto; /* 預設 */
caret-color: transparent; /* 透明 */
caret-color: #FF1744; /* 指定色 */
outline: none; /* 外框效果 */
}
```
### button:新屬性 [https://www.w3school.com.cn/html5/html5_button.asp](https://www.w3school.com.cn/html5/html5_button.asp)
**new** : HTML5 中的新属性。
| **属性** | **值** | **描述** |
|----------------|----------------|-----------------------------|
| autofocus | autofocus | 规定当页面加载时按钮应当自动地获得焦点。 |
| disabled | disabled | 规定应该禁用该按钮。 |
| form | form_name | 规定按钮属于一个或多个表单。 |
| formaction | url | 覆盖 form 元素的 enctype 属性。 |
| | | 注释:该属性与 type="submit" 配合使用。 |
| formenctype | 见注释 | 覆盖 form 元素的 action 属性。 |
| | | 注释:该属性与 type="submit" 配合使用。 |
| formmethod | • get | 覆盖 form 元素的 method 属性。 |
| | • post | 注释:该属性与 type="submit" 配合使用。 |
| formnovalidate | formnovalidate | 覆盖 form 元素的 novalidate 属性。 |
| | | 注释:该属性与 type="submit" 配合使用。 |
| formtarget | • _blank | 覆盖 form 元素的 target 属性。 |
| | • _self | 注释:该属性与 type="submit" 配合使用。 |
| | • _parent | |
| | • _top | |
| | • framename | |
| name | button_name | 规定按钮的名称。 |
| type | • button | 规定按钮的类型。 |
| | • reset | |
| | • submit | |
| value | text | 规定按钮的初始值。可由脚本进行修改。 |
## CSS背景(background): [http://www.eion.com.tw/Blogger/?Pid=1116](http://www.eion.com.tw/Blogger/?Pid=1116)
在 CSS 中常見的背景 (background) 屬性有以下幾種:
簡寫:
- [background](https://ithelp.ithome.com.tw/articles/10250499): { color image attachment repeat poition / size }
//如果要寫size,前面一定要加position
- [background-attachment](https://wcc723.github.io/css/2013/09/25/background-att/):這個 CSS 屬性能夠設定,背景圖片的位置是否要固定在 viewport(視圖)上,還是背景圖片會隨著它的 containing block(外層容器)一起滾動。
是背景固定模式的屬性,有scroll、fixed、local。 [sample link](https://codepen.io/BernLeech/pen/mMNKJV)
- fixed (視差滾動)
背景相對於內、外視窗皆是固定位置的。所以滾動外視窗時,內視窗背景會有往下掉的錯覺。
- local (new)
內視窗滾動時,背景圖片、內容會跟著滾動,外視窗滾動頁面整個挪動
- scroll (預設)
讓背景固定,內視窗滾動是圖片上層內容在滾動,外視窗滾動頁面整個挪動

>
給背景加上透明度:
```css=
background: linear-gradient(rgba(0, 0, 0, 0.5), rgba(0, 0, 0, 0.5)), url('http://placehold.it/350x150') no-repeat 0% 20%/ cover;
```
漸變色:background: [linear-gradient](https://developer.mozilla.org/en-US/docs/Web/CSS/gradient) (角度、色標、色標);
- `linear-gradient`:線性漸層
1. 第一个参数是渐变的角度,他可以接受一个表示角度的值(可用的单位deg、rad、grad或turn)或者是表示方向的关键词(top、right、bottom、left、left top、top right、bottom right或者left bottom)
2. 第二个参数是接受一系列颜色节点(终止点的颜色),以[一種顏色]開始,以[另一種顏色]結尾
ex:
```css=
/* ([<angle> | to <side-or-corner>]? , <color-stop-list>) */
background-color: linear-gradient(20deg,#3d5493,#1aa2a0) fixed center center / 100% 100%;
```
(20度,第一色,第二色,位置,尺寸)
ex:彩虹色 [https://developer.mozilla.org/en-US/docs/Web/CSS/gradient/linear-gradient()](https://developer.mozilla.org/en-US/docs/Web/CSS/gradient/linear-gradient())
```css=
linear-gradient(to right, red 20%, orange 20% 40%, yellow 40% 60%, green 60% 80%, blue 80%);
```

- `radial-gradient`( //放射漸層
example:
```css=
radial-gradient(farthest-side at left bottom, red, yellow 50px, green);
```

>
多重背景: [https://developer.mozilla.org/zh-TW/docs/Web/CSS/CSS_Backgrounds_and_Borders/Using_multiple_backgrounds](https://developer.mozilla.org/zh-TW/docs/Web/CSS/CSS_Backgrounds_and_Borders/Using_multiple_backgrounds)
每個設定的背景被一個個分層,第一個背景在最上面,最後一個背景是在最下面一層。 記得只有最後一個背景可以設定 background color。
>
- [background-color](https://www.1keydata.com/css-tutorial/tw/background.php#color)
- [background-image](https://www.1keydata.com/css-tutorial/tw/background.php#image): url(路徑名稱 或 網址);
- [background-size](https://developer.mozilla.org/zh-CN/docs/Web/CSS/background-size) (背景圖片尺寸):auto | length | percentage | cover | contain
- `auto` 為預設值,即背景圖片原始長寬。
- `length` 指定圖片具體大小的數值,不允許負值。
- `percentage` 以背景圖所在元素的百分比指定背景圖大小(不允許負值)。
- `cover` 主要用於背景圖小於所在的容器,而背景圖又不適合使用 repeat,此時就可以採用 cover 的方式,使背景圖放大至容器的大小,但此方法容易使背景圖因放大而失真。
- `contain` 與 cover 正好相反,主要用於背景圖大於所在容器,但卻需要將背景圖完整呈現,此時就可採用 contain 的方式,使背景圖縮小至容器的大小。
```css=
background:url(penguin.png) no-repeat center;
background-size: auto;
background-size: 300px 100px;
background-size: cover; /*以寬度縮放*/
background-size: contain; /*以高度縮放*/
```
- [background-repeat](https://www.1keydata.com/css-tutorial/tw/background.php#repeat)
- [background-attachment](https://www.1keydata.com/css-tutorial/tw/background.php#attachment) fixed、scroll
- [background-position](https://www.1keydata.com/css-tutorial/tw/background.php#position):center center (center center可以接在圖片連結後面)
- percentage 百分比表示
可用兩個百分比表示水平與垂直的起點。
只用一個百分比表示水平位置,垂直位置由系統預設值是 50% (亦可用負值)。
- length 長度值表示
可用兩個長度值表示水平與垂直的起點。單位是圖元 0px 0px 或任何其他的 CSS 單位。
可以混合使用 % 和 length 值。
- top, center, bottom 位置方向表示
使用此方法背景圖只顯示於元素的矩框之內,其參數有 left, center, right … 及下列方式。
- `background-clip`:背景剪裁,设置元素的背景(背景图片或颜色)是否延伸到边框、内边距盒子、内容盒子下面。
- `border-box`:背景延伸至边框外沿(但是在边框下层)此為預設值。

- `padding-box`:背景延伸至内边距(padding)外沿。不会绘制到边框处。

- `content-box`:背景被裁剪至内容区(content box)外沿。

- `text` :背景被裁剪成文字的前景色。[聚光燈範例](https://www.youtube.com/watch?v=tf9Ueehm03s&ab_channel=CodingStartup)
## CSS濾鏡特效(backdrop-filter):
它适用于元素背后的所有元素,为了看到效果,必须使元素或其背景至少部分透明。(非主流,主流直上filter) [效果圖](https://kumo.tw/article.php?id=75)
```scss=
/* 关键词值 */
backdrop-filter: none;
/* 指向 SVG 滤镜的 URL */
backdrop-filter: url(commonfilters.svg#filter);
/* <filter-function> 滤镜函数值 */
backdrop-filter: blur(2px);
backdrop-filter: brightness(60%);
backdrop-filter: contrast(40%); //對比
backdrop-filter: drop-shadow(4px 4px 10px blue);
backdrop-filter: grayscale(30%); //灰階
backdrop-filter: hue-rotate(120deg); //色彩旋轉
backdrop-filter: invert(70%); //反相
backdrop-filter: opacity(20%);
backdrop-filter: sepia(90%); //褐色
backdrop-filter: saturate(80%); //飽和度
/* 多重滤镜 */
backdrop-filter: url(filters.svg#filter) blur(4px) saturate(150%);
/* 全局值 */
backdrop-filter: inherit;
backdrop-filter: initial;
backdrop-filter: unset;
```
## CSS圖片(image):(inline)
- [object-fit](https://www.w3schools.com/css/tryit.asp?filename=trycss3_object-fit_all):用於指定如何調整`<img>`或`<video>`的大小以適合其容器 [https://codepen.io/nate12/pen/mdmMQKJ?editors=1100](https://codepen.io/nate12/pen/mdmMQKJ?editors=1100)
- fill`-這是默認設置。替換內容的大小可填充元素的內容框。如有必要,將拉伸或擠壓物體以適合物體
- `contain` -縮放內容以保持其縱橫比,同時適合元素的內容框
- `cover`-替換內容的大小可在填充元素的整個內容框時保持其縱橫比。該對象將被裁剪以適合
- `none` -替換的內容未調整大小
- `scale-down` -內容的大小就像未指定或包含的大小一樣(將導致較小的具體對像大小)
- [object-position](https://developer.mozilla.org/zh-CN/docs/Web/CSS/object-position):調整圖片的重心位置
- left|top|right|bottom|百分比%
- vertical-align:bottom;:圖片下面不留白 [https://tzuhui.github.io/2020/01/08/HTML/html-img-blank/](https://tzuhui.github.io/2020/01/08/HTML/html-img-blank/)
原因說明:
因為圖片預設是 inline 元素,而 inline 元素的 vertical-align 設定預設是和父元素的 baseline 對齊的,而 baseline 本身又和父元素底邊有一定的間距。這個間距是來自於英文文字中像是 j, y 這些超過基準線的字符。

解法一:
```css=
img {
vertical-align: top/bottom/text-top/text-bottom;
}
```
解法二:
```css=
img {
display: block;
}
```
解法三:.box 是指 img 的父元素,解法三的方式是讓文字大小為 0px,進而讓因為文字而有的間距不見。
```css=
.box {
font-size: 0px;
}
```
- opacity:0.5; 透明度
- svg尺寸設定: [https://segmentfault.com/a/1190000007143300](https://segmentfault.com/a/1190000007143300)
`<svg width="115" height="190" viewBox="0 0 115 190">……</svg>`
viewPort:寬高是viewport,增加會填滿可視區域
viewBox:可視範圍,減小是拉近,放大是拉遠
## CSS字體(font):
載入字體的三種方式:
1. 使用 `<link>` 元素載入字體
```jsx=
<link rel="preconnect" href="https://fonts.googleapis.com">
<link rel="preconnect" href="https://fonts.gstatic.com" crossorigin>
<link href="https://fonts.googleapis.com/css2?family=Noto+Sans+TC&display=swap" rel="stylesheet">
```
2. 使用 `@import` 載入字體
```scss=
@import url("https://fonts.googleapis.com/css2?family=Noto+Sans+TC&display=swap");
```
1. [font-family](https://www.1keydata.com/css-tutorial/tw/font.php#family) 設定字體的類別
在 CSS 中常見的字體 (font) 屬性有以下幾種:
```scss=
body {
font-family: -apple-system, BlinkMacSystemFont, "Segoe UI", "Microsoft JhengHei", Roboto, "Helvetica Neue", Arial, sans-serif;
/* mac, IOS 系統字體 Windows 英文系統字 微軟正黑體 Android 系統字 IOS 系統字 通用字體 */
}
```
如果文字在這個字體中沒有對應的字的話,就會套用下一個字體。一般來說,最後一個設定的字體會是 sans-serif(無襯線體/黑體) 或 serif(襯線體/明體) 這類的通用字型名稱(generic-family)
### 其他屬性:
- [font-size](https://www.1keydata.com/css-tutorial/tw/font.php#size) font-size: calc(12px + 1.6vw); /* 最小12px,卻又可以變大 */
- [font-weight](https://www.1keydata.com/css-tutorial/tw/font.php#weight) 屬性是用來設定字體的厚度。厚度的設定值可以從 100 到 900 (900 是最厚的)。另外,我們也可以將厚度設定為 bold (厚)、bolder (更厚)、及 normal (正常)。
此屬性==需字體有提供對應的粗細才有作用==
| font-weight | 對應字型的命名 |
| -------------------------- | -------------- |
| 100 | Thin |
| 200 | |
| 300 | Light |
| 400(等同 normal,預設值) | Regular |
| 500 | Medium |
| 600 | |
| 700(等同 bold) | Bold |
| 800 | |
| 900 | Black |
| 1000 | |
- [font-style](https://www.1keydata.com/css-tutorial/tw/font.php#style) 設定字體是否為斜體字 (italic 或 oblique)
- [font-variant](https://www.1keydata.com/css-tutorial/tw/font.php#variant) small-caps、normal,設定文字是不是要以小型大寫 (small caps) 字體顯現。
- overflow-wrap或word-wrap:break-word:文字如果溢出block區塊,可以自動換行
overflow-wrap: normal | break-word | anywhere
按照單字換行可以使用css的word-wrap:break-word;
超過長度強制換行則可以使用word-break: break-all;
- letter-spacing:字元間的空白,如果區塊為inline or inline-block會被視為一塊文字,如:兩個input之間會有一個空白
- 解法1:在母層CSS新增letter-spacing:-0.34;,然後在本層(自己層)設為letter-spacing:0;
- 解法2:在父層CSS設定font-size為0(讓空白消失),然後本層再把font-size設定回來
- webkit-text-`stroke`:5px black;:文字外框
- webkit-text-`fill-color`: transparent;:文字簍空

## CSS文字樣式:
以下是幾個最常被用到與文字樣式有關的 CSS 屬性。
- [direction](https://www.1keydata.com/css-tutorial/tw/text.php#direction) 設定文字的方向。可能的值為 'ltr' 及 'rtl'。
- [letter-spacing](https://www.1keydata.com/css-tutorial/tw/text.php#letterspacing) 字元間距控制 (每個字之間的距離控制)
- [word-spacing](https://www.1keydata.com/css-tutorial/tw/text.php#wordspacing) 設定每個單字與每個單字之間的距離。( 每個單字間的距離 )
word-spacing:5px;
- white-space 空白區域處理:
| **normal** | **默认。空白会被浏览器忽略。** |
|------------|-------------------------------------|
| pre | 空白会被浏览器保留。其行为方式类似 HTML 中的 `<pre>` 标签。 |
| nowrap | 文本不会换行,文本会在在同一行上继续,直到遇到 `<br>` 标签为止。 |
| pre-wrap | 保留空白符序列,但是正常地进行换行。 |
| pre-line | 合并空白符序列(多個空格,視為一個),但是保留换行符。 |
| inherit | 规定应该从父元素继承 white-space 属性的值。 |
- [line-height](https://www.1keydata.com/css-tutorial/tw/text.php#lineheight) 設定每一行之間的空間。(純數字,無單位)
- [text-align](https://www.1keydata.com/css-tutorial/tw/text.php#textalign) left、right、center、justify(左右對齊)
`text-align:justify`不会处理被打断的行和最后一行,因此只有多行適用。[參考](https://segmentfault.com/q/1010000007136263)
`text-align-last:justify`:單行適用
- [vertical-align](https://developer.mozilla.org/zh-CN/docs/Web/CSS/vertical-align) 垂直對齊,top、middle、bottom
- [text-decoration](https://www.1keydata.com/css-tutorial/tw/text.php#textdecoration):屬性是用來設定文字上有什麼裝飾。可能的值包括:
- **underline**: 文字下加上一條線。
- **overline**: 文字上加上一條線。
- **line-through**: 文字中間加上一條線劃過去。
- **blink**: 讓文字閃爍。
- [text-indent](https://www.1keydata.com/css-tutorial/tw/text.php#textindent) 字首縮排,設定每一段的第一行前面要留多少空間。可設定的值包括百分比以及長度。
- text-indent: 32px;
- [text-justify](https://developer.mozilla.org/en-US/docs/Web/CSS/text-justify?fbclid=IwAR2pu-F6kFVaI13Lemvcd5AxvESDDNiBrApHCYKY2PenUq2hfZ-alsbdtCw):文字分散對齊。
根據現有的寬度對句子進行「截斷」與「間距配給」
- inter-word:使用`單詞`截斷,再動態調整間距空間。(中文需用此設定)
- inter-character:使用`字元`來做截斷,再動態調整間距空間。
- [text-transform](https://www.1keydata.com/css-tutorial/tw/text.php#texttransform):屬性是用來控制大小寫是如何展現的。可能的值包括:
- **capitalize**: 每一個字的第一個字母都以大寫顯現,其他的字母則不改變。
- **uppercase**: 所有的字母都以大寫顯現。
- **lowercase**: 所有的字母都以小寫顯現。
- **none**: 大小寫不做任何改變。
- text-overflow:文字溢出設定
- `clip`:直接截斷文字
- `ellipsis`:在截斷位置後方加上`...` (PS: 限單行)
```css=
.single-ellipsis {
overflow: hidden;
text-overflow: ellipsis;
white-space: nowrap;
}
```
- [多行文字截斷](https://netivism.com.tw/blog/492)
```css=
.multiline-ellipsis {
display: -webkit-box;
-webkit-box-orient: vertical;
-webkit-line-clamp: 5; /*限制行數*/
overflow: hidden;
}
```
## CSS文字排版:
columns
- `column-count`:這屬性只要直接填入數值即可,用來定義欄位數量。
- `column-width`:column-count及column-width只能二擇一,前者是直接定義欄位數量,後者則是定義欄位寬度。
- `column-gap`:欄位空隙寬度。
- `column-rule-style`:欄與欄之間的border樣式。
- `column-rule-width`:欄與欄之間的border寬度。
- `column-rule-color`:欄與欄之間的border色彩。
- `column-span`:設定指定元素不受column影響。(可以使用在標題或是重要的文字上)
column-break-inside:文字換欄設定
- `auto`: 自動
- `avoid`: 文字段落結束後才換欄
- `column-break-before`, `column-break-after`
指定元素的前後是否強制換欄。可以放在整個段落的前後
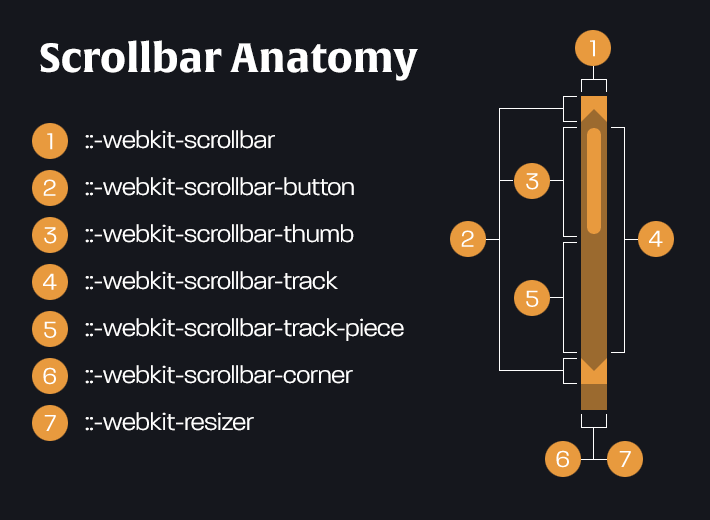
## SCROLLBAR 自訂卷軸樣式:
https://tools.wingzero.tw/article/sn/232
詳細解說:https://www.tpisoftware.com/tpu/articleDetails/2630
- 經典滾動條 (Classic Scrollbars):
範例:
```sass=
.container::-webkit-scrollbar {
width: 1em;
}
.container::-webkit-scrollbar-button{
background: #fff;
}
.container::-webkit-scrollbar-track-piece{
background: #aaa;
}
```
- 製作macos滾動條 (Overlay Scrollbars)
https://www.instagram.com/p/CpNY2nOPa-o/
```sass=
/* 主體 & 背景 */
::-webkit-scrollbar {
width: 18px;
background-color: transprent;
}
/* Handle Bar */
::-webkit-scrollbar-thumb {
// 黑色背景小透明
background-color: rgba(0,0,0,0.3);
border-radius: 999px
// 使用邊框讓拇指能夠與邊緣有些間隙
border: 5px solid transprent;
background-clip: content-box;
}
/* Handle on hover */
::-webkit-scrollbar-thumb:hover {
background: #ccc;
}
body {
// 讓bar浮於元素之上
overflow: overlay;
}
```
- `Scrollbar Gutter`:
是指內邊框邊緣和外填充邊緣之間的空間。
使用 `scrollbar-gutter: stable;` 即可不占用實體空間而排擠到內容。[如圖](https://ithelp.ithome.com.tw/articles/10300710):

```sass=
.card {
overflow-y: auto;
scrollbar-gutter: stable;
}
```
## CSS鏈接:
連接的預設樣式是藍色,且有下劃線。可是,有的時候,我們會想要改變一下這個預設的樣式。這可以透過以下幾個選擇器來達成:
- a`:link`: 設定當連接過去的網頁尚未被看過時,該連接的樣式。
- a`:visited`: 設定當連接過去的網頁已經看過時,該連接的樣式。
- a`:hover`: 設定當滑鼠蓋在連接上面時,該連接的樣式。
- a`:active`: 設定當連接被點擊時,該連接的樣式。
## CSS清單(List):
在 CSS 中常見的清單 (list) 屬性有以下幾種:
- [list-style-type](https://www.1keydata.com/css-tutorial/tw/list.php#styletype):[樣式DEMO](https://www.w3schools.com/cssref/pr_list-style-type.php)
- [list-style-position](https://www.1keydata.com/css-tutorial/tw/list.php#styleposition):修改列表的顯示位置
```scss=
/* 項目符號在 li 範圍內 */
ul.p1 {
list-style-position: inside;
}
/* 項目符號在 li 範圍外(預設值) */
ul.p2 {
list-style-position: outside;
}
/* 可用來確認 li 項目位置 */
li {
border: 1px #cccccc solid;
}
```
- [list-style-image](https://www.1keydata.com/css-tutorial/tw/list.php#styleimage):修改列表開頭為小圖示
- [list-style](https://www.1keydata.com/css-tutorial/tw/list.php#liststyle):list-style-style、list-style-position、list-style-image 多屬性簡寫
- 段落首行縮排:
```scss=
text-indent: -1em; // 負往左,正往右
```
### Counter(CSS計數器):[教學](https://tools.wingzero.tw/article/sn/252)
- 要使用的話首先必須要像 ul, ol 和 li 的關係一樣要有子母的元素
```scss=
ol{
counter-reset:num; // 設定變數,初始值為0
list-style-type: none;
}
li:before{
content:counters(num, ".") ":"; // 印出數字
counter-increment: num; // 每多一個子元件就+1
}
```
效果如下:
<iframe height="300" style="width: 100%;" scrolling="no" title="counter level" src="https://codepen.io/deathhell/embed/yLgEGga?default-tab=html%2Cresult&editable=true" frameborder="no" loading="lazy" allowtransparency="true" allowfullscreen="true">
See the Pen <a href="https://codepen.io/deathhell/pen/yLgEGga">
counter level</a> by deathhell (<a href="https://codepen.io/deathhell">@deathhell</a>)
on <a href="https://codepen.io">CodePen</a>.
</iframe>
- 另一個效果範例:[link](https://hackmd.io/@Heidi-Liu/css-list-style)
```scss=
ol {
list-style: none;
/* 命名自訂標號變數 */
counter-reset: my-counter;
}
ol li {
/* 使用自訂標號 */
counter-increment: my-counter;
/* 段落首行縮排 */
text-indent: -1em;
}
/* 以偽元素自訂標號樣式 */
ol li::before {
content: "("counter(my-counter) ")";
color: blue;
font-weight: bold;
}
```
<iframe height="300" style="width: 100%;" scrolling="no" title="Custom List Style - 自訂標號樣式" src="https://codepen.io/heidiliu2020/embed/PoWXJLv?default-tab=html%2Cresult&editable=true" frameborder="no" loading="lazy" allowtransparency="true" allowfullscreen="true">
See the Pen <a href="https://codepen.io/heidiliu2020/pen/PoWXJLv">
Custom List Style - 自訂標號樣式</a> by Heidi-Liu (<a href="https://codepen.io/heidiliu2020">@heidiliu2020</a>)
on <a href="https://codepen.io">CodePen</a>.
</iframe>
更改預設項目的樣式:
<iframe height="300" style="width: 100%;" scrolling="no" title="Custom List Style - 自訂標號樣式" src="https://codepen.io/twoz/embed/azvLBRj?default-tab=css%2Cresult" frameborder="no" loading="lazy" allowtransparency="true" allowfullscreen="true">
See the Pen <a href="https://codepen.io/twoz/pen/azvLBRj">
Custom List Style - 自訂標號樣式</a> by onedog (<a href="https://codepen.io/twoz">@twoz</a>)
on <a href="https://codepen.io">CodePen</a>.
</iframe>
## CSS表格(Table):
caption:表格標題的標籤,放在table裡面
```sass=
<style>
caption
{
caption-side:bottom;
}
</style>
```
| 值 | 描述|
|---------|---------|
| top | 默认值。把表格标题定位在表格之上。|
| bottom | 把表格标题定位在表格之下。|
| inherit | 规定应该从父元素继承 caption-side 属性的值。 |
在 HTML 中,常看到 `<table>` 之內加了 border、cellpadding、及 cellspacing 的屬性。如果我們有透過 CSS 來制定表格的樣式,那就不需要在 HTML 之內用到這些屬性了。
table的display可選值:
- table:指定對像作為塊元素級的表格,相當於html標籤`<table>`
- inline-table:指定對像作為內聯元素級的表格,相當於html標籤`<table>`
- table-caption:指定對像作為表格標題,相當於html標籤`<caption>`
- table-cell:指定對像作為表格單元格,相當於html標籤`<td>`
- table-row:指定對像作為表格行,相當於html標籤`<tr>`
- table-row-group:指定對像作為表格行組,相當於html標籤`<tbody>`
- table-column:指定對像作為表格列,相當於html標籤`<col>`
- table-column-group:指定對像作為表格列組顯示,相當於html標籤`<colgroup>`
- table-header-group:指定對像作為表格標題組,相當於html標籤`<thead>`
- table-footer-group:指定對像作為表格腳註組,相當於html標籤`<tfoot>`
還有一些協助屬性:
- border-collpase:用來決定表格的邊框是分開的還是合併的。在分隔模式下,相鄰的單元格都擁有獨立的邊框。在合併模式下,相鄰單元格共享邊框。
- border-spacing: 規定相鄰單元格邊框之間的距離(只適用於邊框分離模式)。相當於HTML 中的cellspacing 屬性,但是第二個可選的值可以用來設置不同於水平間距的垂直間距。
- table-layout:定義了用於佈局表格單元格,行和列的算法。
- auto:表格及單元格的寬度取決於其包含的內容。
- fixed:表格和列的寬度通過表格的寬度來設置,某一列的寬度僅由該列首行的單元格決定。
>
默认情况下,表格会根据内容撑开。如果你想强制固定宽度,建议加上 `table-layout: fixed`:
```jsx=
<table border="1" style="width: 600px; table-layout: fixed;">
<tr>
<td style="width: 200px;">即使文字很长很长很长很长,也不会超出 200px</td>
<td style="width: 400px;">400px</td>
</tr>
</table>
```
- vertical-align:用來指定行內元素(inline)或表格單元格(table-cell)元素的垂直對齊方式。
純CSS表格結構樣式&範例:
```sass=
/* DivTable.com */
.divTable {
display: table;
width: 100%;
}
.divTableRow {
display: table-row;
}
.divTableCell,
.divTableHead {
border: 1px solid #999999;
display: table-cell;
padding: 3px 10px;
text-align: center;
}
.divTableHeading {
background-color: #EEE;
display: table-header-group; //group表示為同一組表格
font-weight: bold;
}
.divTableFoot {
background-color: #EEE;
display: table-footer-group;
font-weight: bold;
}
.divTableBody {
display: table-row-group;
}
<div class="divTable">
<div class="divTableHeading">
<div class="divTableRow">
<div class="divTableHead">學號</div>
<div class="divTableHead">姓名</div>
</div>
</div>
<div class="divTableBody">
<div class="divTableRow">
<div class="divTableCell"> </div>
<div class="divTableCell"> </div>
</div>
</div>
</div>
```
## CSS位置 (position) :
在 CSS 中常見的位置 (position) 屬性有以下幾種:
- [position](https://www.1keydata.com/css-tutorial/tw/position.php#position)
**position** 屬性制定出要用哪一類的位置。可能的值有:
- **`static` (預設值)**: 沒有任何的定位效果,元素都會逐行排列。如果 **position** 的值是被設定為 statics 的話,那 top、bottom、left、和 right 的值就都沒有意義了。
- **`absolute`**: 這代表元素會被放在瀏覽器內的某個位置 (依 top、bottom、left、和 right 的值而定)。當使用者將網頁往下拉時,元素也會跟著改變位置。(該元素會浮出來,後面的元素會往上移動)
會寫 position: absolute; 的通常都是在 子元素 的地方撰寫,而 父元素 會寫上 position: relative; 幫助 子元素 進行絕對定位。
- **`relative`**: 這代表元素被放的地方將會與預設的地方有所不同。不同的程度是依照 top、bottom、left、和 right 的值而定。(看起來位置移動,但實際上沒有(保留原位空間)
- **`fixed`**: 相對於瀏覽器視窗 (viewport) 定位,讓元素固定在螢幕上的特定位置,不隨頁面滾動而移動,且脫離文檔流,不佔用原有空間。
此元素會被放在瀏覽器內的某個位置 (依 top、bottom、left、和 right 的值而定)。
- **`sticky`**:滾動黏滯定位。可以跟著滾動,而滾到一定程度時,則會被固定住,搭配top來使用
sticky黏住的範圍等於父層的高度,無法超過父層 [https://codepen.io/twoz/pen/rNyrXQQ?editors=1100](https://codepen.io/twoz/pen/rNyrXQQ?editors=1100)
相互關係:
1. 父為absolute,子為absolute
子元素寬度為內容決定,不會把父元素撐開
2. 父為absolute,子為relative
子元素寬度與父元素同寬,會把父元素撐開
3. 父為relative,子為absolute(常用)
父元素與子元素不會互相影響
###
- [top](https://www.1keydata.com/css-tutorial/tw/position.php#top)
- [right](https://www.1keydata.com/css-tutorial/tw/position.php#top)
- [left](https://www.1keydata.com/css-tutorial/tw/position.php#top)
- [bottom](https://www.1keydata.com/css-tutorial/tw/position.php#top)
- [overflow:](https://www.1keydata.com/css-tutorial/tw/position.php#overflow)
**overflow** 屬性是用來設定當內容放不下時的處理方式。可能的值包括:
- **visible**: 內容完全呈現,不管放得下放不下。
- **hidden**: 放不下的內容就不顯示出來。
- clip: 效果同上
- **scroll**: 無論內容放得下放不下,都加入上下捲軸及左右捲軸的功能。
overflow-y: scroll;
- **auto**: 當內容放不下時,加上捲軸的功能。
或是可以拿來避開float
- [z-index](https://www.1keydata.com/css-tutorial/tw/position.php#z-index)
index 屬性是用來決定元素重疊的順序。換言之,當兩個元素有重疊的情況時,z-index 值將會決定哪一個元素在上面。z-index 值比較大個元素會被放在上面。
絕對定位的確可以達到堆疊的效果,但僅限於 父元素 與 子元素 之間,假如我今天有多個 子元素 要進行堆疊,而且這些 子元素 同時面對一個 父元素 ,這種時候用絕對定位就比較不好做,就必須要利用 z-index 了。
## CSS滑鼠游標圖案(Cursor):[w3c](https://www.w3schools.com/cssref/pr_class_cursor.php)
- cursor: url(圖案網址);
- cursor: pointer;(指標滑鼠-常用)
## CSS製作圖案(遮罩應用):
- [Mask](https://blog.twjoin.com/css-%E9%81%AE%E7%BD%A9%E5%8A%9F%E8%83%BD%E8%88%87%E7%B0%A1%E6%98%93%E4%BA%92%E5%8B%95%E8%A3%BD%E4%BD%9C-9830d2e22b4b):是使用既有圖片(JPG、PNG、SVG) 當作遮罩以達成剪裁效果
* mask-image: 定義圖片 url,初始值為 none
* mask-mode: 定義圖片使用 alpha 或亮度遮罩,初始值為 match-source
* mask-repeat: 定義圖片是否水平/垂直/雙向重複或不重複,初始值為 repeat
* mask-position: 定義圖片的初始位置,初始值為 center
* mask-size: 定義遮罩的尺寸,並設定完全或部分顯示圖像,初始值為 auto
- [clip-path](https://bennettfeely.com/clippy/) (多邊形裁切):透過類似 SVG 連接座標來畫出多邊形
```scss=
clip-path: circle(50%); //圓形
clip-path: ellipse(130px 140px at 10% 20%); //橢圓形
clip-path: polygon(50% 0, 100% 50%, 50% 100%, 0 50%); //多邊形
```
## CSS動畫:
Transition、Animation、Transform的分析比較:[link](https://ithelp.ithome.com.tw/articles/10200712)
| 名稱 | 介紹 | 作用於 | 效能問題 |
| --- | --- | --- | --- |
| `Transition` | 基礎的動畫效果,強調CSS屬性的過渡動畫 | CSS屬性變化 | 另一獨立執行緒處理,較不影響效能 |
| `Animation` | 細節複雜的動畫效果,強調CSS屬性的流程與控制,可加keyframes | CSS屬性變化 | 另一獨立執行緒處理,較不影響效能 |
| `Transform` | 控制html元素的旋轉、縮放、移動等等 | HTML元素(包含內容)變化 | 因會操作HTML元素運算,因此必須考慮效能 |
### Transition:屬性變化:
常用於滑鼠事件(:hover、:active、:focus、click)或鍵盤輸入時觸發
- transition: [[property 屬性名稱](http://litianyi.cc/technology/2014/08/27/css-transition/)] [duration 時間] [timing-function 速度曲線] [delay 延遲]
- transition-property:指定要轉換的CSS屬性:width、height、all
( 只能设置可以连续变化(如:widht, height, color, opacity, font-size等)属性!如果设置(display, position等)这种指定的,不能连续变化的属性时,在transition中没有过渡效果 )
- transition-duration:轉換需要的時間,預設0,單位為s或ms
transition-delay:延遲多久轉換,預設0,單位為s或ms
- transition-timing-function:轉換時的速度曲線,預設ease
>
EXAMPLE: https://thoughtbot.com/blog/transitions-and-transforms
```scss=
div {
transition: transform 1s; //變形的屬性(多屬性加逗號)
}
div:hover {
transform: rotate(1080deg); //變形的樣式
}
```
單向、雙向hover效果:[link](https://ithelp.ithome.com.tw/articles/10200365)
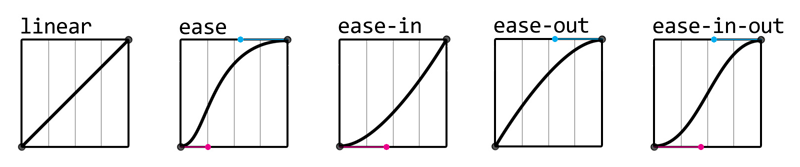
- transition-timing-function:轉換時的速度曲線,**預設ease**
以下表格是transition-timing-function較常用的幾個屬性值:
| 名稱 | 說明 | =cubic-bezier(X,X,X,X) |
|-----------------------|-------------------------|----------------------------|
| linear | 均速 | cubic-bezier(0,0,1,1) |
| ease | 緩入中間快緩出,預設值 | cubic-bezier(.25,.1,.25,1) |
| ease-in | 緩入 | cubic-bezier(.42,0,1,1) |
| ease-out | 緩出 | cubic-bezier(0,0,.58,1) |
| ease-in-out | 緩入緩出(對比於ease較平緩) | cubic-bezier(.42,0,.58,1) |
| cubic-bezier(n,n,n,n) | 利用貝茲曲線自定義速度模式,n=0~1中的數值 | cubic-bezier(n,n,n,n) |
>
### [Animation](https://www.oxxostudio.tw/articles/201803/css-animation.html):真動畫,寫在要動的元件上
- animation:動畫名稱 | 播放時間 | 延遲執行的時間 | 速度 | 次數 | 方向 | 填充模式 | 撥放狀態
(animation:name | duration | timing-function | delay | iteration-count | direction | fill-mode | play-state;)
| 屬性 | 說明 |
|-----------------------------------------------------------------|--------------------------|
| animation-name | 動畫名稱 |
| animation-duration | 動畫持續時間,預設 0,單位 s 或 ms。 |
| animation-delay | 動畫延遲播放時間,預設 0,單位 s 或 ms。 |
| animation-iteration-count | 動畫播放次數,預設 1。 <br/> 其他還有 infinite。無限 |
| animation-timing-function | 動畫加速度函式,預設 ease。 <br/> 其他還有: linear、ease-in、ease-out、ease-in-out <br/> step-start、step-end、steps(int,start/end)、cubic-bezier(n,n,n,n)。 |
| animation-direction | 動畫播放方向,預設 normal。 <br> 其他還有 reverse、alternate來回交替的、alternate-reverse。 |
| animation-fill-mode | 動畫播放前後模式,預設 none。 <br>其他還有 <br> forwards( 動畫結束停在第一格 )、 <br> backwards( 動畫結束停在最後一格 )、 <br> both( 有上面兩種功能 )。 | |
| animation-play-state | 動畫播放或暫停狀態,預設 running。 <br> 其他還有 paused。 | |
```sass=
animation-name: example;
animation-duration: 4s;
animation-delay: 2s;
animation-iteration-count: infinite;
animation-fill-mode: both;
```
- 相當於腳本
```sass=
@keyframs 名稱{
from{狀態一}
to{狀態二}
}
//or %數
@keyframs 名稱{
0% {
top: 0;
left: 0;
}
25% {
top: 200px;
left: 0;
}
50% {
top: 200px;
left: 200px;
}
75% {
top: 0;
left: 200px;
}
100% {
top: 0;
left: 0;
}
}
```
[曲線動畫路徑](https://tobiasahlin.com/blog/curved-path-animations-in-css/)
動畫關鍵字:
CSS Animation, SVG Animation, HTML5 Canvas, Sprite Image
動畫套件總匯: [tools](https://simular.co/resources/type/effects-tools.html),包含:AOS,GSAP、[animate](https://animate.style/)
### Transform(移動、變形):
- 可以用來搭配裁切圖案,如:[裁切圖片定位](https://youtu.be/2Qs0EuqJIYA?t=830)。
**註:translate在inline屬性無法作用**:[link](https://www.w3school.com.cn/cssref/pr_transform.asp)
| 值 | 描述 | 测试 |
|-------------------------------------------|----------------------------|----|
| none | 定义不进行转换。 | 测试 |
| matrix(n,n,n,n,n,n) | 定义 2D 转换,使用六个值的矩阵。 | 测试 |
| matrix3d(n,n,n,n,n,n,n,n,n,n,n,n,n,n,n,n) | 定义 3D 转换,使用 16 个值的 4x4 矩阵。 | |
| translate(x,y) | 定义 2D 转换。從原來的位置移動 | 测试 |
| translate3d(x,y,z) | 定义 3D 转换。 | |
| translateX(x) | 定义转换,只是用 X 轴的值。 | 测试 |
| translateY(y) | 定义转换,只是用 Y 轴的值。 | 测试 |
| translateZ(z) | 定义 3D 转换,只是用 Z 轴的值。 | |
| scale(x,y) | 定义 2D 缩放转换。 | 测试 |
| scale3d(x,y,z) | 定义 3D 缩放转换。 | |
| scaleX(x) | 通过设置 X 轴的值来定义缩放转换。 | 测试 |
| scaleY(y) | 通过设置 Y 轴的值来定义缩放转换。 | 测试 |
| scaleZ(z) | 通过设置 Z 轴的值来定义 3D 缩放转换。 | |
| rotate(angle) | 定义 2D 旋转,在参数中规定角度。 | 测试 |
| rotate3d(x,y,z,angle) | 定义 3D 旋转。 | |
| rotateX(angle) | 定义沿着 X 轴的 3D 旋转。 | 测试 |
| rotateY(angle) | 定义沿着 Y 轴的 3D 旋转。 | 测试 |
| rotateZ(angle) | 定义沿着 Z 轴的 3D 旋转。 | 测试 |
| skew(x-angle,y-angle) | 定义沿着 X 和 Y 轴的 2D 倾斜转换。 | 测试 |
| skewX(angle) | 定义沿着 X 轴的 2D 倾斜转换。 | 测试 |
| skewY(angle) | 定义沿着 Y 轴的 2D 倾斜转换。 | 测试 |
| perspective(n) | 为 3D 转换元素定义透视视图。 | 测试 |
>
- transform-origin(0,0):軸心 [https://wcc723.github.io/css/2013/10/10/css-transform-origin/](https://wcc723.github.io/css/2013/10/10/css-transform-origin/)
可以是:
```scss=
transform-origin(0,100%); //右上
transform-origin:left top; //左上
```
## CSS陰影:
- box-shadow:區塊陰影
`box-shadow: 10px 10px 5px #888888;`
box-shadow: h-shadow | v-shadow | blur | spread | color | inset;
- h-shadow:水平位移距離
- v-shadow:垂直位移距離
- blur:模糊半徑
- spread:擴散距離
- color:顏色
- inset:內陰影
inset | offset-x | offset-y | color
e.g. `box-shadow: inset -7px -7px 7px 1px lightgray;`
進階應用:擬真立體影子 [https://ithelp.ithome.com.tw/articles/10193561](https://ithelp.ithome.com.tw/articles/10193561)

```sass=
.shadow:before{
content: "";
position: absolute;
z-index: -2;
bottom: 15px;
left: 10px;
width: 120px;
height: 48px;
box-shadow: 0 15px 10px rgba(0, 0, 0, 0.5);
transform: rotate(-5deg);
}
.shadow:after{
content: "";
position: absolute;
z-index: -2;
bottom: 15px;
right: 10px;
left: auto;
width: 120px;
height: 48px;
box-shadow: 0 15px 10px rgba(0, 0, 0, 0.5);
transform: rotate(5deg);
}
```

```sass=
.shadow:before{
content: "";
position: absolute;
z-index: -2;
left:80px;
bottom:5px;
width: 120px;
height: 40px;
box-shadow:-80px 0 8px rgba(0, 0, 0, 0.4);
transform:skew(50deg);
transform-origin:0 100%;
}
```
這和上面有點不一樣的是要用 transform:skew() 轉角度
和 transform-origin 移動位置去達到想要的效果
因為只有一個影子就作 :before 一個就可以了
- drop-shadow:擬真陰影
drop-shadow(offset-x offset-y blur-radius color)
- offset-x offset-y (需要)
兩個`<length>`值確定陰影偏移量。offset-x指定水平距離,其中負值將陰影放置在元素的左側。offset-y指定垂直距離,其中負值將陰影放置在元素上方。如果兩個值均為0,則陰影將直接放置在元素後面。
- blur-radius (可選的)
陰影的模糊半徑,指定為`<length>`。值越大,陰影變得越大且越模糊。如果未指定,則默認為0,導致邊緣清晰,不模糊。不允許使用負值。
- color (可選的)
陰影的顏色,指定為`<color>`。如果未指定,color則使用屬性的值。
## CSS變數(variable):
1. 宣告變數:變數都放在 :root 選取器(最高層級)內,並且使用 --自訂名稱作為屬性的方式來宣告變數。
```sass=
:root {
--primary: Aquamarine;
--background-color: Teal;
}
```
> ⭐如果變數不是定義在 `:root` 全域中,而是定義在某個選擇器內,就是區域變數。區域變數只有那個選擇器內(包含子層)可以使用
2. 取用變數方式1:使用 var (--變數名稱) 來套用。
```sass=
body {
background: var(--background-color);
}
```
1. 取用變數方式2:`var(--名稱, 預設值);` ( 預設值不一定要填 )
預設值可以在「無法讀取變數名稱時自動套用預設的值」
```sass=
h2{
color: var(--h2, #0cc);
}
```
JavaScript 操作 CSS 變數:
```javascript=
const root = document.documentElement;
root.style.setProperty('--size', `${this.value}px`)
// 改用 jquery
$('html').get(0).style.setProperty('--size', `${$(this).val()}px`);
// 取值
const style = getComputedStyle(root); // 读取最终样式
const value = style.getPropertyValue('--main-color');
// or 簡化
getComputedStyle(root)['--main-color']
```
- element.style:读取的只是元素的内联样式,即写在元素的 style 属性上的样式,支持讀跟寫。
- getComputedStyle(element):读取的样式是最终样式,包括了内联样式、嵌入样式和外部样式。
### css變數進階用法:
[影片](https://www.youtube.com/watch?v=_2LwjfYc1x8&ab_channel=KevinPowell)、[文章](https://im1010ioio.hashnode.dev/css-variables#heading-kirpgllpmo7nlkjms5uqkg)
- 替變數設定預設值:
```scss=
.plan {
// 變數名稱加底線為模擬私有變數
--_shadow: var(--shadow, pink);
--_icon: var(--icon, red)
}
```
- 如果需要客製化時:
直接修改變數的值 (覆蓋),如果沒給值就會讀取上面之預設值
```scss=
.plan--pram {
--shadow: var(--clr-yellow-300);
--icon: var(--clr-yellow-400);
}
```
## CSS功能符號( Functional Notations )
https://www.oxxostudio.tw/articles/202011/css-max-min-clamp-calc.html
- `max()`:定義了一個數學運算最大值,用來定義最大寬度。
```scss=
div{
width:max(80vw, 200px); //寬度不小於 80vw,寬度最小是 200px
}
/* 原始寫法:
div{
width:80vw;
min-width:200px;
}
*/
```
進階使用:
因為是數學函數,可以在括號內進行數學式的運算 ( 注意 CSS 的算式之間必須有空白 ),下方的例子可以讓 h1 自動變換文字大小。
```scss=
h1{
font-size:max(10 * (1vw + 1vh) / 2, 12px);
}
```

- `min()`:定義了一個數學運算的最小值。與上面相反
```scss=
div{
width:min(80vw, 200px); //寬度不大於 80vw,寬度最大 200px
}
```

- `clamp()`:包含三個數值,定義「最大值、最小值以及中間的數值」,效果等同於:
`max(最小值, min(val, 最大值));`
```scss=
div{
clamp(200px, 100%, 300px); // 最小200px,最大300px。
}
/*
div{
width: 100%;
min-width:200px;
max-width:300px;
}
*/
```

- `calc()`:主要作為計算使用,可以和max()、min()、clamp或是 CSS 的變數互相搭配
```scss=
:root{
--w:min(200px, 80vw);
}
div {
height: 50px;
width:calc(var(--w) - 50px);
}
```
## RWD
- CSS media query:規則
- `not`:
用來排除某些設備的樣式,假如有AB兩個設備,其中有一個樣式是想要A有卻不想要B有,這時候就可以用 `@media A not B` 的方式來讓A設備有指定樣式。
- `only`:
用於一些老舊不支援 Media Queries 的瀏覽器,不過現今的瀏覽器都支援 Media Queries 了,所以這個語法了解就好了XD
- `and`:
and 是最常使用的語法,翻成中文可以想成 而且 ,用邏輯的方式去想就代表左右兩邊均成立這個條件才成立,而 and 最常被擺在等等要介紹的 Media Feature 進行串接。
>
ex:
```css=
/* 當裝置是螢幕,而且寬度小於 767px (包含) 時 */
@media screen and (max-width: 767px) { ... }
/* 當寬度小於 767px (包含) 或者裝置為直向時 */
@media (max-width: 767px), (orientation: portrait) { ... }
/* 當裝置不是螢幕,而且是列印時 */
@media not screen and print { ... }
```
- Media Type:裝置類型
Media Type 有非常多種,筆者在這邊僅列出最常用的三種:
* `all`:用於全部的裝置。
* `print`:用於印表機,此樣式套用於預覽列印中。
* `screen`:用於所有的螢幕,舉凡電腦、手機、平板裝置等螢幕皆適用於此。
* `speech`:朗讀裝置,針對可以「讀出」頁面的設備。
- Media Feature (特徵):
Media Feature 也有非常多種,這邊筆者僅介紹用於 RWD 上的幾種 Features :
* `width`
寬度可分為 最大寬度(max-width) 以及 最小寬度(min-width) 兩種,用於裝置寬度範圍內的特定樣式。
```scss=
@media (min-width: 600px){ } //當螢幕寬度不小於600px的時候(大於600px)
/* 平板:螢幕寬度介於 768px 和 991px (包含) 之間時 */
@media screen and (min-width: 768px) and (max-width: 991px) { ... }
```
新式寫法:可用 >、<、>= 或 <=
```scss=
/* 手機:螢幕寬度小於 768px 時 */
@media screen and (width < 768px) { ... }
/* 平板:螢幕寬度介於 768px 和 992px 之間時 */
@media screen and (768px <= width <= 992px) { ... }
/* 桌機:螢幕寬度大於 992px 時 */
@media screen and (width > 992px) { ... }
```
* `height`
高度可分為 最大高度(max-height) 以及 最小寬度(min-height) 兩種,用於裝置高度範圍內的特定樣式。
* `orientation`
當裝置處於 直立(portrait) 以及 橫向(landscope) 時會有特定樣式。
```css=
@media screen and (orientation: portrait) {}:螢幕方向為直式
@media (orientation: landscape) {}:螢幕方向為橫式
```
* `hover`
當 hover 時,按鈕顏色會變暗,但是在觸控螢幕上會變成類似 focus 的效果,有可能不是我們需要的,這時候就可以透過這個屬性來設定樣式。
```scss=
/* 當螢幕支援 hover 行為時 (例如:非觸控螢幕) */
@media screen and (hover: hover) { ... }
/* 當螢幕不支援 hover 行為時 (例如:觸控螢幕) */
@media screen and (hover: none) { ... }
```
>
PS:在切換的時候,切換前的CSS碼與切換後的CSS碼須放在同一頁才有作用
### 進階
- 可利用可變元素,如:textarea,來控制變數。[sample](https://codepen.io/jh3y/pen/zYZKEyM?editors=1100),[origin web](https://css-tricks.com/can-we-create-a-resize-hack-with-container-queries/)

## CSS 列印
[link](https://ithelp.ithome.com.tw/articles/10337976)


