# 2017q3 Homework1 (phonebook)
contributed by <`amikai`>
###### tags: `sysprog2017`
### Reviewed by `yusihlin`
* 參考資料可以在內容中直接以超連結或索引的方式指向,放在多處顯得有些雜亂
* 使用 BKRD HASH 缺乏動機、說明,應對程式運行的結果加以解釋
* chunking 部分的解說不夠詳盡,可以的話列出部分程式碼,直接貼出分析圖有點突兀
---
- [ ] 準備 GNU/Linux 開發工具
- [ ] 學習使用 Git 與 GitHub
- [ ] 學習效能分析工具
- [x] 研究軟體最佳化
- [x] 技術報告寫作練習
# 開發環境
cpu 資訊:
```
$ lscpu
Architecture: x86_64
CPU op-mode(s): 32-bit, 64-bit
Byte Order: Little Endian
CPU(s): 8
On-line CPU(s) list: 0-7
Thread(s) per core: 2
Core(s) per socket: 4
Socket(s): 1
NUMA node(s): 1
Vendor ID: GenuineIntel
CPU family: 6
Model: 26
Model name: Intel(R) Core(TM) i7 CPU 920 @ 2.67GHz
Stepping: 5
CPU MHz: 1600.000
CPU max MHz: 2668.0000
CPU min MHz: 1600.0000
BogoMIPS: 5332.22
Virtualisation: VT-x
L1d cache: 32K
L1i cache: 32K
L2 cache: 256K
L3 cache: 8192K
NUMA node0 CPU(s): 0-7
```
會在想要用底下這個指令得原因是可以的到 cache line 大小, 我可以針對 cache line 大小做設計
```
$ x86info -c
x86info v1.31pre Dave Jones 2001-2011
Feedback to <davej@redhat.com>.
Found 8 identical CPUs
Extended Family: 0 Extended Model: 1 Family: 6 Model: 26 Stepping: 5
Type: 0 (Original OEM)
CPU Model (x86info's best guess): Core i7 (Nehalem) [bloomfield/gainestown]
Processor name string (BIOS programmed): Intel(R) Core(TM) i7 CPU 920 @ 2.67GHz
Cache info
L1 Instruction cache: 32KB, 4-way associative. 64 byte line size.
L1 Data cache: 32KB, 8-way associative. 64 byte line size.
L2 (MLC): 256KB, 8-way associative. 64 byte line size.
TLB info
Instruction TLB: 2MB or 4MB pages, fully associative, 7 entries
Instruction TLB: 4K pages, 4-way associative, 64 entries.
Data TLB: 4KB or 4MB pages, fully associative, 32 entries.
Data TLB: 4KB pages, 4-way associative, 64 entries
Data TLB: 4K pages, 4-way associative, 512 entries.
Data TLB: 4KB or 4MB pages, fully associative, 32 entries.
Data TLB: 4KB pages, 4-way associative, 64 entries
64 byte prefetching.
Data TLB: 4K pages, 4-way associative, 512 entries.
Found unknown cache descriptors: e4
Total processor threads: 8
This system has 1 quad-core processor with hyper-threading (2 threads per core) running at an estimated 2.70GHz
```
kernel 資訊:
```
$ uname -a
Linux ruei-pc 4.4.0-96-generic #119-Ubuntu SMP Tue Sep 12 14:59:54 UTC 2017 x86_64 x86_64 x86_64 GNU/Linux
```
# 開發使用工具
## git
TODO
## 效能分析工具
再往路上看到一張圖, 原來我們用的 perf 只是眾多效能工具一個而已
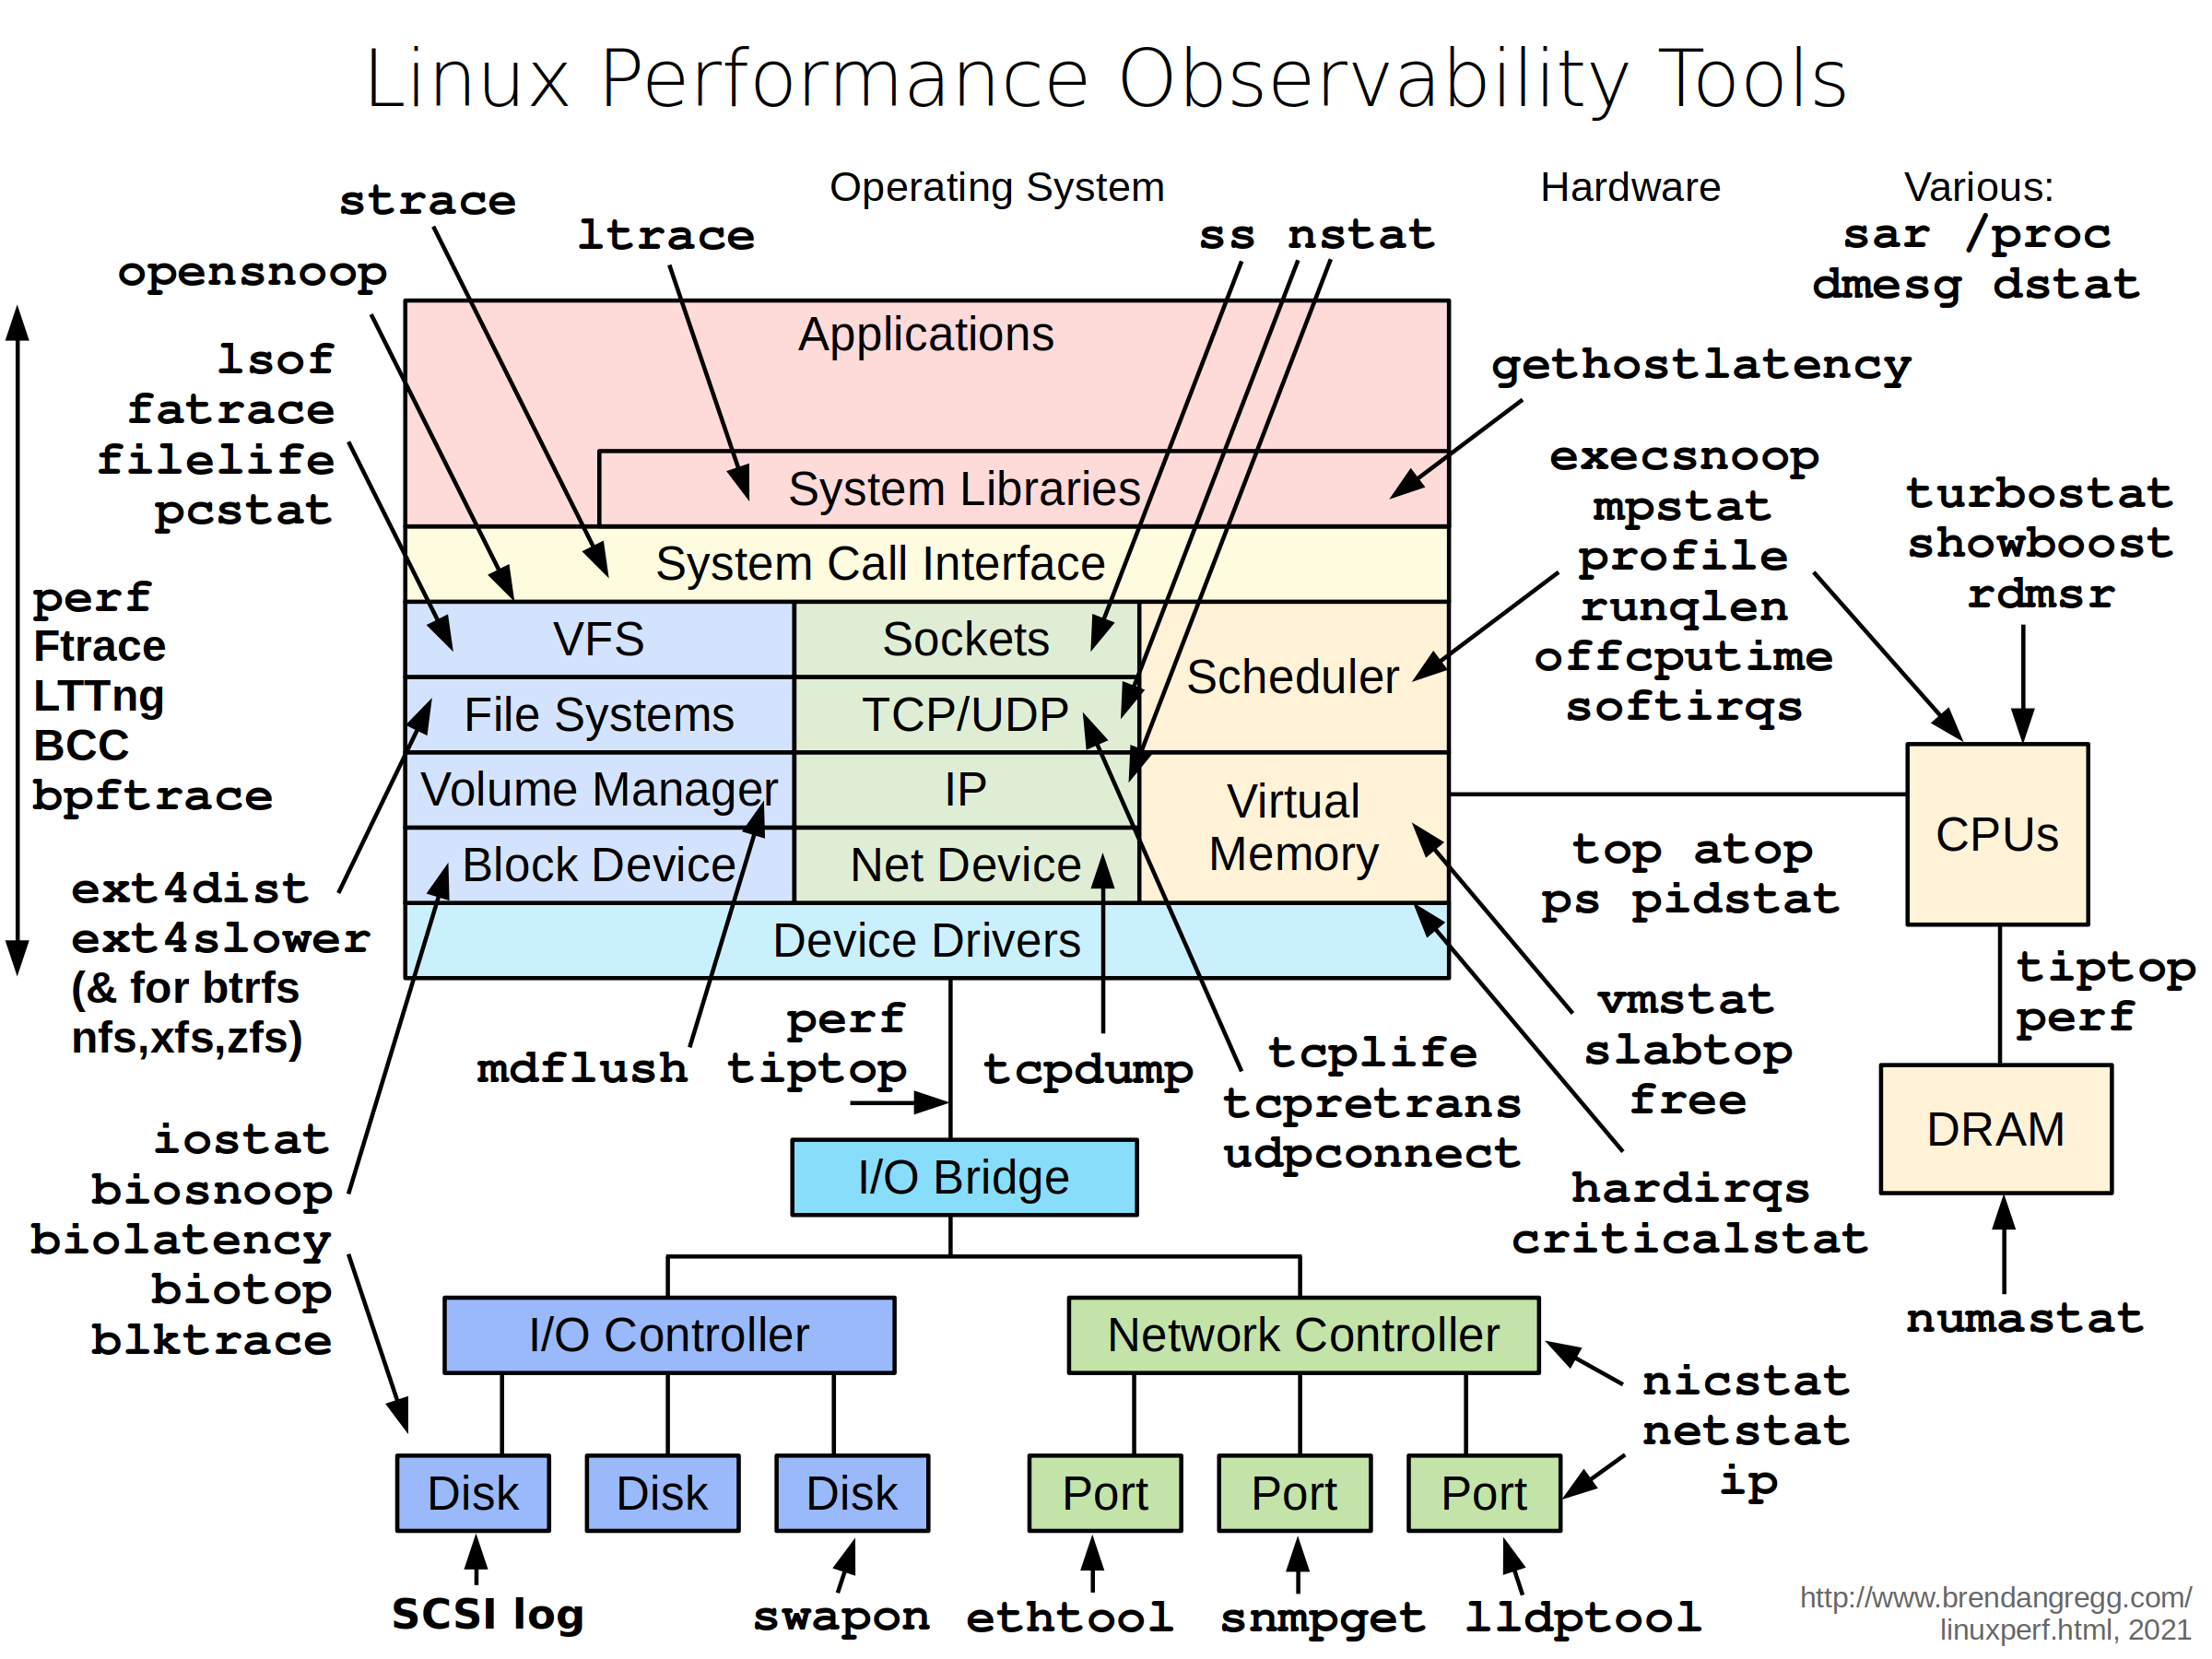
參考資料:
- http://www.brendangregg.com/linuxperf.html
## gnuplot
TODO
# 參考資料:
- http://www.phyast.pitt.edu/~zov1/gnuplot/html/histogram.html
## Makefile
TODO
# phonebook
## 程式研讀
### Defined
`if` 和 `#elif` 表達式用來測試某個 `macro` 是否被定義, 舉例: 當 `name` 有被定義在程式裡時, `defined name` 和 `defined (name)` 這兩個表達式的值會為 1, 否則為 0. 因此 `# if defined MACRO` 和 `#ifdef MACRO` 是相同的.
當你想要測試不只一個 `macro` 是否背定義時, `defined` 就很實用, 舉例:
```
#if defined (__vax__) || defined (__ns16000__)
```
若 `__vax__` 和 `__ns16000__` 皆被定義時, 此條 if 將會成功.
原本的程式有用到 `__GNUC__` 這個 macro, 我去翻了一下 gcc doc, gcc 定義了
`__GNUC__` `__GNUC_MINOR__1` `__GNUC_PATCHLEVEL__` 3個 macro, 用 gcc -v 會看到 gcc 的版本, 若版本為 x.y.z 則 `__GNUC__` 為 x `__GNUC_MINOR__1` 為 y `__GNUC_PATCHLEVEL__` 為 z, 你可以使用此 3 個 macro 限制某些版本只編譯哪些 code.
以下式我實驗的 code.
```
$ gcc -v 2>&1 | tail -n 1
gcc version 5.4.0 20160609 (Ubuntu 5.4.0-6ubuntu1~16.04.4)
$ cat testVersion.c
#include <stdio.h>
int main()
{
#if __GNUC__ == 5 && __GNUC_MINOR__ == 4 && __GNUC_PATCHLEVEL__ == 0
printf("%d.%d.%d\n", __GNUC__, __GNUC_MINOR__, __GNUC_PATCHLEVEL__);
#endif
}
$ gcc testVersion.c -o test && ./test
5.4.0
```
參考:
- [Defined - gcc doc ](https://gcc.gnu.org/onlinedocs/cpp/Defined.html)
- [Common Predefined Macros - gcc doc](https://gcc.gnu.org/onlinedocs/cpp/Common-Predefined-Macros.html)
### __builtin___clear_cache
TODO
### 時間偵測
TODO
參考:
- [Other Built-in Functions Provided by GCC - gcc doc](https://gcc.gnu.org/onlinedocs/gcc/Other-Builtins.html)
## 改進方法
### 準備工作
看到原始的版本沒有將記憶體完整釋放, 編譯完後, 我們可以再寫程式的時候用 valgrind 檢查:
```
$ valgrind --leak-check=full ./phonebook_orig
```
我將有用的資訊擷取出來, 首先以下這些:
```
LEAK SUMMARY:
definitely lost: 136 bytes in 1 blocks
indirectly lost: 16,034,808 bytes in 117,903 blocks
possibly lost: 31,551,320 bytes in 231,995 blocks
```
滿滿的 memory leak, 所以只要把以下程式更改即可:
``` c
/*-------------- before fix --------------*/
if (pHead->pNext) free(pHead->pNext);
free(pHead);
/*-------------- after fix --------------*/
entry *temp = pHead;
while(temp) {
pHead = pHead->pNext;
free(temp);
temp = pHead;
}
```
valgrind 噴出現了一個錯誤:
```
Use of uninitialised value of size 8
```
最後發現是原本的程式都棄用第一個 entry, 只有配置記憶體, 但是沒有放任何資訊, 我重寫了 append function 和部份的 main.c, 全部貼上來會有些雜亂, 所以我放了更改的 [commit](https://github.com/as23041248/phonebook/commit/465211f4c4cc6a5791df3493266c5c8b51674d1b)
參考資料:
- [0140454 共筆](https://hackmd.io/EwMwhgDBDGBsYFoDsBGWAOBAWdSCsCAnCIQEYLAoRgAmApvHiAMylA==?view)
### 縮小 struct
原本的程式只要比對 lastName, 所以將次要的資訊使用指標紀錄就好, 這樣可以增加放在 struct 資料放在 cache 裡的數量, 進而達到降低 cache miss 的目的
``` c
typedef struct __PHONE_BOOK_ENTRY {
char lastName[MAX_LAST_NAME_SIZE];
struct __PHONE_BOOK_ENTRY *pNext;
} entry;
typedef struct _PERSONAL_INFO {
char firstName[16];
char email[16];
char phone[10];
char cell[10];
char addr1[16];
char addr2[16];
char city[16];
char state[2];
char zip[5];
} _PERSONAL_INFO;
```
以下是實驗數據:
- cache misses 由原本的 92% 下降到 75%
```
----------------------- before reduce struct size -----------------------
100 runs
1,224,244 cache-misses # 92.509 % of all cache refs ( +- 0.60% )
1,323,384 cache-references ( +- 0.75% )
328,196,229 instructions # 1.05 insns per cycle ( +- 0.01% )
312,636,095 cycles ( +- 0.81% )
0.114970283 seconds time elapsed ( +- 0.88% )
----------------------- after reduce struct size -----------------------
100 runs
225,574 cache-misses # 75.978 % of all cache refs ( +- 0.57% )
296,893 cache-references ( +- 0.99% )
286,371,069 instructions # 1.54 insns per cycle ( +- 0.02% )
186,522,979 cycles ( +- 0.37% )
0.070776705 seconds time elapsed ( +- 0.49% )
```

注意: 從此這裡開始之後都是從 reduce size 版本, 繼續建構的, 之後將不會特別提到
### BKRD Hash
``` c
#define HASH_TABLE_SIZE 1003
// BKDR Hash Function
unsigned int BKDRHash(char *str)
{
unsigned int seed = 131; // 31 131 1313 13131 131313 etc..
unsigned int hash = 0;
while (*str) {
hash = hash * seed + (*str++);
}
return (hash & 0x7FFFFFFF) % HASH_TABLE_SIZE;
}
```
```
----------------------- BKDR Hash -----------------------
100 runs
585,165 cache-misses # 51.258 % of all cache refs ( +- 1.16% )
1,141,606 cache-references ( +- 0.51% )
300,929,371 instructions # 1.06 insns per cycle ( +- 0.01% )
284,154,565 cycles ( +- 0.49% )
0.104957176 seconds time elapsed ( +- 0.51% )
```

從此資料看來 hash 在 append 上的效能需要改善, 但是 findName 的處理是相當快的
參考資料:
- http://www.jianshu.com/p/0be67bf8887e
- http://www.cse.yorku.ca/~oz/hash.html
- https://stackoverflow.com/questions/7666509/hash-function-for-string
- http://www.eternallyconfuzzled.com/tuts/algorithms/jsw_tut_hashing.aspx
### MMAP + BKDR Hash
看了 [yenWu](https://hackmd.io/s/BkN1JNQp#) 學長的筆記才知道 linux 還有 mmap 這種函數可以用, memory map i/o 比起 read() 和 write() 效能來的好, 因為 read() 和 write() 會有兩次傳輸: 檔案與和 kernrl buffer cache 之間, 而另一個則是 kernel buffer cache 和 user space 之間. 而我們每次 malloc 一次都是一個 system call, 若直接使用 mmap 將檔案映射到記憶體上, 就可以直接存取整個檔案了.
而且這麼大量的存取如果使用 malloc 一小塊一小塊的分配則會造成記憶體不續,記憶體不連續就無法達到 locality 的優點

我使用 hash 是為了在 findName 上降低查找時間, 而 mmap 則會改善append 的效能 (替換 malloc)
那麼 mmap 要怎麼跟 hash 結合呢, 我先將原本的 phonebook 資料讀入之後, 把資料放在 struct 裡, 再以寫入二進制檔的方式, 寫到另一個 file 裡, 而這是我用的 struct
```c
typedef struct __PHONE_BOOK_ENTRY {
char lastName[MAX_LAST_NAME_SIZE];
struct __PHONE_BOOK_ENTRY *pNext;
_PERSONAL_INFO *detail;
} entry;
typedef struct _PERSONAL_INFO {
char firstName[16];
char email[16];
char phone[10];
char cell[10];
char addr1[16];
char addr2[16];
char city[16];
char state[2];
char zip[5];
} _PERSONAL_INFO;
```
為什麼不寫入 lastName 而寫入整個 struct, 以下有兩個好處:
- 直接寫入 struct 則大小就一定是一致的, 在使用記憶體映射時方便迭代讀取
- pNext 的大小也映射再記憶體上了, 這樣我就直接對 pNext 存取就好而不是再另外再配置一次
然後我將此二進制檔使用 mmap 函數映設到記憶體上, 並直接對記憶體存取, 之後我就可以做使用了.
接下來就是 hash 的部份了: `append` 只要迭代記憶體上的每一個 struct 並做 hash function 再放到 hash table 相對應的 slot 即可, 以下是片斷程式碼
``` c
entry *pHead[HASH_TABLE_SIZE], *tail[HASH_TABLE_SIZE];
void *block_start = mmap(NULL, size_of_file, PROT_WRITE, MAP_PRIVATE, fd, 0);
void *iterate = block_start;
while(iterate < block_start + size_of_file) {
append(iterate, pHead, tail);
iterate += size_of_entry;
}
----------------------- append -----------------------
void append(void *addr, entry *pHead[], entry *tail[])
{
entry *e = (entry*) addr ;
e->pNext = NULL;
unsigned int hashVal = BKDRHash(e->lastName);
if(pHead[hashVal] == NULL) {
pHead[hashVal] = tail[hashVal] = e;
return;
}
tail[hashVal]->pNext = e;
tail[hashVal] = e;
}
```
想法非常的簡單, 但是做抽象化的時候想的好久呀
```
----------------------- BKDR Hash + mmap -----------------------
100 runs
386,254 cache-misses # 54.674 % of all cache refs ( +- 0.36% )
706,469 cache-references ( +- 3.23% )
246,095,842 instructions # 1.16 insns per cycle ( +- 0.03% )
211,475,364 cycles ( +- 1.11% )
0.158217696 seconds time elapsed ( +- 3.03% )
```
### MMAP + BKDR Hash + Chuinking
老師在上課時給了一個提示就是以下這[網址](https://www.cs.cornell.edu/courses/cs3110/2010sp/lectures/lec24.html)
使用 Hash Table 加上 Chaning 的方法,每次存取的資料在記憶體上都不是連續的,為了增加locality 我嘗試此用 Chunking 的方法, 在最上面有提到我的 cache line 有 64 bytes 所以我會將我的 phonebook 裡的每個 entry 塞滿到 64bytes:
TODO

另外我做了一個無聊的實驗去測試 grep 有多快:
``` bash
$ time grep zyxel dictionary/words.txtzyxel
zyxels
real 0m0.007s
user 0m0.004s
sys 0m0.000sqj
```
TODO 解釋此數值
參考:
- [yenWu 共筆](https://hackmd.io/s/BkN1JNQp#)
- [The Linux Programmin Interface](http://man7.org/tlpi/)
- [Linux System Programming, Second Edition](http://shop.oreilly.com/product/0636920026891.do)]
# 問題思考
- Q: 有代表性嗎?跟真實英文姓氏差異大嗎?
A: 有沒有代表性我真的想不到, 若跟真實英文姓名差很多的話, 那使用 hash table 過後的結果也不太一樣
TODO: 使用不同的 dataset
- Q: 資料難道「數大就是美」嗎?
A: 自然風景數大就是美, 但是資料一大就難搞了, 而人類也因為資料的成長發展了許多技術, 像是 Hadoop, Spark 等等
TODO: 換大一點的 dataset
- Q: 如果我們要建立符合真實電話簿情境的輸入,該怎麼作?
A: 真實的電話簿情境, 資料量可能不是只有 3 萬多筆, 我會先去學習已知的技術, 像是 MogoDB 之類的東西
TODO: 可以嘗試使用真實的資料做分析
# 補強工作
- mmap 在 locality 上的分析
- 可以使用計算機組織的觀點分析, 像是 asscoiative, locality, branch prediction 等等觀點分析 (perf)
- 可以使用標準差, 平均, CDF, PDF 觀點
- 複習 big-o 的前提
- malloc 的位置是否連續
- ptmalloc
- 看一下技術報告撰寫方式
- 研讀 https://www.cs.cornell.edu/courses/cs3110/2010sp/lectures/lec24.html