:::warning
> **注意事項**
>
> 本文件由 AI 生成,旨在提供 Spring Batch 的教學與範例。所有內容和程式碼範例主要參考自 Spring Batch 官方文件:
> - **官方參考資料**: [Spring Batch Reference Documentation](https://docs.spring.io/spring-batch/reference/index.html)
>
> 雖然我們力求準確,但內容可能無法涵蓋所有最新更新或邊緣案例。建議同時參閱官方文件以獲得最完整的資訊。
:::
# Spring Batch 教學:從入門到進階
Spring Batch 是一個輕量級、全面的批次處理框架,旨在為開發健壯的批次應用提供支援。它提供了讀取、寫入、處理大量數據的重用功能,並包含事務管理、作業統計、作業重啟、跳過和重試等企業級服務。
本教學將從 Spring Batch 的基礎設定開始,逐步深入到最小可用範例、中級應用,以及包含錯誤處理和進階流程控制的高級範例。
---
## 章節一:Spring Batch 介紹與設定
### 1.1. Spring Batch 是什麼?
Spring Batch 專為處理大量數據的離線、批次作業而設計。典型的應用場景包括:
- 定期的數據導入/導出
- 複雜的業務數據處理與轉換
- 報表生成
- 數據清理與驗證
### 1.2. 核心架構
Spring Batch 的架構主要分為三個層次,確保了框架的擴充性與易用性。
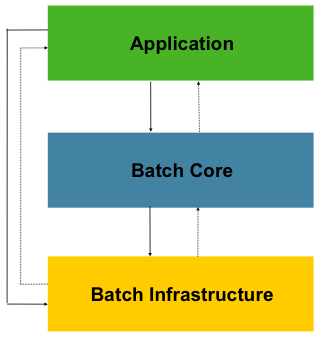
1. **Application (應用層)**: 包含所有由開發者編寫的批次作業(Jobs)和自訂程式碼,例如 `Job`、`Step`、`ItemReader` 等。
2. **Core (核心層)**: 框架的心臟,提供了啟動和控制批次作業所需的核心運行時類別,如 `JobLauncher`、`Job` 和 `Step` 的實現。
3. **Infrastructure (基礎設施層)**: 提供通用的、可重用的元件和服務,如各種 `ItemReader`、`ItemWriter` 以及重試 (`RetryTemplate`) 等底層服務。
### 1.3. 專案設定
要開始使用 Spring Batch,需要一個 Spring Boot 專案並添加必要的依賴。
#### 1.3.1. Maven 依賴 (`pom.xml`)
使用 [Spring Initializr](https://start.spring.io/) 建立專案時,請選擇以下依賴:
- **Spring Batch**
- **H2 Database** (或所選的其他資料庫,用於儲存批次元數據)
- **Spring Data JPA** (如果需要與資料庫互動)
```xml
<dependencies>
<dependency>
<groupId>org.springframework.boot</groupId>
<artifactId>spring-boot-starter-batch</artifactId>
</dependency>
<dependency>
<groupId>org.springframework.boot</groupId>
<artifactId>spring-boot-starter-data-jpa</artifactId>
</dependency>
<dependency>
<groupId>com.h2database</groupId>
<artifactId>h2</artifactId>
<scope>runtime</scope>
</dependency>
<dependency>
<groupId>org.springframework.boot</groupId>
<artifactId>spring-boot-starter-test</artifactId>
<scope>test</scope>
</dependency>
<dependency>
<groupId>org.springframework.batch</groupId>
<artifactId>spring-batch-test</artifactId>
<scope>test</scope>
</dependency>
</dependencies>
```
#### 1.3.2. 啟用 Spring Batch
為了更好的職責分離,建議將 `@EnableBatchProcessing` 註解放在一個獨立的配置類別中。
**主應用程式類別 (`SpringBatchDemoApplication.java`):**
```java
import org.springframework.boot.SpringApplication;
import org.springframework.boot.autoconfigure.SpringBootApplication;
@SpringBootApplication
public class SpringBatchDemoApplication {
public static void main(String[] args) {
SpringApplication.run(SpringBatchDemoApplication.class, args);
}
}
```
**獨立的 Batch 配置類別 (`BatchConfig.java`):**
```java
import org.springframework.batch.core.configuration.annotation.EnableBatchProcessing;
import org.springframework.context.annotation.Configuration;
@Configuration
@EnableBatchProcessing
public class BatchConfig {
// 這個類別可以保持空白,或用於定義共享的批次基礎設施 Bean
}
```
> **注意**: 在 Spring Boot 3.x 中,`@EnableBatchProcessing` 已非必要,因為 Spring Boot 會自動配置。但為了清晰起見和未來的擴展性,使用獨立配置類別是一個好習慣。
> **關於 `JobRepository`**: `JobRepository` 是 Spring Batch 的核心組件,用於持久化批次作業的元數據,從 Spring Batch 創立以來就一直存在。在 Spring Batch 5.0 之前的版本,`@EnableBatchProcessing` 會自動配置一個基於 `DataSource` 的 `JobRepository` Bean。從 5.0 開始,開發者需要更明確地定義 `JobRepository` Bean,或者確保有一個 `DataSource` Bean 可用,Spring Boot 的自動配置會處理它。
#### 1.3.3. `application.properties` 設定
```properties
# H2 Database Configuration
spring.h2.console.enabled=true
spring.h2.console.path=/h2-console
spring.datasource.url=jdbc:h2:mem:testdb;DB_CLOSE_DELAY=-1;DB_CLOSE_ON_EXIT=FALSE
spring.datasource.driverClassName=org.h2.Driver
spring.datasource.username=sa
spring.datasource.password=
# Spring Batch Job 自動執行控制
# 預設為 true,會在應用啟動時自動尋找並執行所有 Job。在生產環境中建議設為 false,改為透過排程或 API 觸發。
spring.batch.job.enabled=false
# Spring Batch JobRepository
spring.batch.jdbc.initialize-schema=never # 建議關閉自動建立,改為手動控制
# 自訂 Spring Batch 元數據表前綴
# 允許為所有 Spring Batch 的表加上自訂前綴,甚至可以包含 schema 名稱,例如 `xxx.BATCH_`
# 這對於在同一個資料庫中區分不同應用的批次表非常有用。
spring.batch.jdbc.table-prefix=BATCH_
# 設定建立 JobExecution 時的事務隔離級別
# 預設是 SERIALIZABLE,但在某些資料庫(如 MS SQL Server)高併發下可能導致死鎖。
# 設定為 READ_COMMITTED 可以緩解此問題,但可能會犧牲一些一致性。
spring.batch.jdbc.isolation-level-for-create=READ_COMMITTED
```
#### 1.3.4. 手動初始化 Schema (建議)
預設情況下,`spring.batch.jdbc.initialize-schema=always` 會在資料庫的預設 schema (例如 PostgreSQL 的 `public`) 中建立 Spring Batch 所需的元數據表。在生產環境中,這通常不是我們想要的。為了更好地控制表的儲存位置和版本,建議手動初始化。
1. **關閉自動初始化**: 在 `application.properties` 中設定 `spring.batch.jdbc.initialize-schema=never`。
2. **獲取 SQL 腳本**: 從 Spring Batch 的官方 GitHub 倉庫獲取對應資料庫的 schema 腳本。例如,PostgreSQL 的腳本位於:
[schema-postgresql.sql](https://github.com/spring-projects/spring-batch/blob/main/spring-batch-core/src/main/resources/org/springframework/batch/core/schema-postgresql.sql)
---
## 章節二:初級範例 - 第一個批次作業 (Tasklet)
`Tasklet` 是最簡單的 `Step` 類型,用於執行單一任務,非常適合入門。
### 2.1. 什麼是 Tasklet?
`Tasklet` 是一種簡單的介面,只有一個 `execute` 方法。它適用於不需要分塊處理數據的場景,例如:
- 執行一個 SQL 更新語句。
- 在批次作業開始前清理暫存目錄。
- 呼叫一個遠程服務。
### 2.2. 範例:印出一行訊息
#### 2.2.1. 定義 `Tasklet`
```java
import org.slf4j.Logger;
import org.slf4j.LoggerFactory;
import org.springframework.batch.core.StepContribution;
import org.springframework.batch.core.scope.context.ChunkContext;
import org.springframework.batch.core.step.tasklet.Tasklet;
import org.springframework.batch.repeat.RepeatStatus;
import org.springframework.stereotype.Component;
@Component
public class SimpleTasklet implements Tasklet {
private static final Logger log = LoggerFactory.getLogger(SimpleTasklet.class);
@Override
public RepeatStatus execute(StepContribution contribution, ChunkContext chunkContext) throws Exception {
log.info("Hello, Spring Batch! This is a simple Tasklet.");
return RepeatStatus.FINISHED; // 表示任務完成,不再重複執行
}
}
```
#### 2.2.2. 配置 `Job` 和 `Step`
```java
import org.springframework.batch.core.Job;
import org.springframework.batch.core.Step;
import org.springframework.batch.core.job.builder.JobBuilder;
import org.springframework.batch.core.repository.JobRepository;
import org.springframework.batch.core.step.builder.StepBuilder;
import org.springframework.context.annotation.Bean;
import org.springframework.context.annotation.Configuration;
import org.springframework.transaction.PlatformTransactionManager;
@Configuration
public class SimpleBatchConfig {
@Bean
public Step taskletStep(JobRepository jobRepository,
PlatformTransactionManager transactionManager,
SimpleTasklet simpleTasklet) {
return new StepBuilder("taskletStep", jobRepository)
.tasklet(simpleTasklet, transactionManager)
.build();
}
@Bean
public Job simpleJob(JobRepository jobRepository, Step taskletStep) {
return new JobBuilder("simpleJob", jobRepository)
.start(taskletStep)
.build();
}
}
```
### 2.3. 執行批次作業
您可以透過 HTTP 請求或命令列來觸發。一個簡單的方式是使用 `CommandLineRunner` 在應用啟動時執行。
```java
import org.springframework.batch.core.Job;
import org.springframework.batch.core.JobParameters;
import org.springframework.batch.core.JobParametersBuilder;
import org.springframework.batch.core.launch.JobLauncher;
import org.springframework.boot.CommandLineRunner;
import org.springframework.context.annotation.Bean;
import org.springframework.stereotype.Component;
@Component
public class JobRunner implements CommandLineRunner {
private final JobLauncher jobLauncher;
private final Job simpleJob;
public JobRunner(JobLauncher jobLauncher, Job simpleJob) {
this.jobLauncher = jobLauncher;
this.simpleJob = simpleJob;
}
@Override
public void run(String... args) throws Exception {
JobParameters jobParameters = new JobParametersBuilder()
.addLong("time", System.currentTimeMillis()) // 確保每次執行都是新的 JobInstance
.toJobParameters();
jobLauncher.run(simpleJob, jobParameters);
}
}
```
執行應用程式,會在控制台看到日誌輸出。
---
## 章節三:中級範例 - Chunk-oriented 處理 (基本)
這個範例將展示最基本的「讀取-寫入」模式,從 CSV 檔案讀取數據,並直接寫入資料庫,中間不進行任何處理。
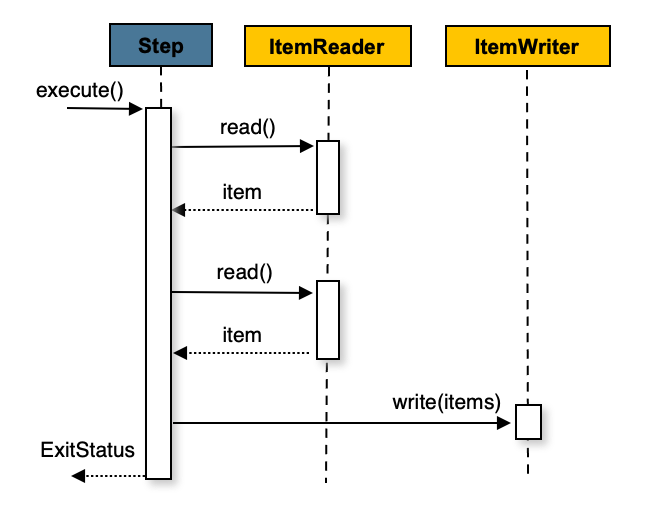
### 3.1. 什麼是 Chunk-oriented Processing?
這是 Spring Batch 最核心的處理模式。它一次讀取一個 item,將多個 items 組成一個「塊」(chunk),然後在單一事務中處理並寫入整個塊。這能提供高性能和事務完整性。
### 3.2. 範例:從 CSV 讀取並寫入資料庫
#### 3.2.1. 定義數據模型和 Repository
```java
// src/main/java/com/example/springbatchdemo/model/Person.java
import jakarta.persistence.Entity;
import jakarta.persistence.Id;
@Entity
public class Person {
@Id
private String firstName; // 簡化範例,使用 firstName 作為主鍵
private String lastName;
// Constructors, getters, setters
}
// src/main/java/com/example/springbatchdemo/repository/PersonRepository.java
import com.example.springbatchdemo.model.Person;
import org.springframework.data.jpa.repository.JpaRepository;
import org.springframework.stereotype.Repository;
@Repository
public interface PersonRepository extends JpaRepository<Person, String> {}
```
#### 3.2.2. 建立輸入 CSV 檔案
在 `src/main/resources` 下建立 `input.csv`:
```csv
John,Doe
Jane,Smith
Peter,Jones
```
#### 3.2.3. 定義 `ItemReader` 和 `ItemWriter`
```java
import com.example.springbatchdemo.model.Person;
import com.example.springbatchdemo.repository.PersonRepository;
import org.springframework.batch.core.configuration.annotation.StepScope;
import org.springframework.batch.item.data.RepositoryItemWriter;
import org.springframework.batch.item.data.builder.RepositoryItemWriterBuilder;
import org.springframework.batch.item.file.FlatFileItemReader;
import org.springframework.batch.item.file.builder.FlatFileItemReaderBuilder;
import org.springframework.context.annotation.Bean;
import org.springframework.context.annotation.Configuration;
import org.springframework.core.io.ClassPathResource;
@Configuration
public class BasicChunkComponents {
// ItemReader: 從 CSV 讀取 Person 對象
@Bean
@StepScope
public FlatFileItemReader<Person> personReader() {
return new FlatFileItemReaderBuilder<Person>()
.name("personItemReader")
.resource(new ClassPathResource("input.csv"))
.delimited()
.names("firstName", "lastName")
.targetType(Person.class)
.build();
}
// ItemWriter: 使用 RepositoryItemWriter 寫入資料庫
@Bean
@StepScope
public RepositoryItemWriter<Person> personWriter(PersonRepository repository) {
return new RepositoryItemWriterBuilder<Person>()
.repository(repository)
// .methodName("save") // 呼叫 JpaRepository 的 save 方法
.build();
}
}
```
> **關於** `RepositoryItemWriter<T>`: 預設情況下會使用 `CrudRepository.saveAll(Iterable)` 來儲存 items,如果手動設定 `methodName(java.lang.String)` / `setMethodName(java.lang.String)` 則將會使用設定的,並傳入單個 item,其他細節請參考[附錄 A.3. Repository-based `ItemReader`/`ItemWriter`](#A3-Repository-based-ItemReaderItemWriter)
#### 3.2.4. 配置 `Job` 和 `Step`
```java
import com.example.springbatchdemo.model.Person;
import org.springframework.batch.core.Job;
import org.springframework.batch.core.Step;
import org.springframework.batch.core.job.builder.JobBuilder;
import org.springframework.batch.core.repository.JobRepository;
import org.springframework.batch.core.step.builder.StepBuilder;
import org.springframework.batch.item.ItemReader;
import org.springframework.batch.item.ItemWriter;
import org.springframework.context.annotation.Bean;
import org.springframework.context.annotation.Configuration;
import org.springframework.transaction.PlatformTransactionManager;
@Configuration
public class BasicChunkBatchConfig {
@Bean
public Step basicProcessStep(JobRepository jobRepository,
PlatformTransactionManager transactionManager,
ItemReader<Person> personReader,
ItemWriter<Person> personWriter) {
return new StepBuilder("basicProcessStep", jobRepository)
.<Person, Person>chunk(2, transactionManager) // 每 2 個 item 提交一次事務
.reader(personReader)
.writer(personWriter) // 直接寫入,無 processor
.build();
}
@Bean
public Job basicProcessJob(JobRepository jobRepository, Step basicProcessStep) {
return new JobBuilder("basicProcessJob", jobRepository)
.start(basicProcessStep)
.build();
}
}
```
執行後,可以自行到 DB 中查看 `PERSON` 表,將會看到原始數據被寫入。
---
## 章節四:中級範例 - 加入 ItemProcessor
現在,我們在基本範例的基礎上,加入 `ItemProcessor` 來對數據進行轉換。
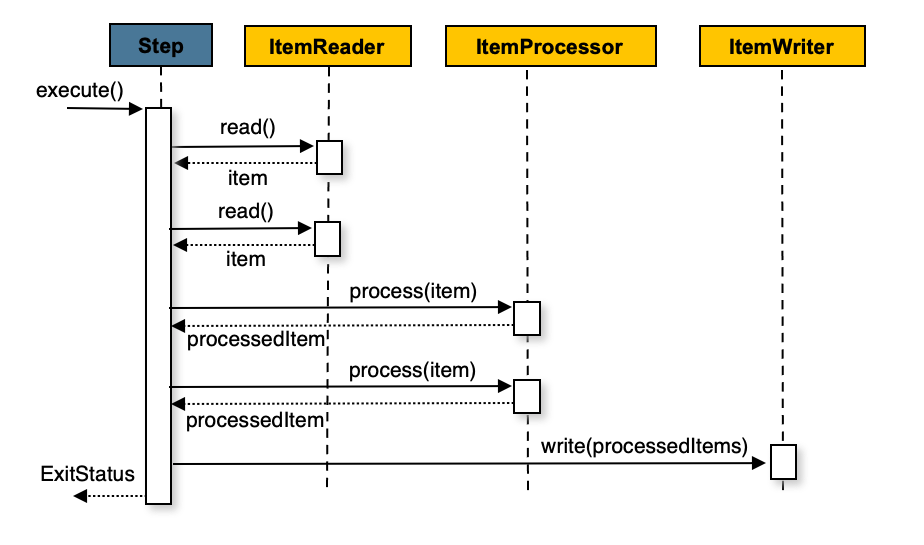
### 4.1. 什麼是 ItemProcessor?
`ItemProcessor` 是 `Chunk-oriented` 流程中的一個可選環節。它接收從 `ItemReader` 讀取到的單個 item,並對其進行業務處理或轉換,然後將處理後的 item 傳遞給 `ItemWriter`。如果 `ItemProcessor` 返回 `null`,則該 item 將被過濾掉,不會被寫入。
### 4.2. 範例:轉換數據並寫入
#### 4.2.1. 定義 `ItemProcessor`
```java
// 在一個新的配置類別中,或者添加到現有的 Components 配置類別中
import com.example.springbatchdemo.model.Person;
import org.springframework.batch.core.configuration.annotation.StepScope;
import org.springframework.batch.item.ItemProcessor;
import org.springframework.context.annotation.Bean;
import org.springframework.context.annotation.Configuration;
@Configuration
public class ProcessorComponents {
// ItemProcessor: 將姓氏轉換為大寫
@Bean
@StepScope
public ItemProcessor<Person, Person> personProcessor() {
return person -> {
person.setLastName(person.getLastName().toUpperCase());
return person;
};
}
}
```
#### 4.2.2. 配置包含 Processor 的 `Job` 和 `Step`
```java
@Configuration
public class ProcessorBatchConfig {
@Bean
public Step processPersonsStep(JobRepository jobRepository,
PlatformTransactionManager transactionManager,
ItemReader<Person> personReader,
ItemProcessor<Person, Person> personProcessor,
ItemWriter<Person> personWriter) {
return new StepBuilder("processPersonsStep", jobRepository)
.<Person, Person>chunk(2, transactionManager)
.reader(personReader)
.processor(personProcessor) // 加入 Processor
.writer(personWriter)
.build();
}
@Bean
public Job processPersonsJob(JobRepository jobRepository, Step processPersonsStep) {
return new JobBuilder("processPersonsJob", jobRepository)
.start(processPersonsStep)
.build();
}
}
```
執行後,會發現寫入資料庫的 `Person` 數據,其 `lastName` 欄位都變成了大寫。
---
## 章節五:高級範例 - 容錯與流程控制
### 5.1. 錯誤處理:跳過 (Skip) 與重試 (Retry)
在真實世界中,數據不總是完美的。Spring Batch 提供強大的容錯機制。
- **Skip (跳過)**: 當遇到格式錯誤的數據或無法處理的 item 時,跳過該 item,繼續處理下一個。
- **Retry (重試)**: 當遇到暫時性錯誤(如網路抖動、資料庫死鎖)時,自動重試失敗的操作。
#### 5.1.1. 範例:配置容錯的 Step
假設 `ItemProcessor` 在處理特定數據時會拋出異常。
```java
// 在一個新的配置類別中
import com.example.springbatchdemo.model.Person;
import org.springframework.batch.core.configuration.annotation.StepScope;
import org.springframework.batch.item.ItemProcessor;
import org.springframework.context.annotation.Bean;
import org.springframework.context.annotation.Configuration;
import org.springframework.dao.DeadlockLoserDataAccessException;
@Configuration
public class FaultTolerantComponents {
@Bean
@StepScope
public ItemProcessor<Person, Person> faultTolerantPersonProcessor() {
return person -> {
if ("Jane".equalsIgnoreCase(person.getFirstName())) {
// 模擬一個可跳過的數據格式錯誤
throw new IllegalArgumentException("無效的名字: Jane");
}
if ("Peter".equalsIgnoreCase(person.getFirstName())) {
// 模擬一個可重試的暫時性錯誤
System.out.println("處理 Peter 時發生暫時性錯誤,準備重試...");
throw new DeadlockLoserDataAccessException("模擬資料庫死鎖", new Exception());
}
person.setLastName(person.getLastName().toUpperCase());
return person;
};
}
}
```
修改 `Step` 配置以啟用容錯。
```java
// 在一個新的配置類別中
import org.springframework.dao.DeadlockLoserDataAccessException;
@Configuration
public class FaultTolerantBatchConfig {
@Bean
public Step faultTolerantStep(JobRepository jobRepository,
PlatformTransactionManager transactionManager,
ItemReader<Person> personReader,
ItemProcessor<Person, Person> faultTolerantPersonProcessor,
ItemWriter<Person> personWriter) {
return new StepBuilder("faultTolerantStep", jobRepository)
.<Person, Person>chunk(2, transactionManager)
.reader(personReader)
.processor(faultTolerantPersonProcessor)
.writer(personWriter)
.faultTolerant() // 啟用容錯功能
.skipLimit(5) // 整個 Step 最多跳過 5 次
.skip(IllegalArgumentException.class) // 當發生此異常時跳過
.retryLimit(3) // 對於可重試的異常,每個 item 最多重試 3 次
.retry(DeadlockLoserDataAccessException.class) // 當發生此異常時重試
.build();
}
@Bean
public Job faultTolerantJob(JobRepository jobRepository, Step faultTolerantStep) {
return new JobBuilder("faultTolerantJob", jobRepository)
.start(faultTolerantStep)
.build();
}
}
```
當執行這個 `Job` 時:
- 遇到 `Jane` 時,會因為 `IllegalArgumentException` 而被跳過。
- 遇到 `Peter` 時,會因為 `DeadlockLoserDataAccessException` 而重試最多 3 次,如果 3 次後仍然失敗,`Step` 將會失敗。
### 5.2. Job 流程控制:條件流程
`Job` 可以根據 `Step` 的 `ExitStatus` (退出狀態) 來決定下一個執行的 `Step`。
#### 5.2.1. 範例:根據 Step 結果執行不同流程
```java
import lombok.extern.slf4j.Slf4j;
import org.springframework.batch.core.ExitStatus;
import org.springframework.batch.core.Job;
import org.springframework.batch.core.Step;
import org.springframework.batch.core.StepContribution;
import org.springframework.batch.core.job.builder.JobBuilder;
import org.springframework.batch.core.repository.JobRepository;
import org.springframework.batch.core.scope.context.ChunkContext;
import org.springframework.batch.core.step.builder.StepBuilder;
import org.springframework.batch.core.step.tasklet.Tasklet;
import org.springframework.batch.repeat.RepeatStatus;
import org.springframework.context.annotation.Bean;
import org.springframework.context.annotation.Configuration;
import org.springframework.transaction.PlatformTransactionManager;
@Slf4j
@Configuration
public class ConditionalFlowConfig {
@Bean
public Step stepA(JobRepository jobRepository, PlatformTransactionManager transactionManager) {
return new StepBuilder("stepA", jobRepository)
.tasklet((contribution, chunkContext) -> {
log.info("Executing Step A");
// 模擬一個可能失敗的條件
boolean shouldFail = Math.random() > 0.5;
if (shouldFail) {
log.warn("Step A FAILED");
contribution.setExitStatus(ExitStatus.FAILED);
} else {
log.info("Step A COMPLETED");
contribution.setExitStatus(ExitStatus.COMPLETED);
}
return RepeatStatus.FINISHED;
}, transactionManager)
.build();
}
@Bean
public Step successStep(JobRepository jobRepository, PlatformTransactionManager transactionManager) {
return new StepBuilder("successStep", jobRepository)
.tasklet((contribution, chunkContext) -> {
log.info("Executing SUCCESS step because Step A completed successfully.");
return RepeatStatus.FINISHED;
}, transactionManager)
.build();
}
@Bean
public Step failureStep(JobRepository jobRepository, PlatformTransactionManager transactionManager) {
return new StepBuilder("failureStep", jobRepository)
.tasklet((contribution, chunkContext) -> {
log.info("Executing FAILURE step because Step A failed.");
return RepeatStatus.FINISHED;
}, transactionManager)
.build();
}
@Bean
public Job conditionalJob(JobRepository jobRepository, Step stepA, Step successStep, Step failureStep) {
return new JobBuilder("conditionalJob", jobRepository)
.start(stepA)
.on("COMPLETED").to(successStep) // 如果 Step A 成功 (ExitStatus 為 COMPLETED),轉到 successStep
.from(stepA).on("FAILED").to(failureStep) // 如果 Step A 失敗 (ExitStatus 為 FAILED),轉到 failureStep
.end() // 結束 Job 定義
.build();
}
}
```
### 5.3. Job 流程控制:並行處理 (Split Flow)
當 `Job` 中的多個流程可以獨立並行執行時,使用 `Split Flow` 可以顯著縮短總執行時間。
#### 5.3.1. 範例:同時執行兩個獨立流程
```java
import lombok.extern.slf4j.Slf4j;
import org.springframework.batch.core.Job;
import org.springframework.batch.core.Step;
import org.springframework.batch.core.job.builder.FlowBuilder;
import org.springframework.batch.core.job.builder.JobBuilder;
import org.springframework.batch.core.job.flow.Flow;
import org.springframework.batch.core.repository.JobRepository;
import org.springframework.batch.core.step.builder.StepBuilder;
import org.springframework.context.annotation.Bean;
import org.springframework.context.annotation.Configuration;
import org.springframework.core.task.SimpleAsyncTaskExecutor;
import org.springframework.transaction.PlatformTransactionManager;
@Slf4j
@Configuration
public class ParallelFlowConfig {
// 輔助方法:建立一個簡單的 Tasklet Step
private Step createStep(String name, String message, JobRepository repo, PlatformTransactionManager tm) {
return new StepBuilder(name, repo)
.tasklet((contribution, chunkContext) -> {
log.info("Executing {}: {}", name, message);
Thread.sleep(1000); // 模擬耗時操作
return org.springframework.batch.repeat.RepeatStatus.FINISHED;
}, tm)
.build();
}
@Bean
public Flow flow1(JobRepository jobRepository, PlatformTransactionManager transactionManager) {
Step step1 = createStep("step1", "Processing data for flow 1", jobRepository, transactionManager);
Step step2 = createStep("step2", "Archiving data for flow 1", jobRepository, transactionManager);
return new FlowBuilder<Flow>("flow1")
.start(step1)
.next(step2)
.build();
}
@Bean
public Flow flow2(JobRepository jobRepository, PlatformTransactionManager transactionManager) {
Step step3 = createStep("step3", "Generating report for flow 2", jobRepository, transactionManager);
return new FlowBuilder<Flow>("flow2")
.start(step3)
.build();
}
@Bean
public Step finalStep(JobRepository jobRepository, PlatformTransactionManager transactionManager) {
return createStep("finalStep", "All parallel flows are complete.", jobRepository, transactionManager);
}
@Bean
public Job parallelJob(JobRepository jobRepository, Flow flow1, Flow flow2, Step finalStep) {
return new JobBuilder("parallelJob", jobRepository)
.start(flow1)
.split(new SimpleAsyncTaskExecutor()) // 使用 TaskExecutor 實現並行
.add(flow2) // 添加另一個並行流程
.next(finalStep) // 兩個並行流程都完成後,執行 finalStep
.end()
.build();
}
}
```
---
## 章節六:進階主題 - 延遲綁定與作用域 (`@JobScope`, `@StepScope`)
在批次作業中,我們經常需要在 `Job` 啟動時才動態地決定某些 `Step` 元件的參數,例如要讀取的檔案名稱或要處理的日期。Spring Batch 提供了 `@JobScope` 和 `@StepScope` 兩個作用域來實現此功能,這被稱為「延遲綁定」(Late Binding)。
### 6.1. 什麼是 `@JobScope` 和 `@StepScope`?
- **`@JobScope`**: 標註在一個 `@Bean` 上,表示這個 Bean 的生命週期與 `Job` 的執行相同。它會在每次 `Job` 執行時被創建一次。`@JobScope` 的 Bean 可以注入 `JobParameters`。
- **`@StepScope`**: 標註在一個 `@Bean` 上,表示這個 Bean 的生命週期與 `Step` 的執行相同。它會在每次 `Step` 執行時被創建一次。`@StepScope` 的 Bean 不僅可以注入 `JobParameters`,還可以注入 `StepContext`。
### 6.2. 使用場景
最常見的場景是將 `JobParameters` 中的值注入到 `ItemReader`、`ItemWriter` 或 `Tasklet` 中。
### 6.3. 範例:動態傳遞檔案名稱給 `ItemReader`
這個範例將展示如何透過 `JobParameters` 在啟動 `Job` 時動態指定要讀取的 CSV 檔案路徑。
#### 6.3.1. 修改 `ItemReader` Bean
在 `BasicChunkComponents` 配置類別中,修改 `personReader` Bean,添加 `@StepScope` 註解,並使用 `@Value` 註解來接收 `jobParameters`。
```java
import org.springframework.batch.core.configuration.annotation.StepScope;
import org.springframework.batch.item.file.FlatFileItemReader;
import org.springframework.batch.item.file.builder.FlatFileItemReaderBuilder;
import org.springframework.beans.factory.annotation.Value;
import org.springframework.context.annotation.Bean;
import org.springframework.context.annotation.Configuration;
import org.springframework.core.io.FileSystemResource;
// ...
@Bean
@StepScope // 標註為 Step 作用域
public FlatFileItemReader<Person> personReader(
@Value("#{jobParameters['input.file.path']}") String filePath) { // 使用 SpEL 從 jobParameters 注入值
return new FlatFileItemReaderBuilder<Person>()
.name("personItemReader")
.resource(new FileSystemResource(filePath)) // 使用動態傳入的路徑
.delimited()
.names("firstName", "lastName")
.targetType(Person.class)
.build();
}
```
**重要提示**:
- 只有 `@StepScope` 或 `@JobScope` 的 Bean 才能使用 `#{jobParameters['...']}` 或 `#{jobExecutionContext['...']}` 這種 SpEL 表達式進行延遲綁定。
- `@Value` 註解來自 `org.springframework.beans.factory.annotation.Value`。
- 由於代理機制的關係,被 `@JobScope` 或 `@StepScope` 標註的 Bean 的配置方法,其返回類型應為具體的類(如 `FlatFileItemReader`),而不是介面(如 `ItemReader`)。
#### 6.3.2. 執行 `Job` 時傳遞參數
修改 `JobRunner`,在啟動 `Job` 時傳入檔案路徑。
```java
// 修改 JobRunner.java
@Component
public class JobRunner implements CommandLineRunner {
private final JobLauncher jobLauncher;
private final Job processPersonsJob; // 注入中級範例的 Job
public JobRunner(JobLauncher jobLauncher, Job processPersonsJob) {
this.jobLauncher = jobLauncher;
this.processPersonsJob = processPersonsJob;
}
@Override
public void run(String... args) throws Exception {
JobParameters jobParameters = new JobParametersBuilder()
.addLong("time", System.currentTimeMillis())
.addString("input.file.path", "src/main/resources/input.csv") // 動態傳入檔案路徑
.toJobParameters();
jobLauncher.run(processPersonsJob, jobParameters);
}
}
```
現在,`ItemReader` 變得更加靈活,可以在每次啟動 `Job` 時處理不同的檔案,而無需修改程式碼。
---
## 章節七:進階主題 - 多執行緒步驟 (Multi-threaded Step)
當處理大量數據時,單一執行緒的 `Step` 可能會成為效能瓶頸。Spring Batch 允許透過配置多執行緒 `Step` 來並行處理數據塊(chunks),從而顯著提升處理速度。
### 7.1. 為什麼使用多執行緒?
- **提升效能**: 利用多核心 CPU 的能力,同時處理多個數據塊。
- **縮短處理時間**: 對於 I/O 密集型或 CPU 密集型的任務,並行處理可以大幅縮短總體批次作業的執行時間。
### 7.2. 如何設定多執行緒 Step
設定多執行緒 `Step` 的關鍵在於提供一個 `TaskExecutor`,並確保 `ItemReader`、`ItemProcessor` 和 `ItemWriter` 是 thread-safe 的。
#### 7.2.1. 範例:配置一個多執行緒的 `Step`
```java
import com.example.springbatchdemo.model.Person;
import org.springframework.batch.core.Job;
import org.springframework.batch.core.Step;
import org.springframework.batch.core.job.builder.JobBuilder;
import org.springframework.batch.core.repository.JobRepository;
import org.springframework.batch.core.step.builder.StepBuilder;
import org.springframework.batch.item.ItemProcessor;
import org.springframework.batch.item.ItemReader;
import org.springframework.batch.item.ItemWriter;
import org.springframework.context.annotation.Bean;
import org.springframework.context.annotation.Configuration;
import org.springframework.core.task.SimpleAsyncTaskExecutor;
import org.springframework.core.task.TaskExecutor;
import org.springframework.transaction.PlatformTransactionManager;
@Configuration
public class MultiThreadedBatchConfig {
// 1. 定義一個 TaskExecutor
@Bean
public TaskExecutor taskExecutor() {
return new SimpleAsyncTaskExecutor("spring_batch_"); // 為執行緒設定前綴
}
// 2. 在 Step 中配置 TaskExecutor
@Bean
public Step multiThreadedStep(JobRepository jobRepository,
PlatformTransactionManager transactionManager,
ItemReader<Person> personReader, // 必須是 thread-safe 的
ItemProcessor<Person, Person> personProcessor, // 必須是 thread-safe 的
ItemWriter<Person> personWriter, // 必須是 thread-safe 的
TaskExecutor taskExecutor) {
return new StepBuilder("multiThreadedStep", jobRepository)
.<Person, Person>chunk(100, transactionManager) // 增加 chunk size 以發揮多執行緒優勢
.reader(personReader)
.processor(personProcessor)
.writer(personWriter)
.taskExecutor(taskExecutor) // 設定 TaskExecutor
.build();
}
@Bean
public Job multiThreadedJob(JobRepository jobRepository, Step multiThreadedStep) {
return new JobBuilder("multiThreadedJob", jobRepository)
.start(multiThreadedStep)
.build();
}
}
```
### 7.3. Thread Safety 的重要性
當 `Step` 在多個執行緒中執行時,所有共享的組件都必須是 thread-safe 的,以避免數據競爭和狀態不一致的問題。
- **`ItemProcessor` 和 `ItemWriter`**:
- 如果它們是無狀態的(stateless),即處理一個 item 不依賴於其他 item 的處理結果,那麼它們通常是 thread-safe 的。
- 如果它們有狀態(stateful),例如需要計數或緩存,您必須使用 `synchronized` 關鍵字或 `java.util.concurrent` 包中的工具來確保 thread-safe。
- **`ItemReader`**:
- 這是最需要注意的部分。大多數 Spring Batch 提供的 `ItemReader`(如 `JdbcPagingItemReader`, `JpaPagingItemReader`)本身就是 thread-safe 的。
- 然而,`FlatFileItemReader` 和 `StaxEventItemReader` **不是** thread-safe 的,因為它們需要在內部維護讀取位置的狀態。
#### 7.3.1. 讓 `ItemReader` 變為 thread-safe
如果 `ItemReader` 不是 thread-safe 的,Spring Batch 提供了一個簡單的解決方案:使用 `SynchronizedItemStreamReader` 進行包裝。
```java
import org.springframework.batch.item.support.SynchronizedItemStreamReader;
import org.springframework.batch.item.support.builder.SynchronizedItemStreamReaderBuilder;
// ... 其他 import
@Configuration
public class ThreadSafeReaderConfig {
// 假設 originalReader 是原本的、非 thread-safe 的 FlatFileItemReader
@Bean
@StepScope
public SynchronizedItemStreamReader<Person> synchronizedPersonReader(
FlatFileItemReader<Person> originalReader) {
return new SynchronizedItemStreamReaderBuilder<Person>()
.delegate(originalReader) // 將非 thread-safe 的 reader 委託給它
.build();
}
}
```
然後,在 `multiThreadedStep` Bean 中,注入這個同步的 `SynchronizedItemStreamReader` 而不是原始的 `ItemReader`。這樣,`SynchronizedItemStreamReader` 會確保每次只有一個執行緒可以呼叫 `read()` 方法,從而避免了狀態衝突。
---
## 章節八:進階主題 - 資料庫讀取器 (Database Readers)
當處理非常大量的資料庫紀錄時,一次性將所有資料載入記憶體是不可行的。為了解決這個問題,Spring Batch 提供了兩種主要的資料庫讀取策略:基於指標(Cursor-based)和基於分頁(Paging)。
### 8.1. 基於指標的讀取 (Cursor-based Readers)
使用資料庫指標是傳統批次處理的常見方法。它在資料庫層面建立一個指向結果集的指標(Cursor),`ItemReader` 每次呼叫 `read()` 方法時,指標向下移動一行並回傳對應的資料。
- **優點**:對於簡單的循序讀取,狀態管理直接由資料庫處理。
- **缺點**:長時間執行的作業會長時間佔用一個資料庫連線,這在高併發環境下可能成為瓶頸。此外,指標的執行緒安全性(thread-safety)通常較差,不適合在多執行緒 `Step` 中直接使用。
#### 8.1.1. `JdbcCursorItemReader`
`JdbcCursorItemReader` 是基於指標讀取的 JDBC 實現。它開啟一個 `ResultSet` 並逐行讀取。
**範例:設定 `JdbcCursorItemReader`**
```java
import com.example.springbatchdemo.model.CustomerCredit;
import org.springframework.batch.item.database.JdbcCursorItemReader;
import org.springframework.batch.item.database.builder.JdbcCursorItemReaderBuilder;
import org.springframework.context.annotation.Bean;
import org.springframework.context.annotation.Configuration;
import javax.sql.DataSource;
@Configuration
public class JdbcCursorReaderConfig {
@Bean
public JdbcCursorItemReader<CustomerCredit> customerCreditCursorReader(DataSource dataSource) {
return new JdbcCursorItemReaderBuilder<CustomerCredit>()
.name("customerCreditCursorReader")
.dataSource(dataSource)
.sql("SELECT id, name, credit FROM customer ORDER BY id")
.rowMapper(new CustomerCreditRowMapper()) // 將 ResultSet 映射到物件
.build();
}
}
```
### 8.2. 基於分頁的讀取 (Paging Readers)
分頁是一種更現代且推薦的策略,它透過執行多次查詢來獲取資料,每次查詢只獲取一「頁」的資料。
- **優點**:
- **記憶體效率**:避免一次性載入大量資料,防止記憶體溢出。
- **連線管理**:每次分頁查詢使用一個連線,用完後即可釋放,對資料庫連線池更友好。
- **可重啟性與執行緒安全**:分頁讀取器通常是無狀態的,易於重啟,並且本身就是執行緒安全的,可以直接用於多執行緒 `Step`。
#### 8.2.1. `JdbcPagingItemReader`
`JdbcPagingItemReader` 是使用純 JDBC 實現分頁讀取的標準元件。它需要一個 `PagingQueryProvider` 來產生針對特定資料庫的分頁 SQL 查詢。最方便的方式是使用 `SqlPagingQueryProviderFactoryBean`,它能自動偵測資料庫類型並選擇合適的實現。
為了確保分頁的正確性,每次查詢都必須有一個穩定的排序順序。`sortKey` 就是用來指定排序的欄位。**這個欄位必須具有唯一性約束(例如主鍵)**,以保證在多次查詢之間不會遺漏或重複讀取任何資料。
**範例:設定 `JdbcPagingItemReader`**
```java
import com.example.springbatchdemo.model.CustomerCredit;
import org.springframework.batch.item.database.JdbcPagingItemReader;
import org.springframework.batch.item.database.PagingQueryProvider;
import org.springframework.batch.item.database.builder.JdbcPagingItemReaderBuilder;
import org.springframework.batch.item.database.support.SqlPagingQueryProviderFactoryBean;
import org.springframework.context.annotation.Bean;
import org.springframework.context.annotation.Configuration;
import javax.sql.DataSource;
import java.util.HashMap;
import java.util.Map;
@Configuration
public class JdbcPagingReaderConfig {
@Bean
public JdbcPagingItemReader<CustomerCredit> customerCreditReader(DataSource dataSource, PagingQueryProvider queryProvider) {
Map<String, Object> parameterValues = new HashMap<>();
parameterValues.put("status", "NORMAL");
return new JdbcPagingItemReaderBuilder<CustomerCredit>()
.name("customerCreditReader")
.dataSource(dataSource)
.queryProvider(queryProvider)
.parameterValues(parameterValues) // 綁定 WHERE 子句中的參數
.rowMapper(new CustomerCreditRowMapper()) // 將 ResultSet 映射到物件
.pageSize(1000) // 每一頁讀取 1000 筆紀錄
.build();
}
@Bean
public SqlPagingQueryProviderFactoryBean queryProvider(DataSource dataSource) {
SqlPagingQueryProviderFactoryBean provider = new SqlPagingQueryProviderFactoryBean();
provider.setDataSource(dataSource);
provider.setSelectClause("SELECT id, name, credit");
provider.setFromClause("FROM customer");
provider.setWhereClause("WHERE status = :status");
provider.setSortKey("id"); // 必須是唯一的排序鍵
return provider;
}
}
```
#### 8.2.2. `JpaPagingItemReader`
`JpaPagingItemReader` 是針對 JPA(Java Persistence API)的分頁讀取實現。它使用 JPQL(Java Persistence Query Language)來查詢資料,並利用 JPA 本身的分頁能力。
一個重要的特性是,`JpaPagingItemReader` 在讀取完每一頁的資料後,會自動清除持久化上下文(Persistence Context),這使得處理過的實體(entities)可以被垃圾回收,從而有效管理記憶體。
**範例:設定 `JpaPagingItemReader`**
```java
import com.example.springbatchdemo.model.CustomerCredit;
import org.springframework.batch.item.database.JpaPagingItemReader;
import org.springframework.batch.item.database.builder.JpaPagingItemReaderBuilder;
import org.springframework.context.annotation.Bean;
import org.springframework.context.annotation.Configuration;
import jakarta.persistence.EntityManagerFactory;
@Configuration
public class JpaPagingReaderConfig {
@Bean
public JpaPagingItemReader<CustomerCredit> customerCreditReader(EntityManagerFactory entityManagerFactory) {
return new JpaPagingItemReaderBuilder<CustomerCredit>()
.name("customerCreditReader")
.entityManagerFactory(entityManagerFactory)
.queryString("SELECT c FROM CustomerCredit c ORDER BY c.id") // JPQL 查詢語句
.pageSize(1000) // 每一頁讀取 1000 筆紀錄
.build();
}
}
```
> **注意**: 在使用 `JpaPagingItemReader` 時,`queryString` 中通常需要包含一個 `ORDER BY` 子句來確保讀取順序的一致性,這與 `JdbcPagingItemReader` 中 `sortKey` 的作用類似。
---
## 附錄:核心組件補充
### A.1. Job 補充
`Job` 是整個批次處理的容器,它由一個或多個 `Step` 組成。
- **`JobInstance`**: 由 `Job` 名稱和 `JobParameters` 唯一確定,代表一次邏輯上的執行。
- **`JobExecution`**: `JobInstance` 的一次實際執行嘗試。
- **流程控制**: `Job` 透過 `.start()`, `.next()`, `.on()`, `.to()`, `.split()` 等方法來定義 `Step` 之間的複雜執行流程。
- **監聽器**: `JobExecutionListener` 可以在 `Job` 的生命週期事件(開始前/結束後)中執行自訂邏輯。
### A.2. Step 補充
`Step` 是 `Job` 的核心執行單元,封裝了獨立的處理階段。
- **類型**: 主要分為 `Chunk-oriented` 和 `Tasklet` 兩種。
- **事務性**: 每個 `Step` 的執行都在事務的保護下。對於 `Chunk-oriented` 步驟,事務在每個 chunk 處理完後提交。
- **容錯**: `faultTolerant()` 方法開啟了 `Step` 的容錯能力,允許配置 `skip` 和 `retry` 策略。
- `skip()`: 定義可跳過的異常類型和次數上限 (`skipLimit`)。
- `retry()`: 定義可重試的異常類型和次數上限 (`retryLimit`)。
- **監聽器**: `StepExecutionListener`, `ChunkListener`, `SkipListener` 等提供了在 `Step` 生命週期的各個階段插入自訂邏輯的能力。
### A.3. Repository-based `ItemReader`/`ItemWriter`
當專案使用 Spring Data JPA 時,可以直接利用 `Repository` 進行讀寫,無需編寫額外的 `ItemReader` 和 `ItemWriter` 實現,這大大簡化了數據庫的讀寫操作。
- **`RepositoryItemReader`**: 利用 `PagingAndSortingRepository` 進行分頁讀取,高效且能防止記憶體溢出。需要指定 `repository`, `methodName` 和 `sorts`。
- **`RepositoryItemWriter`**: 這是一個 `ItemWriter` 的包裝器,專門用於與 Spring Data 的 `CrudRepository` 互動。
- **預設行為與效能**: 預設情況下,`RepositoryItemWriter` 會呼叫 `CrudRepository.saveAll(Iterable)` 方法來一次性儲存整個 chunk 的 items。這是最高效的方式,因為它能利用底層 JPA/Hibernate 的批次更新機制。實際的寫入效能主要取決於 `saveAll` 的實現以及 `application.properties` 中的 JDBC 批次大小設定(`spring.jpa.properties.hibernate.jdbc.batch_size`)。
- **方法自訂**: 可以透過 `.methodName("customSave")` 來指定呼叫 Repository 上的其他方法。但請注意,如果將方法名設為 `save`,`RepositoryItemWriter` 將會退化為逐筆寫入,這會嚴重影響效能,因為每個 `save` 都可能產生一次獨立的資料庫操作。因此,除非有特殊需求,否則應保持預設的 `saveAll` 行為。
- **Thread Safety**: 只要注入的 `CrudRepository` Bean 是 thread-safe 的(在標準的 Spring 環境中通常是),那麼 `RepositoryItemWriter` 在配置完成後也是 thread-safe 的,可以在多執行緒的 `Step` 中使用。