###### tags: `zoego` `開` `Word`
# Word 講義
<style>
/* 加入Logo */
.ui-toc-affix:{position: relative;}
.toc:before{
content: url(https://zoego.tech/img/logo.svg);
width:200px;
position:fixed; top:0 ; left:0;
}
/* 調整 左側NAV */
.markdown-body { max-width: 900px !important;}
.markdown-body h1,.markdown-body h2{border-bottom: none;}
.ui-toc-dropdown .nav>li>a{ color: #000}
.ui-toc-dropdown .nav>.active:focus>a, .ui-toc-dropdown .nav>.active:hover>a, .ui-toc-dropdown .nav>.active>a{ color:#C00000;}
/* h1~H5 修改 */
h1{ color:#4C4C6D; }
.h2{ color:#52006A; background-color:#A2DBFA; line-height:1.8em;font-size:.9em;display:block; padding-left:10px;border-radius:5px;}
h3{ color:#BF1363; }
.h4{color:#000099; font-size:1.2em;}
.h5{color:#7030A0; font-size:1.2em;}
/* 講師資訊 美化 */
.alert-warning { border-width: 2px; width: 60%; margin: auto;}
/* 指令 縮圖 ICON圖設定 */
.img3{ width:30px; display:inline-block;margin:0 5px;}
.img4{ width:40px; display:inline-block;margin:0 5px;}
.img5{ width:50px; display:inline-block;margin:0 5px;}
.img6{ width:60px; display:inline-block;margin:0 5px;}
/* 圖片尺寸 設定 */
.img20{ width:20%; margin:20px auto; display:block; text-align: center;}
.img30{ width:30%; margin:20px auto; display:block; text-align: center;}
.img40{ width:40%; margin:20px auto; display:block; text-align: center;}
.img50{ width:50%; margin:20px auto; display:block; text-align: center;}
.img60{ width:60%; margin:20px auto; display:block; text-align: center;}
.img70{ width:70%; margin:20px auto; display:block; text-align: center;}
.img80{ width:80%; margin:20px auto; display:block; text-align: center;}
.img90{ width:90%; margin:20px auto; display:block; text-align: center;}
.img100{ width:100%; margin:20px auto; display:block; }
/* 連結URL 調整 */
.urlr{ text-align:right; line-height:1.5em;display:block;}
.urll{ line-height:1.5em;display:block;}
/* 提供講義標示頁碼 */
.page{display:flex; justify-content: right;}
.page span{
background:#ffdd75;border:1px solid #d1a128;border-radius:5px; padding:5px;color:#000;text-align:right; float:right;
}
/* Slider 外掛 美化 */
iframe{ width:850px; height:478px; display:block; margin:auto; border-width: 0;border:2px solid #000;}
/* 設定 pre 及 快速鍵 */
.markdown-body code { border: 1px solid #000; margin:0 5px; }
.markdown-body pre>code { font-size: 1.2em; }
.markdown-body pre { border: 1px solid #ab0505 !important; margin:10px 0; padding:5px 10px;}
/* 快速鍵 > 語法於P中 */
.markdown-body p>code { color:#BF1363 !important; border:none; background:none}
/* 表格 設定 */
.markdown-body table {
width: fit-content;
margin: auto;
}
.markdown-body table th, .markdown-body table td {
border: 1px solid #7F7F7F;
}
.tableTitle{text-align:center; display:block;}
.red{color:#BF1363;font-weight:bold;}
.blue{color:#265F92;font-weight:bold;}
.step{ padding-left:1.5em;color:blue;font-size:1.1em; }
.textc{text-align:center; display:block;}
.markdown-body p{ margin-bottom: 0;}
.ex{color:#333399 ; font-size:1.2em; font-weight:bold; line-height:1em;}
/* 置中、圓角框、項目 */
.title{ text-align:center; display:block;color:#766161;font-size:1.2em;font-weight:bold; border:1px solid;line-height:2em;border-radius:5px}
</style>
:::warning
<span class="textc" style="font-weight:bold; font-size:1.2em">課程講師資訊</span>巨匠電腦講師:呂心怡
E-mail:zoego99@gmail.com <span class="urll">[課程練習下載區:連結](https://drive.google.com/file/d/1vnQ4DYkWNmiy2ul-gAnWPGYvRegirx0u/view?usp=drive_link) </span>
:::
# O、準備工作
## <span class="h2">1. 工具配置【快速存取工具列】</span>
### (1) 原始指令
【檔案】> 選項 > 【快速存取工具列】
<a href="https://hackmd.io/_uploads/rkEiEmvEY.png"><span class="img100">
</span></a>
### (2) 設定方式
針對【常用的指令按鈕】>右鍵【新增/移除至快速存取工具列】
<span class="img50"></span>
### (3) 一般建議
快速存取工具列:所有Word、Excel及PPT皆相同建議
<span class="img50"></span>
# 一、【字】的處理
## <span class="h2">1. 選取方式</span>
<a href="https://hackmd.io/_uploads/BJBG--RiJe.png"><span class="img100"></span></a>
## <span class="h2">2. 符號加入</span>
<span class="step">指令:【插入】>【符號】>【其他符號】</span>
<a href="https://hackmd.io/_uploads/r1GXNGnmt.png"><span class="img100"></span></a>
<span style="color:#333399 ; font-size:1.2em; font-weight:bold; line-height:1em;margin-left:60px;">🔶 讀書時所用的符號</span>
<span class="img80">
</span>
<span style="color:#333399 ; font-size:1.2em; font-weight:bold; line-height:1em;margin-left:60px;">🔶 看起來像圖片的文字</span>
<span class="img80"></span>
## <span class="h2">3. Win10 內建功能</span>
### (1) 語音輸入
<a href="https://hackmd.io/_uploads/SJ3kypp60.png"><span class="img70"></span></a>
### (2) 符號加入
<a href="https://hackmd.io/_uploads/rJ3FB2apC.png"><span class="img60"></span></a>
## <span class="h2">4. 標點符號加入</span>
<span class="red bold fs1_1"> ※ 所有標點號輸入前加`Ctrl`</span>
<a href="https://hackmd.io/_uploads/SyWVH3a60.png"><span class="img100"></span></a>
## <span class="h2">5. 輸入時快速鍵</span>
<a href="https://hackmd.io/_uploads/S1tMvz27F.png"><span class="img70"></span></a>
## <span class="h2">6. <span class="img3"></span>剪下、<span class="img3"></span>複製、<span class="img3"></span>貼上</span>
### 方法1:基本操作
<span class="img60"></span>
### 方法2:拖曳法
<span class="img40"></span>
### ※ 快速鍵鍵盤配置
<span class="img80">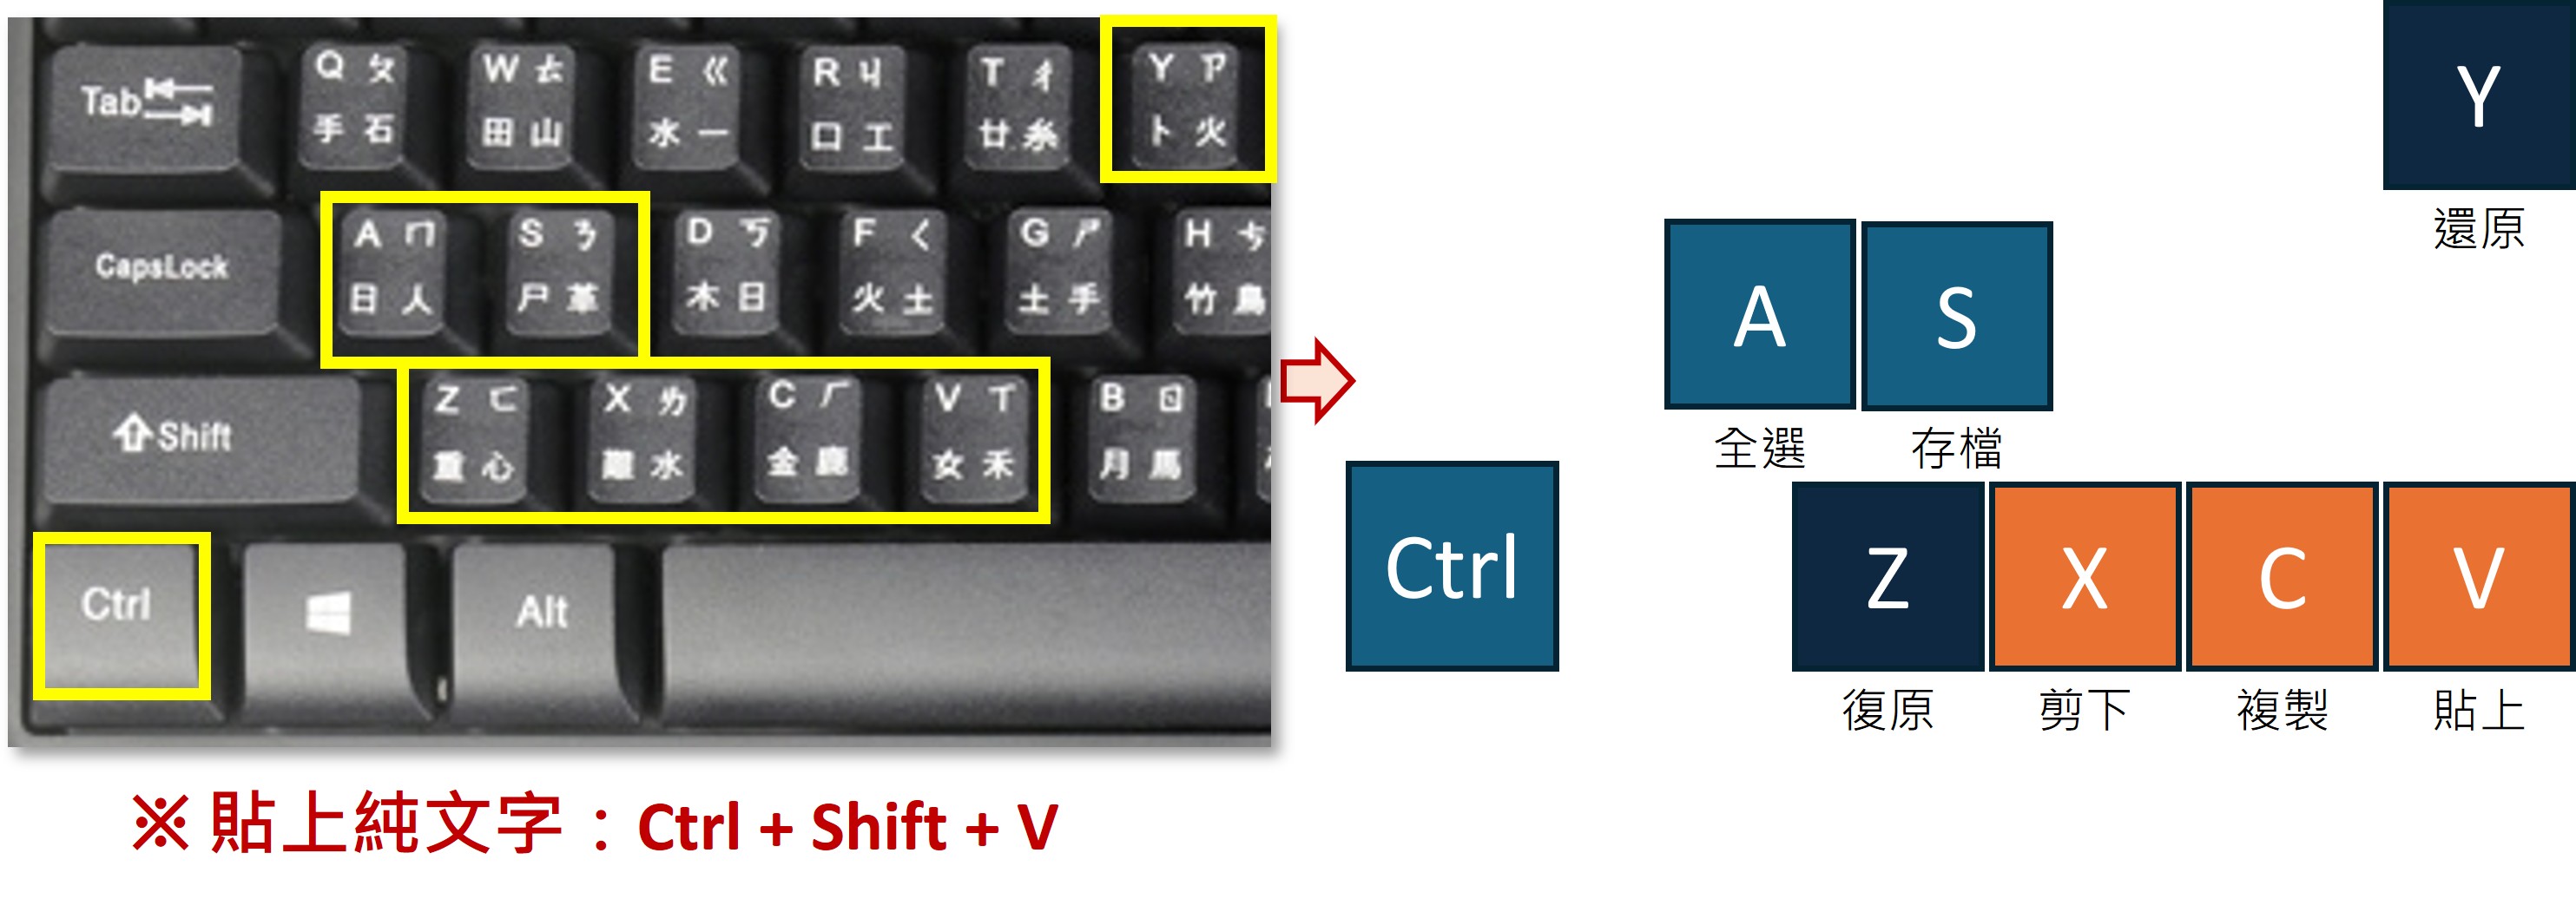</span>
## <span class="h2">7. 字型美化</span>
<span class="img60"></span>
## <span class="h2">8. <span class="img3"></span>複製格式
<span class="img50"></span></span>
### ※ 多地方相同格式美化
文件中,多處地方相同格式的美化方法說明:<br>
<span class="blue" style="padding-left:2em">方法1:利用 `Ctrl` 多範圍選取後,同時美化</span><br>
<span class="blue" style="padding-left:2em">方法2:利用<span class="img3"></span>複製格式,逐一刷取美化</span>
## <span class="h2">9. 貼上有幾種選擇</span>
<br>
|方法序|指令|說明|
|-|-|-|
|方法1|【貼上】>【保留來源格式】<br> 等同於 `Ctrl`+`V`|缺點:不符合Word被貼入的文件格式大小<br>優點:全部貼入,包含圖片|
|方法2|【貼上】>【只留文字】|缺點:圖片沒有貼入,需要逐一貼入<br>優點:符合Word被貼入的文件格式大小|
|方法3|【常用】>【清除格式】<br>(<span class="img3"></span>橡皮擦)|去除所有格式,<br>還原為<br>【預設文字格式:新細明體 / 12 大小 / 黑色】
## <span class="h2">10. 螢幕縮放</span>
<span class="blue bold fs1_1">a. 螢幕縮放</span>
<span class="step">快速鍵:`Ctrl` + `滾輪捲動`</span>
<br>
<span class="blue bold fs1_1">b. 多頁檢視排列方法</span>
<span class="img70"></span>
# 二、【段落】的處理
## <span class="h2">1. Word 文件基本條件</span>
<span class="blue blod fs1_1">(1) 【版面配置】>【邊界】:確認紙張的四邊留白</span>
預設值:上下 2.54 公分 / 左右 3.18 公分
課程練習值: 上下左右 1 公分
<span class="img80"></span>
<span class="blue blod fs1_1">(2) 預設文字格式:新細明體 / 12 大小 / 黑色</span>
## <span class="h2">2. 尺規的啟動</span>
<span class="img100"></span>
## <span class="h2">3. 尺規單位的確認</span>
<span class="step">S1. 【檔案】>【選項】</span>
<span class="step">S2. 【進階】>【顯示字元寬度單位】</span>
<span class="img60"></span>
<span style="color:#333399 ; font-size:1.2em; font-weight:bold; line-height:1em;margin-left:60px;">🔶 以A4紙張為例:公分0-14 / 字元:0-34</span>
## <span class="h2">4. 原始指令</span>
<span class="step">【常用】>【段落】工作群組之下</span>
<span class="img90"></span>
## <span class="h2">5. 尺規與段落關係</span>
### (1) 段落基本型式
<span class="img70"></span>
### (2) 利用【尺規】設定段落
<span class="img70"></span><span style="color:#333399 ; font-size:1.2em; font-weight:bold; line-height:1em;margin-left:60px;">🔶 尺規微調:(1)左鍵+右鍵 (2)左鍵+`Alt`鍵</span>
<a href="https://hackmd.io/_uploads/HyBNO0suK.png"><span class="img30"></span></a>
## <span class="h2">6. 尺規與原始指令關係</span>
### (1) 利用指令設定
<span class="step">指令:【常用】>【段落】工作群組之下</span>
<span class="img100"></span>
### (2) 縮排中的【特殊】
<span class="img100"></span>
### (3) 縮排中的【左】設定
<span class="img70"></span>
## <span class="h2">7. 段落處理小技巧分享</span>
### 1. 【行距】設定困擾
#### <span class="h4">(1) 【固定行高】圖片及文字卡住不顯示</span>
<a href="https://hackmd.io/_uploads/B1Vg1HnmY.png"><span class="img100"></span></a>
#### <span class="h4">(2) 【最小行高】行距過大</span>
<a href="https://hackmd.io/_uploads/B1M0kB27F.png"><span class="img100"></span></a>
<a href="https://hackmd.io/_uploads/HJO-o0idY.png"><span class="img60"></span></a>
### 2. 小圖與內文的對齊方式
#### <span class="h4">(1) 方法</span>
<span class="img50"></span><span class="img50"></span>
#### <span class="h4">(2) 情境結合</span>
<a href="https://hackmd.io/_uploads/BkkxUCnmK.png"><span class="img100"></span></a>
### 3. 中文標點符號排版的困擾
#### <span class="h4">(1) 困擾:</span>
<span class="img70" style="border:1px solid #000"></span>
#### <span class="h4">(2) 解決方法:</span>
<span class="img60"></span>
▶️ 什麼是避頭尾?
https://blog.justfont.com/2023/10/punctuationrules/
### 4. 精確排版
#### <span class="h4">(1) 指令:【常用】> <span class="img6"></span>【顯示/隱藏編輯標記】</span>
<span class="img40"></span>
#### <span class="h4">(2) 相關設定:</span>
<span class="step">【檔案】>【選項】></span>
<span class="img70" style="border:1px solid #000"></span>
### 5. 清除相關格式
#### <span class="h4">(1) 指令:【常用】> <span class="img6"></span>【清除所有格式】</span>
<span class="img60"></span>
#### <span class="h4">(2)必要使用時機:</span>
<span class="step">🔹 單行段落插入圖片</span>
<span class="step">🔹 大綱標題之下,新增其內文,若產生大綱編號時</span>
### 6. 使用【微軟正黑體】產生行距過大困擾
#### <span class="h4">(1)原因:【檢視】>【格線】</span>
<a href="https://hackmd.io/_uploads/BJ8OSnh7K.png"><span class="img100" style="border:1px solid #000"></span></a>
#### <span class="h4">(2)解決方法1:【常用】>【段落】工作群組之下</span>
<span class="img60"></span>
#### <span class="h4">(2)解決方法2:【版面配置】>【版面設定】工作群組之下</span>
<span class="img60"></span>
# 三、【樣式】的處理
## <span class="h2">A、使用樣式優點</span>
<a href="https://hackmd.io/_uploads/rytlF22Qt.png"><span class="img100" style="border:1px solid #000"></span></a>
## <span class="h2">B、 設定步驟</span>
<a href="https://hackmd.io/_uploads/Bkd0P63XF.png"><span class="img100" style="border:1px solid #000; padding:10px"></span></a>
## <span class="h2">C、 YouTube 影片說明</span>
### S1:樣式介紹
<span style="color:#b71c1c; display:block; background:#fce4ec; text-align:center; line-height:2em">【Youtube】</span>
{%youtube 9mqX6Fn1kFM %}
### S2:樣式與大綱及目錄結合
<span style="color:#b71c1c; display:block; background:#fce4ec; text-align:center; line-height:2em">【Youtube】</span>
{%youtube psVqws8wP7s %}
# 四、【段落】其他功能介紹
## <span class="h2">A、定位點</span>
### 1. 類型
<span class="img80"></span>
### 2. 課程範例
<a href="https://hackmd.io/_uploads/HJKnyC2Qt.png"><span class="img100">
</span></a>
### 3. 說明
#### <span class="h4">(1) 利用Tab執行位移(表格內改為【Ctrl】+【Tab】)</span>
#### <span class="h4">(2) 啟動 <span class="img6" ></span>【顯示/隱藏編輯標記】</span>
<br><br>
## <span class="h2">B、項目條例</span>
### 1. 指令
<span class="step">【常用】>【段落】</span>
<span class="img50"></span>
### 2. 類型
<span class="img100"></span>
### 3.排版說明
#### <span class="h4">(1) 凸排排版</span>
<span class="img50"></span>
#### <span class="h4">(2) 強制換行</span>
<span class="step">🔹 `Shift`+`Enter`</span>
<span class="step">🔹 原始指令</span>
<span class="img70"></span>
### 4.多層次清單
#### <span class="h4">(1) 指令</span>
<span class="step">【常用】>【段落】><span class="img6"></span> >定義新的清單樣式</span>
#### <span class="h4">(2) 升降階</span>
<span class="step">🔹 方法1:【常用】>【段落】></span><span class="img6"></span><span class="step" style="padding-left:10px" >> 變更清單階層</span>
<span class="step">🔹 方法2:【常用】>【段落】></span>
<span class="img60"></span>
<span class="step">📌 (a) 降階:<span class="img6"></span><span style="color:red">`Tab`</span></span>
<span class="step">📌 (b) 升階:<span class="img6"></span><span style="color:red">`Shift`+`Tab`</span></span>
# 五、圖片介紹
## <span class="h2">A. 常用圖檔格式</span>
<span style="text-align:center; display:block;color:#766161;font-size:1.2em;font-weight:bold;">🔹點陣圖🔹</span>
|類型|說明|
|-|-|
|<span style="color:#BF1363;font-weight:bold">Webp</span>|1.WebP是Google新推出影像技術,讓網頁圖檔有效進行壓縮,又不影響圖片實際清晰度,讓網頁下載速度加快<br>2.目前許多軟體不支援,需要藉由工具轉換為常用圖檔格式<br>(1) 方法1:加入 [Chrome 套件](https://chrome.google.com/webstore/detail/save-image-as-type/gabfmnliflodkdafenbcpjdlppllnemd/related)<br>【圖片另存為JPG/PNG/WebP】,加入後針對想下載圖片,按右鍵即可選擇轉換格式<br>(2)方法2:線上轉檔網站,例如:[iLoveIMG](https://www.iloveimg.com/zh-tw/convert-to-jpg/webp-to-jpg)|
|<span style="color:#BF1363;font-weight:bold">jpg、jpeg</span>|主要儲存照片、支援全彩、不支援透明及動畫、網頁圖片由Webp取代趨勢|
|<span style="color:#BF1363;font-weight:bold">png</span>|取jpg與gif優點,全彩、透明,但不支援動畫|
|GIF|多張圖片依序顯示,營造動畫效果、圖片色彩少、支援透明及動畫|
|tiff、tif|傳統影像印刷、掃瞄檔|
|BMP|點陣圖、支援全彩、檔案大、早期圖檔格式|
|PSD|PhotoShop檔案,需要專業軟體開啟|
<span style="text-align:center; display:block;color:#766161;font-size:1.2em;font-weight:bold;">🔹向量圖🔹</span>
|類型|說明|
|-|-|
|<span style="color:#BF1363;font-weight:bold">SVG</span>|可縮放向量圖形,可由瀏覽器檢視圖檔,現階段流行格式|
|WMF|向量圖檔、任意放大縮小品質不失真、早期圖檔格式,由SVG取代|
|EPS、Ai|需要Adobe illustrator專業軟體開啟|
|swf|需要Adobe Flash專業軟體開啟,已被程式語法取代|
## <span class="h2">B. 螢幕擷取畫面</span>
<span class="img50"></span><span class="img100"></span>
# 六、表格
## <span class="h2">A、指令安排</span>
### 1. 指令安排
<span class="img70"></span>
### 2. 表格結構
<a href="https://hackmd.io/_uploads/HJLEh9DXK.png"><span class="img100"></span></a>
## <span class="h2">B、表格技巧</span>
### 1. 插入一列非表格行列
<span class="img80"></span>
#### <span class="h4">(1) 情形一:</span>
<span class="step">若第一頁第一個字是表格,則在第一個字之前按【Enter】即可</span>
#### <span class="h4">(2) 情形二:</span>
<span class="step">指令:【表格工具】>【版面配置】>【分割表格】</span>
<a href="https://hackmd.io/_uploads/HJ4PdtD7t.png"></a>
### 2. 儲存格文字對齊
<span class="img50"></span>
<span class="step">指令:【表格工具】>【版面配置】</span>
<a href="https://hackmd.io/_uploads/SJsfvFPQY.png"></a>
🔷原始指令:
<a href="https://hackmd.io/_uploads/rkLZYKDXt.png"></a>
### 3. 標題文字對齊
<span class="step">指令:【常用】>【段落】工作群組>分散對齊<span class="img5"></span>> 利用尺規調整</span>
<a href="https://hackmd.io/_uploads/H1gcSKPQF.png">
</a>
<span class="img30"></span>
### 4. 頁面多一頁的處理
<span class="img70"></span>
<span class="step">指令:【右鍵】>【段落】></span><span class="img30"></span>
### 5. 【表格】常見困擾
<span class="img70"></span>
<span class="step">指令:表格【版面配置】>【內容】></span>
<a href="https://hackmd.io/_uploads/BypNI9vmF.png"></a>
### 6. 表格中【列】常見困擾
🔷 <span style="color:blue; font-size:1.1em">困擾1:頁面有剩餘空間,表格列卻無法顯示</span>
<a href="https://hackmd.io/_uploads/H1RKP9w7t.png"></a>
🔷 <span style="color:blue; font-size:1.1em">困擾2:設定 > 表格內輸入文字卻消失</span>
🔷 <span style="color:blue; font-size:1.1em">困擾3:最小高度 > 表格列的高度過高,無法隨輸入文字中行距高度調整</span>
<span style="color:#990099 ; font-size:1.2em; font-weight:bold">【解決方法】</span>
<a href="https://hackmd.io/_uploads/Sy6YK9DmY.png"><span class="img80"></span></a>
### 7. 公式製作
<span class="step">S1:表格公式函數計算時,【範圍】表示方式:</span>
<span class="img90"></span>
<span class="step">S2:公式複製後,功能變數利用【F9】更新鍵更新。</span>
# 七、圖文彙整
## <span class="h2">A、指令及分類</span>
<a href="https://hackmd.io/_uploads/rk1_2aYmt.png"><span class="img100"></span></a>
<a href="https://hackmd.io/_uploads/SyKoZRFQK.png"><span class="img100"></span></a>
## <span class="h2">B、與文字排列</span>
<span style="color:#990099 ; font-size:1.2em; font-weight:bold">🔶 圖片視為文字,影響段落行距</span>
## <span class="h2">C、矩形、緊密</span>
### (1) 一般設定
<span class="img100"></span>
### (2) 緊密
<span style="color:#333399 ; font-size:1.2em;">S1:移除背景</span>
<span style="margin:20px;" class="img60"></span>
<span style="color:#333399 ; font-size:1.2em;">S2:編輯文字與圖形間端點</span>
<span style="margin:20px;" class="img60"></span>
<span style="color:#333399 ; font-size:1.2em;">Note:討論繪圖元件加入時圖文彙整情形</span>
<span style="margin:20px;" class="img100"></span>
## <span class="h2">D、文字在後</span>
## <span class="h2">E、文字在前的困擾</span>
<span style="color:#990099 ; font-size:1.2em; font-weight:bold">🔶困擾1:圖片無法選取</span>
<span style="margin:20px;" class="img40"></span>
<span style="color:#333399 ; font-size:1.2em; padding-left:20px">(結束時在文字上,左鍵2下)</span>
<span style="color:#990099 ; font-size:1.2em; font-weight:bold">🔶困擾2:文字不易閱讀</span>
<span style="margin:10px 20px;" class="img100"></span>
# 八、框線及網底
## <span class="h2">A、文字間</span>
<span class="step">指令:【常用】>【段落】工作群組之下</span>
<span class="img60"></span><span class="img50"></span>
<span style="color:#333399 ; font-size:1.2em;">Note:套用文字時無法任一決定四邊不同,套用段落時,反之</span><span class="img80"></span>
## <span class="h2">B、頁面間</span><span class="img80"></span>
### (1) 頁面框線
<span class="img80"></span>
<a href="https://hackmd.io/_uploads/SyKoZRFQK.png"><span class="img70"></span></a>
### (2) 頁面色彩
<span class="step">列印時預設無法顯示,故【檔案】>【選項】></span>
<span class="img80"></span>
### (3) 浮水印
<span class="img90"></span>
<span style="color:#333399 ; font-size:1.2em; font-weight:bold">🔶 浮水印執行步驟</span>
<span style="margin:20px;" class="img50"></span>
# 九、分隔設定
## <span class="h2">A、指令</span>
<span class="img100"></span>
## <span class="h2">B、文字間</span>
### (1) 分頁符號
<span class="img100">
</span>
### (2) 分欄符號
<span class="step">執行步驟:【版面配置】</span>
<span class="step">S1【欄】</span>
<span class="step">S2 置於分欄點></span>
<span class="step">S3【分隔設定】>【分欄符號】</span>
<span class="img100"></span>
### (3) 分節符號
<span class="img100"></span>
<span style="color:#333399 ; font-size:1.2em;">🔶Note:</span>
<span style="color:#333399 ; font-size:1.2em; padding-left:2em">a.【一般屬性】切割:</span>
<span style="color:#333399 ; font-size:1.2em; padding-left:3em">紙張大小、紙張方向、紙張邊界、頁碼跳頁..</span>
<span style="color:#333399 ; font-size:1.2em; padding-left:2em">b.書籍製作:</span>
<span style="color:#333399 ; font-size:1.2em; padding-left:3em">各章節、封面、目錄、附錄…</span>
# 十、開發人員
<span class="img80" style="border:1px solid #000; padding:20px"></span>
## <span class="h2">A、【啟動】開發人員</span>
<span class="step">【檔案】>【選項】>【自訂功能區】>勾選【開發人員】</span>
<a href="https://hackmd.io/_uploads/S1N3iYq7K.png"><span class="img100"></span></a>
## <span class="h2">B、控制項設定</span>
### (1) 利用【屬性】變更相關設定
### (2) 建議勾選<span class="img3" style="width:40%; vertical-align: top;"> </span>
### (3) 利用【設計模式】修改控制項說明
### (4)保護文件
<span class="step">指令:利用【限制編輯】>文件編輯方式:填寫表單</span>
<span class="img50"></span>
# 十一、其他功能
## <span class="h2">A、重覆元件加入</span>
### (1) 自動校正
方法1:【檔案】>【選項】>【校訂】>【自動校正選項】
<a href="https://hackmd.io/_uploads/HynyMYfys.png"><span class="img100"></span></a>
### (2) 快速組件、自動圖文集
<span class="blue">指令:【插入】>【快速組件】</span>
#### <span class="h4">a. 方法2:快速組件庫</span>
#### <span class="h4">b. 方法3:自動圖文集</span>
<a href="https://hackmd.io/_uploads/ryAaEKGJs.png"><span class="img80"></span></a>
<a href="https://hackmd.io/_uploads/HypsIYGkj.png"><span class="img80"></span></a>
## <span class="h2">B、(備用)Word不常用的小技巧</span>
### 1. 移除超連結
全選【Ctrl】+【A】後 > 快速鍵 【Ctrl】+【Shift】+【F9】
### 2. 移除功能變數
全選【Ctrl】+【A】後 > 快速鍵 【Ctrl】+【6】(非數字鍵盤)
## <span class="h2">C、VBA 批次圖片尺寸變更</span>
<span class="urll" style="line-height:3em">[參考文獻](https://unauna1129.medium.com/vba-Word圖片批次轉換大小-bce4f4ebcb0f) </span>
```
Sub BatchChangePicSize()
Dim picWidth As Integer
Dim picHeight As Integer
Dim oIshp As InlineShape
picHeight = 12 * 28.35
picWidth = 24 * 28.35
For Each oIshp In ActiveDocument.InlineShapes
With oIshp
.LockAspectRatio = msoFalse
.Height = picHeight
.Width = picWidth
End With
Next oIshp
End Sub
```
其中,Word中的尺寸單位默認是cm,而1cm等於28.35px(像素),由於代碼中換算設置的單位是px(像素)。所以就用尺寸高度或寬度值乘像素值。即爲:12 * 28.35 轉為 px;寬度換算方法與此相同。
## <span class="h2">D、VBA 批次轉為PDF檔</span>
<span class="step">S1:啟動【記事本】軟體>將下方語法貼入</span>
<span class="urll" style="line-height:3em">[參考文獻](https://kknews.cc/zh-tw/code/lkex9gb.html) </span>
```
On Error Resume Next
Const wdExportFormatPDF = 17
Set oWord = WScript.CreateObject("Word.Application")
Set fso = WScript.CreateObject("Scripting.Filesystemobject")
Set fds=fso.GetFolder(".")
Set ffs=fds.Files
For Each ff In ffs
If (LCase(Right(ff.Name,4))=".doc" Or LCase(Right(ff.Name,4))="docx" ) And Left(ff.Name,1)<>"~" Then
Set oDoc=oWord.Documents.Open(ff.Path)
odoc.ExportAsFixedFormat Left(ff.Path,InStrRev(ff.Path,"."))&"pdf",wdExportFormatPDF
If Err.Number Then
MsgBox Err.Description
End If
End If
Next
odoc.Close
oword.Quit
Set oDoc=Nothing
Set oWord =Nothing
MsgBox "Word文件已全部轉換為PDF格式!"
```
<span class="step">S2:將S1檔案,副檔案由【 *.txt 】改為【 *.vbs 】,置於要轉為PDF檔案的資料夾,執行後,即可將Word檔進行轉為PDF檔</span>
## <span class="h2">E、圖片批次去除替代文字的方法</span>
### 說明緣由
Office364在插入圖片時,圖片自動顯示圖說文字,但生成PDF檔文件閱讀時,滑鼠靠上去會顯示,影響文件閱讀

### VBA 語法
```
Sub RemoveAllAltText()
Dim shp As Shape
Dim ils As InlineShape
' 處理浮動圖片(Shape)
For Each shp In ActiveDocument.Shapes
On Error Resume Next
shp.AlternativeText = ""
On Error GoTo 0
Next shp
' 處理嵌入式圖片(InlineShape)
For Each ils In ActiveDocument.InlineShapes
On Error Resume Next
ils.AlternativeText = ""
On Error GoTo 0
Next ils
MsgBox "已移除所有圖片的替代文字!", vbInformation
End Sub
```
# 十二、合併列印
## <span class="h2">A、種類</span>
<a href="https://hackmd.io/_uploads/HkcwNdoXt.png"><span class="img100">
</span></a>
## <span class="h2">B、步驟</span>
<a href="https://hackmd.io/_uploads/HJNBvyiXK.png"><span class="img100"></span></a>
## <span class="h2">E、批次匯入圖片方法</span>
### (1) 路徑陳述方法
<span style="color:#333399 ; font-size:1.2em; font-weight:bold;display:block; text-align:center">磁碟機:\\\資料夾\\\檔案.副檔案</span>
### (2) 執行步驟
<span class="step">S1:依步驟執行合併列印。</span>
<span class="step">S2:【插入】>【快速組件】>【功能變數】>【IncludePicture】</span>
<a href="https://hackmd.io/_uploads/SJNgn1jmF.png"><span class="img100"></span></a>
<span class="step">S3:【右鍵】>【切換功能變代碼】</span>
<a href="https://hackmd.io/_uploads/SJNgn1jmF.png"><span class="img100"></span></a>
<span class="step">S4:【郵件】>【插入合併欄位】>加入【路徑】欄位</span>
<a href="https://hackmd.io/_uploads/SJNgn1jmF.png"><span class="img100"></span></a>
<span class="step">S5:【郵件】>【完成與合併】>【編輯個別文件】</span>
<a href="https://hackmd.io/_uploads/SJNgn1jmF.png"><span class="img100"></span></a>
<span class="step">S6:全選後,【F9】更新功能變數鍵</span>
## <span class="h2">F、薪資單</span>
### (1) 基本步驟執行
<a href="https://hackmd.io/_uploads/Skes-NHH9.png"><span class="img100"></span></a>
<span class="step">S1:依步驟執行合併列印。</span>
<span class="step">S2:如下圖設定</span>
<a href="https://hackmd.io/_uploads/rJmFx4BS5.png"><span class="img60"></span></a>
<span class="step">S3:【功能變數相關設定】</span>
<a href="https://hackmd.io/_uploads/Sk4kb4Hrq.png"><span class="img60"></span></a>
### (2) 利用【規則】> 【IF…Then…Else】
<span class="step">S1:【郵件】>【規則】>【IF…Then…Else】</span>
<a href="https://hackmd.io/_uploads/BJAq7NHH9.png"><span class="img100"></span></a>
<span class="step">S2:再次執行【郵件】>【規則】>【IF…Then…Else】</span>
<a href="https://hackmd.io/_uploads/S1mnEEHH9.png"><span class="img100"></span></a>
<span class="step">S3:【郵件】>【完成與合併】>【編輯個別文件】</span>
<a href="https://hackmd.io/_uploads/SJNgn1jmF.png"><span class="img100"></span></a>
### (3) 利用【大綱模式】依人員設定不同檔案
<span class="step">S1:將【職工代號】及【姓名】置於文中第一行</span>
<span class="step">S2:S1更新為【標題一】樣式</span>
<a href="https://hackmd.io/_uploads/r1gNUEHBc.png"><span class="img100"></span></a>
<span class="step">S3:【郵件】>【完成與合併】>【編輯個別文件】並另存新檔</span>
<a href="https://hackmd.io/_uploads/SJNgn1jmF.png"><span class="img100"></span></a>
<span class="step">S4:啟動>【大綱模式】</span>
<a href="https://hackmd.io/_uploads/B1mDwVrHq.png"><span class="img100"></span></a>
<span class="step">S5:全選文件>【大綱】>【建立】</span>
<span class="step">S6:【大綱】>【摺疊子文件】</span>
<a href="https://hackmd.io/_uploads/ByC8uNrS9.png"><span class="img100"></span></a>
<span class="step">S7:利用【常用】>【取代】進行移除</span>
<a href="https://hackmd.io/_uploads/BybUtVrS9.png"><span class="img90"></span></a><a href="https://hackmd.io/_uploads/SkzUcEHSq.png"><span class="img70"></span></a>
### (4) 批次轉為PDF檔
<span class="step">S1:啟動【記事本】軟體>將下方語法貼入</span>
<span class="urll" style="line-height:3em">[參考文獻](https://kknews.cc/zh-tw/code/lkex9gb.html) </span>
```
On Error Resume Next
Const wdExportFormatPDF = 17
Set oWord = WScript.CreateObject("Word.Application")
Set fso = WScript.CreateObject("Scripting.Filesystemobject")
Set fds=fso.GetFolder(".")
Set ffs=fds.Files
For Each ff In ffs
If (LCase(Right(ff.Name,4))=".doc" Or LCase(Right(ff.Name,4))="docx" ) And Left(ff.Name,1)<>"~" Then
Set oDoc=oWord.Documents.Open(ff.Path)
odoc.ExportAsFixedFormat Left(ff.Path,InStrRev(ff.Path,"."))&"pdf",wdExportFormatPDF
If Err.Number Then
MsgBox Err.Description
End If
End If
Next
odoc.Close
oword.Quit
Set oDoc=Nothing
Set oWord =Nothing
MsgBox "Word文件已全部轉換為PDF格式!"
```
<span class="step">S2:將S1檔案,副檔案由【 *.txt 】改為【 *.vbs 】,置於要轉為PDF檔案的資料夾,執行後,即可將Word檔進行轉為PDF檔</span>
# 十三、書籍製作(Part1):基本程序
<span style="color:#333399 ; font-size:1.2em; font-weight:bold;">🔶 結果:</span>
<span class="flex">
<span class="img70"></span>
<span class="img70"></span></span>
## <span class="h2">A、書籍結構</span>
<span class="img70"></span>
## <span class="h2">B、設定樣式</span>
### (1) 既有樣式:標題1
<span class="step">S1.設定美化格式</span>
<span class="img70"></span>
<span class="step">S2.針對【標題1】樣式>右鍵>更新以符合選取範圍</span>
<span class="img100"></span>
### (2) 新增樣式:1.1
<span style="color:#333399 ; font-size:1.2em; padding-left:30px; font-weight:bold;">※ 1.1.1作法相同</span>
<span class="img100"></span>
<span class="step">S1.【標題1】段落複製格式予【1.1】段落</span>
<span class="step">S2.新增樣式名稱【1.1】,並利用【修改】鈕,修改【1.1】相關格式</span>
<a href="https://hackmd.io/_uploads/Hk9f6_jQt.png"><span class="img100"></span></a>
<span class="step">S3.【1.1】段落複製格式<span class="img5"></span>予【1.1.1】段落</span>
<span class="step">S4.新增樣式名稱【1.1.1】,並利用【修改】鈕,修改【1.1.1】相關格式</span>
### (3) 各【章節內文】樣式設定條件
<span class="img60"></span>
### (4) 注意事項
#### <span class="h4" style="padding-left:30px;">(a) 大綱樣式<span style="color:red ;">不可</span>逾級<span class="img5"></span>複製格式</span>
<span style="color:#CC0000 ; font-size:1.2em; margin-left:60px; font-weight:bold;background:#FDEFB7">異常情形:造成樣式循環</span>
#### <span class="h4" style="padding-left:30px;">(b) 大綱樣式<span style="color:red ;">不可</span><span class="img5"></span>複製格式至本文樣式</span>
<span style="color:#CC0000 ; font-size:1.2em; margin-left:60px; font-weight:bold;background:#FDEFB7">異常情形:本文樣式會產生大綱項目</span>
<hr>
<span style="color:#CC0000 ; font-size:2em;bold;background:#FDEFB7; display:block; text-align:center">以上情形總原因:樣式根據</span>
<br><br><br><br><br><br>
## <span class="h2">C、樣式與大綱結合</span>
<span class="step">S1.【常用】>【段落】工作群組><span class="img6"> </span>>【定義新的清單樣式】
<a href="https://hackmd.io/_uploads/BJfq4KsXF.png"><span class="img100"></span></a>
<span class="step">S2.【格式】>【編號方式】</span>
<a href="https://hackmd.io/_uploads/rJ2-HFimK.png"><span class="img70"></span></a>
<span class="step">S3.【階層一】設定</span>
<a href="https://hackmd.io/_uploads/r1l5vFs7F.png"><span class="img80"></span></a>
<span class="step">S4.【階層二】設定</span>
<a href="https://hackmd.io/_uploads/rkSxOtjmK.png"><span class="img80">
</span></a>
<span class="step">S5.【階層三】設定</span>
<a href="https://hackmd.io/_uploads/SkUBuYsXF.png"><span class="img80">
</span></a>
## <span class="h2">D、依結構套用文章</span>
<span class="img70"></span></span>
<br><br><br><br><br>
# 十三、書籍製作(Part2):書籍元件加入
<a href="https://hackmd.io/_uploads/rJM1fJRXK.png"><span class="img100">
</span></a>
## <span class="h2">A、【2-1頁尾】</span>
<span class="step">S1.【插入】>【頁碼】></span><span class="img30"></span>
<span style="color:#333399 ; font-size:1.2em; font-weight:bold; line-height:3em;margin-left:60px;">🔶 頁碼格式</span>
<span class="img50"></span>
<span style="color:#333399 ; font-size:1.2em; font-weight:bold; line-height:3em;margin-left:60px;">🔶 【頁面底端】> 加入頁碼</span>
<span class="img90"></span>
<span class="step">S2.各章節【版面配置】>【分隔設定】> 分節符號下一頁</span>
<span class="img60"></span>
## <span class="h2">B、【2-1頁首】</span>
<span class="step">S1.<span style="color:red; font-weight:bold;">取消同前</span>:【頁首及頁尾工具】>【連結到前一節】</span>
<span class="step">S2.才可修改不同頁首內容</span>
<a href="https://hackmd.io/_uploads/rkI13l2mF.png"><span class="img100"></span></a>
## <span class="h2">C、【1-1頁首】</span>
<span style="color:#333399 ; font-size:1.2em; font-weight:bold;">🔶 【頁首章節標題】與【各章節標題】兩者同步連動</span>
<span class="step">利用【功能變數】將樣式標題置於頁首</span>
<span class="img80"></span>
<span class="step">S1. 【插入】>【快速組件】>【功能變數】</span>
<span class="step"><span style="color:red">S2. 此項功能執行二次</span>,選擇【StyleRef】第一次勾選【插入段落編號】,第二次皆不勾選</span>
<a href="https://hackmd.io/_uploads/Hy_dy1CQK.png"><span class="img100"></span></a>
## <span class="h2">D、【1-2頁首】</span>
<span class="step">S1.【頁首及頁尾工具】>【奇偶頁不同】</span>
<a href="https://hackmd.io/_uploads/H1GJ6g2QY.png"><span class="img100"></span></a>
<span class="step">S2.【插入】>【圖片】>【文字在前】> 再調整圖片位置</span>
<a href="https://hackmd.io/_uploads/rJL9TlnQK.png"><span class="img100"></span></a>
## <span class="h2">E、【2-2頁首】</span>
<span class="step">S1.<span style="color:red; font-weight:bold;">取消同前</span>:【頁首及頁尾工具】>【連結到前一節】</span>
<a href="https://hackmd.io/_uploads/S1GqJf37F.png"><span class="img100"></span></a>
<span class="step">S2.點選圖片>【圖片工具】>【變更圖片】</span>
<a href="https://hackmd.io/_uploads/Hyjrgf37K.png"><span class="img100"></span></a>
## <span class="h2">F、【目錄】及【封面】</span>
### (1) 目錄
<span class="step">S1.分節設定</span>
<span class="step">S2.連兩次Enter換行</span>
<span class="step">S3.若產生大綱編號,利用【常用】>【字型】工作群組 > 清除所有格式</span>
<span class="step">S4.在第二行上,【參考資料】>【目錄】>【自動目錄】</span>
<a href="https://hackmd.io/_uploads/HJ7cvJAXK.png"><span class="img60"></span></a>
### (2) 封面
<span class="step">S1.分節設定</span>
<span class="step">S2.【插入】>【封面頁】</span>
<a href="https://hackmd.io/_uploads/HyzSu10Qt.png"><span class="img70"></span></a>
<br><br><br><br><br><br><br><br><br><br><br>