
# IoT Weather Monitor
### Tutorial Guide on how to build a Temperature & Humidity Sensor on Ardunio IDE, using Datacake & Node Red
##### By: Jonatan Rassekhnia (jr223kk)
---
## Introducton
The project will demonstrate how ESP8266 interfaces with a DHT11 Sensor while the data is sent to DataCake
The time that took to create this project was approximately 7 days, the first 3 to 4 days, was getting the docs read by DataCake/Node-Red & Code with process with the installation of the ESP8266 microboard in Ardurino IDE. Within the tutorial the process should be couple of hours on creating this project. Further explanation conducted on the research on this project done at Linnaeus University will be deliberated in the tutorial report.
The reason i choose this project is to get the full understanding of IoT and its purpose, the goal behind the "Internet of things" is to have devices that self report in real-time, improving efficiency with performance on gaining important data to the surface more quickly than a system depending on human intervention
The insight that I have gained, are from products to services
1. Technology lessons, well-defined processes will save you time
2. Engagment with teams, marketing your product, techincal requirements
3. Involves people to share knowledge faster
4. Complex technology requires skill
Then we learn from the business factor
1. All over business strategy
2. What to do with the data
### Narrative "Objective"
The project is related to intial steps in the IoT "Internet of Things" world, in my project i will interface the DHT11 sensor with a NodeMCU "ESP8266" board and it will receive the data on the internet cloud, we use the DataCake Application which is the cloud system, while Node-Red reads the Debugs. Read throught my following tutorial to get a clear understanding on how the process is established.
An estimation by 2025 that a person will interact with connected devices 4,800 times oer day. Thats the Insight i have recieved under go with my studies at Linnaeus University with my IoT project throughout the course.
---
# Project Materials & Cost
## Hardware Components
---
##### NodeMCU ESP8266 Microboard
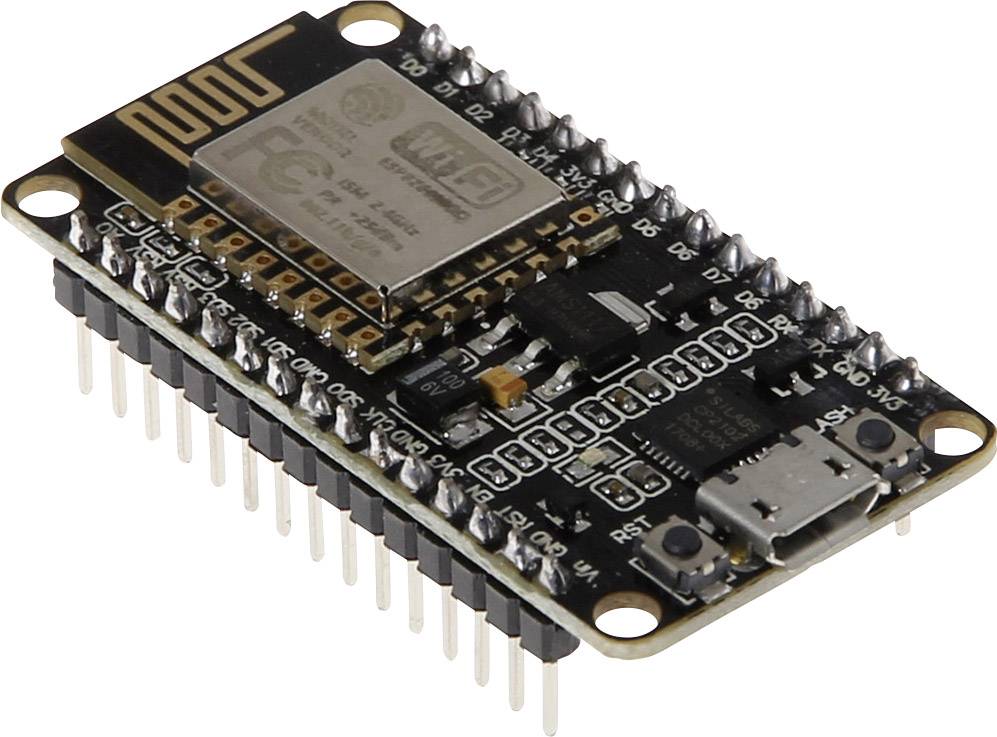
[Cost: 86krs ](https://www.banggood.com/Geekcreit-LoLin-V3-NodeMcu-Lua-WIFI-Development-Board-ESP8266-Serial-Wifi-Module-p-992733.html?utm_source=googleshopping&utm_medium=cpc_organic&gmcCountry=SE&utm_content=minha&utm_campaign=aceng-pmax-se-en-pc¤cy=SEK&cur_warehouse=CN&createTmp=1)
---
##### DHT11 Temperature & Humidity Sensor (3 pins)

[Cost: 42krs](https://www.banggood.com/KY-015-DHT11-Temperature-Humidity-Sensor-Module-p-916173.html?cur_warehouse=CN&rmmds=search)
---
##### Jumper wire cables female to female "40 pins"

[Cost: 28krs](https://www.banggood.com/40pcs-10cm-Female-To-Female-Jumper-Cable-Dupont-Wire-p-994059.html?cur_warehouse=CN&rmmds=search)
---
##### USB Cable to Micro USB

[Cost: 78krs](https://www.banggood.com/1_0M-USB2_0-To-Micro-USB-Charging-Data-Line-for-Android-Phones-and-Tablets--p-1028814.html?cur_warehouse=CN&rmmds=search)
---
## Software & Online Services
### Operating System
Windows 10 Pro

The operating system that the project was created on, was Windows 10 Pro
---
### Ardunio IDE
Language C/C++

[Ardunio](https://www.arduino.cc/)
[Download Link](https://www.arduino.cc/en/software)
---
### Datacake Cloud

[DataCake](https://datacake.co/)
[Documentations](https://docs.datacake.de/)
---
### Node Red

[Node-Red](https://nodered.org/)
[Documentations](https://nodered.org/docs/)
---
### MQTT

[MQTT](https://mqtt.org/)
---
## Getting Started
### Understanding your parts
---
##### ESP8266 DataSheet
We can start out by looking at our "ESP8266" data-sheet, the datasheet contains what each pin is capable of performing.

---
##### DHT11 vs DHT22 data-sheet with specifications
What the DHT11 can perform vs DHT22, the specification on the sensors explain what the sensors contain, for my project i will be using the DHT11 sensor

---
##### DHT11 Calculations
DHT11 Calculates relative humidity by measuring the electrical resistance between two electrodes. The humidity senses the component from the DHT11 when a moisture holding substrate with the electrodes that applied to the surface. When water vapor is absorbed by the substrate, ions are released by the substrate which increases the conductivity between the electrodes. The change in resistance between the two electrodes is proportional to the relative humidity. Higher relative humidity decreases the resistance between the electrodes while lower relative humidity increases the resistance between the electrodes.

---
##### Schematic diagram
The Schematic Diagram on the project that I've created

---
# Installation Process of Hardware & Software "Setup"
### Installation of ESP8266 Board
After you install the Arduino 1.6.8 software from the link that was informed, you need to follow these following steps to install your ESP8266 Board
### *Prepequisites*
* Arduino 1.6.8
* Internet Connection
* Phyton 3 interpreter (Mac or Linux) Windows installation supplies its own
### Instructions
* Start Arduino and open Preferences Window
* Enter `https://arduino.esp8266.com/stable/package_esp8266com_index.json `into Additional Board Manager URLs field. You can add multiple URLs, separating them with commas.
* Open Boards Manager from Tools > Board menu and find "ESP8266" platform.
* Select the version you need from a drop-down box
* Don't forget to select your ESP8266 board from Tools > Board menu after installation.
### Visual Photo
The steps that were explained on installation process for the ESP8266, are shown in a visual form to get a clear understanding.


After we have installed the ESP8266 board, we need to install the libaries of the DHT11 Temperature & Humidity Sensor
For Mac or Linux User further Instructions can be found on the link below, due to my Tutorial is stricly made for Windows Enviroment
[Mac or Linux Users](https://arduino-esp8266.readthedocs.io/en/latest/installing.html)
---
### Installation of DHT11 Sensor
DHT Sensor Libary is created by Adafruit and the maintainer is also Adafruit. Arduino Library for DHT is made for DHT11 & DHT22 series.
### Instructions
* Installation Process is to download the Latest Zip library from the following link.
* You need to click on Sketch
* Include Library '
* Add .ZIP Library
* Upload the latest Zip file from link given below
[DHT Sensor Libary](https://www.arduino.cc/reference/en/libraries/dht-sensor-library/)
### Visual Photo

---
### Coding & Uploading Process
Our next goal is to program our main board which is the "ESP8266" to inform the board, what it needs to do. For the language on the IDE is C/C++, on this process i will explain how my ESP8266 board will be programmed for MQTT Service to recieve data as well. Loggging data is the goal here and i want to visualize the data through a service that can be checked from on WIFI Based.
### Coding Process
*MQTT Setup with ESP 8266, we need to include wifi and the PubSubClient
```phyton=
#include "PubSubClient.h"
#include <ESP8266WiFi.h>
```
* Arduino to send to send data at the start of your .ino file by modifying the code below to you needs on the project you created. Example of my MQTT code is shown below
```phyton=
// MQTT properties
const char* mqtt_server = "mqtt.datacake.co"; // IP address of the MQTT broker
const char* temp_topic = "dtck-pub/mqtt-tempdevice/fdf0f057-daf3-4716-a510-b8fee04f99ae/TEMPERATURE";
const char* humid_topic = "dtck-pub/mqtt-tempdevice/fdf0f057-daf3-4716-a510-b8fee04f99ae/HUMIDITY";
const char* mqtt_username = "01e5a5726352ca95607820f69d5d5f3a3566ebde"; // MQTT username safer to use API user
const char* mqtt_password = "01e5a5726352ca95607820f69d5d5f3a3566ebde"; // MQTT password safer to use API pass
const char* clientID = "arduino"; // MQTT client ID
```
* To setup the WIFI
```phyton=
WiFiClient wifiClient;
PubSubClient client(mqtt_server, 1883, wifiClient);
void setup()
{
Serial.begin(115200);
WiFi.begin(ssid, pass);
// while wifi not connected yet, print '.'
// then after it connected, get out of the loop
while (WiFi.status() != WL_CONNECTED) {
delay(500);
Serial.print(".");
}
//print a new line, then print WiFi connected and the IP address
Serial.println("");
Serial.println("WiFi connected");
// Print the IP address
Serial.println(WiFi.localIP());
dht.begin();
}
```
* Now we to define some routines that are used to start WIFI, and to connect to the MQTT server.
``` phyton=
bool connect_MQTT() {
Serial.print("Connecting to ");
Serial.println(ssid);
WiFi.begin(ssid, pass);
// Wait until the connection has been confirmed before continuing
while (WiFi.status() != WL_CONNECTED) {
delay(500);
Serial.print(".");
}
// Debugging - Output the IP Address
Serial.println("WiFi connected");
Serial.print("IP address: ");
Serial.println(WiFi.localIP());
// Connect to MQTT Broker
// client.connect returns a boolean value to let us know if the connection was successful.
if (client.connect(clientID, mqtt_username, mqtt_password)) {
Serial.println("Connected to MQTT Broker!");
return true;
}
else {
Serial.println("Connection to MQTT Broker failed...");
return false;
}
}
```
* In the Main loop we also want to connect the MQTT server and send the collected data, the sent data has to be a string
```phyton=
void loop()
{
if (connect_MQTT()) {
delay(10); // This delay ensures that client.publish doesn't clash with the client.connect call
float h = dht.readHumidity();
float t = dht.readTemperature(); // or dht.readTemperature(true) for Celsius
if (isnan(h) || isnan(t)) {
Serial.println("Failed to read from DHT sensor!");
resetFunc();
}
char temp_buf[6];
char hum_buf[6];
//null terminator
String(t, 2).toCharArray(temp_buf, 6);
String(h, 2).toCharArray(hum_buf, 6);
// Publish all data to the MQTT
if (client.publish(temp_topic, temp_buf, 6)) {
delay(10); // This delay ensures that Temperature data upload is all good
client.publish(humid_topic, hum_buf, 6);
delay(10); // This delay ensures that Humidity data upload is all good
Serial.print("Temperature: ");
Serial.println(temp_buf);
Serial.print("Humitidy: ");
Serial.println(hum_buf);
delay(300000);
}
}
```
* To reset the function the following code needs to be added
```phyton=
void(* resetFunc) (void) = 0;
resetFunc();
```
---
### Transmitting the Data/Connectivity
### Configure DataCake Cloud & its purpose
The Datacake IoT Cloud Platform requires no code and has deep integration for LoRaWAN Gateways and Devices, such as the weather monitor i have created on my ESP8266 board.
What made me choose the platform "DataCake" is more in depth with the intergation i wanted for my Device. DataCake is muli-purpose use, for low-code IoT platform that requries custom IoT applications that can be brought into a while label.
### Power Source
The device is powered from a USB cable that is connected to a Micro-USB slot on the ESP8266 board. Computer USB ports supply 5V of electricity with a maximum current of 0.5A. This amount of current is standard across the majority of computers and means the overall power output will be 2.5 Watts at best.
### Instructions
* First you want to create an account
* Once the account is created, you want to add a device in the upper right hand corner which is a "+ Add Device" button then you want to choose the connectivity type for your device, in my case I have choosen API. Since my board is Generic that supports MQTT & HTTP connectivity.
* Now we want to start off by creating our dashboard, but turing it on also in the upper right hand corner as shown in the photo below

* We would want to click on the "+ Widget" button then you want to select Value, which displays a measurement
* After we created our Dashboard we need to click on "Confirguration"
* We need to add Fields for Temperature & Humidity, the type should be Float, Idenftifer should be the name and the units should be stated as well. For Humidity i choose the percentage sign, and for Temperature i choose the degree sign in celsius
* Now we need to hop back to the DataCake Dashboard to select "Members" a member needs to be created, to do so...you need to click on the upper right hand corner "Add member"
* By adding member gives you a workspace Permission to Devices, Basics, Members, Rules, White label. What you choose is what you desire for your device to do. I selected all, expect "billing" and "Cake Red" I will not be using these options. Don't forget to add your email!
* After your member is created you take your API key and put it in your following code.
```phyton=
// MQTT properties
const char* mqtt_username = "01e5a5726352ca95607820f69d5d5f3a3566ebde"; // MQTT username safer to use API user
const char* mqtt_password = "01e5a5726352ca95607820f69d5d5f3a3566ebde"; //
```
* Your code will recognize what data needs to be sent to your DataCake under MQTT server
* Last step before uploading your code, we want to add "Rules" this will send the user notification on certain degrees or percentages that you would want to know of. We can set a rule for Humidity, that we want a Email notification every one hour, letting us know that the Humidity is at 32%. This is a great tool of informent towards the builder.

---
### Uploading Code to Board
#### Debugging before uploading
* Before you upload your code to your board, you want to click on the check button to run your code to see if you have any errors, so you can debug the code first. Once you have no errors, and see on your "Com Monitor" that its functioning properly.

* Then you upload your code to your board by clicking on the Arrow button pointing to your board. Make sure your board is connected before doing so!
### Visual Photo
The Check button & Arrow button is the Debug/Upload button as explained in the pervious steps

---
### Debugging System by Node Red
Node-Red is built on Node.js, it takes full advantage of its own event-driven, non-blocking model. For it to run at the edge of the network on low-cost hardware such as my ESP8266
---
### Installation of Node Red
* To install Node-Red locally you will need to type the following command in command prompt `sudo npm install -g --unsafe-perm node-red`
* Once the process is installed, you type the next following command to get your IP Address in command prompt so you can type in you defult web browser `Node-Red`
---
### Results from Command Prompt
```phyton=
Microsoft Windows [Version 10.0.19044.1766]
(c) Microsoft Corporation. All rights reserved.
C:\Users\Jdog>node-red
30 Jun 16:53:45 - [info]
Welcome to Node-RED
===================
30 Jun 16:53:45 - [info] Node-RED version: v2.2.2
30 Jun 16:53:45 - [info] Node.js version: v16.15.1
30 Jun 16:53:45 - [info] Windows_NT 10.0.19044 x64 LE
30 Jun 16:53:46 - [info] Loading palette nodes
30 Jun 16:53:47 - [info] Settings file : C:\Users\Jdog\.node-red\settings.js
30 Jun 16:53:47 - [info] Context store : 'default' [module=memory]
30 Jun 16:53:47 - [info] User directory : C:\Users\Jdog\.node-red
30 Jun 16:53:47 - [warn] Projects disabled : editorTheme.projects.enabled=false
30 Jun 16:53:47 - [info] Flows file : C:\Users\Jdog\.node-red\flows.json
30 Jun 16:53:47 - [info] Creating new flow file
30 Jun 16:53:47 - [warn]
---------------------------------------------------------------------
Your flow credentials file is encrypted using a system-generated key.
If the system-generated key is lost for any reason, your credentials
file will not be recoverable, you will have to delete it and re-enter
your credentials.
You should set your own key using the 'credentialSecret' option in
your settings file. Node-RED will then re-encrypt your credentials
file using your chosen key the next time you deploy a change.
---------------------------------------------------------------------
30 Jun 16:53:47 - [info] Server now running at http://127.0.0.1:1880/
30 Jun 16:53:47 - [info] Starting flows
30 Jun 16:53:47 - [info] Started flows
30 Jun 16:55:48 - [info] Installing module: node-red-contrib-datacake, version: 0.1.4
30 Jun 16:56:07 - [info] Installed module: node-red-contrib-datacake
30 Jun 16:56:07 - [info] Added node types:
30 Jun 16:56:07 - [info] - node-red-contrib-datacake:datacake-in
30 Jun 16:56:07 - [info] - node-red-contrib-datacake:datacake-out
30 Jun 16:56:07 - [info] - node-red-contrib-datacake:datacake-configuration
30 Jun 17:02:17 - [info] Stopping flows
30 Jun 17:02:17 - [info] Stopped flows
30 Jun 17:02:17 - [info] Starting flows
30 Jun 17:02:17 - [info] Started flows
Connected to Datacake MQTT Broker
Successfully subscribed to dtck/mqtt-tempdevice/fdf0f057-daf3-4716-a510-b8fee04f99ae/TEMP
30 Jun 18:54:25 - [info] Stopping flows
30 Jun 18:54:25 - [info] Stopped flows
30 Jun 18:54:25 - [info] Starting flows
30 Jun 18:54:25 - [info] Started flows
Connected to Datacake MQTT Broker
Successfully subscribed to dtck/mqtt-tempdevice/fdf0f057-daf3-4716-a510-b8fee04f99ae/TEMP
30 Jun 18:55:19 - [info] Stopping flows
30 Jun 18:55:19 - [info] Stopped flows
30 Jun 18:55:19 - [info] Starting flows
30 Jun 18:55:19 - [info] Started flows
Connected to Datacake MQTT Broker
Successfully subscribed to dtck/mqtt-tempdevice/fdf0f057-daf3-4716-a510-b8fee04f99ae/TEMPERATURE
30 Jun 18:57:34 - [info] Stopping flows
30 Jun 18:57:34 - [info] Stopped flows
30 Jun 18:57:34 - [info] Starting flows
30 Jun 18:57:34 - [info] Started flows
Connected to Datacake MQTT Broker
Successfully subscribed to dtck/mqtt-tempdevice/fdf0f057-daf3-4716-a510-b8fee04f99ae/TEMPERATURE
30 Jun 18:58:21 - [info] Stopping flows
30 Jun 18:58:21 - [info] Stopped flows
30 Jun 18:58:21 - [info] Starting flows
30 Jun 18:58:21 - [info] Started flows
Connected to Datacake MQTT Broker
Successfully subscribed to dtck/mqtt-tempdevice/fdf0f057-daf3-4716-a510-b8fee04f99ae/TEMPERATURE
30 Jun 19:13:10 - [info] Stopping flows
30 Jun 19:13:10 - [info] Stopped flows
30 Jun 19:13:10 - [info] Starting flows
30 Jun 19:13:10 - [info] Started flows
Connected to Datacake MQTT Broker
Successfully subscribed to dtck/mqtt-tempdevice/fdf0f057-daf3-4716-a510-b8fee04f99ae/TEMPERATURE
Successfully subscribed to dtck/mqtt-tempdevice/fdf0f057-daf3-4716-a510-b8fee04f99ae/HUMIDITY
30 Jun 19:23:34 - [info] Stopping flows
30 Jun 19:23:34 - [info] Stopped flows
30 Jun 19:23:34 - [info] Starting flows
30 Jun 19:23:34 - [info] Started flows
Connected to Datacake MQTT Broker
Successfully subscribed to dtck/mqtt-tempdevice/fdf0f057-daf3-4716-a510-b8fee04f99ae/TEMPERATURE
Successfully subscribed to dtck/mqtt-tempdevice/fdf0f057-daf3-4716-a510-b8fee04f99ae/HUMIDITY
30 Jun 20:02:07 - [info] Stopping flows
30 Jun 20:02:07 - [info] Stopped flows
30 Jun 20:02:07 - [info] Starting flows
30 Jun 20:02:07 - [info] Started flows
Connected to Datacake MQTT Broker
Successfully subscribed to dtck/mqtt-tempdevice/fdf0f057-daf3-4716-a510-b8fee04f99ae/TEMPERATURE
Successfully subscribed to dtck/mqtt-tempdevice/fdf0f057-daf3-4716-a510-b8fee04f99ae/HUMIDITY
```
---
* Before we start our automation service on Node-Red for debugment, lets check our version on Windows PowerShell to see if we have the latest Version
```phyton=
Windows PowerShell
Copyright (C) Microsoft Corporation. All rights reserved.
Try the new cross-platform PowerShell https://aka.ms/pscore6
PS C:\Users\Jdog> npm install -g --unsafe-perm node-red
Welcome to Node-RED
===================
1 Jul 00:09:23 - [info] Node-RED version: v2.2.2
1 Jul 00:09:23 - [info] Node.js version: v16.15.1
1 Jul 00:09:23 - [info] Windows_NT 10.0.19044 x64 LE
```
---
* We copy and Paste this `http://127.0.0.1:1880/` in our web browser to build our automation and to debug our device on the set time we want, so we can see that its debugging every time its greater than 28 degrees or 28 percent for Humidity and Temperature
### Visual Photo

* The Visual Photo is shows how i built my debugging system on the device i created. By clicking on datacake-in you can edit your properties, on the configuration that is created from DataCake

* Our next step is to create the switch key which tells the msg.payload on what to debug, i choose if its greater than 28 degrees or 28 percent on the Humidity and Temperature Sensor Calculations

* Once you click on Deploy, the Dubugment will start and you will recieve data on your right hand side when the degree or percentage is above "28"
---
# Presenting the Data
### Presentation of the Data
The data is sent to DataCake cloud, including the Node-Red debugging cloud.
Here are some results on History, and Dashboard overview on how it receives the data while its printed on the dashboard for the user. The DataBase choosen due to depth of results and rules that can be set, including the debugging that is deployed from MQTT server to recieve the data on Node-red.


### Email Notfication


### Final Design

---
 Sign in with Wallet
Connect another wallet
Sign in with Wallet
Connect another wallet