# AI Common Platform - Data Validation
###### tags: `ML Platform`
# TFDV
TFDV 是一套用來觀察資料分佈與驗證資料正確性的工具。
一般資料驗證流程分為四步驟:
1. Computing and Visualizing Descriptive Statistics
2. Infer a Schema
3. Data Validation
4. Statistics Comparison
tfdv 底層使用 apache-beam 做資料處理。apache-beam 作為一個資料處理的 interface,底下可以串接 Spark, Flink, Google DataFlow 作為實際處理資料的系統來處理大量的資料 (詳見apache-beam介紹 [link](https://www.youtube.com/watch?v=owTuuVt6Oro&ab_channel=GoogleCloudTech))。
在缺乏底下這些分散式資料處理系統的情況下,tfdv/apache-beam 支援直接使用 "DirectRunner" 在本機處理資料。
以下皆以 "DirectRunner" 執行
## Computing and Visualizing Descriptive Statistics
tfdv 目前支援三種 datatype:
- DataFrame (API: [link](https://www.tensorflow.org/tfx/data_validation/api_docs/python/tfdv/generate_statistics_from_dataframe))
- 需注意的是,若 df 裡面含有 nested dict 或是 list of list 則無法處理,此方法需 pyarrow 可處理的 df
- 此方法經測試有 bug,無法支援 multiprocesses,參數 `n_jobs` 只能給 1
- csv (API: [link](https://www.tensorflow.org/tfx/data_validation/api_docs/python/tfdv/generate_statistics_from_csv))
- 上述無法處理的 df 可以先存成 csv,再由此方法處理
- pipeline_options 為 apache beam 的執行設定
- tfrecord (API: [link](https://www.tensorflow.org/tfx/data_validation/api_docs/python/tfdv/generate_statistics_from_tfrecord))
範例:
```python3
import tensorflow_data_validation as tfdv
from apache_beam.options.pipeline_options import PipelineOptions
stats = tfdv.generate_statistics_from_dataframe(df)
stats = tfdv.generate_statistics_from_csv("/foo/data.csv")
stats = tfdv.generate_statistics_from_tfrecord("/foo/data.tfrecord")
# 設定 pipeline_opetions,用 multiprocessing 來處理 csv
pipeline_options = PipelineOptions(
['--direct_num_workers', '10', '--direct_running_mode', 'multi_processing']
)
stats = tfdv.generate_statistics_from_csv("/foo/data.csv", pipeline_options=pipeline_options)
```
上面產出的 stats,可以使用下面的 API 視覺化的呈現
- `tfdv.visualize_statistics` (API: [link](https://www.tensorflow.org/tfx/data_validation/api_docs/python/tfdv/visualize_statistics))
```python3
# 在 jupyter-notebook 上,可直接呈現
tfdv.visualize_statistics(stats)
# 存成 html,在 chrome 上呈現
html = tfdv.utils.display_util.get_statistics_html(stats)
with open('statistic.html', 'w') as f:
f.write(html)
```


TFDV 將 features 分成兩類,分別顯示不同的統計數據
1. numerical features
* Count of records
* Number of missing (i.e. null values)
* Histogram of values
* Mean and standard deviation
* Minimum and maximum values
* Percentage of zero values
2. categorical features
* Count of values
* Percentage of missing values
* Number of unique values
* Average string length
* Count for each label and its rank
Note: 因為 non-numerical features 都會被當作 categorical features,有些情況並不適合,像是 feature value 是 list 的。可以考慮等做完 feature transform 後再來生成 statistics。
## Infer a Schema
tfdv 可以針對你給予的統計資料生成一個 schema 作為初版草稿。
生成的 schema 會將每一個 feature 對應到一個 type (int, float, bytes 等),也會幫你初步定義一些 features 特性,例如: numerical feature 的 min-max value、categorical feature 的 value domain。
接著使用者可以根據自己的需求繼續更新該 schema 。
- `tfdv.infer_schema` (API: [link](https://www.tensorflow.org/tfx/data_validation/api_docs/python/tfdv/infer_schema))
而 tfdv 可以將 schema 進一步用表格呈現
範例:
```python3=
# Infer schema based on statistics
schema = tfdv.infer_schema(train_stats)
# Display schema inline in table format
tfdv.display_schema(schema)
```
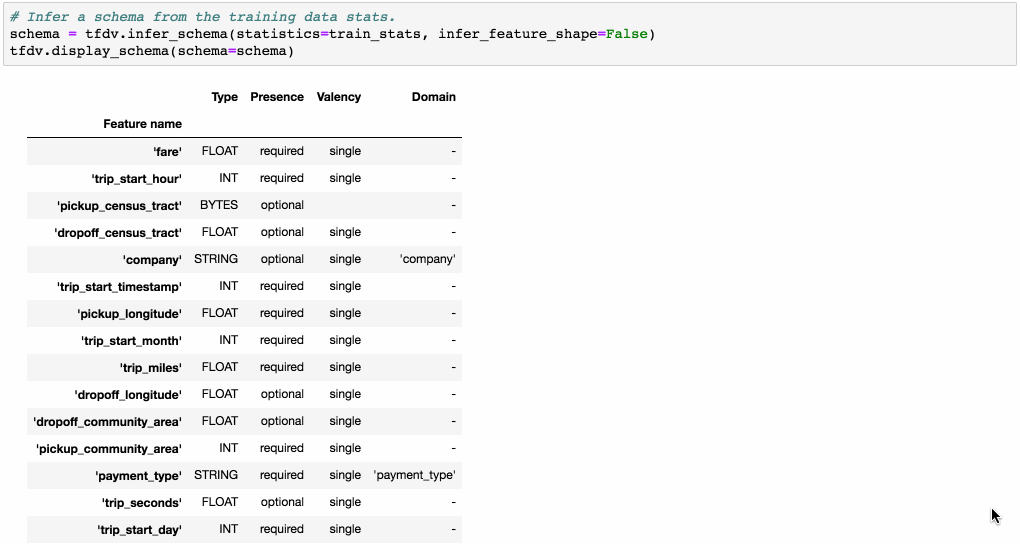
- Presence: indicates whether the feature must be present in 100% of examples (required) or not (optional).
- Valency: indicates the number of values required per training example. In the case of categorical features, single indicates that each training example must have exactly one category for the feature.
## Updating Schema
tfdv 生成的 schema 是 [Schema protocol buffer](https://github.com/tensorflow/metadata/blob/master/tensorflow_metadata/proto/v0/schema.proto), tfdv 提供一些現成的 function,允許你對 schema 做更新來符合你對資料的需求。
範例:
```python=
data = {'Name':['Tom', 'nick', 'krish', 'jack'],
'Age':[20, 21, 19, 18]}
df = pd.DataFrame(data)
---
Name Age
0 Tom 20
1 nick 21
2 krish 19
3 jack 18
---
stats = tfdv.generate_statistics_from_dataframe(df)
schema = tfdv.infer_schema(stats)
```
將 schema 直接印出
```python=
print(schema)
---
feature {
name: "Name"
type: BYTES
domain: "Name"
presence {
min_fraction: 1.0
min_count: 1
}
shape {
dim {
size: 1
}
}
}
feature {
name: "Age"
type: INT
presence {
min_fraction: 1.0
min_count: 1
}
shape {
dim {
size: 1
}
}
}
string_domain {
name: "Name"
value: "Tom"
value: "jack"
value: "krish"
value: "nick"
}
---
```
### Numerical feature:
可以看到上面初步生成的 schmea 只包含 presence 資訊,甚至沒有限制這個 feature 的值域。
1. 修改 presence 限制
```python=
tfdv.get_feature(schema, 'Age').presence.min_fraction = 0.8
```
2. 新增與修改 feature 值域
```python=
tfdv.get_feature(schema, 'Age').int_domain.name = 'Age'
tfdv.get_feature(schema, 'Age').int_domain.min = 15
tfdv.get_feature(schema, 'Age').int_domain.max = 30
```
修改完後的結果
```json
feature {
name: "Age"
type: INT
// 新增了 age domain
int_domain {
name: "Age"
min: 15
max: 30
}
presence {
// 修改成了 0.8
min_fraction: 0.8
min_count: 1
}
shape {
dim {
size: 1
}
}
}
```
### Categorical feature:
對於 categorical feature 也可以新增他的 domain
```python=
tfdv.get_domain(schema, 'Name').value.append("John")
print(schema)
---
...
string_domain {
name: "Name"
value: "Tom"
value: "jack"
value: "krish"
value: "nick"
value: "John" // 新增
}
---
```
## Data Validation with schema
有了剛剛的 schema 後,我們即可用剛剛的 schema 來驗證新的資料
舉例:
```python=
data2= {'Name':['Tom', 'nick', 'krish', 'jack', "Kevin"],
'Age':[20, 21, 40, 40, 30]}
df2 = pd.DataFrame(data2)
stats2 = tfdv.generate_statistics_from_dataframe(df2)
anomalies = tfdv.validate_statistics(statistics=stats2, schema=schema)
# 顯示 anomalies,也可以直接 print
tfdv.display_anomalies(anomalies)
```

如圖上所示,新的資料及有兩個不符合 schema 的部分。
- "Kevin" 並不在 Name 的 Domain 裡面。( %20 表示 "Kevin" 出現的比例。)
- Age 40 超過 schema 設定的 15~30。
## Statistics Comparison
除了 schema 檢查外, tfdv 也可以用來比較兩個資料集的統計量。
### Dataset Comparison
圖像化顯示兩筆資料的差異
```python=
tfdv.visualize_statistics(
lhs_statistics=stats1, lhs_name='DAY2',
rhs_statistics=stats2, rhs_name='DAY1'
)
```
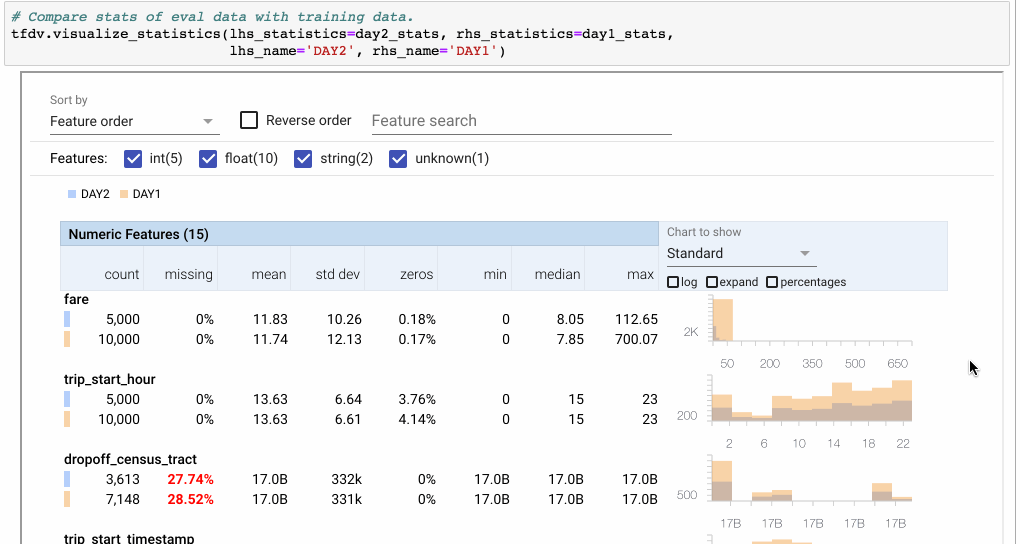
> Note: Using the Facets overview visualization to compare two sets of data. Here we compare the feature ‘fare’ between two days. Because DAY2 only has half of the number of examples of DAY1, we switch to percentages. Then we click ‘expand’ to zoom into the visualization. The ‘Quantiles’ view shows that the distribution is similar with the exception of an outlier in the DAY1 dataset.
(來源: [link](https://medium.com/tensorflow/introducing-tensorflow-data-validation-data-understanding-validation-and-monitoring-at-scale-d38e3952c2f0))
### Slicing Data
Note: 此功能經測試 generate_statistics_from_dataframe 不支援! (測試在 tfdv 0.28.0 上)
TFDV 可以將資料集切分在特定的 feature 上,來判斷此子集是否有 bias。例如: 觀察是否某個國家的人都特別缺少某些特定的 feature,導致訓練完的 model 的成效在這些國家的人身上較差。
範例:
```python=
# helper code for visualization
from tensorflow_metadata.proto.v0 import statistics_pb2
def display_slice_keys(slice_stats):
print(list(map(lambda x: x.name, slice_stats.datasets)))
def get_sliced_stats(stats, slice_key):
for sliced_stats in stats.datasets:
if sliced_stats.name == slice_key:
result = statistics_pb2.DatasetFeatureStatisticsList()
result.datasets.add().CopyFrom(sliced_stats)
return result
print(f'Invalid Slicing key: {slice_key}')
# 此資料中,"US" 的人 Age 皆為 0
data_bias = {
'Name':['Tom', 'Nick', 'Krish', 'Jack', 'John', 'Kevin', 'Jerry'],
'Age':[20, 0, 19, 0, 80, 90, 0],
'Country':["TW", "US", "GB", "US", "DE", "TW", "US"],
}
df_bias = pd.DataFrame(data_bias)
# 因為此方法不支援直接用在 df 上,故先存成 csv
df_bias.to_csv('df_bias.csv', index=False)
# 定義 slice_fn,注意 feature 要轉成 bytes
slice_fn = tfdv.get_feature_value_slicer(features={'Country': [b'US']})
slice_options = tfdv.StatsOptions(slice_functions=[slice_fn])
stats_list = tfdv.generate_statistics_from_csv('df_bias.csv', stats_options=slice_options)
# 前面定義的 utils function
display_slice_keys(stats_list) # 會得到 ['All Examples', 'Country_US']
# Visualize both statistics
lhs_stats = get_sliced_stats(stats_list, 'Country_US')
rhs_stats = get_sliced_stats(stats_list, 'All Examples')
tfdv.visualize_statistics(lhs_stats, rhs_stats)
```

可以看到圖中,Country_US 的資料是 All Examples 的子集,而此子集的 Age 這個 feature 皆是 0。
### Slicing Data to Multiple Categorics
範例:
```python=
data_time = {
'Name':['Tom', 'Nick', 'Krish', 'Jack', 'John', 'Kevin', 'Jerry'],
'Age':[20, 0, 19, 0, 80, 90, 0],
'Country':["TW", "US", "GB", "US", "DE", "TW", "US"],
'date': ['03/20/2021','03/21/2021','03/21/2021', '03/22/2021', '03/23/2021', '03/23/2021', '03/23/2021']
}
df_time = pd.DataFrame(data_time)
df_time["date"] = pd.to_datetime(data_time["date"])
print(df_time)
'''
Name Age Country date
0 Tom 20 TW 2021-03-20
1 Nick 0 US 2021-03-21
2 Krish 19 GB 2021-03-21
3 Jack 0 US 2021-03-22
4 John 80 DE 2021-03-23
5 Kevin 90 TW 2021-03-23
6 Jerry 0 US 2021-03-23
'''
# slice function feature 指定在 date 上且不給 value
slice_fn = tfdv.get_feature_value_slicer(features={'date': None})
# 得到一個 list of stats
stats_list = tfdv.generate_statistics_from_csv(
"./df_date.csv",
stats_options=tfdv.StatsOptions(slice_functions=[slice_fn])
)
for sliced_stats in stats_list.datasets:
print(sliced_stats.name)
# All Examples
# date_2021-03-20
# date_2021-03-21
# date_2021-03-22
# date_2021-03-23
# 接著可以針對這已經分好的 list of stats 去做操作
lhs_stats = get_sliced_stats(stats_list, "date_2021-03-20")
rhs_stats = get_sliced_stats(stats_list, "date_2021-03-23")
tfdv.visualize_statistics(lhs_stats, rhs_stats, "date_2021-03-20", "date_2021-03-23")
```

### Data Skew and Drift
#### Categorical feature
在 tfdv 中提供了兩個 schema 設定,`skew_comparator` 和 `drift_comparator`。
- skew_comparator: 用來比較兩個 dataset 的差異,例如比較 training dataset 和 serving dataset。
- drift_comparator: 用來比較兩個 dataset 的差異,例如比較 today training dataset 和 yesterday training dataset
沒錯,其實沒有差異,連異常的訊息跟判斷方法都一樣,都是 `L-INFINITY NORM` XD
唯一的差異是 `tfdv.validate_statistics` 時給的參數不一樣。
範例:
```python=
data_yesterday = {
'Name':['Tom', 'Nick', 'Krish', 'Jack', 'John', 'Kevin', 'Jerry'],
'Age':[20, 0, 19, 0, 80, 90, 0],
'Country':["TW", "US", "GB", "US", "DE", "TW", "US"],
}
df_yesterday = pd.DataFrame(data_yesterday)
print(df_yesterday)
stats_yesterday = tfdv.generate_statistics_from_dataframe(df_yesterday)
schema = tfdv.infer_schema(stats_yesterday)
'''
df_yesterday:
Name Age Country
0 Tom 20 TW
1 Nick 0 US
2 Krish 19 GB
3 Jack 0 US
4 John 80 DE
5 Kevin 90 TW
6 Jerry 0 US
'''
data = {
'Name':['Tom', 'Nick', 'Krish', 'Jack'],
'Age':[20, 21, 19, 18],
'Country':["TW", "US", "GB", "US"]
}
df_today = pd.DataFrame(data)
print(df_today)
stats_today = tfdv.generate_statistics_from_dataframe(df_today)
'''
df_today:
Name Age Country
0 Tom 20 TW
1 Nick 21 US
2 Krish 19 GB
3 Jack 18 US
'''
'''
df_yesterday: ["TW", "US", "GB", "DE"] = [2, 3, 1, 1]
df_today: ["TW", "US", "GB", "DE"] = [1, 2, 1, 0]
'''
# 用 skew_comparator
tfdv.get_feature(schema, 'Country').skew_comparator.infinity_norm.threshold = 0.01
# validate_statistics,要帶入 "serving_statistics" 這個參數
skew_anomalies = tfdv.validate_statistics(
statistics=stats_yesterday,
schema=schema,
serving_statistics=stats_today)
tfdv.display_anomalies(skew_anomalies)
# 用 drift_comparator
tfdv.get_feature(schema, 'Country').drift_comparator.infinity_norm.threshold = 0.01
# validate_statistics 要帶入 "previous_statistics" 這個參數
skew_anomalies = tfdv.validate_statistics(
statistics=stats_today,
schema=schema,
previous_statistics=stats_yesterday)
tfdv.display_anomalies(skew_anomalies)
```
上面不管用 skew_comparator 還是 drift_comparator,結果都會是

Categorical feature 使用的是 **`L-INFINITY NORM`** 來判斷資料的 skew 程度
> L-INFINITY NORM
The L-infinity norm is an expression used to define the difference between two vectors (in our case, the serving statistics). The L-infinity norm is defined as the maximum absolute value of the vector’s entries.
For example, the L-infinity norm of the vector [3, –10, –5] is 10. Norms are often used to compare vectors. If we wish to compare the vectors [2, 4, –1] and [9, 1, 8], we first compute their difference, which is [–7, 3, –9], and then we compute the L-infinity norm of this vector, which is 9.
In the case of TFDV, the two vectors are the summary statistics of the two datasets. The norm returned is the biggest difference between these two sets of statistics.
而tfdv這邊的的 vector list 取的是 normialize count 作為 vector value。
因此上面的範例中 "DE" 的 norm 會是 1/7 - 0 = 0.1428
#### Neumerical Feature
如果想要比較的對象是 Neumerical Feature,則在 `drift_comaprator`, `skew_comparator` 後面改用 `jensen_shannon_divergence` ([link](https://en.wikipedia.org/wiki/Jensen%E2%80%93Shannon_divergence))。
範例(延續前面的dataframe):
```python=
tfdv.get_feature(schema, 'Age').skew_comparator.jensen_shannon_divergence.threshold = 0.1
skew_anomalies = tfdv.validate_statistics(
statistics=stats_yesterday,
schema=schema,
serving_statistics=stats_today)
tfdv.display_anomalies(skew_anomalies)
tfdv.get_feature(schema, 'Age').drift_comparator.jensen_shannon_divergence.threshold = 0.1
skew_anomalies = tfdv.validate_statistics(
statistics=stats_today,
schema=schema,
previous_statistics=stats_yesterday)
tfdv.display_anomalies(skew_anomalies)
```

### Use Case
TFDV 提供了兩個 Use Case
詳情請見官方部落格的文章
https://medium.com/tensorflow/introducing-tensorflow-data-validation-data-understanding-validation-and-monitoring-at-scale-d38e3952c2f0
Case 1

Case 2

 Sign in with Wallet
Connect another wallet
Sign in with Wallet
Connect another wallet