# WEEK 3 - SECURITY AND DEPLOYMENT
###### tags: `WEB` `JS` `DIGITALIZE` `BACKEND` `Express` `MongoDB`, `Deployment`, `Security`
## Security
how to make sure our web applications are secure.
### Env. files and configuration
Environment variables allow us to manage the configuration of our applications separately from our codebase.
Common examples of configuration data that are stored in environment variables include:
* HTTP port
* database connection string
* location of static files
* endpoints of external services
* Private keys like(google map key, access Keys, Twilio credentials)
The `.env` file should never be committed to the source code repository. We must place the file into the `.gitignore`file. (When using git.)
Previously, we were connecting to `mongodb` in `index.js` file directly pass the params as hard coded strings.
Now we will create our .env file and start refactor and enhance our old code.
Create `.env` file at the root of the project and make sure to add it to the `.gitignore` file to prevent this file to be pushed and uploaded to the repo at github.
Add the following to the file:
```
HOST = localhost
DATABASE = clinic
PORT = 27017
APP_PORT = 5000
```
now let's install new package called `dotenv`, The dotenv is a zero-dependency module that loads environment variables from a .env file into process.env. Storing configuration in the environment separate from code
`npm i dotenv`
Now let's replace connection string at `index.js` with values from .env with help of `dotenv` package.
```
...
require('dotenv').config()
const HOSTNAME = process.env.HOST
const PORT = process.env.PORT;
const DBNAME = process.env.DATABASE
const APP_PORT = process.env.APP_PORT
...
mongoose.connect(`mongodb://${HOSTNAME}:${PORT}/${DBNAME}`);
```
Now our application connected to the database successfully.
### HTTPS
We understood what is HTTP protocol and how it works, but the data transafered throught client and server are plain text not encrypted, so any one in the middle of the connection can listen to the data and steal it. So to ensure that all of these data could not read by anyone are not authorized, we have to transfer data in a secured way, so it is important that all of this transferred information is encrypted, meaning that the characters of the message are altered so that the sender and receiver of the message can understand it, but no one else can.
**How is the data encrypted and decrypted?**
**Step 1 -** The client (browser) and the server establish a TCP connection.
**Step 2 -** The client sends a “client hello” to the server. The message contains a set of necessary encryption algorithms (cipher suites) and the latest TLS version it can support. The server responds with a “server hello” so the browser knows whether it can support the algorithms and TLS version.
The server then sends the SSL certificate to the client. The certificate contains the public key, hostname, expiry dates, etc. The client validates the certificate.
**Step 3 -** After validating the SSL certificate, the client generates a session key and encrypts it using the public key. The server receives the encrypted session key and decrypts it with the private key.
**Step 4 -** Now that both the client and the server hold the same session key (symmetric encryption), the encrypted data is transmitted in a secure bi-directional channel.
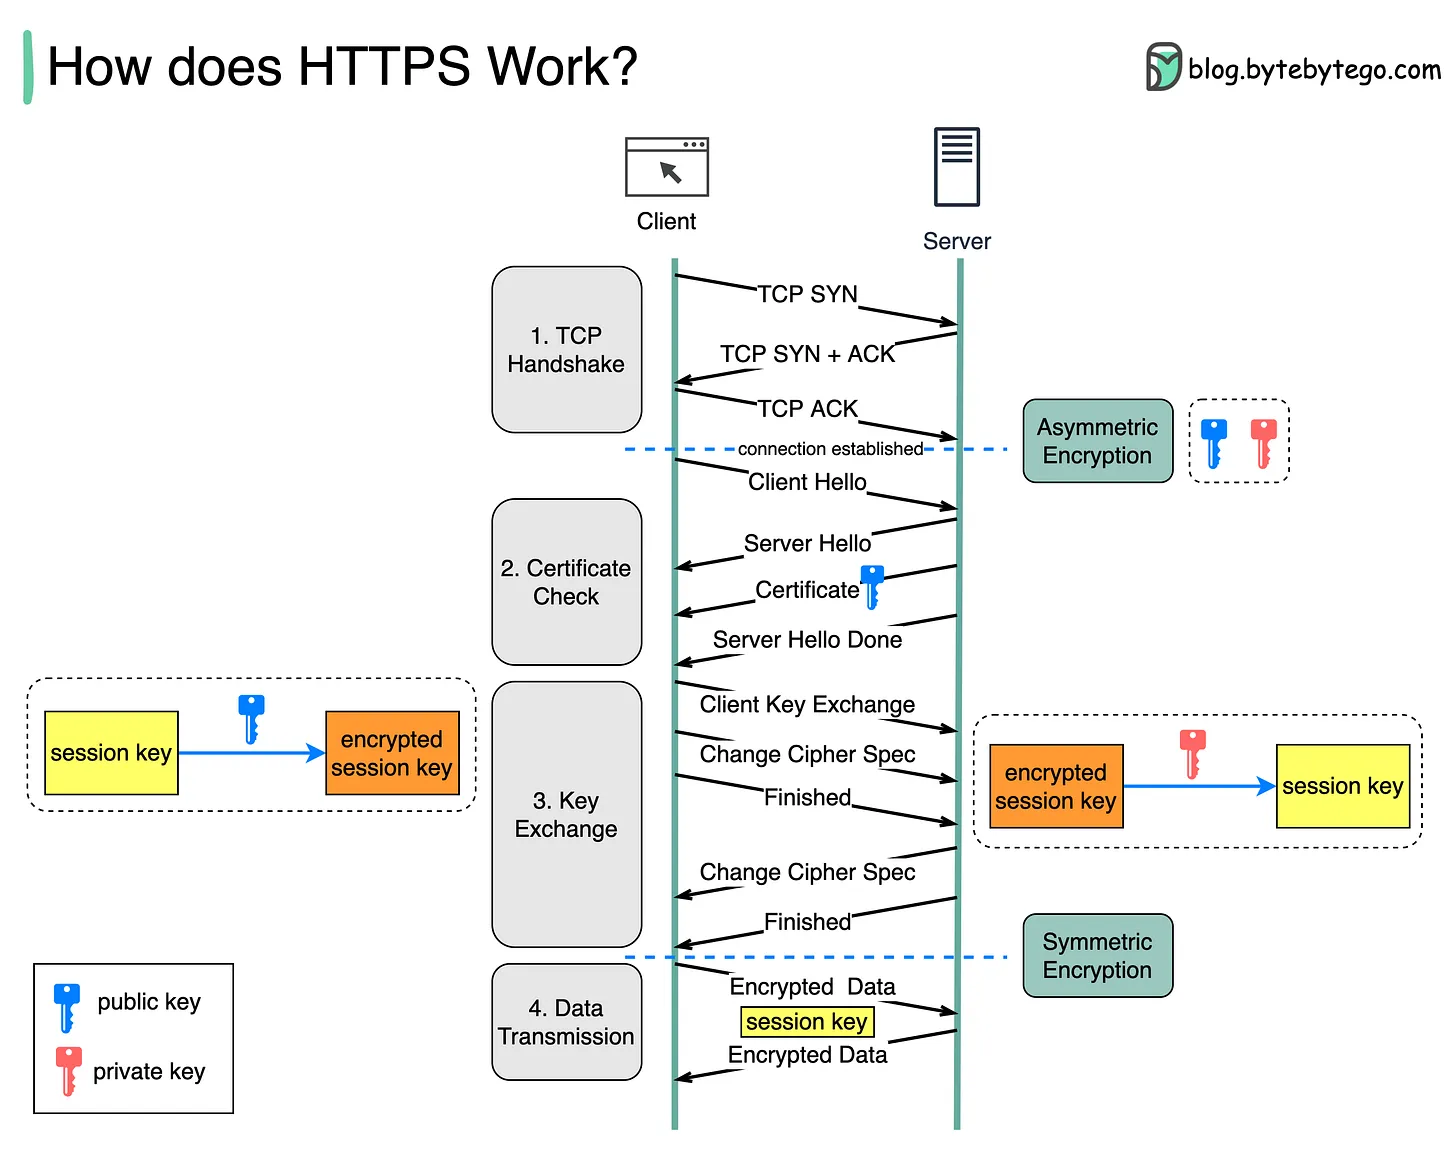
1. Security: The asymmetric encryption goes only one way. This means that if the server tries to send the encrypted data back to the client, anyone can decrypt the data using the public key.
2. Server resources: The asymmetric encryption adds quite a lot of mathematical overhead. It is not suitable for data transmissions in long sessions.
### Authentication and JWT
Authentication is a process that verifies that someone or something is who they say they are. Technology systems typically use some form of authentication to secure access to an application or its data. For example, when you need to access an online site or service, you usually have to enter your username and password. Then, behind the scenes, it compares the username and password you entered with a record it has on its database. If the information you submitted matches, the system assumes you are a valid user and grants you access. System authentication in this example presumes that only you would know the correct username and password. It, therefore, authenticates you by using the principle of something only you would know.
**JWT**
JWT, or JSON Web Token, is an open standard used to share security information between two parties — a client and a server. Each JWT contains encoded JSON objects, including a set of claims. JWTs are signed using a cryptographic algorithm to ensure that the claims cannot be altered after the token is issued.
So the user don't have to enter his credentials each time he visits the website.

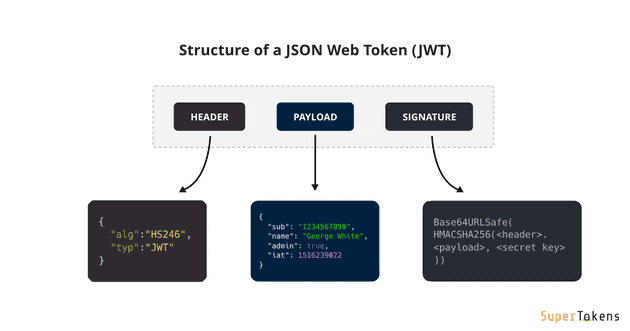
**JWT Strcuture**
* Header: Consists of two parts:
* The signing algorithm that’s being used.
* The type of token, which, in this case, is mostly “JWT”.
* Payload: The payload contains the claims or the JSON object.
* Signature: A string that is generated via a cryptographic algorithm that can be used to verify the integrity of the JSON payload.
The Client typically attaches JWT in Authorization header with Bearer prefix:
`Authorization: Bearer [header].[payload].[signature]`
Or only in x-access-token header:
`x-access-token: [header].[payload].[signature]`
**Pros and Cons**
* **Secure:** JWTs are digitally signed using either a secret (HMAC) or a public/private key pair (RSA or ECDSA) which safeguards them from being modified by the client or an attacker.
* **Stored only on the client:** You generate JWTs on the server and send them to the client. The client then submits the JWT with every request. This saves database space.
* **Efficient / Stateless:** It’s quick to verify a JWT since it doesn’t require a database lookup. This is especially useful in large distributed systems.
**Flow for Singup and login**

### Architecture with Authentication & Authorization

Via Express routes, HTTP request that matches a route will be checked by CORS Middleware before coming to Security layer.
Security layer includes:
* JWT Authentication Middleware: verify SignUp, verify token
* Authorization Middleware: check User’s roles with record in database, and check permissions.
Packages that we need:
* Express
* bcryptjs
* jsonwebtoken
* mongoose
* MongoDB
### Implementation on CLINIC APP
- `npm i cors jsonwebtoken bcryptjs`
- Setup web server as `index.js`:
```
const cors = require("cors");
var corsOptions = {
origin: "http://localhost:8081"
};
app.use(cors(corsOptions));
```
- Create Models (User, Role )
`User` object will have a `roles` array that contains ids in roles collection as reference.
```
const mongoose = require("mongoose");
const Role = mongoose.model(
"Role",
new mongoose.Schema({
name: String
})
);
module.exports = Role;
```
`models/user.model.js`
```
const mongoose = require("mongoose");
const User = mongoose.model(
"User",
new mongoose.Schema({
username: String,
email: String,
password: String,
roles: [
{
type: mongoose.Schema.Types.ObjectId,
ref: "Role"
}
]
})
);
module.exports = User;
```
- Add Roles Seeder
Create new directory name it `seeders`, create new file `rolesSeeder.js`.
Add the following code to insert roles into DB.
```
const Role = require('../models/Role')
const seed = async ()=> {
try {
let count = await Role.estimatedDocumentCount();
if(count == 0)
{
await new Role({
name: "admin"
}).save();
await new Role({
name: "user"
}).save();
}
} catch (err) {
console.error(err)
}
}
module.exports = seed;
```
create another file called `index.js` at the directory `seeders`, and add the following code:
```
const mongoose = require('mongoose')
require('dotenv').config()
const HOSTNAME = process.env.HOST
const PORT = process.enva.PORT;
const DBNAME = process.env.DATABASE
const seed = require('./rolesSeeder')
mongoose.connect(`mongodb://${HOSTNAME}:${PORT}/${DBNAME}`);
console.log('Roles Seeder Started')
const db = mongoose.connection;
db.on('error',(e)=>{
console.error(e)
})
db.once('open', async ()=>{
console.log('Connected to DB successfully')
console.log('Start The Seeder...')
await seed();
console.log('Closed the connection, seeder ended.')
})
```
Go to `package.json` file and define a new command `seed`.
Now you can run the seeder with `nm run seed`.
- Prepare Secret Key for JWT
`jsonwebtoken` functions such as `verify()` or `sign()` use algorithm that needs a secret key (as String) to encode and decode token.
In the `.env` file, add following code:
```
JWT_SECRET_KEY="123$%^&*(*-secret-key"
```
- Create Middleware for Auth by token
Why we need to create middleware? this will be act as seperated layer that http requests will pass through, to deal with request and apply any action before pass http request to our core code (controllers), now we need to check if username or email is duplicate or not, and we need check if roles in the request is existed or not.
- Create a new `directory` called `middlewares` at the root directory of the project.
- Create new middleware js file name it `verifySignup.js` with following code:
```
const User = require('../models/User')
const {ROLES}= require('../config/constants')
const {success, error} = require('../utils/responser')
checkDuplicateUser = async (req, res, next) => {
let user = await User.findOne({
username: req.body.username
})
if(user) {
return res.status(409).json(error(409,{},"User already exists"))
}
next();
};
checkRoleExistance = (req, res, next) => {
if (req.body.roles) {
for (let i = 0; i < req.body.roles.length; i++) {
if (!ROLES.includes(req.body.roles[i])) {
return res.status(400).json(error(400,{},"Invalid Role Name"));
}
}
}
next();
};
const verifySignUp = {
checkDuplicateUser,
checkRoleExistance
};
module.exports = verifySignUp;
```
To process Authentication & Authorization, we create following functions:
- check if token is provided or not. We get token from `Authorization` of HTTP headers, then use jsonwebtoken's `verify()` function
- check if the user is admin or not
```
const jwt = require("jsonwebtoken");
require('dotenv').config()
const User = require("../models/User");
const Role = require("../models/User");
const {success, error} = require('../utils/responser')
const JWT_SECRET_KEY = process.env.JWT_SECRET_KEY
verifyToken = (req, res, next) => {
let token = req.headers["Authorization"];
if (!token) {
return res.status(403).json(error(403,{},"Unathorized"))
}
jwt.verify(token, JWT_SECRET_KEY, (err, decoded) => {
if (err) {
return res.status(403).json(error(403,{},"Unathorized"))
}
req.userId = decoded.id;
next();
});
};
// for check role
isAdmin = async (req, res, next) => {
let user = await User.findById(req.userId)
Role.find(
{
_id: { $in: user.roles }
},
(err, roles) => {
if (err) {
return res.status(500).json(error(500,{},"Server Side Error"))
}
for (let i = 0; i < roles.length; i++) {
if (roles[i].name === "admin") {
next();
return;
}
}
return res.status(403).json(error(403,{},"You dot not have permission to this area"))
return;
}
);
};
const verifyJWT = {
verifyToken,
isAdmin
};
module.exports = verifyJWT;
```
Now let's create `index.js` at the directory `middlewares` so we can expose those modules through it.
`middlewares/index.js`
```
const verifyJWT = require("./verifyJWT");
const verifySignUp = require("./verifySignUp");
module.exports = {
verifyJWT,
verifySignUp
};
```
**Controllers:**
- Create Controller for Auth
There are 2 main functions for Authentication:
`signup`: create new User in database (default role is `user` if not specifying role)
`signin`:
* find username of the request in database, if it exists
* compare password with password in database using bcrypt, if it is correct
* generate a token using `jsonwebtoken`
* return user information & access Token
`controllers/AuthController.js`
```
require('dotenv').config()
const User = require("../../../models/User");
const Role = require("../../../models/Role");
var jwt = require("jsonwebtoken");
var bcrypt = require("bcrypt");
const JWT_SECRET_KEY = process.env.JWT_SECRET_KEY;
const { success, error} = require('../../../utils/responser');
const signup = (req, res) => {
const user = new User({
username: req.body.username,
password: bcrypt.hashSync(req.body.password,10)
});
user.save((err, user) => {
if (err) {
return res.status(500).json(error(500,{},"Server Side Error"))
}
if (req.body.roles) {
Role.find(
{
name: { $in: req.body.roles }
},
(err, roles) => {
if (err) {
return res.status(500).json(error(500,{},"Server Side Error"))
}
user.roles = roles.map(role => role._id);
user.save(err => {
if (err) {
return res.status(500).json(error(500,{},"Server Side Error"))
}
return res.status(201).json(success(201,user,"User Registered Successfully"))
});
}
);
} else {
Role.findOne({ name: "user" }, (err, role) => {
if (err) {
return res.status(500).json(error(500,{},"Server Side Error"))
}
user.roles = [role._id];
user.save(err => {
if (err) {
return res.status(500).json(error(500,{},"Server Side Error"))
}
return res.status(201).json(success(201,user,"User registered Successfully"))
});
});
}
});
};
signin = (req, res) => {
User.findOne({
username: req.body.username
})
.populate("roles", "-__v")
.exec((err, user) => {
if (err) {
return res.status(500).json(error(500,{},"Server Side Error"))
}
if (!user) {
return res.status(404).json(error(404,{},"User not found"))
}
var passwordIsValid = bcrypt.compareSync(
req.body.password,
user.password
);
if (!passwordIsValid) {
return res.status(401).json(error(401,{
token: null
},"Invalid Credentials"))
}
var token = jwt.sign({ id: user.id }, JWT_SECRET_KEY, {
expiresIn: 86400 // 24 hours
});
var authorities = [];
for (let i = 0; i < user.roles.length; i++) {
authorities.push(user.roles[i].name.toUpperCase());
}
return res.status(200).json(success(200,
{
id: user._id,
username: user.username,
roles: authorities,
accessToken: token
}
,"Logged Successfully"))
});
};
module.exports = {signin, signup}
```
**Protect API Routes with middlewares**
- public routes: (signin, signup)
- proteted routes:
- patients: protect all
- history: protect all
Call middleware on route function for verifying JWT and protect tawards all patients API:
```
app.use('/api/v1/patients',[
verifyJWT.verifyToken
],patientsRouter);
```
We also can specifiy some endpoints to be protected inside auth router file as below:
`index.js`
```
app.use('/api/v1/auth',authRouter);
```
`auth.js router`
```
const express = require('express')
const router = express.Router()
const {signup,signin} = require('../../controllers/v1/auth/AuthController')
const {verifySignUp, verifyJWT} = require('../../middlewares')
router.post('/signup',[
verifySignUp.checkDuplicateUser,
verifySignUp.checkRoleExistance
],signup);
router.post('/signin', signin);
module.exports = router;
```
Now you can start test the API using postman.
## Data Validation
Data validation is an essential part of an application whether the task is to collect information, analyze the data, prepare the data for presentation and many other use cases. It is important to verify the incoming data from the start because if the unwanted data is dragged on further through the application then it can happen that we have data that is not accurate.
There are many libraries used for dat vaLidation, most commonly used is `express-validator`.
### Installation
- `npm i express-validator`
- Usage:
`routers/auth.js`
```
const {check} = require('express-validator')
router.post('/signin', check('username').not().isEmpty().withMessage('username is required'),signin )
```
`controllers/AuthController.js`
```
const {validationResult} = require('express-validator')
const signin = async (req, res)=>{
let errors = validationResult(req).array();
if(errors)
{
return res.status(400).json(error(400,errors))
}
try {
let user = await User.findOne({
username:req.body.username
}).populate('roles')
if(!user)
{
return res.status(404).json(error(404,"Not Found"))
}
let ok = await bcrypt.compare(req.body.password, user.password)
if(!ok)
return res.status(401).json(error(401,"Invalid Password"))
const RolesNames = [];
for(let i = 0; i<user.roles.length; i++)
{
RolesNames.push(user.roles[i].name)
}
let token = jwt.sign({
id:user.id,
roles:RolesNames
},JWT_SECRET_KEY,{
expiresIn:3600// 1 hour
})
return res.status(200).json(error(200,{
id:user.id,
username:user.username,
roles:RolesNames,
token:token
},"Registered Successfully"))
} catch (err) {
console.error(err)
return res.status(500).json(error(500,"Server Side Error"))
}
}
```
## File Uploading
In this section, we will talking about:
* Uploading File to a static folder in the Server (restrict file size: 2MB)
* Downloading File from server with the link
* Getting list of Files’ information (file name & url)
* Deleting File from server by file name
We will create a directory at the project to store the uploaded files.
We will use `Multer` middleware package to process `multipart/form-data` and upploaded files.
**Multer:** Multer is a node.js middleware for handling multipart/form-data, which is primarily used for uploading files.
Let's practise on clinic Restful API:
- Create new directory `public` at the root of the project
- `npm i multer`
- Create file for using multer middleware to handle request of `multipart/form-data` type:
`middlewares/upload.js`
```
const multer = require('multer');
const path = require('path');
const util = require('util')
// define storage engine
let storage = multer.diskStorage({
destination:(req,file,cb)=>{
cb(null,path.join(__dirname,'../../public/resources/uploads/'));
},
filename:(req,file,cb)=>{
console.log(file.originalname)
cb(null, file.originalname);
}
})
const maxSize = 2 * 1024 * 1024;// size in bytes, 1 MB = 1024 KB, 1KB=1024 Bytes
let uploadFile = multer({
storage: storage,
limits: { fileSize: maxSize},
}).single("file");
let uploadFileMiddleware = util.promisify(uploadFile);
module.exports = uploadFileMiddleware;
```
diskStorage options:
* `destination`: The folder used to store the uploaded files or the path where the images will be stored. Well make it ./uploads.
* `filename:` chooses the name that will be saved in storage or the files name that will be placed in the desired folder. Simply using its original name will suffice.
`.single('file')`: Returns middleware that processes a single file associated with the given form field.
`util.promisify()` creates the exported middleware object that can later be used with async-await.
- Add file uploading funcionality to `newHistory` function
Go to `routers/v1/patients`, import `uploadFile` middleware and use it in the route of `newHistory` as below
```
const uploadFile = require("../../middlewares/upload");
router.post(`/:id/history`,[
uploadFile,
check('file').custom((value, { req }) => {
if (!req.file) throw new Error("File is required");
return true;
}
)],newHistory);
```
- Let's update `history` collection, so we will create a new relationship between history and uploaded images using embedded method, each history document has many images.
```
const newHistory = async (req, res)=>{
const id = req.params.id;//patient
// TO-DO
const errors = validationResult(req).array();
console.error(errors)
if(errors && errors.length > 0)
{
return res.status(400).json(error(400,"You have to upload a file"))
}
let p = await Patient.findById(id);
console.log('p',p)
if(!p)
return res.status(404).json(error(404,{},"No Data"))
let h = new History(req.body)
await h.save()
if(!p.history)
p.history = []
p.history.push(h._id)
console.log('file is ',req.file)
if(req.file)
{
if(!p.images)
p.images = []
p.images.push(req.file.originalname)
}
p.save()
// or method 2 to update history array
/*
let p = await Patient.findByIdAndUpdate(id,
{
$push:{
history:req.body
}
}
)
*/
return res.status(200).json(success(200,p,"Success"))
}
```
**Access the Uploaded Images Via Browser**
- first we need to enable accessibility for public folder by include middleware at `index.js`:
```
app.use(express.static('public'))
```
Now to access uploaded image via visiting the browser, use the following URL:
```
http://127.0.0.1:5000/resources/uploads/1667231521239_n.jpg
```
## Deloyment
## Task
## References
HTTPS: https://blog.bytebytego.com/p/how-does-https-work-episode-6
https://github.com/expressjs/multer
Source Code:
https://github.com/computiq-training/dig-w3-security.git
Express Validator:
https://express-validator.github.io/docs/
 Sign in with Wallet
Connect another wallet
Sign in with Wallet
Connect another wallet