# 30 Days of Web3 Curriculum FINAL DRAFT
Jump to part 2 here: https://hackmd.io/TFKB9cHdSASZn1C1FOIoyA
# Welcome to 30 Days of Web3!
**DOC: 0-getting-started/0-overview.md**
Writers: [Cami](https://twitter.com/camiinthisthang)
Editors: [Deborah Emeni](https://twitter.com/_emeni_deborah), [Kristen](https://twitter.com/CuddleofDeath)
## 👋 Welcome
If you're reading this, you're here to build dope dapps — Welcome!
This course is for devs that want to start building on Ethereum, one of the biggest blockchains in the world.
This course will focus on big-picture architecture and will help you define your web3 techstack that you'll be able to use to build any idea you have.
Prerequisites:
- Basic understanding of how to navigate your terminal
- Basic JavaScript
- Basic React
It's helpful to be familiar with the aforementioned, but you'll pick up everything along the way.
## Before Starting:
Be sure to register through this form: https://forms.gle/AEDy1sezV9YJJU316. By signing up, you'll get access to our Discord where you'll be able to ask questions, connect with speakers, and get the alpha on prizes we're giving away.
Mark your calendars to attend the live workshops. These workshops will supplement the curriculum and give you all opportunities to ask questions live and get live, structured education. If you can't attend, all of the videos will be posted in the discord under #workshop-recordings.
- This course is fully async, online, and created to only take 30-45 mins daily to ship in 30 days.
- This acts as a prerequisite for women and nb devs applying to our BUIDL Accelerator. In order to meet the deadline application for BUIDL, you'll have to finish this project within the next **40 days**. If you're not planning to apply for the accelerator, you can feel free to go through this project at your own pace.
## Project Overview
In this course, you'll be building Web3RSVP, an event creation and management platform. This will be similar to something like Eventbrite in that users can create events, discover and RSVP to events.
Checkout a video of the dapp [here](https://www.loom.com/share/c3fb24a579644feaa7510e98be37181a).
Below is a diagram of the dapp architecture.

> Note: The sections marked with `optional` can be skipped if you're already familar with the basics like understanding wallets, blockchains, transactions, etc.
## Checkpoints
blurb about quizzes + note about "The team will be sending out kudos in batches by the end of every week"
## 🤚 Getting Help
When you have a question, drop a message in the discord server in the channel that corresponds to the section you're in.
This project is broken up into 6 sections and you'll see a help channel for each section where a member of the WBW3 team will help you out.
## 🚨 Progress Report
Keep us updated on your progress and motivate your peers!
Drop into the #progress channel in discord and post a GIF, photo, or written update to let us know how you're doing. Have fun with it - we may or may not be giving out prizes to those who keep up with progress reports :-)
---
# Intro to Web3
**DOC: 0-getting-started/1-intro-to-web3.md**
Writers: [Kristen](https://twitter.com/CuddleofDeath)
Editors: [Sarah Z](https://twitter.com/haegeez)
Welcome to the beginning of your decentralized adventure! Allow me to guide you through the new and exciting iteration of the internet known as Web3. By the end of this article, you will have the answers to the questions you're currently thinking, like: _What the heck is web3? What does decentralization mean?_ And: _Are these all just buzzwords?_
## The Internet Over The Years...

The internet has been a global phenomenon for quite some time now. It has changed the very way in which we live our lives. Before the internet, it wasn't as easy to show a photo of your cute cat to thousands of people.
Now, it's thanks to the modern day advancements of the internet that we can post daily updates about our lives, communicate with friends and family through instant messaging apps, or even order everyday items like food and appliances online.
## Web 1.0 - The Root of Decentralization

The **internet was invented during the 1970s** at the peak of the cold war between the United States and Russia. Because the US government feared an attack would disable their weapons systems, they built a decentralized system that contained a network of many computers all across the country. This way, if anything were to happen, the defense system in place would still be operational.
In 1989, [Tim Berners-Lee](https://www.w3.org/People/Berners-Lee/) was developing the technology that would ultimately become the World Wide Web. What exactly was his vision for the web? It was to create decentralized, open-source information sharing around the world.
**Web 1.0 is defined as the version of the web that existed between 1990 to 2004.** During this time, the internet mainly consisted of static websites owned by individual companies. Because the web was facing a slow adoption rate, most sites had little to no user interaction. Since user interaction was practically non-existent during these times, **Web 1.0 is commonly referred to as the _"read-only"_ web.**
## Web 2.0 - The Centralized Web

Around 2005, internet speeds had significantly increased compared to the prior decade. More people were connecting to the internet than ever before, with that number increasing each subsequent year.
Needless to say, the web was experiencing growth at a rapid rate. People were now able to communicate instantly by using chat applications like AOL Instant Messenger. Taking 3 minutes to load a webpage had now become a thing of the past for the majority of users. Most websites started to actually have layouts instead of just being colored backgrounds with text on them.
Websites that previously had little user interactions finally gained traction. Businesses were being created, communities were being built, and education was becoming more accessible due to resources available online. **Because of this, Web 2.0 is also known as the _“read-write”_ web** (as opposed to Web 1.0 being known as the “read-only” web).
This version of the internet is the one that most users are familiar with: the centralized web. Also known as **Web 2.0**, the centralized web contains websites that store their content on a cloud storage management service like CloudFlare or AWS ([Amazon Web Services](https://en.wikipedia.org/wiki/Amazon_Web_Services)). Basically, the majority of sites on the mainstream internet are tied to a server run by Google, Amazon, or other big name organizations.
This means that, if anything were to happen to the cloud services such as a hack or service disruption, all the websites attached to those services would go down. In 2017, Amazon Web Services experienced a massive outage that lasted [around 4 hours](https://aws.amazon.com/message/41926/). This outage was caused by an engineer who executed the wrong command. This was a massive problem for AWS, which hosts millions of sites on its platform (over 9 million at the time of writing!).
Popular sites like Coursera, Medium, Docker, Slack, and more were down during this time as well.
It seems that 2017 was a rough year for the centralized web in general. Aside from the aforementioned AWS outage, there was also the massive [Equifax Data Breach](https://archive.epic.org/privacy/data-breach/equifax/) which impacted 148 million customers.
## Web 3.0 - The People's Internet
In **Web3**, decentralization has returned! Data is encrypted and securely stored across multiple nodes (computers connected to a blockchain network). These nodes are run by individuals worldwide who are sharing their disk space for a fee. Because data is stored on multiple nodes instead of one central server like AWS, it is decentralized. This enhances data security for websites and for its users.
Imagine you're accessing a site that you want to become a member of:
- In Web 2.0, you would have to sign up, go to your email, click a verification link, then navigate back to the site, probably solve a captcha where you have to click all the bicycles in the picture, then login. That's not a very good user experience!
- In Web 3.0, you simply just connect your wallet to login. You don't have to deal with annoying captchas, and your data is protected!
Unlike instances of misfortune that happen on the centralized web like the AWS outage, web3 servers cannot go down. A data breach like the 2017 Equifax breach could never happen in web3. This is thanks to the decentralized network of nodes connected to the blockchain that are responsible for encrypting data.
## Too Long, Didn't Read (Recap)

- The internet was invented by the United States in the 1970s. It was originally **decentralized**, which meant that the network consisted of many computers across the country.
- Tim Berners-Lee invented the World Wide Web in 1989. This version of the web would later come to be known as Web 1.0. There was little to no user interaction on most websites during this time, which is why **Web 1.0 is also sometimes referred to as the _"read-only" web._**
- Around 2005 was when Web 2.0 arrived. The internet had begun to undergo a rapid adoption rate. Interaction with other users was now possible through instant messaging and online status updates. This is why **Web 2.0 is also called the _"read-write"_ web.** Web 2.0 is centralized, meaning that existing sites are likely to be tethered to a cloud storage management service like Amazon Web Services. If anything happens to these cloud services such as an outage, hack, or takedown, millions of websites would go down as a result (as seen in the AWS outage and Equifax breach).
- In Web 3.0, decentralization has returned. Data is encrypted and securely stored across multiple nodes. Authentication is as simple as connecting your wallet to login. Web3 enhances security and puts the power of the internet back in the hands of its users! **Web 3.0 is also sometimes referred to as the "read-write-own" web.**
## Source links
- Article - [From Web 1.0 to Web3: How the Internet Grew Over The Years](https://hackernoon.com/from-web-10-to-web3-how-the-internet-grew-over-the-years-zac032g1)
- Article - [Equifax Data Breach](https://archive.epic.org/privacy/data-breach/equifax/)
- Article - [Amazon Web Services 2017 Disruption Summary](https://aws.amazon.com/message/41926/)
- Article - [Web2 vs Web3](https://ethereum.org/en/developers/docs/web2-vs-web3/#:~:text=Web3%2C%20in%20the%20context%20of,without%20monetising%20their%20personal%20data.)
- Article - [Introduction to Web3](https://ethereum.org/en/web3/)
- Biography - [Tim Berners-Lee](https://www.w3.org/People/Berners-Lee/)
- Article - [A Brief History of The Internet](https://www.usg.edu/galileo/skills/unit07/internet07_02.phtml)
---
# Intro to Blockchain
**DOC: 0-getting-started/1-intro-to-blockchain.md**
Writers: [Kristen](https://twitter.com/CuddleofDeath)
Editors: [Deborah Emeni](https://twitter.com/_emeni_deborah)
## Blockchain Transactions
The first step in a blockchain transaction usually starts with a user requesting a transaction. Any 'write' operation to the blockchain is a transaction. This includes everything from deploying a smart contract onto the chain, purchasing an NFT, purchasing an ENS name, etc.
Transactions are requests for your action to be validated and added to the chain. In order to successfully execute a transaction on the Blockchain, a gas fee (a transaction fee on the blockchain) is typically required.
When there is a lot of traffic and there is high demand for the network, the gas fees go up because block space is limited, and therefore miners can demand higher fees in order to prioritize which transactions they want to process. Think of it like Uber Surge Pricing: if you're at an airport with a bunch of people getting Ubers, the prices go up and the wait times go up.
**Gas fees** are *something that all users must pay in order to perform a function on the blockchain*. The amount of gas required to pay varies depending on which blockchain you’re using, as well as other factors like high traffic. According to [Gemini](https://www.gemini.com/cryptopedia/what-are-gas-fees-gwei-gas-fees-eth-ether-transaction-fee), the amount of these transaction fees can vary from less than 0.0001 USD to over 100 USD.
Once the transaction has been requested, it gets authenticated and added to a **block** (*which represents a set of transactions across the blockchain*). These blocks each have a maximum storage capacity so that once the capacity is reached, the blocks are closed and linked to the previously filled block. Also, these blocks contain information like digital signatures, a timestamp, and any other important information. The block is sent out to the entirety of the network’s *nodes* (participants on the blockchain).
After, nodes validate the transaction and then receive a reward (usually, the reward will be that blockchain’s main cryptocurrency) for participating in the validation process. Then, the block gets officially added to the existing blockchain. Afterward, the blockchain receives an update across the entire network and officially reflects that transaction. The transaction is now complete. If you’d like to read more in-depth about how transactions work, we recommend checking out this helpful article from [Euromoney Learning](https://www.euromoney.com/learning/blockchain-explained/how-transactions-get-into-the-blockchain).
Now that we have learned a bit about how blockchain transactions work, we will be taking a look at smart contracts next!
---
# Intro to Smart Contracts
**DOC: 0-getting-started/3-intro-to-smart-contracts.md**
Writers: [Kristen](https://twitter.com/CuddleofDeath)
Editors: [Deborah Emeni](https://twitter.com/_emeni_deborah), [Christina Mills](https://twitter.com/bombayonchain), [Briseida Montiel](https://twitter.com/brizism)
A **smart contract** is *a computer program compiled from code that can control events and actions according to the terms set within the contract’s code*.
Much like vending machines, we can program smart contracts with various functions. Vending machines allow consumers to insert a currency and then press a button to execute that transaction. A refreshing soda or a candybar is dispensed, and any leftover change that the consumer is owed is dispensed as well.
Smart contracts can be programmed to accept payment and can return an item in place of that payment. An example of this would be a “mint” button on a project’s website. **Minting** is *the process of taking a digital asset like a photo and publishing that asset to the blockchain*. Many NFT projects with a minting website will have a smart contract designed so that whenever the buyer pays a specified fee, they can “mint” a project’s NFT. Then, the smart contract activates the function that accepts the buyer’s payment and follows that function up with another one that distributes a randomly-generated NFT to the buyer.
In another example, some websites allow you to swap one cryptocurrency into a different one. Popular sites like Uniswap have options to swap between many different cryptocurrencies. Each time a user goes to execute a swap, a function tied to a smart contract is triggered. Like the vending machine, the swapping smart contract accepts the user’s payment then sends the user the currency they requested in return.
---
# Intro to Crypto Wallets
**DOC: 0-getting-started/4-intro-to-wallets.md**
Writers: [Kristen](https://twitter.com/CuddleofDeath)
Editors: [Deborah Emeni](https://twitter.com/_emeni_deborah), [Christina Mills](https://twitter.com/bombayonchain)
A **crypto wallet** is *a storage system for your digital assets like cryptocurrencies, NFTs, and more*. The contents of each crypto wallet can be accessed by a unique key made of a combination of letters and numbers explicitly assigned to the wallet’s creator (called a **private key**).
A crypto wallet’s **public key** is *the public address of the user’s wallet*. Think of it as a business address available publicly on the web. Anyone can use a wallet’s public key to look up and verify transaction information, however, personal information is not posted to the blockchain.
There are many forms of crypto wallets, with many options being available digitally like MetaMask, Coinbase Wallet, and Phantom wallet. While there are many options available as browser extensions and mobile apps, there are also **hardware wallets** (*physical devices that store and protect your private keys*).
A **hot wallet** is one of the most common ways to store crypto assets. It’s a very convenient option because it’s typically accessed via web, mobile, or desktop. However, *because hot wallets are always online, they are more vulnerable to attacks*.
**For best safety practices, a cold wallet is recommended.** Unlike hot wallets, **cold wallets** are *hardware devices that require physical input to unlock*. While cold wallets aren’t as convenient and are less accessible due to costing a fee to purchase, they provide the best security, as no one can access their contents without interacting in person with the hardware wallet. Some popular cold storage options include Ledger and Trezor.
---
# Setup Your Wallet
**DOC: 0-getting-started/5-setup-your-wallet.md**
Writers: Camila Ramos, [Kristen](https://twitter.com/CuddleofDeath)
Editors: [Deborah Emeni](https://twitter.com/_emeni_deborah), [Christina Mills](https://twitter.com/bombayonchain)
1. **Download the Coinbase Wallet chrome extension.** You can find the link [here](https://chrome.google.com/webstore/detail/coinbase-wallet-extension/hnfanknocfeofbddgcijnmhnfnkdnaad?hl=en).
2. Click on the puzzle piece icon at the top right of your chrome browser search bar. **Pin the extension to your toolbar by clicking on the pin icon.**
3. **Open the extension and select "Create a new wallet" and follow the prompts.**
>*(Note: This wallet will be used specifically for developing your dapp. This wallet should not be used to recieve payments or send real $ to!!)*
4. You should **write down your recovery phrase** and keep it safe as best practice, but if you lose this wallet, nothing will happen because this is strictly a development wallet.
5. **In the settings tab, scroll down to "Developer Mode" and switch it on.**
6. **Change your network to Polygon Mumbai**, the network we will be using to deploy our smart contract.
## Blockchain Safety Tips
- **Never share your PRIVATE KEY or SECRET RECOVERY PHRASE with anyone.**
Anyone who has your private key can access your account (or, in some cases: multiple accounts, depending on the wallet.)
- **Do not click on any suspicious links.**
Much like the centralized version of the web, scammers are looking for an easy way to make their next buck. You may receive suspicious links in direct messages on Discord, tweets on Twitter, and even emails that claim to be from wallet support.
As a general rule of thumb, web3 support teams will not reach out to you. Most of the time, the actual support team can be contacted on the official website. For example, MetaMask only offers support via their Help Center and their Community Channels.
- **Store your seed phrase somewhere safe and secure.**
Computers can be hacked. Ultimately, the safest way to store your seed phrase is by writing it down on a piece of paper and keeping it in a safe location that only you have access to.
Alternatively, while not as safe as pen and paper, using a detachable media device like a USB stick or external hard drive is another potential option.
- **For many interactions, use a burner wallet.**
Using a burner wallet to mint NFTs is safer than connecting your main wallet to a website and interacting with it. There have been instances of scams happening where people have reported their entire wallets getting drained due to connecting it to a website. While this only happens occasionally, it is best to be prepared and to keep your other precious assets safe from potential scammers.
---
# Checkpoint #1
**DOC: 0-getting-started/6-checkpoint.md**
Solidify everything you learned in this **Getting Started** section and earn kudos by taking this quiz: https://forms.gle/r1P6WdaCtRHcxqBt9
**End of Day 1**
---
# Building on Ethereum
**DOC: 1-building-on-ethereum/0-client-server-architecture.md**
Writers: [Cami](https://twitter.com/camiinthisthang)
Editors: [Deborah Emeni](https://twitter.com/_emeni_deborah), [Christina Mills](https://twitter.com/bombayonchain)
## Client Server Architecture
In order to fully understand the fundamental difference between web2 and web3, you have to understand the traditional client server architecture to understand the concept of open, composable backends.
Here is the TLDR:
A client application is the one that a user is actually interacting with, that's displaying the content. A server application is the one that sends the content, or resource, to your client application. A server application is a program that is running somewhere, listening, and waiting for a request.
The main reason for this separation is to secure sensitive information. Your entire client application gets downloaded into the browser, and all of the data can be accessed by anyone accessing your web page.
This architecture helps protect things like your API keys, personal data, and more. Now modern tools like Next.js and Netlify allow developers to run server code in the same app as their client app, without needing a dedicated server application.
### Why We Use A Client-Server Architecture
Let’s say you were building a weather web app, for example. The weather app that your user is going to interact with is the client application – it has buttons, a search bar, and displays data like city name, current temperature, AQI, and so on.
This weather app wouldn’t have every city and its weather information coded directly into it. This would make the app bloated and slow, would take forever to research and manually add to a database, and would be a headache to update every single day.
Instead, the app can access weather data by city using the Weather web API. Your app would gather your user’s location and then make a request to the server saying, “Hey, send me the weather information for this specific city.”
Depending on what you are trying to achieve, you would use the various request methods that are available. The server sends back a response containing the weather information and a few other things, depending on how the API is written. It may also send back things like a timestamp, the region this city is located in, and more.
Your client application communicated with a server application running somewhere, whose only job is to listen continuously for a request to that address. When it receives a request, it works to fulfill that request either by reading from a database, another API, local file, or a programmatic calculation based on data you pass in.
### How This Translates to Blockchain Development
Instead of having a server application, blockchain developers have this idea of open and composable backends, AKA smart contracts. You'll create a smart contract which handles the logic for the creation of a new event, RSVP'ing to a new event, etc. Your client application will be in charge of aggregating and displaying all of the events that were created, show a dashboard to your user indicating past and upcoming events, etc.
Read the full post on client-server architecture, APIs, and HTTP request methods [in this freeCodeCamp article](https://www.freecodecamp.org/news/http-request-methods-explained/).
---
# Introduction to Polygon
**DOC: 1-building-on-ethereum/1-intro-to-polygon.md**
Writers: [Fatma](https://twitter.com/fatima39_fatima)
Editors: [Deborah Emeni](https://twitter.com/_emeni_deborah)
## Ethereum Scaling Solutions
Ethereum has become one of the most popular blockchains for a while due to its ability to employ Turing complete smart-contracts. Though, after it gained popularity there has been a significant network congestion as a result high gas fees.
## Difference Between Ethereum L1, L2 and Sidechains.
**L1 Blockchain** *refers to the main blockchain layer such as Ethereum*. Layer1 scaling solutions are implemented directly on the main blockchain thus deriving the name on-chain solutions. Some examples of the on-chain scaling solution involve Consensus Protocol Switch and Sharding.
**L2 Blockchains** *are add-on solutions built on the base layer*. Thus deriving the name off-chain scaling solution, since they intend to take away workload from the blockchain while utilizing its security.
**Sidechains** are *Ethereum-compatible independent blockchains with their own consensus model*. Sidechains achieve interoperability with Ethereum by the use of the same EVM. Since they are independent from the main-chain side chains are responsible for their own security. If a sidechain’s security is compromised it will pose no impact to the mainchain.
In this program, we will focus on developing applications mainly on the Polygon sidechain.
## What Is Polygon?
**Polygon** is *a scaling solution that achieves scale by utilizing sidechains for off-chain computation and a decentralized network of Proof-of-Stake (PoS) validators.*
Polygon strives to solve the scalability and usability issues while not compromising on decentralization and leveraging the existing developer community and ecosystem. Polygon is an off-/sidechain scaling solution for existing platforms to provide scalability and superior user experience to DApps and user functionalities.
## Why Would A Developer Choose Polygon?
The main blockchain (Layer 1) is usually slow. Sidechains such as Polygon were created as a solution to speed up the blockchain without having to compromise its security and decentralization thus an improved user experience and reduce network congestion.
Transaction fees are cheaper on Polygon, making Ethereum more inclusive and accessible by everyone. This is made possible through the application of rollups which work by rolling a number of transactions into batches.
**End of Day 2**
---
# Intro to Solidity
**DOC: 1-building-on-ethereum/2-intro-to-solidity.md**
Writers: [Cami](https://twitter.com/camiinthisthang), [Fatma](https://twitter.com/fatima39_fatima)
Editors: [Busayo](https://twitter.com/AmoweO), [Sarah Schwartz](https://twitter.com/schwartzswartz), [Deborah Emeni](https://twitter.com/_emeni_deborah)
## Hello World
In this section, you will learn smart contract development with Solidity programming language by working on a sample project. You will also learn how to connect the various components of Solidity, including variables, types, and functions.
## Your First Smart Contract
We'll start with a very simple beginner project. This smart contract only has two functions, one for storing, and one retrieving data from the blockchain. Check it out:
```solidity
// SPDX-License-Identifier: GPL-3.0
pragma solidity >=0.7.0 <0.9.0;
contract Pets {
string public myPet;
function setPetName(string memory petName) public {
myPet = petName;
}
function getPetName() public view returns(string memory){
return myPet;
}
}
```
The first line (with the *SPDX-License-Identifer*) tells you that the source code is licensed under GPL-3.0.
The second line "pragma solidity" is where we specify the version of Solidity that our smart contract is written on. We do this so that we can ensure to use the correct compiler.
A contract in Solidity is similar to class in object oriented programming languages. It is a collection of code made up of a constructor, variables, and functions. In this example, 'Pets' is the contract name. In our contract we have a state variable of type string which is public and gave it a name of 'myPet'.
We defined two functions, sometimes called 'getters' and 'setters' in programming. The first function, setPetName, sets the state, or value, of the variable myPet. The second function, 'getPetName' retrievees the value saved at the variable myPet. The vast majority of the functions you'll ever write will either be a setter or a getter.
### Anatomy of A Function
```solidity
function functionName(unit x, uint y) public view returns (uint){
// function body here
}
```
Every function must begin with the keyword `function`, followed by its name `functionName`. Whatever is placed inside the brackets (parameters) are the inputs, or the values that you will pass to your function.
`Public` states the visibility of the function. In this case, it defines that can it be accessible to the other contracts, denoted by the ketword `public`.
The keyword `view` denotes that this function will not modify the state of the blockchain. Meaning, it will not modify variables, not emit events etc.
Finally, `returns` defines that the function will return a value, and also defines the data type of that output.
## Try It Yourself
Using [Remix](https://remix.ethereum.org/#optimize=false&runs=200&evmVersion=null&version=soljson-v0.8.7+commit.e28d00a7.js), an online IDE, create a simple smart contract which adds two numbers together and then returns the value.
You should define two functions inside your smart contract: one to do the computation based on two numbers passed in by the user, and one to return the value of that computation. We'll write one getter to retreieve the current value of the variable and one setter to add the two numbers and update the value of the variable.
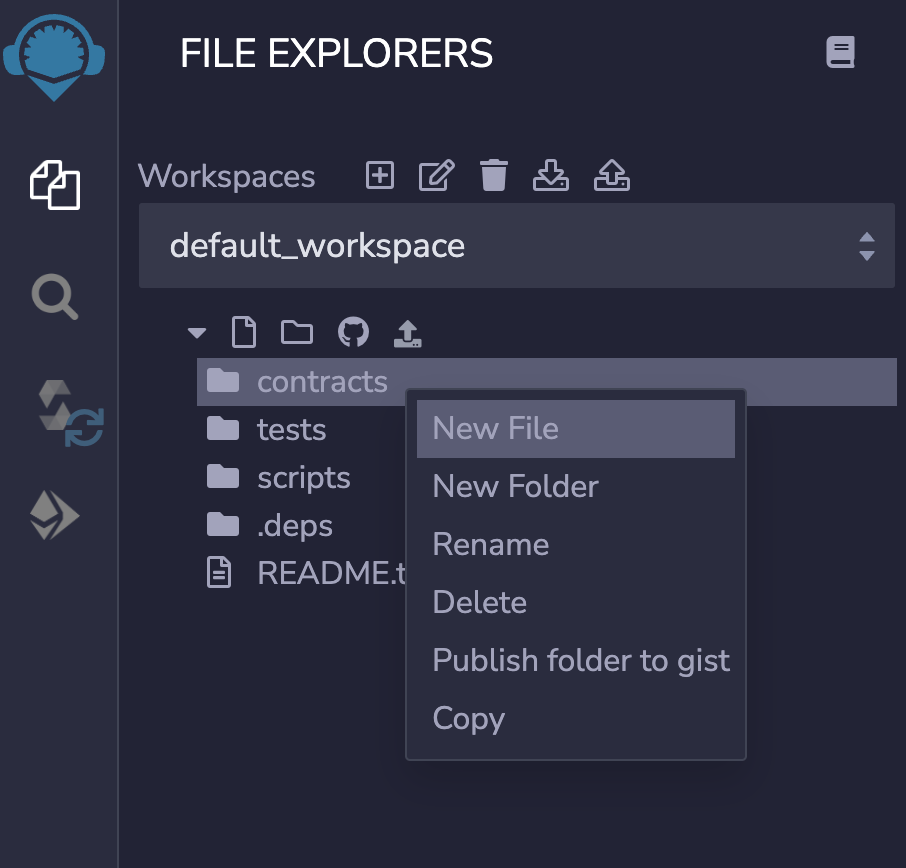
In Remix, create a new file inside the contracts folder, `add.sol`.
Start by adding a license identifier, followed by the version pragma:
```
// SPDX-License-Identifier: GPL-3.0
pragma solidity >=0.7.0 <0.9.0;
```
Next, define your contract and inside, define a variable of type uint (unsigned integer) and set it to zero.
```
// SPDX-License-Identifier: GPL-3.0
pragma solidity >=0.7.0 <0.9.0;
contract AddNumbers{
uint public sum = 0;
}
```
Next, write the function to add two numbers passed in by the user and a function to return the current value of the sum variable. Here's what your contract should look like:
```
// SPDX-License-Identifier: GPL-3.0
pragma solidity >=0.7.0 <0.9.0;
contract AddNums {
uint public sum = 0;
function addNums(uint x, uint y) public {
sum = x + y;
}
function getSum() public view returns (uint) {
return sum;
}
}
```
Now we'll compile, deploy, and test our contract. Head over to the 3rd icon from the top and hit `Compile add.sol`

Move to the 4th icon from the top and select the Javascript VM from the dropdown in the `environment` selection. This will give you some fake ether to be able to deploy and test your contract.

Finally, hit the `Deploy` button to create an instance of your contract that we'll interact with and test that the sum function is working as expected. Afer a few seconds, you'll see a `Deployed Contracts` panel on the bottom left.

Pass in two integers, then hit the addNums button. You'll see a new log indicating the new transaction you just initiated.

The addNums function adds the two numbers, but doesn't actually return the new value. In order for us to verify that the function worked, we need to call our getter function. Hit the `getSum` button. You'll notice a new log appears. Expand that log using the down arrow and scroll to the bottom to find a value called `decoded output.`
You'll see we get the right answer - 8! You just wrote your first smart contract :-)

---
# Checkpoint #2
**DOC: 1-building-on-ethereum/3-checkpoint.md**
Solidify everything you learned in this **Building on Ethereum** section and earn kudos by taking this quiz: https://forms.gle/MNUAu3Da1X9qPwRs5
**End of Day 3**
---
# Dapp requirements & overview
**DOC: 2-dapp-overview/0-requirements.md**
Writers: [Cami](https://twitter.com/camiinthisthang)
## Define Goal & Requirements
During these 30 days, we’ll be working to create a full-stack RSVP dapp. Think of it as a web3-native eventbrite, except attendees need to deposit ETH to RSVP and will get it back upon them checking in at the event.
**Here’s what our smart contract should be able to handle:**
**Creation of a new event:**
- A unique ID
- A reference to who created the event (a wallet address of the creator)
- The time of the event, so we know when refunds should become available.
- The maximum capacity of attendees for that event
- The deposit amount for that event
- Keep track of those who RSVP’d
- Keep track of users who check into the event
- Find the difference between those who RSVP’d and those who checked in, and refund everyone except those.
**RSVP to an event:**
- Pass in a unique event ID the user wishes to RSVP to
- Ensure that the value of their deposit is sufficient for that event’s deposit requirement
- Ensure that the event hasn’t already started based on the timestamp of the event - people shouldn’t be able to RSVP after the event has started
- Ensure that the event is under max capacity
**Check in attendees:**
- Pass a unique event ID for the event the user wants to confirm users for
- Ensure that only the creator of the event can confirm attendees
- Pass in the attendee address of the user who is checking in and check if their address is saved in RSVP list
- If they are found in the RSVP list, add them to a list of confirmed attendees
- If user is in the confirmed attendees list, return their deposit
**Withdraw any remaining deposits from guests who didn’t check in and send them to the owner of the event:**
- Pass in a unique event ID for the event the user wishes to withdraw funds from
- Ensure that at least 7 days has passed since the event
- Find the difference in the number of guests who rsvp’d and guests who checked in
- Multiple the deposit amount times the discrepancy of guests between rsvp and check in and send the amount back to the owner
### Events and Subgraphs
As we’re writing our smart contract, we’re going to create custom events that will help us build our subgraph. **Events** are *triggers that your frontend and subgraph can listen to*, and this makes them perfect for conditionally executing code on the front end and conditionally indexing data.
The subgraph is what will allow us to create the ability to add a dashboard functionality, where users can see events they’ve created and/or attended. More on subgraphs later, but for now the important thing to note is that we have to expose data about the events that a user creates and RSVPs for via Solidity Events.
**The events we’ll be creating:**
- **NewRSVP:** to be emitted inside the function that gets called when a user RSVPs for an event
- **ConfirmedAttendee:** to be emitted inside the function that gets called when a user gets checked into an event
- **DepositsPaid:** to be emitted inside the function that gets called when a user gets checked into an event and gets their deposit back
### Subgraph Preparation
We'll be diving into the specifics of building our subgraph after the smart contract section, but you should understand the role of a subgraph in your dapp as you're writing the smart contract to make sure that you're optimizing your contract for the on-chain information you want to show on your front end
The **subgraph** allows you to *ask sophisticated questions* about your data. The subgraph only has access to data we expose via *Solidity events*. For this reason, we're going to create custom events that expose data we'll ask questions about our data to get insights about the events our users are RSVP'd for, events that are in the future vs events that have already passed.
---
# Setup Your Dev Environment
**DOC: 2-dapp-overview/1-dev-setup.md**
Writers: [Cami](https://twitter.com/camiinthisthang)
Editors: [Sarah Z](https://twitter.com/haegeez), [Kristen](https://twitter.com/cuddleofdeath)
## IDE (Integrated Developer Environment)
Although any IDE will work, we recommend the use of **VSCode**, a free IDE which you can download [here.](https://code.visualstudio.com/download)
## Node.js and NPM
You will need Node.js and npm installed on your machine.
**Node.js** is a runtime environment that executes JavaScript outside the browser, enabling developers to build full-stack JavaScript apps. **NPM** stands for _node package manager_ and is the command-line interface to a vibrant ecosystem of open-source Node.js packages. If you want to learn more about NPM, check out [this article](https://nodesource.com/blog/an-absolute-beginners-guide-to-using-npm/).
To check if you have Node.js and npm installed, you can run `node -v` and `npm -v`. If you get back a number that looks like 8.0.6, that means you do have these installed.

To download Node.js and npm, we recommend using **nvm**, a node version manager that helps you manage various Node.js and npm versions. Follow the installation guide [here.](https://github.com/nvm-sh/nvm#installing-and-updating)
Once you have installed nvm, run the following to download a stable version of Node.js and npm.
```
nvm install --lts
nvm use --lts
```
Confirm your Node.js version by calling `nvm current`. You should be using Node v16.
Now you’re good to go! We’ll be installing dependencies in our app as we build, but this will set you up to be able to download smoothly.
## Project Setup
### Create a Smart Contract
During these 30 days, we’ll be working to create a full-stack RSVP dapp. Think of it as a web3-native eventbrite, except attendees need to deposit ETH to rsvp and will get it back upon them checking in at the event.
Let’s start coding! Today we’ll be writing about ½ of the smart contract.
**Create a new project from your terminal:**
- Navigate to the folder you want to create this project inside. If you want to create this project on your Desktop, navigate to that directory by running `cd Desktop`.
- Create a new folder for your project to live in `mkdir web3rsvp`
- Run the following command to initialize an npm project: `npm init` and then follow the instructions (you can press enter and say yes on everything if you'd like!).
- After the project initialization and a successful creation of a `package.json` file, run the following command to install hardhat (*a development environment to compile, deploy, test, and debug your Ethereum code*): `npm install --save-dev hardhat` or `yarn add --dev hardhat`.
- After this, run `npx hardhat`.
- Select a basic project, select `y` for all prompts. `y` simply stands for `yes`.
- Finally, open this newly created project in your code editor. Do this by opening VS code and hitting `file` > `open` > look for the folder you just created.
- If you have any issues with this setup, you can fork and then clone this [starter repo](https://github.com/womenbuildweb3/hardhat-sample).
First, fork the project:
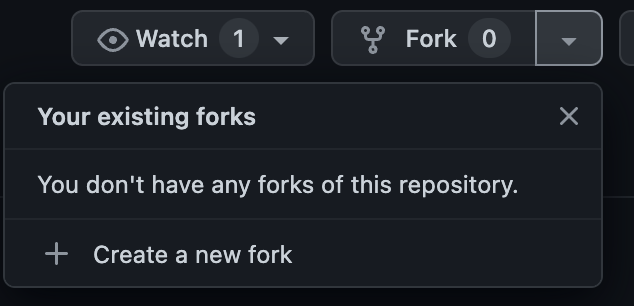
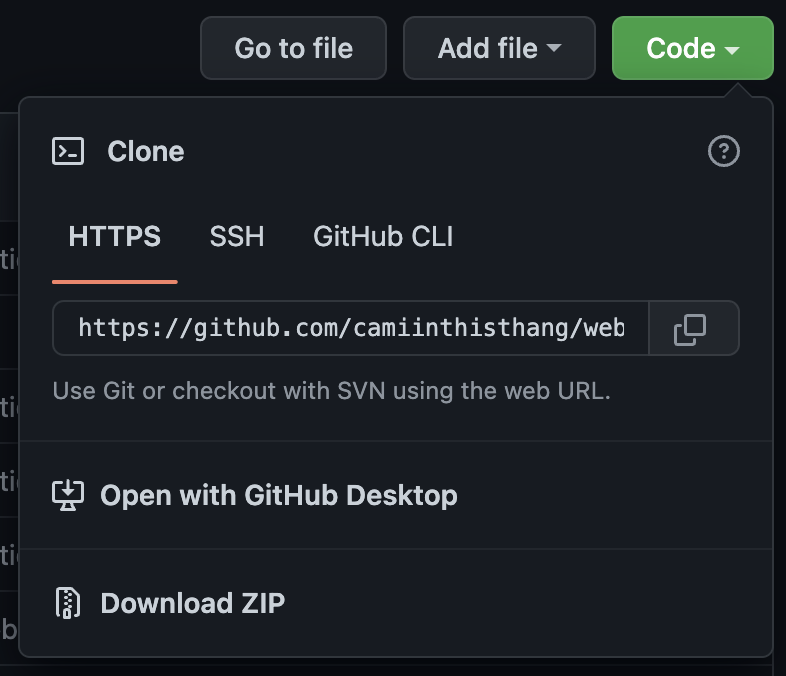
Then, clone the repo onto your machine by copying the link that is given to you when you press `code.` Note that the username should be your username. If you still see `womenbuildweb3` as the user name, you haven't forked the repo. After copying the link, run this command in your terminal:
`git clone <insert link here>`
Under the `contracts` folder, head to your `Greeter.sol` file and rename it to `Web3RSVP.sol`.
Delete everything in this file except for the first two lines, plus the comment at the very top.
This is what your file should look like:
```solidity
// SPDX-License-Identifier: MIT
pragma solidity ^0.8.0;
```
The SPDX-License-Identifier helps define the license of our file. In this project, we are choosing the [MIT license](https://spdx.org/licenses/MIT.html). This is because our project is completely open source.
The `pragma solidity ^0.8.4;` line tells the compiler which version of Solidity it will use when compiled. **Important Note:** It's a requirement that the pragma solidity line matches the version of Solidity defined in the module exports of your hardhat.config.js file.
---
# Defining Our Data Strucutre
**DOC: 2-dapp-overview/2-defining-our-data-structure.md**
Writers: [Cami](https://twitter.com/camiinthisthang)
## Define An 'Event'
Let’s start by defining our smart contract and the information that we want to store on-chain: the creation of a new event by an event organizer and the details associated with that event. We’ll save this in a struct. As a refresher, a *struct is similar to a JS object in that it stores related information about an entity*. In our case, we’re storing information related to the creation of a new event on our RSVP contract.
```solidity
contract Web3RSVP {
struct CreateEvent {
bytes32 eventId;
string eventDataCID;
address eventOwner;
uint256 eventTimestamp;
uint256 deposit;
uint256 maxCapacity;
address[] confirmedRSVPs;
address[] claimedRSVPs;
bool paidOut;
}
}
```
These properties are the properties that each individual event will have on our platform. All of these details will also be stored on-chain.
In general, it’s wise to be picky about the data you store on-chain because it’s expensive to store data on Ethereum. Because of this, you’ll notice that we’re not storing details like the event’s name and event description directly in the struct, but instead we’re storing a reference to an IPFS hash where those details will be stored off-chain. More on this later, but for now just know that’s what `eventDataCID` is for!
**End of Day 4**
## Handling Multiple Events
Because we want our contract to be able to handle the creation of multiple events, **we need a mechanism to store and easily look up events by some identifier**, like a unique ID. This is what we will use to tell our program which event a user is RSVPing to, since we can assume there will be many.
To do this, we can create a Solidity `mapping` that maps, or defines a relationship with, a unique eventID to the struct we just defined that is associated with that event.
We’ll use this mapping to make sure we are referencing the correct event when we call functions on that event like RSVPing, confirming attendees, etc.
Inside of our contract and under our struct, we'll define this mapping.
```solidity
contract Web3RSVP {
struct CreateEvent {
bytes32 eventId;
string eventDataCID;
address eventOwner;
uint256 eventTimestamp;
uint256 deposit;
uint256 maxCapacity;
address[] confirmedRSVPs;
address[] claimedRSVPs;
bool paidOut;
}
mapping(bytes32 => CreateEvent) public idToEvent;
}
```
---
# Defining Functions
**DOC: 2-dapp-overview/3-defining-functions.md**
Writers: [Cami](https://twitter.com/camiinthisthang)
## Create a New Event
Next, we’ll write the function that will get called when a user creates a new event in our frontend. This is one of our setter methods - a function that gets executed and sets the value based on information the user passed in.
**A reminder of what this function should be able to handle:**
- A unique ID
- A reference to who created the event (a wallet address of the creator)
- The time of the event, so we know when refunds should become available.
- The maximum capacity of attendees for that event
- The deposit amount for that event
- Keep track of those who RSVP’d
- Keep track of users who check into the event
After adding that function under our mapping, here's what your smart contract should look like so far:
```solidity
struct CreateEvent {
bytes32 eventId;
string eventDataCID;
address eventOwner;
uint256 eventTimestamp;
uint256 deposit;
uint256 maxCapacity;
address[] confirmedRSVPs;
address[] claimedRSVPs;
bool paidOut;
}
mapping(bytes32 => CreateEvent) public idToEvent;
function createNewEvent(
uint256 eventTimestamp,
uint256 deposit,
uint256 maxCapacity,
string calldata eventDataCID
) external {
// generate an eventID based on other things passed in to generate a hash
bytes32 eventId = keccak256(
abi.encodePacked(
msg.sender,
address(this),
eventTimestamp,
deposit,
maxCapacity
)
);
address[] memory confirmedRSVPs;
address[] memory claimedRSVPs;
//this creates a new CreateEvent struct and adds it to the idToEvent mapping
idToEvent[eventId] = CreateEvent(
eventId,
eventDataCID,
msg.sender,
eventTimestamp,
deposit,
maxCapacity,
confirmedRSVPs,
claimedRSVPs,
false
);
}
```
**Line by line explanation of what we just did:**
We define the function `createNewEvent` and define the parameters the function should accept. These are the settings-specific to an event that we will get from the person actually creating the event on the frontend. These things are: the eventTimestamp (when the event will start), the deposit required to RSVP to this event, the max capacity of this event, and a reference to the IPFS hash containing information like the event name and description.
```solidity
function createNewEvent(
uint256 eventTimestamp,
uint256 deposit,
uint256 maxCapacity,
string calldata eventDataCID
)
```
We set the function visibility to external since it is highly performant and saves on gas.
`external {`
In the body of the function, we create a unique ID for the event by **hashing** together a few values.
We let the user pass in their own unique ID, but this may lead to **collisions**. Collisions are a problem to look out for when creating hash tables or mappings. Collisions occur when two or more elements are referenced by the same hash (unique ID).
For example, if 2 users created an event at the same exact time, they might both get the same identifier, or they might unknowingly choose the same eventID as someone else. This would cause issues later when we try to look up elements by their unique eventID.
In order to combat this, we generate a unique ID by creating a hash by passing in all of the arguments passed into the function call. The combination of all of the arguments and the hash function would vastly decrease the likelihood of a collision.
```solidity
// generate an eventID based on other things passed in to generate a hash
bytes32 eventId = keccak256(
abi.encodePacked(
msg.sender,
address(this),
eventTimestamp,
deposit,
maxCapacity
)
);
```
We initialize the two arrays we’ll use to track RSVPs and attendees. We know we need to define these two arrays because in our struct, CreateEvent, we define that there will be two arrays which will be used to track the addresses of users who RSVP, and the address of users who actually arrive and get checked into the event AKA are confirmed.
```solidity
address[] memory confirmedRSVPs;
address[] memory claimedRSVPs;
```
Now that we have a unique ID, we can create a new entry to our mapping. You can think of this as adding a new event to our directory of events managed by this smart contract.
The `key` is the eventID and the `value` is a struct, or object, with the following properties that we grabbed either from the function arguments passed by the user in the front end (eventName, eventTimestamp, deposit, maxCapacity), some we generated ourselves, or gathered from the smart contract side (eventID, eventOwner, confirmedRSVPS, claimedRSVPs). Finally we set the boolean paidOut to false because at the time of eventCreation, there have been no payouts to the RSVPers (there are none yet) or the event owner yet.
```solidity
idToEvent[eventId] = CreateEvent(
eventId,
eventName,
msg.sender,
eventTimestamp,
deposit,
maxCapacity,
confirmedRSVPs,
claimedRSVPs,
false
);
```
## RSVP To Event
Next, we’ll write the function that gets called when a user finds an event and RSVPs to it on the front end.
**Reminder of the requirements for a function to allow users to RSVP to an event:**
- Pass in a unique event ID the user wishes to RSVP to
- Ensure that the value of their deposit is sufficient for that event’s deposit requirement
- Ensure that the event hasn’t already started based on the timestamp of the event - people shouldn’t be able to RSVP after the event has started
- Ensure that the event is under max capacity
- Add this function to your contract, just under the createNewEvent function.
Here's what your function createNewRSVP will look like:
```solidity
function createNewRSVP(bytes32 eventId) external payable {
// look up event from our mapping
CreateEvent storage myEvent = idToEvent[eventId];
// transfer deposit to our contract / require that they send in enough ETH to cover the deposit requirement of this specific event
require(msg.value == myEvent.deposit, "NOT ENOUGH");
//require that the event hasn't already happened (<eventTimestamp)
require(block.timestamp <= myEvent.eventTimestamp, "ALREADY HAPPENED");
//make sure event is under max capacity
require(
myEvent.confirmedRSVPs.length < myEvent.maxCapacity,
"This event has reached capacity"
);
//require that msg.sender isn't already in myEvent.confirmedRSVPs AKA hasn't already RSVP'd
for (uint8 i = 0; i < myEvent.confirmedRSVPs.length; i++) {
require(myEvent.confirmedRSVPs[i] != msg.sender, "ALREADY CONFIRMED");
}
myEvent.confirmedRSVPs.push(payable(msg.sender));
}
```
**End of day 5**
## Check In Attendees
Part of our app requires users to pay a deposit which they get back when they arrive to the event. We'll write the function that checks in attendees and returns their deposit.
```solidity
function confirmAttendee(bytes32 eventId, address attendee) public {
// look up event from our struct using the eventId
CreateEvent storage myEvent = idToEvent[eventId];
// require that msg.sender is the owner of the event - only the host should be able to check people in
require(msg.sender == myEvent.eventOwner, "NOT AUTHORIZED");
// require that attendee trying to check in actually RSVP'd
address rsvpConfirm;
for (uint8 i = 0; i < myEvent.confirmedRSVPs.length; i++) {
if(myEvent.confirmedRSVPs[i] == attendee){
rsvpConfirm = myEvent.confirmedRSVPs[i];
}
}
require(rsvpConfirm == attendee, "NO RSVP TO CONFIRM");
// require that attendee is NOT already in the claimedRSVPs list AKA make sure they haven't already checked in
for (uint8 i = 0; i < myEvent.claimedRSVPs.length; i++) {
require(myEvent.claimedRSVPs[i] != attendee, "ALREADY CLAIMED");
}
// require that deposits are not already claimed by the event owner
require(myEvent.paidOut == false, "ALREADY PAID OUT");
// add the attendee to the claimedRSVPs list
myEvent.claimedRSVPs.push(attendee);
// sending eth back to the staker `https://solidity-by-example.org/sending-ether`
(bool sent,) = attendee.call{value: myEvent.deposit}("");
//if this fails, remove the user from the array of claimed RSVPs
if(!sent){
myEvent.claimedRSVPs.pop();
}
require(sent, "Failed to send Ether");
}
```
## Confirm The Whole Group
As an event organizer, you might want to be able to confirm all of your attendees at once, instead of processing them one at a time.
Let’s write a function to confirm every person that has RSVPs to a specific event:
```solidity
function confirmAllAttendees(bytes32 eventId) external {
// look up event from our struct with the eventId
CreateEvent memory myEvent = idToEvent[eventId];
// make sure you require that msg.sender is the owner of the event
require(msg.sender == myEvent.eventOwner, "NOT AUTHORIZED");
//confirm each attendee in the rsvp array
for (uint8 i = 0; i < myEvent.confirmedRSVPs.length; i++) {
confirmAttendee(eventId, myEvent.confirmedRSVPs[i]);
}
}
```
## Send Unclaimed Deposits to Event Organizer
Finally, we need to write a function that will withdraw deposits of people who didn’t show up to the event and send them to the event organizer:
```solidity
function withdrawUnclaimedDeposits(bytes32 eventId) external {
// look up event
CreateEvent memory myEvent = idToEvent[eventId];
// check that the paidOut boolean still equals false AKA the money hasn't already been paid out
require(!myEvent.paidOut, "ALREADY PAID");
// check if it's been 7 days past myEvent.eventTimestamp
require(
block.timestamp >= (myEvent.eventTimestamp + 7 days),
"TOO EARLY"
);
// only the event owner can withdraw
require(msg.sender == myEvent.eventOwner, "MUST BE EVENT OWNER");
// calculate how many people didn't claim by comparing
uint256 unclaimed = myEvent.confirmedRSVPs.length - myEvent.claimedRSVPs.length;
uint256 payout = unclaimed * myEvent.deposit;
// mark as paid before sending to avoid reentrancy attack
myEvent.paidOut = true;
// send the payout to the owner
(bool sent, ) = msg.sender.call{value: payout}("");
// if this fails
if(!sent){
myEvent.paidOut == false;
}
require(sent, "Failed to send Ether");
}
```
---
# Custom Solidity Events
**DOC: 2-dapp-overview/4-custom-solidity-events.md**
Writers: [Cami](https://twitter.com/camiinthisthang)
Editors: ...
## Define Events
Recall that Solidity events are a way for our subgraph to *listen* for specific actions to enable us to make queries about the data from our smart contract. We have functions written to create a new event on our platform, RSVP to an event, confirm individual attendees, confirm the group of attendees, and send unclaimed funds back to the event owner. In order for our subgraph to be able to access the information from these functions, we need to expose them via events. We'll write the following events and *emit* them inside of their corresponding function:
- **NewEventCreated**: exposes data about the new event like the owner, max capacity, event owner, deposit amount, etc.
- **NewRSVP**: exposes data about the user who RSVP'd and the event they RSVP'd to
- **ConfirmedAttendee**: exposes data about the user who was confirmed and the event that they were confirmed for
- **DepositsPaid**: exposes data about unclaimed deposits being sent to the event organizer
All of our events are denoted by using the keyword *event*, followed by the custom name for our event.
Define your events at the very top of your file, inside the curly braces (right after `contract Web3RSVP {`):
```solidity
event NewEventCreated(
bytes32 eventID,
address creatorAddress,
uint256 eventTimestamp,
uint256 maxCapacity,
uint256 deposit,
string eventDataCID
);
event NewRSVP(bytes32 eventID, address attendeeAddress);
event ConfirmedAttendee(bytes32 eventID, address attendeeAddress);
event DepositsPaidOut(bytes32 eventID);
```
## Emit Events
Now that we've defined them, we actually have to *emit* them somewhere. Defining events is adding them as a tool on your toolbelt, but emitting them is actually pulling that tool out and using it. Each event should be emitted where it makes sense, after a specific action has been taken.
For our first event, `newEventCreated`, we should emit this at the very end of our function `createNewEvent`.
To emit an event, we use the keyword *emit* and then pass in the arguments, AKA the actual values we want, based on the parameters we defined.
Emit NewEventCreated at the bottom of your `createNewEvent` function like this:
```solidity
emit NewEventCreated(
eventId,
msg.sender,
eventTimestamp,
maxCapacity,
deposit,
eventDataCID
);
```
`NewRSVP` should be emitted at the very end of our function `confirmAttendee` like this:
```solidity
emit NewRSVP(eventId, msg.sender);
```
`ConfirmedAttendees` should be emitted at the very end of our function `confirmAttendee` like this:
```solidity
emit ConfirmedAttendee(eventId, attendee);
```
`DepositPaidOut` should be emitted at the very end of our function `withdrawUnclaimedDeposits` like this:
``` solidity
emit DepositsPaidOut(eventId);
```
## You Did It!
You've written your functions, defined your structs, and defined custom events! This is what your final code should look like:
```solidity
// SPDX-License-Identifier: MIT
pragma solidity ^0.8.4;
contract Web3RSVP {
event NewEventCreated(
bytes32 eventID,
address creatorAddress,
uint256 eventTimestamp,
uint256 maxCapacity,
uint256 deposit,
string eventDataCID
);
event NewRSVP(bytes32 eventID, address attendeeAddress);
event ConfirmedAttendee(bytes32 eventID, address attendeeAddress);
event DepositsPaidOut(bytes32 eventID);
struct CreateEvent {
bytes32 eventId;
string eventDataCID;
address eventOwner;
uint256 eventTimestamp;
uint256 deposit;
uint256 maxCapacity;
address[] confirmedRSVPs;
address[] claimedRSVPs;
bool paidOut;
}
mapping(bytes32 => CreateEvent) public idToEvent;
function createNewEvent(
uint256 eventTimestamp,
uint256 deposit,
uint256 maxCapacity,
string calldata eventDataCID
) external {
// generate an eventID based on other things passed in to generate a hash
bytes32 eventId = keccak256(
abi.encodePacked(
msg.sender,
address(this),
eventTimestamp,
deposit,
maxCapacity
)
);
address[] memory confirmedRSVPs;
address[] memory claimedRSVPs;
//this creates a new CreateEvent struct and adds it to the idToEvent mapping
idToEvent[eventId] = CreateEvent(
eventId,
eventDataCID,
msg.sender,
eventTimestamp,
deposit,
maxCapacity,
confirmedRSVPs,
claimedRSVPs,
false
);
emit NewEventCreated(
eventId,
msg.sender,
eventTimestamp,
maxCapacity,
deposit,
eventDataCID
);
}
function createNewRSVP(bytes32 eventId) external payable {
// look up event
CreateEvent storage myEvent = idToEvent[eventId];
// transfer deposit to our contract / require that they sent in enough ETH
require(msg.value == myEvent.deposit, "NOT ENOUGH");
//require that the event hasn't already happened (<eventTimestamp)
require(block.timestamp <= myEvent.eventTimestamp, "ALREADY HAPPENED");
//make sure event is under max capacity
require(
myEvent.confirmedRSVPs.length < myEvent.maxCapacity,
"This event has reached capacity"
);
//require that msg.sender isn't already in myEvent.confirmedRSVPs
for (uint8 i = 0; i < myEvent.confirmedRSVPs.length; i++) {
require(myEvent.confirmedRSVPs[i] != msg.sender, "ALREADY CONFIRMED");
}
myEvent.confirmedRSVPs.push(payable(msg.sender));
emit NewRSVP(eventId, msg.sender);
}
function confirmAllAttendees(bytes32 eventId) external {
// look up event
CreateEvent memory myEvent = idToEvent[eventId];
// make sure you require that msg.sender is the owner of the event
require(msg.sender == myEvent.eventOwner, "NOT AUTHORIZED");
//confirm each attendee
for (uint8 i = 0; i < myEvent.confirmedRSVPs.length; i++) {
confirmAttendee(eventId, myEvent.confirmedRSVPs[i]);
}
}
function confirmAttendee(bytes32 eventId, address attendee) public {
// look up event
CreateEvent storage myEvent = idToEvent[eventId];
// make sure you require that msg.sender is the owner of the event
require(msg.sender == myEvent.eventOwner, "NOT AUTHORIZED");
// require that attendee is in myEvent.confirmedRSVPs
address rsvpConfirm;
for (uint8 i = 0; i < myEvent.confirmedRSVPs.length; i++) {
if(myEvent.confirmedRSVPs[i] == attendee){
rsvpConfirm = myEvent.confirmedRSVPs[i];
}
}
require(rsvpConfirm == attendee, "NO RSVP TO CONFIRM");
// require that attendee is NOT in the claimedRSVPs list
for (uint8 i = 0; i < myEvent.claimedRSVPs.length; i++) {
require(myEvent.claimedRSVPs[i] != attendee, "ALREADY CLAIMED");
}
// require that deposits are not already claimed
require(myEvent.paidOut == false, "ALREADY PAID OUT");
// add them to the claimedRSVPs list
myEvent.claimedRSVPs.push(attendee);
// sending eth back to the staker https://solidity-by-example.org/sending-ether
(bool sent,) = attendee.call{value: myEvent.deposit}("");
//if this fails
if(!sent){
myEvent.claimedRSVPs.pop();
}
require(sent, "Failed to send Ether");
emit ConfirmedAttendee(eventId, attendee);
}
function withdrawUnclaimedDeposits(bytes32 eventId) external {
// look up event
CreateEvent memory myEvent = idToEvent[eventId];
// check if already paid
require(!myEvent.paidOut, "ALREADY PAID");
// check if it's been 7 days past myEvent.eventTimestamp
require(
block.timestamp >= (myEvent.eventTimestamp + 7 days),
"TOO EARLY"
);
// only the event owner can withdraw
require(msg.sender == myEvent.eventOwner, "MUST BE EVENT OWNER");
// calculate how many people didn't claim by comparing
uint256 unclaimed = myEvent.confirmedRSVPs.length - myEvent.claimedRSVPs.length;
uint256 payout = unclaimed * myEvent.deposit;
// mark as paid before sending to avoid reentrancy attack
myEvent.paidOut = true;
// send the payout to the owner
(bool sent, ) = msg.sender.call{value: payout}("");
// if this fails
if(!sent){
myEvent.paidOut == false;
}
require(sent, "Failed to send Ether");
emit DepositsPaidOut(eventId);
}
}
```
**End of day 6**
---
# Writing a Test Script
**DOC: 2-dapp-overview/5-writing-a-test-script.md**
Writers: [Sarah Schwartz](https://twitter.com/schwartzswartz)
Editors: Busayo, [Sarah Z](https://twitter.com/haegeez)
We can test our smart contract locally before we deploy to a testnet so we can make sure it works as intended. A testnet (test network) is an alternative blockchain network used to run and test programs before releasing updates to the mainnet (main network).
Create a file in the `scripts` folder called `run.js`. We will start by importing hardhat at the top of file so we can use it later.
Create an async function called `main` and another async function called `runMain`, which will use a `try...catch` statement to run the `main` function. At the bottom of the file, we can execute`runMain()`.
```javascript
const hre = require("hardhat");
const main = async () => {};
const runMain = async () => {
try {
await main();
process.exit(0);
} catch (error) {
console.log(error);
process.exit(1);
}
};
runMain();
```
Inside our `main` function, we can use hardhat to deploy the contract locally by adding the code below:
```javascript
const rsvpContractFactory = await hre.ethers.getContractFactory('Web3RSVP');
const rsvpContract = await rsvpContractFactory.deploy();
await rsvpContract.deployed();
console.log("Contract deployed to:", rsvpContract.address);
```
Hardhat allows us to access different test wallets inside our script so we can simulate different wallets interacting with our contract. To get our deployer wallet address and a couple others for testing, we use the `getSigners` method.
```javascript
const [deployer, address1, address2] = await hre.ethers.getSigners();
```
The first thing we want to test is creating a new event. Before we can call this method, we need to define the event data we are going to use. You can use an IPFS CID we already created.
```javascript
let deposit = hre.ethers.utils.parseEther("1")
let maxCapacity = 3
let timestamp = 1718926200
let eventDataCID = "bafybeibhwfzx6oo5rymsxmkdxpmkfwyvbjrrwcl7cekmbzlupmp5ypkyfi"
```
*Extras*: *A timestamp is a sequence of characters or encoded information identifying when a certain event occurred, usually giving date and time of day, sometimes accurate to a small fraction of a second.* *More info @ [unixtimestamp](https://www.unixtimestamp.com/)*
Next we can create a new event with our mock data. Once the transaction is done, `txn.wait` will return data about the transaction including an array of the emitted events which we can log to our console. We can save the eventID created so we can use it to RSVP.
You can log the entire `wait` object if you want to see everything that is returned.
```javascript
let txn = await rsvpContract.createNewEvent(timestamp, deposit, maxCapacity, eventDataCID)
let wait = await txn.wait()
console.log("NEW EVENT CREATED:", wait.events[0].event, wait.events[0].args)
let eventID = wait.events[0].args.eventID
console.log("EVENT ID:", eventID)
```
We can have each account we pulled from `getSigners` RSVP to the event. By default, Hardhat will call our contract functions from the deployer wallet address. To call a contract function from another wallet, we can use the `.connect(address)` modifier.
To send our deposit, we can pass in an object as the last parameter with the value set to the deposit amount.
```javascript
txn = await rsvpContract.createNewRSVP(eventID, {value: deposit})
wait = await txn.wait()
console.log("NEW RSVP:", wait.events[0].event, wait.events[0].args)
txn = await rsvpContract.connect(address1).createNewRSVP(eventID, {value: deposit})
wait = await txn.wait()
console.log("NEW RSVP:", wait.events[0].event, wait.events[0].args)
txn = await rsvpContract.connect(address2).createNewRSVP(eventID, {value: deposit})
wait = await txn.wait()
console.log("NEW RSVP:", wait.events[0].event, wait.events[0].args)
```
We can confirm all of the RSVPs with `confirmAllAttendees`. Since we created the event from the deployer address, we have to call this function from the deployer address too.
```javascript
txn = await rsvpContract.confirmAllAttendees(eventID)
wait = await txn.wait()
wait.events.forEach(event => console.log("CONFIRMED:", event.args.attendeeAddress))
```
Because we require that the event owner must wait 7 days before withdrawing unclaimed deposits, it will fail if we try to call this function now.
To work around this, hardhat lets us simulate the passing of time. We can wait 10 years to make sure it's been enough time.
```javascript
// wait 10 years
await hre.network.provider.send("evm_increaseTime", [15778800000000])
txn = await rsvpContract.withdrawUnclaimedDeposits(eventID)
wait = await txn.wait()
console.log("WITHDRAWN:", wait.events[0].event, wait.events[0].args)
```
To easily test this script, we can add a shortcut in our `package.json` file.
```json
"scripts": {
"script": "node scripts/run.js"
```
Before we can test the script, we will need to run `npx hardhat compile` in the terminal to compile our contract.
Once that is done, go ahead and test out the script with `npm run script` to make sure your contract is working as expected.
Now we can run `npm run script` in our terminal whenever we want to test our contract.
---
# Checkpoint #3
**DOC: 2-dapp-overview/3-checkpoint.md**
Solidify everything you learned in this **Dapp Overview** section and earn kudos by taking this quiz: https://forms.gle/kM2n4NRBDgcBwEKj7
---
# Deploying with Infura
**DOC: 3-deploying-your-smart-contract/0-deploying-with-infura.md**
Writers: [Sarah Schwartz](https://twitter.com/schwartzswartz)
Editors: [Kristen](https://twitter.com/cuddleofdeath)
## What is Infura?
[**Infura**](https://infura.io/) is a company that provides web3 infrastructure tools that allow developers to develop on a blockchain. Infura provides the nodes that are the entry point to the blockchain and allow you to execute transactions. Without a node provider like Infura, a developer would have to run their own node to communicate with the blockchain, which can be expensive, difficult, and time consuming.
## How Infura fits into your project
Once we deploy our smart contract, we need it to be able to communicate with the blockchain to execute transactions (create a new event, rsvp to an existing event, etc). Because we don’t want to run our own node, we’ll use Infura’s node infrastructure to give us the functionality of interacting with the blockchain.

## Update hardhat config & install dotenv
We also need to update our `hardhat.config.js` file with information about what network we will deploy to, a provider URL from Infura, and our wallet’s private key. Because this includes sensitive information ( Reminder: *NEVER SHARE YOUR PRIVATE KEY WITH ANYONE!* ), we will store our provider URL and private key in a new .env file in the root directory of our folder.
At the root of your project, create a file called ".env". Alternatively, you can also run `touch .env` in your terminal and it will create the .env file for you.
Then, install `dotenv` by running `npm install dotenv`. Dotenv is a module that loads environment variables from a .env file - it will allow you to keep your private keys secure while using them in your app and will keep you from committing these to github.
Update your `hardhat.config.js` file like this:
```javascript
require("@nomiclabs/hardhat-waffle");
require("dotenv").config();
module.exports = {
solidity: "0.8.4",
networks: {
hardhat:{
chainId: 1337
},
mumbai: {
url: process.env.STAGING_INFURA_URL,
accounts: [`0x${process.env.STAGING_PRIVATE_KEY}`],
gas: 2100000,
gasPrice: 8000000000
}
}
};
```
## Configure Infura with Polygon Mumbai
Navigate to https://infura.io/ and create an account.
Go to ‘Dashboard’ and then hit ‘Create new project’. Select ‘Ethereum’ from the dropdown selection and name your project.
Under the section, ‘Keys’, click the dropdown to change the endpoint to Polygon Mumbai.
If this is grayed out, you’ll have to select it as an add-on. Infura may ask for a credit card to protect the service from being spammed by bots, but will not charge you (make sure the total amount shows $0).
Copy the new endpoint that appears in Infura after selecting Polygon Mumbai and save that as a variable to your project in the .env file we just created.
Next, get the private key from your Coinbase wallet by opening the extension and going to *Settings > Advanced Settings > Show private key*. Log in using your password and then copy your private key.
Head back to your .env file and create a variable called `STAGING_PRIVATE_KEY` and set the value to be your private key that you just copied. Here is what your `.env` file should look like now
```
STAGING_INFURA_URL=https://polygon-mumbai.infura.io/v3/12345678
STAGING_PRIVATE_KEY=1234_YOUR_PRIVATE_KEY_5678
```
---
# Creating Your Deploy Script
**DOC: 3-deploying-your-smart-contract/1-creating-a-deploy-script.md**
Writers: [Sarah Schwartz](https://twitter.com/schwartzswartz)
Editors: [Kristen](https://twitter.com/cuddleofdeath)
In our scripts folder, we can create a file called `deploy.js`, where we can paste a copy of our test script and take out any test transactions. Our `deploy.js` file should look like this:
```javascript
const hre = require("hardhat");
const main = async () => {
const rsvpContractFactory = await hre.ethers.getContractFactory('Web3RSVP');
const rsvpContract = await rsvpContractFactory.deploy();
await rsvpContract.deployed();
console.log("Contract deployed to:", rsvpContract.address);
};
const runMain = async () => {
try {
await main();
process.exit(0);
} catch (error) {
console.log(error);
process.exit(1);
}
};
runMain();
```
## Deploying to Mumbai Testnet
We’ll need test MATIC in our Coinbase Wallet on the Mumbai network in order to deploy our contract.
For this step, you'll need your wallet address. To find this in your Coinbase Wallet, click on the "Assets" tab (the first tab on the app). Then, click the downward facing arrow to show your wallet address. You'll want to copy the one that says, "Your Ethereum Address". After copying your address, get some free test MATIC here by entering in your wallet address: https://faucet.polygon.technology/
Before we deploy our contract, we want to make sure we have compiled the latest version. To do this we can run `npx hardhat compile` in the terminal from the project folder. If successful, you should see a message that reads: "Compiled 1 Solidity file successfully."
To deploy, all we need to do is run the deploy script we just created. We can add a script in our `package.json` file so we can reuse our deploy command if we ever need it again.
```json
"scripts": {
"deploy": "npx hardhat run scripts/deploy.js --network mumbai",
```
If we ever need to change something in our contract and redeploy, all we have to do is run `npx hardhat compile` and then `npm run deploy`. If this was successful, you will see something similar to this message in your terminal: `Contract deployed to: 0x80B72dcab8FA1d220E9e8bc93acC75EA36535623`.
---
# Verifying Your Contract
**DOC: 3-deploying-your-smart-contract/2-verifying-your-contract.md**
Writers: [Cami](https://twitter.com/camiinthisthang), [Sarah Schwartz](https://twitter.com/schwartzswartz)
Editors: [Kristen](https://twitter.com/cuddleofdeath)
At this point, your contract should be deployed and you should have your contract’s address copied. Paste it in the Polygon Mumbai block explorer: https://mumbai.polygonscan.com/.
You might notice that the contract tab on Polygonscan doesn’t have a copy of your contract code like blockchain scanner sites (like Etherscan) might.
To fix this, we can give Polygonscan our contract code so that it:
- Knows the correct names for events.
- Is readable for developers.
Using the search bar, paste the contract deployment address shown inside your terminal.
Click the ‘Contract’ tab on Polygonscan and hit ‘Verify and publish’.
Select 'single file' and the correct compiler that matches your contract. In our case, it's 0.8.4 and 'no license'.
Finally, copy everything from your smart contract file and paste it into the box on Polygonscan, and hit 'verify and pubish.' You will get brought to a new page that shows a Compiler Output tab. It should say something similar to: `Note: Contract was created during TxHash# 0x0f5b4cf1be68a6b82fc88f1d6a9431b40e9662e16ee68a82fe31489bbec99eeb` and `Successfully generated ByteCode and ABI for Contract Address` if the contract was successfully verified.
---
# Checkpoint #4
**DOC: 3-deploying-your-smart-contract/3-checkpoint.md**
Solidify everything you learned in this **Deploying Your Smart Contract** section and earn kudos by taking this quiz: https://forms.gle/rEhD9AFFYvKFYTuU9
**End of Day 7**
---
# Introduction to The Graph
**DOC: 4-creating-your-subgraph/0-intro-to-the-graph.md**
Writers: [Sarah Schwartz](https://twitter.com/schwartzswartz)
The Graph is a web3 protocol that allows developers to create GraphQL APIs to query data from any smart contract. This makes it fast and easy to create dashboards and websites that show live data about how users are interacting with your contract.
Anyone can deploy their own API, also called a subgraph. Our subgraph will allow us to connect our frontend website to our contract so we can easily fetch the data we need.
Without The Graph, developers had to run their own indexing servers to be able to query their smart contract data. This can be expensive to run, and because it’s a centralized server it could be vulnerable to down-time and censorship.
You can use The Graph’s hosted service for free with any chain. You can find a full list [here](https://thegraph.com/hosted-service/). You can also use The Graph’s decentralized network for subgraphs that index Ethereum mainnet contracts, which charges a small fee for each query. For this tutorial, we will be using the free hosted service.
## CLI Installation
To get started, you will need to install The Graph CLI:
```
# NPM
$ npm install -g @graphprotocol/graph-cli
# Yarn
$ yarn global add @graphprotocol/graph-cli
```
You can test to see if it was installed correctly by running:
```
graph —v
````
For this example we are using version 0.30.3.
---
# The Graph Setup
**DOC: 4-creating-your-subgraph/1-setup.md**
Writers: [Sarah Schwartz](https://twitter.com/schwartzswartz)
Editors: [Kristen](https://twitter.com/cuddleofdeath)
Next we are going to create a subgraph on the hosted service where we can deploy our code. Go to thegraph.com and select the Hosted Service in the Products menu dropdown. You will need to sign in with your Github account.
Navigate to the “My Dashboard” tab, and click the “Add a Subgraph” button.
Fill out the required fields however you want, and click the “Create subgraph” button at the bottom.
Note: you can edit this information later by clicking the pencil icon on your subgraph page.
Navigate to wherever you want to save your subgraph in your terminal and paste the command below. Make sure to replace the Github User and Subgraph Name with your own. (Hint: you can find this at the end of the url of your subgraph)
```bash
graph init --product hosted-service <GITHUB_USER>/<SUBGRAPH NAME>
```
You will now be prompted with several options for your subgraph.
For the protocol, we will choose ethereum. You can change the subgraph and directory names if you want, or you can just hit enter.
For the network, *we will choose Mumbai*.
For the contract address, enter the contract address you deployed.
For the contract name, we will use Web3RSVP.
**Note**: you can’t have any spaces or dashes here, or the setup will fail.
After this, it will ask you if you'd like to add another contract. Make sure that this is set to **false** and press enter.
---
# Structure of a Subgraph
**DOC: 4-creating-your-subgraph/2-structure-of-a-subgraph.md**
Writers: [Sarah Schwartz](https://twitter.com/schwartzswartz)
Editors: [Kristen](https://twitter.com/cuddleofdeath), [Briseida Montiel](https://twitter.com/brizism)
You should now have a new folder with this structure:
```json
subgraph-name
└───abis
│ │ {Name}.json
└───generated
│ └───{Name}
│ │ {Name}.ts
│ │ schema.ts
│ networks.json
│ package.json
│ schema.graphql
└───src
│ │ {Name}.ts
│ subgraph.yaml
│ tsconfig.json
│ yarn.lock
```
Make sure to run `yarn` or `npm install` to install the dependencies. If you are using git, add a `.gitignore` file to ignore the `node_modules` folder.
We will also add `@protofire/subgraph-toolkit` as a dependency. Run `yarn add @protofire/subgraph-toolkit` or `npm install @protofire/subgraph-toolkit` to add this package.
The initial setup should have already grabbed the contract ABI for you. If you don’t see it in the abis folder, you can find the abi in your hardhat project in the artifacts folder. It will be called `[YourContractName].json`.
The three main files in the subgraph project folder we will be changing are the `subgraph.yaml`, `schema.graphql`, and `src/{Name}.ts` files.
---
# Schema (schema.graphql)
**DOC: 4-creating-your-subgraph/3-schema.md**
Writers: [Sarah Schwartz](https://twitter.com/schwartzswartz)
This is where we will define the schema for our GraphQL queries. Ideally we want to model this data to match the data we need for our frontend.
**Based on our website mockups, we can see that we need to be able to:**
- search events by title, description
- filter events by date and/or date range
- fetch current user's hosted events by date (upcoming vs past)
- fetch current user's rsvp'd events by date (upcoming vs past)
- sort events by most number of rsvps
- sort events by date
- check if current user has rsvp'd to the event
- check if current user has attended the event
- fetch event details
We can delete the example entity in the schema file. Here is how our schema file should look:
```json
type Event @entity {
id: ID!
eventID: Bytes!
name: String
description: String
link: String
imageURL: String
eventOwner: Bytes!
eventTimestamp: BigInt!
maxCapacity: BigInt!
deposit: BigInt!
paidOut: Boolean!
totalRSVPs: BigInt!
totalConfirmedAttendees: BigInt!
rsvps: [RSVP!] @derivedFrom(field: "event")
confirmedAttendees: [Confirmation!] @derivedFrom(field: "event")
}
type Account @entity {
id: ID!
totalRSVPs: BigInt!
totalAttendedEvents: BigInt!
rsvps: [RSVP!] @derivedFrom(field: "attendee")
attendedEvents: [Confirmation!] @derivedFrom(field: "attendee")
}
type RSVP @entity {
id: ID!
attendee: Account!
event: Event!
}
type Confirmation @entity {
id: ID!
attendee: Account!
event: Event!
}
```
Let’s break down what is happening here.
We have 4 entities: `Event`, `Account`, `RSVP`, and `Confirmation`. Each entity must be defined with the `@entity` tag. You can think of an entity like an object. It’s a “thing” that has keys and values, with each key being a schema field that can be queried for its value.
Each entity also has an ID field for a unique id, and some fields for information about that entity that we want to be able to query. Each field has a type, and if it’s required it has a “!” (the value can’t be null). The event name, description, link, and imageURL fields are not required, which means that they can return a `null` value.
In the `Event` and `Account` entities for the rsvps and confirmedAttendees fields we are using a special keyword `@derivedFrom`, also called a reverse lookup, which allows us to reference data from another entity. Let’s look at the rsvps as an example:
```json
rsvps: [RSVP!] @derivedFrom(field: "event")
```
One way to think about what is happening here is that whenever someone creates a new RSVP, that RSVP instance gets added to this array if the event id from the “event” field in the RSVP entity matches the id for this Event. For example, a new RSVP gets created:
```json
RSVP {
id: 20
attendee: 300
event: 5000
}
```
This RSVP is for an event with the id 5000. The Event with the matching id will have this RSVP added to the rsvps array.
```json
Event {
id: 5000
rsvps: [ {id: 20, attendee: 300, event: 5000} ]
}
```
Each new RSVP for this event will also get added here. Using reverse lookups like this, we are easily able to query all of the RSVPs and Confirmations for any Event or Account.
---
# Subgraph Manifest (subgraph.yaml)
**DOC: 4-creating-your-subgraph/4-manifest.md**
Writers: Sarah Schwartz
The subgraph manifest is where you can define settings for the subgraph. Most of this will already be filled out for you, but there are a few changes we need to make.
Just above the `dataSources`, we will need to add a `features` section where we can add `ipfsOnEthereumContracts`.
```json
features:
- ipfsOnEthereumContracts
```
Under `dataSources`, you can see our contract address and abi. We can add another property here called startBlock, which we will set to the block number when this contract was first deployed. Adding a start block reduces the amount of time it takes to index data for your subgraph.
You can find the start block on etherscan. Copy the block number for the first transaction when the contract is created.
The top of our `dataSources` should now look like this:
```json
dataSources:
- kind: ethereum
name: Web3RSVP
network: mumbai
source:
address: "0xYOUR_ADDRESS_HERE"
abi: Web3RSVP
startBlock: 26(...YOUR_START_BLOCK)
```
We also want to update our `Entity` names. You can delete the generated entities here and replace them with the ones below. We will be creating four entities: `Event`, `Account`, `RSVP`, and `Confirmation`.
```json
entities:
- Event
- Account
- RSVP
- Confirmation
```
The `eventHandlers` section is where we can tell the subgraph how to connect each of our mappings to different event triggers. This should already be filled out for you. Each time an event that is defined here is emitted from our contract, the corresponding mapping function set as the handler will run.
**End of Day 8**
---
# Mappings (src/{Name}.ts)
**DOC: 4-creating-your-subgraph/5-mappings.md**
Writers: [Sarah Schwartz](https://twitter.com/schwartzswartz)
You can find the mappings file in the `src` folder. Mappings use AssemblyScript, a strongly-typed language based on Typescript, and act like the resolvers in your typical GraphQL API. They are responsible for the logic that happens in-between an event firing from our smart contract and that data being organized into our schema.
This file will already have a basic layout generated for you. You should see a function for each event handler defined in our subgraph manifest. Each function in our mapping must be exported, and takes in the event it will handle as an argument.
We can run `graph codegen` in the terminal to generate AssemblyScript types for our entities and events, and import them at the top of our mappings file (make sure you are in the root directory of your project folder and have saved your changes before running this command). With this you should also be able to easily see all of the properties of the `event` object in your code editor.

If you make any other changes to the schema or subgraph manifest, you can always run `graph codegen` again to generate new types.
We will delete everything in the first function and replace the `Example Entity` object imported at the top with the entity types we just generated. We won’t need the Web3RSVP contract type imported in the second line either since we won’t need to make any contract calls. We can also delete the BigInt type imported in the first line, and replace that with the `Address`, `ipfs`, and `json` types.
The mappings file should now look like this:
```javascript
import { Address, ipfs, json } from "@graphprotocol/graph-ts";
import {
ConfirmedAttendee,
NewEventCreated,
NewRSVP,
DepositsPaidOut,
} from "../generated/Web3RSVP/Web3RSVP";
import { Account, RSVP, Confirmation, Event } from "../generated/schema";
import { integer } from '@protofire/subgraph-toolkit';
export function handleNewEventCreated(event: NewEventCreated): void {}
export function handleNewRSVP(event: NewRSVP): void {}
export function handleConfirmedAttendee(event: ConfirmedAttendee): void {}
export function handleDepositsPaidOut(event: DepositsPaidOut): void {}
```
We can start with the `handleNewEventCreated` function. We can create a new instance of an `Event` entity by passing in a unique id that is a string of hexadecimal characters.
Here is how our events look in our contract:
```javascript
event NewEventCreated(
bytes32 eventID,
address creatorAddress,
uint256 eventTimestamp,
uint256 maxCapacity,
uint256 deposit,
string eventDataCID
);
event NewRSVP(bytes32 eventID, address attendeeAddress);
event ConfirmedAttendee(bytes32 eventID, address attendeeAddress);
event DepositsPaidOut(bytes32 eventID);
```
Because we have an `eventID` already from the `NewEventCreated` event, we can use this as the unique id for the `Event` entity. We also want to make sure that we don’t create any duplicate events with the same id, so we can try to load this event first, and if it isn’t found, we can create it and save it. (Note: If you forget to use the `save` method at the end of your function, this data won’t save! Always make sure you are saving any changes made to an entity).
Because the `eventID` emitted from our contract is of the type `Bytes32`, we can use the built-in method `toHex()` to convert the id to a hexadecimal string representing the bytes in the array.
```javascript
let newEvent = Event.load(event.params.eventID.toHex());
if (newEvent == null) {
newEvent = new Event(event.params.eventID.toHex());
newEvent.save();
}
```
This is a standard pattern we will follow for each of our mapping functions. We will first check to see if we can load our entity with a unique id, and create a new instance only if that result is null.
The last thing we need to do here is set the values for each field from our schema. We can access most of this data in the event.params object. For the `paidOut` field, we can just set this to false.
```javascript
let newEvent = Event.load(event.params.eventID.toHex());
if (newEvent == null) {
newEvent = new Event(event.params.eventID.toHex());
newEvent.eventID = event.params.eventID;
newEvent.eventOwner = event.params.creatorAddress;
newEvent.eventTimestamp = event.params.eventTimestamp;
newEvent.maxCapacity = event.params.maxCapacity;
newEvent.deposit = event.params.deposit;
newEvent.paidOut = false;
```
For the `totalRSVPs` and `totalConfirmedAttendees` fields, we will be using the protofire subgraph toolkit we added earlier. In our `handleNewEventCreated` function, we want to set the totals to 0 to start, so we can use `integer.ZERO` to set these fields to 0.
```
newEvent.totalRSVPs = integer.ZERO;
newEvent.totalConfirmedAttendees = integer.ZERO;
```
For the `name`, `description`, `link`, and `imagePath` fields, we will be using the `eventCID` to access data stored with ipfs (web3.storage). We can use the CID and the name of the event details file, `data.json`, to pull this data in.
```javascript
let metadata = ipfs.cat(event.params.eventDataCID + "/data.json");
if (metadata) {
const value = json.fromBytes(metadata).toObject();
if (value) {
const name = value.get("name");
const description = value.get("description");
const link = value.get("link");
const imagePath = value.get("image");
if (name) {
newEvent.name = name.toString();
}
if (description) {
newEvent.description = description.toString();
}
if (link) {
newEvent.link = link.toString();
}
if(imagePath){
const imageURL =
"https://ipfs.io/ipfs/" + event.params.eventDataCID + imagePath.toString();
newEvent.imageURL = imageURL;
} else {
// return fallback image if no imagePath
const fallbackURL = "https://ipfs.io/ipfs/bafybeibssbrlptcefbqfh4vpw2wlmqfj2kgxt3nil4yujxbmdznau3t5wi/event.png";
newEvent.imageURL = fallbackURL;
}
}
}
newEvent.save();
```
Our `handleNewEventCreated` function should now look like this:
```javascript
export function handleNewEventCreated(event: NewEventCreated): void {
let newEvent = Event.load(event.params.eventID.toHex());
if (newEvent == null) {
newEvent = new Event(event.params.eventID.toHex());
newEvent.eventID = event.params.eventID;
newEvent.eventOwner = event.params.creatorAddress;
newEvent.eventTimestamp = event.params.eventTimestamp;
newEvent.maxCapacity = event.params.maxCapacity;
newEvent.deposit = event.params.deposit;
newEvent.paidOut = false;
newEvent.totalRSVPs = integer.ZERO;
newEvent.totalConfirmedAttendees = integer.ZERO;
let metadata = ipfs.cat(event.params.eventDataCID + "/data.json");
if (metadata) {
const value = json.fromBytes(metadata).toObject()
if (value) {
const name = value.get('name')
const description = value.get('description')
const link = value.get('link')
if(name){
newEvent.name = name.toString()
}
if(description){
newEvent.description = description.toString()
}
if(link){
newEvent.link = link.toString()
}
}
}
newEvent.save();
}
}
```
For our `handleNewRSVP` function, we will create a new RSVP entity and a new account entity (assuming it’s a new user). To keep our functions simple, we can split this into two functions.
```javascript
function getOrCreateAccount(address: Address): Account {
let account = Account.load(address.toHex());
if (account == null) {
account = new Account(address.toHex());
account.totalRSVPs = integer.ZERO;
account.totalAttendedEvents = integer.ZERO;
account.save();
}
return account;
}
export function handleNewRSVP(event: NewRSVP): void {
let newRSVP = RSVP.load(event.transaction.from.toHex());
let account = getOrCreateAccount(event.params.attendeeAddress);
let thisEvent = Event.load(event.params.eventID.toHex());
if (newRSVP == null && thisEvent != null) {
newRSVP = new RSVP(event.transaction.from.toHex());
newRSVP.attendee = account.id;
newRSVP.event = thisEvent.id;
newRSVP.save();
account.totalRSVPs = integer.increment(account.totalRSVPs);
account.save();
}
}
```
Our `handleConfirmedAttendee` function will follow the same pattern:
```javascript
export function handleConfirmedAttendee(event: ConfirmedAttendee): void {
let id = event.params.eventID.toHex() + event.params.attendeeAddress.toHex();
let newConfirmation = Confirmation.load(id);
let account = getOrCreateAccount(event.params.attendeeAddress);
let thisEvent = Event.load(event.params.eventID.toHex());
if (newConfirmation == null && thisEvent != null) {
newConfirmation = new Confirmation(id);
newConfirmation.attendee = account.id;
newConfirmation.event = thisEvent.id;
newConfirmation.save();
thisEvent.totalConfirmedAttendees = integer.increment(thisEvent.totalConfirmedAttendees);
thisEvent.save();
account.totalAttendedEvents = integer.increment(account.totalAttendedEvents);
account.save();
}
}
```
For our `handleDepositsPaidOut` function, all we need to do is change the paidOut field of the matching event from false to true:
```javascript
export function handleDepositsPaidOut(event: DepositsPaidOut): void {
let thisEvent = Event.load(event.params.eventID.toHex());
if (thisEvent) {
thisEvent.paidOut = true;
thisEvent.save();
}
}
```
You can see a final version of the mappings file [here](https://github.com/womenbuildweb3/web3RSVP-subgraph/blob/main/src/mapping.ts).
Finally we can run `graph build` in the terminal to build our subgraph and make sure we don't get any errors.
---
# Deploying to the Hosted Service
**DOC: 4-creating-your-subgraph/6-deploying-your-subgraph.md**
Writers: [Sarah Schwartz](https://twitter.com/schwartzswartz)
Open up the subgraph you created on The Graph's Hosted Service, and select the “Show commands” button under Deploy.
Copy the first command that starts with graph auth, and replace the ``<ACCESS_TOKEN>`` with your access token from your subgraph page.
```
graph auth --product hosted-service <ACCESS_TOKEN>
```
Running this command will authenticate you as the subgraph owner so that you are able to push your code changes. Paste and run this command in your terminal from your project root folder. You should see a confirmation message in your terminal that says "Deploy key set".
Now we can deploy our subgraph by copying the second command that starts with graph deploy. Here you just have to replace `<GITHUB_USER>/<SUBGRAPH NAME>` (you can find this in the url for your subgraph).
```
graph deploy --product hosted-service <GITHUB_USER>/<SUBGRAPH NAME>
```
Run this command to deploy your subgraph to The Graph’s hosted service.
Once you deploy you can start querying right away, however the data won’t be verifiably accurate until the subgraph has finished indexing.
## Updating your subgraph
If you make changes to your smart contract and re-deploy to a new address, you can easily update your subgraph to index the new contract.
You can update the contract address in the manifest (subgraph.yaml), and copy and paste the new abi in the abis folder. If you made any changes to the schema or emitted events from your contract, make sure to run graph codegen to generate new types.
When you’re ready to re-deploy, you can run the same deploy command above. You can view the pending version by toggling the version in the upper right corner.
---
# Checkpoint #5
**DOC: 4-creating-your-subgraph/7-checkpoint.md**
Solidify everything you learned in this **Creating Your Subgraph** section and earn kudos by taking this quiz: https://forms.gle/9q1kk1kkc9NQJHFE7
**End of Day 9**
---
# PART 2:
https://hackmd.io/TFKB9cHdSASZn1C1FOIoyA
 Sign in with Wallet
Connect another wallet
Sign in with Wallet
Connect another wallet