# GitLab Geo
>**官方原文:**
>
> - [Geo](https://docs.gitlab.com/ee/administration/geo/#geo)
> - [Geo Setting up](https://docs.gitlab.com/ee/administration/geo/setup/)
> - [Geo database replication](https://docs.gitlab.com/ee/administration/geo/setup/database.html)
> - [Geo configuration](https://docs.gitlab.com/ee/administration/geo/replication/configuration.html)
> - [Using a Geo Site](https://docs.gitlab.com/ee/administration/geo/replication/usage.html)
> - [Introduction to GitLab Geo - GitLab Features](https://www.youtube.com/watch?v=-HDLxSjEh6w)
> - [Geo for multiple servers](https://docs.gitlab.com/ee/administration/geo/replication/multiple_servers.html)
>
>**修订记录:**
>
> - 2021/05/12 [Alex Ju](mailto:alexju@gitlab.cn) 创建文档
>
>**Note:** _本操作笔记仅供参考,请务必阅读官方文档链接_
---
## 1. GitLab Geo概述
有时候从一个距离很远的GitLab实例,拉取一个非常大的仓库,会比较费时费力。
GitLab Geo 提供了一个`近距离的、只读`的GitLab实例克隆,可以大大减少用户拉取代码的时间,帮助加快开发进度。
Geo视频介绍:
[Introduction to GitLab Geo - GitLab Features](https://www.youtube.com/watch?v=-HDLxSjEh6w)
**Geo使用场景:**
Geo能够提供:
- 一个只读的`从节点`(Secondary node)
- 完全继承`主节点`(Primary node)的用户权限
- 与主节点相同的UI,不过在用户访问的时候会提示用户正在使用从节点
Geo带来哪些好处:
- 拉取大的仓库,耗时从`分钟级`降到`秒级`
- 让开发者之间更便捷的同步工作,分享想法
- 在两个节点之间分摊只读流量
- [灾难恢复](https://docs.gitlab.com/ee/administration/geo/disaster_recovery/index.html)时,可以快速的切换到从节点
- 能够[有计划的](https://docs.gitlab.com/ee/administration/geo/disaster_recovery/planned_failover.html)切换到从节点
与Gitaly集群的区别:
- 两者不能混淆,具体比较:[Gitaly集群和Geo比较](https://docs.gitlab.com/ee/administration/gitaly/index.html#gitaly-cluster-compared-to-geo)
**Geo工作原理:**
场景示意图:
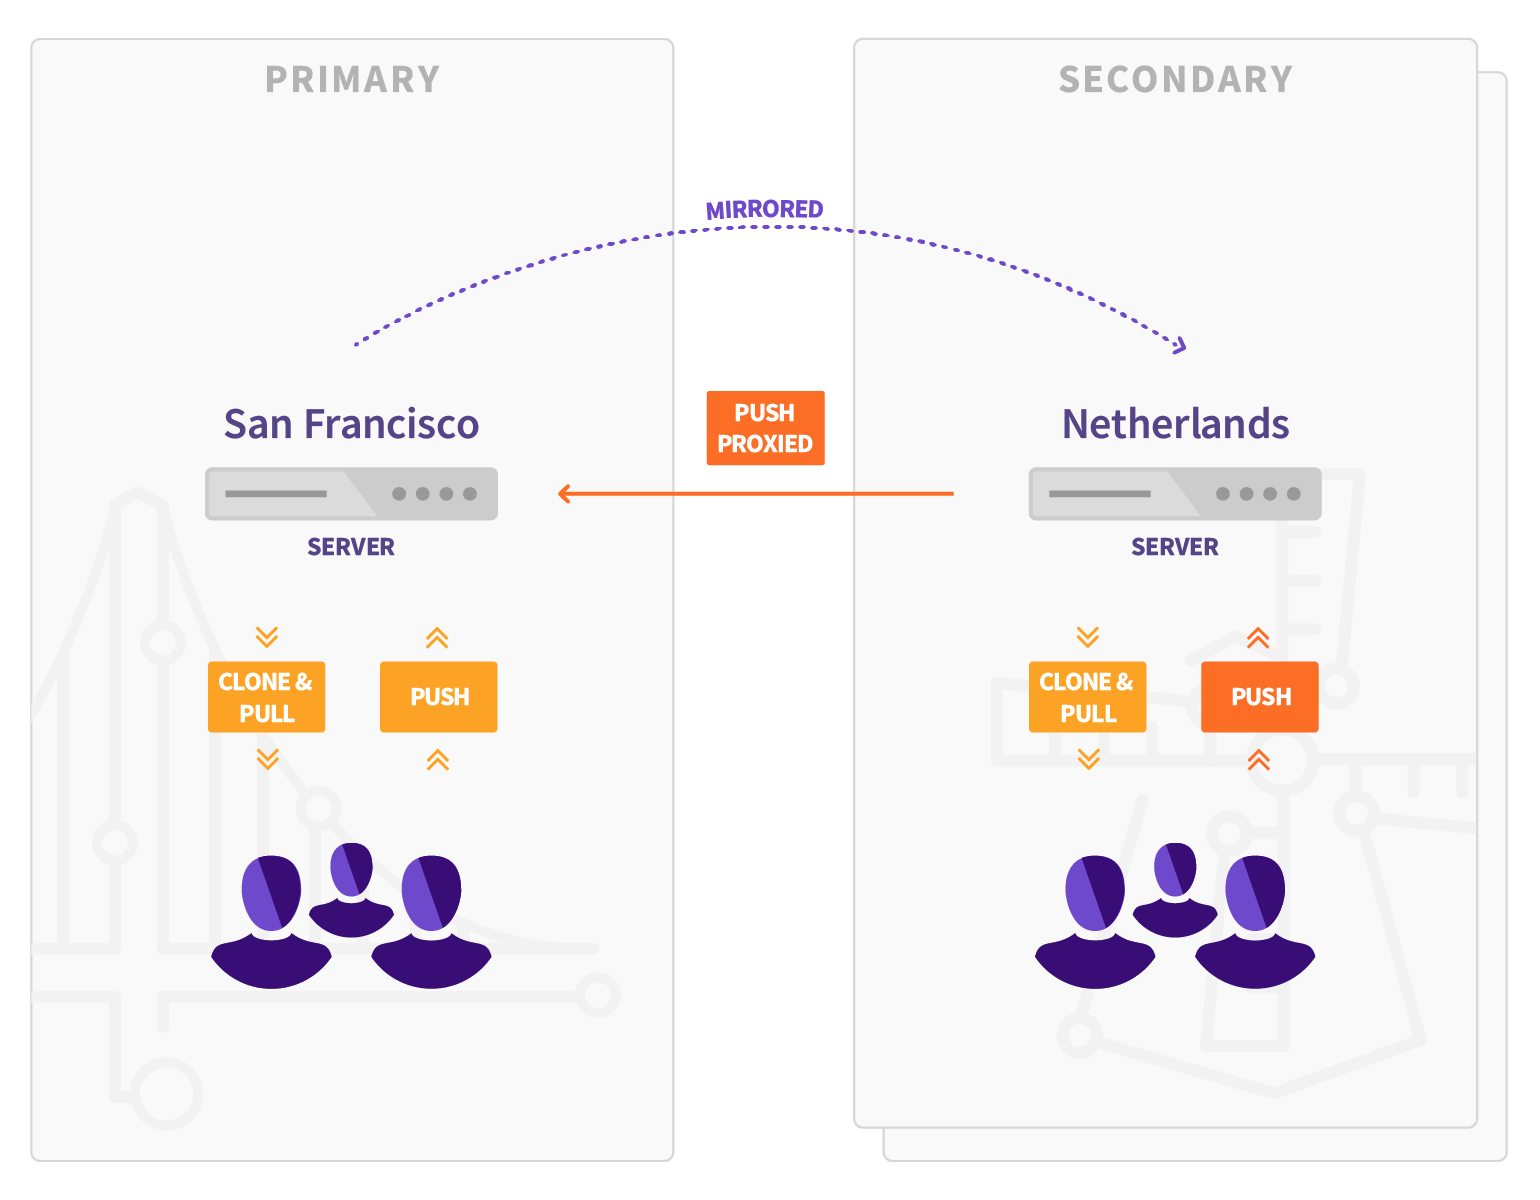
- 原始节点,也称主节点(Primary node)
- 镜像的只读节点,也称从节点(Secondary node),从节点可以有多个
- 从节点通过API获取主节点的用户数据,通过HTTPS+JWT同步仓库,LFS对象和附件
- GitLab Premium 10.0之后,主节点不再主动将变化通知从节点
- GitLab Premium 11.3之后,可以直接推送代码到从节点
- 使用Geo有部分限制,详细参考:[Geo限制](https://docs.gitlab.com/ee/administration/geo/#limitations)
架构图:

- 对数据库的写入,只发生在主节点。从节点通过Postgresql流复制,收到数据库的更新
- 从节点会有两个PostgreSQL数据库:一个只读数据库,用来同步主节点。另外一个数据库,用来记录哪些数据被同步
- 建议LDAP也配置主备模式,来应对灾难恢复的场景
- 从节点虽然是只读的,但可以接收Push请求,然后转发到主节点,这使得从节点看上去可以接收Push请求
**运行要求:**
- OpenSSH 6.9+ (CentOS 7.4+, Ubuntu 16.04+ 默认支持)
- PostgreSQL 11+
- Git 2.9+
- Git-lfs 2.4.2+(用户端)
- 所有节点必须使用相同版本的GitLab, 要求GitLab EE 10.0+
## 2. Geo安装配置
**测试环境:**
- 主节点:192.168.123.116
- 从节点:192.168.123.118
### 2.1 安装Geo从节点
在从节点上,[安装极狐GitLab EE版](https://about.gitlab.com/install/),建议使用极狐官方最新版。
安装完成后,`不要`在从节点上`创建用户`或者`登录`。
### 2.2 主节点添加许可证
在主节点上,[安装license](https://docs.gitlab.com/ee/user/admin_area/license.html),要求Premium版本以上,解锁Geo功能。
### 2.3 配置数据库复制
如果你的Omnibus实例用的是默认的内置PostgreSQL数据库,请继续下面操作。
如果你的Omnibus使用的是外部PostgreSQL数据库,请参照[Geo with external PostgreSQL instances](https://docs.gitlab.com/ee/administration/geo/setup/external_database.html)进行配置。
#### 2.3.1 配置主节点
- 修改`/etc/gitlab/gitlab.rb`,为主节点定义一个独特的名称:
```bash
gitlab_rails['geo_node_name'] = 'cn'
```
- 运行`gitlab-ctl reconfigure`,使上述配置生效。
- 指定当前节点为主节点:
```bash
gitlab-ctl set-geo-primary-node
```
输出:
```bash
Saving primary Geo node with name cn.alexju.cn and URL https://cn.alexju.cn/ ...
https://cn.alexju.cn/ is now the primary Geo node
```
- 设置PostgreSQL数据库用户的密码:
```bash
gitlab-ctl pg-password-md5 gitlab
# Enter password:
# Confirm password:
# a21bac212b079462ce5a27472e46e2e2
```
编辑`/etc/gitlab/gitlab.rb`:
```bash
postgresql['sql_user_password'] = 'a21bac212b079462ce5a27472e46e2e2'
gitlab_rails['db_password'] = 'Gitlab,123'
```
Omnibus GitLab默认内置的复制用户gitlab_replicator,需要设置密码:
```bash
gitlab-ctl set-replication-password
```
如果你使用的`外置PostgreSQL数据库`,你需要创建复制用户并设置密码:
```bash
--- 创建用户 'replicator'
CREATE USER gitlab_replicator;
--- 配置密码和权限
ALTER USER gitlab_replicator WITH REPLICATION ENCRYPTED PASSWORD '<replication_password>';
```
- 配置PostgreSQL监听地址
编辑`/etc/gitlab/gitlab.rb`:
```bash
#启用Geo标志
roles ['geo_primary_role']
#配置PG监听的公网地址或者VPC内部地址
postgresql['listen_address'] = '192.168.123.116'
postgresql['md5_auth_cidr_addresses'] = ['192.168.123.116/32', '192.168.123.118/32']
#配置从节点的数量
postgresql['max_replication_slots'] = 1
#临时禁止数据库自动迁移,直到PG完成重启并监听内部地址
gitlab_rails['auto_migrate'] = false
```
- 运行`gitlab-ctl reconfigure`,使GitLab配置生效
- 运行`gitlab-ctl restart postgresql`,使PostgreSQL配置生效
- 编辑`/etc/gitlab/gitlab.rb`,将false改为true:
```bash
gitlab_rails['auto_migrate'] = true
```
- 运行`gitlab-ctl reconfigure`,使GitLab配置生效
#### 2.3.2 配置从节点
- 停止 `puma`和`sidekiq`
目的是在从节点配置完成之前,防止执行任何东西
```bash
gitlab-ctl stop puma
gitlab-ctl stop sidekiq
```
- 检查与主节点PostgreSQL数据库连通性
```bash
gitlab-rake gitlab:tcp_check[192.168.123.116,5432]
```
输出:
```bash
TCP connection from 192.168.123.118:45696 to 192.168.123.116:5432 succeeded
```
如果这步失败,请检查IP地址(注意区分内、外网地址)以及防火墙规则。
- 安装`server.crt`
将主节点的证书 `~gitlab-psql/data/server.crt`拷贝到从节点,在从节点执行安装
```bash
scp root@192.168.123.116:~gitlab-psql/data/server.crt /etc/gitlab/ssl
install \
-D \
-o gitlab-psql \
-g gitlab-psql \
-m 0400 \
-T /etc/gitlab/ssl/server.crt ~gitlab-psql/.postgresql/root.crt
```
- 测试数据库TLS加密通信
使用`gitlab-psql`用户测试与主节点的数据库连通性,主节点的默认数据库为gitlabhq_production
```bash
sudo \
-u gitlab-psql /opt/gitlab/embedded/bin/psql \
--list \
-U gitlab_replicator \
-d "dbname=gitlabhq_production sslmode=verify-ca" \
-W \
-h 192.168.123.116
```
输出:
```bash
List of databases
Name | Owner | Encoding | Collate | Ctype | Access privileges
---------------------+-------------+----------+---------+-------+---------------------------------
gitlabhq_production | gitlab | UTF8 | C | C |
postgres | gitlab-psql | UTF8 | C | C |
template0 | gitlab-psql | UTF8 | C | C | =c/"gitlab-psql" +
| | | | | "gitlab-psql"=CTc/"gitlab-psql"
template1 | gitlab-psql | UTF8 | C | C | "gitlab-psql"=CTc/"gitlab-psql"+
| | | | | =c/"gitlab-psql"
(4 rows)
```
- 配置gitlab.rb文件
```bash
roles ['geo_secondary_role']
postgresql['listen_address'] = '192.168.123.118'
postgresql['md5_auth_cidr_addresses'] = ['192.168.123.118/32']
#sql_user_password是之前主节点的hash密码
postgresql['sql_user_password'] = 'a21bac212b079462ce5a27472e46e2e2'
gitlab_rails['db_password'] = 'Gitlab,123'
```
- 运行`gitlab-ctl reconfigure`,使GitLab配置生效
- 运行`gitlab-ctl restart postgresql`,使PostgreSQL配置生效
#### 2.3.3 数据库复制
  **请确保下列操作在`从节点`上执行,该操作将删除所有`从节点`的数据。**
- 复制数据库
给从节点指定一个独特的名称slot-name, 该名称只允许包含`小写字母、数字和下划线`。
```bash
gitlab-ctl replicate-geo-database --slot-name=us --host=192.168.123.116
```
输出:
```bash
No user created projects. Database not active
---------------------------------------------------------------
WARNING: Make sure this script is run from the secondary server
---------------------------------------------------------------
*** You are about to delete your local PostgreSQL database, and replicate the primary database. ***
*** The primary geo node is `192.168.123.116` ***
*** Are you sure you want to continue (replicate/no)? ***
Confirmation: replicate
Enter the password for gitlab_replicator@192.168.123.116:
* Executing GitLab backup task to prevent accidental data loss
* Stopping PostgreSQL and all GitLab services
* Checking for replication slot us
* Creating replication slot us
* Backing up postgresql.conf
* Moving old data directory to '/var/opt/gitlab/postgresql/data.1620826017'
* Starting base backup as the replicator user (gitlab_replicator)
pg_basebackup: initiating base backup, waiting for checkpoint to complete
pg_basebackup: checkpoint completed
pg_basebackup: write-ahead log start point: 0/C000028 on timeline 1
pg_basebackup: starting background WAL receiver
0/79784 kB (0%), 0/1 tablespace (...lab/postgresql/data/backup_label)
65879/79784 kB (82%), 0/1 tablespace (...postgresql/data/base/16401/28114)
79794/79794 kB (100%), 0/1 tablespace (...ostgresql/data/global/pg_control)
79794/79794 kB (100%), 1/1 tablespace
pg_basebackup: write-ahead log end point: 0/C000138
pg_basebackup: waiting for background process to finish streaming ...
pg_basebackup: syncing data to disk ...
pg_basebackup: base backup completed
* Restoring postgresql.conf
* PostgreSQL 12 or newer. Writing settings to postgresql.conf and creating standby.signal
* Setting ownership permissions in PostgreSQL data directory
* Starting PostgreSQL and all GitLab services
```
至此,数据库复制完成。
### 2.4 配置SSH密钥快速查找
- 默认情况下,GitLab通过查找遍历`~git/.ssh/authorized_keys`文件来判断用户是否可以访问GitLab, 该文件包含了用户访问Gitlab的公钥。如果用户需要频繁的更改自己的公钥,导致`authorized_keys`文件越来越大,GitLab来不及缓存,那么GitLab将不得不频繁的访问硬盘,导致整个SSH鉴权比较缓慢。
因此,更快速的方法是,**配置GitLab通过数据库查找SSH公钥指纹。**
- 配置sshd_config
在主节点和从节点上,都配置`/etc/ssh/sshd_config`文件:
```bash
cat << EOF >> /etc/ssh/sshd_config
Match User git # 开始匹配,让AuthorizedKeysCommand仅适用于git用户
AuthorizedKeysCommand /opt/gitlab/embedded/service/gitlab-shell/bin/gitlab-shell-authorized-keys-check git %u %k
AuthorizedKeysCommandUser git
Match all # 结束匹配, 配置再次适用于所有用户
EOF
```
- 重新加载OpenSSH
```bash
# Debian 或 Ubuntu
service ssh reload
# CentOS
service sshd reload
```
- 注销公钥并拉取代码
在`~git/.ssh/authorized_keys`(注意不是`/root/.ssh/authorized_keys`)中找到并注销你自己用户的公钥,然后测试pull拉取代码是否依然成功。
如果成功,表明GitLab已经可以顺利从数据库找到公钥指纹,因为`authorized_keys`文件里已经没有这个公钥了。
如果失败,请检查上述步骤。
- 新添加的SSH公钥依然会写入`authorized_keys`, 想要禁止写入`authorized_keys`,请在UI界面上打开`Admin Area > Settings > Network > Performance optimization`,取消勾选`Write to "authorized_keys" file`。
- 在UI界面上删除你的个人SSH Key,添加一个新SSH Key,测试是否能用新SSH Key对应的客户端成功拉取代码,新的SSH Key并不会出现在`~git/.ssh/authorized_keys`中。
- 如果以上均顺利通过,你可以备份并删除你的`~git/.ssh/authorized_keys`了。
### 2.5 Geo配置
以下步骤将完成:
- 在主节点和从节点之间,复制配置
- 在从节点上,配置一个额外的跟踪数据库
- 在从节点上,启用GitLab
#### 2.5.1 拷贝secrets
主节点和从节点的`/etc/gitlab/gitlab-secrets.json`文件必须保持一致。
- 备份从节点secrets文件
```bash
mv /etc/gitlab/gitlab-secrets.json /etc/gitlab/gitlab-secrets.json.`date +%F`
```
- 复制主节点secrets文件到从节点
```bash
scp root@192.168.123.116:/etc/gitlab/gitlab-secrets.json /etc/gitlab
```
- 修改权限
```bash
chown root:root /etc/gitlab/gitlab-secrets.json
chmod 0600 /etc/gitlab/gitlab-secrets.json
```
- 重启从节点
```bash
gitlab-ctl reconfigure
gitlab-ctl restart
```
#### 2.5.2 拷贝SSH主机密钥
在灾难恢复的场景下,管理员通常会指定从节点成为新的主节点,同时会变更DNS指向从节点,这样客户端就不需要更改仓库地址也能拉取代码。
但由于从节点(新主节点)的SSH主机密钥与旧的主节点不一样,所以会导致客户端SSH请求失败。
下列操作可以确保从节点和主节点的SSH主机密钥一致。
- 备份从节点主机密钥
```bash
find /etc/ssh -iname ssh_host_* -exec cp {} {}.backup.`date +%F` \;
```
- 拷贝主节点主机密钥
```bash
scp root@192.168.123.116:/etc/ssh/ssh_host_*_key* /etc/ssh
```
- 修改主机密钥权限
```bash
chown root:root /etc/ssh/ssh_host_*_key*
chmod 0600 /etc/ssh/ssh_host_*_key*
```
- 检查两边主机密钥一致性
在两边都运行,比对输出结果是否一致:
```bash
for file in /etc/ssh/ssh_host_*_key; do ssh-keygen -lf $file; done
```
输出:
```bash
256 SHA256:+zS8Eu3XaV/MS3LDNGXtnj4u8xBdIqdhmQjPkO2xg60 /etc/ssh/ssh_host_ecdsa_key.pub (ECDSA)
256 SHA256:r8hi50aXfS7yl8CuExLYr4DuW7JX20swoDlqPWKwKdo /etc/ssh/ssh_host_ed25519_key.pub (ED25519)
2048 SHA256:T+QzA8AJqD5UHoVsRIljDTdVy2ooimNWHJjJoue+O+U /etc/ssh/ssh_host_rsa_key.pub (RSA)
```
- 检查公钥和私钥的匹配性
在从节点上,拷贝过来的公钥和私钥的指纹应该是一致的。
```bash
#打印私钥的指纹
for file in /etc/ssh/ssh_host_*_key; do ssh-keygen -lf $file; done
#打印公钥的指纹
for file in /etc/ssh/ssh_host_*_key.pub; do ssh-keygen -lf $file; done
```
- 重新加载OpenSSH
```bash
# Debian 或 Ubuntu
service ssh reload
# CentOS
service sshd reload
```
- 重新登陆从节点
打开一个新的Terminal, 尝试是否可以成功登陆从节点。如果不能,请检查上述步骤。
#### 2.5.3 添加从节点
- 配置gitlab.rb
编辑`/etc/gitlab/gitlab.rb`文件,加入一行:
```bash
gitlab_rails['geo_node_name'] = 'us'
```
运行`gitlab-ctl reconfigure`,使上述配置生效.
- 在界面上添加从节点
打开主节点GitLab界面:Admin Area > Geo (/admin/geo/nodes)
点击`New node`按钮:

填写Name和URL,Name是/etc/gitlab/gitlab.rb文件中的`gitlab_rails['geo_node_name']`,URL是`external_url`,必须和配置文件保持一致。
- 在从节点上运行`gitlab-ctl restart`
- 在从节点上检查geo配置
```bash
gitlab-rake gitlab:geo:check
```
输出:
```bash
Checking Geo ...
GitLab Geo secondary database is correctly configured ... yes
Database replication enabled? ... yes
Database replication working? ... yes
GitLab Geo HTTP(S) connectivity ...
* Can connect to the primary node ... yes
GitLab Geo is available ...
GitLab Geo is enabled ... yes
This machine's Geo node name matches a database record ... yes, found a secondary node named "us"
HTTP/HTTPS repository cloning is enabled ... yes
Machine clock is synchronized ... yes
Git user has default SSH configuration? ... yes
OpenSSH configured to use AuthorizedKeysCommand ... skipped
Reason:
Cannot access OpenSSH configuration file
Try fixing it:
This is expected if you are using SELinux. You may want to check configuration manually
For more information see:
doc/administration/operations/fast_ssh_key_lookup.md
GitLab configured to disable writing to authorized_keys file ... yes
GitLab configured to store new projects in hashed storage? ... yes
All projects are in hashed storage? ... yes
Checking Geo ... Finished
```
在主节点上检查geo配置,确认与从节点的geo连接:
```bash
gitlab-rake gitlab:geo:check
```
输出:
```bash
Checking Geo ...
GitLab Geo is available ...
GitLab Geo is enabled ... yes
This machine's Geo node name matches a database record ... yes, found a primary node named "cn"
HTTP/HTTPS repository cloning is enabled ... yes
Machine clock is synchronized ... yes
Git user has default SSH configuration? ... yes
OpenSSH configured to use AuthorizedKeysCommand ... skipped
Reason:
Cannot access OpenSSH configuration file
Try fixing it:
This is expected if you are using SELinux. You may want to check configuration manually
For more information see:
doc/administration/operations/fast_ssh_key_lookup.md
GitLab configured to disable writing to authorized_keys file ... yes
GitLab configured to store new projects in hashed storage? ... yes
All projects are in hashed storage? ... yes
Checking Geo ... Finished
```
- 主节点界面
你的主节点Geo界面样例如下:

#### 2.5.4 (可选)从节点信任主节点
如果你的主节点SSL证书由`权威CA`颁发,那么你可以跳过这项配置。
如果你的主节点证书是自签的,那么你需要将主节点证书加入到从节点证书的`信任仓库`中,具体步骤参考[SSL Configuration](https://docs.gitlab.com/omnibus/settings/ssl.html).
#### 2.5.4 为Geo启用HTTP/HTTPS
Geo默认通过`HTTP/HTTPS`同步仓库,所以需要确保可以通过`HTTP/HTTPS`进行克隆。
- 在主节点界面打开`Admin Area > Settings (/admin/application_settings/general)`
- 展开`Visibility and access controls`
- 确认`Enabled Git access protocols`被设置为`Both SSH and HTTP(S)`或者`Only HTTP(S)”`
#### 2.5.6 检查从节点
你的从节点配置至此已经完成.
现在你可以使用主节点的用户,登陆从节点,访问`/admin/geo/nodes`,界面如下:

#### 2.5.7 故障检查
如果你的配置有故障,请参考[Troubleshooting Geo](https://docs.gitlab.com/ee/administration/geo/replication/troubleshooting.html)
通过UI界面能观察到的最明显的2个故障:
- 节点与节点之间的数据库复制不正常
- 节点与节点之间的通知不正常,原因通常是:1.非权威CA颁发的证书;2.防火墙拦截。
## 3. 用户指南
用户现在可以:
- 从`从节点`上`pull`代码
- 直接`push`代码到`从节点`, `从节点`会将`push`请求转发到`主节点`:
```bash
remote:
remote: This request to a Geo secondary node will be forwarded to the
remote: Geo primary node:
remote:
remote: git@cn.alexju.cn:root/p1.git
remote:
Counting objects: 4, done.
Delta compression using up to 4 threads.
Compressing objects: 100% (2/2), done.
Writing objects: 100% (3/3), 272 bytes | 0 bytes/s, done.
Total 3 (delta 1), reused 0 (delta 0)
To git@us.alexju.cn:root/p1.git
eaa4833..a678624 master -> master
```
## 4. 其他工作
### 4.1 暂停和恢复Geo
在GitLab Premium 13.2版本之后,Geo支持暂停和恢复。
- 暂停Geo(在从节点上)
```bash
gitlab-ctl geo-replication-pause
```
- 恢复Geo(在从节点上)
```bash
gitlab-ctl geo-replication-resume
```
### 4.2 多节点配置
Geo的从节点可以是多个,详细步骤:[Geo for multiple servers](https://docs.gitlab.com/ee/administration/geo/replication/multiple_servers.html)
### 4.3 Geo配合对象存储
Geo配合对象存储使用,详细步骤:[Geo with Object storage](https://docs.gitlab.com/ee/administration/geo/replication/object_storage.html)
### 4.4 Geo灾难恢复
在灾难恢复场景下,可以对Geo主节点和从节点进行切换,详细步骤:[Disaster Recovery (Geo)](https://docs.gitlab.com/ee/administration/geo/disaster_recovery/index.html)