Notebook / Extension Tutorial
===
> #ipython, jupyter notebook, python notebook, jupyterlab, elyra
###### tags: `Jupyter`
###### tags: `Jupyter`, `JupyterLab`, `Notebook`, `Elyra`, `Extension`
<br>
[TOC]
<br>
## [Extension Tutorial](https://jupyterlab.readthedocs.io/en/stable/extension/extension_tutorial.html)
### 教學目標
- 如何從頭建置 extension 開發環境
- 如何起一個 extension 專案
- 如何在 JupyterLab 迭代編碼、建置、載入 extension
- 如何使用 git 進行版本控制
- 如何發布 extension
<br>
### 要實作的 extension 成品
開一個空白頁面 (頁籤名稱為 **Astronomy Picture**),並隨機下載天文圖

<br>
### Step 1 - 建置開發環境
> 使用 conda 或 virtualenv 皆可
- ### 需要安裝 conda 套件 (使用 miniconda 即可)
- [[HackMD] conda (Anaconda, Miniconda)](/9LPtSgKBQdmVW2qTtNSE9g)
- ### 需要在 conda 環境中,安裝底下套件
- JupyterLab
- [cookiecutter](https://github.com/audreyr/cookiecutter)
- [NodeJS](https://nodejs.org/)
- JavaScript 執行環境
- [git](https://git-scm.com/)
- 用於版本控制
- ### 建立 conda 環境,名稱為 `jupyterlab-ext`,並安裝上述套件
```bash=
$ conda create \
-n jupyterlab-ext \
--override-channels \
--strict-channel-priority \
-c conda-forge \
-c nodefaults \
jupyterlab=3 cookiecutter nodejs jupyter-packaging git
...
#
# To activate this environment, use
#
# $ conda activate jupyterlab-ext
#
# To deactivate an active environment, use
#
# $ conda deactivate
```
- `-n ENVIRONMENT, --name ENVIRONMENT`
Name of environment.
- `--override-channels`
Do not search default or .condarc channels. Requires --channel.
- `--strict-channel-priority`
Packages in lower priority channels are not considered if a package with the same name appears in a higher priority channel.
- ### 啟用 conda 環境
```bash=
conda activate jupyterlab-ext
```

- ### 透過 virtualenv 環境亦可
```bash=
$ virtualenv -p python3 jupyterlab-ext
$ pip install jupyterlab==3 cookiecutter nodejs jupyter-packaging
```
- pip 無 git 套件
<br>
### Step 2 - 建立空的 extension 專案
:::warning
:warning: 當前目錄下,不能有相同名稱的專案,即便裡面是空的,否則會引發下列錯誤!
```
Error: "jupyterlab_apod" directory already exists
```
:::
:::info
:bulb: **下面會使用 `Cookiecutters` 指令**
`Cookiecutters` 用來提供程式範例的基本模板
- **提供 app 模板**
有 TypeScript 或 JavaScript 腳本,兩種選擇
- **提供 mimerender 模板**
- **提供 theme 模板**
:::
:::info
:bulb: **ts 模板 和 js模板,差異在:**
- [ts 模板](https://github.com/jupyterlab/extension-cookiecutter-ts/tree/3.0/%7B%7Bcookiecutter.python_name%7D%7D)的腳本放在 `src/` (編譯後會放在 `lib/` )
`src/*.ts` -> compile -> `lib/*.js`
- [js 模板](https://github.com/jupyterlab/extension-cookiecutter-js/tree/master/%7B%7Bcookiecutter.python_name%7D%7D)的腳本放在 `lib/`
:::
```bash=
$ cookiecutter https://github.com/jupyterlab/extension-cookiecutter-ts
author_name []: tj_tsai
author_email []: tsungjung411@gmail.com
labextension_name [myextension]: jupyterlab_apod
python_name [jupyterlab_apod]: jupyterlab_apod
project_short_description [A JupyterLab extension.]: Show a random NASA Astronomy Picture of the Day in a JupyterLab panel
has_settings [n]: n
has_server_extension [n]: n
has_binder [n]: y
repository [https://github.com/github_username/jupyterlab_apod]: https://github.com/tsungjung411/jupyterlab-study
# 切換到 estension 專案
$ cd jupyterlab_apod
$ ls
```
- ### 指令說明
- ### `cookiecutter [OPTIONS] TEMPLATE [EXTRA_CONTEXT]...`
Create a project from a Cookiecutter [project template](https://github.com/jupyterlab/extension-cookiecutter-ts) (TEMPLATE).
- 類似 helm-chart 的概念
- ### apod
**A**stronomy **P**icture **o**f the **D**ay
- ### [`labextension_name` vs `python_name`](https://github.com/jupyterlab/extension-cookiecutter-ts/tree/3.0/%7B%7Bcookiecutter.python_name%7D%7D#-cookiecutterpython_name-)
| 參數 | 套件類型 | 用途 |
|-----|---------|-----|
| `labextension_name` | NPM package | 用於 frontend 擴充 |
| `python_name` | Python package | 用於 server 擴充 |
- 當 `has_server_extension` 為 n (no) 時,`python_name` 應該就沒有用途
- ### `ls`

- ### template [產生前](https://github.com/jupyterlab/extension-cookiecutter-ts/tree/3.0/%7B%7Bcookiecutter.python_name%7D%7D) vs [產生後](https://github.com/tsungjung411/jupyterlab-study)


<br>
### Step 3 - 編譯&安裝空的 extension 專案
將本地端的 extension 專案,編譯並安裝到 JupyterLab。底下方法1&2&3皆可單獨使用。
- ### 方法1:使用 pip
```bash=
$ pip install -ve .
```
- `-v, --verbose`
Give more output. Option is additive, and can be used up to 3 times.
- `-e, --editable <path/url>`
Install a project in editable mode (i.e. setuptools "develop mode") from a local project path or a VCS url.
:::warning
:warning: **沒有 -e 好像會引發錯誤**
```
ERROR: Could not install packages due to an OSError.
FileNotFoundError: [Errno 2] No such file or directory:
'/home/tj/miniconda3/envs/jupyterlab-ext/share/jupyter/labextensions/jupyterlab_apod/build_log.json'
```
:::
- 指令說明
- 會先安裝 extension 專案相依的 pip 套件
- 啟用編輯模式後,稍後有任何檔案變更,再執行 `pip install -ve .`
- ### 方法2:使用 jupyter 指令
```bash=
$ jupyter labextension develop --overwrite .
Obtaining file:///home/tj/Asus/workplace/jupyter/jupyterlab_apod
Installing build dependencies ... done
Checking if build backend supports build_editable ... done
Getting requirements to build wheel ... done
Preparing metadata (pyproject.toml) ... done
Installing collected packages: jupyterlab-apod
Running setup.py develop for jupyterlab-apod
Successfully installed jupyterlab-apod-0.1.0
Installing /home/tj/Asus/workplace/jupyter/jupyterlab_apod/jupyterlab_apod/labextension -> jupyterlab_apod
Removing: /home/tj/miniconda3/envs/jupyterlab-ext/share/jupyter/labextensions/jupyterlab_apod
Symlinking: /home/tj/miniconda3/envs/jupyterlab-ext/share/jupyter/labextensions/jupyterlab_apod -> /home/tj/Asus/workplace/jupyter/jupyterlab_apod/jupyterlab_apod/labextension
```
- 指令說明
- 會建立 symbolic link
- ~~好處是,稍後有任何檔案變更,都會在 JupyterLab 中自動生效~~
(不 work, 還是需要 `pip install -ve .`)
- 連接點可以在下面找到
`/home/tj/miniconda3/envs/jupyterlab-ext/share/jupyter/labextensions`
- ### 方法3:使用 jlpm 指令 (JupyterLab Package Manager)
> [The `jlpm` command is a JupyterLab-provided, locked version of the `yarn` package manager.](https://jupyterlab.readthedocs.io/en/stable/developer/contributing.html)
```bash=
# 安裝套件
$ jlpm add @jupyterlab/apputils
...
[1/4] Resolving packages...
...
[2/4] Fetching packages...
...
[3/4] Linking dependencies...
...
[4/4] Building fresh packages...
...
# 才能使用 tsc 指令,才能 build
$ jlpm run build # [1] run build + [2] install JS packages
```
- **每次 build 大概要花 9 秒,隨後即可在 JupyterLab 環境看到更新**
- `$ tsc`: 4.6s
- install: 4.3s
- **run build 包含:**
1. compile (via `jlpm run build`):
- `src/*.ts` => (轉成) => `lib/*.js
2. bundle (via `jlpm run build:extension`):
- `lib/*.js` => (打包成) => `./jupyterlab_apod/labextension/static/` JupyterLab extension
- **`$ npm run build` 也可以**
- **有任何檔案變更,手動 build:**
```bash=
$ jlpm run build
```
- **有任何檔案變更,自動 build:**
```bash=
$ jlpm run watch
# npm run watch` # work
```
<br>
### Step 4 - 檢視 JupyterLab 環境,是否有載入 extension?
- 開新的 terminal
- 進入到 conda 環境
```
$ conda activate jupyterlab-ext
```
- 啟動 JupyterLab
```
$ jupyter lab
```
- 開啟 Browser 的 console 模式 (按`F12`),就可看到底下訊息:

(JupyterLab extension jupyterlab_apod is activated!)
- 源自於:
`jupyterlab_apod/src/index.ts`

<br>
### Step 5 - 測試空頁面
<br>
### Step 6 - 測試基本完整頁面
```typescript=
import {
JupyterFrontEnd,
JupyterFrontEndPlugin
} from '@jupyterlab/application';
import { ICommandPalette, MainAreaWidget } from '@jupyterlab/apputils';
import { Widget } from '@lumino/widgets';
interface APODResponse {
copyright: string;
date: string;
explanation: string;
media_type: 'video' | 'image';
title: string;
url: string;
};
/**
* Initialization data for the jupyterlab_apod extension.
*/
const plugin: JupyterFrontEndPlugin<void> = {
id: 'jupyterlab_apod:plugin',
autoStart: true,
requires: [ICommandPalette],
activate: async (app: JupyterFrontEnd, palette: ICommandPalette) => {
console.log('JupyterLab extension jupyterlab_apod is activated!');
// Create a blank content widget inside of a MainAreaWidget
const content = new Widget();
const widget = new MainAreaWidget({ content });
widget.id = 'apod-jupyterlab';
widget.title.label = 'Astronomy Picture';
widget.title.closable = true;
// Add an image element to the content
let img = document.createElement('img');
content.node.appendChild(img);
// Get a random date string in YYYY-MM-DD format
function randomDate() {
const start = new Date(2010, 1, 1);
const end = new Date();
const randomDate = new Date(start.getTime() + Math.random()*(end.getTime() - start.getTime()));
return randomDate.toISOString().slice(0, 10);
}
// Fetch info about a random picture
const response = await fetch(`https://api.nasa.gov/planetary/apod?api_key=DEMO_KEY&date=${randomDate()}`);
console.log(`https://api.nasa.gov/planetary/apod?api_key=DEMO_KEY&date=${randomDate()}`)
const data = await response.json() as APODResponse;
if (data.media_type === 'image') {
// Populate the image
img.src = data.url;
img.title = data.title;
} else {
console.log('Random APOD was not a picture.');
}
// Add an application command
const command: string = 'apod:open';
app.commands.addCommand(command, {
label: 'Random Astronomy Picture',
execute: () => {
if (!widget.isAttached) {
// Attach the widget to the main work area if it's not there
app.shell.add(widget, 'main');
}
// Activate the widget
app.shell.activateById(widget.id);
}
});
// Add the command to the palette.
palette.addItem({ command, category: 'Tutorial' });
}
};
export default plugin;
```
<br>
<hr>
<br>
## APOD Response
### image / jpg
- https://api.nasa.gov/planetary/apod?api_key=DEMO_KEY&date=2021-12-03
```json
{
"copyright":"Gregg Ruppel",
"date":"2021-12-03",
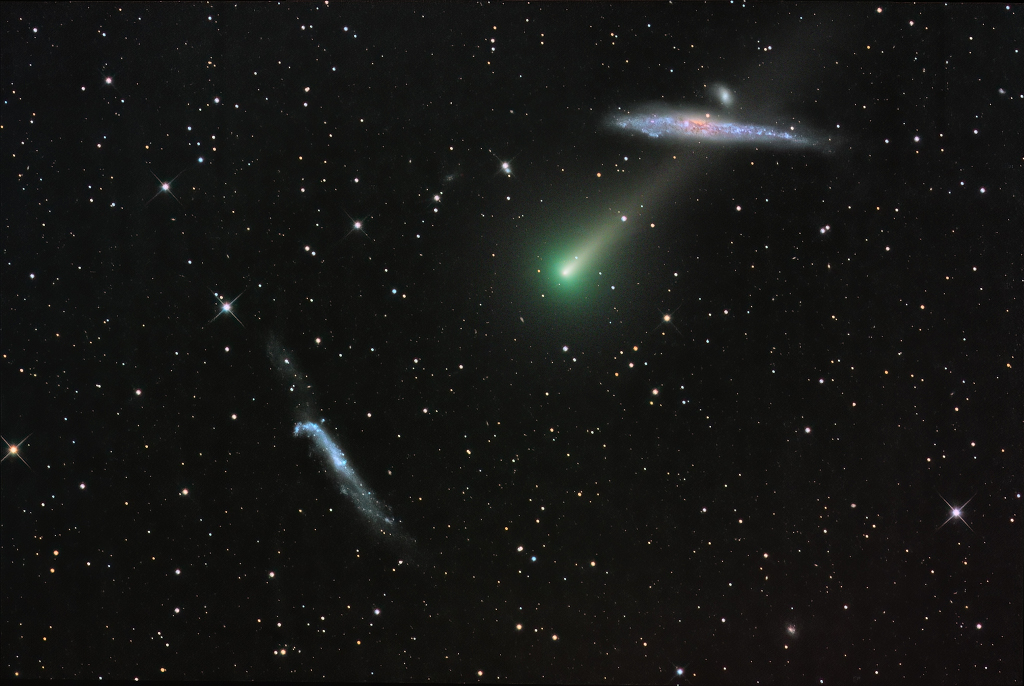
"explanation":"Sweeping through northern predawn skies, on November 24 Comet Leonard (C/2021 A1) was caught between two galaxies in this composite telescopic image. Sporting a greenish coma the comet's dusty tail seems to harpoon the heart of NGC 4631 (top) also known as the Whale Galaxy. Of course NGC 4631 and NGC 4656 (bottom, aka the Hockey Stick) are background galaxies some 25 million light-years away. On that date the comet was about 6 light-minutes from our fair planet. Its closest approach to Earth (and even closer approach to Venus) still to come, Comet Leonard will grow brighter in December. Already a good object for binoculars and small telescopes, this comet will likely not return to the inner Solar System. Its perihelion, or closest approach to the Sun, will be on January 3, 2022.",
"hdurl":"https://apod.nasa.gov/apod/image/2112/ngc4656_4631_A1-LRGB_112421.jpg",
"media_type":"image",
"service_version":"v1",
"title":"Comet Leonard and the Whale Galaxy",
"url":"https://apod.nasa.gov/apod/image/2112/ngc4656_4631_A1-LRGB_112421_1024px.jpg"
}
```
<br>
### image / gif
- https://api.nasa.gov/planetary/apod?api_key=DEMO_KEY&date=2017-09-04 (gif)
```json=
{
"date":"2017-09-04",
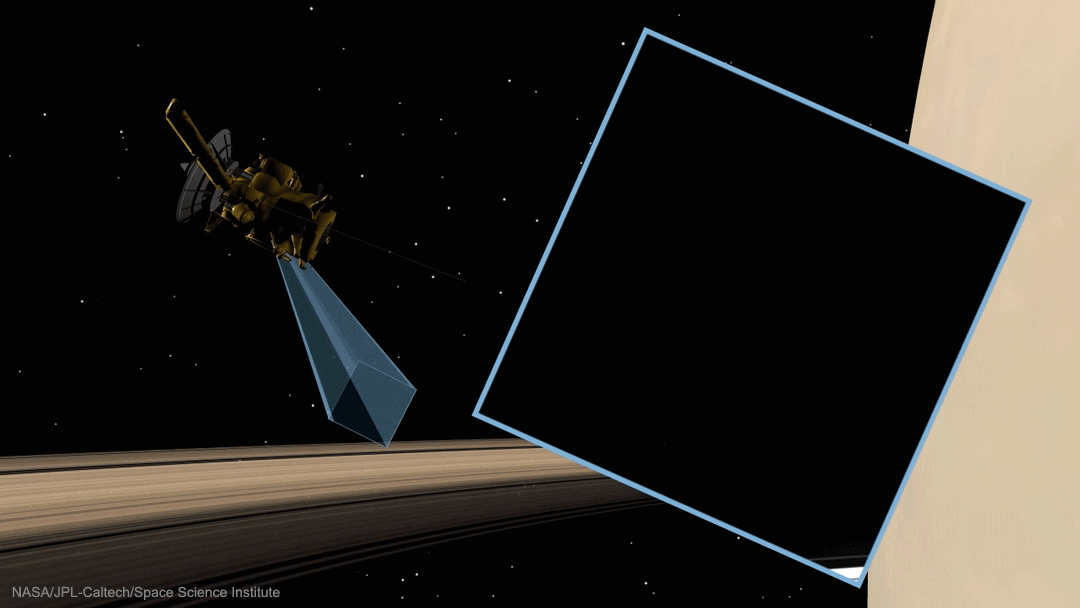
"explanation":"What do Saturn's rings look like from Saturn? Images from the robotic spacecraft Cassini are providing humanity with this unprecedented vantage point as it nears the completion of its mission. Previous to Cassini's Grand Finale orbits, all images of Saturn's majestic ring system were taken from outside of the rings looking in. Pictured in the inset is the remarkable video, while the spacecraft's positions are depicted in the surrounding animation. Details of the complex rings are evident as the short time-lapse sequence begins, while the paper-thin thickness of the rings becomes apparent near the video's end. The featured images were taken on August 20. Cassini has only a few more orbits around Saturn left before it is directed to dive into the giant planet on September 15.",
"hdurl":"https://apod.nasa.gov/apod/image/1709/InsideSaturnsRings_Cassini_1280.gif",
"media_type":"image",
"service_version":"v1",
"title":"Saturn's Rings from the Inside Out",
"url":"https://apod.nasa.gov/apod/image/1709/InsideSaturnsRings_Cassini_1080.gif"
}
```
<br>
### video / youtube
- https://api.nasa.gov/planetary/apod?api_key=DEMO_KEY&date=2016-12-21
{%youtube ZS2FvljQXsk %}
```json=
{
"copyright":"Gy\u00f6rgy\nBajm\u00f3czy",
"date":"2016-12-21",
"explanation":"This year the December Solstice is today, December 21, at 10:44 UT, the first day of winter in the north and summer in the south. To celebrate, watch this amazing timelapse video tracing the Sun's apparent movement over an entire year from Hungary. During the year, a fixed video camera captured an image every minute. In total, 116,000 exposures follow the Sun's position across the field of view, starting from the 2015 June 21 solstice through the 2016 June 20 solstice. The intervening 2015 December 22 solstice is at the bottom of the frame. The timelapse sequences constructed show the Sun's movement over one day to begin with, followed by traces of the Sun's position during the days of one year, solstice to solstice. Gaps in the daily curves are due to cloud cover. The video ends with stunning animation sequences of analemmas, those figure-8 curves you get by photographing the Sun at the same time each day throughout a year, stepping across planet Earth's sky.",
"media_type":"video",
"service_version":"v1",
"title":"Traces of the Sun",
"url":"https://www.youtube.com/embed/ZS2FvljQXsk?rel=0"
}
```
<br>
### 存取失敗例子
- case1:存取太多次
- `response.ok`
```
response.ok: false
```
- `response.text()`
```json=
{
"error": {
"code": "OVER_RATE_LIMIT",
"message": "You have exceeded your rate limit. Try again later or contact us at https://api.nasa.gov:443/contact/ for assistance"
}
}
```

<br>
<hr>
<br>
## 參考資料
- [跟著官方手冊開發 JupyterLab Extension](https://qrtt1.medium.com/677ab218ea2f)
 Sign in with Wallet
Connect another wallet
Sign in with Wallet
Connect another wallet