---
title: Setting Up Flask with MongoDB Using PyMongo- Scaler Topics
description: With this article by Scaler Topics we will learn all about MongoDB MapReduce along with their examples and explanations.
category: MongoDB
author :Trapti Gupta
---
:::section{.abstract}
## Overview
MongoDB is a very popular NoSQL database that can also be used with Flask. MongoDB Flask is a web framework that allows users to create dynamic web applications. PyMongo is a library of Python that enables a convenient working interface for MongoDB. PyMongo allows you to perform various database operations with your Python application.
:::
:::section{.main}
## Introduction to Flask
MongoDB Flask is a lightweight framework of Python that gives features and tools for web application creation in Python Programming Language. Flask allows the faster development of applications. MongoDB and Flask are popular technologies, and they are used together for application development. MongoDB allows data storage flexibly, and Flask is a web framework. Both are, when used together, then used for the development of dynamic web applications.
:::
:::section{.main}
## Prerequisites
* A machine in which Python is already installed.
* Good knowledge of the Python programming language.
* Basic flask concept understanding.
* A machine installed with the MongoDB
:::
:::section{.main}
## MongoDB Configuration
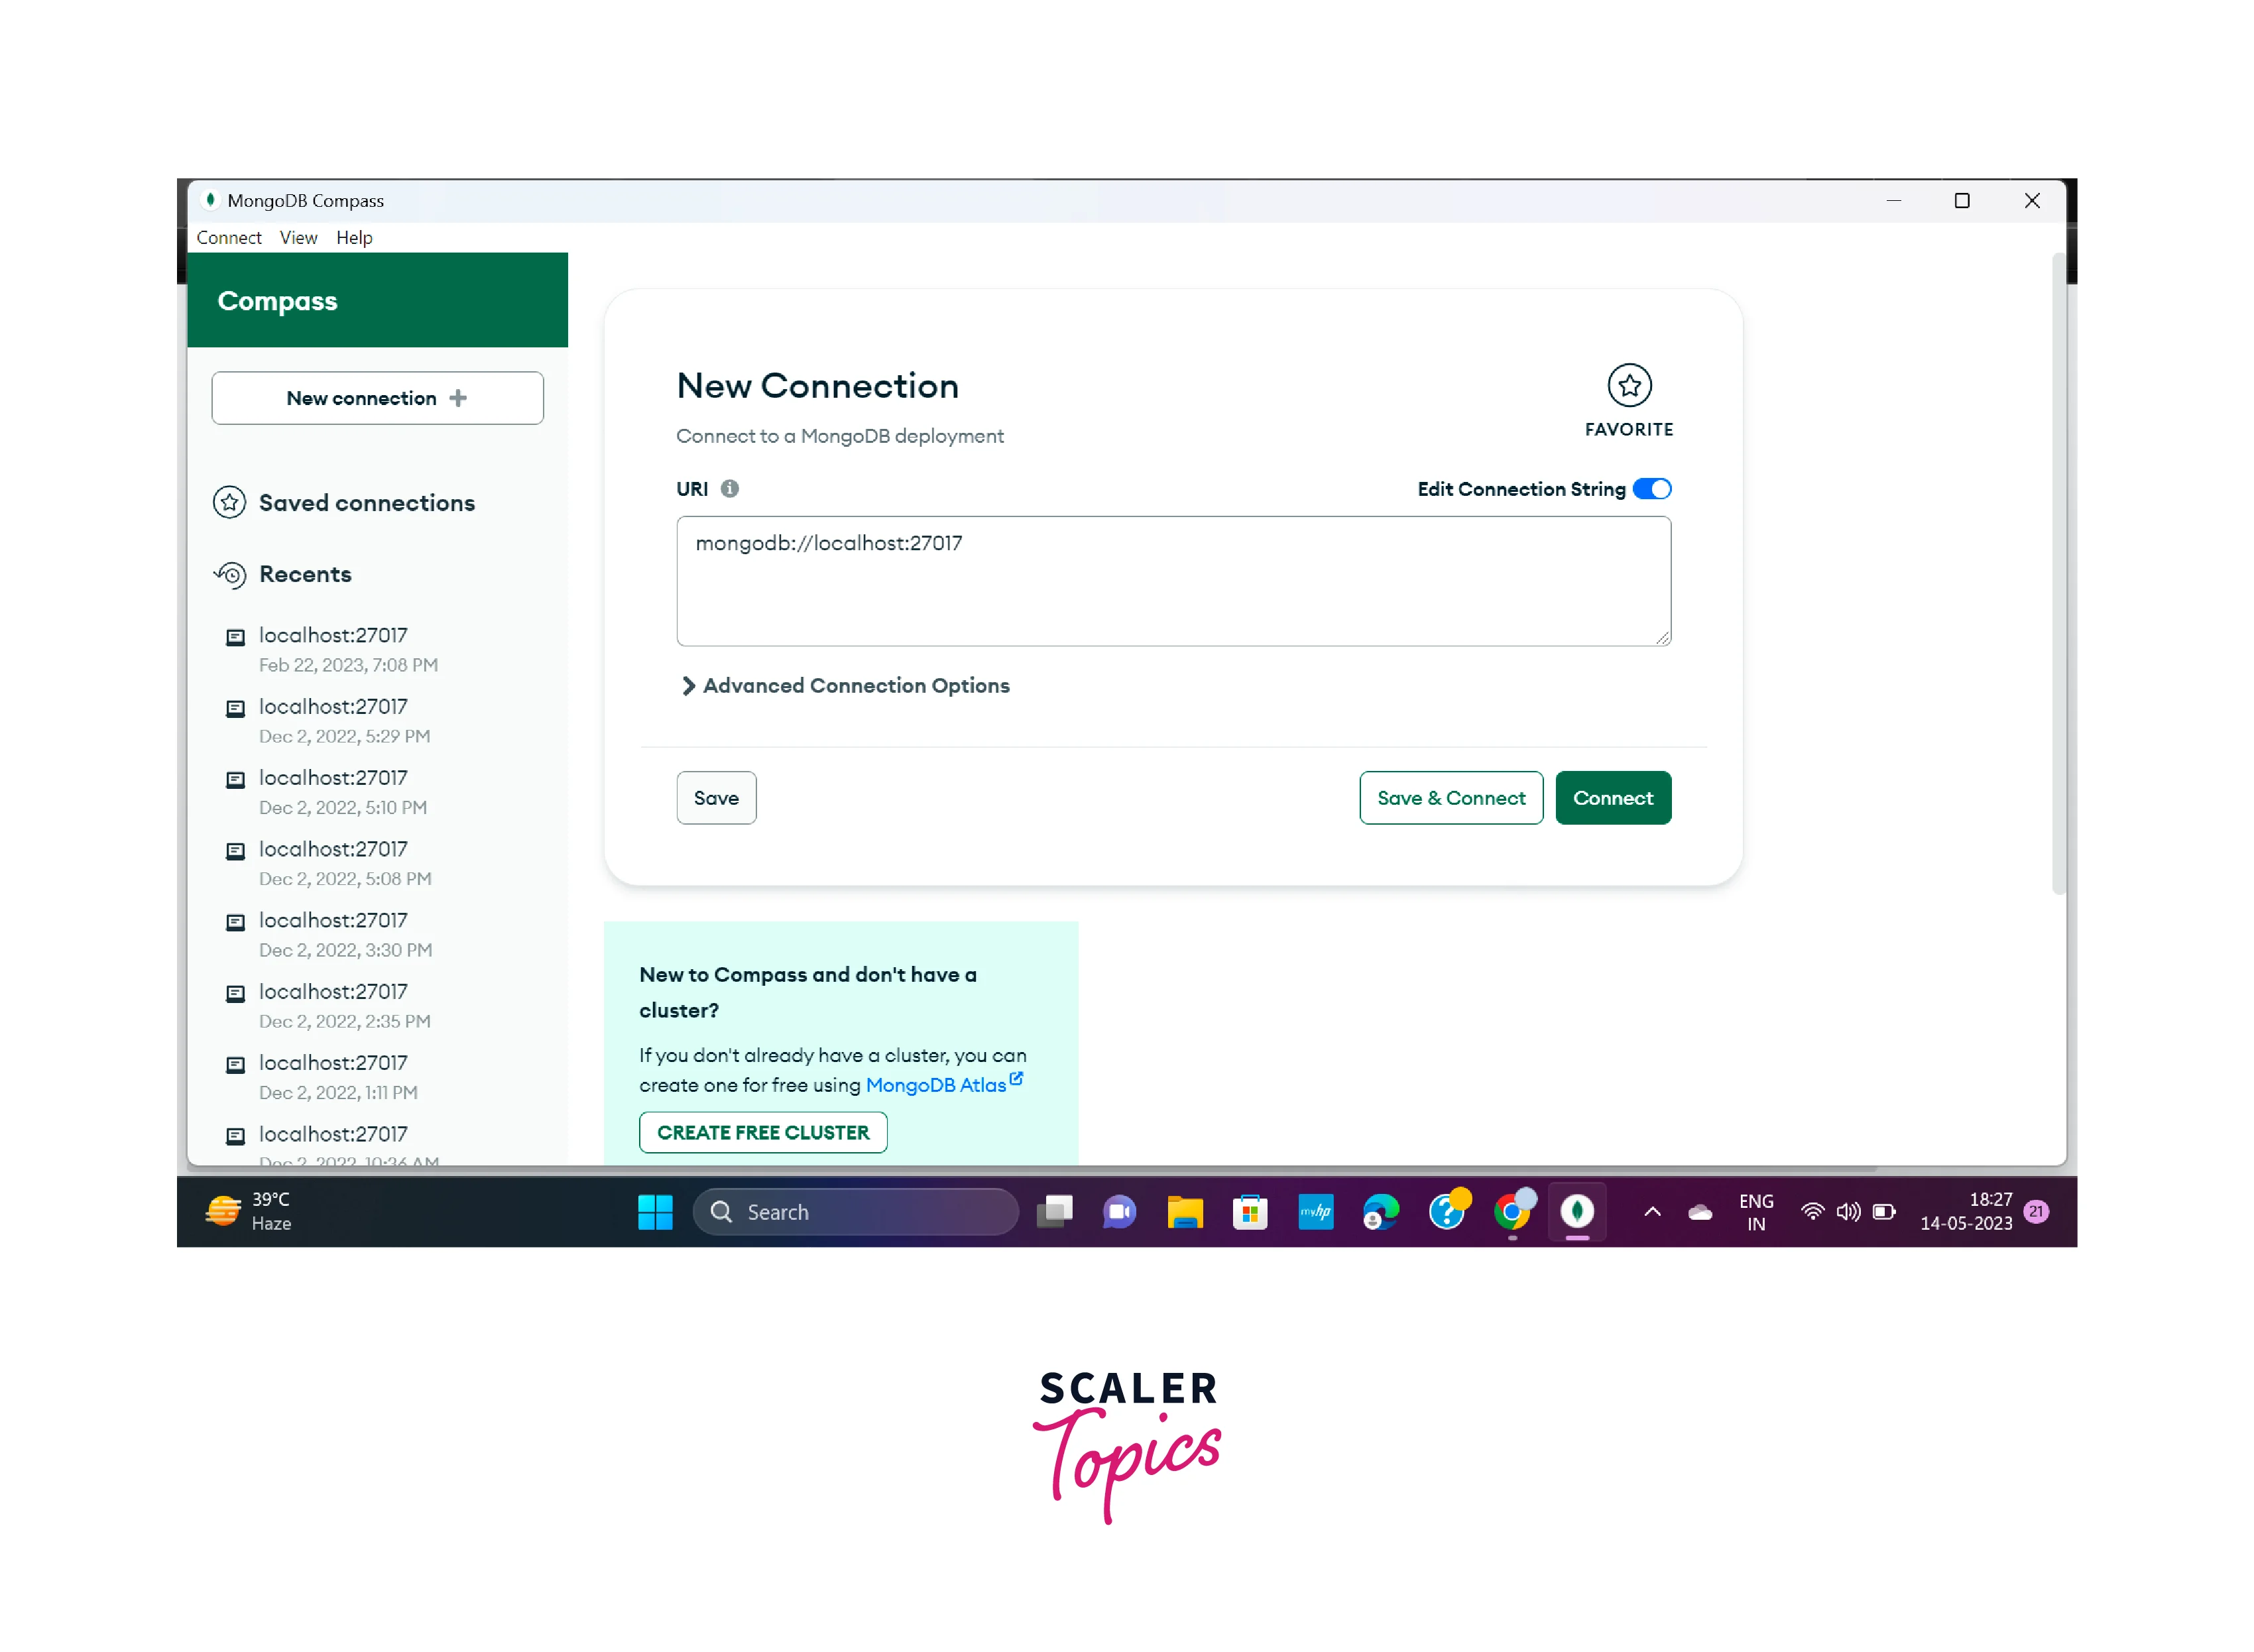
As MongoDB is already in your system, open the MongoDB compass on your machine. And the screen similar to the screen shown below is opened in your system. You can connect by just clicking the connect, or you can also modify the settings if required. And after connecting now on your local system, MongoDB starts running.
:::
:::section{.main}
## Creating Development Environment
Now for the development, virtual environment configuration is required, we can also skip this step, but to prevent dependency clashes, it is always recommended for every project to use the dedicated development environment for every individual project.
```python
# Creating a folder with the name proj
$ mkdir proj
# Move to the recently created folder
$ cd proj
```
Here we are using the mkdir command for creating the folder, and we are creating the folder with the name project, but we can make the folder with any name we desire. After that use the cd command to go into the folder created recently. Now for creating a virtual environment for your project, run the command given below.
```python
$ python -m venv venv
```
Now for utilizing the virtual environment, firstly it is required to activate it, and we can achieve this by the activated binary file execution.
```python
# run the command given below for Windows OS
$ .\venv\Scripts\activate
# run the command given below for Linux OS
$ source venv/bin/activate
```
:::
:::section{.main}
## Steps to Set Up Flask with MongoDB Using PyMongo
### PyMongo and Flask Setup
The MongoDB PyMongo Library and Flask are installed and set up in this step. With your activated virtual environment, for installing PyMongo and Flask, use the pip command.
```python
pip install Flask pymongo
```
After the successful completion of the installation, a line similar to the line given below is displayed on your system in the last of your output.
**Output:**
```plaintext
Successfully installed Flask-2.0.2 Jinja2-3.0.3 MarkupSafe-2.0.1 Werkzeug-2.0.2 click-8.0.3 itsdangerous-2.0.1 pymongo-4.0.1
```
Now the required Python packages are installed successfully, and you can create a collection after connecting with your server.
### Connecting to the Server
Now we will create a client by using the PyMongo library, which is used for interaction with the MongoDB server, database creation, and collection creation. Open an `app.py` file by our activated programming environment inside the directory named project.
```python
nano app.py
```
All the required helpers and classes are imported by it from the PyMongo library and MongoDB Flask. You can perform an interaction with the MongoDB server for the database and collection creation for storing the todos. Insert the line of code given below in your `app.py` file.
```python
# importing libraries
from pymongo import MongoClient
from flask import Flask
# making app
app = Flask(__name__)
# Creating client object
client = MongoClient('localhost', 27017)
# connecting to the database
db = client.flask_db
todos = db.todos
```
Here we have imported the Flask class, which is used for Flask application instance creation named app. We also have MongoClient for client object creation which allows the interaction and connection with the MongoDB server.
A MongoDB database named flask_db can be created by using the client instance. And in a variable db, save a reference to it. With the help of the db variable, a collection named todos can be created on flask_db. A group of documents in MongoDB is stored in the MongoDB collection, such as tables present in relational databases.
### Creating Collections and Models
There is a lazy creation of databases and collections in MongoDB, even after the execution of the `app.py` file, until the creation of the first document, no code related to the database will execute. In the next step, you have to design a small flask application along with the page so that
s will be able to add todos documents in your created todos collection.
The flask_db database and the todos collection will be created on the MongoDB server after the insertion of the first to-do document.
Now create a web page along the web form so that users will be able to insert todos.
```python
@app.route('/insertData/', methods=('GET', 'POST'))
# function to insert data into the collection
def index():
If request.method=='POST':
# getting data from request
todo_content = request.form['todo_content']
degree = request.form['degree']
# storing data into the database
todos.insert_one({'todo_content': todo_content, 'degree': degree})
return redirect(url_for('index'))
```
### Creating Webpage to Add and Display Todos
Open the `app.py` file for modification with your activated programming environment.
```python
nano app.py
```
Firstly add the imports given below from the flask
```python
from pymongo import MongoClient
from flask import redirect, url_for, request, render_template, Flask
# ...
```
Add the route given below at the end of the file.
```python
# ...
@app.route('/', methods=('GET', 'POST'))
def index():
return render_template('index.html')
```
The next step is to create the folder with the name templates in the directory and add the template named index.html in it.
```python
mkdir templates
nano templates/index.html
```
Add the code given below in the file index.html:
```html
<!DOCTYPE html>
<html lang="en">
<head>
<meta charset="UTF-8">
<title>FlaskApp</title>
<style>
.todo {
background-color: #eee;
margin: 10px;
padding: 20px;
}
</style>
</head>
<body>
<h1>Flask Based TODO Management</h1>
<hr>
<div class="content">
<form method="post">
<p>
<b><label for="content">Content for Todo:</label></b>
</p>
<p>
<input type="text" name="todo_content"
placeholder="Content for Todo:"></input>
</p>
<p>
<b><label for="degree">Degree</label></b>
</p>
<p>
<input id="degree-0" name="degree"
required type="radio" value="Important">
<label for="degree-0">Important</label>
</p>
<p>
<input id="degree-1" name="degree"
required type="radio" value="Unimportant">
<label for="degree-1">Unimportant</label>
</p>
<button type="submit">Submit</button>
</form>
</div>
</body>
</html>
```
When the virtual environment is activated in your directory, then with the help of the FLASK_APP environment variable tell the flask about the application. Set the FLASK_ENV environment variable to development so that application can be run in development mode and can access debuggers. Follow the following commands to implement it.
```python
export FLASK_APP=app
export FLASK_ENV=development
```
The next step is to run the application
```python
flask run
```
Visit the URL given below by the browser while the development server is running.
``` plaintext
http://127.0.0.1:5000/
```
There appears an index page along with an input field for todo content, two radio buttons, and a submit button.
**Output:**
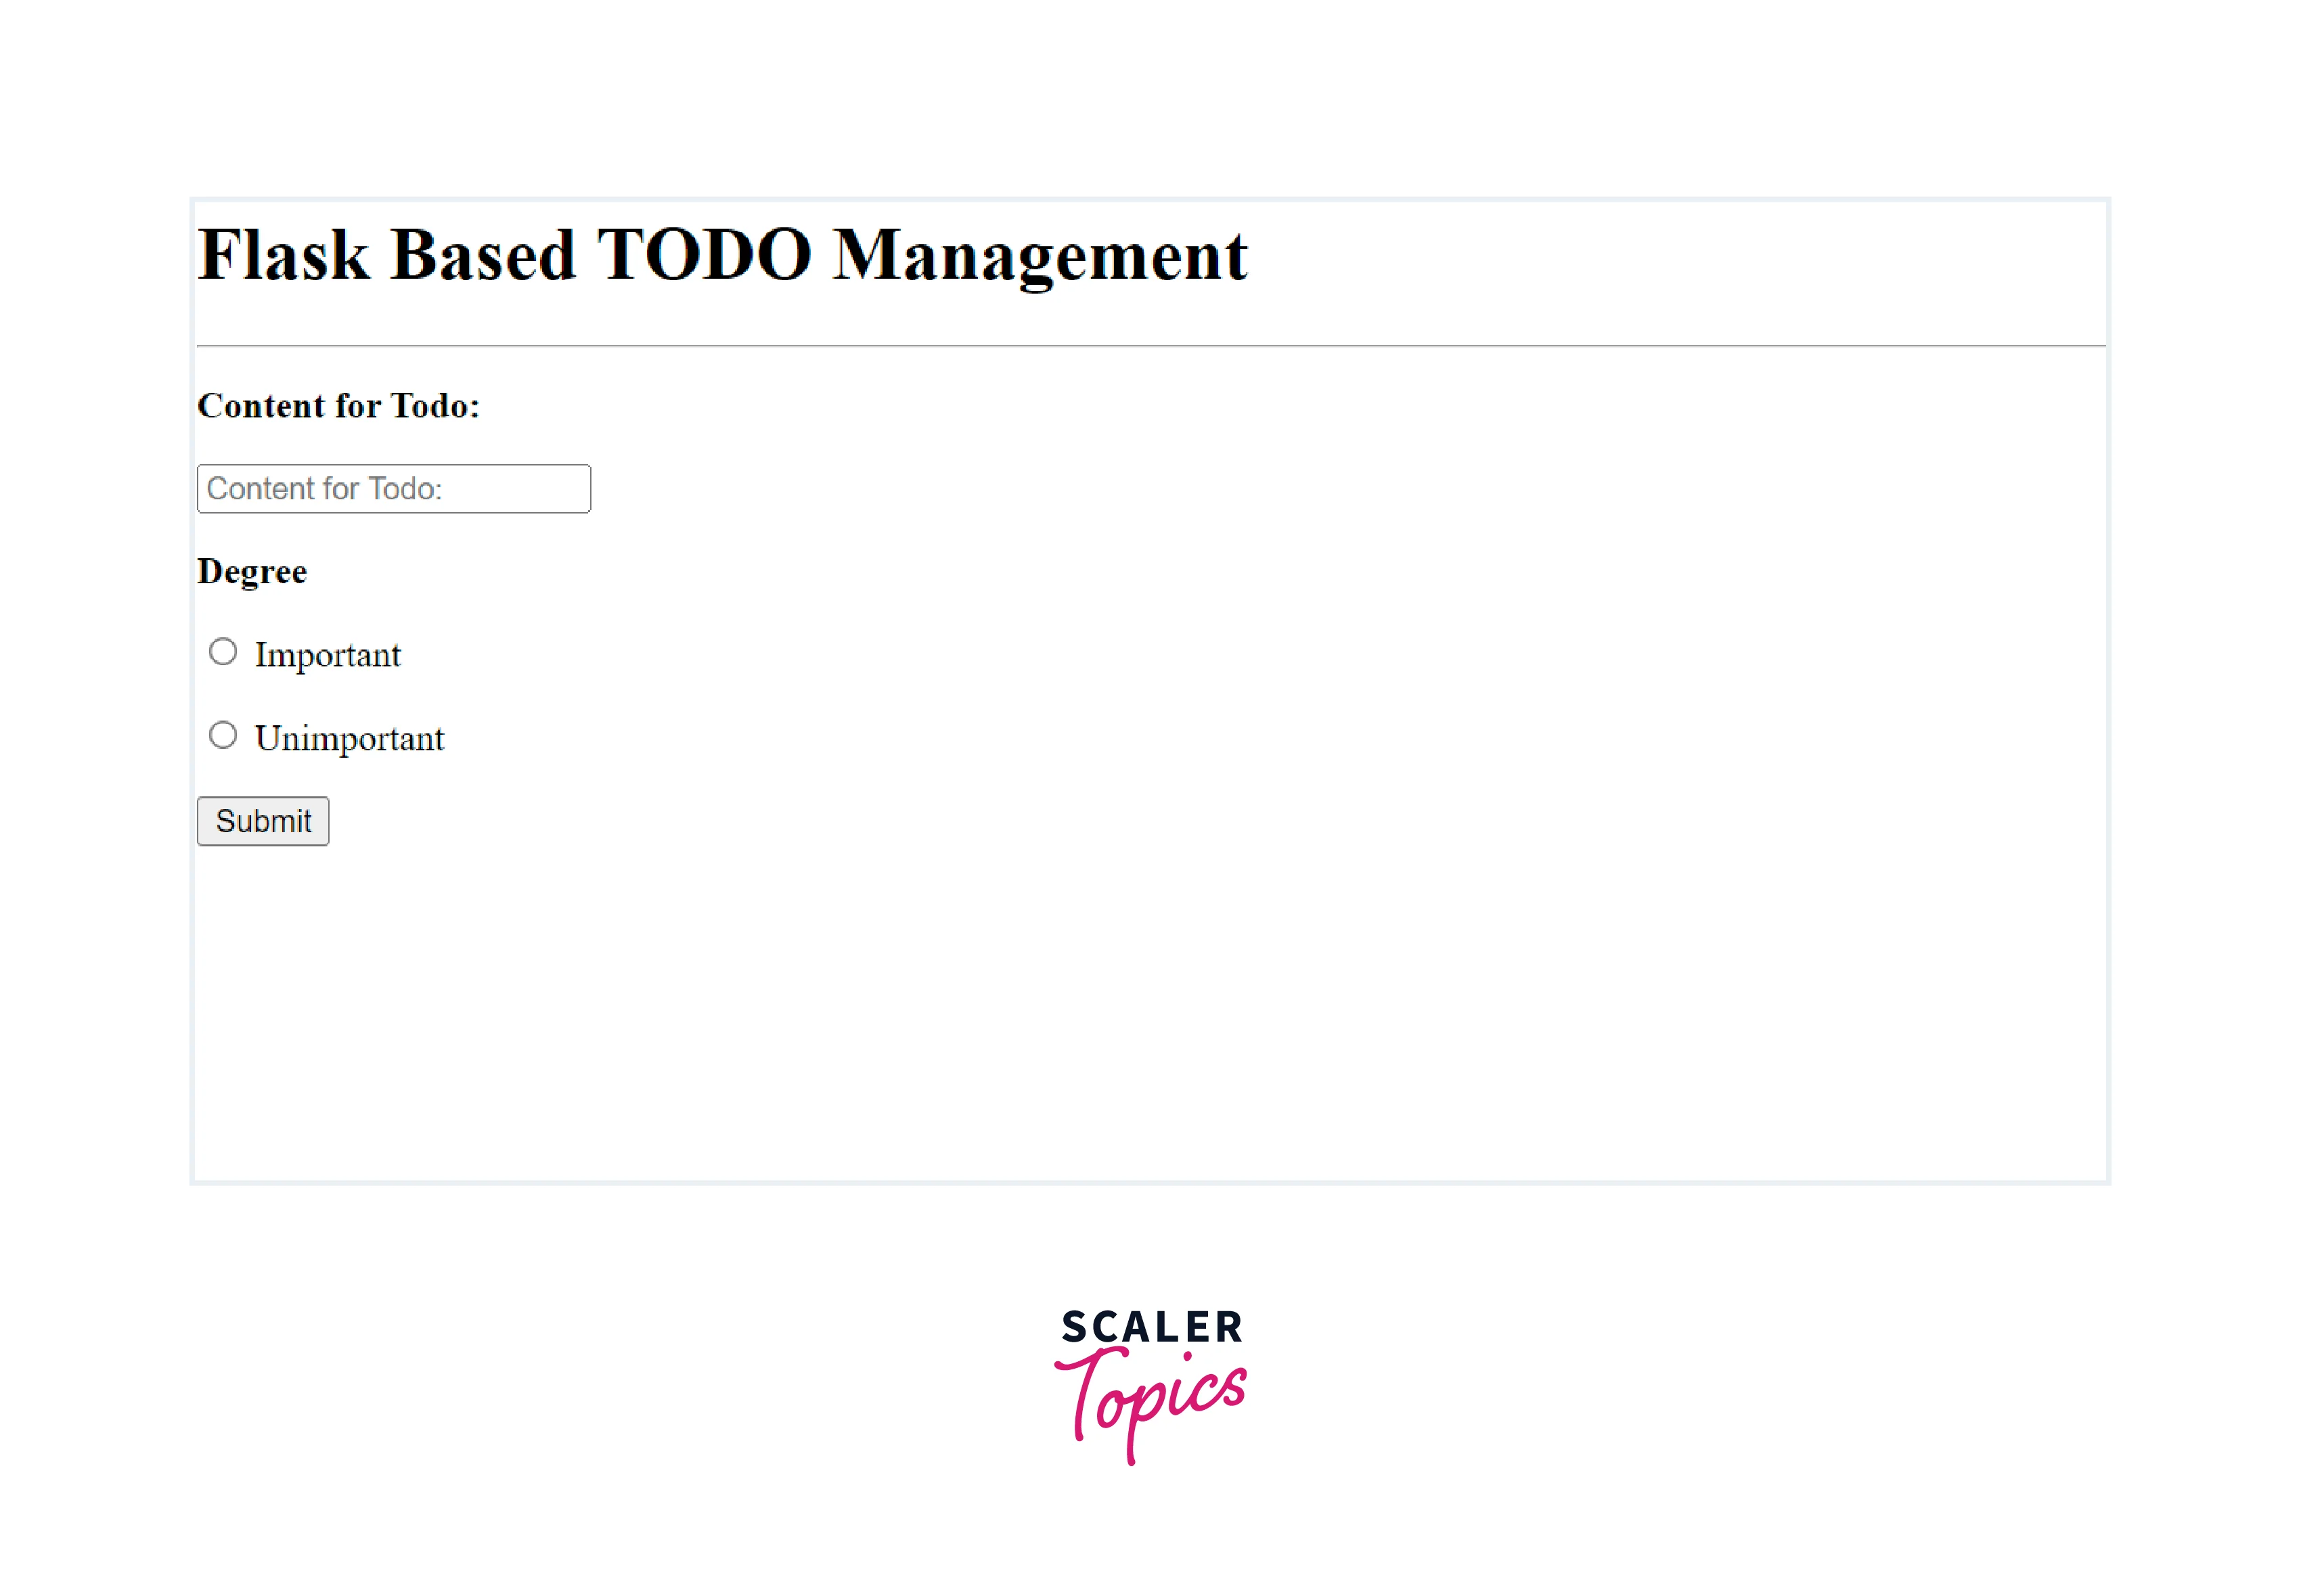
After Filling out the form and submitting it, a POST request was sent to the server, but nothing worked as the POST request was not handled on the route.
Open the new terminal.
For handling the POST requests submitted by the user and inserting the data in the todos, you have to open the `app.py`.
```python
nano app.py
```
```python
@app.route('/insertData/', methods=('GET', 'POST'))
def index():
if request.method=='POST':
todo_content = request.form['todo_content']
degree = request.form['degree']
todos.insert_one({'todo_content': todo_content, 'degree': degree})
return redirect(url_for('index'))
all_todos = todos.find()
return render_template('index.html', todos=all_todos)
```
In these changes, POST requests are handled in the condition of request.method == 'POST'. Using the request.form object, you can access the todo content.
For the insertion of todos documents in the todos collection, implement `insert_one()`. And `find()` method is used to display all the saved todos. Implement this method outside the code that is designed for handling the POST requests, so that it can return all todo documents stored on the todos collection. A variable name all_todos can store the todos from the database. Edit the function call `render_template()` so that the list of todo documents can be passed to the template index.html and it is present in the template in a variable named todos.
### Trashing Todos
Now next step is to the addition of a route for allowing the user for todos delete by clicking on the button.
Firstly, **a new route /id/delete/ will be added by which POST requests will be accepted.** The ID of the todo required to be deleted is received by the delete_one() method, and then that received ID is used for the deletion of the particular todo.
You receive an ID in the form of a string for todo deletion. And now it is required to convert that in the ObjectID form before sending it to the delete method of the collection. So it required the ObjectId() class importing from the BSON module, by which encoding and decoding of BSON (Binary JSON) are handled.
For performing the modification, open the `app.py` file:
```python
nano app.py
```
Firstly in the file, at the top, add the import given below:
```python
from bson.objected import ObjectId
# ...
```
And here, for converting string IDs intoObjectID objects, we are using the ObjectID() class. And add the route.
```python
# ...
@app.post('/<id>/delete/')
def delete(id):
todos.delete_one({"_id": ObjectId(id)})
return redirect(url_for('index'))
```
The ID of the todo that is required to be deleted is received by the function. This received ID is passed to the delete_one() method and uses the ObjectId() class for converting the ID you received into the ObjectID form.
After successful todo deletion, the user is redirected to the index page. Now perform modification in index.html file for adding the DELETE todo button:
```python
nano templates/index.html
```
Add a new `<form>` tag in the loop:
```html
{% for todo in todos %}
<div class="todo">
<p>{{ todo['content'] }} <i>({{ todo['degree']}})</i></p>
<form method="POST" action="{{ url_for('delete', id=todo['_id']) }}" >
<input type="submit" value="Delete Todo"
onclick="return confirm('Confirm your deletion?')">
</form>
</div>
{% endfor %}
```
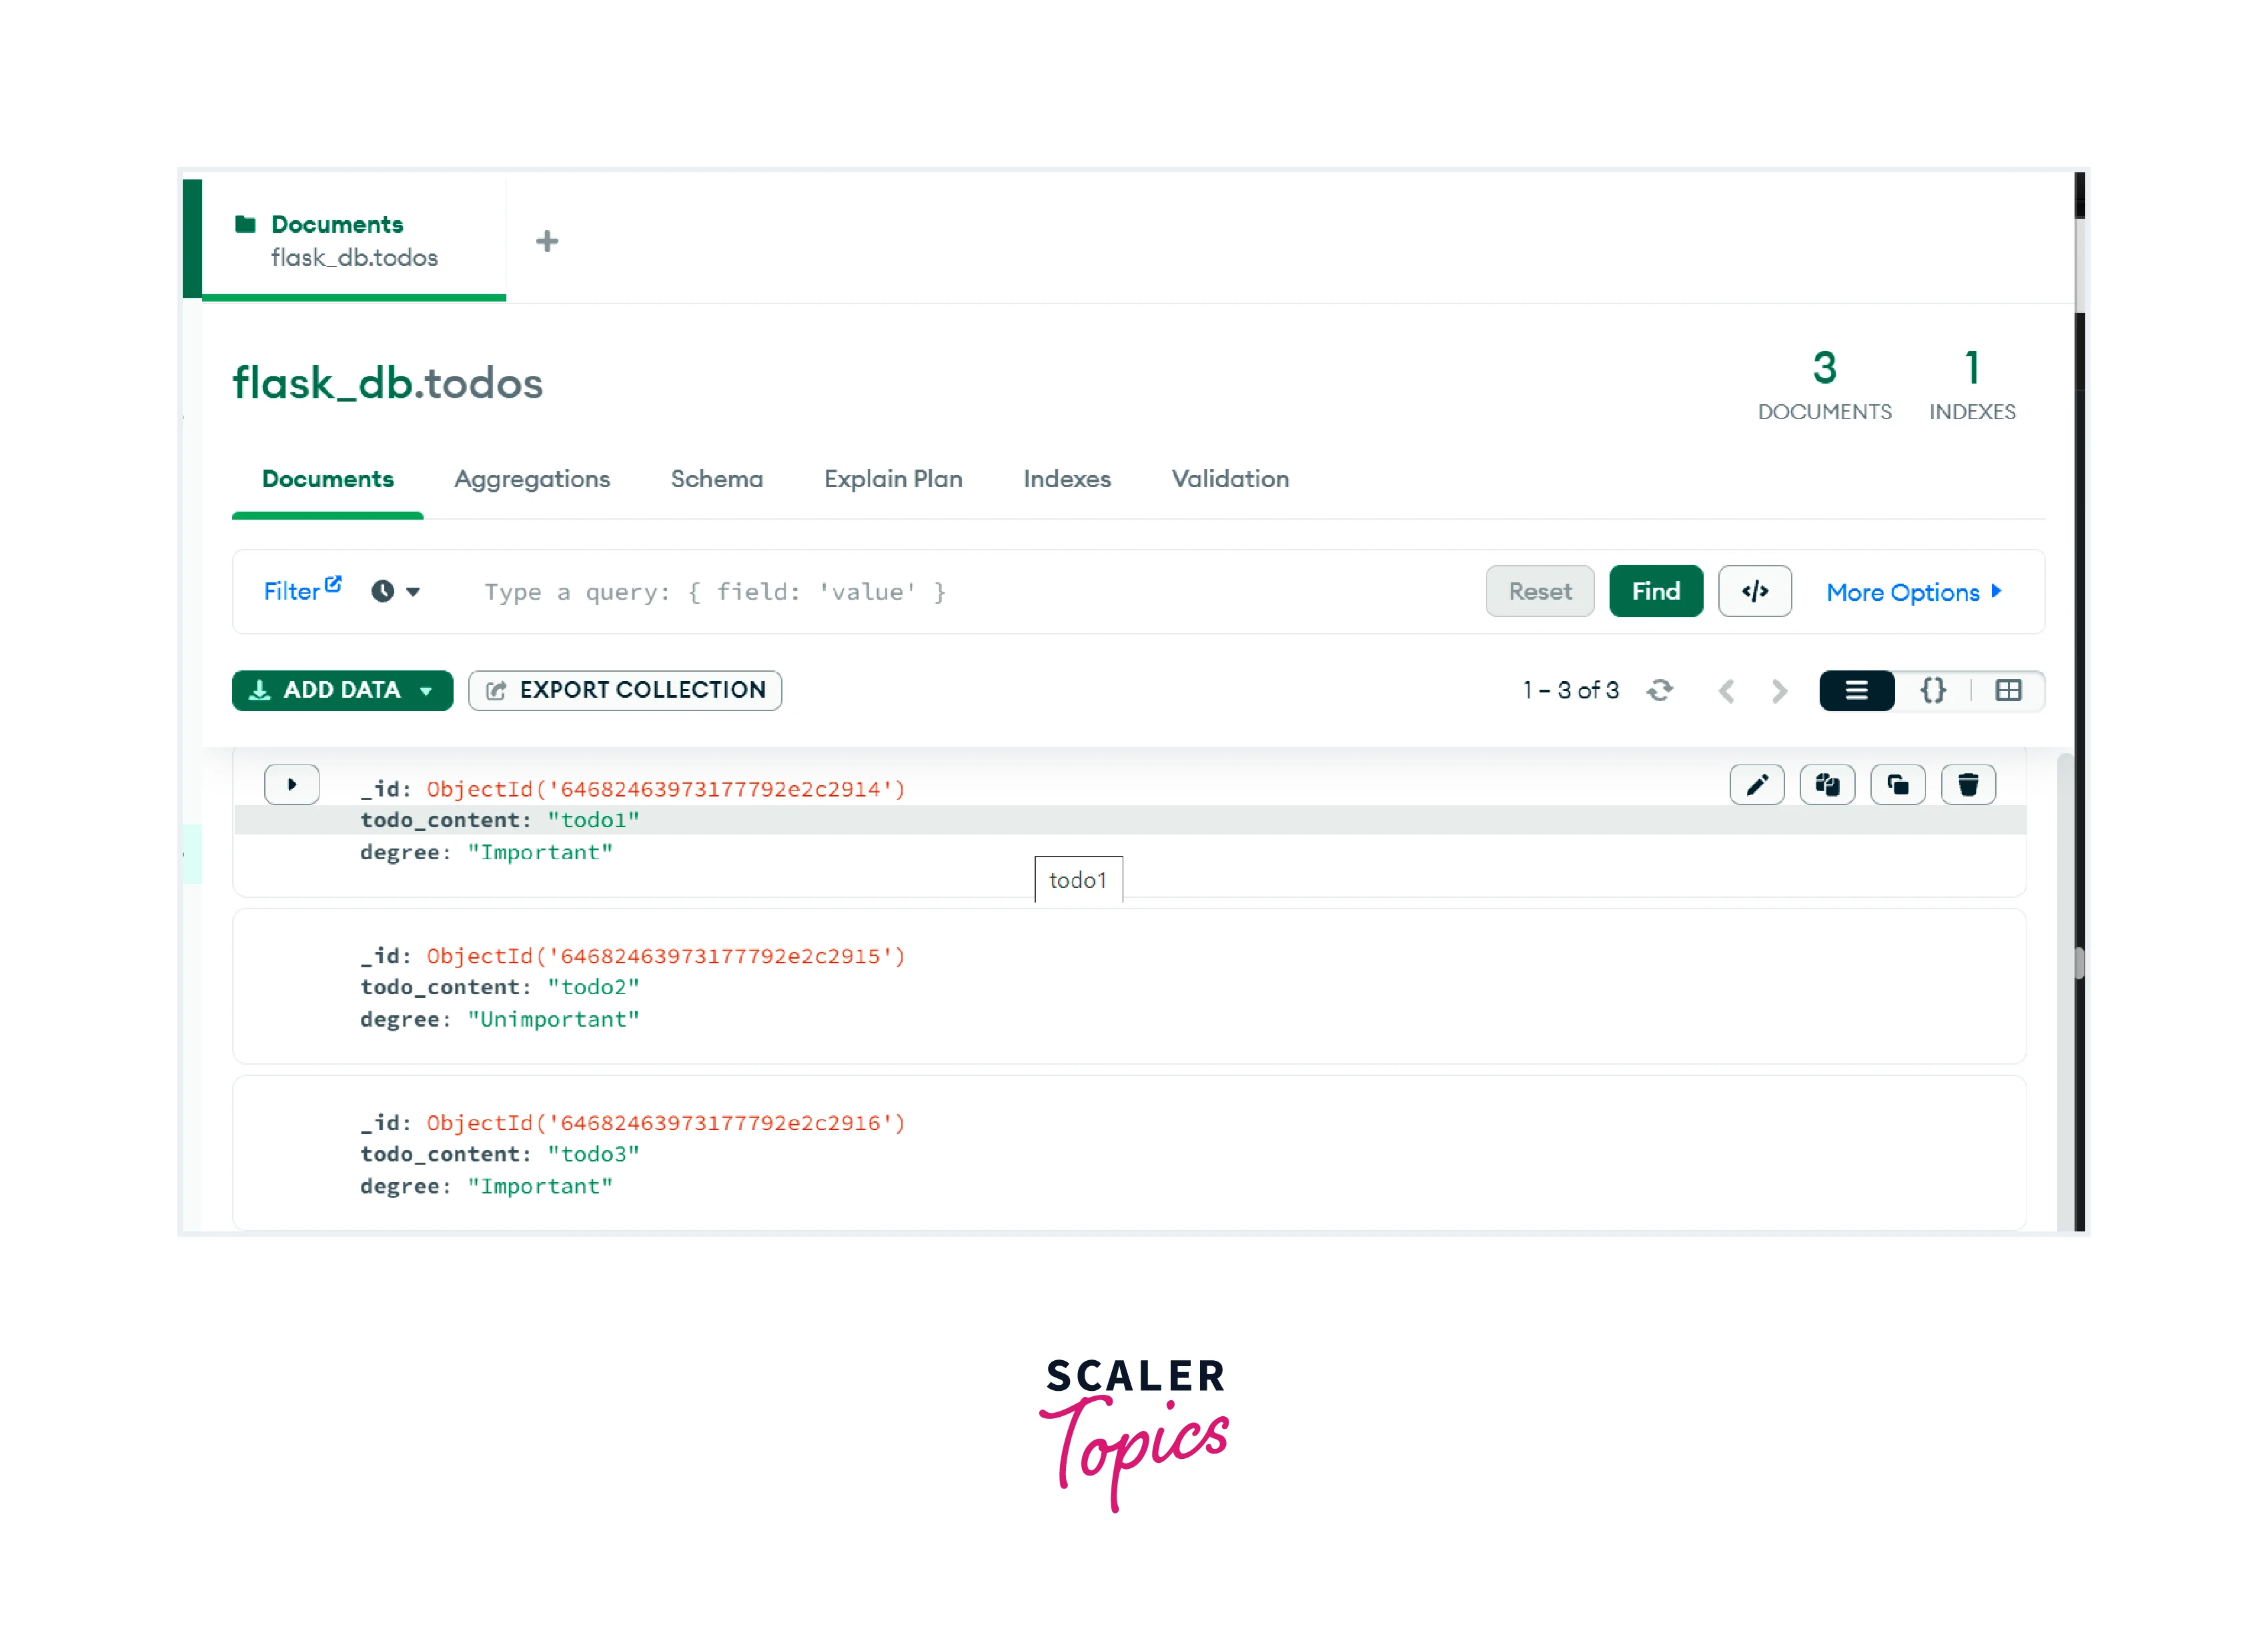
Now save the file and refresh the page, and the delete Todo button is displayed with every todo time. Now you can click on it for todo deletion and confirm it. After successful deletion, the user will be redirected to the index page. Before deleting todo, we have the following view:
After deleting the todo1:
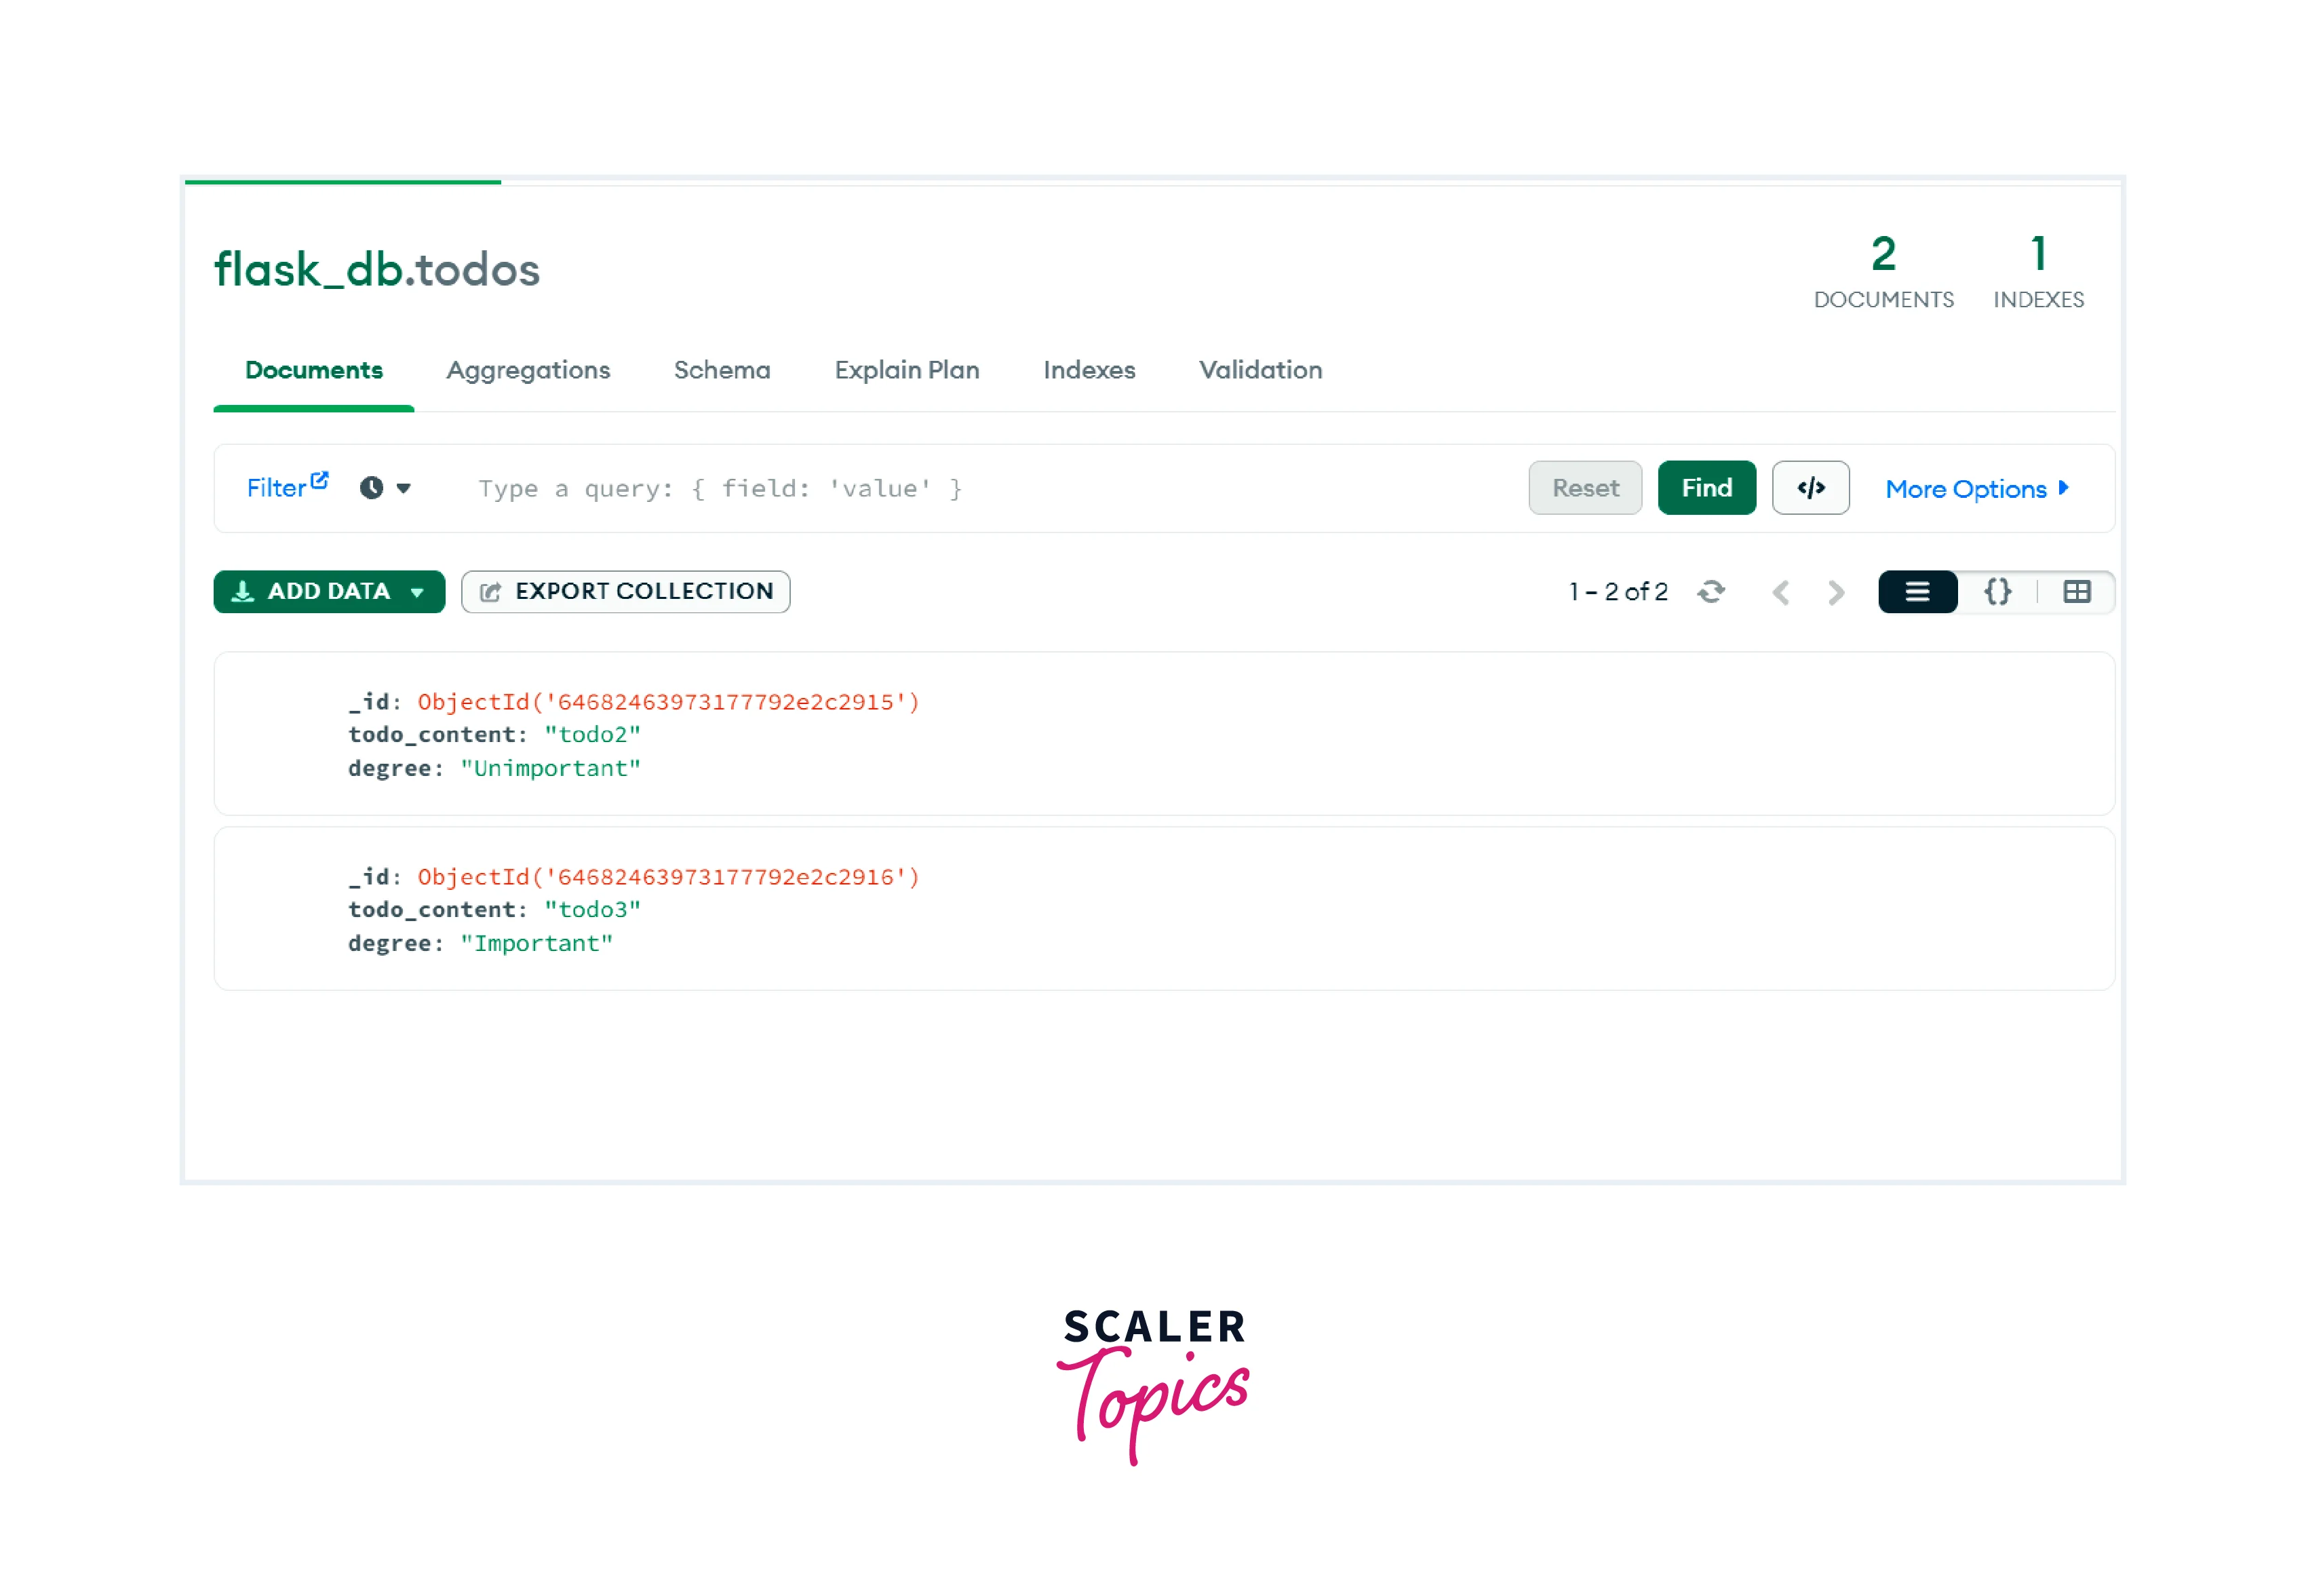
To confirm that deletion is performed successfully, run the `find()` function from the Mongo shell. And you will find that all the deleted items are no longer displayed.
```python
db.todos.find()
```
:::
:::section{.main}
## MongoDB Example
Here is a complete example of performing CRUD operations. In this code, we are taking the roll_no and name as the parameters for the Student model
```mongodb
#!/usr/bin/env python
# encoding: utf-8
import json
from flask_mongoengine import MongoEngine
from flask import jsonify, request, Flask
app = Flask(__name__)
app.config['MONGODB_SETTINGS'] = {
'db': 'database_name',
'host': 'localhost',
'port': 27017
}
db = MongoEngine()
db.init_app(app)
class Student(db.Document):
roll_no = db.StringField()
name = db.StringField()
def to_json(self):
return {"roll_no": self.roll_no,
"name": self.name}
# for fetching record from the collection by id
@app.route('/getData/', methods=['GET'])
def query_records():
roll_no = request.args.get('roll_no')
student = Students.objects(roll_no=roll_no).first()
if not student:
return jsonify({'error': 'no data found'})
Else:
return jsonify(student.to_json())
# for insert a record into the collection
@app.route('/insertData/', methods=['PUT'])
def create_record():
record = json.loads(request.data)
student = Student(roll_no=record['roll_no'],
name=record['name'])
student.save()
return jsonify(student.to_json())
# for updating a record in the collection by id
@app.route('/updateData/', methods=['POST'])
def update_record():
record = json.loads(request.data)
student = Student.objects(roll_no=record['roll_no']).first()
if not student:
return jsonify({'error': 'no data found'})
else:
student.update(name=record['name'])
return jsonify(student.to_json())
# for deleting a record from the collection by id
@app.route('/deleteData/', methods=['DELETE'])
def delete_record():
record = json.loads(request.data)
student = Student.objects(roll_no=record['roll_no']).first()
if not student:
return jsonify({'error': 'no data found'})
else:
student.delete()
return jsonify(student.to_json())
if __name__ == "__main__":
app.run(debug=True)
```
**Output:**
**For storing data in the database:**
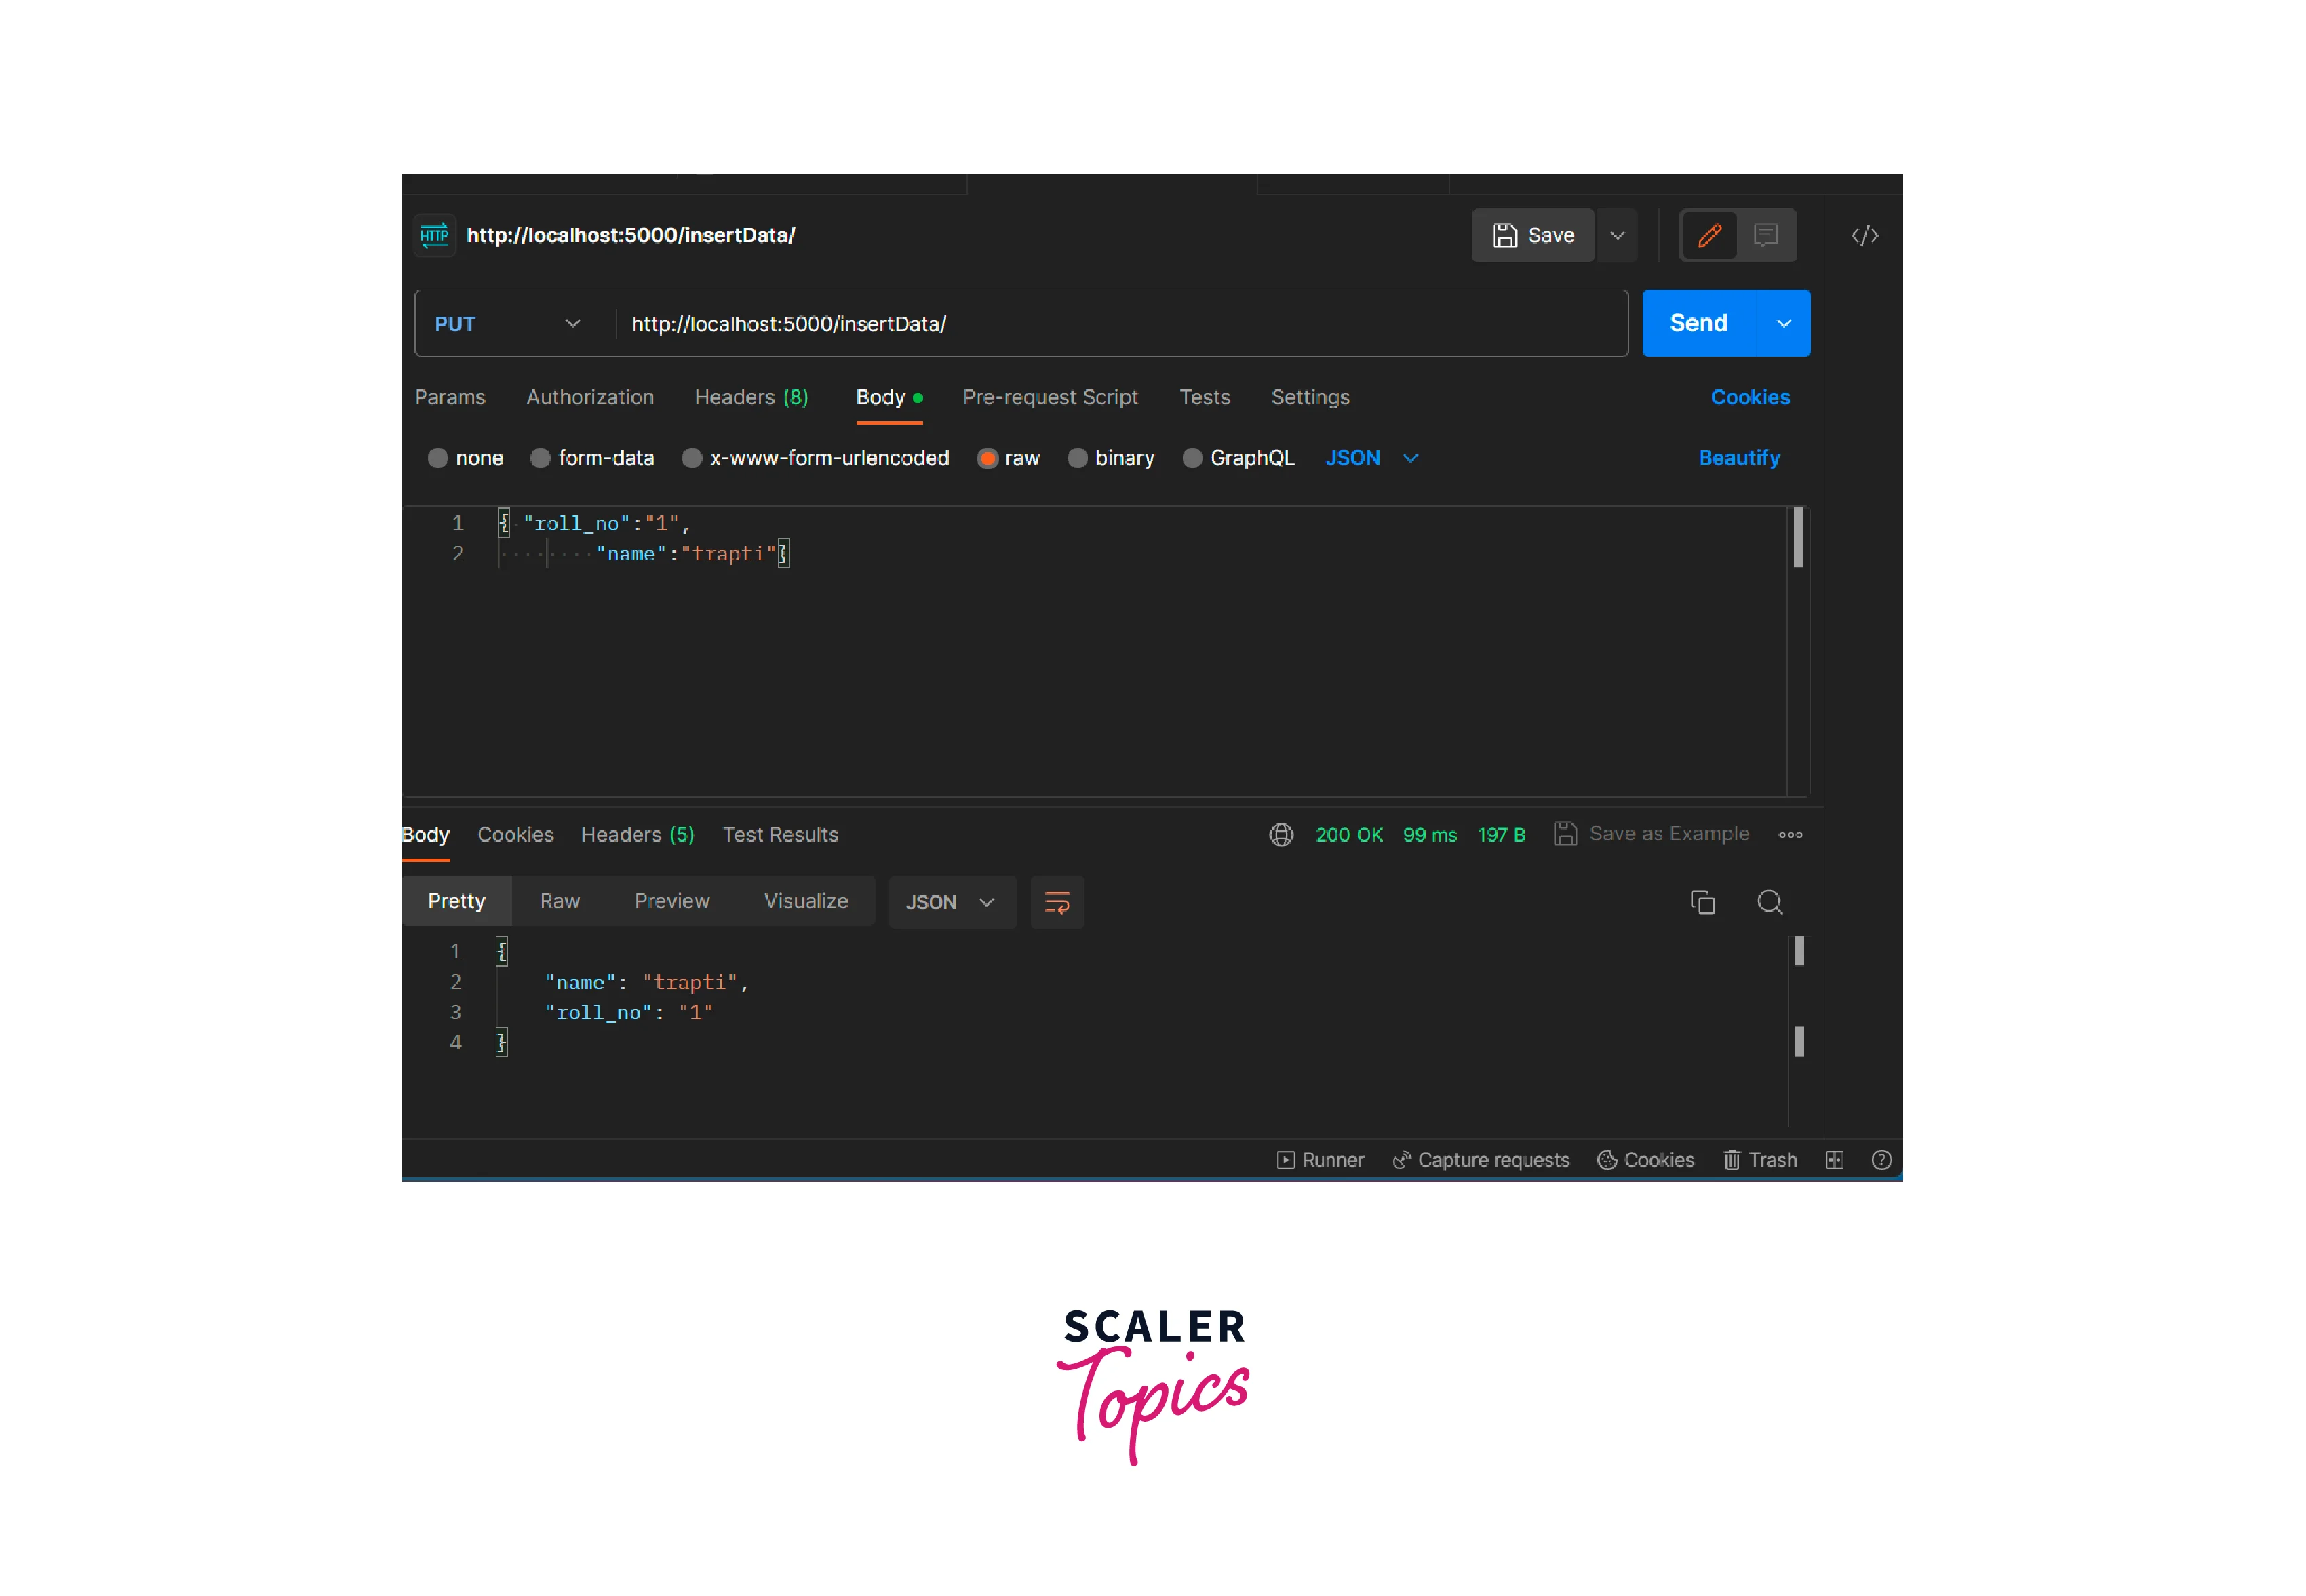
After this, data will be added to the database.
[IMAGE_4 FINISH]
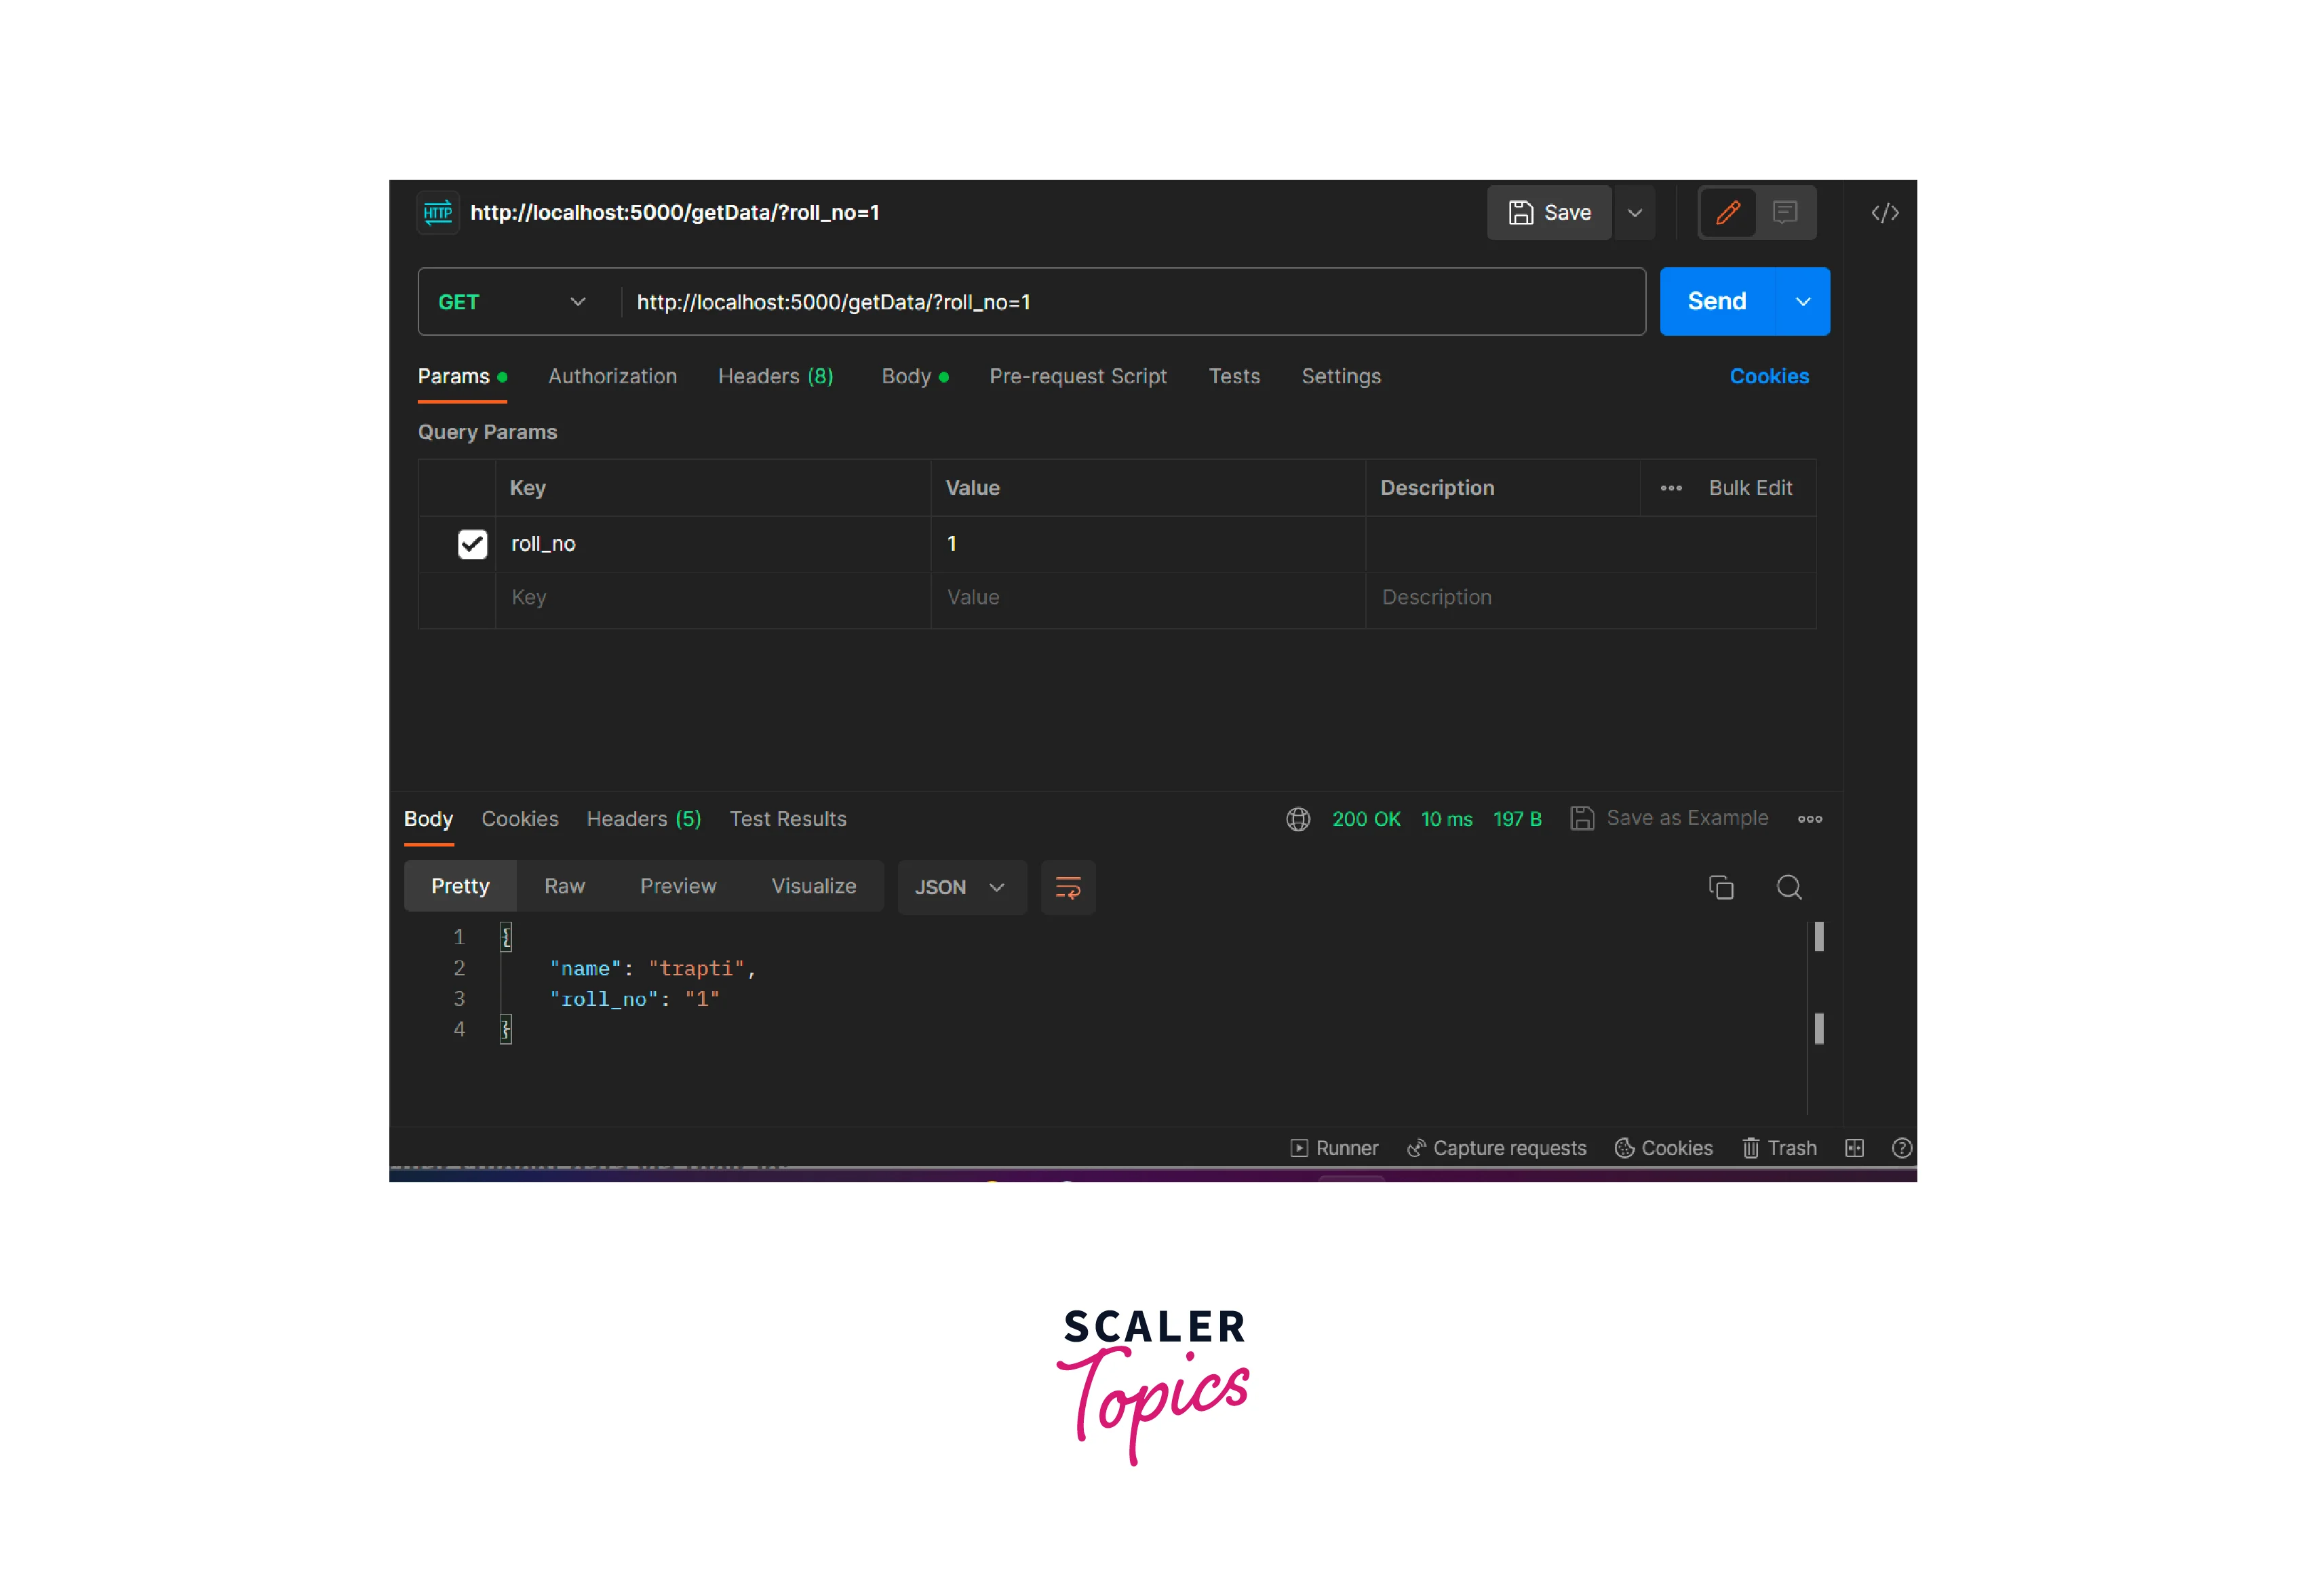
**Fetching particular student data via their id:**
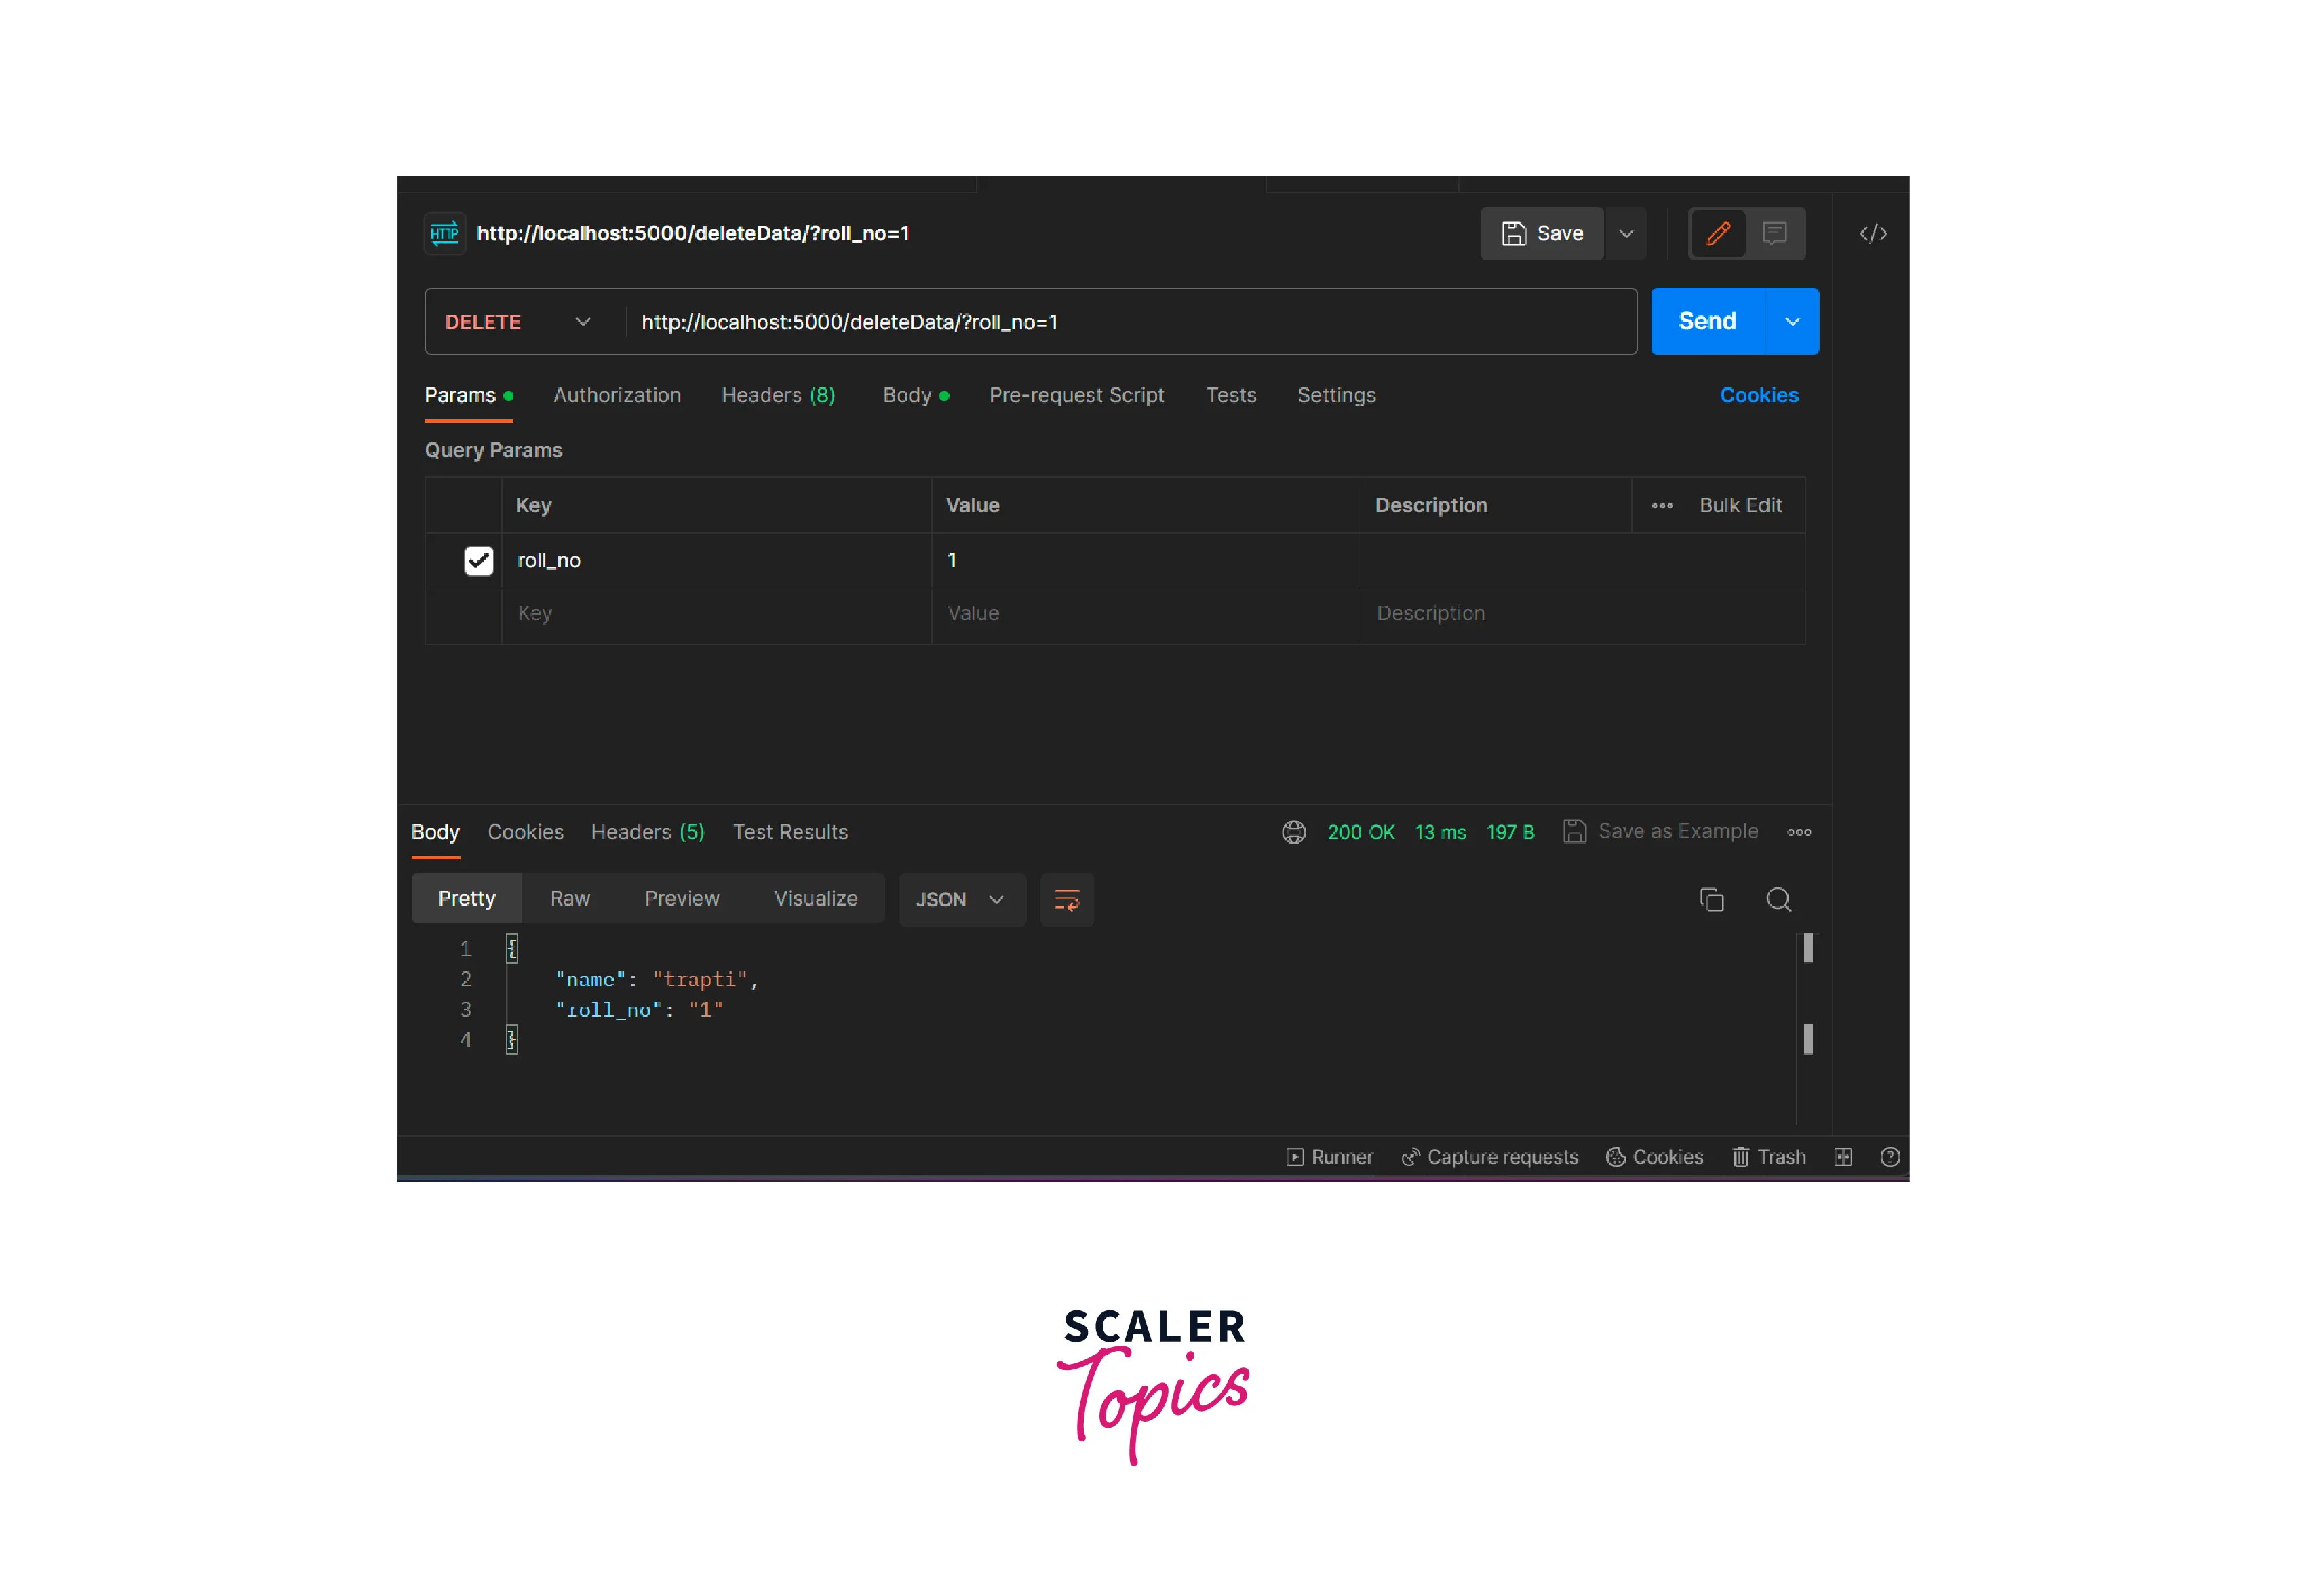
**Deleting particular student data via their id:**
:::
:::section{faq-section}
## FAQs
**Q.** How MongoDB can be installed for using Flask?
**A** MongoDB is a database that we need to download and then install. After the successful installation of MongoDB `pip install flask pymongo` command is used for using MongoDB Flask and PyMongo library.
**Q.** What is Flask?
**A.** MongoDB Flask is a lightweight framework of Python with features and tools provided for web application creation in Python Programming Language. Flask allows the faster development of applications.
:::
:::section{.summary}
## Conclusion
* MongoDB Flask is a lightweight framework of Python that gives features and tools for web application creation in Python Programming Language.
* For preventing dependency clashes, it is always recommended to perform virtual environment configuration.
* `pip install Flask pymongo` is used for installing MongoDB PyMongo Library and Flask.
* There is a lazy creation of databases and collections in MongoDB, even after the execution of the app.py file, until the creation of the first document.
* For the insertion of documents in the collection, implement `insert_one()`. And `find()` method is used to display all the saved documents.
* `delete_one()` method is used for deleting a particular document from the collection.
:::
 Sign in with Wallet
Connect another wallet
Sign in with Wallet
Connect another wallet