# Tutorial on how to build a Man in the middle awareness device
Project by Thomas Longuevergne (tl223ar)
This project aims to create a bait acces point which will collect the IP and MAC address of the connecting computers and redirect them to a « Hacking Awareness » html page.
Time to build the project : around 3 hours.
## Objective
As a Network Security student to be, I am aware and passionated about cybersecurity. So it came naturally that this project would serve a purpose I judge useful. How many people around us are connecting to a cafe’s WiFi without using a VPN ?
With this project, I hope to make people more aware about the vulnerability of their electronic life companions and give them a lead on how to protect their devices but also a part of their privacy.
## Material
| Reference | Description | Marketplace | Price |
| -------- | -------- | -------- | -------|
| 41017619 | Lopi4 starter kit with an expansion board, a USB cable, jumper cables, a breadboard, resistors, LEDs and a few sensors | electrokit.se | 949kr |
| B088LSTG9P | Bundle of 2 ESP8266 with their USB adapters | amazon.se | 92kr |
| B001C6I49U | Soldering iron starter pack with iron, station, tin and a desoldering pump | amazon.se | 126kr |
| B08973B7Z1 | A pack of tactile switches | amazon.se | 68kr |
## Computer setup
For this project, we will use the ESP8266 as our bait hotspot. Once a device connects to it, it will request the IP and MAC addresses and send them to the LoPy4 using the UART interface. Then the LoPy4 will input them in a JSON file with the time and date the device connected to our network and send it to a TIG stack running on our computer, displaying these data in a clean dashboard. Since the LoPy4 is programed in micropython, a python sublanguage for microcontrollers, for it to be easier for us we will flash the ESP8266 using the same langage and program it as an access point. Then, we will program the LoPy4 to finally setup out TIG stack.
### The ESP 8266 :
For the computer to recognize the device, we need to install the right driver. Here, our adapter uses a CH340 chip, [here](https://learn.sparkfun.com/tutorials/how-to-install-ch340-drivers/all) is a tutorial to install it correctly according to your system.
Also, even if the computer recognizes our ESP8266, we are not able yet to flash micropython.
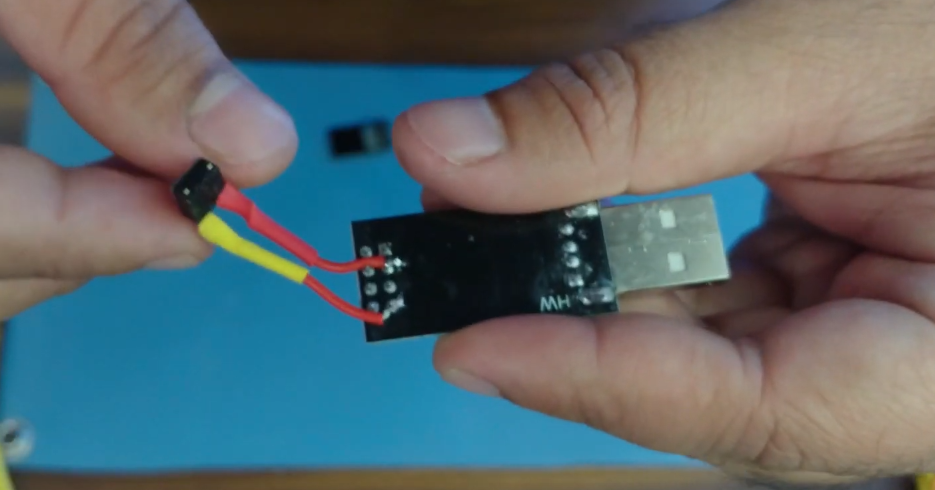
> For that, we need to solder the tactile switch on the USB adapter between the GPIO0 and the Ground pin like in the picture below, taken from [this](https://www.youtube.com/watch?v=cTfjqNFAkZ8&t=268s) video I recommand you to watch. We are soldering under the device, so the pins are reversed.
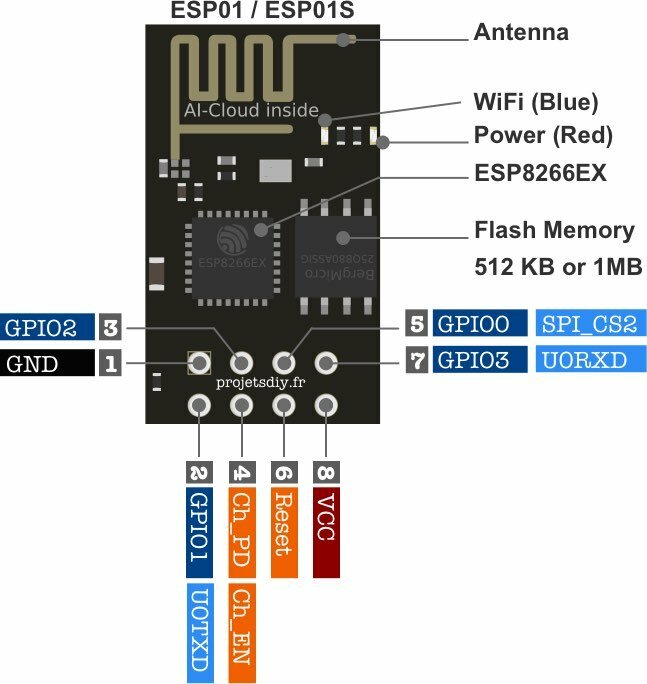
> A pinout of the ESP8266
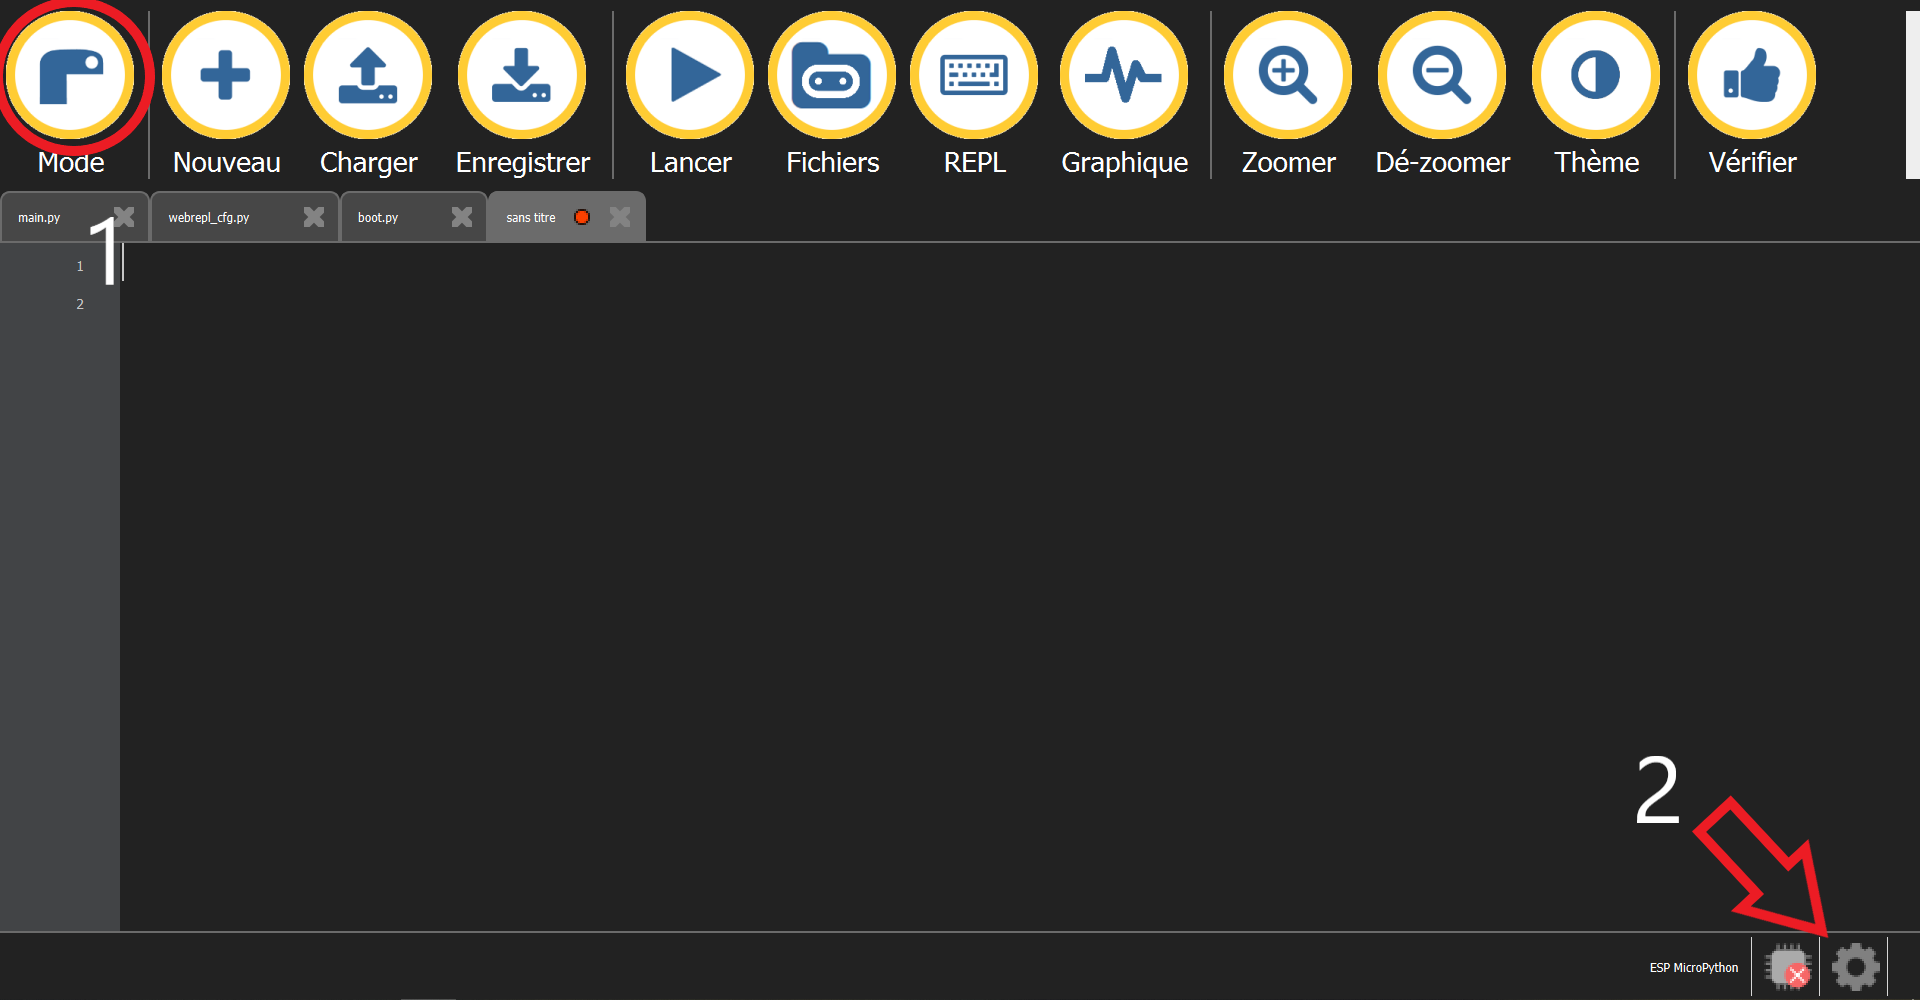
Now we can use the Mu Editor to flash and communicate with the ESP8266, dowloadable [here](https://codewith.mu/en/download). On [this page](https://micropython.org/download/esp8266/) download the latest stable version for 1Mbyte of flash. Let’s go back to Mu. Click the Mode button(1), set it up on ESP Micropython then on the gear(2)
In the window that just opened, click on browse and select the path to the micropython firmware you downloaded previously. Now we are ready to erase and flash the firmware. Connect your device while pushing the tactile switch. You might have to push it again if you see the Editor stuggling to burn the firmware, don’t be shy. Now our device is flashed in Micropython and we will be able to write our files onto it with the « File » button
### The LoPy4 :
First, we will update our LoPy’s firmware following [this documentation](https://docs.pycom.io/updatefirmware/device/)
For this microcontroller we will install Atom, the GitHub text editor. I chose this one over Vscode because it’s fully opensource and as they say, hackable. It’s purely political, but it’s the Internet I want.
So upgrade Node.JS [here](https://nodejs.org/en/Download), download Atom [there](https://atom.io). With the install submenu, Atom > Preferences > Install , let’s search for pymakr and install it.
>Now your LoPy should be recognized and you should have access to the REPL, marked by >>>.
## Putting everything together
The ESP8266 requires a voltage of maximum 3,3V. As the CH340 plays the role of a suitable electrical converter, let’s use it as a power source. As we have two different powersoures, we need to connect the two grounds for each device to «sense» each other’s voltage. More to read about it [here](http://www.thebox.myzen.co.uk/Tutorial/Power_Supplies.html).
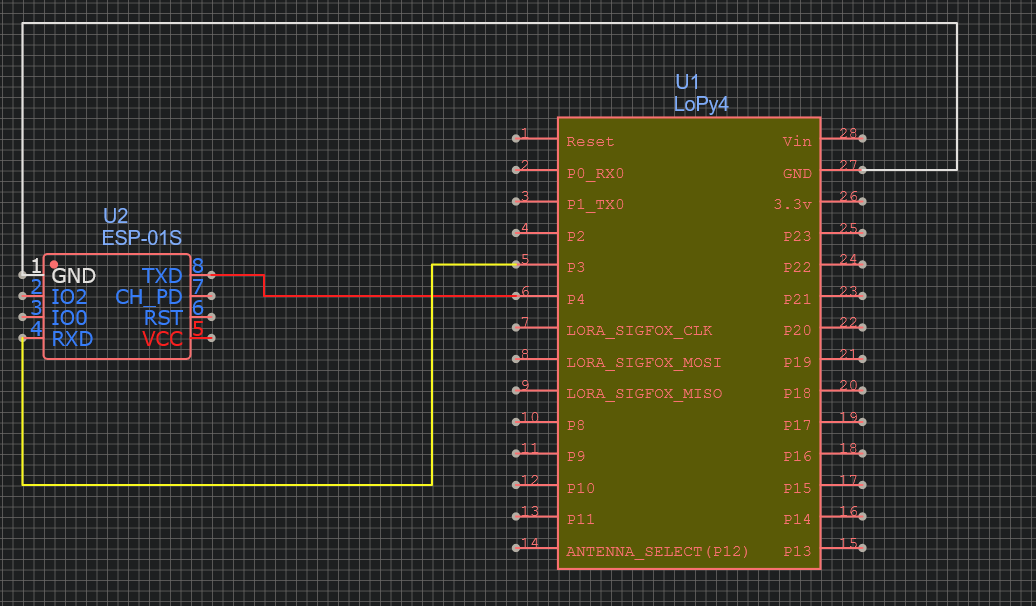
For both our devices to be able to communicate over UART, the transmission pin (Tx) of the ESP8266 needs to be connected to the reception pin (Rx) of the Lopy4and it’s reception pin to the transmission pin of the LoPy4
> On the [LoPy4 pinout](https://docs.pycom.io/gitbook/assets/lopy4-pinout.pdf) we can see that Pin3 is labeled Tx1 and Pin4 is labeled Rx1, so let’s use these.
## Platform
I know my project can feel a bit scary and intrusive. As my goal is not to traumatise the « victims », I want to be around to talk about the project and make them feel safe about what happened. I believe if it happens to be a good experience, they will be more open about security and also will talk about our interaction without shame to their surrounding, making the project a bit more impactful. This is for these reasons I chose to run the data locally in a TIG stack (standing for Telegraf-InfluxDB-Grafana).
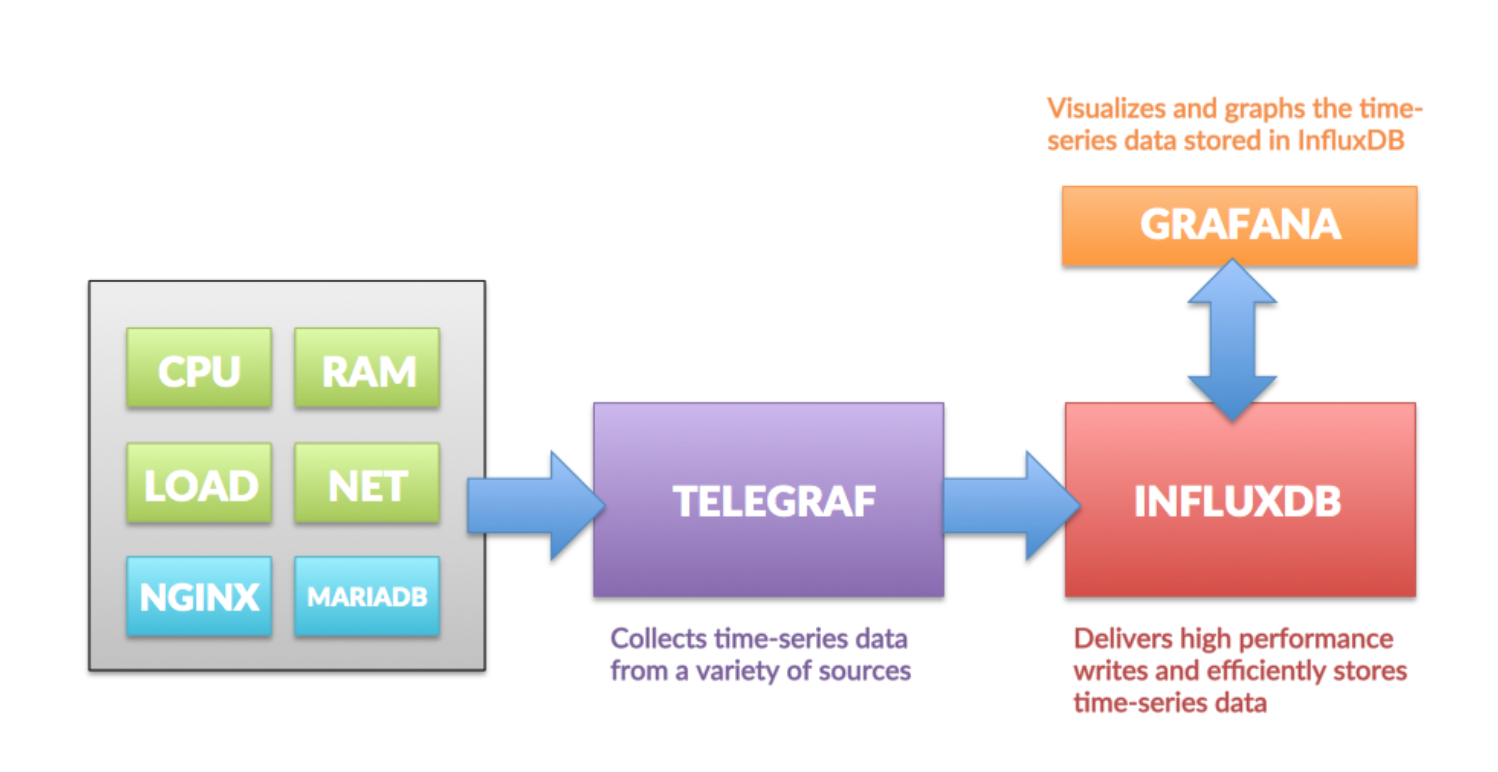
> On this image found [here](https://hackmd.io/@lnu-iot/tig-stack) we can see how these programs interact to be able to display our data.
## The Code
### The ESP8266 :
```python=
import uos, machine
import gc
import network
import webrepl
import esp
from machine import UART
try:
import usocket as socket
except:
import socket
gc.collect()
webrepl.start()
#Here we are giving the settings for our UART
uart = UART(1, 115200) # init with given baudrate
uart.init(115200, bits=8, parity=None, stop=1) # init with given parameters
#These are the access point credentials
ssid = 'ESP_AP' #Set access point name
password = '12345678' #Set your access point password
#Setting our ESP as an access point
ap = network.WLAN(network.AP_IF)
ap.active(True) #activating
ap.config(essid=ssid, password=password)
while ap.active() == False:
pass
print('Connection is successful')
print(ap.ifconfig())
#Creating the HTML where the victim will be redirected
def web_page():
html = """<html><head><meta name="viewport" content="width=device-width, initial-scale=1"></head>
<body><h1>Welcome, you've been hacked!</h1></body></html>"""
return html
s = socket.socket(socket.AF_INET, socket.SOCK_STREAM) #creating socket object
s.bind(('', 80))
s.listen(5)
while True:
conn, addr = s.accept()
#transmitting our IP through UART
uart.write(addr)
```
### The LoPy4 :
As I am new to programming, the TA Mohammad Qasem helped me writing this code :
```python
#making a function to check if the data received is an IP
def checkip(ip):
iparr = ip.split('.')
print("iparr",iparr)
if len(iparr) == 4:
for i,x in enumerate(iparr):
if(len(x) > 3 or not x.isdigit()):
return False
try:
num = int(x)
if num > 255 or num < 0:
return False
except:
return False
return True
return False
uart = UART(1, 115200) # init with given baudrate
uart.init(115200, bits=8, parity=None, stop=1) # init with given parameters
while True:
count = uart.any()
if(count > 0):
print("somehing is recieved") # uart 1
message = uart.readline() # uart 1
ipCheck = checkip(ip)
if ipCheck
print("we send to mqtt here")
```
## Transmitting the data
Because we don’t need extreme precision for these data, it will be sent every minute. I am using WiFi as a protocol, since I will manually activate the AP in different places where WiFi will be available.
Since I am using TIG stack, MQTT was the right protocol to use.
>To set it up, let's follow [this tutorial](https://hackmd.io/@lnu-iot/tig-stack).
## Finalizing the design
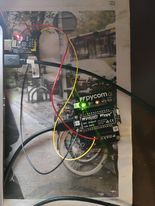
> Here is the device
The project was difficult for me. As a newcomer in programming, I was not mastering the language and had to learn everything at the same time. In the end I didn’t find a way to get the MAC address from the connecting device and I don’t really understand why my LoPy is not always sending the data. I really want to improve the project after fixing these two elements. Here are some ideas :
- To print a case for it
- To be able to control the MiMA from an interface (Acces Point credentials and to connect to a WiFi network).
- Using the credentials entered by the connecting computer to connect to the chosen WiFi AP.
- To be able to switch between different modes (Awareness, honeypot and why not Giant robot)
 Sign in with Wallet
Connect another wallet
Sign in with Wallet
Connect another wallet