# SwarmPAL Development Guide
This is a guide for working with the code which lives at https://github.com/Swarm-DISC/SwarmPAL.
:::success
**To try SwarmPAL in the cloud:**
Temporary demo tool: https://github.com/smithara/swarmpal-demo
Launch with [](https://mybinder.org/v2/gh/smithara/swarmpal-demo/HEAD) for an ephemeral environment
Or [](https://vre.vires.services/hub/user-redirect/git-pull?repo=https%3A%2F%2Fgithub.com%2Fsmithara%2Fswarmpal-demo&urlpath=lab%2Ftree%2Fswarmpal-demo%2FREADME.ipynb&branch=main) to launch in the ESA Swarm Virtual Research Environment
:::
---
> *Background*
> The repository was set up using a template for a modern Python package, https://github.com/scikit-hep/cookie, which provides some tools for automation and improving code quality. The purpose of this page is to explain how to create a development environment, how to work on the code, and how to push changes to the repository for review.
## Getting started
### Make a local copy of the repository
1. Clone the repository:
```
git clone https://github.com/Swarm-DISC/SwarmPAL
```
or
```
git clone git@github.com:Swarm-DISC/SwarmPAL.git
```
2. Create your own development branch based on `staging`
```
cd SwarmPAL
git checkout staging
git checkout -b <new_branch>
```
(replace `<new_branch>` with a name describing what you will add, for example: `tfa-initial`)
### Option A, Using conda/mamba
We will create a new conda environment named `swarmpal` that contains everything you need to work on the package.
:::info
[mamba](https://mamba.readthedocs.io) is a replacement for conda. You can replace `mamba` with `conda` in the instructions below if you do not have mamba. However, I recommend removing miniconda/Anaconda and instead installing miniforge or micromamba following the mamba documentation. (yes, it's confusing!)
:::
1. Create development environment:
```
mamba env create --file environment.yml --name swarmpal
mamba activate swarmpal
```
:::info
You can edit `environment.yml` as you wish (just don't commit the changes). Using conda/mamba makes it easy to tear down and recreate the development environment when needed. To remove the environment and start again:
```
mamba activate base
mamba env remove --name swarmpal
```
:::
:::warning
If on Windows there could be a problem installing apexpy (and so the above step fails). apexpy is only required for the DSECS toolbox, so you can skip it by editing `environment.yml` as follows:
- remove the line containing `apexpy`
- change the last line from:
`- -e .[test,dev,docs,dsecs]`
to:
`- -e .[test,dev,docs]`
:::
2. Set the VirES access token if you have not already (it will be stored in your home directory and is not tied to any particular conda environment). Go to https://vires.services/accounts/tokens/ to generate a token, and use the command line tool to set it:
```
viresclient set_token https://vires.services/ows
viresclient set_default_server https://vires.services/ows
```
[(read more)](https://viresclient.readthedocs.io/en/latest/config_details.html#configuration-via-cli)
3. Start coding...
a. Use your preferred editor/IDE. Just make sure to point it to the conda environment
:::warning
There are still some problems with acquiring a working version of apexpy, which is required for the DSECS part of the toolbox. If you are on Linux, you can use some prebuilt binaries at https://github.com/smithara/apexpy/releases/tag/v2.0.1-binaries, e.g. for Linux & Python 3.10:
```
pip uninstall apexpy
pip install https://github.com/smithara/apexpy/releases/download/v2.0.1-binaries/apexpy-2.0.1-cp310-cp310-manylinux_2_17_x86_64.manylinux2014_x86_64.whl
```
The package can be installed without the apexpy dependency if you are not working on the DSECS code (i.e. omit `[dsecs]` from `pip install -e .[dev,dsecs]`: so just do `pip install -e[.dev]`). See the caveat below [Testing](#Testing) if you are omitting apexpy
:::
The environment file also installs the `swarmpal` package itself in editable mode with `pip install -e` (i.e. linked to the files within the repository you have just cloned). Just edit those files and the changes will already be available when you `import swarmpal` from within that environment. You do not need to edit `PYTHONPATH`.
:::info
**Jupyter usage**
**Option A:** You may install jupyterlab into the swarmpal conda environment:
```
mamba install -n swarmpal jupyterlab
mamba run -n swarmpal jupyter-lab
```
**Option B:** Manage jupyterlab from a separate conda environment
1. Create an environment containing jupyterlab, e.g.:
```
mamba create --name jlab python=3.11 jupyterlab=4 nb_conda_kernels jupyterlab-git jupyterlab-lsp jupyter-lsp-python jupyter-resource-usage
```
2. Configure the swarmpal environment jupyter kernel (probably only necessary if using micromamba):
```
mamba run -n swarmpal python -m ipykernel install --user --name swarmpal
```
3. Run jupyter-lab from the `jlab` environment (and you should see the `swarmpal` kernel available):
```
mamba run -n jlab jupyter-lab
```
Note that `nb_conda_kernels` must be present in the `jlab` environment, and `ipykernel` must be present in the `swarmpal` environment
---
Make a notebook like `scratchpad.ipynb` where you can test ideas (don't commit this), and add this to the top to make module code reload automatically:
```
%load_ext autoreload
%autoreload 2
```
(so you don't always need to restart the notebook kernel each time you change files in swarmpal)
:::
### Option B, requiring outside dependencies
We recommend using conda/mamba because some packages have non-Python dependencies which can be tricky to install (and the conda-forge packages make that easy). However, it should also be possible to work without conda if you first set up the prerequisites for those. You should still be working in a virtual environment for development.
Then from within `SwarmPAL`:
```
pip install -e .[dev]
```
(this installs the package in editable mode along with the the `dev` requirements as specified in `pyproject.toml`)
### Working on the code
Here are some guidelines, but don't worry about following it entirely. Your code will pass through a review during the *Pull Request*, and that is where we will make any fixes to the style.
For now:
- Follow the [numpydoc](https://numpydoc.readthedocs.io/en/latest/format.html) style for docstrings
- See the section below about [Testing](#Testing) to run the tests
- Use the ruff (there's a vscode extension) linter
- or if it's hard to get in your IDE, flake8 or any other linter will help
Optional (ignore this for now):
- If you want to run the tests independent of your environment (defined in`noxfile.py`), run `nox -s tests`. *I'm still figuring this out with conda environments*
- Code style and other fixes are run using `pre-commit`. These can be run before committing with: `pre-commit run -a` which will report errors and automatically fix some code. If this is causing too much difficulty, don't worry about using it. You can still push changes to your development branch and we can fix them in the review before merging them into `staging`.
- If pre-commit fails because of a broken package, the hooks can be updated with: `pre-commit autoupdate`
### Using git
Summary: make a branch from `staging`, add your work to that branch and push it. Open a PR to `staging`, at which point the automated testing will kick in and we can make a review, tidying things up before merging it in.
Write your GitHub handle to ashley.smith@ed.ac.uk if you do not already have write access to the repository.
The [SwarmPAL Network Graph on GitHub](https://github.com/Swarm-DISC/SwarmPAL/network) is a good way to visualise the branches.
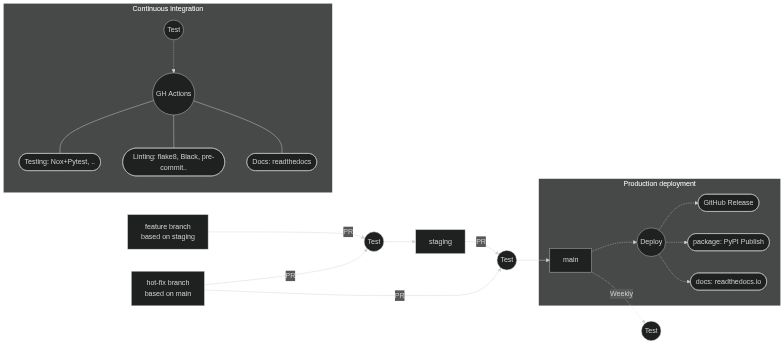
#### Git branching and CI strategy
Four branch types:
- `main`: consider as the "published" version, where packages are released from after a manual review is made
- `staging`: where features are accumulated and tested
- features: temporary branches to experiment with new features that are then merged into `staging`
- Any (authorised) developers can create feature branches and push them to the repo. We open a PR when nearly ready, which triggers the automated tests and the maintainer (i.e. Ashley) can review it and make the merge. Further changes can be made by simply pushing new commits to that branch
- hotfixes: used to quickly fix critical issues that occur in `main`. This is useful where features have already accumulated in `staging` which we are not yet ready to deploy to `main` (they may not be stable or documented yet).
[](https://mermaid.live/edit/#pako:eNptkk1r4zAQhv_KoMNis3bOi1kK3bgkgbJrUsMe7BxkaxKLWJKRZKhp-t93FCfpx9YHfcy8M3r1WC-sNQJZxg6WDx08bmtd6z1yP1qsLjM0luu2-9nYu4Y7FGA0OM8PUh92kKZ3p2J7gtJFUYnOx3EIXfOh22X5plQflIrLIBqb2UFhjRhbL-kMgUNvJoXa1xroC0pIF1STU4v8nI3jOZerObNab6NqJf16bGCLPZLfXQzfoNgUUTXw9sgPmEExFRsoxqaXrtt96pD_WUaVMK3LwCIXvsOwWUgThKhFuFJn_F4-VzSlNH_FJ3h9B0eRhdLV-naF01_EYz9Rqr3SqN9jWBrtpR7N6EBqjxQMSGan5cNT-YaQmq3W91G0WsP9mZu7MqEwOUhhuQnaqAoj_YgMfpvn78XkaZvAYrH7T_5IR0ZVGM_yfc-P-COBXz3xS2CwmLZGKem_qs0JVlTln_nd4LGEKbTEQdCjewnVNSONwppltBTcHmtW61fSjYPgHh-E9MaybM97hwnjozdPk25vgVmVS06M1CX6-g-Fve1p)
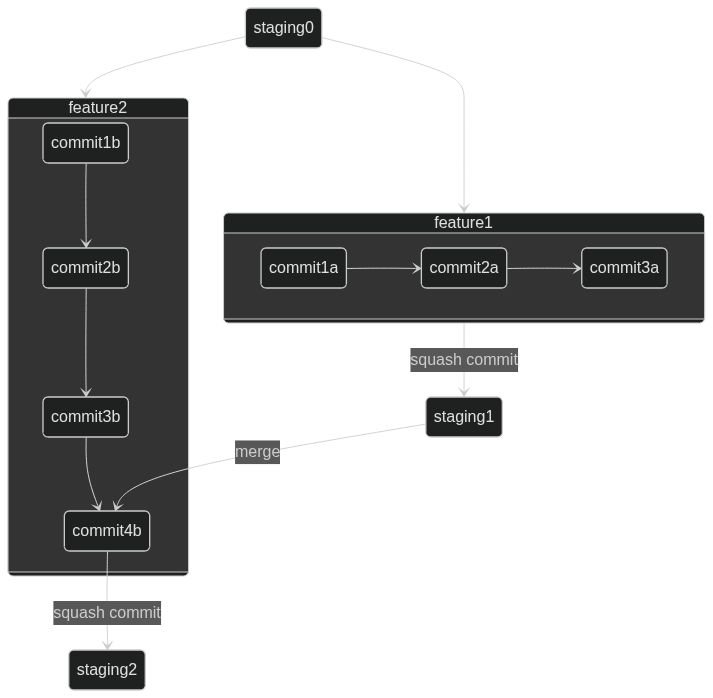
#### Process for adding features
- Create feature branches from `staging` (naming strategy? e.g.`feat-XYZ`)
- Make atomic commits to the branch to add the functionality
- Open a PR to request the merge of the feature branch to `staging`
- commits will be squashed into one commit to `staging`
- A second concurrent feature branch will be handled the same, but merge conflicts will have to be dealt with
- Can be done by merging in changes from `staging` to `feature` as shown here
[](https://mermaid.live/edit#pako:eNqNUsFOxCAQ_RUy521iqScOnvTmSa9cZstslyhU6WBiNv132S2trGjinOC9Ny9vBk7Qj4ZAwcTIdG9xCOiaD6m9SJXAwfrhRjTNnTgQcgzUbhTThonTgp7L2EA929GLx6dvtB-ds9zixWq5SPxJy5LuKnpF5r_TyV_SyX-n25fp9lW6ku4quivp24pekRx-29y5J0_SKjG9R5yOueVqzPbKXQlHYaBFsYKll6y8tIcdpC6H1qQHv-xEAx_JkQaVjgbDiwbt56SLbyZt8MFYHgOoA75OtAOMPD5_-h4Uh0irKH-arJq_AADmuLI)
## Initial notes about dependencies
- SpacePy (has messy dependencies) - **might be fixed with latest version?**
- We might want this in order to access IRBEM (through https://spacepy.github.io/irbempy.html): get_Lm, get_Lstar
- Investigate if there is an alternative Python interface out there
- Could be possible to do it on the server instead, as auxiliaries
- The installer doesn't have configurations for optional dependencies? - so we need to pip install with `--no-deps` to skip some? (and configure the needed dependencies under swarmx instead?)
- According to https://spacepy.github.io/dependencies.html#soft-dependency-summary we need to add fortran-compiler but only under Linux (as they distribute Windows binaries directly)
- What ramifications will this have for maintenance (the spacepy update cycle is slow)
---
## Adding a module
...TODO...
## Testing
...TODO...
Write tests in `./tests/` to run with pytest...
To exclude the DSECS code (i.e. if you do not have a working apexpy), run:
`pytest -m "not dsecs"`
### Handling tests and input data
- VirES only provides the most recent baselines of data (check the `Sources` attribute in returned data)
- Use stored test data instead to test consistent behaviour of functions
- Maybe we should set up an automated notebook-based report to give visual & quantitative feedback, to store as a document to refer back to after data versions change
- Remember that underlying numpy/scipy can change over time & implementations of functions don't always return exactly the same results (e.g. also across platforms). Where relevant, only test matches to a certain tolerance (e.g. `numpy.allclose`, `scikit-validate` etc)
## Documentation
Firstly, just focus on writing good docstrings following the [numpydoc style](https://numpydoc.readthedocs.io/en/latest/format.html). More details will follow below about how to contribute directly to the documentation, but you can also send any free-form text, demonstration text to Ashley to be added.
### Building the documentation
- These are built use sphinx, and pages can be written as [.md (MyST)](https://myst-parser.readthedocs.io/en/latest/syntax/typography.html) or .ipynb (which are automatically executed each time the docs are built using [myst-nb](https://myst-nb.readthedocs.io/en/latest/index.html))
- To build locally:
- `sphinx-autobuild docs docs/_build/html`
(it will take some time to automatically execute and cache the notebooks, then rebuilds the documentation every time a change is detected)
- Parallel option: `sphinx-autobuild -j 2 docs docs/_build/html`
(this executes two notebooks in parallel, but doesn't show its progress - seems to require re-executing notebooks when you rerun the command)
- *Skip execution of notebooks:*
`sphinx-autobuild -D nb_execution_mode=off docs docs/_build/html`
- Or from within `./docs`:
```
make clean
make html
```
and open the file `./docs/build/html/index.html` in a browser
- Or using nox instead (isolated environment): `nox -s docs -- serve`
### Making the documentation nice to use
Try to follow https://diataxis.fr/ / https://documentation.divio.com/ - the four parts (and therefore tasks to work on) of documentation might be:
1. reference: mostly just what is built from docstrings, i.e. API auto-described
2. explanation: a page for each part of the toolbox, mostly prose
3. how-to guides: shows specific tasks - could be written as notebooks
4. tutorial: probably better as separate project
parts 3/4: TBD what should be part of SwarmPAL repo and docs and what should be separate Jupyter Book or part of existing Swarm_notebooks
---
More details to follow, https://scikit-hep.org/developer/style
 Sign in with Wallet
Connect another wallet
Sign in with Wallet
Connect another wallet