---
title: "从0-1:如何构建一个基于知识图谱的智能问答助手?"
date: 2021-12-30T14:04:31+08:00
draft: false
lightgallery: true
tags: ["Nebula Graph", "图数据库", "智能问答", "语音助手", "KBQA"]
categories: ["Nebula Graph", "Mini Project"]
description: "如何利用图数据库从0-1构建一个特定领域问答助手?本文手把手带你构建一个简易版的篮球领域智能问答机器人。"
featuredImage: "featured-image.webp"
featuredImagePreview: "featured-image.webp"
---
> 如何利用图数据库从0-1构建一个特定领域问答助手?本文手把手带你构建一个简易版的篮球领域智能问答机器人。
<!--more-->
## 前言
「问答机器人」在我们日常生活中并不少见到 :像是一些电商客服、智能问诊、技术支持等人工输入与沟通界面的场景下,机器人“智能”问答系统一定程度上可以在无需人力、不需要耗费终端用户心智去做知识库、商品搜索、科室选择等等的情况下实时给出问题答案。
问答机器人系统背后的技术有多重可能:
- 基于检索,全文搜索接近的问题
- 基于[机器学习阅读理解](https://arxiv.org/abs/1710.10723)
- 基于知识图谱(Knowledge-Based Question Answering system: KBQA)
- 其他
基于知识图谱构建问答系统在以下三个情况下很有优势:
- 对于领域类型是结构化数据场景:电商、医药、系统运维(微服务、服务器、事件)、产品支持系统等,其中作为问答系统的参考对象已经是结构化数据;
- 问题的解答过程涉及多跳查询,比如“姚明的妻子今年是本命年吗?”,“你们家的产品 A 和 A+ 的区别是什么?”;
- 为了解决其他需求(风控、推荐、管理),已经构建了图结构数据、知识图谱的情况。
为了方便读者最快速了解如何构建 KBQA 系统,我写了非常简陋的小 KBQA 项目,在本文中,我会带领大家从头到尾把它搭起来。
> 💡:这个小项目叫做 Siwi,它的代码就在 GitHub 上:[github.com/wey-gu/nebula-siwi](https://github.com/wey-gu/nebula-siwi/)
>
> Siwi 的发音是:`/ˈsɪwi/` 或者叫:`思二为` ,它是一个能解答 NBA 相关问题的机器人。
我们开始吧。
## 鸟瞰 TL;DR
KBQA 用一句话说就是把问题解析、转换成在知识图谱中的查询,查询得到结果之后进行筛选、翻译成结果(句子、卡片或者任何方便人理解的答案格式)。
> 💡:知识图谱的构建实际上是非常重要的过程,在本文中,我们专注在串起来 KBQA 系统的骨架,我们假设需求是基于一个已经有的图谱之上,为其增加一个 QA 系统。
「问题到图谱查询的转换」有不同的方法可以实现。
- 可以是对语义进行分析:理解问题的意图,针对不同意图匹配最可能的问题类型,从而构建这个类型问题的图谱查询,查得结果;
- 也可以是基于信息的抽取:从问题中抽取主要的实体,在图谱中获取实体的所有知识、关系条目(子图),再对结果根据问题中的约束条件匹配、排序选择结果。
> 💡:美团技术团队在[这篇文章](https://tech.meituan.com/2021/11/03/knowledge-based-question-answering-in-meituan.html)里分享了他们的真实世界实践,下图是美团结合了机器学习和 NLP 的方案。

而在 Siwi 里,我们一切从简,单独选择了语义分析这条路,它的特点是需要人为去标注或者编码一些问题类型的查询方式,但实际上在大多数场景下,尤其单一领域图谱的场景下反而是轻量却效果不差的方案,也是一个便于新手理解 KBQA 的合适的入门方式。
除了核心的问答部分,我还为 Siwi 增加了语音识别和语音回答(感谢浏览器接口标准的发展)的功能,于是,这个项目的结构和问答调用流程就是这样的了:一个语音问题自上而下分别经过三个部分:
- 基于网页的 Siwi Frontend 语音、文字问答界面
- Python Flask 实现的 Siwi Backend/API 系统
- [Nebula Graph](https://nebula-graph.com.cn) 开源分布式高性能图数据库之上的知识图谱
```asciiarmor
┌────────────────┬──────────────────────────────────────┐
│ │ │
│ │ Speech │
│ ┌──────────▼──────────┐ │
│ │ Frontend │ Siwi, /ˈsɪwi/ │
│ │ Web_Speech_API │ A PoC of │
│ │ │ Dialog System │
│ │ Vue.JS │ With Graph Database │
│ │ │ Backed Knowledge Graph │
│ └──────────┬──────────┘ │
│ │ Sentence │
│ ┌────────────┼──────────────────────────────┐ │
│ │ │ Backend │ │
│ │ ┌──────────▼──────────┐ │ │
│ │ │ Web API, Flask │ ./app/ │ │
│ │ └──────────┬──────────┘ │ │
│ │ │ Sentence ./bot/ │ │
│ │ ┌──────────▼──────────┐ │ │
│ │ │ Intent matching, │ ./bot/classifier│ │
│ │ │ Symentic Processing │ │ │
│ │ └──────────┬──────────┘ │ │
│ │ │ Intent, Entities │ │
│ │ ┌──────────▼──────────┐ │ │
│ │ │ Intent Actor │ ./bot/actions │ │
│ └─┴──────────┬──────────┴───────────────────┘ │
│ │ Graph Query │
│ ┌──────────▼──────────┐ │
│ │ Graph Database │ Nebula Graph │
│ └─────────────────────┘ │
└───────────────────────────────────────────────────────┘
```
> 💡:图数据库相比于其他知识图谱存储系统来说,因为其设计专注于数据内的数据关系,非常擅长实时获取海量数据下实体之间的复杂关联关系。
>
> Nebula Graph 的原生分布式设计和 share-nothing 架构使得它擅长于巨大数据量和高并发读写的场景,加上它的开源社区特别活跃,已经被国内很多团队用于支撑生产上的各种业务,[这里](https://nebula-graph.com.cn/cases/)有一些他们分享的选型、落地实践。
## 知识图谱
Siwi 构建于一个篮球相关的知识图谱之上,它其实是 Siwi 采用的开源分布式图数据库 [Nebula Graph](http://nebula-graph.com.cn/) 社区的官方文档里的示例[数据集](https://docs.nebula-graph.com.cn/master/3.ngql-guide/1.nGQL-overview/1.overview/#basketballplayer)。
在这个非常简单的图谱之中,只有两种点:
- player,球员
- team,球队
两种关系:
- serve 服役于(比如:姚明 `-服役于->` 休斯顿火箭)
- follow 关注 (比如:姚明 `-关注->` 奥尼尔)
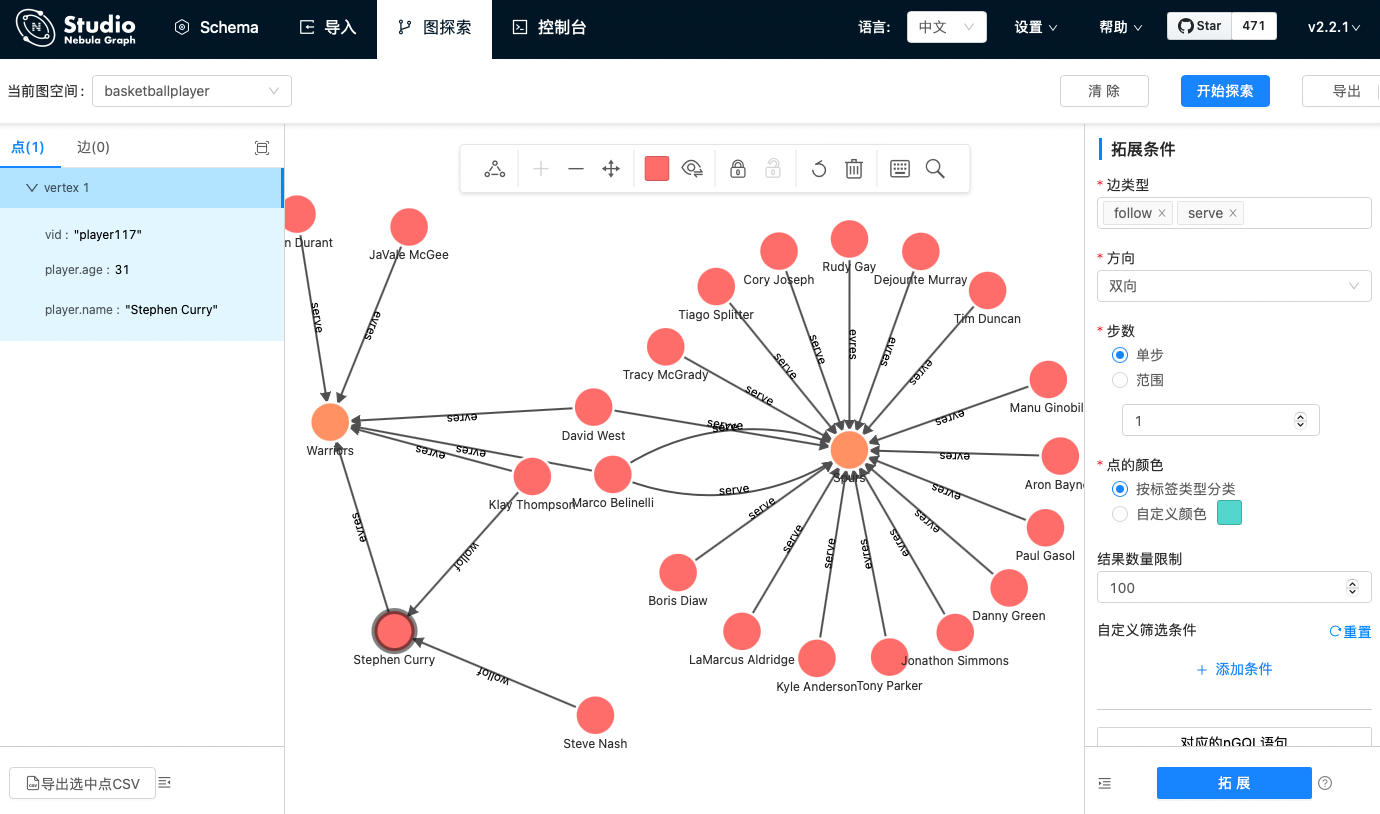
> 💡:这个数据集在 Nebula 社区上有一个 [在线体验](https://nebula-graph.com.cn/demo/) 环境,任何人都无需登录,通过[Nebula Graph Studio](https://docs.nebula-graph.com.cn/2.6.1/nebula-studio/about-studio/st-ug-what-is-graph-studio/) 可视化探索篮球图谱。
下图就是这个图谱的可视化探索截图,可以看到左边的中心节点勇士队(Warriors)有杜兰特(Durant)还有其他几个队员在其中服役(serve);除了服役之外,还可以看到队员和队员之中也有关注(follow)的关系存在。
有了这个知识图谱,咱们接下来就在它之上搭一个简单的基于语法解析的 QA 系统吧😁。
## Siwi-backend
```asciiarmor
┌────────────┼──────────────────────────────┐
│ │ Backend │
│ ┌──────────▼──────────┐ │
│ │ Web API, Flask │ ./app/ │
│ └──────────┬──────────┘ │
│ │ Sentence ./bot/ │
│ ┌──────────▼──────────┐ │
│ │ Intent matching, │ ./bot/classifier│
│ │ Symentic Processing │ │
│ └──────────┬──────────┘ │
│ │ Intent, Entities │
│ ┌──────────▼──────────┐ │
│ │ Intent Actor │ ./bot/actions │
└─┴──────────┬──────────┴───────────────────┘
│ Graph Query
┌──────────▼──────────┐
│ Graph Database │ Nebula Graph
└─────────────────────┘
```
如上图的设计流程,Siwi 的后端部分需要接收问句,处理之后访问知识图谱(图数据库),然后将处理结果返回给用户。
### 接收 HTTP 请求(app)
对于请求,就简单地用 Flask 作为 web server 来接收 HTTP 的 POST 请求:
> 💡:还不熟悉 Flask 的同学,可以在 [freeCodeCamp 上搜索一下](https://www.freecodecamp.org/news/tag/flask/),有一些不错的课程哈。
下边的代码就是告诉 Flask :
1. 如果用户发过来 `http://<server>/query` 的 POST 请求,提的问题就在请求的 body 里的 `question` 的 Key 之下。
2. 取得问题之后,调用把请求传给 `siwi_bot` 的 `query()`,得到 `answer` 。
代码段:`src/siwi/app/__init__.py`
```python
#...
from siwi.bot import bot
#...
@app.route("/query", methods=["POST"])
def query():
request_data = request.get_json()
question = request_data.get("question", "") # <----- 1.
if question:
answer = siwi_bot.query(
request_data.get("question", "")) # <----- 2.
else:
answer = "Sorry, what did you say?"
return jsonify({"answer": answer})
```
接下来我们来实现 `siwi_bot`,真正处理提问的逻辑。
### 处理请求(bot)
```asciiarmor
│ │ Sentence ./bot/ │
│ ┌──────────▼──────────┐ │
│ │ Intent matching, │ ./bot/classifier│
│ │ Symentic Processing │ │
│ └──────────┬──────────┘ │
│ │ Intent, Entities │
│ ┌──────────▼──────────┐ │
│ │ Intent Actor │ ./bot/actions │
└─┴──────────┬──────────┴───────────────────┘
```
前边提到过,KBQA 基本上是
a. 把问题解析、转换成在知识图谱中的查询
b. 查询得到结果之后进行筛选、翻译成结果
这里,我们把 a. 的逻辑放在 `classifier` 里,b. 的逻辑放在 `actions`(actor) 里。
a. HTTP 请求的问题句子 `sentence` 传过来,用 `classifier` 解析它的意图和句子实体
b. 用意图和句子实体构造 `action`,并链接图数据库执行,获取结果。
代码段:`src/siwi/bot/bot/__init__.py`
```python
from siwi.bot.actions import SiwiActions
from siwi.bot.classifier import SiwiClassifier
class SiwiBot():
def __init__(self, connection_pool) -> None:
self.classifier = SiwiClassifier()
self.actions = SiwiActions()
self.connection_pool = connection_pool
def query(self, sentence):
intent = self.classifier.get(sentence) # <--- a.
action = self.actions.get(intent) # <--- b.
return action.execute(self.connection_pool)
```
首先咱们来进一步实现一下 `SiwiClassifier` 吧。
#### 语义解析(classifier)
`classifier ` 需要在 `get(sentence)` 方法里将句子中的实体和句子的意图解析、分类出来。通常来说,这里是需要借助机器学习、NLP去分词、分类实现的,这里只是为了展示这个过程实际上只是各种 `if/ else`。
我们这里实现了三类意图的问题:
- 关系(A,B):获得 A 和 B 在图谱中的关系路径,比如姚明和湖人队的关系是?
- 服役情况:比如乔纳森在哪里服役?
- 关注情况:比如邓肯关注了谁?
> ❓ 开放问题:
>
> 如果看教程的你觉得这几个问题太没意思了,这里留一个开放问题,你可以在 Siwi li 帮我们实现:「共同好友(A,B)获得 A 和 B 的一度共同好友」这个意图(或者更酷的其他句子)么?欢迎来 Github:github.com/wey-gu/nebula-siwi/ 提 PR 哦,看看谁先实现。
代码片段:`src/siwi/bot/classfier/__init__.py`
```python
class SiwiClassifier():
def get(self, sentence: str) -> dict:
"""
Classify Sentences and Fill Slots.
This should be done by NLP, here we fake one to demostrate
the intent Actor --> Graph DB work flow.
sentense:
relation:
- What is the relationship between Yao Ming and Lakers?
- How does Tracy McGrady and Lakers connected?
serving:
- Which team had Jonathon Simmons served?
friendship:
- Whom does Tim Duncan follow?
- Who are Tracy McGrady's friends?
returns:
{
"entities": entities,
"intents": intents
}
"""
entities = self.get_matched_entities(sentence)
intents = self.get_matched_intents(sentence)
return {
"entities": entities,
"intents": intents
}
```
这里,我把匹配的规则(等价于 if else...)写在了 `src/siwi/bot/test/data` 之下的 YAML 文件里,这样增加 `classifier` 之中新的规则只需要更新这个文件就可以了:
##### 意图识别(intent)
```python
def load_entity_data(self) -> None:
# load data from yaml files
module_path = f"{ siwi.__path__[0] }/bot/test/data"
#...
with open(f"{ module_path }/intents.yaml", "r") as file:
self.intents = yaml.safe_load(file)["intents"]
```
对于每一个意图来说:
- `intents.<名字>` 代表名字
- 名字之后的 `action` 代表后边在要实现的相应的 `xxxAction` 的类
- 比如 `RelationshipAction` 将是用来处理查询关系(A,B)这样的问题的 Action 类
- `keywords` 代表在句子之中匹配的关键词
- 比如问句里出现 serve,served,serving 的字眼的时候,将会匹配服役的问题
> 💡:写 if else 条件来对应意图是不容易的,因为不同意图不可能没有关键词相交的情况,我们的实现只是一个非常简陋、不严谨的方式。在实际场景下,训练模型去做匹配效果会更好,有意思的是,那些做的比较好的模型的输入和我们的 YAML 的格式是很类似的。
```yaml
---
intents:
fallback:
action:
FallbackAction
keywords: []
relationship:
action:
RelationshipAction
keywords:
- between
- relation
- relationship
- related
- connect
- correlate
serve:
action:
ServeAction
keywords:
- serve
- served
- serving
friend:
action:
FollowAction
keywords:
- follows
- followed
- follow
- friend
- friends
```
##### 实体识别(entity)
类似的,实体识别的部分本质上也是 if else,只不过这里利用到了**[Aho–Corasick算法](https://zh.wikipedia.org/wiki/AC%E8%87%AA%E5%8A%A8%E6%9C%BA%E7%AE%97%E6%B3%95)**来帮助搜索实体,在生产(非玩具)的情况下,应该用 NLP 里的分词的方法来做。
> 💡:大家可以去了解一下这个 [AC自动机算法](https://zh.wikipedia.org/wiki/AC%E8%87%AA%E5%8A%A8%E6%9C%BA%E7%AE%97%E6%B3%95)
```python
def setup_entity_tree(self) -> None:
self.entity_type_map.update({
key: "player" for key in self.players.keys()
})
self.entity_type_map.update({
key: "team" for key in self.teams.keys()
})
self.entity_tree = ahocorasick.Automaton()
for index, entity in enumerate(self.entity_type_map.keys()):
self.entity_tree.add_word(entity, (index, entity))
self.entity_tree.make_automaton()
#...
def get_matched_entities(self, sentence: str) -> dict:
"""
Consume a sentence to be matched with ahocorasick
Returns a dict: {entity: entity_type}
"""
_matched = []
for item in self.entity_tree.iter(sentence):
entities_matched.append(item[1][1])
return {
entity: self.entity_type_map[entity] for entity in _matched
}
```
至此,我们的 `SiwiClassifier.get(sentence)` 已经能返回解析、分类出来的意图和实体了,这时候,它们会被传给 Actions 来让 siwi bot 知道如何去执行只是图谱的查询啦!
#### 构造图谱查询(action)
还记得前边的 bot 代码里,最后一步,图谱查询的动作是这么被构造的:
`action = self.actions.get(intent)`
现在咱们就把它实现一下:
1. 在前边提到过的 `intents.yaml` 里获取这个意图里配置的意图的类名称
2. 导入相应的 Action 类
代码段:`src/bot/actions/__init__.py`
```python
class SiwiActions():
def __init__(self) -> None:
self.intent_map = {}
self.load_data()
def load_data(self) -> None:
# load data from yaml files
module_path = f"{ siwi.__path__[0] }/bot/test/data"
with open(f"{ module_path }/intents.yaml", "r") as file:
self.intent_map = yaml.safe_load(file)["intents"]
def get(self, intent: dict):
"""
returns SiwiActionBase
"""
if len(intent["intents"]) > 0:
intent_name = intent["intents"][0]
else:
intent_name = "fallback"
cls_name = self.intent_map.get(
intent_name).get("action") #-------> 1.
action_cls = getattr( #-------> 2.
importlib.import_module("siwi.bot.actions"), cls_name)
action = action_cls(intent)
return action
```
最后,我们来实现这个类吧,比如 `RelationshipAction` 对应的代码如下:
1. 根据提供的 A 和 B,构造并执行图数据库之中的 `FIND PATH`
2. 将 `FIND PATH` 的结果进行解析,通过 `as_path()` 方法的封装,获得 path 类型的数据,并处理一个句子返回给用户
> 💡:FIND PATH 就是字面意思的查找路径,[这里](https://docs.nebula-graph.com.cn/2.6.1/3.ngql-guide/16.subgraph-and-path/2.find-path/)有详细的解释哦。
```python
class RelationshipAction(SiwiActionBase):
"""
USE basketballplayer;
FIND NOLOOP PATH
FROM "player100" TO "team204" OVER * BIDIRECT UPTO 4 STEPS;
"""
def __init__(self, intent):
print(f"[DEBUG] RelationshipAction intent: { intent }")
super().__init__(intent)
try:
self.entity_left, self.entity_right = intent["entities"]
self.left_vid = self._vid(self.entity_left)
self.right_vid = self._vid(self.entity_right)
except Exception:
print(
f"[WARN] RelationshipAction entities recognition Failure "
f"will fallback to FallbackAction, "
f"intent: { intent }"
)
self.error = True
def execute(self, connection_pool) -> str:
self._error_check()
query = (
f'USE basketballplayer;'
f'FIND NOLOOP PATH '
f'FROM "{self.left_vid}" TO "{self.right_vid}" '
f'OVER * BIDIRECT UPTO 4 STEPS;'
)
print(
f"[DEBUG] query for RelationshipAction :\n\t{ query }"
)
with connection_pool.session_context("root", "nebula") as session:
result = session.execute(query) #--------------------> 1.
if not result.is_succeeded():
return (
f"Something is wrong on Graph Database connection when query "
f"{ query }"
)
if result.is_empty():
return (
f"There is no relationship between "
f"{ self.entity_left } and { self.entity_right }"
)
path = result.row_values(0)[0].as_path() #-------------------> 2.
relationships = path.relationships()
relations_str = self._name(
relationships[0].start_vertex_id().as_string())
for rel_index in range(path.length()):
rel = relationships[rel_index]
relations_str += (
f" { rel.edge_name() }s "
f"{ self._name(rel.end_vertex_id().as_string()) }")
return (
f"There are at least { result.row_size() } relations between "
f"{ self.entity_left } and { self.entity_right }, "
f"one relation path is: { relations_str }."
)
```
至此,咱们就已经实现了后端的所有功能,我们可以把它启动起来试试了!
### 测试一下
#### 启动图数据库
我们在 Nebula Graph 里建立(导入数据)一个篮球的知识图谱。
> 💡:在导入数据之前,请先部署一个 Nebula Graph 集群。最简便的部署方式是使用 Nebula-UP 这个小工具,只需要一行命令就能在 Linux 机器上同时启动一个 Nebula Graph 核心和可视化图探索工具 [Nebula Graph Studio](https://docs.nebula-graph.com.cn/2.6.1/nebula-studio/about-studio/st-ug-what-is-graph-studio/)。如果你更愿意用 Docker 部署,请参考[这个文档](https://docs.nebula-graph.com.cn/2.6.1/4.deployment-and-installation/2.compile-and-install-nebula-graph/3.deploy-nebula-graph-with-docker-compose/)。
本文假设我们使用 [Nebula-UP](https://siwei.io/nebula-up/) 来部署一个 Nebula Graph:
```bash
curl -fsSL nebula-up.siwei.io/install.sh | bash
```
之后,我们会看到这样的提示:

按照提示,我们可以通过这个命令进入到有 Nebula Console 的容器里:
> 💡:[Nebula Console](https://github.com/vesoft-inc/nebula-console) 是命令行访问 Nebula Graph 图数据库的客户端,支持 Linux,Windows 和 macOS,下载地址:[这里](https://github.com/vesoft-inc/nebula-console/releases)
```bash
~/.nebula-up/console.sh
```
然后,在 `#` 的提示符下就表示我们进来了,我们在里边可以执行:
```
nebula-console -addr graphd -port 9669 -user root -p nebula
```
这样就表示我们连接上了 Nebula Graph 图数据库:
```mysql
/ # nebula-console -addr graphd -port 9669 -user root -p nebula
Welcome to Nebula Graph!
(root@nebula) [(none)]>
```
在这里,我们就可以通过 nGQL 去操作 Nebula Graph,不过我们先退出来,执行 `exit`:
```mysql
(root@nebula) [(none)]> exit
Bye root!
Fri, 31 Dec 2021 04:11:28 UTC
```
我们在这个容器内把基于 nGQL 语句的数据下载下来:
```bash
/ # wget https://docs.nebula-graph.io/2.0/basketballplayer-2.X.ngql
```
然后通过 Nebula Console 的 `-f <file_path>` 把数据导入进去:
```bash
nebula-console -addr graphd -port 9669 -user root -p nebula -f basketballplayer-2.X.ngql
```
至此,我们就启动了一个 Nebula Graph 图数据库,还在里边加载了篮球的知识图谱!
> 💡:还记得前边我们提到的 [在线体验](https://nebula-graph.com.cn/demo/) 环境么?现在,我们可以在这个利用 Nebula-UP 部署了 Nebula 的环境里启动自己的 Nebula Studio 啦,按照上边 Nebula-UP 的提示:http://<本机IP>:7001 就是它的地址,然后大家可以参考[文档](https://docs.nebula-graph.com.cn/2.6.1/nebula-studio/deploy-connect/st-ug-connect/)和[在线体验介绍](https://www.bilibili.com/video/BV1hq4y1177e)去了解更多。
>
> 
#### 启动 Siwi-backend
大家可以直接 clone 我的代码:`git clone https://github.com/wey-gu/nebula-siwi/`
然后安装、启动 Siwi Backend:
```bash
cd nebula-siwi
# Install dependencies
python3 -m pip install -r src/requirements.txt
# Install siwi backend
python3 -m build
# Configure Nebula Graph Endpoint
export NG_ENDPOINTS=127.0.0.1:9669
# Run Backend API server
gunicorn --bind :5000 wsgi --workers 1 --threads 1 --timeout 60
```
启动之后,我们可以另外开窗口,通过 cURL 去发起问题给 backend,更多细节大家可以参考 GitHub 上的 README:
[](https://github.com/wey-gu/nebula-siwi/blob/main/images/backend-demo.webp)
至此,我们已经写好了 QA 系统的重要的代码啦,大家是不是对一个 KBQA 的构成有了更清晰的概念了呢?
接下来,我们为它增加一个界面!
## Siwi-frontend
### 聊天界面
我们利用 [Vue Bot UI](https://github.com/juzser/vue-bot-ui) 这个可爱的机器人界面的 Vue 实现可以很容易构造一个
代码段:`src/siwi/frontend/src/App.vue`
```vue
<template>
<div id="app">
<VueBotUI
:messages="msg"
:options="botOptions"
:bot-typing="locking"
:input-disable="locking"
@msg-send="msgSender"
/>
</div>
</template>
<script>
import { VueBotUI } from 'vue-bot-ui'
```
[](https://github.com/wey-gu/nebula-siwi/blob/main/src/siwi_frontend/images/demo.webp)
注意到那个小飞机按钮了吧,它是发出问题请求的按键,我们要在按下它的时候对后端做出请求。
### 访问后端
这部分用到了[Axios](https://github.com/axios/axios),它是浏览器里访问其他地址的 HTTP 客户端。
1. 在按下的时候,`@msg-send="msgSender"` 会触发 `msgSender()`
2. ` msgSender()`去构造`axios.post(this.apiEndpoint, { "question": data.text })` 的请求给 Siwi 的后端
3. 后端的结果被 `push()` 到界面的聊天消息里,渲染出来 `this.msg.push()`
代码段:`src/siwi/frontend/src/App.vue`
```vue
<template>
<div id="app">
<button id="mic_btn" @click="record = !record">
{{record?'👂':'🎙️'}} --------------------------> 1.
</button>
<vue-web-speech
v-model="record"
@results="onResults" --------------------------> 1.
@unrecognized="unrecognized"
>
</vue-web-speech>
...
<vue-web-speech-synth
v-model="agentSpeak"
:voice="synthVoice"
:text="synthText"
@list-voices="listVoices" --------------------------> 4.
/>
</div>
</template>
<script>
import { VueBotUI } from 'vue-bot-ui'
import axios from "axios";
export default {
name: 'App',
components: {
VueBotUI,
},
onResults (data) { -------------------------> 2.
this.results = data;
this.locking = true;
this.msg.push({
agent: "user",
type: "text",
text: data[0],
});
this.locking = true;
console.log(data[0]);
axios.post(this.apiEndpoint, { "question": data[0] }).then((response) => {
console.log(response.data);
this.msg.push({
agent: "bot",
type: "text",
text: response.data.answer,
});
this.synthText = response.data.answer; ----------> 3.
this.agentSpeak = true;
});
this.locking = false;
},
}
}
</script>
```
现在,我们已经有了一个图形界面的机器人啦,不过,更进一步,我们可以利用现代浏览器的接口,实现语音识别和机器人说话!
### 语音识别
我们借助于 [Vue Web Speech](https://github.com/Drackokacka/vue-web-speech), 这个语音 API 的 VueJS 的绑定,可以很容易在按下 🎙️ 的时候接收人的语音,并把语音转换成文字发出去,在回答被返回之后,它(还是他/她😁?)也会把回答的句子读出来给用户。
1. `record` 在 `🎙️` 被按下之后,变成 `👂`
2. 触发 `onResults()` 监听
3. 把返回结果发给 `this.synthText` 合成器,准备读出
4. `<vue-web-speech-synth>` 把语音读出
代码段:`src/siwi/frontend/src/App.vue`
```vue
<template>
<div id="app">
<button id="mic_btn" @click="record = !record">
{{record?'👂':'🎙️'}} -----------------------------> 1.
</button>
<vue-web-speech
v-model="record"
@results="onResults" -----------------------------> 1.
@unrecognized="unrecognized"
>
</vue-web-speech>
...
<vue-web-speech-synth
v-model="agentSpeak"
:voice="synthVoice"
:text="synthText"
@list-voices="listVoices" ---------------------------> 4.
/>
</div>
</template>
<script>
import { VueBotUI } from 'vue-bot-ui'
import axios from "axios";
export default {
name: 'App',
components: {
VueBotUI,
},
onResults (data) { -------------------> 2.
this.results = data;
this.locking = true;
this.msg.push({
agent: "user",
type: "text",
text: data[0],
});
this.locking = true;
console.log(data[0]);
axios.post(this.apiEndpoint, { "question": data[0] }).then((response) => {
console.log(response.data);
this.msg.push({
agent: "bot",
type: "text",
text: response.data.answer,
});
this.synthText = response.data.answer; ----------------------> 3.
this.agentSpeak = true;
});
this.locking = false;
},
}
}
</script>
```
## 总结
至此,我们已经学会了搭建自己的第一个 KBQA:知识图谱驱动的问答系统。
回顾下它的代码结构:
- `src/siwi` 对应后端
- App 是 Flask API 处理的部分
- Bot 是处理请求、访问 Nebula Graph 的部分
- `src/siwi_frontend` 是前端
希望大家在这个简陋的基础之上,多多探索,做出来更加成熟的聊天机器人,欢迎你来给我邮件、留言告诉我呀,这里:https://siwei.io/about 有我的联系方式。
```bash
.
├── README.md
├── src
│ ├── siwi # Siwi-API Backend
│ │ ├── app # Web Server, take HTTP requests and calls Bot API
│ │ └── bot # Bot API
│ │ ├── actions # Take Intent, Slots, Query Knowledge Graph here
│ │ ├── bot # Entrypoint of the Bot API
│ │ ├── classifier # Symentic Parsing, Intent Matching, Slot Filling
│ │ └── test # Example Data Source as equivalent/mocked module
│ └── siwi_frontend # Browser End
│ ├── README.md
│ ├── package.json
│ └── src
│ ├── App.vue # Listening to user and pass Questions to Siwi-API
│ └── main.js
└── wsgi.py
```
如果你很喜欢这样的小项目,欢迎来看看我之前的分享: 「[从0-1:如何构建一个企业股权图谱系统?](https://siwei.io/corp-rel-graph/)」哦。
> 💡:你知道吗,我其实借助于 Katacoda 已经为大家搭建了一个交互式体验 Siwi + Nebula 的部署的环境,如果您的网络条件够快(Katacoda服务器在国外),可以在[这里](https://siwei.io/learn/nebula-101-siwi-kgqa/)点点鼠标就交互式体验它。
>
> 视频介绍
>
> <iframe src="//player.bilibili.com/player.html?aid=421964672&bvid=BV1Rm4y1Q7B5&cid=448090671&page=1" scrolling="no" border="0" frameborder="no" framespacing="0" allowfullscreen="true"> </iframe>
## 感谢用到的开源项目 ❤️
这个小项目里我们用到了好多开源的项目,非常感谢这些贡献者们的慷慨与无私,开源是不是很酷呢?
### Backend
- [KGQA on MedicalKG](https://github.com/liuhuanyong/QASystemOnMedicalKG) by [Huanyong Liu](https://liuhuanyong.github.io/)
- [Flask](https://github.com/pallets/flask)
- [pyahocorasick](https://github.com/WojciechMula/pyahocorasick) created by [Wojciech Muła](http://0x80.pl/)
- [PyYaml](https://pyyaml.org/)
### Frontend
- [VueJS](https://vuejs.org/) for frontend framework
- [Vue Bot UI](https://github.com/juzser/vue-bot-ui), as a lovely bot UI in vue
- [Vue Web Speech](https://github.com/Drackokacka/vue-web-speech), for speech API vue wrapper
- [Axios](https://github.com/axios/axios) for browser http client
- [Solarized](https://en.wikipedia.org/wiki/Solarized_(color_scheme)) for color scheme
- [Vitesome](https://github.com/alvarosaburido/vitesome) for landing page design
### Graph Database
- [Nebula Graph](https://github.com/vesoft-inc/nebula/) 高性能、云原生的开源分布式图数据库