# Bareos Backup System
## Understanding System
### Jobs & Scedule
In order to make Bareos as flexible as possible, the directions given to Bareos are specified in several pieces. The main instruction is the job resource, **which defines a job**. A backup job generally consists of a **FileSet**, a **Client**, **a Schedule** for one or several levels or times of backups, **a Pool**, as well as additional instructions.
Another way of looking at it is the FileSet is what to backup; the Client is who to backup; the Schedule defines when, and the Pool defines where (i.e. what Volume).
Typically one FileSet/Client combination will have one corresponding job. Most of the directives, such as FileSets, Pools, Schedules, can be mixed and matched among the jobs. So you might have two different Job definitions (resources) backing up different servers using the same Schedule, the same Fileset (backing up the same directories on two machines) and maybe even the same Pools.
The Schedule will define what type of backup will run when (e.g. Full on Monday, incremental the rest of the week), and when more than one job uses the same schedule, the job priority determines which actually runs first. If you have a lot of jobs, you might want to use JobDefs, where you can set defaults for the jobs, which can then be changed in the job resource, but this saves rewriting the identical parameters for each job. In addition to the FileSets you want to back up, you should also have a job that backs up your catalog.
Finally, be aware that in addition to the backup jobs there are restore, verify, and admin jobs, which have different requirements.
### Pools, Volumes and Labels
A Volume is a single physical tape (or possibly a single file) on which Bareos will write your backup data. Pools group together Volumes so that a backup is not restricted to the length of a single Volume (tape). Consequently, rather than explicitly naming Volumes in your Job, you specify a Pool, and Bareos will select the next appendable Volume from the Pool and mounts it.
Although the basic Pool options are specified in the Director’s Pool resource, the real Pool is maintained in the Bareos Catalog. It contains information taken from the Pool resource (configuration file) as well as information on all the Volumes that have been added to the Pool.
For each Volume, Bareos maintains a fair amount of catalog information such as the first write date/time, the last write date/time, the number of files on the Volume, the number of bytes on the Volume, the number of Mounts, etc.
Before Bareos will read or write a Volume, the physical Volume must have a Bareos software label so that Bareos can be sure the correct Volume is mounted. Depending on your configuration, this is either done automatically by Bareos or manually using the label command in the Console program.
The steps for creating a Pool, adding Volumes to it, and writing software labels to the Volumes, may seem tedious at first, but in fact, they are quite simple to do, and they allow you to use multiple Volumes (rather than being limited to the size of a single tape).
Pools also give you significant flexibility in your backup process. For example, you can have a “Daily” Pool of Volumes for Incremental backups and a “Weekly” Pool of Volumes for Full backups. By specifying the appropriate Pool in the daily and weekly backup Jobs, you thereby insure that no daily Job ever writes to a Volume in the Weekly Pool and vice versa, and Bareos will tell you what tape is needed and when.
### vSphere Environment Backup Methods
Backing up your vSphere environment is crucial, and there are several methods to consider, each with its advantages and use cases. Here's a breakdown of the common approaches:
1. Backing Up VMs as Physical Machines
This traditional method treats virtual machines (VMs) just like physical machines. You use standard backup tools to copy the entire VM files, including:
- VM configuration files (VMX)
- Virtual Disks (VMDK)
Pros:
- Familiar process for those already using physical machine backups.
- Wide variety of backup tools compatible.
Cons:
- Inefficient - Backs up unchanged data repeatedly, increasing storage usage.
- Slower backups and restores compared to dedicated VM solutions.
2. File-Level Backup for VMs
This method focuses on individual VM files instead of the entire VM. You can use tools that understand VMFS (VMware File System) to back up specific files or folders within the VM.
Pros:
- More efficient - Only backs up changed data, reducing storage consumption.
- Granular control - Restore specific files or folders if needed.
Cons:
- Requires VMFS-aware backup tools.
- Might not capture VM configuration details for a complete restore.
3. Dedicated VMware Backup and Replication Solutions
These are software specifically designed for backing up and replicating VMs in vSphere environments. Popular options include Veeam Backup & Replication and others.
Pros:
- Optimized for VMs - Leverage features like VM snapshots, quiescing (pausing VM for consistent backups), and application-aware processing.
- Faster backups and restores due to VM-specific techniques.
- Advanced features like replication for disaster recovery.
Cons:
- Additional software cost compared to using native tools.
- Learning curve for using the new backup solution.
Additional Considerations:
- VMware Consolidated Backup: This is a built-in feature in vSphere that leverages storage capabilities (like vStorage APIs for Array Integration) for backups. While not a standalone method, it can be used with some backup solutions.
- VM Snapshots: While not strictly a backup method, snapshots create a point-in-time image of a VM for quick recovery. However, they shouldn't be used for long-term backups as they consume storage space on the datastore.
Choosing the best method depends on your specific needs, budget, and environment. For basic backups, method 1 might suffice. For efficient VM backups with advanced features, dedicated solutions (method 3) are preferred.
## Installation Steps
### System Design

### Pre-Requisite
1. Install PHP and Apache2 Dependency
```bash
sudo apt install php
sudo apt install libapache2-mod-php
sudo systemctl restart apache2
```
2. Install PostgreSQL Server
```bash
sudo apt update
sudo apt install postgresql postgresql-contrib
```
3. Configure bareos hostname for each client
```conf
# /etc/hosts
127.0.0.1 localhost
10.0.0.116 bareos-server
```
### Bareos Server & Webui
1. Add the bareos official repo
```bash
wget https://download.bareos.org/current/xUbuntu_22.04/add_bareos_repositories.sh
chmod +x add_bareos_repositories.sh
```
The `add_bareos_repositories.sh` script will:
* Create a Bareos signature key file `/etc/apt/keyrings/bareos-*.gpg` .
* Create the Bareos repository configuration file `/etc/apt/sources.list.d/bareos.sources`
* This file refers to the Bareos repository on the download server and to the local `/etc/apt/keyrings/bareos-*.gpg` file.
* If authentication credentials are required (https://download.bareos.com) they are stored in the file `/etc/apt/auth.conf.d/download_bareos_com.conf`.
2. Execute the script for Bareos installation on Ubuntu
> DO THIS IN ROOT
```bash
sh ./add_bareos_repositories.sh
apt update
apt install bareos
```
3. Configure the PostreSQL for Bareos Catalog
```bash
su postgres -c /usr/lib/bareos/scripts/create_bareos_database
su postgres -c /usr/lib/bareos/scripts/make_bareos_tables
su postgres -c /usr/lib/bareos/scripts/grant_bareos_privileges
```
4. Start the Daemons
```bash
systemctl start --now bareos-dir
systemctl start --now bareos-sd
systemctl start --now bareos-fd
```
After that verify status post-installation.
```bash
systemctl status bareos-dir bareos-sd bareos-fd
```
---
5. Install Webui Bareos
```bash
apt-get install bareos-webui
```
6. Configure Ubuntu enabling php8-fpm support on Apache2
```bash
a2enmod proxy_fcgi setenvif
a2enconf php8.1-fpm
systemctl reload apache2
```
7. Configure the Apache Webserver *(OPTIONAL)*
The package bareos-webui provides a default configuration for Apache. Depending on your distribution, it is installed at `/etc/apache2/conf.d/bareos-webui.conf`, `/etc/httpd/conf.d/bareos-webui.conf`, `/etc/apache2/available-conf/bareos-webui.conf` or similar.
8. Use bconsole to create a user with name admin and password secret and permissions defined in webui-admin (`/etc/bareos/bareos-dir.d/profile`)
```bash
# bconsole
Connecting to Director localhost:9101
Encryption: TLS_CHACHA20_POLY1305_SHA256 TLSv1.3
1000 OK: bareos-dir Version: 22.0.0~pre27.402cd1616 (13 January 2022)
pre-release version binary
pre-release versions are UNSUPPORTED.
Get a released version and vendor support on https://www.bareos.com
You are connected using the default console
Enter a period (.) to cancel a command.
*
```
Add UI admin user like below
```console
*reload
*configure add console name=admin password=secret profile=webui-admin tlsenable=false
```
9. Access the Console in your browser
Login to http://HOSTNAME/bareos-webui with username and password as created.
### Bareos Client
1. Add the bareos official repo
```bash
wget https://download.bareos.org/current/xUbuntu_22.04/add_bareos_repositories.sh
chmod +x add_bareos_repositories.sh
```
2. Execute the script for Bareos installation on Ubuntu
> DO THIS IN ROOT
```bash
sh ./add_bareos_repositories.sh
apt update
apt install bareos-client
```
The package `bareos-client` is a meta-package. Installing it will also install the `bareos-filedaemon`, `bareos-bconsole` and suggests the installation of the `bareos-traymonitor`.
3. Integration: Server and Client
* Director: configure client
```conf
bconsole
*configure add client name=client2-fd address=10.0.2.36 password=secret
```
This creates two resource configuration files:
* `/etc/bareos/bareos-dir.d/client/client2-fd.conf`
* `/etc/bareos/bareos-dir-export/client/client2-fd/bareos-fd.d/director/bareos-dir.conf` (assuming your director resource is named bareos-dir)
* Client: configure director
> Make sure you can ssh root without password first
```bash
scp /etc/bareos/bareos-dir-export/client/client2-fd/bareos-fd.d/director/bareos-dir.conf root@10.0.2.36:/etc/bareos/bareos-fd.d/director/
```
4. Backup Test Client & Job
* Test the client and add a job resource
```conf
*status client=client2-fd
...
*configure add job name=client2-job client=client2-fd jobdefs=DefaultJob
Created resource config file "/etc/bareos/bareos-dir.d/job/client2-job.conf":
Job {
Name = client2-job
Client = client2-fd
JobDefs = DefaultJob
}
*estimate listing job=client2-job
...
*run job=client2-job
...
*wait jobid=...
...
*list joblog jobid=...
...
*list files jobid=...
...
*list volumes
...
```
This creates two resource configuration files:
* Verify the network connection from Bareos Director to the Bareos File Daemon.
* Add a job resource.
* Dry-run the job (estimate listing).
* Run the job.
* Wait for the job to finish.
* Verify the job.
* Verify the Job Testing

## Use Cases Testing
### Backup Bareos Catalog
**Sceme: Backup Bareos Catalog**
If ever the machine on which your Bareos database crashes, and you need to restore from backup tapes, one of your first priorities will probably be to recover the database. Although Bareos will happily backup your catalog database if it is specified in the FileSet, this is not a very good way to do it, because the database will be saved while Bareos is modifying it. Thus the database may be in an instable state. Worse yet, you will backup the database before all the Bareos updates have been applied.
To resolve these problems, you need to backup the database after all the backup jobs have been run. In addition, you will want to make a copy while Bareos is not modifying it. To do so, you can use two scripts provided in the release `make_catalog_backup` and `delete_catalog_backup`. These files will be automatically generated along with all the other Bareos scripts. The first script will make an ASCII copy of your Bareos database into bareos.sql in the working directory you specified in your configuration, and the second will delete the `bareos.sql` file.
The basic sequence of events to make this work correctly is as follows:
* Run all your nightly backups
* After running your nightly backups, run a Catalog backup Job
* The Catalog backup job must be scheduled after your last nightly backup
* You use `Run Before Job (Dir->Job)` to create the ASCII backup file and `Run After Job (Dir->Job)` to clean up
Assuming that you start all your nightly backup jobs at 1:05 am (and that they run one after another), you can do the catalog backup with the following additional Director configuration statements:
* `bareos-dir.d/job/BackupCatalog.conf`
```conf
Job {
Name = "BackupCatalog"
Description = "Backup the catalog database (after the nightly save)"
JobDefs = "DefaultJob"
Level = Full
FileSet="Catalog"
Schedule = "WeeklyCycleAfterBackup"
# This creates an ASCII copy of the catalog
# Arguments to make_catalog_backup are:
# make_catalog_backup <catalog-name>
RunBeforeJob = "/usr/lib/bareos/scripts/make_catalog_backup MyCatalog"
# This deletes the copy of the catalog
RunAfterJob = "/usr/lib/bareos/scripts/delete_catalog_backup MyCatalog"
# This sends the bootstrap via mail for disaster recovery.
# Should be sent to another system, please change recipient accordingly
Write Bootstrap = "|/usr/sbin/bsmtp -h localhost -f \"\(Bareos\) \" -s \"Bootstrap for Job %j\" root@localhost"
Priority = 11 # run after main backup
}
```
* `bareos-dir.d/schedule/WeeklyCycleAfterBackup.conf`
```conf
# This schedule does the catalog. It starts after the WeeklyCycle
Schedule {
Name = "WeeklyCycleAfterBackup"
Run = Level=Full sun-sat at 1:10
}
```
* `bareos-dir.d/fileset/Catalog.conf`
```conf
# This is the backup of the catalog
FileSet {
Name = "Catalog"
Include {
Options {
signature=MD5
}
File = "/var/lib/bareos/bareos.sql" # database dump
File = "/etc/bareos" # configuration
}
}
```
**Demo: Backup Bareos Catalog**
1. Run a Backup Catalog Job
```
# run
Automatically selected Catalog: MyCatalog
Using Catalog "MyCatalog"
A job name must be specified.
The defined Job resources are:
1: backup-bareos-fd
2: BackupCatalog
3: RestoreFiles
Select Job resource (1-3): 2
```
Here, Bareos has listed the three different Jobs that you can run, and you should choose number 2 and type enter, at which point you will get:
```
Run Backup job
JobName: BackupCatalog
Level: Full
Client: bareos-fd
Format: Native
FileSet: Catalog
Pool: Full (From Job FullPool override)
Storage: File (From Job resource)
When: 2024-04-04 07:48:15
Priority: 11
OK to run? (yes/mod/no): yes
Job queued. JobId=26
```
2. Verify the Backup Process
* Verify the Volumes File
```output
root@bareos-server:/var/lib/bareos# ls -l /var/lib/bareos/storage
total 86472
-rw-r----- 1 bareos bareos 5284038 Mar 30 21:00 Differential-0003
-rw-r----- 1 bareos bareos 77966700 Apr 4 07:48 Full-0001
-rw-r----- 1 bareos bareos 5287893 Apr 3 21:00 Incremental-0002
```
This is the file Volume that you just wrote and it contains all the data of the job just run. If you run additional jobs, they will be appended to this Volume unless you specify otherwise.
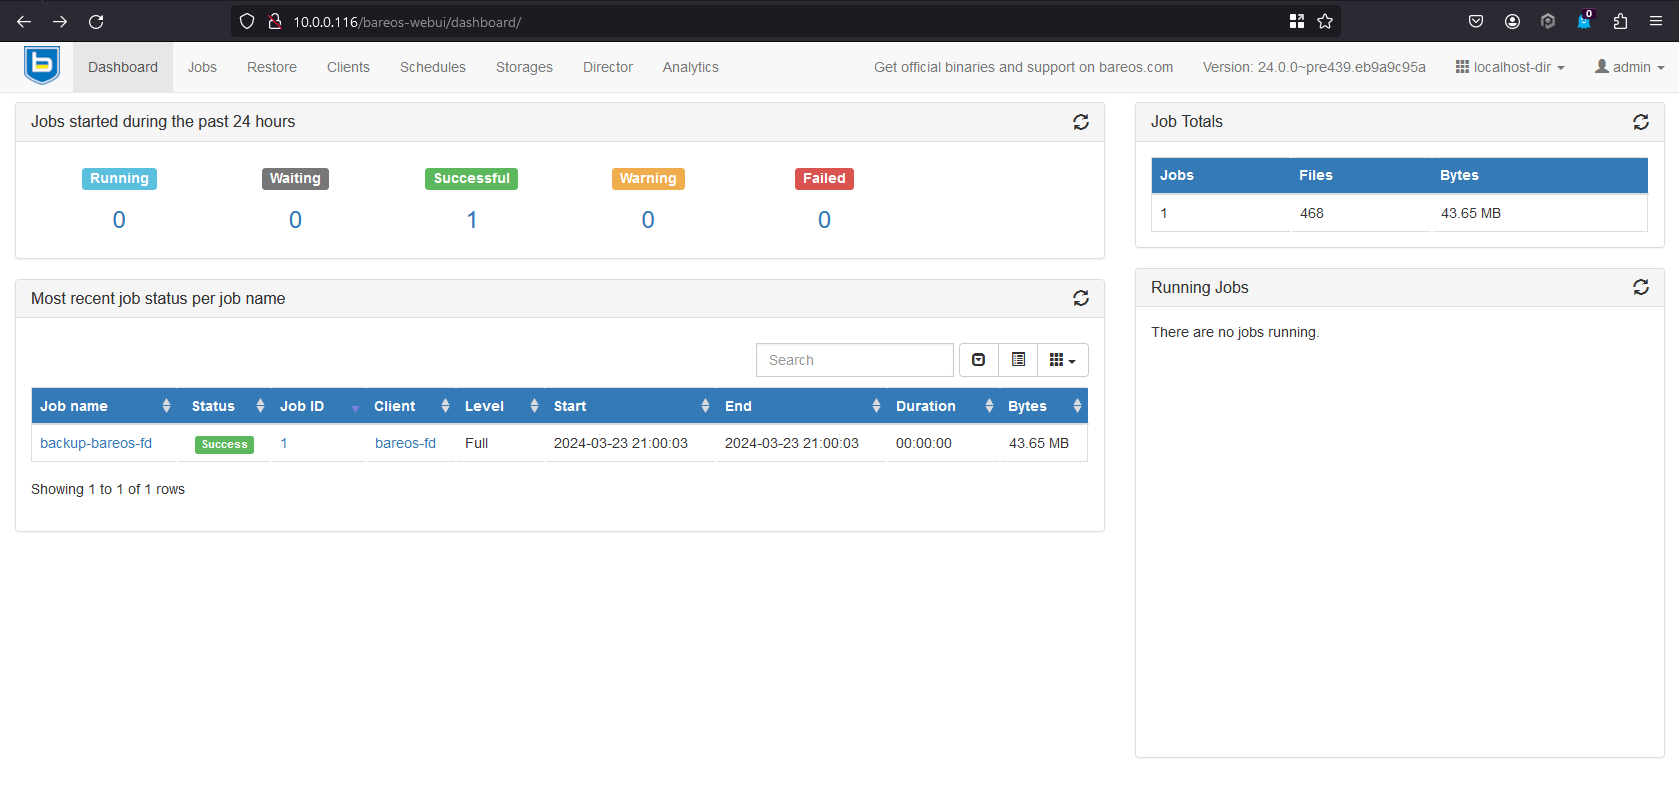
* Verify in Bareos Webui

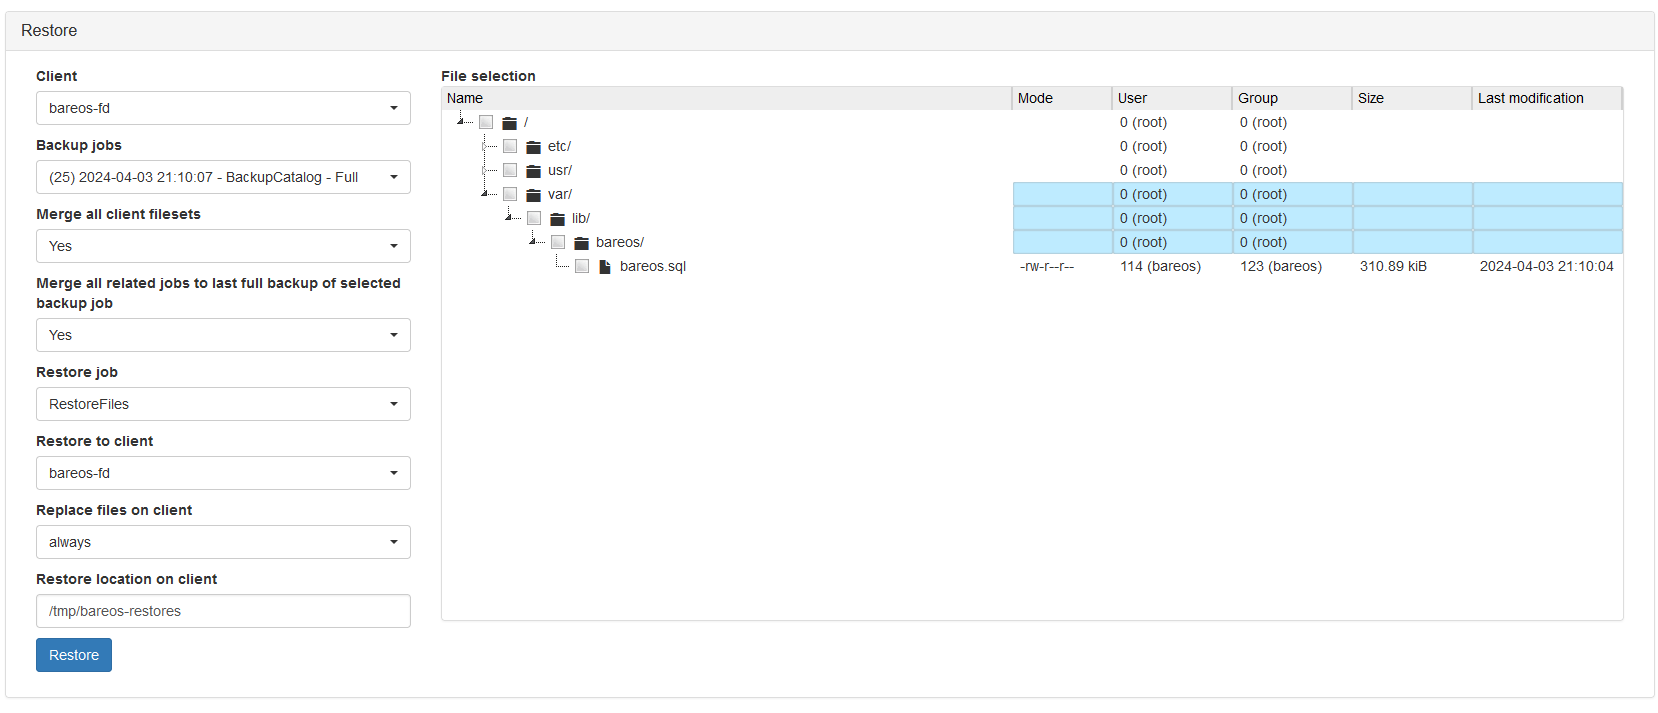
3. Run a Restore Catalog Job
* Do Restore by UI
* Do Restore by bconsole
```output
*restore all
Automatically selected Catalog: MyCatalog
Using Catalog "MyCatalog"
First you select one or more JobIds that contain files
to be restored. You will be presented several methods
of specifying the JobIds. Then you will be allowed to
select which files from those JobIds are to be restored.
To select the JobIds, you have the following choices:
1: List last 20 Jobs run
2: List Jobs where a given File is saved
3: Enter list of comma separated JobIds to select
4: Enter SQL list command
5: Select the most recent backup for a client
6: Select backup for a client before a specified time
7: Enter a list of files to restore
8: Enter a list of files to restore before a specified time
9: Find the JobIds of the most recent backup for a client
10: Find the JobIds for a backup for a client before a specified time
11: Enter a list of directories to restore for found JobIds
12: Select full restore to a specified Job date
13: Cancel
Select item: (1-13): 5
```
* Select to Restore
```output
Select item: (1-13): 5
Defined Clients:
1: bareos-fd
2: client2-fd
Select the Client (1-2): 1
The defined FileSet resources are:
1: Catalog
2: SelfTest
Select FileSet resource (1-2): 1
+-------+-------+----------+----------+---------------------+------------+
| jobid | level | jobfiles | jobbytes | starttime | volumename |
+-------+-------+----------+----------+---------------------+------------+
| 26 | F | 71 | 344,489 | 2024-04-04 07:48:24 | Full-0001 |
+-------+-------+----------+----------+---------------------+------------+
You have selected the following JobId: 26
```
* Mark the boostrap file
```
cwd is: /
$ mark *
71 files marked.
$ done
Bootstrap records written to /var/lib/bareos/bareos-dir.restore.2.bsr
The job will require the following
Volume(s) Storage(s) SD Device(s)
===========================================================================
Full-0001 File FileStorage
Volumes marked with "*" are online.
```
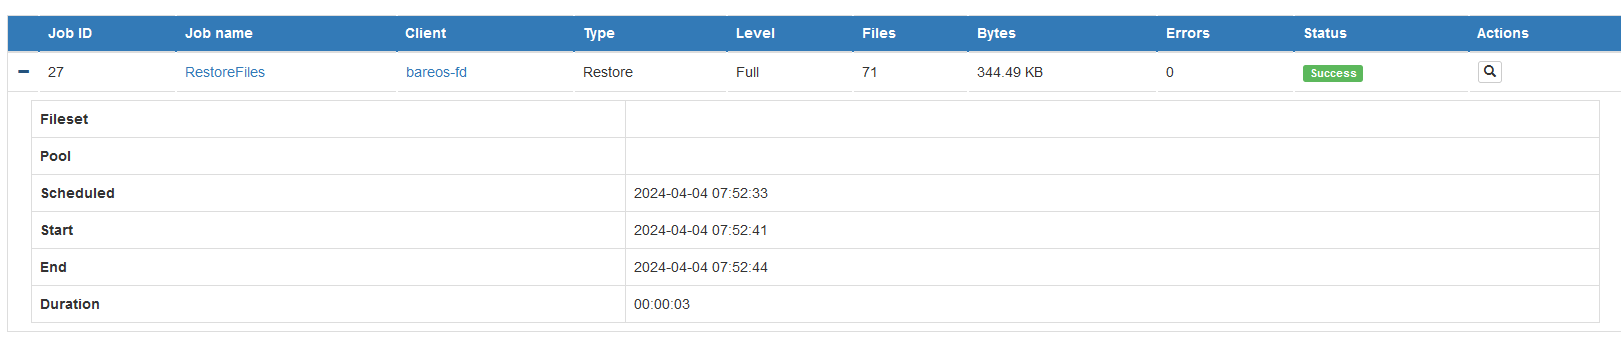
4. Verify the Restore Job
* See on `/tmp/bareos-restores` if the `bareos.sql` exist
```output
root@bareos-server:~# ls -l /tmp/bareos-restores/var/lib/bareos/
total 324
-rw-r--r-- 1 bareos bareos 330140 Apr 4 07:48 bareos.sql
```
* Verify on the Bareos WebUI
**Sceme: Bareos Crashes**
To create the crases scenario, I try to uninstall the software as the equal scenario.
1. Uninstall Bareos Server
```bash
sudo apt purge bareos*
```
```output
Reading package lists... Done
Building dependency tree... Done
Reading state information... Done
The following packages were automatically installed and are no longer required:
bareos-bconsole bareos-client bareos-common bareos-database-common bareos-database-postgresql bareos-database-tools
bareos-director bareos-filedaemon bareos-storage bareos-tools dbconfig-common dbconfig-pgsql
```
2.
## Reference
1. https://www.baculasystems.com/blog/backup-virtual-machine/
2. https://gitlab.com/barcus/bareos
3. https://medium.com/@alexander.bazhenov/bareos-бесплатное-резервное-копирование-формата-enterprise-d84b90a4415a
4. https://blog.korphome.ru/2023/03/31/bareos-%D0%B1%D0%B5%D0%BA%D0%B0%D0%BF-vmware-%D0%B4%D0%BB%D1%8F-%D0%BD%D0%B5%D0%BF%D1%80%D0%B8%D1%82%D1%8F%D0%B7%D0%B0%D1%82%D0%B5%D0%BB%D1%8C%D0%BD%D1%8B%D1%85/