---
tags: staintools, README, keynote
---
# StainTools
Tools for tissue image stain normalization and augmentation in Python 3.
- https://github.com/Peter554/StainTools
- https://pypi.org/project/staintools
[](https://zenodo.org/badge/latestdoi/113061327)
## Install
1. `pip install staintools`
2. Install [SPAMS](http://spams-devel.gforge.inria.fr). This is a dependency to staintools and is technically available on PyPI (see [here](https://pypi.org/project/spams/)). However, personally I have had some issues with the PyPI install and would instead recommend using conda (see [here](https://anaconda.org/conda-forge/python-spams)).
## Quickstart
### Normalization
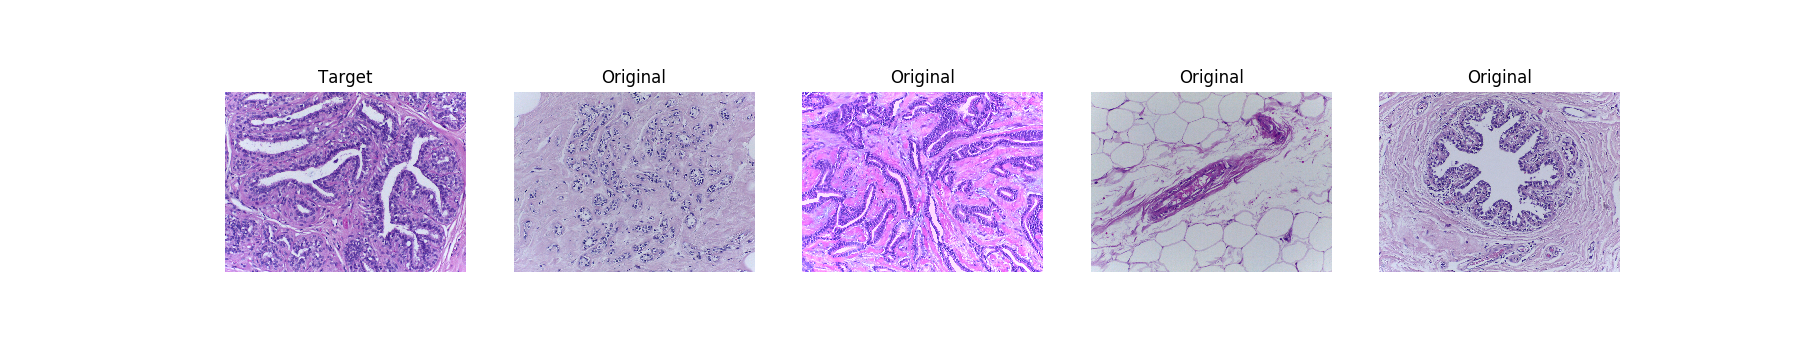
Original images:
[(Bigger)](https://res.cloudinary.com/dyjhco7zg/image/upload/v1548511529/StainTools/2hRBZ25_-_Imgur.png)
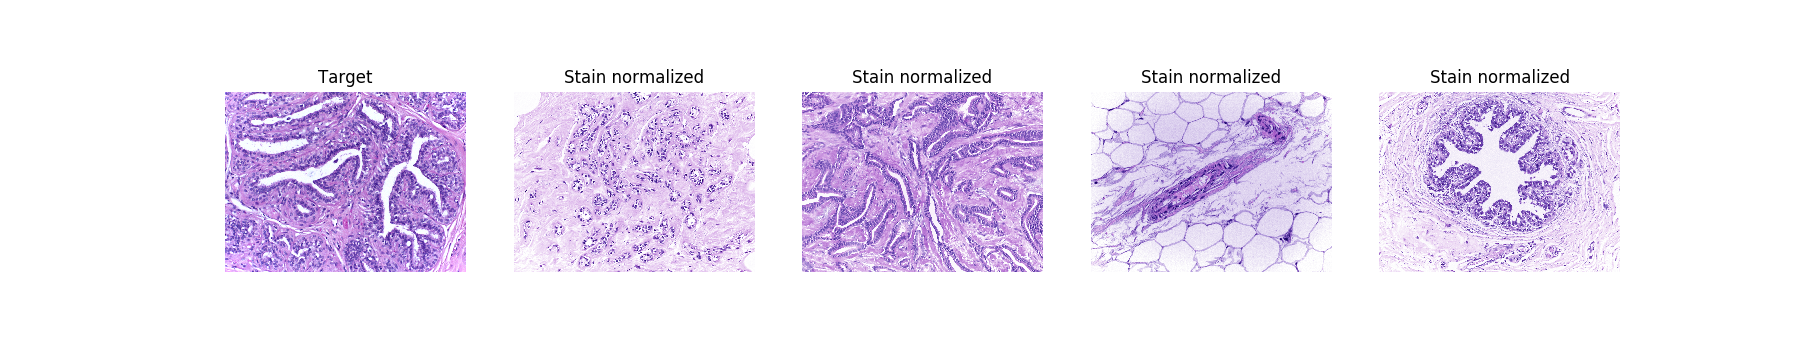
Stain normalized images:
[(Bigger)](https://res.cloudinary.com/dyjhco7zg/image/upload/v1548511528/StainTools/n3u87IP_-_Imgur.png)
```python
# Read data
target = staintools.read_image("./data/my_target_image.png")
to_transform = staintools.read_image("./data/my_image_to_transform.png")
# Standardize brightness (This step is optional but can improve the tissue mask calculation)
target = staintools.LuminosityStandardizer.standardize(target)
to_transform = staintools.LuminosityStandardizer.standardize(to_transform)
# Stain normalize
normalizer = staintools.StainNormalizer(method='vahadane')
normalizer.fit(target)
transformed = normalizer.transform(to_transform)
```
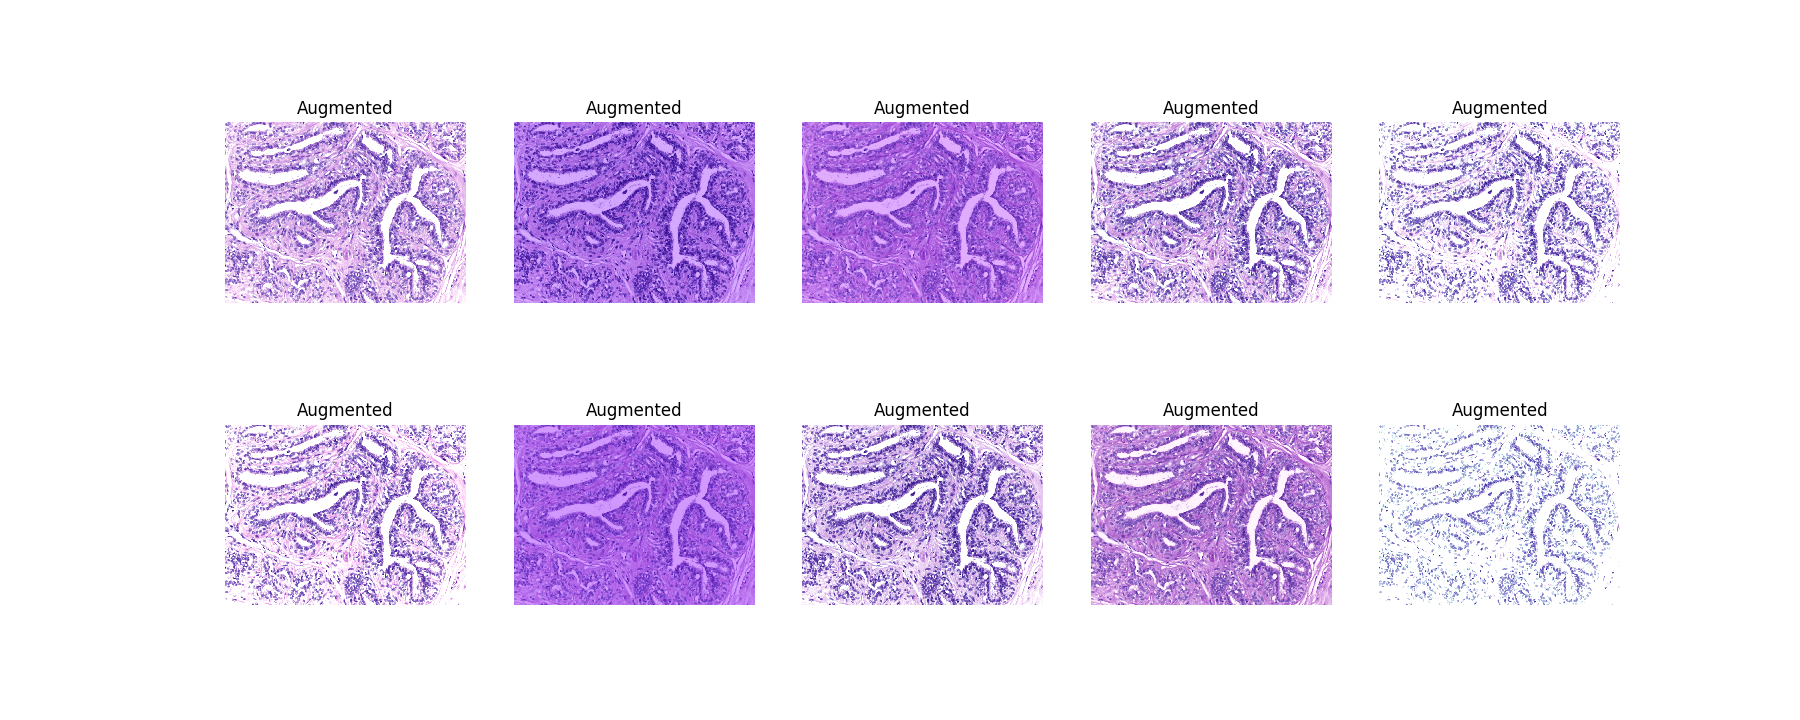
### Augmentation
[(Bigger)](https://res.cloudinary.com/dyjhco7zg/image/upload/v1548511530/StainTools/v9R1aGQ_-_Imgur.png)
```python
# Read data
to_augment = staintools.read_image("./data/my_image_to_augment.png")
# Standardize brightness (This step is optional but can improve the tissue mask calculation)
to_augment = staintools.LuminosityStandardizer.standardize(to_augment)
# Stain augment
augmentor = staintools.StainAugmentor(method='vahadane', sigma1=0.2, sigma2=0.2)
augmentor.fit(to_augment)
augmented_images = []
for _ in range(100):
augmented_image = augmentor.pop()
augmented_images.append(augmented_image)
```
## Sample data
The data used for the above example is available [here](https://drive.google.com/drive/folders/1fD6o5rWEWSTudkFxhULOe1Rn47NIL7v7?usp=sharing). These images are a small subset taken from [this 2018 Breast Histology Challenge](https://iciar2018-challenge.grand-challenge.org/).
## More examples
For more examples see files inside of the `samples` directory.
## More detail
Histology images are often stained with the Hematoxylin & Eosin (H&E) stains. These two chemicals typically stain: the nuclei a dark purple (Hematoxylin) and the cytoplasm a light pink (Eosin). Thus all pixels in an idealized histology image are principally composed of two colors. These stain colors vary from image to image and may be summarised in a stain matrix:
$$
S = \left(
\begin{array}{ccc}
H_R & H_G & H_B \\
E_R & E_G & E_B
\end{array}
\right)
$$
The first row of this matrix shows the Hematoxylin stain color in RGB. The second row of the matrix shows the Eosin stain color in RGB.
We transform a normal RGB image I to a RGB optical density image OD via the Beer-Lambert Law:
$$
I = 255 \times \exp\left(-OD\right)
$$
so
$$
OD = - \log\left(\frac{I}{255}\right)
$$
If we flatten the OD image so that it is Npix x 3, with Npix being the total number of image pixels, then we can relate the images OD array and the stain matrix S via the pixel concentration matrix C (an Npix x 2 array where the columns give the pixel concentration of H and E respectively):
$$
OD_\text{flat} = C \times S
$$
A `StainExtractor` provides methods for estimating the stain matrix S and a concentration matrix C given an image. First the optical density array OD is calculated for the given image. The stain matrix S may then be calculated by the desired methodology (see below). The concentration matrix C is finally obtained by 'solving' the above equation. I say 'solving' here as in general there is no exact solution to the above equation. An idealized image will be made up of exactly two color - the stains - however for real world histology images we may only expect to approximately compose the image using just these two primary colors.
We implement:
- `VahadaneStainExtractor`. Stain matrix estimation via method of *A. Vahadane et al., “Structure-Preserving Color Normalization and Sparse Stain Separation for Histological Images”*. This method takes a dictionary learning based approach to find the two basis stains that best fit the image. See the paper for details.
- `MacenkoStainExtractor`. Stain matrix estimation via method of *M. Macenko et al., "A method for normalizing histology slides for quantitative analysis"*. This method considers the projection of pixels onto the 2D plane defined by the two principle eigenvectors of the optical density covariance matrix. It then considers the extreme directions (in terms of angular polar coordinate) in this plane. See the paper for details.
In both cases it is preferable to first remove background pixels - white pixels of the image where no tissue is present - as these will not be composed of simply the two primary stains. We attempt to isolate tissue by a thresholding on the pixel luminosity. For some images that are dimly lit however the background is not bright enough and therefore it may be helpful to standardize the brightness of any image first. For this we implement a `LuminosityStandardizer`, which enforces an image to have at least 5% of pixels being luminosity saturated.
Once we have the stain and concentration matrices we are able to easily carry out.
- **Stain Normalization**. This basically involves casting one image in the stain colors of a target image. For this we basically decompose the images into the stain matrix S and the concentration matrix C, then replace the stain matrix of the image to be transformed with that of the target image. We then recombine to give the final stain normalized image. This is implemented in the class `StainNormalizer`.
- **Stain Augmentation**. For this we simply augment a single image by decomposing it into the stain matrix S and the concentration matrix C, perturbing the concentrations somewhat and then recombining to be get an augmented image. This is implemented in the class `StainAugmentor`.
We also implement a simpler color normalizer, the `ReinhardColorNormalizer`, which normalizes images according to the method of *E. Reinhard, M. Adhikhmin, B. Gooch, and P. Shirley, "Color transfer between images"*. This method does not consider the details of stain matrices etc. Instead it simply maps the color distribution mean and standard deviation to match that of another target image.