# How to use the SLEAP module
This guide explains how to test and use the [SLEAP](https://sleap.ai/) module that is installed on the SWC's HPC cluster for running training and/or inference jobs.
[toc]
## Abbreviations
| Acronym | Meaning |
| --- | --- |
| SLEAP | Social LEAP Estimates Animal Poses |
| SWC | Sainsbury Wellcome Centre |
| HPC | High Performance Computing |
| SLURM | Simple Linux Utility for Resource Management |
| GUI | Graphical User Interface |
:::info
:information_source: Note
In this document, shell commands will be shown in code blocks like this:
```bash
$ echo "Hello world!"
```
The `$` is not part of the command, it is just a placeholder for the shell prompt. You should not type it when entering the command.
Similarly, Python commands will be prepended with the `>>>` prompt:
```python
>>> print("Hello world!")
```
The expected outputs of both shell and Python commands will be shown without any prompt:
```python
>>> print("Hello world!")
Hello world!
```
:::
## Prerequisites
### Verify access to the HPC cluster and the SLEAP module
Log into the HPC login node (typing your `<SWC-PASSWORD>` both times when prompted):
```bash
$ ssh <SWC-USERNAME>@ssh.swc.ucl.ac.uk
$ ssh hpc-gw1
```
SLEAP should be listed as one of the available modules:
```bash
$ module avail
SLEAP/2023-03-13
```
Start an interactive job on a GPU node:
```bash
$ srun -p gpu --gres=gpu:1 --pty bash -i
```
Load the SLEAP module. This might take some seconds, but it should finish without errors. Your terminal prompt may change as a result.
```
<SWC-USERNAME>@gpu-350-04:~$ module load SLEAP
(sleap) <SWC-USERNAME>@gpu-350-04:~$
```
The hostname (the part between "@" and ":") will vary depending on which GPU node you were assigned to.
To verify that the module was loaded successfully:
```bash
$ module list
Currently Loaded Modulefiles:
1) SLEAP/2023-03-13
```
The module is essentially a centrally installed conda environment. When it is loaded, you should be using particular executables for conda and Python. You can verify this by running:
```bash
$ which conda
/ceph/apps/ubuntu-20/packages/SLEAP/2023-03-13/condabin/conda
$ which python
/nfs/nhome/live/<SWC-USERNAME>/.conda/envs/sleap/bin/python
```
Finally we will verify that the `sleap` python package can be imported and can "see" the GPU. We will just follow the [relevant SLEAP instructions](https://sleap.ai/installation.html#testing-that-things-are-working). First, start a Python interpreter:
```bash
$ python
```
Next, run the following Python commands (shown below with their expected outputs:
```python
>>> import sleap
>>> sleap.versions()
SLEAP: 1.2.9
TensorFlow: 2.6.3
Numpy: 1.19.5
Python: 3.7.12
OS: Linux-5.4.0-139-generic-x86_64-with-debian-bullseye-sid
>>> sleap.system_summary()
GPUs: 1/1 available
Device: /physical_device:GPU:0
Available: True
Initalized: False
Memory growth: None
>>> import tensorflow as tf
>>> print(tf.config.list_physical_devices('GPU'))
[PhysicalDevice(name='/physical_device:GPU:0', device_type='GPU')]
```
:::warning
:warning: Warning
The `import sleap` command may take some time to run (more than a minute). This is normal. Subsequent imports should be faster.
:::
If all is as expected, you can exit the Python interpreter, and then exit the GPU node
```python
>>> exit()
$ exit
```
To completely exit the HPC cluster, you will need to logout of the SSH session twice:
```bash
$ logout
$ logout
```
### Install SLEAP on your local PC/laptop
While you can delegate the GPU-intensive work to the HPC cluster, you will still need to do some steps, such as labelling frames, on the SLEAP graphical user interface. Thus, you also need to install SLEAP on your local PC/laptop.
We recommend following the official [SLEAP installation guide](https://sleap.ai/installation.html). To be on the safe side, ensure that the local installation is the same version as the one on the cluster - version `1.2.9`.
### Mount the SWC filesystem on your local PC/laptop
The rest of this guide assumes that you have mounted the SWC filesystem on your local PC/laptop. If you have not done so, please follow the relevant instructions on the [SWC internal wiki](https://wiki.ucl.ac.uk/display/SSC/SWC+Storage+Platform+Overview).
We will also assume that the data you are working with are stored in a `ceph` or `winstor` directory to which you have access to. In the rest of this guide, we will use the path `/ceph/scratch/neuroinformatics-dropoff/SLEAP_HPC_test_data` which contains a SLEAP project for test purposes. You should replace this with the path to your own data.
## Model training
This will consist of two parts - [preparing a training job](#Prepare-the-training-job) (on your local SLEAP installation) and [running a training job](#Run-the-training-job) (on the HPC cluster's SLEAP module). Some evaluation metrics for the trained models can be [viewed via the SLEAP GUI](#Evaluate-the-trained-models) on your local SLEAP installation).
### Prepare the training job
- Follow the SLEAP instructions for [Creating a Project](https://sleap.ai/tutorials/new-project.html) and [Initial Labelling](https://sleap.ai/tutorials/initial-labeling.html). Ensure that the project file (e.g. `labels.v001.slp`) is saved in the mounted SWC filesystem (as opposed to your local filesystem).
- Next, follow the instructions in [Remote Training](https://sleap.ai/guides/remote.html#remote-training), i.e. "Predict" -> "Run Training…" -> "Export Training Job Package…".
- For selecting the right configuration parameters, see [Configuring Models](https://sleap.ai/guides/choosing-models.html#) and [Troubleshooting Workflows](https://sleap.ai/guides/troubleshooting-workflows.html)
- Set the "Predict On" parameter to "nothing". Remote training and inference (prediction) are easiest to run separately on the HPC Cluster.
- If you are working with a top-down camera view, set the "Rotation Min Angle" and "Rotation Max Angle" to -180 and 180 respectively in the "Augmentation" section.
- Make sure to save the exported training job package (e.g. `labels.v001.slp.training_job.zip`) in the mounted SWC filesystem, ideally in the same directory as the project file.
- Unzip the training job package. This will create a folder with the same name (minus the `.zip` extension). This folder contains everything needed to run the training job on the HPC cluster.
### Run the training job
Login to the HPC cluster as described above.
```bash
$ ssh <SWC-USERNAME>@ssh.swc.ucl.ac.uk
$ ssh hpc-gw1
```
Navigate to the training job folder (replace with your own path) and list its contents:
```bash
$ cd /ceph/scratch/neuroinformatics-dropoff/SLEAP_HPC_test_data
$ cd labels.v001.slp.training_job
$ ls -1
```
There should be a `train-script.sh` file created by SLEAP, which already contains the commands to run the training. You can see the contents of the file by running:
```bash
$ cat train-script.sh
#!/bin/bash
sleap-train centroid.json labels.v001.pkg.slp
sleap-train centered_instance.json labels.v001.pkg.slp
```
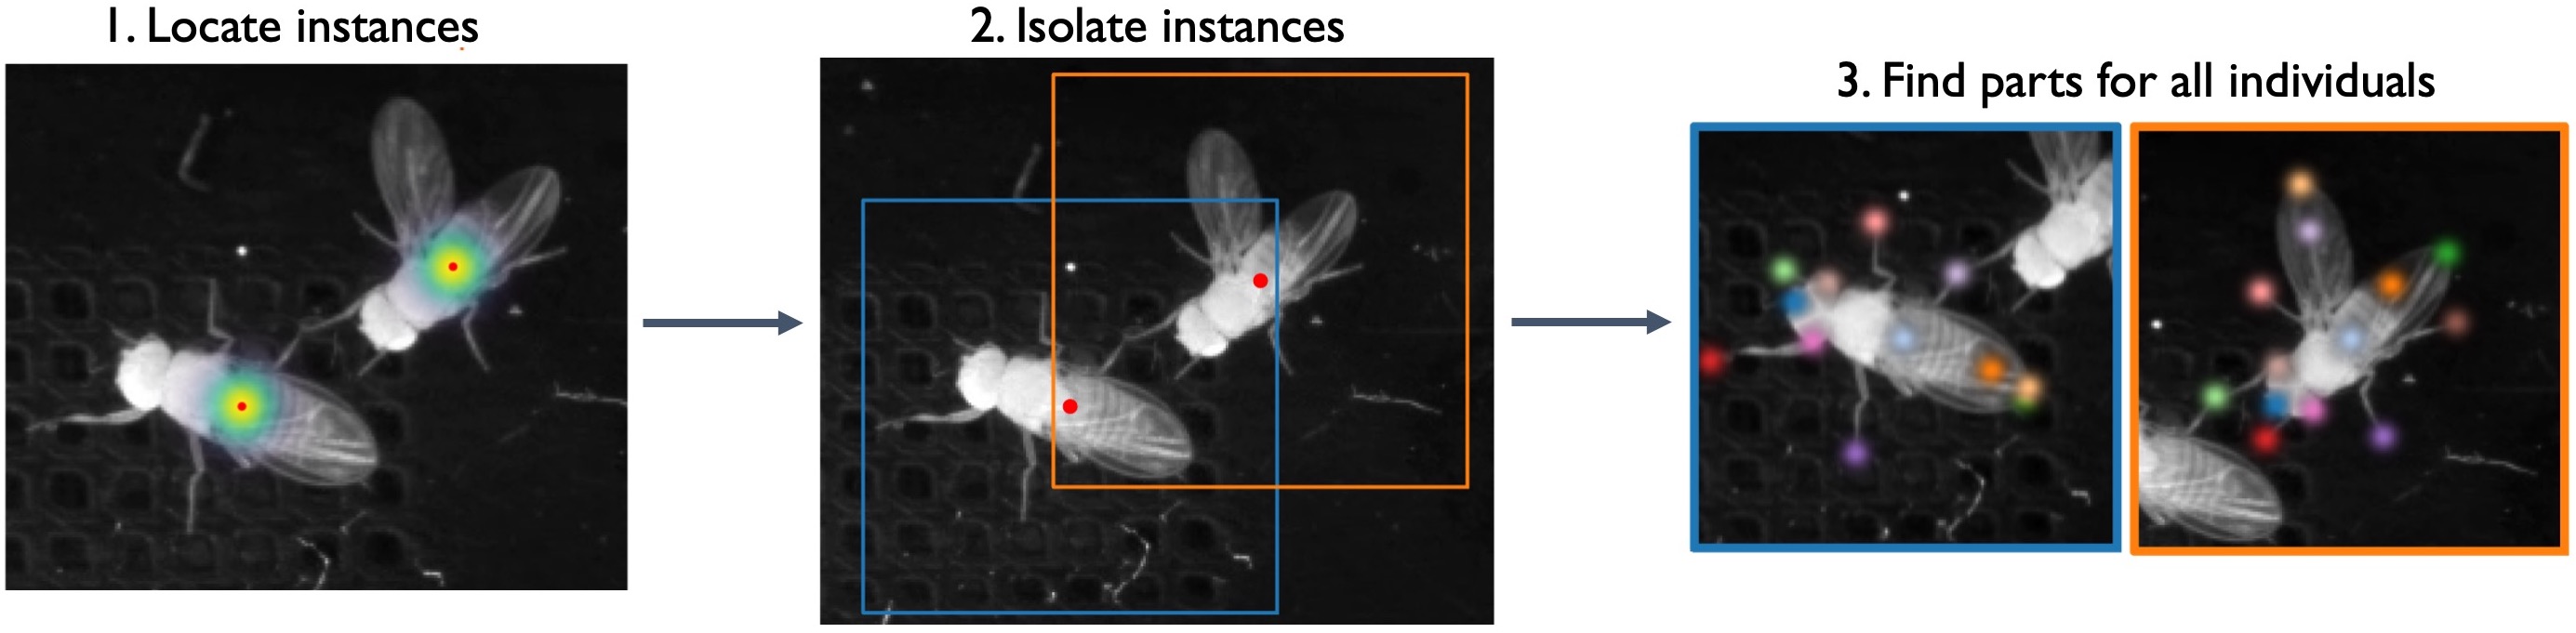
The precise commands will depend on the model configuration you chose in SLEAP. Here we see two separate training calls, one for the "centroid" and another for the "centered_instance" model. That's because in this example we have chosen the ["Top-Down"](https://sleap.ai/tutorials/initial-training.html#training-options) configuration, which consists of two neural networks - the first for isolating the animal instances (by finding their centroids) and the second for predicting all the body parts per instance.
:::info
:information_source: Note
Although the "Top-Down" configuration was designed with multiple animals in mind, it can also be used for single-animal videos. It makes sense to use it for videos where the animal occupies a relatively small portion of the frame - see [Troubleshooting Workflows](https://sleap.ai/guides/troubleshooting-workflows.html) for more info.
:::
Next you need to create a SLURM batch script, which will schedule the training job on the HPC cluster. Create a new file called `slurm_train_script.sh` (You can do this in the terminal with `nano`/`vim` or in a text editor of your choice on your local PC/laptop). An example is provided below, followed by explanations.
```bash
#!/bin/bash
#SBATCH -p gpu # partition
#SBATCH -N 1 # number of nodes
#SBATCH --mem 12G # memory pool for all cores
#SBATCH -n 2 # number of cores
#SBATCH -t 0-04:00 # time (D-HH:MM)
#SBATCH --gres gpu:1 # request 1 GPU (of any kind)
#SBATCH -o slurm.%N.%j.out # write STDOUT
#SBATCH -e slurm.%N.%j.err # write STDERR
#SBATCH --mail-type=ALL
#SBATCH --mail-user=n.sirmpilatze@ucl.ac.uk
# Load the SLEAP module
module load SLEAP
# Define directories for data and exported training job
DATA_DIR=/ceph/scratch/neuroinformatics-dropoff/SLEAP_HPC_test_data
JOB_DIR=$DATA_DIR/labels.v001.slp.training_job
# Go to the job directory
cd $JOB_DIR
# Run the training script generated by SLEAP
./train-script.sh
```
:::info
:information_source: Note
The `#SBATCH` lines are SLURM directives. They specify the resources needed for the job, such as the number of nodes, CPUs, memory, etc. For more information see the [SLURM documentation](https://slurm.schedmd.com/sbatch.html).
- the `-p gpu` and `--gres gpu:1` options ensure that your job will run on a GPU. If you want to request a specific GPU type, you can do so with the syntax `--gres gpu:rtx2080:1`. You can view the available GPU types on the [SWC internal wiki](https://wiki.ucl.ac.uk/display/SSC/CPU+and+GPU+Platform+architecture).
- the `--mem` option refers to CPU memory (RAM), not the GPU one. However, the jobs often contain steps that use the RAM.
- the `-t` option should be your time estimate for how long the job will take. If it's too short, SLURM will terminate the job before it's over. If it's too long, it may take some time to be scheduled (depending on resource availability). With time, you will build experience on how long various jobs take. It's best to start by running small jobs (e.g. reduce the number of epochs) and scale up gradually.
- `-o` and `-e` allow you to specify files to which the standard output and error will be directed. In the example scipt above, the filenames are set to contain the node name (`%N`) and the job ID (`$j`).
- The `--mail-type` and `--mail-user` options allow you to get email notifications about the progress of your job. Currently email notifications are not working on the SWC HPC cluster, but this might be fixed in the future.
The `module load SLEAP` line loads the SLEAP module, which we checked earlier.
The `cd` line changes the working directory to the training job folder. This is necessary because the `train-script.sh` file contains relative paths to th model configuration and the project file.
The `./train-script.sh` line runs the training job (executes the containe commands)
:::
Now you can submit the batch script with:
```bash
$ sbatch slurm_train_script.sh
Submitted batch job 3445652
```
You may monitor the progress of the job in various ways:
- View the status of the queued/running jobs with `squeue`:
```bash
# View status of queued/running jobs
$ squeue -u <SWC-USERNAME>
JOBID PARTITION NAME USER ST TIME NODES NODELIST(REASON)
3445652 gpu slurm_ba sirmpila R 23:11 1 gpu-sr670-20
```
- View status of running/completed jobs with `sacct`:
```bash
$ sacct -u <SWC-USERNAME>
JobID JobName Partition Account AllocCPUS State ExitCode
------------ ---------- ---------- ---------- ---------- ---------- --------
3445652 slurm_bat+ gpu swc-ac 2 COMPLETED 0:0
3445652.bat+ batch swc-ac 2 COMPLETED 0:0
```
- Run `sacct` with some more helpful arguments (view jobs from the last 24 hours, including the time elapsed):
```bash
$ sacct -u nstest \
--starttime $(date -d '24 hours ago' +%Y-%m-%dT%H:%M:%S) \
--endtime $(date +%Y-%m-%dT%H:%M:%S) \
--format=JobID,JobName,Partition,AllocCPUS,State,Start,End,Elapsed,MaxRSS
```
- View the contents of standard output and error (the node name and job ID will differ in each case):
```bash
$ cat slurm.gpu-sr670-20.3445652.out
$ cat slurm.gpu-sr670-20.3445652.err
```
### Evaluate the trained models
Upon successful completion of the training job, a `models` folder will have been created in the training job directory. It contains one subfolder per training run (by default prefixed with the date and time of the run), which holds the trained model files (e.g. `best_model.h5`), their configurations (`training_config.json`) and some evaluation metrics.
```bash
$ cd /ceph/scratch/neuroinformatics-dropoff/SLEAP_HPC_test_data
$ cd labels.v001.slp.training_job
$ cd models
$ ls -1
230509_141357.centered_instance
230509_141357.centroid
$ cd 230509_141357.centered_instance
$ ls -1
best_model.h5
initial_config.json
labels_gt.train.slp
labels_gt.val.slp
labels_pr.train.slp
labels_pr.val.slp
metrics.train.npz
metrics.val.npz
training_config.json
training_log.csv
```
The SLEAP GUI on your local machine can be used to quickly evaluate the trained models.
- Select "Predict" -> "Evaluation Metrics for Trained Models..."
- Click on "Add Trained Models(s)" and select the subfolder(s) containing the model(s) you want to evaluate (e.g. `230509_141357.centered_instance`).
- You can view the basic metrics on the shown table or you can also view a more detailed report (including plots) by clicking "View Metrics".
## Model inference
By inference, we mean using a trained model to predict the labels on new frames/videos. SLEAP provides the `sleap-track` command line utility for running inference on a single video or a folder of videos.
Below is an example SLURM batch script that contains a `sleap-track` call.
```bash
#!/bin/bash
#SBATCH -p gpu # partition
#SBATCH -N 1 # number of nodes
#SBATCH --mem 12G # memory pool for all cores
#SBATCH -n 2 # number of cores
#SBATCH -t 0-01:00 # time (D-HH:MM)
#SBATCH --gres gpu:1 # request 1 GPU (of any kind)
#SBATCH -o slurm.%N.%j.out # write STDOUT
#SBATCH -e slurm.%N.%j.err # write STDERR
#SBATCH --mail-type=ALL
#SBATCH --mail-user=n.sirmpilatze@ucl.ac.uk
# Load the SLEAP module
module load SLEAP
# Define directories for data and exported training job
DATA_DIR=/ceph/scratch/neuroinformatics-dropoff/SLEAP_HPC_test_data
JOB_DIR=$DATA_DIR/labels.v001.slp.training_job
# Go to the job directory
cd $JOB_DIR
# Run the inference command
sleap-track $DATA_DIR/videos/M708149_EPM_20200317_165049331-converted.mp4 \
-m $JOB_DIR/models/230509_141357.centroid/training_config.json \
-m $JOB_DIR/models/230509_141357.centered_instance/training_config.json \
--gpu auto \
--tracking.tracker none \
-o labels.v001.slp.predictions.slp \
--verbosity json \
--no-empty-frames
```
The script is very similar to the training script, with the following differences:
- The time limit `-t` is set lower, since inference is normally faster than training. This will however depend on the size of the video and the number of models used.
- The `./train-script.sh` line is replaced by the `sleap-track` command. Some important command line arguments are explained below. You can view a full list of the available arguments by running `sleap-track --help`.
- The first argument is the path to the video file to be processed.
- The `-m` option is used to specify the path to the model configuration file(s) to be used for inference. In this example we use the two models that were trained above.
- The `--gpu` option is used to specify the GPU to be used for inference. The `auto` value will automatically select the GPU with the highes percentage of available memory (of the GPUs that are available on the machine/node)
- The `--tracking.tracker` option is used to specify the tracker for inference. Since in this example we only have one animal, we set it to "none".
- The `-o` option is used to specify the path to the output file containing the predictions.
- The above script will predict all the frames in the video. You may select specific frames via the `--frames` option. For example: `--frames 1-50` or `--frames 1,3,5,7,9`.
You can submit and monitor the inference job in the same as the training job.
```bash
$ sbatch slurm_infer_script.sh
$ squeue -u <SWC-USERNAME>
```
Upon completion, a `labels.v001.slp.predictions.slp` file will have been created in the job directory.
You can use the SLEAP GUI on your local machine to load and view the predictions: "File" -> "Open Project..." -> select the `labels.v001.slp.predictions.slp` file.
## The training-inference cycle
Now that you have some predictions, you can keep improving your models by repeating the training-inference cycle. The basic steps are:
- Manually correct some of the predictions: see [Prediction-assisted labeling](https://sleap.ai/tutorials/assisted-labeling.html)
- Merge corrected labels into the initial training set: see [Merging guide](https://sleap.ai/guides/merging.html)
- Save the merged training set as`labels.v002.slp`
- Export a new training job `labels.v002.slp.training_job` (you may reuse the training configurations from `v001`)
- Repeat the training-inference cycle until satisfied