---
tags: workshop
---
# Introduction to UNIX for Cloud Computing: January 19, 2022
**When:** Wednesday, January 19, 2022 from 10:00 am-12:00 pm PDT
**Instructors:** Dr. Rayna Harris
**Helpers:** Jessica Lumian and Jeremy Walter
**Connect via** [](https://zoom.us/j/7575820324?pwd=d2UyMEhYZGNiV3kyUFpUL1EwQmthQT09)
**Computing environment:** [](https://mybinder.org/v2/gh/nih-cfde/training-rstudio-binder/data?urlpath=rstudio)
:::warning
#### Questions:
1. What city/state/country are you in now?
1. What time is it?
1. Why did you hope to learn from this workshop?
:::
#### Lesson Overview
This lesson introduces the UNIX command line to scientists and clinicians who need to use cloud-based and remote computers for basic and biomedical research.
These commands used in today's workshop are commonly used by practitioners across disciplines. By practicing the commands, you will gain familiarity with the command line and confidence as a programmer. These commands can be used on a local or remote computer. We hope that you notice an improvement in the speed and reproducibility of your bioinformatics workflow.
:::success
#### Today's Learning Goals
* Understand basic UNIX command structure
* Navigate through hierarchical directory structures
* Read, write, create, copy, move, and remove files
* Understand wildcards and regular expression
* Redirect outputs and write for loops to build reproducible workflows
:::
The lesson materials were adapted from the UC Davis Data Lab's [Intro to Cloud Computing](https://ngs-docs.github.io/2021-august-remote-computing/) workshop, Data Carpentry's [Introduction to the Command Line for Genomics](https://datacarpentry.org/shell-genomics/) lesson, and the Lab for Data Intensive Biology's [Advanced Beginner/Intermediate Shell](https://dib-training.readthedocs.io/en/pub/2016-01-13-adv-beg-shell.html) workshop.
Please refer to our [UNIX Cheatsheet](https://training.nih-cfde.org/en/latest/General-Tools/Cheat-Sheets/bash_cheatsheet/) for a list of commonly used commands.
#### Table of Contents
[TOC]
---
## 1. The shell and terminal
The **shell** is a computer program that uses a command-line interface (CLI) to give commands made by your keyboard to your operating system. Most people are used to interacting with a graphic user interface (GUI), where you can use a combination of your mouse and keyboard to carry out commands on your computer.
We can use the shell through a **terminal** program. From the terminal, we can open programs, run analyses, create documents, delete files, and create folders.
For this remote workshop, we will be using a custom-created computing environment using [Binder](https://mybinder.org/). Click the **launch binder** button below, wait for it to launch, then open a new terminal window by clicking **Terminal**.
[](https://mybinder.org/v2/gh/nih-cfde/training-rstudio-binder/data?urlpath=rstudio)

To help with readability, type `PS1='$ '` in the terminal to remove the very long computer name from the path. Then type `clear` to clear the screen of irrelevant warning messages.
```
PS1='$ '
clear
```
Why use Binder and RStudio? We like it for several reasons. With Binder, we can create custom computing environments that can be used by the instructor and the learners. This means we don't have to worry about differences between Mac, PC, and UNIX computers or admin permissions. Additionally, RStudio has a graphical interface that shows the filesystem, unlike most command-line terminal programs.
For today's lesson, we will focus on four different sets of data. `books` contains ebooks such as A Tale of Two Cities and The Wizard of Oz that were downloaded from [Project Gutenberg](https://www.gutenberg.org/ebooks/). .`southpark` contains a compressed .csv file containing all the lines spoken by each character across 14 seasons. `seattle` contains data from the Open Seattle Data Portal, including a csv file with names of pets. The `MiSeq` directory contains FASTQ and FASTA files that are associated with the [Mauther software tutorial](https://mothur.org/wiki/miseq_sop/). These data are useful for practicing commonly used UNIX commands to explore genome-scale data.
During this lesson, we use UNIX commands to answer questions following motivating questions.
* What is the title of Chapter 1 of each book?
* Which ebook contains the most lines of text?
* How many R1 and R2 reads were generated from each MiSeq sample?
* Do our results match the reported results?
* Which South Park character spoke the most lines?
:::success
#### Key points about the UNIX shell and terminal
* A shell is a program that reads commands and runs programs.
* We are using a remote terminal provided by mybinder.org.
:::
---
## 2. Navigating with `pwd`, `ls`, and `cd`
UNIX commands are like sentences that can be very simple or complex. The simplest commands consist of only the command name. Many require the name of a file or directory and allow specially formatted arguments, known as flags or options, which modify the default behavior of the program. The grammar of a shell allows you to combine existing tools into powerful pipelines and handle large volumes of data automatically. Sequences of commands can be written into a script, improving the reproducibility of workflows. The ease of getting things done via the shell will increase with your exposure to the program.
We should note that _folders_ are called **directories** at the command line. For all intents and purposes, they can be used interchangeably, but if you'd like more information please read about ["the folder metaphor"](https://en.wikipedia.org/wiki/Directory_%28computing%29#Folder_metaphor).
This Binder comes preloaded with data provided by your instructors. _If you want to do these exercises locally, on your own computer, you can [download the data here](https://s3.us-west-1.amazonaws.com/dib-training.ucdavis.edu/shell-data2.zip)._
The commands `pwd` and `ls` are two simple commands that can be used to answer the two commonly asked questions "where am I?" and "what files are here?". We will use these frequently through the next sections.
To answer the question "where am I?", we can use the **print working directory** or `pwd` command to see what directory we are currently located in.
```
pwd
```
This will print the **absolute path** to the directory where we are located. An absolute path shows the complete series of directories you need to locate either a directory or a file starting from the **root directory** of your computer. The absolute path to the root directory is `/`. A useful way to start thinking about directories and files is through levels. At the highest level of your computer, you have the root directory. Everything that is contained in your computer is located in directories below your root directory.
The **home directory** is typically two levels down. For many Mac users, the home directory is `/Users/USERNAME`. If you are using the Binder provided for this workshop, the home directory is `/home/jovyan`. Because the absolute path to the home directory is different for every user, you can refer to the home directory with the tilde symbol `~`.
```
/home/jovyan
```
:::info
Who or what is `Jovyan`?
:::spoiler
Who or what is `Jovyan`? According to [Project Juypter](https://jupyter.readthedocs.io/en/latest/community/content-community.html#what-is-a-jovyan), the creators of the binder service, the word “Jovian” describes several planets that share Jupiter-like properties. Much like the planet Jupiter and our solar system, the Jupyter community is large, distributed, and nebulous, so the word "Jovyan" is used to describe members of the community. Thus, the name of the User for this remote computer is "jovyan".
:::
The **list** or `ls` command is a simple yet powerful command that is used to list the contents of your computer. It can be executed with or without optional flags and directories or files. Let's look at the contents in our working directory by using the `ls`.
```
ls
```
We can see the following files:
```
books images README.md seattle
CFDE-logo.png MiSeq rstudio-terminal.png southpark
```
If we want more information about the files, such as the date they were created and their file size, we can add "flags" `-l` for long listing format.
```
ls -l
```
```
drwxr-xr-x 2 jovyan jovyan 4096 Jan 18 21:13 books
-rw-r--r-- 1 jovyan jovyan 71154 Jan 18 21:13 CFDE-logo.png
drwxr-xr-x 2 jovyan jovyan 4096 Jan 18 21:13 images
drwxr-xr-x 2 jovyan jovyan 4096 Jan 18 21:13 MiSeq
-rw-r--r-- 1 jovyan jovyan 2089 Jan 18 21:13 README.md
-rw-r--r-- 1 jovyan jovyan 188705 Jan 18 21:13 rstudio-terminal.png
drwxr-xr-x 2 jovyan jovyan 4096 Jan 18 21:13 seattle
drwxr-xr-x 2 jovyan jovyan 4096 Jan 18 21:13 southpark
```
Flags (sometimes called options) allow us to finely control the behavior of the command. But how did we know to add `-l` after ls? The [`ls` manual ](https://man7.org/linux/man-pages/man1/ls.1.html) describes the command and all its options in detail. Like most commands, you can type the command followed `--help` to view the manual in your terminal.
```
ls --help
```
:::warning
#### Challenge: Modifying the behavior of `ls`
You can use multiple flags, wildcards, and specify directories to modify the behavior of a command. What does the command `ls` do when used with the following option:
1. `ls -a`
2. `ls -F`
3. `ls -aF`
:::spoiler
1. The `-a` flag will list hidden files and directories.
2. The `-F` flag will class the file types by appending an identifier. This works best if there are directories present.
3. We can combine `-a` and `-F` to be `-aF` to use both options.
:::
Now we have seen how to list the contents of folders on our computers and what is located in the directory we are presently in. But some of the beauty of the shell is that we can perform activities in locations that we are not currently in. To do this we can either use an absolute path or a relative path. A **relative path** is the path to another directory from the one you are currently in. An **absolute path** starts from the root and ends in the apropriate subdirectory.
To move from one directory to the other, we use the `cd` command to **change directories**. We can use the `pwd` and/or `ls` commands to confirm that we did indeed change directories. Because you can change directories using either the relative or absolute path, there are multiple ways to successfully move up or down in the directory hierarchy.
Let's return to our home directory using the `cd` command and a relative path, then print the working directory to confirm.
Let's practice using the cd and ls commands to explore files in different directories.
Because books/ is in our working directory, we can navigate there with a relative path. What files are in the `books` directory and how large are they?
```
cd books/
pwd
ls -lh
```
We can see the following files:
```
-rw-r--r-- 1 jovyan jovyan 171K Jan 18 21:13 Alice_in_wonderland.txt
-rw-r--r-- 1 jovyan jovyan 789K Jan 18 21:13 A-tale-of-two-cities.txt
-rw-r--r-- 1 jovyan jovyan 789K Jan 18 21:13 book.txt
-rw-r--r-- 1 jovyan jovyan 282K Jan 18 21:13 PeterPan.txt
-rw-r--r-- 1 jovyan jovyan 1.1K Jan 18 21:13 README.md
-rw-r--r-- 1 jovyan jovyan 80K Jan 18 21:13 WizardOfOz.txt.gz
-rw-r--r-- 1 jovyan jovyan 12M Jan 18 21:13 yeast.fasta
```
:::warning
#### Challenge: Navigating with relative and absolute paths
Starting from `books`, which of the following commands could Jovyan use to navigate to the `MiSeq` directory?
1. `cd MiSeq`
2. `cd ./MiSeq`
3. `cd ~/MiSeq`
4. `cd /home/jovyan/MiSeq`
5. `cd ../MiSeq`
6. `cd ../../MiSeq`
7. `cd /MiSeq`
:::spoiler
1. No, MiSeq does not exist in the current working directory.
2. No, MiSeq does not exist in the current working directory.
3. Yes, MiSeq is in the home directory.
4. Yes, this is the full path to MiSeq.
5. Yes, MiSeq is in the directory one level above.
6. No, MiSeq is not in the directory two levels above.
7. No, MiSeq is not in the root directory.
:::
Most, but not all of the files in the MiSeq directory are .fastq files. Which .fastq files are the largest? We can use the wildcard `*` to list only files that end in .fastq. We can use the `-S` option to sort by size.
```
cd ~/MiSeq
pwd
ls -lhS *.fastq
```
```
-rwxr-xr-x 1 jovyan jovyan 11M Jan 18 21:13 F3D2_S190_L001_R1_001.fastq
-rwxr-xr-x 1 jovyan jovyan 11M Jan 18 21:13 F3D2_S190_L001_R2_001.fastq
-rwxr-xr-x 1 jovyan jovyan 9.2M Jan 18 21:13 F3D147_S213_L001_R1_001.fastq
-rwxr-xr-x 1 jovyan jovyan 9.2M Jan 18 21:13 F3D147_S213_L001_R2_001.fastq
-rwxr-xr-x 1 jovyan jovyan 7.1M Jan 18 21:13 F3D149_S215_L001_R1_001.fastq
-rwxr-xr-x 1 jovyan jovyan 7.0M Jan 18 21:13 F3D149_S215_L001_R2_001.fastq
-rwxr-xr-x 1 jovyan jovyan 6.7M Jan 18 21:13 F3D148_S214_L001_R1_001.fastq
-rwxr-xr-x 1 jovyan jovyan 6.7M Jan 18 21:13 F3D148_S214_L001_R2_001.fastq
-rwxr-xr-x 1 jovyan jovyan 4.3M Jan 18 21:13 F3D6_S194_L001_R1_001.fastq
-rwxr-xr-x 1 jovyan jovyan 4.3M Jan 18 21:13 F3D6_S194_L001_R2_001.fastq
```
How large are all the files in the `southpark` directory? After navigating to the `southpark` , we can use `ls` with the`-l` and `-h` options to use a "long listing" format with the filesize printed in a "human-readable" format using Megabytes, Kilobytes and Gigabytes instead of displaying the file size in bytes.
```
cd ../southpark
pwd
ls -l -h
```
We will see the following:
```
-rw-r--r--@ 1 jovyan jovyan 1.8M Jan 18 21:13 All-seasons-clean.csv.gz
-rw-r--r-- 1 jovyan jovyan 1.8M Jan 18 21:13 All-seasons.csv.gz
-rw-r--r-- 1 jovyan jovyan 252B Jan 18 21:13 LICENSE.md
-rw-r--r-- 1 jovyan jovyan 603B Jan 18 21:13 README.md
```
:::success
#### Key Points
|Command |Description|
|-|-|
|`pwd`| print name of current/working directory|
| `ls` [options] [path] | list directory contents |
|`cd` [path]| change the working directory |
:::
## 3. Reading files with `head`, `tail`, `cat`, and `less`
Now that we know what files exist on our computer, it is time to look at the contents of the file. There are multiple ways to look at the contents of a file.
The `cat` command prints the entirety of a file to the stdout of our computer. `head` prints, by default the first 10 lines of a file, and `tail` prints the last 10 lines of a file by default.
The `less` command provides a safe way of looking at the contents of a file without the ability to change it. Use the up and down arrows to scroll through the file. Type `q` to exit the lesson program
All four of the commands use the same syntax:
```
head [filename]
tail [filename]
cat [filename]
less [filename]
```
:::info
#### Tab completion
You can use TAB to do filename completion, so if you type `cat R` and then press your Tab key once, it will autocomplete if there is a unique match. If there is more than one match, the first Tab will do nothing, and the second will show all the possible matches.
:::
Let's navigate to the `books` directory.
```
cd ~/books/
```
Now we can view the file with `head`, `cat`, `less`, and `tail`.
```
head book.txt
tail book.txt
cat book.txt
less book.txt
```
We can see there are a lot more books, and we can look at the first few lines of all the .txt files with the *.
```
head *.txt
```
Notice that there is one book that is compressed. We can uncompress it with the command `gunzip`. The `-k` option will keep the original file.
```
gunzip -k WizardOfOz.txt.gz
```
Now we can return the previous command and also see the first lines of The Wizard of Oz.
```
head *.txt
```
::: success
#### Key UNIX commands for viewing files
| Command [OPTION] | Description |
| -------- | -------- |
|`head [filename]` | print first 10 lines of `FILENAME` |
|`cat [filename]`| print `FILENAME`'s contents to stdout|
|`less [filename]`| view `FILENAME` without printing to stdout |
| `gunzip [filename]` | uncompress filename
| `gzip -k [filename]` | compress a file and keep the original |
:::
## 4. Working with files and directories using `cp`, `gunzip`, `mv`, `mkdir`, and `curl`
We are used to copying and moving files using a GUI. These functions can be also carried out at the command line.
The `cp` and `mv` commands can be used to copy and move (or rename) files and directories respectively. For both commands, you must specify the old and new names. Specifying the path is necessary if you want to move files out of the current working directory.
```
cp [original-filename] [copy-filename]
mv [original-filename] [new-filename]
```
Let's make a copy of some raw data before we start modifying it.
```
cp book.txt book-copy.txt
ls
```
The `mv` command can be used to either move files to a new location or to rename them (which is essentially moving the contents from the old filename to the new file name. Let's use the `mv` command to rename one of the books.
```
mv A-tale-of-two-cities.txt Two-Cities.txt
```
If you want to move your book-copy.txt to a new folder, you first have to create that folder using the command `mkdir`. Then you move the copy. We can use `ls *` to list files in this directory and subdirectories.
```
mkdir book-copies
mv book-copy.txt book-copies
ls *
```
Take care when naming and renaming files. File names should not contain spaces or slashes. The use of capital letters (e.g. CamelCase) and underscores (e.g. snake_case) are often preferred over periods or spaces. It is good practice to keep track of where you got files. The commands used to get these books are stored in the `README.md`. The `README.md` file is written in [Markdown](https://en.wikipedia.org/wiki/Markdown). (To learn more about Markdown syntax, read this excellent [Markdown guide](https://github.com/adam-p/markdown-here/wiki/Markdown-Cheatsheet).)
```
head README.md
```
```
# Books
These books were downloaded from [Project Gutenberg](https://www.gutenberg.org/ebooks/) using the following commands.
curl https://www.gutenberg.org/files/98/98-0.txt -o book.txt
curl https://www.gutenberg.org/files/98/98-0.txt -o A-tale-of-two-cities.txt
curl https://www.gutenberg.org/files/11/11-0.txt -o Alice_in_wonderland.txt
curl https://www.gutenberg.org/files/16/16-0.txt -o PeterPan.txt
curl https://www.gutenberg.org/files/55/55-0.txt -o WizardOfOz.txt
```
If the books are deleted or modified, they can easily be downloaded again from the source with `curl` command followed by the path to the file. Use the `-o` option to specify the file name.
```
curl https://www.gutenberg.org/files/98/98-0.txt -o A-tale-of-two-cities.txt
```
:::warning
### Challenge: Creating and deleting a hierarchy of directories
Now you know how to copy and move files, but you may encounter errors if you try to move files to a directory that does not exist. But, have no fear, we can create new directories at the command line with the command `mkdir` followed by the path to the directories you want to create.
What happens when you run the following commands?
1. `mkdir data results images/`
2. `mkdir data/results/images`
3. `mkdir -p data/results/images`
:::spoiler Answer
1. 3 subfolders (data, results, and images) all created in the working directory.
2. An error message (`mkdir: cannot create directory ‘data/results/images’: No such file or directory`) appears because the results directory does not exist
3. The `-p` option tells `mkdir` to create parent directories if they do not already exist, so the subdirectory results and its subdirectory, images, are successfully created.
:::
::: warning
Now, imagine you could create the perfect directory hierarchy for a project. What would it look like? Type a command or series of commands to create your ideal directory structure. Share with your group.
:::spoiler Hint
An example project directory could be set up like this:
```
mkdir awesome-project/
cd awesome/
mkdir -p data/ results/2020/ results/2021 images/ notes/
ls *
```
:::
::: warning
If you created some files or directories that you don't want, you can remove them with the `rm` and `rmdir` commands. How could you remove `data/results/`
:::spoiler A solutions
```
rmdir data/results/images
rmdir data/results
```
or use the `-r` option to "recursively" delete all the contents.
```
rm -r data/results
```
:::
:::success
#### Key Commands: Working with files and directories
| Command | Description |
| -------- | -------- |
|cp [old] [new] | copies a file |
|mv [old] [new]| moves or renames a file or directory |
|rm [path] | removes (deletes) a file |
|mkdir -p [path/to/files] | creates a hierarchy of directories |
|rmdir [path] | removes an empty directory |
|curl [webaddress] -o [filename] | downloads from URL named [filename]
:::
## 5. Finding things with `grep` and `find`
A big part of data science is making sure what you _expect_ in a particular file is what you _have_ in that file. This is fairly easy when your files are small but is challenging when the files are much larger than your screen.
#### Books
Let's navigate to the books directory to explore this topic.
```
cd
cd books
```
Earlier, when we used `head` and `tail` to view the books, we read extraneous information about Project Gutenberg. Let's say you want to extract some information about each book such as the author or title? We can use the command `grep` to search for a pattern
```
grep Title *txt
```
```
Alice_in_wonderland.txt:Title: Alice’s Adventures in Wonderland
A-tale-of-two-cities.txt:Title: A Tale of Two Cities
book.txt:Title: A Tale of Two Cities
PeterPan.txt:Title: Peter Pan
WizardOfOz.txt:Title: The Wonderful Wizard of Oz
```
What are the Chapter titles of each book?
```
grep Chapter *txt
```
You should see some text including the following:
```
PeterPan.txt: Chapter I. PETER BREAKS THROUGH
PeterPan.txt: Chapter II. THE SHADOW
...
WizardOfOz.txt: Chapter I. The Cyclone
WizardOfOz.txt: Chapter II. The Council with the Munchkins
```
Why do we only see Chapter titles for 2 books? Because the other Chapter titles are written in all caps. Let's modify grep to match Chapter 1, chapter 1, and CHAPTER 1. We use the `-i` option to "ignore case" and the `-w` option to match the word.
```
grep -i -w "chapter i" *txt
```
This returns the first chapter for each book. Shown below is the first chapter for each book. This pattern occurs once in the table of contents and once in the main text. A Tale of Two Cities has 3 Chapter 1s.
```
Alice_in_wonderland.txt: CHAPTER I. Down the Rabbit-Hole
Alice_in_wonderland.txt:CHAPTER I.
A-tale-of-two-cities.txt: CHAPTER I The Period
A-tale-of-two-cities.txt: CHAPTER I Five Years Later
A-tale-of-two-cities.txt: CHAPTER I In Secret
A-tale-of-two-cities.txt:CHAPTER I.
A-tale-of-two-cities.txt:CHAPTER I.
A-tale-of-two-cities.txt:CHAPTER I.
book.txt: CHAPTER I The Period
book.txt: CHAPTER I Five Years Later
book.txt: CHAPTER I In Secret
book.txt:CHAPTER I.
book.txt:CHAPTER I.
book.txt:CHAPTER I.
PeterPan.txt: Chapter I. PETER BREAKS THROUGH
PeterPan.txt:Chapter I.
WizardOfOz.txt: Chapter I. The Cyclone
WizardOfOz.txt:Chapter I
```
#### MiSeq
To explore this topic in more detail and in a biological context, navigate to the `data/MiSeq/` directory.
```
cd ~/MiSeq
ls
```
This directory contains multiple [**FASTQ** files](https://en.wikipedia.org/wiki/FASTQ_format)). A FASTQ file normally uses four lines per sequence.
* Line 1 begins with a '@' character and is followed by a sequence identifier and an optional description (like a FASTA title line).
* Line 2 is the raw sequence letters.
* Line 3 begins with a '+' character and is optionally followed by the same sequence identifier (and any description) again.
* Line 4 encodes the quality values for the sequence in Line 2 and must contain the same number of symbols as letters in the sequence.
A FASTQ file containing a single sequence might look like this:
::: info
An example FASTQ file
```
@SEQ_ID
GATTTGGGGTTCAAAGCAGTATCGATCAAATAGTAAATCCATTTGTTCAACTCACAGTTT
+
!''*((((***+))%%%++)(%%%%).1***-+*''))**55CCF>>>>>>CCCCCCC65
```
:::
We can use the `cat` command to print .fastq files to the screen, but thousands of lines of text would crowd your screen. Instead, let's use the `head` and `less` command to view a portion of a file. By default, they print the first 10 lines. We can use the `-n` flag to specify how many lines to print. Because each entry of a .fastq file consists of 4 lines, printing the first 4 and last 4 lines of the file will confirm that the file is properly formatted.
You can copy the file name and paste it into the console or you can type and use tab complete to pick a particular file.
```
head -n 4 F3D0_S188_L001_R1_001.fastq
```
```
@M00967:43:000000000-A3JHG:1:1101:18327:1699 1:N:0:188
NACGGAGGATGCGAGCGTTATCCGGATTTATTGGGTTTAAAGGGTGCGTAGGCGGCCTGCCAAGTCAGCGGTAAAATTGCGGGGCTCAACCCCGTACAGCCGTTGAAACTGCCGGGCTCGAGTGGGCGAGAAGTATGCGGAATGCGTGGTGTAGCGGTGAAATGCATAGATATCACGCAGAACCCCGATTGCGAAGGCAGCATACCGGCGCCCTACTGACGCTGAGGCACGAAAGTGCGGGGATCAAACAG
+
AABABBFFFGGGGGGGGGGGGGGGGHHHHHHHGGGHHHHHGHGGGGGGGHGGGGGGHHHHHHHHHHGGGGGHHHHGHGGGGGGHHBGHGDGGGGGHHHGGGGHHHHHHHHGGGGGHG@DHHGHEGGGGGGBFGGEGGGGGGGG.DFEFFFFFFFDCFFFFFFFFFFFFFFFFFFFFFFFFFFDFDFFFEFFCFF?FDFFFFFFFFAFFFFFFFFFFFBDDFFFFFEFADFFFFFBAFFFA?EFFFBFF
```
```
tail -n 4 F3D0_S188_L001_R1_001.fastq
```
```
@M00967:43:000000000-A3JHG:1:2114:11799:28499 1:N:0:188
TACGGAGGATGCGAGCGTTATCCGGATTTATTGGGTTTAAAGGGTGCGTAGGCGGGATGCCAAGTCAGCGGTAAAAAAGCGGTGCTCAACGCCGTCGAGCCGTTGAAACTGGCGTTCTTGAGTGGGCGAGAAGTATGCGGAATGCGTGGTGTAGCGGTGAAATGCATAGATATCACGCAGAACTCCGATTGCGAAGGCAGCATACCGGCGCCCTACTGACGCTGAGGCACGAAAGCGTGGGTATCGAACAG
+
3AAA?AADAFFFCGCGGGFEGCHA?EG?FHHGHGHGGEFHGFHGHF?EFA?EBFGC?EGEFHHHHHH3EEGEEGHFH@E0BCA/CGFHHHDGGGFFF/@DGGDGFHHHHBGH.<<AGGHHHHGHEGE?-ABGF;FFGGDGGGGGGG.CCFEFFF/9;9BFFFFFFFFFFFFFFFFFFFFFFFFFFBDFFFFFFFFCBAF9.AFF/FFAAFFADAFFEFFFFFBDDFFFF.DFFFFFFDDFA;BFFDEFFFF
```
**FASTQ** files should not be confused with **FASTA** files. FASTQ files contain information about the quality of the sequence, but FASTA files only contain the sequence and an identifier.
::: info
An Example FASTA file
```
> SEQUENCE_1
MTEITAAMVKELRESTGAGMMDCKNALSETNGDFDKAVQLLREKGLGKAAKKADRLAAEG
LVSVKVSDDFTIAAMRPSYLSYEDLDMTFVENEYKALVAELEKENEERRRLKDPNKPEHK
IPQFASRKQLSDAILKEAEEKIKEELKAQGKPEKIWDNIIPGKMNSFIADNSQLDSKLTL
MGQFYVMDDKKTVEQVIAEKEKEFGGKIKIVEFICFEVGEGLEKKTEDFAAEVAAQL
>SEQUENCE_2
SATVSEINSETDFVAKNDQFIALTKDTTAHIQSNSLQSVEELHSSTINGVKFEEYLKSQI
ATIGENLVVRRFATLKAGANGVVNGYIHTNGRVGVVIAAACDSAEVASKSRDLLRQICMH
```
:::
Let's look at a synthetic FASTA file. Because each entry of a .fasta file consists of 2 lines, let's modify head and tail to look at the first and last two lines of HMP_MOCK.v35.fasta.
```
head -n 2 HMP_MOCK.v35.fasta
```
```
> A.baumannii.1
TGGGGAATATTGGACAATGGGGGGAACCCTGATCCAGCCATGCCGCGTGTGTGAAGAAGGCCTTATGGTTGTAAAGCACTTTAAGCGAGGAGGAGGCTACTTTAGTTAATACCTAGAGATAGTGGACGTTACTCGCAGAATAAGCACCGGCTAACTCTGTGCCAGCAGCCGCGGTAATACAGAGGGTGCGAGCGTTAATCGGATTTACTGGGCGTAAAGCGTGCGTAGGCGGCTTATTAAGTCGGATGTGAAATCCCCGAGCTTAACTTGGGAATTGCATTCGATACTGGTGAGCTAGAGTATGGGAGAGGATGGTAGAATTCCAGGTGTAGCGGTGAAATGCGTAGAGATCTGGAGGAATACCGATGGCGAAGGCAGCCATCTGGCCTAATACTGACGCTGAGGTACGAAAGCATGGGGAGCAAACAGGATTAGATACCCTGGTAGTCCATGCCGTAAACGATGTCTACTAGCCGTTGGGGCCTTTGAGGCTTTAGTGGCGCAGCTAACGCGATAAGTAGACCGCCTGGGGAGTACGGTC
```
```
tail -n 2 HMP_MOCK.v35.fasta
```
```
>S.pneumoniae.1
TAGGGAATCTTCGGCAATGGACGGAAGTCTGACCGAGCAACGCCGCGTGAGTGAAGAAGGTTTTCGGATCGTAAAGCTCTGTTGTAAGAGAAGAACGAGTGTGAGAGTGGAAAGTTCACACTGTGACGGTATCTTACCAGAAAGGGACGGCTAACTACGTGCCAGCAGCCGCGGTAATACGTAGGTCCCGAGCGTTGTCCGGATTTATTGGGCGTAAAGCGAGCGCAGGCGGTTAGATAAGTCTGAAGTTAAAGGCTGTGGCTTAACCATAGTAGGCTTTGGAAACTGTTTAACTTGAGTGCAAGAGGGGAGAGTGGAATTCCATGTGTAGCGGTGAAATGCGTAGATATATGGAGGAACACCGGTGGCGAAAGCGGCTCTCTGGCTTGTAACTGACGCTGAGGCTCGAAAGCGTGGGGAGCAAACAGGATTAGATACCCTGGTAGTCCACGCTGTAAACGATGAGTGCTAGGTGTTAGACCCTTTCCGGGGTTTAGTGCCGTAGCTAACGCATTAAGCACTCCGCCTGGGGAGTACGACC
```
::: warning
#### Challenge: Wilcards
Sometimes you know a file or directory exists, but you can't find it. Sometimes you want to find many files with similar properties. This is where the wildcard (`*`) comes in handy. What do the following commands do?
1. `ls *`
1. `ls F3D*`
1. `ls *fasta`
:::spoiler
1. `ls *` lists files in the working directory and 1 level down.
1. `ls MiSeq/F3D*` lists files in the data/MiSeq directory that start with "F3D".
1. `ls MiSeq/*fasta` lists files in the data/MiSeq directory that end with "fasta".
:::
A lot of the time we want to know if a file contains what we expect. A useful thing to do is to be able to **search the contents of files** for a particular string of characters you would like to find. We can use the file pattern searcher `grep` to find things.
The `MiSeq/` directory contains many of the sequence files ending in`.fastq`. We expect these files to contain information in a particular format throughout the file with four lines of information for each sequence string. Looking through a million line file using less will take a long time. Rather than manually looking at the whole file, we can print only a portion of the file's contents to standard output.
Let's imagine you would like to find the sequence `CATTAG` in your MiSeq files. We can also use the **wildcard** regular expression to search `CATTAG` in all of the .fastq files located in our current working directory:
```
grep CATTAG F3D0_S188_L001_R2_001.fastq
grep CATTAG *.fastq
```
:::warning
#### CHALLENGE: grep
What line does `CATTAG` occur on in `F3D141_S207_L001_R1_001.fastq`?
:::spoiler Hint
Use `grep --help` to search for `grep` options related to line number.
`grep -n [filename]` will print the line number.
:::
In addition to searching for nucleotide sequences, you may want to search for information in the first line of a .fastq or .fasta file. The `^` (shift + 6) can be used to specify "the beginning of the line".
```
grep "^>" *fasta
```
This will print the name associated with a given sequence in the searched files. In this case, there is only one fasta file, so the name is not printed.
```
>A.baumannii.1
>A.odontolyticus.1
>B.cereus.1
...
>S.agalactiae.1
>S.mutans.1
>S.pneumoniae.1
```
We can also print the line before or after the line that matches a pattern with `-B 1` `-A 1`, respectively.
```
grep -A 1 "^>" *fasta
```
This will print the name and sequence for every entry. The first is shown here.
```
>A.baumannii.1
TGGGGAATATTGGACAATGGGGGGAACCCTGATCCAGCCATGCCGCGTGTGTGAAGAAGGCCTTATGGTTGTAAAGCACTTTAAGCGAGGAGGAGGCTACTTTAGTTAATACCTAGAGATAGTGGACGTTACTCGCAGAATAAGCACCGGCTAACTCTGTGCCAGCAGCCGCGGTAATACAGAGGGTGCGAGCGTTAATCGGATTTACTGGGCGTAAAGCGTGCGTAGGCGGCTTATTAAGTCGGATGTGAAATCCCCGAGCTTAACTTGGGAATTGCATTCGATACTGGTGAGCTAGAGTATGGGAGAGGATGGTAGAATTCCAGGTGTAGCGGTGAAATGCGTAGAGATCTGGAGGAATACCGATGGCGAAGGCAGCCATCTGGCCTAATACTGACGCTGAGGTACGAAAGCATGGGGAGCAAACAGGATTAGATACCCTGGTAGTCCATGCCGTAAACGATGTCTACTAGCCGTTGGGGCCTTTGAGGCTTTAGTGGCGCAGCTAACGCGATAAGTAGACCGCCTGGGGAGTACGGTC
```
As you have seen, `grep` is very useful for finding things within files, and the `*` or wildcard is useful for listings files that match a partial pattern. But, how do we find files when we don't know their location? The `find` command.
Let's navigate back to our home directory and use `find` to command to look for .fasta files. Use the`-name` flag to specify that you are looking for a file with the name listed in double quotes. Use the `*` wildcard to only search for files with a specific extension.
```
cd ~
find . -name "*.fasta"
```
This reveals that .fasta file was found in both the books and the MiSeq directory.
```
./books/yeast.fasta
./MiSeq/HMP_MOCK.v35.fasta
```
::: warning
#### CHALLENGE: find
1. Which directories contain a `README.md` file?
2. Which directories contain images?
:::spoiler A hint
Use the commands:
```
find . -name "README.md"
find . -name "*.png"
```
to show the following README.md files
```
./seattle/README.md
./books/README.md
./MiSeq/README.md
./README.md
./southpark/README.md
```
and the following images.
```
./images/rstudio-binder-setup.png
./images/MiSeq-readcount-Mothur.png
./rstudio-terminal.png
./CFDE-logo.png
```
:::
:::success
#### Key Points:
|Command|Description|
|-|-
| `grep [option] [filename]` | selects lines in files that match patterns|
| `wc` [filename] | prints the total characters, words, and lines in a file
|`find [path] [conditions]` | finds files with specific properties that match patterns|
:::
## 6. Redirecting, counting, and looping things with `>`, `>>`, and `|`, `wc` and `for`
If you did the last challenge, you saw that the **images/** directory contains a file called **MiSeq-readcount-Mothur.png**. This image is a screenshot from the [Mauther software tutorial](https://mothur.org/wiki/miseq_sop/) showing the count or number of reads for each sample.
To see if our data matches theirs, we can count the number of lines in the .fastq files with the UNIX command `wc`. This will print by default the number of characters, words, and lines in a file. We can ask for just the number of lines with the `-l` option.
```
wc -l *fastq
```
This gives something like:
```
31172 F3D0_S188_L001_R1_001.fastq
31172 F3D0_S188_L001_R2_001.fastq
23832 F3D141_S207_L001_R1_001.fastq
23832 F3D141_S207_L001_R2_001.fastq
...
28280 F3D9_S197_L001_R1_001.fastq
28280 F3D9_S197_L001_R2_001.fastq
19116 Mock_S280_L001_R1_001.fastq
19116 Mock_S280_L001_R2_001.fastq
1218880 total
```
However, this number is too large. In fact, it is 4 times larger than the number of reads. To capture just the number of reads, we can first use `grep` followed `wc`.
By default, many UNIX commands like `cat` send output to something called
standard out, or "stdout". This is a catch-all phrase for "the basic
place we send regular output." (There's also standard error, or "stderr",
which is where errors are printed; and standard input, or "stdin", which
is where input comes from.)
Much of the power of the UNIX command line comes from working with
stdout output, and if you work with UNIX a lot, you'll see characters
like the `>` (redirect), `>>` (append) , and `|` (pipe). These
are redirection commands that say, respectively, "send stdout to a new
file", "append stdout to an existing file", and "send stdout from one
program to another program's stdin."
If you know you want to save an output file, you can use the redirect symbol `>`. Note, if you want to save a file in a different directory, that directory must exist. We can go to our MiSeq directory and try it.
Let's now use grep to match the first line, which starts with "@M00967", of all the R1 files then pipe the output to wc and count the number of liens.
```
head -n 1 *.fatsq
grep "^@M00967" *R1*.fastq | wc -l
```
The answer, 152883, matches the authors. Nice. Also, we just scanned many large files very quickly to confirm a finding.
```
152883
```
You probably don't want to read all the lines that were matched, but piping the output to head is a nice way to view the first 10 lines.
```
grep "^@M00967" *R1*.fastq | head
```
The result looks like the following. The error message at the end is as expected, and happens after the specified number of lines are printed.
```
F3D0_S188_L001_R1_001.fastq:@M00967:43:000000000-A3JHG:1:1101:18327:1699 1:N:0:188
F3D0_S188_L001_R1_001.fastq:@M00967:43:000000000-A3JHG:1:1101:14069:1827 1:N:0:188
F3D0_S188_L001_R1_001.fastq:@M00967:43:000000000-A3JHG:1:1101:18044:1900 1:N:0:188
F3D0_S188_L001_R1_001.fastq:@M00967:43:000000000-A3JHG:1:1101:13234:1983 1:N:0:188
F3D0_S188_L001_R1_001.fastq:@M00967:43:000000000-A3JHG:1:1101:16780:2259 1:N:0:188
F3D0_S188_L001_R1_001.fastq:@M00967:43:000000000-A3JHG:1:1101:19378:2540 1:N:0:188
F3D0_S188_L001_R1_001.fastq:@M00967:43:000000000-A3JHG:1:1101:17674:2779 1:N:0:188
F3D0_S188_L001_R1_001.fastq:@M00967:43:000000000-A3JHG:1:1101:18089:2781 1:N:0:188
F3D0_S188_L001_R1_001.fastq:@M00967:43:000000000-A3JHG:1:1101:14203:2907 1:N:0:188
F3D0_S188_L001_R1_001.fastq:@M00967:43:000000000-A3JHG:1:1101:19561:3147 1:N:0:188
grep: write error: Broken pipe
```
To count the number of reads in each file, we could `grep` each file individually, but that would be prone to errors.
```
grep "^@M00967" F3D0_S188_L001_R1_001.fastq | wc -l
grep "^@M00967" F3D0_S188_L001_R1_001.fastq | wc -l
grep "^@M00967" F3D142_S208_L001_R1_001.fastq | wc -l
```
If we want to know how many times it occurs in each in each file, we need a for loop. A for often loop looks like this:
```
for [thing] in [list of things]
do
echo $[thing]
command $[thing]
done
```
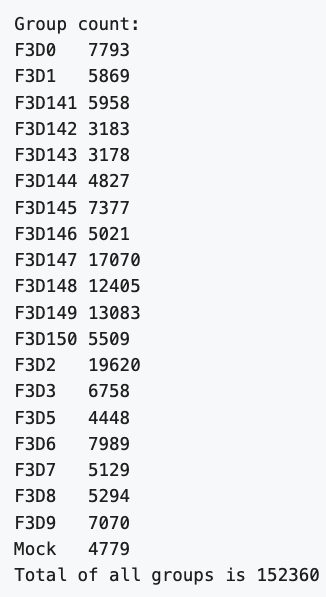
To answer the question, how many reads are in each R1 file, we can construct the following for loop.
```
for file in *R1*fastq
do
echo $file
grep "^@M00967" $file | wc -l
done
```
This gives the following result, which matches the authors
```
F3D0_S188_L001_R1_001.fastq
7793
F3D141_S207_L001_R1_001.fastq
5958
F3D142_S208_L001_R1_001.fastq
3183
...
F3D8_S196_L001_R1_001.fastq
5294
F3D9_S197_L001_R1_001.fastq
7070
Mock_S280_L001_R1_001.fastq
4779
```
:::warning
#### CHALLENGE: Using `wc` to calculate genome size
How many genes are in the yeast genome?
:::spoiler Hint
If you did a previous exercise with `find` you saw a file called yeast.fasta in the books directory. You can use `wc` to count the lines beginning with `>` to calculate the genome size.
```
cd ~/books
grep "^>" yeast.fasta | wc -l
```
```
6600
```
:::
:::warning
#### CHALLENGE: Writing for loops with `grep` and `wc`
Which eBook contains the most lines that start with "The"?
:::spoiler Hint
The following for loop will reveal that 269 lines of A Tale of Two Cities start with The.
```
cd ~/books
for book in *.txt
do
echo $book
grep -w "^The" $book | wc -l
done
```
```
Alice_in_wonderland.txt
69
A-tale-of-two-cities.txt
269
book.txt
269
PeterPan.txt
60
WizardOfOz.txt
123
```
:::
:::success
#### Key points: redirecting outputs
|Command|Description|
|-|-
|`\|` | pipes the standard output to a new command|
| `>` | redirects the standard output to a new file |
| `>>` | append the standard output to a new or existing file|
| `wc` | prints the characters, words, and lines of a file
:::
## 7. Bonus module: Using `cut` to work with .csv files
When working with .csv files, sometimes you only want to look for patterns in one column instead of all the columns. So, you need to filter the data first to only have the column of interest.
Notice, if you search for characters' names in the South Park TV series, grep will return both instances where the character spoke a line and where the line mentions their name.
```
cd ~/southpark
gunzip -k All-seasons-clean.csv
grep Chef All-seasons-clean.csv
```
_Note: if you don't want to keep an uncompressed copy of a file, you can use the command `zgrep` to search for a pattern in a compressed file._
Let's say you want to know which of your Southpark characters had the most spoken lines. You could do like by counting how often their name appeared in the third column of the .csv file. We need the command `cut`. We use the `-f3` to specify the third column and `-d,` to specify that it is a csv.
```
head All-seasons-clean.csv
cut -d, -f3 All-seasons-clean.csv
```
Now, after we extract only the column with character names, we can search for our favorite characters and count how many spoken lines they had.
```
cut -d, -f3 All-seasons-clean.csv | grep Chef | wc -l
```
If we want to do this on more than one character, we could copy and paste the command lots of times, editing it for each character.
```
cut -d, -f3 All-seasons-clean.csv | grep Chef | wc -l
cut -d, -f3 All-seasons-clean.csv | grep Kenny | wc -l
cut -d, -f3 All-seasons-clean.csv | grep Kyle | wc -l
cut -d, -f3 All-seasons-clean.csv | grep Stan | wc -l
```
Or, we could use a for loop to loop through a list of characters of interest/
```
for character in Chef Kenny Cartman Kyle
do
echo $character
cut -d, -f3 All-seasons-clean.csv | grep $character | wc -l
done
```
## Concluding thoughts
This lesson focused on file and directory exploration because that's
something everyone needs to know, and all these commands will work on
pretty much any computer that is running a UNIX compatible shell (including
Mac OS X and Windows Subsystem for Linux).
We have shown you multiple options for editing and working with text files. These tools may seem confusing at first, but they will become second nature if you use them regularly.
If you want to save all the commands we used today, you can use the `history` command to print out all the commands you typed.
```
history
```
You can save the file in your home directory with:
```
history > ~/history-today.txt
```
The binder and this documentation page will stay working for the foreseeable
future, so please feel free to come back and revisit some of these commands!
Google (and especially stackoverflow) is your friend! Use Internet
search whenever you have questions about what a command does, or what
commands to use to achieve a particular task.
The website [Explain Shell](https://explainshell.com/) is great for defining what each command and flag does.
::: success
#### Key points
This workshop teaches a dozen commonly used UNIX commands that can be combined to perform power, reproducible bioinformatic workflows. The commands taught `pwd` `ls` `cd` `cat` `head` `less` `cp` `mv` `rm` `mkdir` `grep` `wc` `cut` `gunzip` and `gzip` (and probably a few others).
:::
 Sign in with Wallet
Connect another wallet
Sign in with Wallet
Connect another wallet