---
tags: 1082, lsa
---
- Book mode https://hackmd.io/@ncnu-opensource/book
# CI/CD
- Book mode https://hackmd.io/@ncnu-opensource/By4H6JLNW
:::spoiler 目錄
[TOC]
:::
<br>
<img class="flower "src="http://1.blog.xuite.net/1/5/e/6/20639728/blog_1170816/txt/28954586/60.gif"/>
<img class="flower "src="http://1.blog.xuite.net/1/5/e/6/20639728/blog_1170816/txt/28954586/59.gif"/>
<img class="flower "src="http://1.blog.xuite.net/1/5/e/6/20639728/blog_1170816/txt/28954586/60.gif"/>
# CI/CD 是甚麼?:boom:
:::success
## CONTITUOUS --
## -- Integration
:point_right: Avoid Conflicts.
> 及時反映衝突,馬上處理
## -- Delivery
:point_right: Be Ready To Deploy.
## -- Deployment
:point_right: Automatic Deploy.
:::
<!-- ### Continuous Integration
> The practice of frequently integrating one's new or changed code with the existing code repository. **~wikipedia**
### Continuous Delivery
> the ability to get changes of all types—including new features, configuration changes, bug fixes and experiments—into production, or into the hands of users, **safely** and **quickly** in a sustainable way. **~continuousdelivery.com**
### Continuous Deployment
> Continuous deployment is a strategy for software releases wherein any code commit that passes the **automated** testing phase is automatically released into the production environment, making changes that are visible to the software's users. **~WhatIs.com**
#### Example Tasks (CD)
- Publishing to (mobile) app stores
- Performing/updating Kubernetes deployments
- Publishing libraries to repos/registries (e.g. NPM, - NuGet, Maven) -->
## 為什麼需要 CI/CD ?
1. 避免版本衝突
1. 及早發現 bug 及早修正
1. 開發人員專注於自己的工作,更有生產力
1. 更快部署,更常部署
1. 越常發布新版本,有助於團隊做出更好的決定
1. 從 5 個月更新 1 次,到 1 天更新 5 次
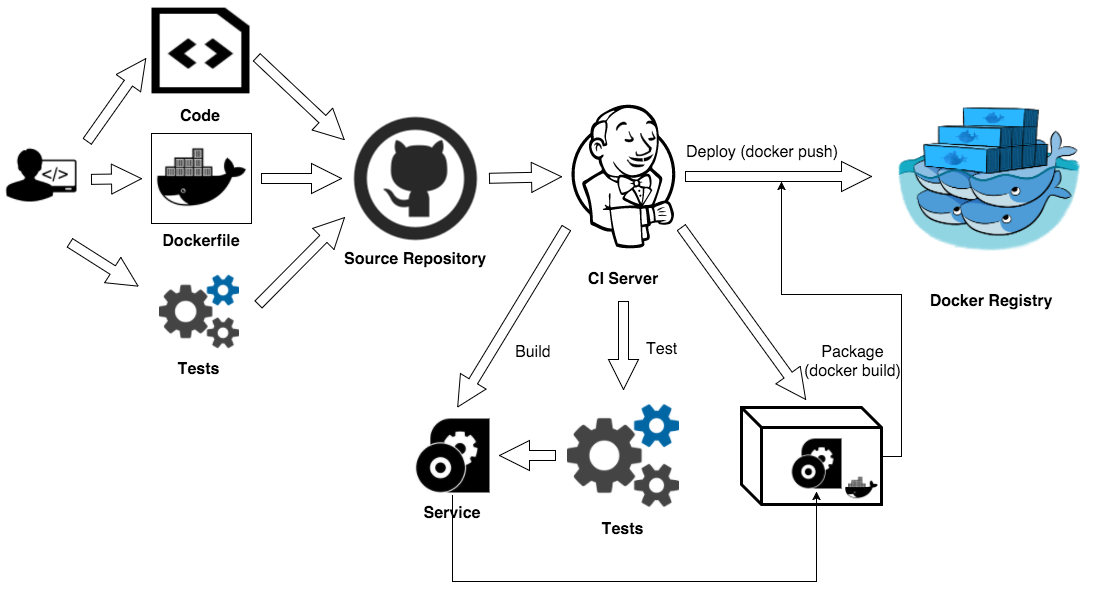
## CI/CD流程圖


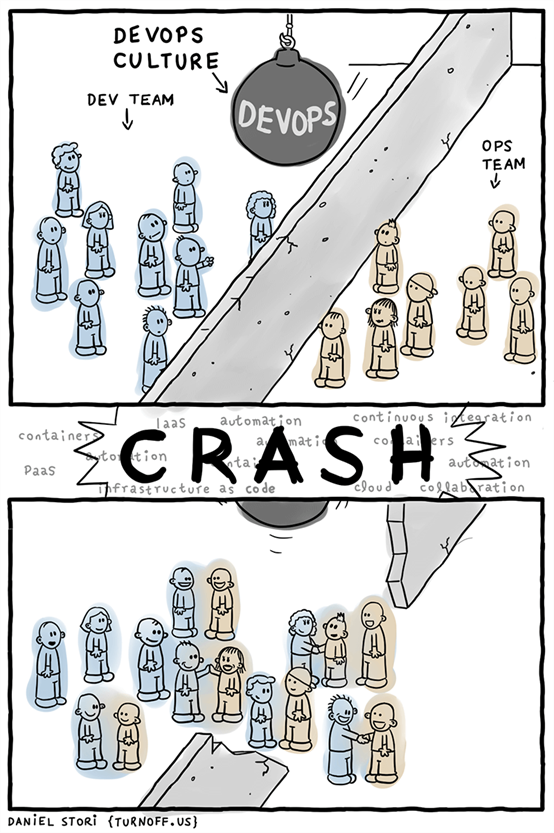
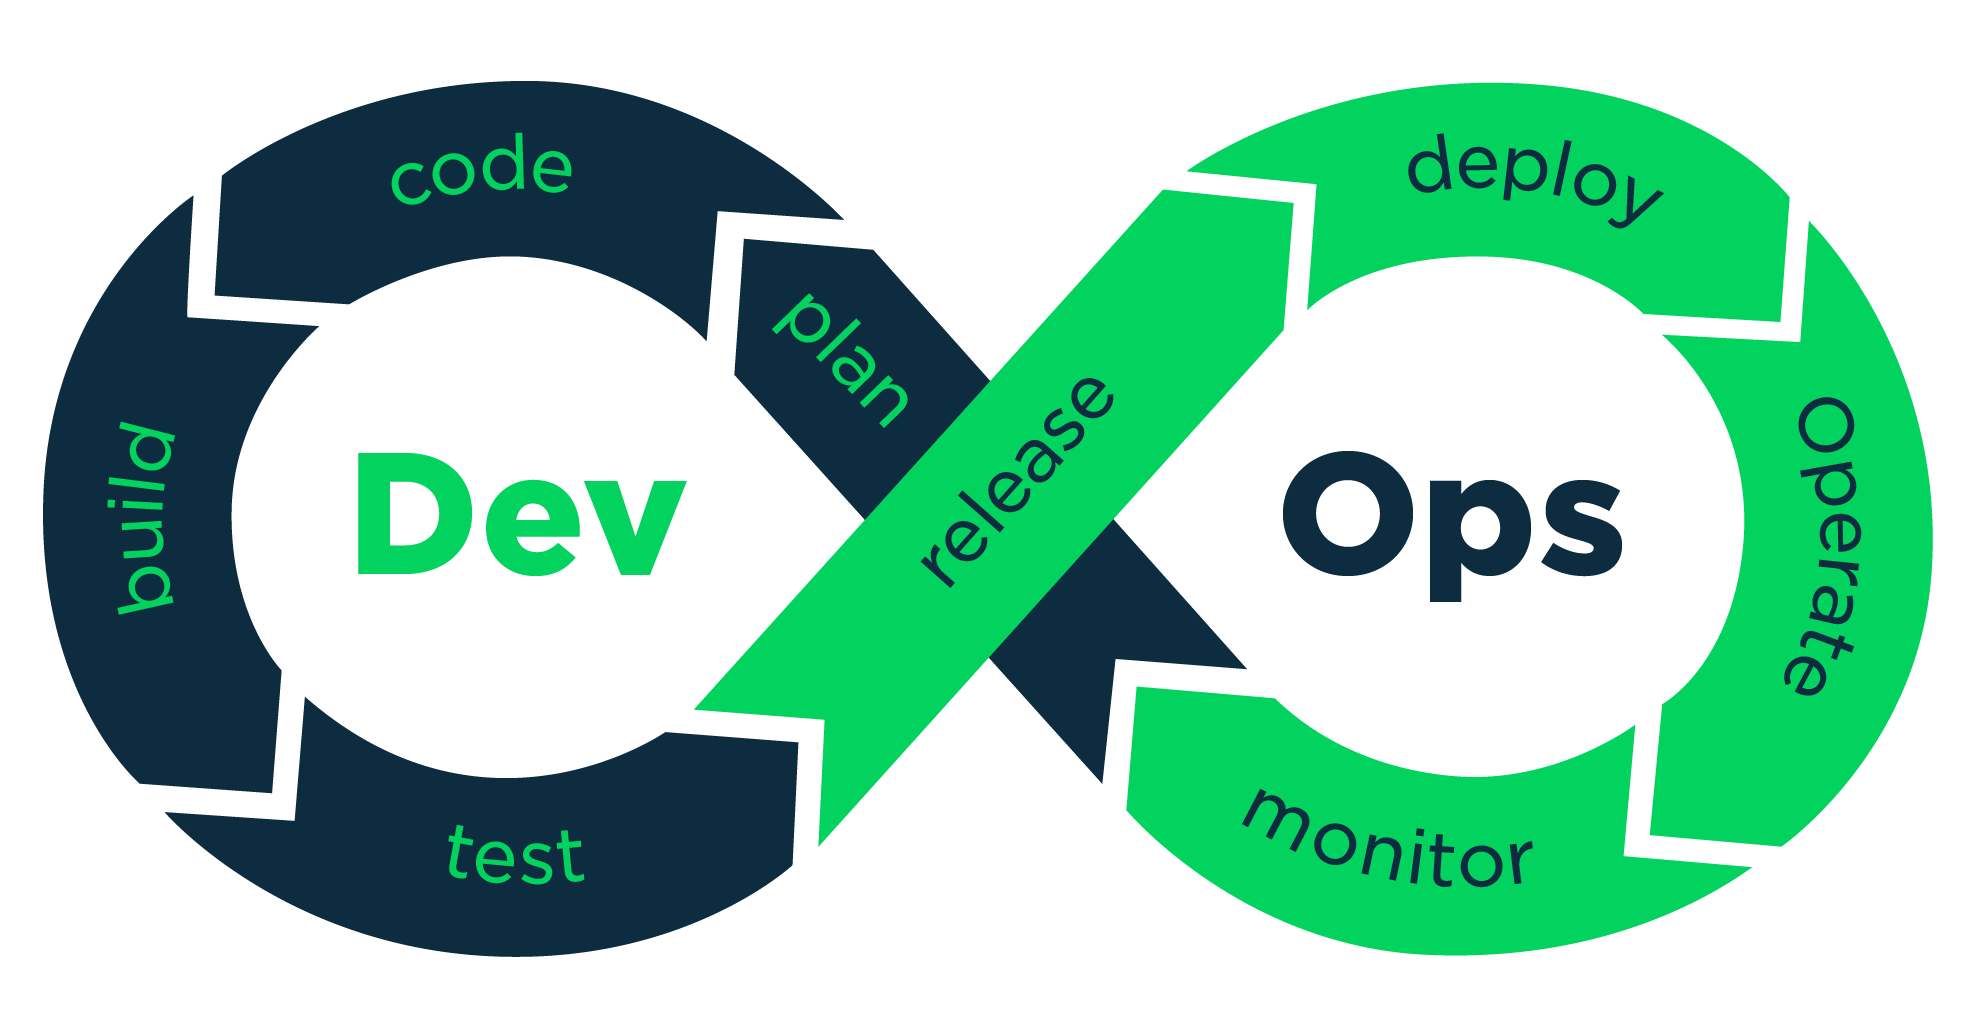
## DevOps 與 CI/CD 的關係
:::info
補充
另一個概念 **Agile Development**:盡快取得市場的 feedback,確認開發方系是否符合市場需求。需要 DevOps 和 CI/CD 兩項技術支援以達到加速整個流程的目的。
:::
## 自動測試
**CI/CD 中非常重要的一環**
- 單元測試 (Unit Test)
- 整合測試 (Intergration Test)
- 端對端測試 (End to End, E2E)
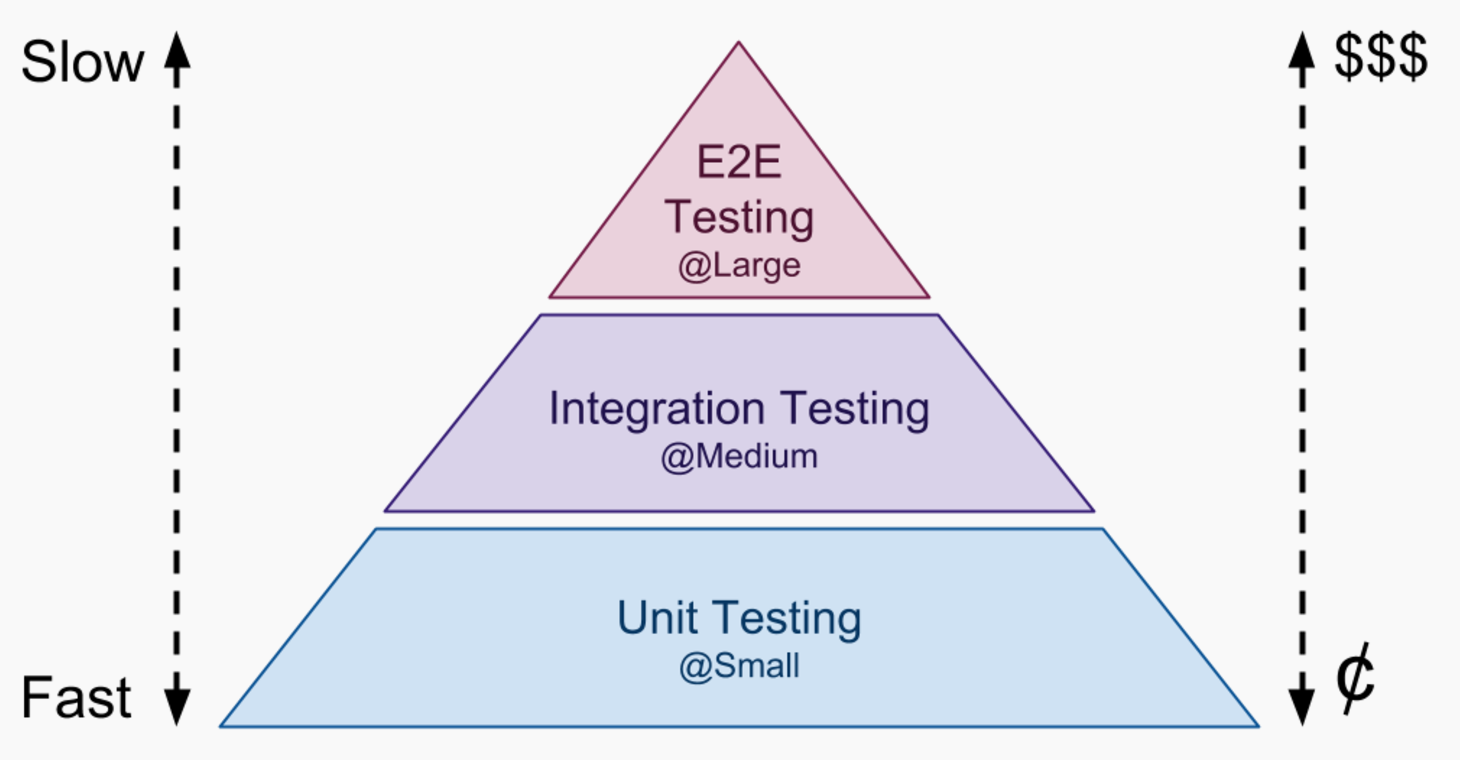
### 單元測試 (Unit Test)
- 檢查每個元件是不是 OK 的
- 範圍小、速度快、比例最多
- 以最小單位做測試 (method、class、function)
- F.I.R.S.T Principle
- Fast:越快越好
- Independent:相依性越低越好
- Repeatable:降低環境影響
- Self-Validating:輸出 Boolean

- Timely (TDD的概念) 及時
> TDD(Test-Driven Development)是一種開發流程,中文是「測試驅動開發」。 用一句白話形容,就是「先寫測試再開發」。 先寫測試除了能確保測試程式的撰寫,還有一個好處:有助於在開發初期釐清程式介面如何設計。
### 整合測試 (Intergration Test)
- 檢測多個元件組合後還是不是 OK 的
<br/>
<br/>
- 範圍較大、速度較慢
- 可能結合了:網路、Server、database
### 端對端測試 (End to End, E2E)
- 以用戶的角度做測試 (模擬完整的環境)
- 針對 UI 做測試
- 常見的 web 測試工具:selenium
### 小結
- 軟體開發者有責任為自己寫的 code 做單元測試或整合測試。
- 注意金字塔的比例,避免過多的E2E測試取代整合測試 (變成沙漏型)
- 其他測試 : 回歸測試、用戶接受度測試 (UAT)
## CI/CD 的缺點與風險 (注意事項)?
### 流程較多
- 若對一個什麼都沒有做的團隊,想要一次到位,多數機率會以失敗收場
### 排除 Continuous Deployment
- 專案內容極度嚴謹(如:金錢、機密資訊等...),容錯率相當敏感之系統,都還是會建議人工驗證完畢,再部屬至系統
<br>
<img class="flower "src="http://1.blog.xuite.net/1/5/e/6/20639728/blog_1170816/txt/28954586/60.gif"/>
<img class="flower "src="http://1.blog.xuite.net/1/5/e/6/20639728/blog_1170816/txt/28954586/59.gif"/>
<img class="flower "src="http://1.blog.xuite.net/1/5/e/6/20639728/blog_1170816/txt/28954586/60.gif"/>
# CI/CD 如何辦到 ?
- 版控系統
- Git hooks
- Git hooks post commit
- inotify
- Container
維持開發環境和營運環境的統一性
維持測試環境的單純
維持系統的安全性
- docker in docker (DinD)
## 版本控制系統
人工的版控 :point_down:

當專案稍微大型一點,還在用人工去做版控已經不太實際...

> pic by 陳建宏老師
### 人工版控的缺點 :
1. 無法得知檔案版本之間的差異
1. 無法得知備份的原因
1. 無法追蹤修改者和修改的內容
1. 人工管理容易出錯
1. 無法快速切換版本
:::warning
所以我們需要一個自動化的版控系統,去解決上述問題。
:::
### Branch & Merge
為了保持 codebase 的健康,我們會以 branch 的方式,從現在穩定的版本開一個分支,並且在這個分支上開發,開發完後要跟 codebase 合併,就是所謂的 merge。
### 有哪些版本控制系統?
- Git
- SVN (Subversion)
- CVS (Concurrent Versions System)
- Bazaar
- Bitbucket (以前用 Mercurial,現在用 Git)
> [Bitbucket 放棄 Mercurial
](https://blog.gslin.org/archives/2019/08/23/9167/bitbucket-%E6%94%BE%E6%A3%84-mercurial/)
## Git
### Git 的出現
Linux kernel 的開發團隊原本以 BitKeeper 來管理程式碼,但後來 BitKeeper 開始收費,於是 Linus Torvalds(Linux 之父) 花了 10 天,自己做了一個版控系統,就是 Git。
### Git 能做到
- 追蹤:
- 更動前 v.s. 更動後的程式碼
- 修改者
- 修改時間
- 修改原因(修改者需自行撰寫 commit message)
### Git 的優點
1. 免費、開源
1. 速度快、檔案體積小 (snapshot)
[.git 目錄巡禮](https://hackmd.io/ij7Y936vSTSxjOnTMwqo9w?view)
1. 分散式系統
- 在以往的集中式版控系統(Centralize Version Control),例如 [CVS](https://en.wikipedia.org/wiki/Concurrent_Versions_System) 或是 [SVN](https://zh.wikipedia.org/wiki/Subversion),需要一台專用的伺服器,所以萬一這台伺服器壞了或是沒有連網,就無法使用。
- 而 Git 屬於分散式系統,在沒有伺服器或網路的環境中依然可以在 local 端操作,等伺服器正常運作或連網後再進行同步。
- 實際上在使用 Git 的過程中,大多的操作都在本機完成,這也是它速度快的很大一個原因。
1. 支援多人同時編輯,傳統版控的作法是把要修改的檔案 lock 起來,直到解除 lock 之前,其他人都是無法編輯的狀態。
### Git 的缺點
易學難精,但根據 "80/20 法則", 20% 的指令就可以應付 80% 的工作。
### Fast-Forward Merge
當 master 還沒被其他 branch 修改,對目前 fork 出來的 branch 來說,他就等於是所有的修改,所以可以被 ff-merge 回去。

預設為 ff-merge,使用`no-ff`參數 merge,生成新節點,以便維持版本歷史的清晰。
## 三種版本控制流程
三種最常用的 Workflow
- Git flow
- Github flow
- GitLab flow
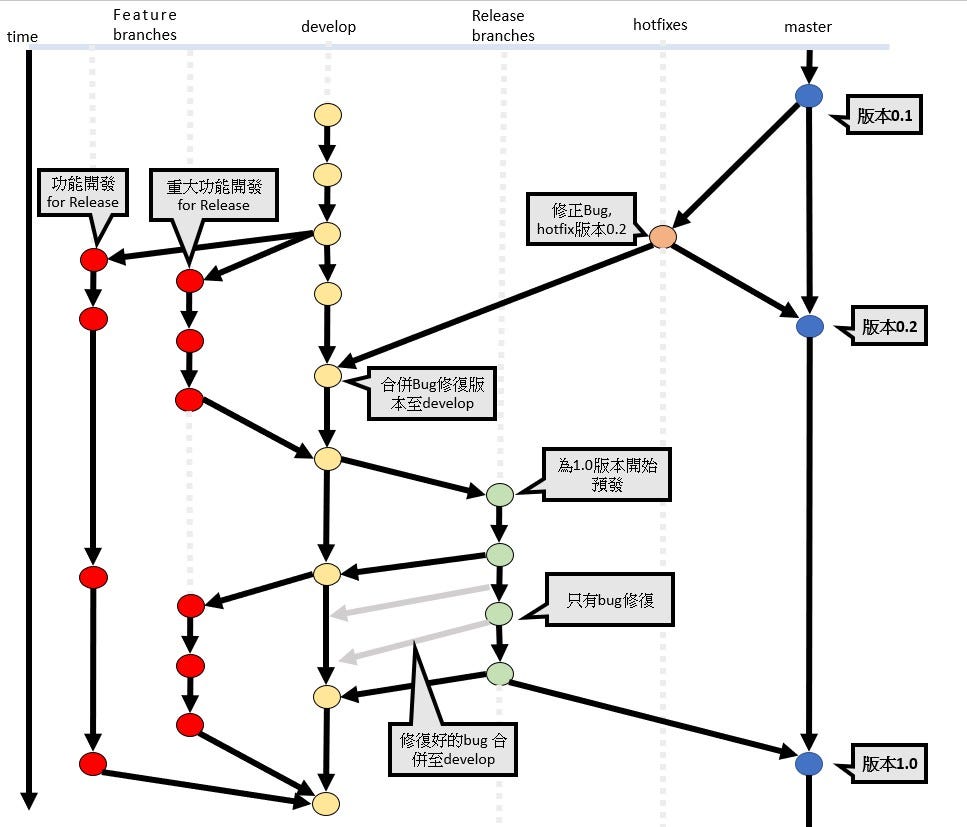
### Git flow
最早出現,也最早被廣泛使用。
特色是專案中長期 (不會刪除) 存在兩個 branch :point_right: **Master** & **Develop**。
- master branch : 存放對外發布的版本 (穩定版)
- develop branch : 存放最新的開發版本
還有三種短期的臨時分支,開發完 merge 到 master 或 develop 就會刪除。
- feature branch(功能分支)
為了開發某個功能而從 develop 拉出來的分支,開發完成後要再併入 develop。
- hotfix branch(修復分支)
修復小型 bug 時使用的分支,修復結束後合併進 master 和 develop,然後刪除。
- release branch(預發分支)
develop 在合併到 master 之前,為了進行版本測試而拉出來的分支,只處理與發布前相關的提交。預發布結束後合併進 develop 和 master,最後刪除。
### Github flow
Github 比 Git 多了兩個服務,fork 和 pull request(簡稱PR)。
先有一個共有的 remote repository,然後各自 fork 到個人的 repository。完成 develop 之後,向共有的 repository 發 PR,審核後 merge 進 master。

所以他只有 feature 跟 master 分支 :point_down:

### GitLab flow
- 以 master 做為主要的開發分支。
- merge request (MR)
- Upstream 原則
#### 前兩者的問題 :
1. Git 中 hotfix 跟 release 在版本快速疊代的專案裡幾乎用不到。
2. Git 中 hotfix 跟 release 分別從 develop 跟 master 開出來,要 merge 回去的時候會忘記要 merge 回哪裡。
3. 在 Github 可能會發生,版本發佈(審核)的流程跑到一半的同時,又在 master 上 push,造成混亂。
4. Github 中只用一個 master 分支,要做到:開發 => 測試 => 發佈,實在是不太夠用。
5. Github 中只用一個 master 分支,有多個版本要同時維護,實在是不太夠用
>
#### **GitLab solution:**
1. 主要使用一個 master 分支(同 Github)
2. 同上
3. 新增一個 production 分支,專門供發布使用
4. Environment Branches & Upstream First
新增了所謂 pre-production branch,以供不同環境測試使用

5. Release Branches & Upstream First
要對特定版本做維護的時候,再從 master 分支 cherry-pick 出需要的 commit

> 如此一來,既可以滿足很多 github flow 不方便的地方,又不會像 git flow 那麼複雜。
<br>
<img class="flower "src="http://1.blog.xuite.net/1/5/e/6/20639728/blog_1170816/txt/28954586/60.gif"/>
<img class="flower "src="http://1.blog.xuite.net/1/5/e/6/20639728/blog_1170816/txt/28954586/59.gif"/>
<img class="flower "src="http://1.blog.xuite.net/1/5/e/6/20639728/blog_1170816/txt/28954586/60.gif"/>
# 如何開始?
## Google 搜尋 CI / CD 最常看到下面這張圖 :point_down:
進而產生對知名工具的迷思
> FIXME 不符合現狀
## 常見的 CI / CD 工具
> FIXME table
- Jenkins (老牌的 CI/CD 工具,設定繁複,對新手不友善,程式碼裸奔)
- Circle CI
- Travis CI
- GitLab CI/CD
- Drone
| 名稱 | jenkins | drone | Gitlab CI | Travis CI | Circle CI |
|-|-|-|-|-|-|
| 定價 | Free | Free | Free |Free / On-premise| Free / Pricing|
| 支援系統 | Linux、Mac OS、iOS | Linux、Mac OS、iOS | Linux|Linux|Linux、Mac OS、支援容器|
| 服務類型 |SaaS|SaaS|SaaS/On-premise| SaaS | SaaS |
| 支援的版控系統 |CVS、Git、Perforce|Git、Bitbucket|GitHub|GitHub |GitLab、Bitbucket |
| 設定檔格式 |.jenkins.yml |.drone.yml|.gitlab-ci.yml|.travis.yml|.circle.yml|
| 特點 |1.在各版本作業系統輕鬆更新 2. 可以通過Web介面輕鬆設定和設定 Jenkins | 1. 為開源產品使用者可下載官方Docker映象或從原始碼構建 2. Pipeline配置了一個簡單易讀的檔案,可以直接提交至git倉庫;每個Pipeline步驟都在一個隔離的Docker容器中執行|1. 提供大多數功能的API讓開發人員進行更深入的整合 2. GitLab中的內部專案允許促進內部儲存庫的內部sourcing |1. Travis使用虛擬機器構建應用程式 2. 強大的 API 和命令列工具 |1.支援Docker可以配置自定義環境 2. 與VCS工具整合
## 把架構簡化為下面這張圖,再逐步擴大到上一張圖的境界。 :point_down:

## 架構決定後,依需求把選擇的的系統或是工具填上去。以我們的選擇為例。 :point_down:

## 為什麼選用 GitLab CI/CD?
1. 可中文化
2 . 但是如果你平常用 Github, 他也有支援
:point_right: [GitLab CI/CD for GitHub
](https://about.gitlab.com/solutions/github/)
3. **OpenSource!!!!** 可以架自己的 CI Server 就算了,還可以架自己的gitlab
4. 被 BT 推坑
### GitLab Runners又是什麼?
預設是使用雲端的共享的 runner 來執行 `.gitlab-ci.yml` 裡面撰寫的 script,不過你也可以架自己的 runner,runner 就是一個在 server 上跑的 container,所以一個 server 也可以架設多個 runner。
:point_right: [GitLab Runner Docs](https://docs.gitlab.com/runner/)
<br>
<img class="flower "src="http://1.blog.xuite.net/1/5/e/6/20639728/blog_1170816/txt/28954586/60.gif"/>
<img class="flower "src="http://1.blog.xuite.net/1/5/e/6/20639728/blog_1170816/txt/28954586/59.gif"/>
<img class="flower "src="http://1.blog.xuite.net/1/5/e/6/20639728/blog_1170816/txt/28954586/60.gif"/>
# GitLab CI/CD
:::success
**GitLab 內建了 CICD 工具,不需要使用第三方工具。**
:::
## Dashboard 上的元素
- **Job**
整個 GitLab-CI 裡面最小的執行單位,每一個 job 都會開一個 container。
- **Stage**
包含一個或多個 Job,代表一個執行階段。
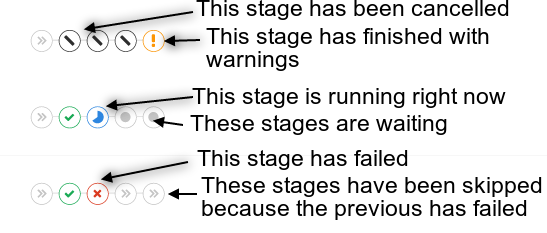
- **Pipeline**
由一個或多個 Stage 組成,就是一次 CI/CD 的所有執行階段,依序執行 Stage,執行過程中一旦有一個 Job 報錯,預設後續的 Stage 都會被忽略。

:::info
- job_B :point_right: `allow_failure: true` (`.gitlab-ci.yml`)

:::
## Stage Status
## What is `.gitlab-ci.yml` ?
:::info
放在 Project 的根目錄,用來決定 Gitlab CI 要做什麼。它會跟著 Project 一起做版控,每次 Push 的時候 GitLab 就會去讀取他,然後用 Gitlab Runner 執行 pipeline.
> YAML 是專門用來寫設定檔的語言,和 python 一樣用縮排代表層級
:::
### `.gitlab-ci.yml` 檔案結構
```yaml=
stages:
- stage_1
- stage_2
image: alpine:latest
```
- stages: 一開始就要先定義 pipeline 中有哪些 stage,還有執行順序
- image: 設定要使用的映像檔
> alpine: 極輕量化的 linux (5MB)
```yaml=+
job_A:
stage: stage_1
script:
- touch hello.txt
- echo 'this is job A'
- echo 'Hello world!!' > hello.txt
#在這邊定義了上面 touch 的 hello.txt為 artifacts
artifacts:
paths:
- hello.txt
```
- stage: 設定目前的 job 屬於哪個 stage (預設為 test )
- script: 此 job 要執行的腳本內容 ( job 中唯一必要的參數 )
- artifacts: 當 stage 結束時會保留的檔案,以便別的 job 取用

```yaml=+
job_B:
stage: stage_1
script:
- echo "this is job B"
- exit 1
allow_failure: true
job_C:
stage: stage_2
#這個 stage 需要上一個 stage 裡叫 hello 的 job
script:
- "cat hello.txt"
```
- allow_failure: 設定允許失敗的話,當失敗時,後續的 stage 照樣會執行。
> `exit 1` :point_right: 強制設定 job 為 failed (0 為 success,非 0 皆為失敗 )
:::info
#### 其他參數
| 參數 | 內容 |
| ------------- | ---------------------------------------------------------- |
| tags | 用來選擇註冊到 gitlab 的自架 runner |
| dependencies | 限制 job 之間的依賴關係 |
| cache | 存放需要使用的套件,以前沒有 cache 的時候放在 artifacts |
| before_script | 每次執行測試之前的設置,例如 docker 的登入,或 apt install |
| only | 定義 job 僅限於哪些 branch 使用 |
| except | 定義 job 不被哪些 branch 使用 |
| retry | 設置失敗後重試的次數,小於等於 2 |
:::
:::warning
#### Cache vs Artifacts
|Cache|Artifacts|
|-|-|
|透過 key 來辨識,同樣的 key 檔案會被後來執行的 job 覆蓋|沒有同 key 覆蓋問題|
|只會存在同一個 runner 所以不同 tag 的 job 無法相互取用|生成之後,後面的 job 都可以取用|
:::
<br>
<img class="flower "src="http://1.blog.xuite.net/1/5/e/6/20639728/blog_1170816/txt/28954586/60.gif"/>
<img class="flower "src="http://1.blog.xuite.net/1/5/e/6/20639728/blog_1170816/txt/28954586/59.gif"/>
<img class="flower "src="http://1.blog.xuite.net/1/5/e/6/20639728/blog_1170816/txt/28954586/60.gif"/>
# Lab
## [the reab LAB](https://hackmd.io/bk9TRJX1RE6CvBNBoNr0sQ)
### 架設 GitLab runner
``` bash
# 先加入 gitlab 這個 repo
curl -L https://packages.gitlab.com/install/repositories/runner/gitlab-runner/script.deb.sh | sudo bash
# install
sudo apt-get install gitlab-runner
```
設定預設要使用的 image,他給你的是 doker + machine,可以自己做選擇。
還有 executor 預設要用的 runner
### 再註冊到 GitLab 上
連結大概長這樣
https://gitlab.com/chiyuh1996/hello/-/settings/ci_cd
```bash
sudo gitlab-runner register
# 這邊輸入 gitlab 給你的位址跟 token
# 然後幫這個 runner 取個名字跟 tag
```
## 1. Hellow World!
### 先在 gitlab 開一個 repo
1. new project
1. 輸入一些有的沒的 ( project 名稱 etc.)
1. create project
### 在 local 端 clone 下來並加入 .gitlab-ci.yml
```bash
#clone your project
git clone "your project url" "your local folder"
#add .gitlab-ci.yml
touch .gitlab-ci.yml
```
### 編輯 `.gitlab-ci.yml`
```yaml=
Hello:
# 這行也可以省略,因為有預設 image
image: ubuntu:18.04 #或 alpine: latest
script:
-echo "Hello world!"
```
### 將檔案 push上 remote
```bash
git add .gitlab-ci.yml
git commit -m 'whatever message'
git push origin master
```
### 到 Gitlab 查看成果

顯示 passed 表示執行成功
那再點進去看他到底做了什麼
## 2. Pipeline with Artifacts & Dependencies
Artifacts 就是在 jobs 之間傳遞的檔案,
常用於 error report等
example
```yaml=
stages:
- stage_1
- stage_2
image: alpine:latest
job_A:
stage: stage_1
script:
- touch hello.txt
- echo 'this is job A'
- echo 'Hello world!!' > hello.txt
#在這邊定義了上面 touch 的 hello.txt為 artifacts
artifacts:
paths:
- hello.txt
job_B:
stage: stage_1
script:
- echo "this is job B"
- exit 1
allow_failure: true
job_C:
stage: stage_2
#這個stage需要上一個stage裡叫hello的job
script:
- "cat hello.txt"
```
這樣就成功把 hello.txt 從 job_A 傳到 job_C
如果在 job_C 中把 dependencies 設為 job_B
```yaml
# 在 job_C 中加入這行
dependencies: job_B
```
則 job_C 只會去取用 job_B 的artifacts,所以他就拿不到 hello.txt 這個檔案

:::info
- 補充: 當 job 屬於同一個 stage,就不能設定 dependency

:::
## 實作
專案目錄

DOCKERFILE
```
FROM php:apache
COPY index.php /var/www/html
```
:::info
**ADD 跟 COPY 的差別**
COPY 是單純把 local 檔案 複製到 docker image 裡面,ADD 可以做到 COPY 的功能,不一樣的是,ADD 可以用URL (非 local),或者是直接把一個 tar 檔案,解壓到指定的 docker image 裡的位置。意思是就可以 save 你的 image 並用 artifacts 傳到下個 stage,就可以在下個 stage 把這個 image 把他 load 出來
:::
#### 具體流程大概會是以下這樣
```yaml=
stages:
- unit_test
- build
- test
- deploy
```
#### 1. 單元測試
```yaml=+
unit_test:
stage: unit_test
image: php:7.3
before_script:
# Install dependencies
- bash ci/docker_install.sh > /dev/null
script:
- phpunit test/IndexTest.php
```
#### 2. Build Image
```yaml=+
docker-build:
image: docker
stage: build
services:
- docker:dind
before_script:
# 登入 registry , GitLab 會自動產生這三個變數
- docker login -u "$CI_REGISTRY_USER" -p "$CI_REGISTRY_PASSWORD" $CI_REGISTRY
script:
- docker build -t $CI_REGISTRY_IMAGE:$CI_COMMIT_SHORT_SHA .
-t $CI_REGISTRY_IMAGE:$CI_COMMIT_REF_SLUG
- docker push $CI_REGISTRY_IMAGE:$CI_COMMIT_SHORT_SHA
```
:::info
**參考:若要改成 push 到 Docker Hub**
在 project 的 CI/CD 設定中加入 Docker Hub 的 url 跟帳號密碼,即可改成 push 到 Docker Hub。

Docker Hub 也有自動 build image 的功能。在 Docker Hub 設定好 autobuild 之後,當每次 push 到 git repository,就會透過 webhook 去觸動 Docker Hub 開始 build image。
:::
#### 3. 跑起來測試看看
這邊會在 docker 裡面把剛剛 build 的 image 跑起來
再看跑出來的字串是否符合預期
```yaml=+
test:
image: docker
stage: test
services:
- docker:dind
before_script:
- docker login -u "$CI_REGISTRY_USER" -p "$CI_REGISTRY_PASSWORD" $CI_REGISTRY
script:
- docker run -d --name test $CI_REGISTRY_IMAGE:$CI_COMMIT_SHORT_SHA
- export OUTPUT=$(docker exec test curl -s localhost?name=World)
- >
if [ "$OUTPUT" = "Hello World" ]; then
echo "OK"
else
echo $OUTPUT
exit 1
fi
after_script:
- docker stop test
- docker rm test
````
<style>
.flower {
width:33%;
}
</style>