# 15th March Progress
This is the fourth of my weekly study progress report before going to NTUST for internship. Here I will explain about how to build simple timer using Ionic 4 Platform.
## Summary of this week:
- Build PWA using Ionic 4 in app folder
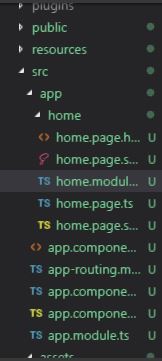
- With Ionic 4 we can build our app by editing all components in src/app/home folder, instead of "index.html" in src folder
- index.html call the app-root which means it call the source from app folder
- In app/home folder, the html file is the main index.html, IF we don't edit the others ("index.html" in src folder, or "app.component.html" in src/app folder)
- Knowing this, we can build more than home page by add more reference to "app-routing.module.ts", which is not explained in here
- Study about programming in Typescript (Ts) language
- Typescript is JavaScript-like for Ionic project, we can modify in here using Typescript format
- Typescript can be understood with ease if we have object-oriented programming (OOP) basic knowledge
- The formula and programming language are JavaScript model, so actually it's easier if we have basic knowledge of JavaScript
- In this report, we use "home.page.ts" as our main script, while the "home.module.ts" is for installing the Angular/Ionic component and add-on, such as import module
- Typescript, like other back-end programming language, has variable definition, function, etc. (Variable types can be found here: https://dzone.com/articles/what-are-the-basic-data-types-in-typescript)
- Next is tutorial how to build this simple Timer PWA using Ionic 4, in a nutshell:
- Install Ionic and build new blank project
- Inside project, install Angular and NgCircleProgress module
- Code in home.page.html, home.page.ts, and other needed
- Launch locally using "ionic serve"
- *Additional: use Firebase if you want to deploy into HTTPS and go live (online)*
---
## Documentation
I will write the documentation for this report about how to build simple timer PWA.
### 1. Basic Installation
First of all, install a blank Ionic project. You can use this [tutorial](/NsojkzQ4Rf2mzVKk0t_Nkg).
Go to your app path, for example: myApp, and install the modules. You will need internet to install this.
```
npm install ng-circle-progress --save
ionic cordova plugin add cordova-plugin-insomnia
npm install @ionic-native/insomnia
```
- This will install the **NgCircleProgress** module, it will be use to build timer object.
- This will install the **Insomnia** module, it will be use for prevent the device not into sleep mode when idle.
- After installation, you need to define yourself to use it, explained right after this.
### 2. Coding Part
Open your folder where you have your Ionic project, you can use IDE like VS Code to open it more comfortable.
:::info
I will define the directory like this: **"src\app"**, which means you need to open "src" folder and then "app" folder
:::
Find the directory "src\app\home", this is our workspace.

#### 2.1. Modify the Module
In this directory, open **home.module.ts**, again you can use IDE or Notepad to help you modify the code. Here we are going to modify to add our NgCircleProgress module so it can be used in the project.
``` typescript=
import { NgModule } from '@angular/core';
import { CommonModule } from '@angular/common';
import { IonicModule } from '@ionic/angular';
import { FormsModule } from '@angular/forms';
import { RouterModule } from '@angular/router';
import { HomePage } from './home.page';
import { NgCircleProgressModule } from 'ng-circle-progress';
@NgModule({
imports: [
CommonModule,
FormsModule,
IonicModule,
RouterModule.forChild([
{
path: '',
component: HomePage
}
]),
NgCircleProgressModule.forRoot({
// set defaults here
radius: 100,
outerStrokeWidth: 16,
innerStrokeWidth: 8,
outerStrokeColor: "#78C000",
innerStrokeColor: "#C7E596",
animationDuration: 300,
// add-on
animation: false,
responsive: true,
renderOnClick: false
})
],
declarations: [HomePage]
})
export class HomePageModule {}
```
Based on the [NPM Js - NgCircleProgress](https://www.npmjs.com/package/ng-circle-progress) there are two main parts of installing NgCircleProgress module:
1. import { NgCircleProgressModule } ...
2. NgCircleProgressModule.forRoot({ ... })
The `import { NgCircleProgressModule } ...` thing will import the module from component which we had install it before. The `NgCircleProgressModule.forRoot({ ... })` will create the default format/object will created of the module if we use it. There is an add-on I use to deactivate the **animation** and **renderOnClick** and activate the **responsive** so it can be responsive for monitor size of browser.
#### 2.2. Modify the Index Page
In same directory, open **home.page.html** to modify the index page of web-app. There is some code here, delete them, and we can add our own. First is this one:
``` html=
<ion-content padding>
<ion-item color="dark">
<ion-label>Duration</ion-label>
<ion-datetime
display-format="mm:ss"
placeholder="Tab Here"
[(ngModel)]="fullTime"
></ion-datetime>
</ion-item>
<circle-progress
[percent]="percent"
[maxPercent]="100"
[radius]="radius"
[title]="myTitle"
[titleFontSize]="50"
[titleColor]="'white'"
[subtitle]="mySubtitle"
[subtitleFontSize]="30"
[subtitleColor]="grey"
[showUnits]="false"
[outerStrokeWidth]="16"
[outerStrokeColor]="'#FF00CB'"
[outerStrokeGradient]="true"
[outerStrokeGradientStopColor]="'#FFAACB'"
[showZeroOuterStroke]="false"
[backgroundStroke]="'#FF0000'"
[backgroundStrokeWidth]="3"
[innerStrokeWidth]="8"
[innerStrokeColor]="'#C7E596'"
[showInnerStroke]="false"
[animation]="true"
[animationDuration]="animDur"
></circle-progress>
<ion-fab vertical="bottom" horizontal="center" slot="fixed">
<ng-container *ngIf="timer == false; else running">
<ion-fab-button (click)="startTime()">
<ion-icon name="play"></ion-icon>
</ion-fab-button>
</ng-container>
<ng-template #running>
<ion-fab-button (click)="stopTime()">
<ion-icon name="square"></ion-icon>
</ion-fab-button>
</ng-template>
</ion-fab>
</ion-content>
```
- The **ion-content** is the integrated container to code our body page. Any component should be build in the ion-content.
- The **ion-datetime** is part of ion-item, which is the container to import ion module of items, to build a simple datetime. Ion-datetime will displayed like choosing date/time in native app, you can set by your own, display it, and save it for next purpose. The reference can be found [here](https://ionicframework.com/docs/api/datetime).
- The **circle-progress** will create using NgCircleProgress module template which we install and define before. Inside it there you can modify the content by your own, like the radius, the percent, the title, and so on. You can check the the content settings in [here](https://www.npmjs.com/package/ng-circle-progress#user-content-options).
- The **ion-fab** is use for build an object, like button, to be use for a purpose. In here, we define two **ng-container**, one for when the button is clicked and the other one for when the button is clicked after that.
- You can see there is **(click)="function-name()"** on each container which means that the button can be click and run the script. We will use it as "Start" and "Stop" button.
- The **ion-icon** is icon style, you can use any Ionic icon that you found [here](https://ionicons.com/)
#### 2.3. Modify the App Module
There is a function/module which we will use globally in app folder. Open in directory "src\app" the file named **app.module.ts**, modify like this:
``` typescript=
import { NgModule } from '@angular/core';
import { BrowserModule } from '@angular/platform-browser';
import { RouteReuseStrategy } from '@angular/router';
import { IonicModule, IonicRouteStrategy } from '@ionic/angular';
import { SplashScreen } from '@ionic-native/splash-screen/ngx';
import { StatusBar } from '@ionic-native/status-bar/ngx';
import { AppComponent } from './app.component';
import { AppRoutingModule } from './app-routing.module';
import { Insomnia } from '@ionic-native/insomnia/ngx';
@NgModule({
declarations: [AppComponent],
entryComponents: [],
imports: [BrowserModule, IonicModule.forRoot(), AppRoutingModule],
providers: [
StatusBar,
SplashScreen,
{ provide: RouteReuseStrategy, useClass: IonicRouteStrategy },
Insomnia
],
bootstrap: [AppComponent]
})
export class AppModule {}
```
There is something has been added, yes, the Insomnia module. Insomnia module is use to prevent the device, usually smartphone, not into sleep mode. The purpose is the timer on browser can still running while you are not focus to your device, or idle.
- Import it with **import { Insomnia } ...**
- Add some inside @NgModule with **Insomnia**, you can check the code above to verify.
#### 2.4. Modify the Script
Here we are, the main script for our PWA. Open the **home.page.ts** and we can see some codes here. This is the main codes of our PWA, any script programming that we use for home page are here. The script is using Typescript (.ts). Basically it has the same function as JavaScript, to run a certain program inside web-app.
Because of so much code we have, I will explain it per part or function:
##### 1. Import and initialization
``` typescript=
import { Component } from '@angular/core';
import { Insomnia } from '@ionic-native/insomnia/ngx';
import { from } from 'rxjs';
@Component({
selector: 'app-home',
templateUrl: 'home.page.html',
styleUrls: ['home.page.scss'],
})
export class HomePage {
```
... and the rest of code ...
```typescript=141
}
```
- In this part we know that the script will need import some module from main script folder.
- It also takes the script to which it will be loaded, can be seen in **@Component** part.
- The last one is **export class HomePage { ... }**, we code here so the script can be run properly in web-page.
##### 2. Variable definition
``` typescript=12
percent:number = 100;
radius:number = 100;
fullTime:any = '00:01:10';
animDur:any = 1000;
timer:any = false;
progress:any = 0;
minutes: number = 1;
seconds: any = 10;
elapsed: any = {
m: '00',
s: '00'
}
myTitle:string = this.elapsed.m + ":" + this.elapsed.s;
mySubtitle:string = "START";
overallTimer: any = false;
```
- Variables in here are defined with this formula:
`<name> : <type> = <value>;`
- The types of typescript language can be found [here](https://dzone.com/articles/what-are-the-basic-data-types-in-typescript).
- Struct type can be also defined, you can take a look at **elapsed:any { ... }** as example:
```
<parent-name>:<type> = {
<child-name-1>: <value>,
<child-name-2>: <value>,
...
<child-name-n>: <value>
}
```
- In struct type, all the child variable take the parent type, they can be called with `dot (.)`, it will be like this: `<parent-name>.<child-name>`
##### 3. Insomnia constructor
``` typescript=+
constructor(private insomnia: Insomnia) { }
```
- Insomnia constructor is main constructor for Insomnia module
- It should be defined but there is no anything to add inside the bracket.
##### 4. Function: startTime()
``` typescript=+
startTime() {
this.animDur = 10;
this.printTimer();
if (this.timer) {
clearInterval(this.timer);
}
if (this.overallTimer == false) {
this.progressTimer();
this.insomnia.keepAwake();
}
this.timer = false;
this.percent = 0;
this.progress = 0;
let timeSplit = this.fullTime.split(":");
this.minutes = timeSplit[1];
this.seconds = timeSplit[2];
let totalSecond = Math.floor(this.minutes * 60) + parseInt(this.seconds);
this.timer = setInterval( () => {
if (this.percent >= this.radius) {
clearInterval(this.timer);
this.mySubtitle = "FINISH";
} else {
this.mySubtitle = "GO!";
this.percent = Math.floor(((this.progress / totalSecond) * 100) / 10);
this.progress++;
}
}, 100)
}
```
- This function is use for activate the timer, run the animation, and keep count until the timer expired.
- The **if (this.timer)** statement is use for prevent the clock being multiple running because of user multiple input, so it reset the timer.
- The **if (this.overallTimer == false)** statement is use for detecting the overallTimer variable (check **5. Function: progressTime()** ) is still running then keep call progressTime() function, also keep the device awake (we can see `insomnia.keepAwake()` function there).
- The **split()** function can cast the variable into array, with define the separator between array
- The "totalSecond" variable note the full timer that user has input, with `Math.floor()` function to calculate.
- Because of *any* or *number* variable type in Typescript has very large definition (it can be integer, float, binary, etc.), using `Math.floor()` function is necessary to prevent two different logic variable type being calculated in their raw data, like integer meet binary, even we didn't state them, the machine state them for us.
- The **setInterval( () => { ... }, 1000)** function is to do loop with boolean variable as the flag, to identify whether it is done or not yet, the *1000* number is 1000 millisecond, which means 1 second interval.
- Inside this interval, there is identification if the "percent" already greater than or equal to the "radius", the maximum percentage, then `clearInterval()`, or make it negative state of it defined (for example: false -> true, and vice versa).
- The "percent" variable controlled with the "progress" divided by "totalSecond" and multiple by 100 for 100 percent, here we divided again by 10 because we want to update for every 0.1 second.
:::info
**Note:** I have tested that the interval maximum is nearly 100, below than that the machine, and the browser, cannot process it properly. I use 100 and it still work, 50 is not.
:::
##### 5. Function: progressTime()
``` typescript=+
progressTimer () {
let countDownDate = new Date();
this.overallTimer = setInterval( () => {
let now = new Date().getTime();
let distance = now - countDownDate.getTime();
if (this.percent >= this.radius) {
clearInterval(this.overallTimer);
} else {
this.elapsed.m = Math.floor((distance % (1000 * 60 * 60)) / (1000 * 60));
this.elapsed.s = Math.floor((distance % (1000 * 60)) / (1000));
this.printTimer();
}
}, 1000)
}
```
- In this part, there is using `Date()` function to get the current date from machine's time.
- In order to get the clock number in correct number, we use the deviation of current time, defined in "now", and the time when the program starts, defined in "countDownDate".
- Back to **4. Function: startTime()** note, we will not use basic math calculation because of variable type issues, if you want to take experiment with `Math.floor()` it's up to you.
- In interval, update the **elapsed.m** and **elapsed.s** so the timer will display minute and second.
:::info
**Note:** The formula for **elapsed.m** and **elapsed.s** to getting the proper time value from machine's time is just like that. I don't know either why the math like this. If you curious you can take research on that. From the video where I learn to build this app, the narrator doesn't know why the math formula goes like this. I will post the link at the end of this tutorial.
:::
```
Time Formula:
Hour => Math.floor((distance % (1000 * 60 * 60 * 24)) / (1000 * 60 * 60))
Minute => Math.floor((distance % (1000 * 60 * 60)) / (1000 * 60))
Second => Math.floor((distance % (1000 * 60)) / (1000))
```
##### 6. Function: printTime()
``` typescript=+
printTimer () {
this.elapsed.m = this.pad(this.elapsed.m, 2);
this.elapsed.s = this.pad(this.elapsed.s, 2);
this.myTitle = this.elapsed.m + ":" + this.elapsed.s;
}
```
- This function purpose is for update the display of the timer number
- It called `pad()` function and update the display with format mm:ss
##### 7. Function: pad()
``` typescript=+
pad (num, size) {
let s = num + "";
while (s.length < size){
s = "0" + s;
}
return s;
}
```
- This function purpose is to create String from a number with leading zero
- It will pass the parameter or **num** (the number wants to modify) and the **size** (how many character in this number)
- For example: num takes **3** and size take **2**, the result will be **03**.
- The return value is the result.
##### 8. Function: stopTime()
``` typescript=+
stopTime() {
this.mySubtitle = "START";
clearInterval(this.timer);
clearInterval(this.overallTimer);
this.overallTimer = false;
this.timer = false;
this.percent = 0;
this.progress = 0;
this.elapsed = {
m:'00',
s:'00'
}
this.insomnia.allowSleepAgain();
}
```
- This function purpose is for reset the timer when the **Stop** button is pressed.
- It will reset the `timer`, the `overallTimer`, clear their state, and other variable which related to the timer progress.
- This function also allowing the device to enter sleep mode again with Insomnia module.
#### 2.5. Additional
##### 1. Playing with styles
In here we can customize the webpage by modify **variable.scss**. Look "src\theme" and open it. Basically the logic is same as the CSS, to customize the style, but with Ionic language.
For example we can modify the background color. Simply, add this into **:root { ... }** function:
`--ion-background-color: #000000;`
and the background become black now! The color is in HEX format, you can customize with your own. Check the [HTMLColorCodes](https://htmlcolorcodes.com/) if you want.
##### 2. Better progressive
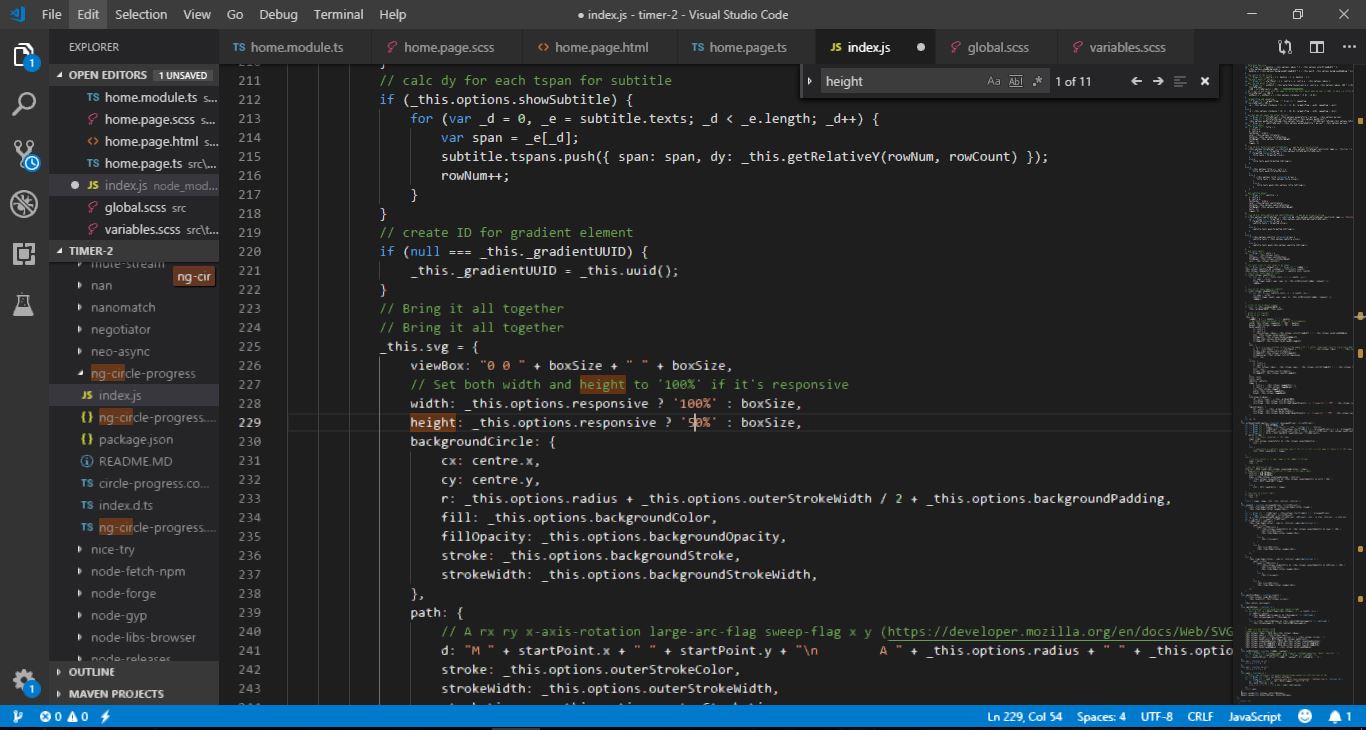
We use **progressize** function for NgCircleProgress (check in )which means it can resize its own to fit the browser windows. The problem is when the window is big the circle is too big even not seen very good.

To modify this, open the directory "..\node_modules\ng-circle-progress" and open **index.js**. Find the
`height: _this.options.responsive ? '100%' : boxSize,`
and change the **100%** into 50% or 75%
### 3. Conclusion
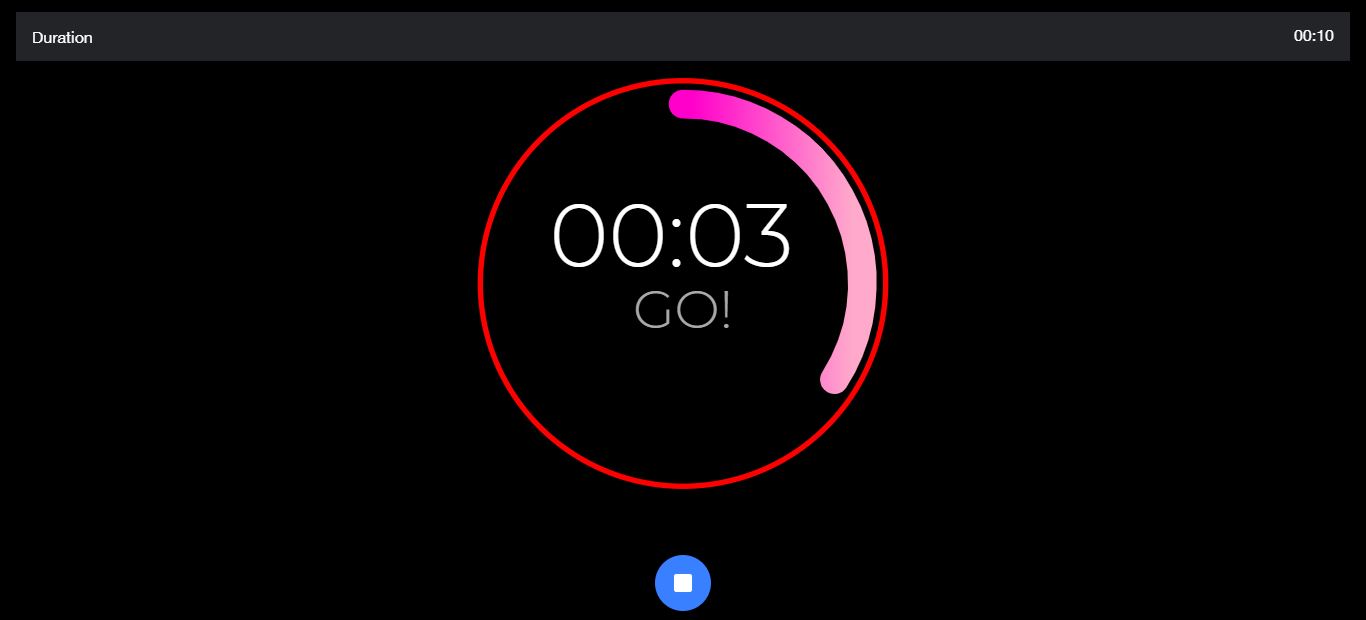
After we have long report here, the app should take look like this:

I have deploy the app using Firebase hosting, you can check and have fun [**here**](https://timer-2.firebaseapp.com). If you have any question or trouble, let me know by comment or give me email at muhamadaldy17@gmail.com and we can learn together. Maybe we can also share our experience, I still learn how to develop and I hope this report can be useful for next generation.
---
## References:
Youtube tutorial: https://www.youtube.com/watch?v=qTdwUpQRptc
Typescript Variable Types: https://dzone.com/articles/what-are-the-basic-data-types-in-typescript
NPM Js - NgCircleProgress Basic: https://www.npmjs.com/package/ng-circle-progress
Ionic - Datetime: https://ionicframework.com/docs/api/datetime
Ionic Icons: https://ionicons.com/
HTMLColorCodes: https://htmlcolorcodes.com/
My Timer App: https://timer-2.firebaseapp.com
###### tags: `pre-intern report`