# MDF BLENDER TUTORIAL
<div class="sketchfab-embed-wrapper"> <iframe title="The Rosetta Stone" frameborder="0" allowfullscreen mozallowfullscreen="true" webkitallowfullscreen="true" allow="autoplay; fullscreen; xr-spatial-tracking" xr-spatial-tracking execution-while-out-of-viewport execution-while-not-rendered web-share src="https://sketchfab.com/models/1e03509704a3490e99a173e53b93e282/embed"> </iframe> <p style="font-size: 13px; font-weight: normal; margin: 5px; color: #4A4A4A;"> <a href="https://sketchfab.com/3d-models/the-rosetta-stone-1e03509704a3490e99a173e53b93e282?utm_medium=embed&utm_campaign=share-popup&utm_content=1e03509704a3490e99a173e53b93e282" target="_blank" style="font-weight: bold; color: #1CAAD9;"> The Rosetta Stone </a> by <a href="https://sketchfab.com/britishmuseum?utm_medium=embed&utm_campaign=share-popup&utm_content=1e03509704a3490e99a173e53b93e282" target="_blank" style="font-weight: bold; color: #1CAAD9;"> The British Museum </a> on <a href="https://sketchfab.com?utm_medium=embed&utm_campaign=share-popup&utm_content=1e03509704a3490e99a173e53b93e282" target="_blank" style="font-weight: bold; color: #1CAAD9;">Sketchfab</a></p></div>
that's my rosetta stone
<iframe width="560" height="315" src="https://www.youtube.com/embed/_3JTx64C8q8" title="YouTube video player" frameborder="0" allow="accelerometer; autoplay; clipboard-write; encrypted-media; gyroscope; picture-in-picture" allowfullscreen></iframe>
Why Blender? checkout our [pinterest](https://www.pinterest.com/learninglabpins/toolblender/) for examples of what you can do with it. But for MDF work this coming year, here are some more specific ideas:
1. disciplines that work with objects are moving towards producing high-quality 3D scans of these objects, many of which you can access for free online and then manipulate or annotate them in a tool like Blender
2. 3D tools like Blender offer nice options for creating data visualizations and infographics
3. such tools are also great for representating arguments about spatial data (whether you are analyzing something moving across a map or geographical area or interpreting the direction of a particle or force in physics)
4. if you end up getting excited about building interactive 3D worlds in Unity, Blender is where you'd build the objects that would populate these worlds (in Unity you can create some primitive objects like cubes and spheres, but Blender is where you'd create more complex shapes)
5. and much more :)
Here's an example of a very simple way of using Blender to create a visual argument:
<iframe width="560" height="315" src="https://www.youtube.com/embed/F5OEf9xomcI?start=339" title="YouTube video player" frameborder="0" allow="accelerometer; autoplay; clipboard-write; encrypted-media; gyroscope; picture-in-picture" allowfullscreen></iframe>
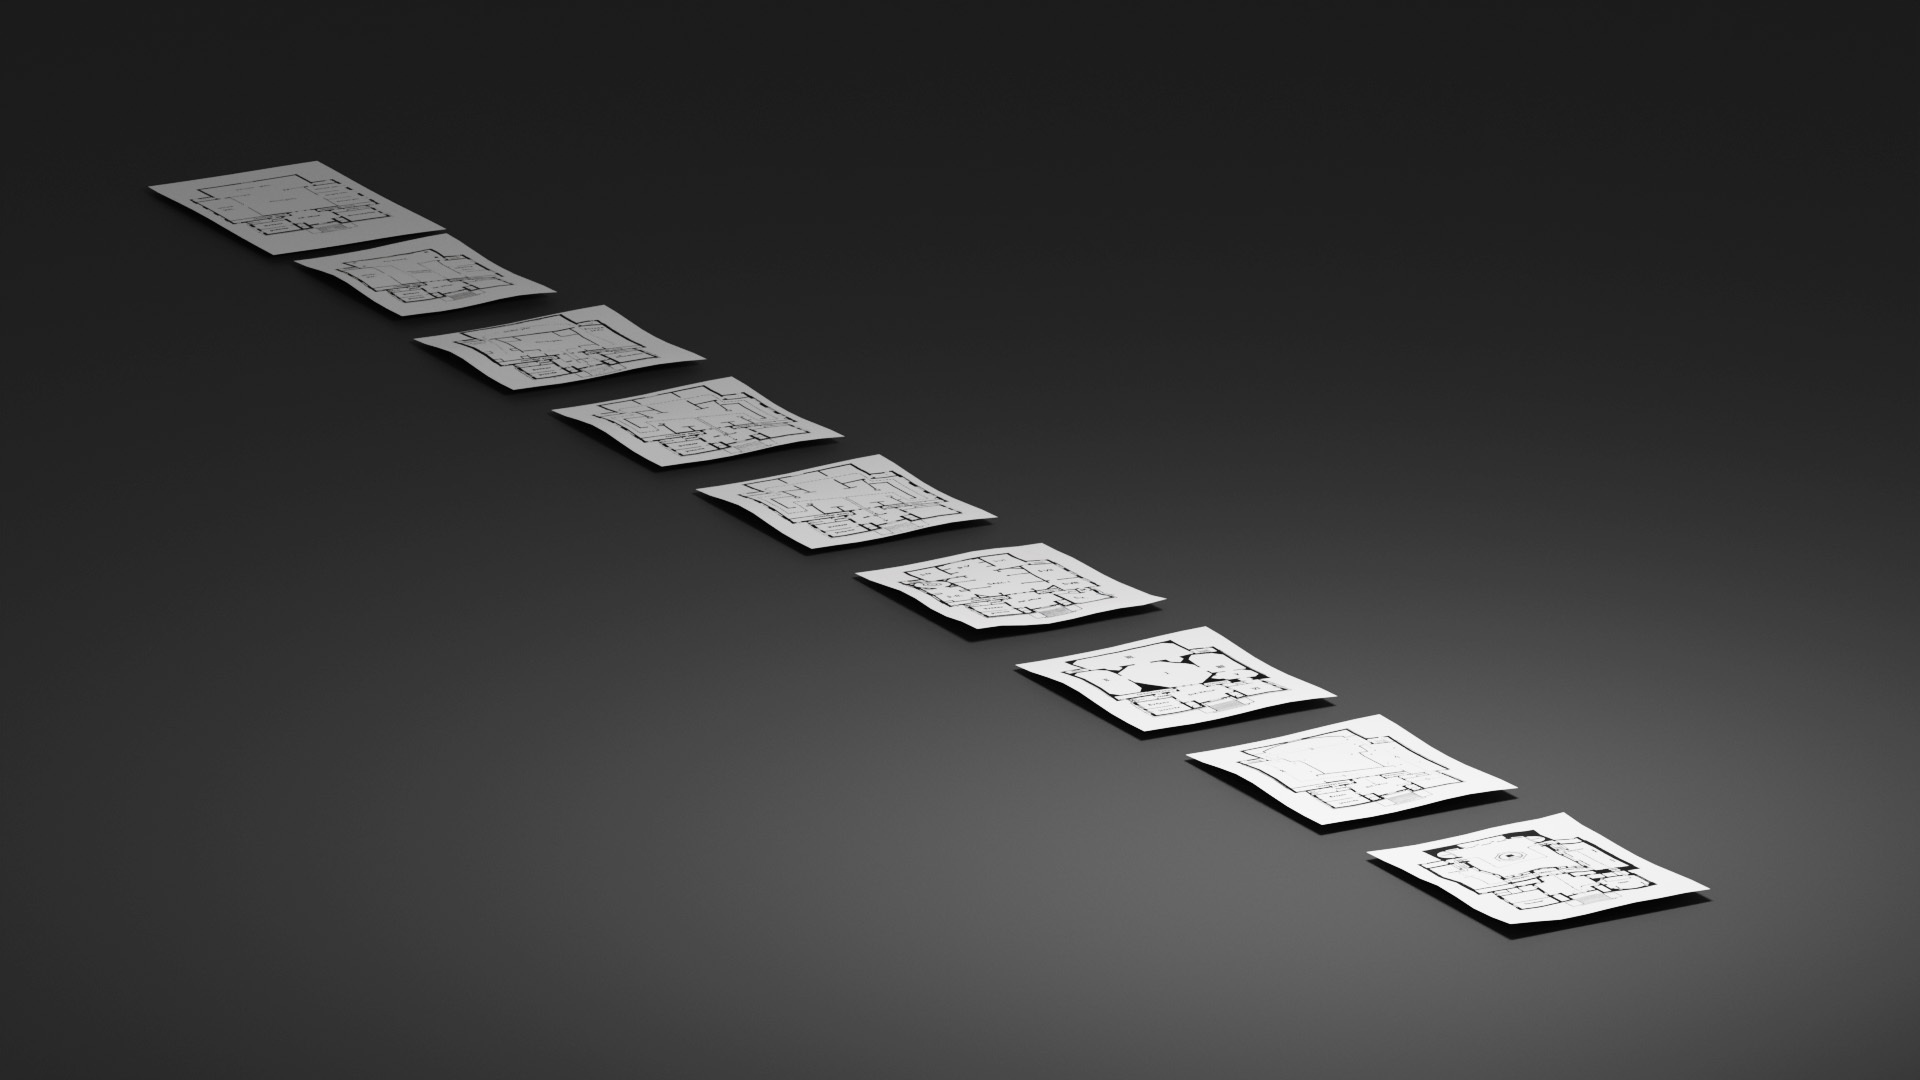
behind this was a morphing model of the Vienna Secession space and then a line of archival floorplans of the many ways it had been set up.
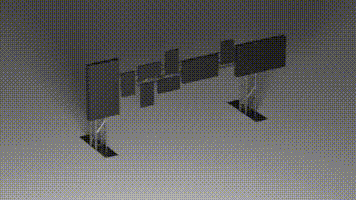
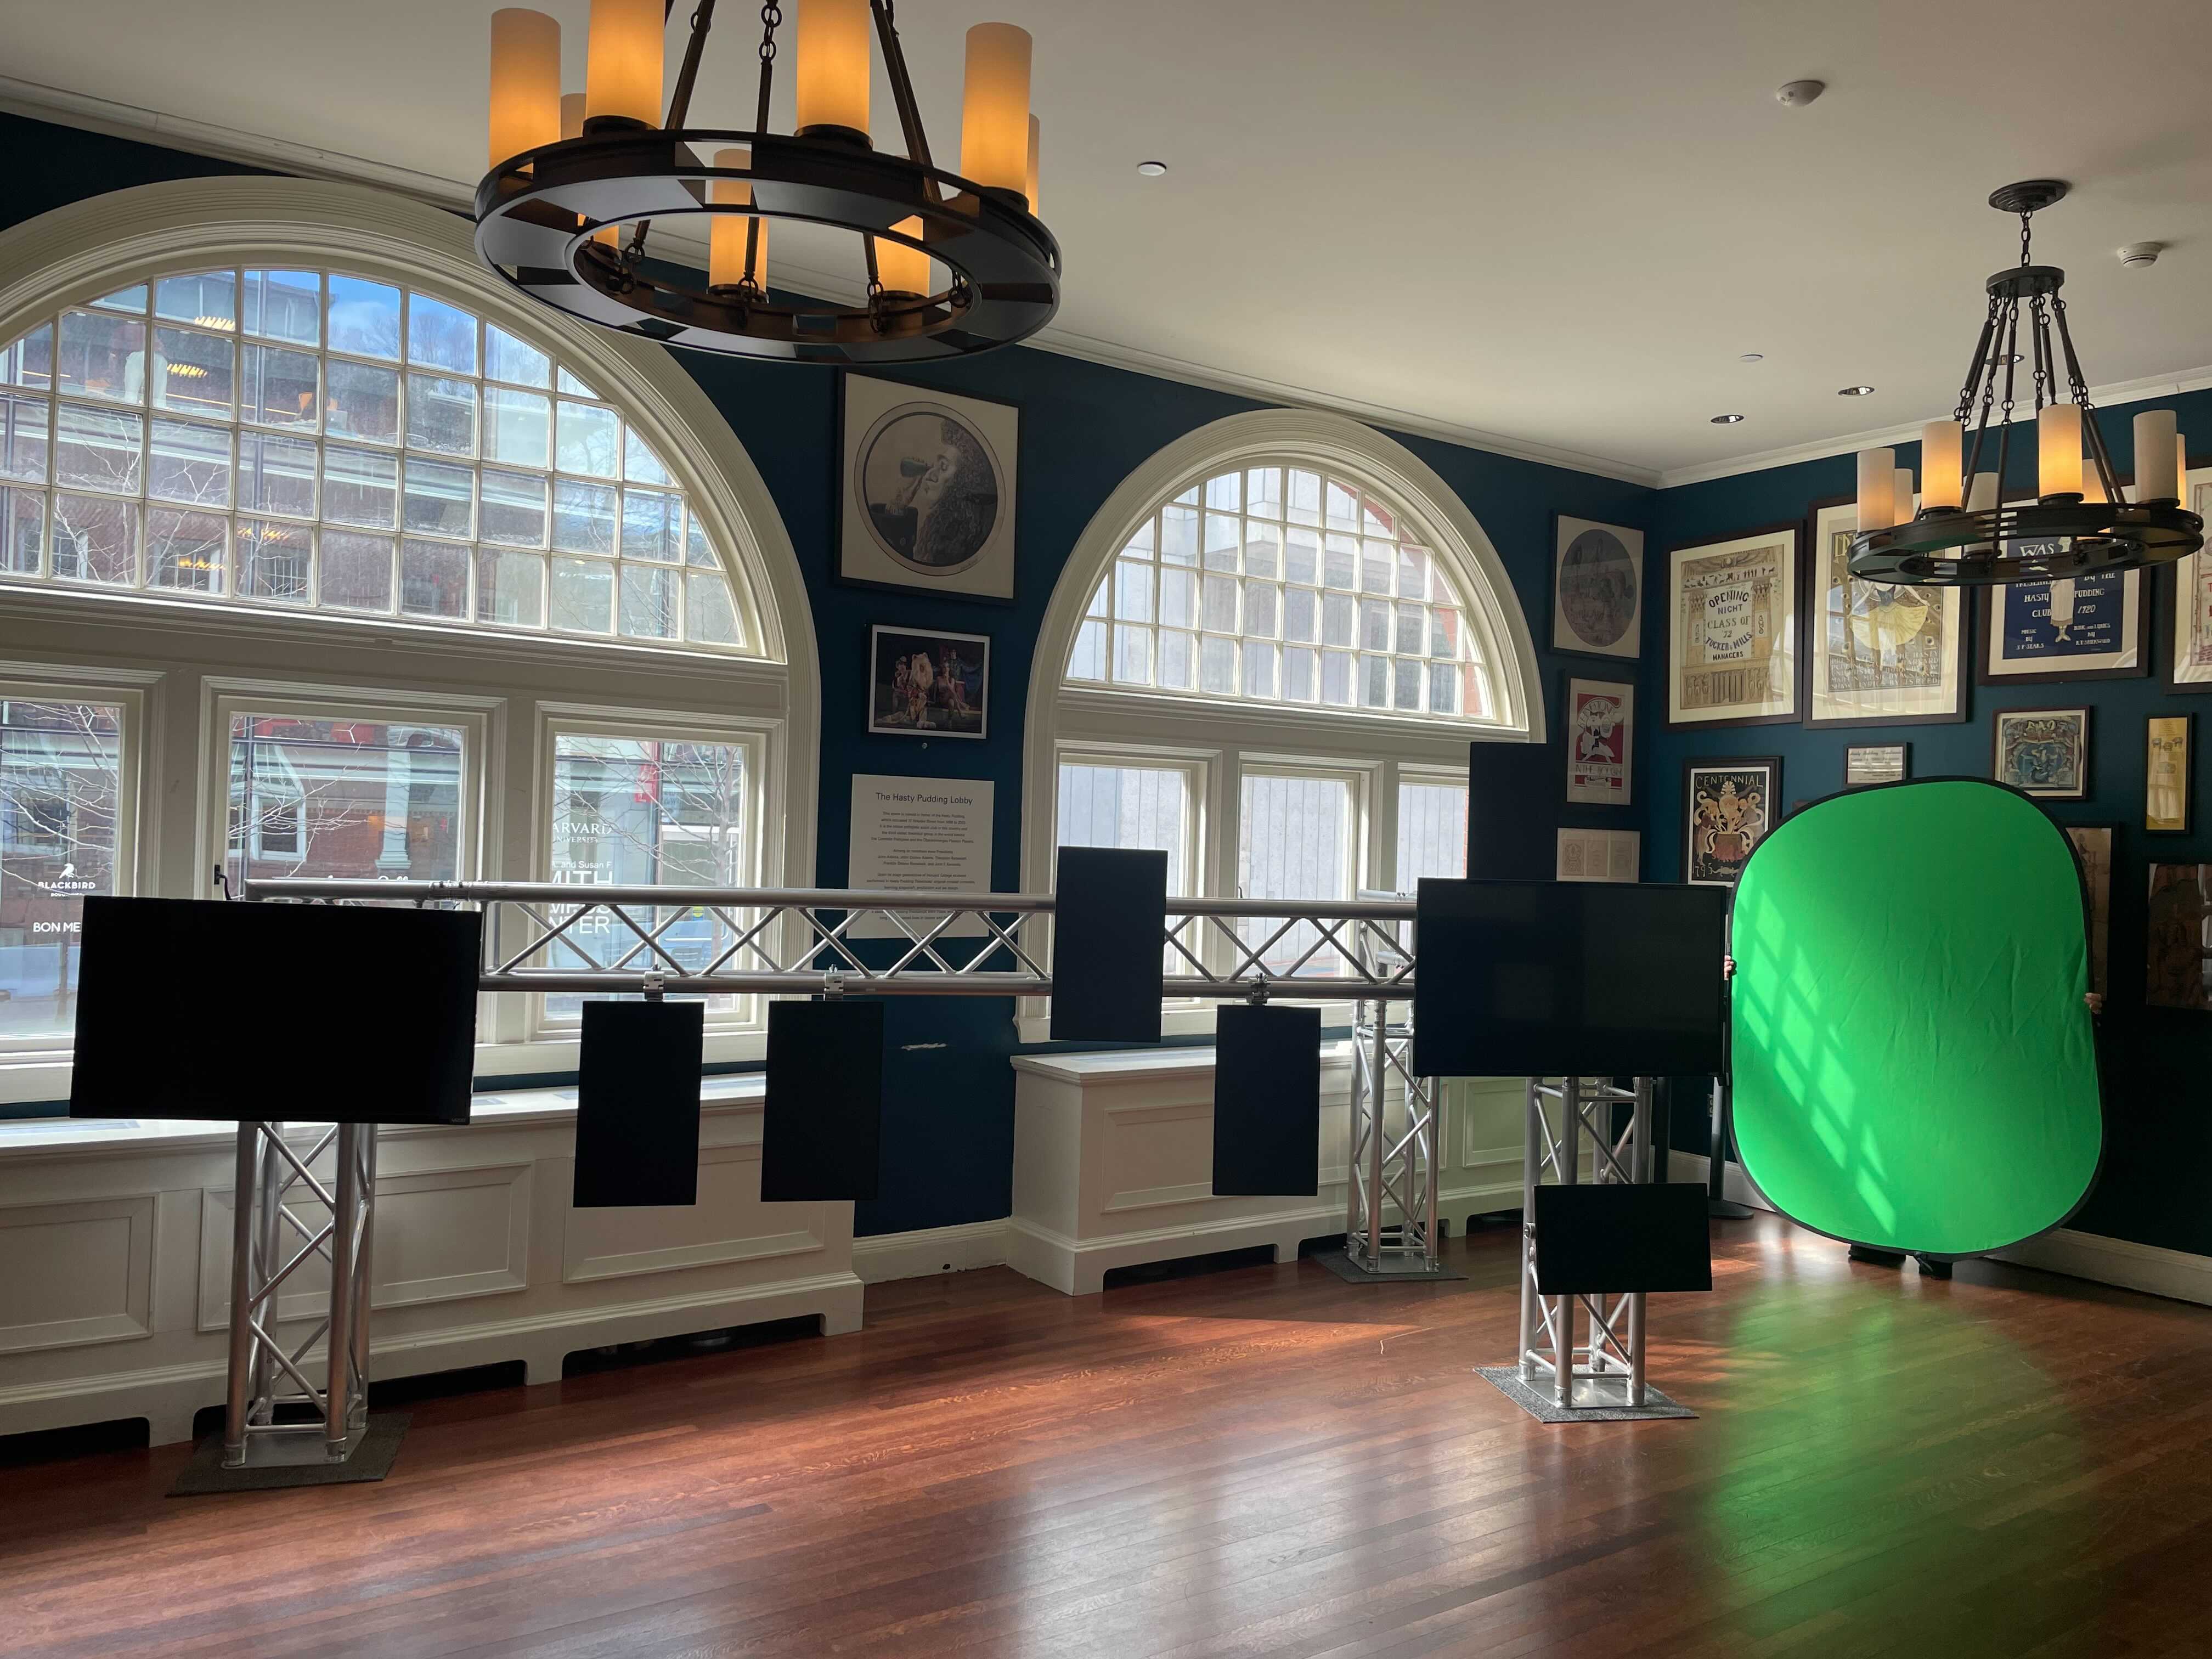
or here's an instance where we designed some installation options for TDM, and then the thing we actually built.
### BLENDER INTRO (Mac)
These are the basics on using Blender 2.8 (or higher) on a Mac. Just the _very_ basics.
This is for you to mark up---be sure to underline anything that feels counter-intuitive to you as you use the software, because this is the stuff you’ll come back to, and you’ll need your paper+pen markup to help you remember where it is. The big thing you’ll want to do as you learn is to **practice each step** (each shortcut key, each mouse move, each sequence of operations). It’s more like learning a new dance step than learning the capital of Ohio[^1]--it’s not enough to just hear and understand the information. It’s about **knowing-how** rather than **knowing-that** . . . and to know **how**, you actually need to train your body to make the right movement.
### THE INTERFACE

### BASIC KEYBOARD AND MOUSE MOVES
#### TRACKPAD-NAVIGATION
* Two finger scroll = orbit
* Shift + two-finger-scroll = move the scene
* Ctrl + two-finger-scroll = zoom in and out
* Pinch to zoom works too
#### MOUSE-NAVIGATION
* Middle-mouse-button + drag = orbit the scene
* Shift + middle-mouse-button + drag = move the scene
* Mouse wheel = zoom in and out
* Left click = select object (or point/edge/face in edit mode)
#### KEYBOARD-NAVIGATION
* with object selected, `.` on number pad frames object selected. On a laptop, hit the `~` key and then the number `3`
* if you have a numeric keyboard, hit all the numbers to see what happens
#### SHORTCUT KEYS
* **X** (and return to confirm) to delete an object
* **S** = scale
* **R** = rotate
* **G** = grab (and move)
* With **S**, **R** or **G** clicked, constrain axis with **X**, **Y** or **Z**
* **shift + Space** and then **S, R, **or **G **will activate the scale, rotate or grab tools
* **Control + Option + Q** = toggle quad view
* **Tab** = toggle between edit and object modes in 3D view
* **A** (in edit mode) = select/deselect all
* **B** then left-mouse-drag (in edit mode) = rectangular selection tool
* **C** then left-mouse-click (in edit mode) = select face/edge/point (right click to disable)
* **E** (especially in face mode) = extrude selected face
* **Z** = toggle on/off wireframe mode
* In edit mode this will allow you to select faces/edges/points on the other side of the model too (like the “limit selection to visible” toggle on the toolbar).
* **Shift + Z** = render in 3D view
* **Control + left-click + drag** = lasso select
* **Option + right-click an edge** = select a ring of edges
### STEPS TO PRACTICE
these are some moves you might find yourself making frequently in Blender
#### ADDING TEXT
- click `Add` in the viewport and then select `Text`
- if you want it standing up vertically in your word, rotated it 90 degrees around the X axis, either with the rotate tool or by typing `R` then `X` then `90`
- with the `Text` object selected (it will be orange in your viewport and outliner/hierarchy) look
####
#### THE SELECT AND EXTRUDE DANCE
* Drop a cube into the scene with **Add => Mesh => Cube**
* practice moving it around in two ways:
* use the move tool (**Shift + Spacebar => G** or find it in the left sidebar) to move it along one axis at a time. Just grab one of the three axis arrows and pull along the X, Y or Z
* you can also hit the letter **G** with the object selected in the viewport and drag it around . . . but if you hit G and then X, Y or Z, you can constrain movement to that axis
* if you hit G, then X or Y or Z and then type in a number (start with 1 or 2), you'll move the object exactly that number of spatial units along that axis
* Shift to edit mode by hitting **tab** (repeat this step a number of times to help internalize it). Do you see how the options in the “Tools” tab change depending on whether you are in edit or object mode?
* If you don’t _see_ the Tools tab (or even if you do), hit **T**, again and again and again.
* Right click and select **Subdivide,** then do it again (so that you see 16 faces on each side of the cube)
* Hit **A**, then hit **option + A,** then do it again, then again and again. Note how you move from selecting all of the faces to selecting none?
* Now click a single face to select it. (If you seem to be secting points or lines instead of faces, hit the number **2** on your keyboard to switch from points or lines to faces--you can also find this in the top left of the GUI)
* Now hold down **shift** and click another face elsewhere on the object--you should see both of those faces now selected.
* With faces selected you can select the move or rotate or scale tools and change them, just as you could change the whole object when in object mode.
* But we are going to do something else. So command Z to undo any changes and get back to your default cube.
* Then select a single face
* Then select the **Extrude Region** tool on the lefthand side of the interface (again, you need to be in edit mode to make this happen). You can also hit **shift + space** and then **E** to make this happen.
* grab the little yellow handle and pull it away from the face. You will seem to be moving the face, but you are actually adding MORE geometry.
* subdivision surface
* add a simple color material
* plane for the floor, add an image texture to material
* render view: Eevee vs Cycles
*
### EXTRAS TO KNOW ABOUT
* To change the object’s **anchor point**, select **Transform => origin to cursor **after clicking on the right spot of the object (the orthographic views are good for this
* To apply a material to only a group of polygons in an object, select them in edit mode, then create a new material, then click **assign**
* Each window’s toolbar is at the BOTTOM rather than the top of the window.
* You can add windows by clicking and dragging the little lines at the top right or bottom left of each window (drag down or inwards to the left from the top right; drag up inward to the right from the bottom left). But there is no immediately obvious way to get RID of the windows. The way to do it is to invert what you’ve just done: hover over one of those same corners until you see crosshairs (a white “plus” shape), and then instead of dragging INWARDs, drag OUTWARDS into a neighboring window that you’d like to collapse (so you do this not in the window you want to get RID of, but in the window you want to “absorb” the space of the window you need to close). You will get used to this, but everyone has to admit that it’s a little weird.
### CREATING A SIMPLE SCREEN IN BLENDER FOR UNITY
The easiest way to create a “screen” in Blender is to create a simple plane. On its own, it won’t do much that a quad generated in Unity can’t do, so if all you need is a flat surface, you may want to stick with Unity alone. So we are going to create a slightly wavy plane to make it more interesting: starting by adding a simple plane, then deforming it just a bit, and then bringing it into Unity.
1. In your new Blender scene, right click on the cube and delete it (forward delete key, or fn + delete on macBook).
2. In the Create menu, click Plane. And then, BEFORE you do anything else, look for the “add plane” menu and make sure that you select** “generate UVs”**--it’s _possible_ to fix things if you forget to do this; it just takes some extra steps that add complexity, and we’re trying to keep this simple.
3. Find your “transform” tab (if you can’t see it, hit the letter “N” while your mouse is hovering over your 3d view [i.e. your main editing window]). With your screen selected (right click on it), rotate it 90 degrees around the X axis in one of these three ways
1. Click in the X Rotation field and type in 90
2. With the screen selected and your cursor hovering over the 3D view, type “R” for rotate, then type “X” to constrain your rotation to the x-axis
3. Click the little arc in the toolbar at the bottom of your 3D view and rotate the object
4. Export the object as an .fbx file (if you don’t want to export the whole scene, including the cameras, lights, etc., then select the object and check “export selected objects” when in the export .fbx view)
5. In Unity, import the .fbx file. When you click on it in the assets folder, you will see a materials tab in the inspector. Click on this and select your Video Material. If you don’t have a Video Material, create a new material, call it VideoMat or some such, and follow these steps:
4. Drag your .fbx object (the one that you just applied VideoMat to) from the assets folder into the hierarchy to add it to the scene.
5. Then select the object in the hierarchy to reveal its properties in the inspector
6. Click “Add Component” => Video Player.
7. Choose your video in the “Video Clip” box
8. Change “Render Mode” from “Material Override” to Render Texture
9. Change
#### HOTKEYS
opt + G = resest position of object
N = toggle on/off transform numers
T = toggle on/off tool palette
[^1]:
And, to tell you the truth, learning the capital of Ohio may be more like learning a dance step than we think!