# Tmux 筆記
###### tags: `開發環境` `Tmux`
最近使用 `Neovim` 覺得要重新開新的視窗 Terminal(command + n)很麻煩,上網找到了許多人推薦的 Tmux,在此筆記我昨晚的成果。
## 什麼是 Tmux?
Tmux 是 terminal multiplexer,藉由 Tmux 提供的多重視窗功能,可以讓我們在一個 terminal 分割不同的頁面,達到一個頁面多工的效果(而不是需要手動開多個 terminal 分頁)。
## Tmux 的多重視窗功能
Tmux 的多重視窗由四個元素組成:
1. server
2. session
3. window
4. pane

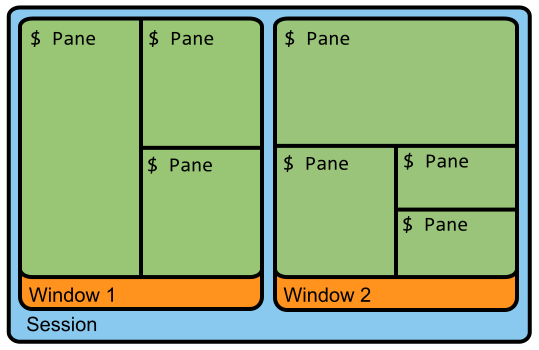
*(server -> session -> window -> pane)*
### 1. server
server 用來管理 session ,只要 server 沒有被關閉,session 就不會遺失。
### 2. session
要使用 Tmux 的功能就需要在 terminal 輸入指令 `tmux` 啟動 Tmux,每次啟動都會新增一個 session。每一個 session 可以擁有數個 window,且每個 session 彼此為獨立地存在,不會互相影響。
==以一個 project / directory 為 session。==
### 3. window
session 中保存的項目,概念類似瀏覽器的分頁。
### 4. pane
分割視窗,一個 window 可以有數個分割視窗。
## 安裝 Tmux
```shell=
brew install tmu
```
## 基礎設定
==Tmux 中很多指令都是靠著 prefix (預設為 control + b)+ 其他指令達成。==
*一開始按了很久都無法成功執行指令,後來[上網](https://askubuntu.com/questions/850055/ctrl-b-c-n-w-etc-not-working-in-tmux-console)找到答案:==要先執行完 prefix 再按其他指令,不要一起按。==*
在家目錄`(~/)` 新增設定檔 `.tmux.conf`,便可以設定 Tmux。
`~/.tmux.conf`:
```shell=
# prefix + r 直接讓 tmux 吃到設定不用重開
bind-key r source-file ~/.tmux.conf \; display-message "~/.tmux.conf reloaded"
set-option -g default-terminal "screen-256color"
set-option -g status-key "emacs"
set-option -g status-bg "#666666"
set-option -g status-fg "#aaaaaa"
set-option -g status-left-length 50
# 使用滑鼠
set-option -g mouse on
set-option -g history-limit 102400
# 在 status bar 的右側顯示:
# 1. 按下 prefix 的提示
# 2. 顯示時間
set -g status-right '#{prefix_highlight} | %Y-%m-%d %H:%M'
# index 從 0 變成 1
set -g base-index 1
# window 如果由新增、刪除時會自動重新計數
set -g renumber-windows on
# prefix - 在 window 左側開啟水平的分割視窗 / prefix - | 在 window 的下方開啟垂直的分割視窗
# - 後面的 -v -c '${path_current_path}' 會讓分割的視窗自動定位在目前 path
bind-key - split-window -v -c '#{pane_current_path}'
bind-key | split-window -h -c '#{pane_current_path}'
# prefix c 直接新增新的 window
# - 後面的 -c "${pane_current_path}" 讓新增的視窗自動定位目前的 path
bind c new-window -c "#{pane_current_path}"
# prefix b 讓當前分割的 pane 變成獨立的 window
bind-key b break-pane -d
# prefix j 開啟 choose-tree
# - 透過 j k + enter 選擇要跳到哪個 session
# 注意: 要啟動 tmux 的狀態下才可以使用,如果把 tmux 壓到背景(detach)(prefix d)是叫不出來的
bind-key j choose-tree -swZ
# Fine adjustment (1 or 2 cursor cells per bump)
# 調整分割視窗的大小
# shift + 方向鍵
bind -n S-Left resize-pane -L 2
bind -n S-Right resize-pane -R 2
bind -n S-Down resize-pane -D 1
bind -n S-Up resize-pane -U 1
# control k 清理 terminal 畫面
# 不能用一般的 command k,因為 Tmux 也會被洗掉(外加同個 window 的 pane 都會被洗掉)
bind -n C-k send-keys -R \; send-keys C-l \; clear-history
```
## 安裝套件
使用 [tpm](https://github.com/tmux-plugins/tpm]) Tmux 的套件管理工具。
先 clone 到 local
```shell=
git clone https://github.com/tmux-plugins/tpm ~/.tmux/plugins/tpm
```
之後再 `~/.tmux.conf` 新增:
```shell=
# List of plugins
set -g @plugin 'tmux-plugins/tpm'
# Initialize TMUX plugin manager (keep this line at the very bottom of tmux.conf)
run '~/.tmux/plugins/tpm/tpm'
```
再執行指令讓 Tmux 吃到設定,或者用 `prefix r`:
```shell=
tmux source ~/.tmux.conf
```
就完成套件管理的安裝了,之後如果想要安裝其他套件,直接在 `~/.tmux.conf` 新增 `set -g @plugin 'tmux-plugins/tmux-sensible'` (假設要安裝 `tmux-sensible`),再讓 Tmux 吃到設定後執行 `prefix + I` 安裝套件即可。
## 如何刪除套件?
在 `~/.tmux.conf` 把該套件註解/刪除後再執行指令 `~/.tmux/plugins/tpm/bin/clean_plugins` 後 `tmux kill-server` 重新開啟 `tmux` 即可。
## 套件介紹
### 1. [tmux-resurrect](https://github.com/tmux-plugins/tmux-resurrect)
儲存 tmux 的工作視窗(比方來說 session),讓我們 kill-server 後還可以叫回該工作視窗。
預設儲存 `prefix + C-s`
預設叫回 `prefix + C-r`
在 `~/.tmux.conf` 寫入套件設定
```shell=
# restore vim sessions
set -g @resurrect-strategy-vim 'session' # 會保存 vim 檔案的 session
# restore neovim sessions
set -g @resurrect-strategy-nvim 'session' # 會保存 nvim 檔案 session
# restore panes
set -g @resurrect-capture-pane-contents 'on'
```
### 2. [tmux-continuum](https://github.com/tmux-plugins/tmux-continuum)
讓 tmux-resurrect 達到自動保存的功能。
套件的 [FAQ](https://github.com/tmux-plugins/tmux-continuum/blob/master/docs/faq.md) 中有提到保存檔只會保存 30 天。
### 3. [tmux-yank](https://github.com/tmux-plugins/tmux-yank)
可以複製 tmux 上的東西到系統的剪貼簿上。
預設進入 copy mode `prefix [`,對選取的文字按 `y` 即可複製。
可以在 `~/.tmux.conf` 寫入設定,讓 copy mode 的移動跟 vim 相同。
==如果有數個搜尋結果,可用 `n` / `N` 前後移動。==
### 4.[tmux-copycat](https://github.com/tmux-plugins/tmux-copycat)
更方便地在 copy mode 搜尋要複製的文字。
雖然在 copy mode 可以用 vim 的方式搜尋文字 `prefix [ + ? 搜尋文字`,但是有些特別的情況還是用 `copycat` 提供的方法比較快速。
1. `prefix / 搜尋文字(支援 reg)`
2. `prefix + C - f` 搜尋檔案路徑
3. `prefix + C - u` 搜尋 Url
==再搭配 tmux-yank 提供的 `y` 複製,就可以不用進入 copy mode 複製文字。==
==如果有數個搜尋結果,可用 `n` / `N` 前後移動。==
```shell=
https://www.rockyourcode.com/copy-and-paste-in-tmux/
## ~/.tmux.conf
## Use vim keybindings in copy mode
set-option -g mouse on # 自動複製滑鼠選取的文字
setw -g mode-keys vi
set-option -s set-clipboard off
bind P paste-buffer
bind-key -T copy-mode-vi v send-keys -X begin-selection
bind-key -T copy-mode-vi y send-keys -X rectangle-toggle
unbind -T copy-mode-vi Enter
bind-key -T copy-mode-vi Enter send-keys -X copy-pipe-and-cancel 'xclip -se c -i'
bind-key -T copy-mode-vi MouseDragEnd1Pane send-keys -X copy-pipe-and-cancel 'xclip -se c -i'
```
## `tat` 直接以 directory 名稱命名 session
前面提及為了方便管理,可以用一個 project / directory 分類 session,但是預設建立 session 的話都會以當前 session index 為 session 的名稱,看起來很難管理,雖然可以手動輸入指令 `tmux new -s <session_name>` 建立有名稱的 session,但每次都輸入這個還真的有點麻煩。幸好網路大神有發明一個招式,讓我們可以只輸入 `tat` 就會自動新增一個以當前 directory 名稱為名字的 session。
在 `~/.bashrc` 或者 `~/.zshrc` 或者其他你使用的 shell 新增以下程式碼:
```shell=
# tat: tmux attach
function tat {
name=$(basename `pwd` | sed -e 's/\.//g')
if tmux ls 2>&1 | grep "$name"; then
tmux attach -t "$name"
elif [ -f .envrc ]; then
direnv exec / tmux new-session -s "$name"
else
tmux new-session -s "$name"
fi
}
```
之後就可以順利地輸入 `tat` 得到有名字的 session 了。
## 常用快捷建 / 指令
### 快捷鍵
`prefix + d` 將 Tmux 壓到背景(detach)
`tmux at` 把該被壓到背景的 Tmux session 叫回來
`prefix + 方向鍵` 在 pane 之間移動
`control + d` 刪除目前的 pane / window
`prefix + ,` 重新命名目前的 window
`prefix + $` 重新命名目前的 session
### 指令
`tmux kill-server` 直接把目前 Tmux 砍掉(如果個人化設定救不會來的話,除了刪掉改動的設定,還要執行這行)
`tmux kill-session -a` 除了目前的 session 外其他皆刪除
`tmux list-session` / `tmux ls` 查看目前有多少 tmux sessions
`tmux kill-session -t <targetSession>` 可以刪除特定的 session(可以用 index 或者 sessionName)
## 目前 `.tmux.conf`
```shell=
# prefix + r 直接讓 tmux 吃到設定不用重開
bind-key r source-file ~/.tmux.conf \; display-message "~/.tmux.conf reloaded"
# https://quinoa42.github.io/en/oceanus/terminfo-truecolor/
# 只有用文章中 tmux 的設定
# use italic
set -g default-terminal "tmux-256color"
# true color!!!
set-option -ga terminal-overrides ",xterm-256color-italic:Tc"
set-option -g status-key "emacs"
set-option -g status-bg "#666666"
set-option -g status-fg "#aaaaaa"
set-option -g status-left-length 50
set-option -g status-right-length 50
set -g status-left "#[fg=green] ❐ #S #[default]"
# 使用滑鼠
set-option -g mouse on
set-option -g history-limit 102400
# 在 status bar 的右側顯示:
# 1. 按下 prefix 的提示
# 2. 顯示時間
set -g status-right '#{prefix_highlight} | %Y-%m-%d %H:%M #{cpu_bg_color} #[fg=darkslategray]CPU: #{cpu_percentage} #{cpu_icon} #{ram_bg_color} RAM: #{ram_percentage} '
# index 從 0 變成 1
set -g base-index 1
# window 如果由新增、刪除時會自動重新計數
set -g renumber-windows on
# prefix - 在 window 左側開啟水平的分割視窗 / prefix - | 在 window 的下方開啟垂直的分割視窗
# - 後面的 -v -c '${path_current_path}' 會讓分割的視窗自動定位在目前 path
bind-key - split-window -v -c '#{pane_current_path}'
bind-key | split-window -h -c '#{pane_current_path}'
# prefix c 直接新增新的 window
# - 後面的 -c "${pane_current_path}" 讓新增的視窗自動定位目前的 path
bind c new-window -c "#{pane_current_path}"
# prefix b 讓當前分割的 pane 變成獨立的 window
bind-key b break-pane -d
# prefix j 開啟 choose-tree
# - 透過 j k + enter 選擇要跳到哪個 session
# 注意: 要啟動 tmux 的狀態下才可以使用,如果把 tmux 壓到背景(detach)(prefix d)是叫不出來的
bind-key j choose-tree -swZ
# Fine adjustment (1 or 2 cursor cells per bump)
# 調整分割視窗的大小
# shift + 方向鍵
bind -n S-Left resize-pane -L 2
bind -n S-Right resize-pane -R 2
bind -n S-Down resize-pane -D 1
bind -n S-Up resize-pane -U 1
# control k 清理 terminal 畫面
# 不能用一般的 command k,因為 Tmux 也會被洗掉(外加同個 window 的 pane 都會被洗掉)
# https://notes.jerzygangi.com/the-only-way-that-actually-works-to-clear-the-screen-in-tmux/
bind -n C-k send-keys -R \; send-keys C-l \; clear-history
# restore vim sessions
set -g @resurrect-strategy-vim 'session'
# restore neovim sessions
set -g @resurrect-strategy-nvim 'session'
# restore panes
set -g @resurrect-capture-pane-contents 'on'
# restore last saved environment (automatically)
set -g @continuum-restore 'on'
set -g @colors-solarized '256'
set -g @ram_low_bg_color "#[bg=darkKhaki]"
set -g @ram_medium_bg_color "#[bg=linen]"
set -g @ram_high_bg_color "#[bg=lightcoral]"
# 讓 copy mode 時可以像 vim 一樣地移動
setw -g mode-keys vi
set-option -s set-clipboard off
bind P paste-buffer
bind-key -T copy-mode-vi v send-keys -X begin-selection
bind-key -T copy-mode-vi y send-keys -X rectangle-toggle
unbind -T copy-mode-vi Enter
bind-key -T copy-mode-vi Enter send-keys -X copy-pipe-and-cancel 'xclip -se c -i'
bind-key -T copy-mode-vi MouseDragEnd1Pane send-keys -X copy-pipe-and-cancel 'xclip -se c -i'
# List of plugins
set -g @plugin 'tmux-plugins/tpm'
set -g @plugin 'tmux-plugins/tmux-sensible'
set -g @plugin 'tmux-plugins/tmux-prefix-highlight'
set -g @plugin 'tmux-plugins/tmux-resurrect'
set -g @plugin 'tmux-plugins/tmux-continuum'
set -g @plugin 'tmux-plugins/tmux-yank'
set -g @plugin 'tmux-plugins/tmux-copycat'
set -g @plugin 'seebi/tmux-colors-solarized'
set -g @plugin 'tmux-plugins/tmux-cpu'
# Initialize TMUX plugin manager (keep this line at the very bottom of tmux.conf)
run '~/.tmux/plugins/tpm/tpm'
```
## 參考資料
- [06 - TPM - Tmux Plugin Manager 與它的插件](https://ithelp.ithome.com.tw/articles/10269848?sc=iThomeR)
- [A simple tmux config](https://juliu.is/a-simple-tmux/)
- [Tmux Tutorial](https://thoughtbot.com/upcase/tmux)
- [How to kill all tmux sessions (or at least multiple sessions) from the CLI?](https://askubuntu.com/questions/868186/how-to-kill-all-tmux-sessions-or-at-least-multiple-sessions-from-the-cli)
- [tmux---plugins](https://funzzz.fun/2020/12/30/tmux---plugins/)
- [A mininal tmux configuration from scratch](https://rudra.dev/posts/a-mininal-tmux-configuration-from-scratch/)(大神超厲害設定)